
5501FL - Iron Flama - Free user manual and instructions
Find the device manual for free 5501FL Flama in PDF.
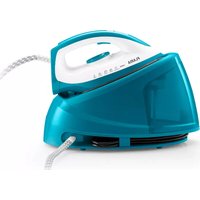
| Product type | Steam iron with steam generator |
| Brand | Flama |
| Model | 5501FL |
| Power supply | 220-240 V ~ 50/60 Hz |
| Power | Not specified (estimated 2400 W) |
| Water tank capacity | 1.1 L |
| Soleplate type | Stainless steel |
| Temperature setting | Rotary knob (Min, Synthetic/Silk, Wool, Cotton/Linen, Max) |
| Steam functions | Steam burst button, continuous steam |
| Thermostat indicator light | Indicates heating up |
| Anti-scale filter | Present, replaceable |
| Locking system | For storage and transport |
| Heat insulation support | Integrated into the base |
| Cable storage | Space in the base |
| Body material | Heat-resistant plastic |
| Weight | Approximately 1.5 kg (iron only) |
| Dimensions (approx.) | 30 x 15 x 20 cm (iron with base) |
| Safety | Automatic shut-off not mentioned; hot surface, do not touch |
| Warranty | 36 months (excluding consumable parts) |
| Cleaning | Damp cloth, non-abrasive cleaner |
| Recommended water type | Tap water (demineralized water not recommended) |
Frequently Asked Questions - 5501FL Flama
User questions about 5501FL Flama
0 question about this device. Answer the ones you know or ask your own.
Ask a new question about this device
Download the instructions for your Iron in PDF format for free! Find your manual 5501FL - Flama and take your electronic device back in hand. On this page are published all the documents necessary for the use of your device. 5501FL by Flama.
USER MANUAL 5501FL Flama
natural_image
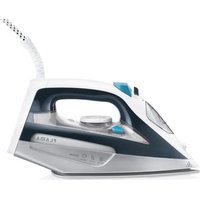
Exterior view of a standard white electric iron with a gray body and power cord (no text or symbols visible)5501FL
PT GERADOR DE VAPOR 1
ES CENTRO DE PLANCHADO 9
EN STEAM GENERATOR 17
FR GÉNÉRATEUR DE VAPEUR 24

IEC 60417 - 5041 (DB:2002 / 10)
ATTENTION - HOT SURFACE - Accessible surface temperatures can be high during appliance operation.
natural_image
Close-up of a white appliance lid with a circular inset showing a small mechanical component (no text or symbols visible)natural_image
Symbol of a trash bin with crossed lines indicating no waste or discharge (no text or labels)natural_image
Close-up of a white appliance casing with a circular inset highlighting a small white object, no visible text or symbols.natural_image
Symbol of a trash bin with crossed lines indicating no waste or discharge (no text or labels)Please read all the instructions carefully before using the appliance for the first time and keep them for future reference. FLAMA shall not be liable for any use that is not in accordance with the instructions.
This appliance must be connected to an earthed socket.
When placing the iron on its stand make sure that the surface on which it is placed is stable.
The iron must be used and rest on a flat, stable surface.
This appliance may be used by children aged 8 and over and by persons with limited physical, sensory or mental abilities or lack of experience and knowledge, if they are supervised or have received instructions concerning the safe use of the appliance and understand the risks involved.
Children must not play with the appliance.
Cleaning and maintenance must not be carried out by unsupervised children.
Keep the appliance and the power cord out of the reach of children under the age of 8, when it is switched on or cooling down.
Always remove the plug from the socket after each use and when cleaning.
Do not remove the plug from the socket by pulling the power cord.
Use only the water in the container without adding any other substance, as this may damage the appliance.
It must be cleaned as indicated in the Cleaning and Maintenance
instructions.
Please allow the appliance to cool down before carrying out with any cleaning or storage operations.
Never leave the appliance unattended if it is switched on.
The plug must be removed from the socket before the water container is filled.
The filling hole must not be opened when the appliance is switched on.
The iron must only be used with the stand that is provided. Do not use the appliance if it is not working properly, or if it is in any way damaged.
Any intervention other than cleaning must be carried out by an Authorized FLAMA Technical Assistance Service.
The appliance should not be used if it has tipped over and there are visible signs of damage or if there are leaks. Please contact the Flama Technical Assistance Service.
Do not use the appliance if the power cord or plug are damaged. If the power cord is damaged, do not attempt to replace it. Have it replaced immediately at an Authorized FLAMA Technical Assistance Service in order to avoid a hazard.
This product complies with the Low-Voltage and Electromagnetic Compatibility Directives.
This instruction manual is also available in PDF format at www.flama.pt.
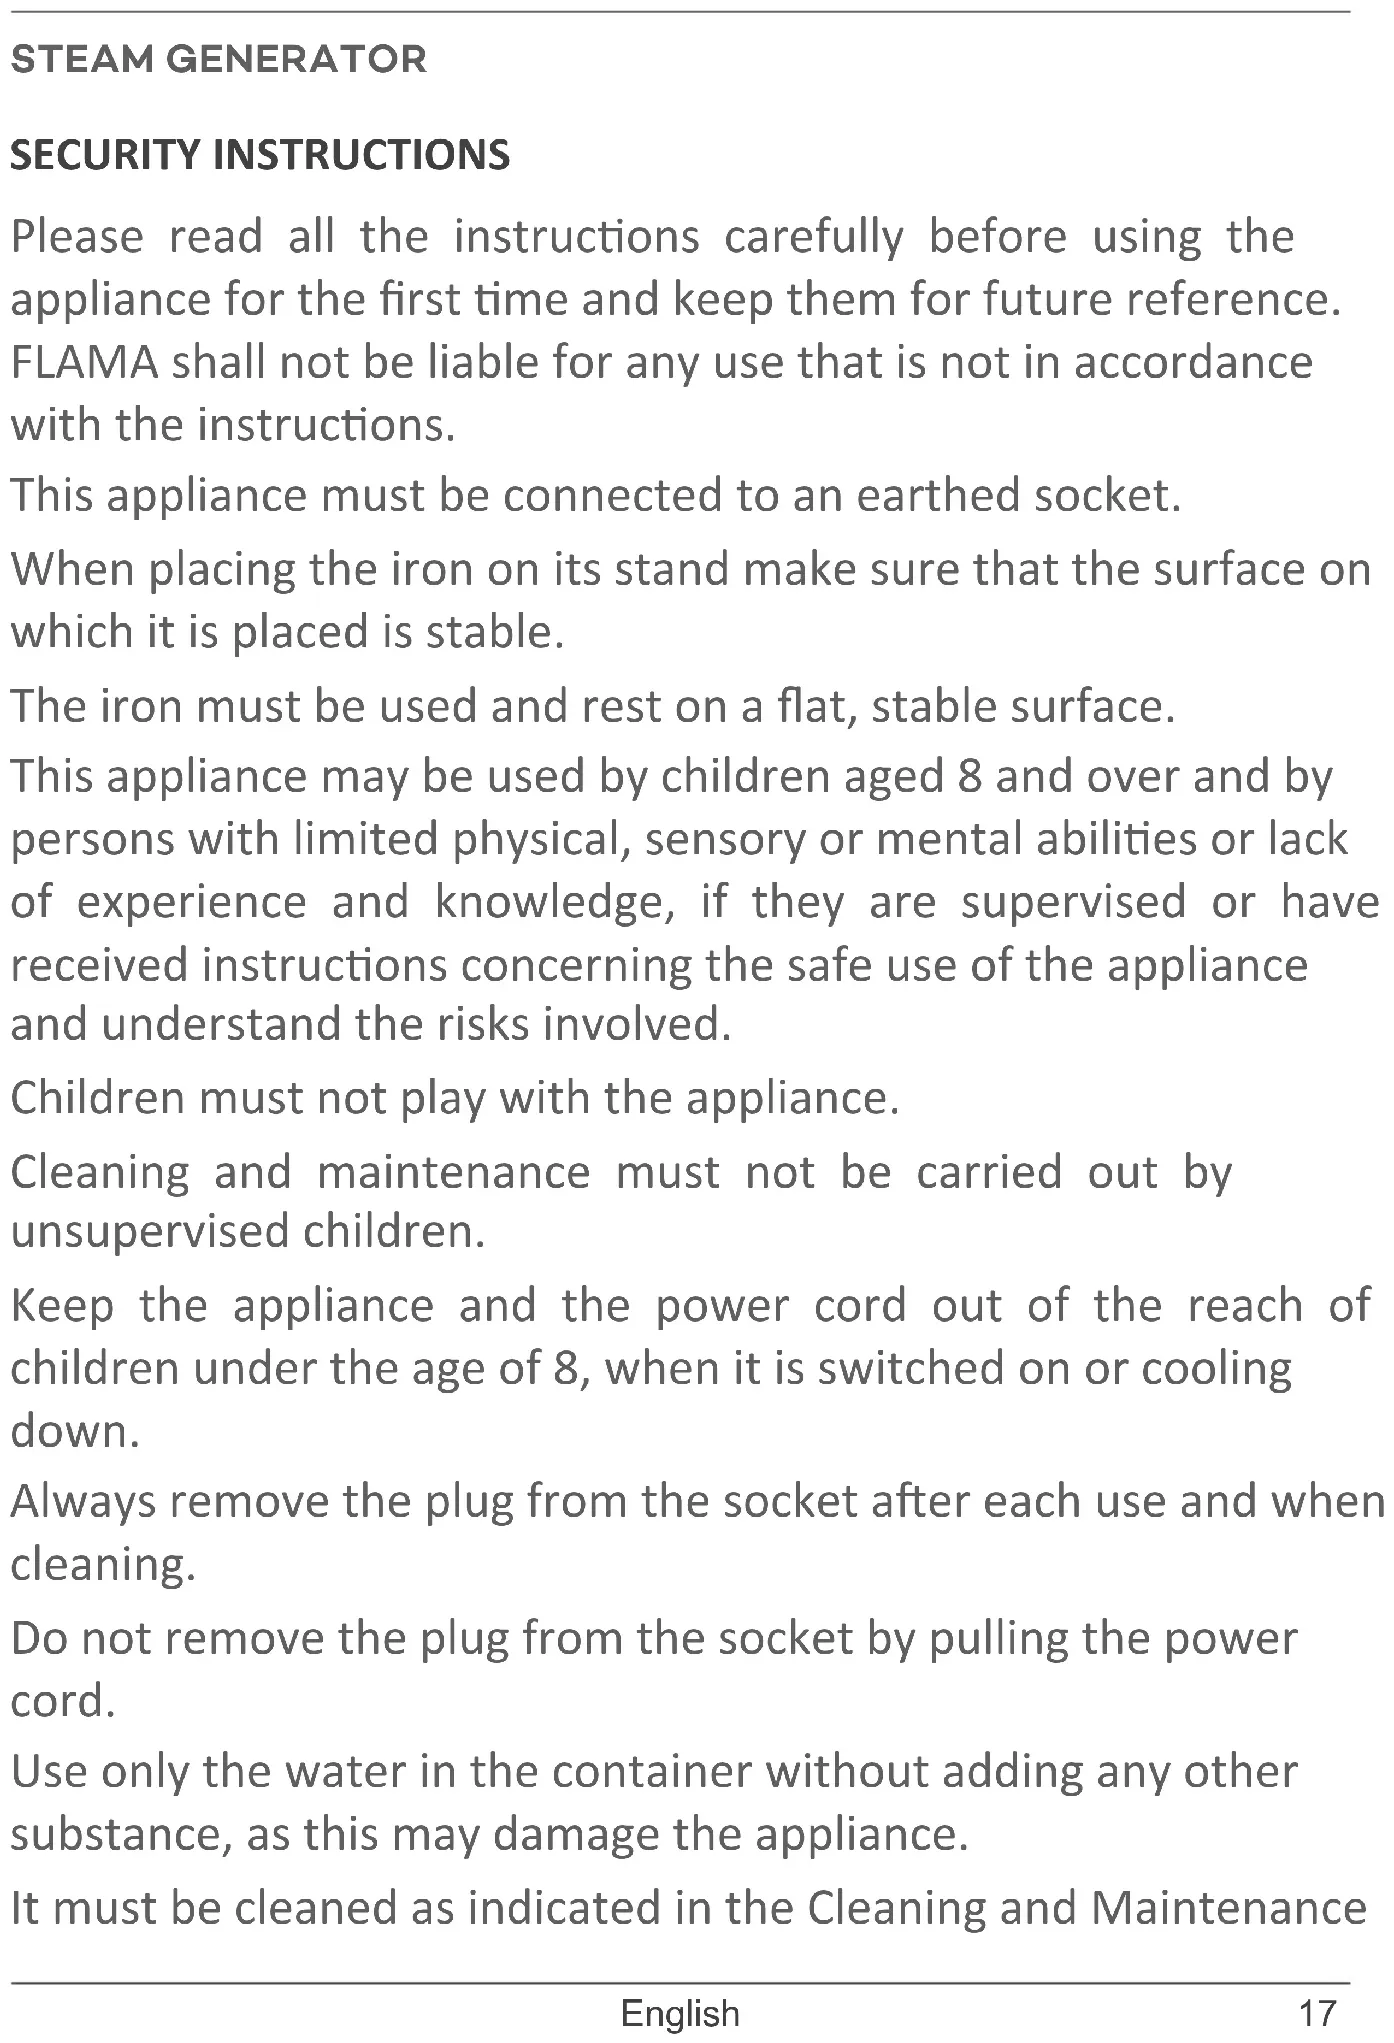
DESCRIPTION
- Generator base
- Water tank with handle
- Thermal insulation support
- Storage and transport lock
- Iron
- Temperature button
- Steam button
- Continuous steam button
- Temperature indicator
- Base of the iron
- Cable organizer
- Anti-limestone filter
GENERAL INFORMATION
WARNING
During or after ironing, never rest the hot base of the iron anywhere besides the thermal insulation support.
Temperature button
Rotate the temperature button to set the ironing temperature according to the fabrics to be ironed.
Min - Minimum temperature position. In this position steam ironing may not be used.
- - Indicated for synthetic fibers and silks. In this position steam ironing may not be used.
- - Indicated for wool. In this position steam ironing may not be used.
- Indicated for cotton and linen.
Max - Maximum temperature position.
Steam button
When the appliance has heated to the temperature selected and the temperature indicator goes off, press the steam button Release the steam button to dry iron, without steam.
Continuous steam button
Move the continuous steam button forward for continuous steam output without having to press the steam button.
To stop continuous steam delivery, move the Continuous Steam Knob backwards.
Temperature indicator
When you plug in the appliance, the temperature indicator lights up. As soon as the iron reaches the selected temperature, it will turn itself off. The temperature indicator will go off and on while the appliance is in use, to indicate that it is operating correctly.
Water tank
Before filling the tank with water, make sure that the appliance is unplugged.
NOTE: We recommend that you use tap water instead of demineralized water, which can affect the generator's internal sensors and prevent the pump from working properly.
WARNING! Do NOT fill the water tank with hot water.
WARNING! Never add descaling, aromatic, alcoholic or detergent products, which may damage the device or make it unsafe to use.
Storage and transport lock
This generator is equipped with a storage and transport lock that locks the iron to the base of the generator.
To use the generator, slide the storage lock downwards, releasing the iron.
To block the iron at the base of the generator, fit the iron into the rear lock on the generator base and slide the storage latch upwards until it clicks.
NOTE – let the iron cool down completely before locking it to the generator base.
Cable organizer
When not in use, the power cable and the steam supply hose may be stored in the base of the appliance.
OPERATING INSTRUCTIONS
Before first use
Remove any sticker, protective film or storage card from the base, except the technical data plate.
Fill the water tank with water, heat the iron to the maximum temperature and iron a piece of damp cloth for several minutes to remove any residues from the base.
NOTES:
- It is normal for there to be a strange odor coming from the appliance the first time you use it. This odor disappears after a short time.
- It is possible that some particles come out of the base when using the iron for the first time. This is normal. The particles are harmless and will stop coming from the iron shortly.
- When plugging in the appliance, the iron may emit a pumping sound This is normal. The sound indicates the water is being pumped from the base to the iron.
- During the heating process, a small amount of steam may come from the base, which will stop after a few seconds.
Use
Filling the water tank
Grasp the handle of the water tank and remove the tank, pulling it horizontally.
Fill the tank through the opening. We recommend using tap water or water with less limestone particles. The maximum capacity of the water tank is 1.1 liters and the water level must not exceed the “MAX” mark.
Replace the water tank correctly on the base of the generator.
The appliance has two ironing methods. You may use dry ironing or steam ironing.
Dry ironing
Place the appliance on a stable, flat surface. Always place the iron on the heat insulating stand.
Connect the plug to the wall socket; the device turns on.
Turn the temperature knob to the desired setting, which depends on the fabric of the garment; the temperature indicator lights up and the iron starts to heat up.
When the temperature indicator turns off, it means the selected temperature has been reached. Now you may begin ironing.
WARNING: never touch the hot base before it has cooled down!
Steam ironing
Place the appliance on a stable, flat surface.
Always place the iron on the heat insulating stand.
Fill the water tank.
Connect the plug to the wall socket; the device turns on.
Turn the temperature knob to the desired setting, which depends on the fabric of the garment; the temperature indicator lights up and the iron starts to heat up.
When the temperature indicator turns off, it means the selected temperature has been reached. Now you may begin steam ironing.
Gently press the steam button, steam will be sprayed from the base continuously; you can iron the clothes with steam.
NOTE - Water may drip while spraying steam when the temperature is lower than position 2 of the temperature knob. This is normal.
CAUTION:
- Never touch the hot base until it has cooled!
- Never point the steam at anyone!
- Do not turn on the steam feature when the iron is placed on the base of the unit to avoid burns from the steam.
- After ironing, remove the plug from the wall outlet. The base will still be hot, so you should not touch it with your hands.
- If it is necessary to refill the tank during ironing, unplug the appliance from the socket and let it cool down for at least 5 minutes before carefully removing the water tank.
WARNING
During or after ironing, never rest the hot base of the iron anywhere besides the thermal insulation support.
CLEANING AND MAINTENANCE
Before cleaning, first unplug and let the appliance cool.
Clean residues and any other deposits from the base with a damp cloth or a non-abrasive (liquid) cleaning product.
NOTE: Do not use chemical cleaning products, steel, wood, or abrasives to scrape the base.
Clean the upper part of the iron with a soft damp cloth. Wipe off water droplets on the base of the unit and the thermal insulation bracket with a dry cloth.
Limescale filter
Due to the large amount of steam that this appliance produces, limescale can form inside the water tank. Since limescale can affect the components of the appliance, it is important that limescale build-up is kept to a minimum.
The appliance is equipped with an anti-scale filter, which cleans and prevents scale build-up from affecting the pump and other components inside the appliance.
The limescale filter must be replaced periodically. How often the filter needs to be replaced will depend on how often the iron is used and the hardness of the water in the area. For information on water hardness in your area, consult your local water supplier.
If limescale accumulates inside the water tank or if the appliance loses performance,
this indicates that the filter has stopped working properly. If this happens, replace the limescale filter.
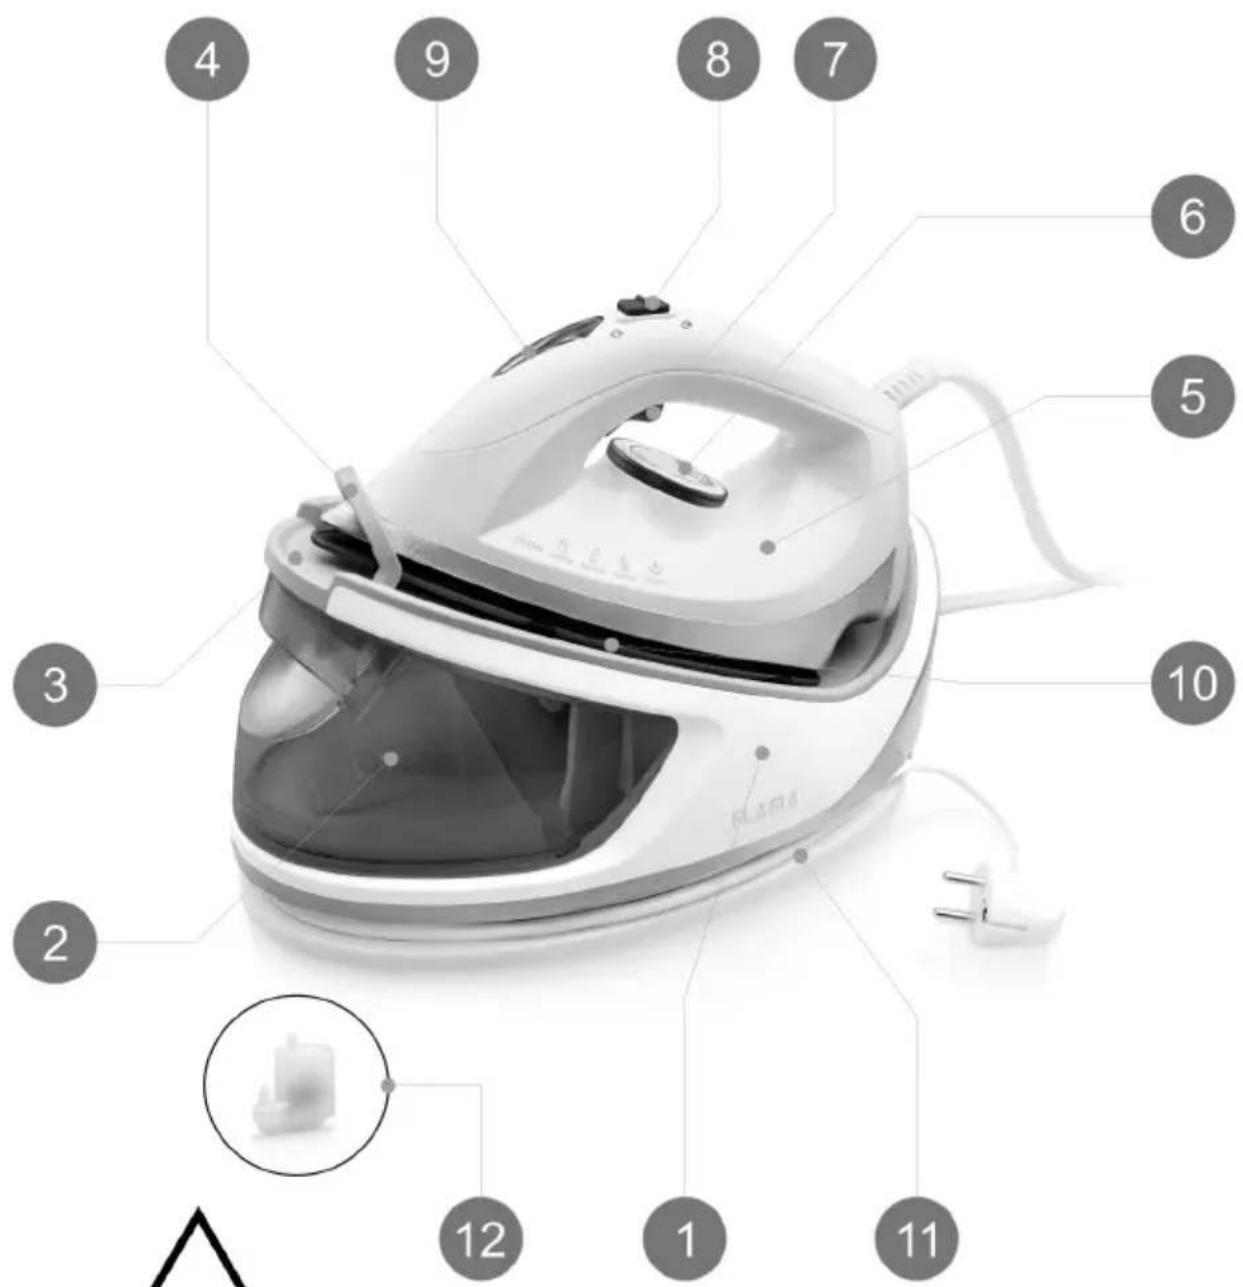
Replacing the limescale filter
Change the filter with the appliance cold and disconnected from the mains.
Empty the water tank.
Remove the limescale filter from the bottom of the generator base.
natural_image
Close-up of a white industrial fan or scrubber with a circular inset showing a small white component, no visible text or symbols.Replace with a new filter.
WARNING! Never pour vinegar or other cleaning fluids to remove calcium into the water tank.
Storage
Check that the appliance is cold and dry.
Check that the water tank is empty and turn the temperature button to the MIN position.
Fit the iron into the rear stopper of the generator base and slide the storage latch upwards until you hear a click.
Wrap the power cord and steam supply hose around the base of the appliance.
Store horizontally in a cool, dry place and out of reach of children.
ANOMALIES AND REPAIR
In case of malfunction, please take the appliance to an authorized Technical Assistance Service. Do not attempt to disassemble or repair the appliance, as this may be dangerous.
PROTECTING THE ENVIRONMENT
natural_image
Symbol of a trash bin with crossed lines and a solid black rectangle below (no text or labels)This symbol indicates the separate collection of electrical and electronic equipment.
The main objective of the separate collection of this waste is to reduce the quantity to be disposed of, promote re-
use, recycling and other forms of recovery in order to reduce its negative effects on the environment.
When it is no longer in use, this appliance must not be disposed of together with other unsorted municipal waste.
The user is responsible for delivering it free of charge to the selective collection facilities available for that purpose.
Pieces of equipment that are no longer in use can also be taken back at points of sale, by purchasing new pieces of equipment that are equivalent and have the same functions.
For more detailed information on collection points, please contact your City Council or a point of sale for this equipment.
TROUBLESHOOTING
| Problem Possible | cause Possible solution | |
| The iron does not heat up. | The iron is not plugged into the wall outlet.The selected temperature is too low.The fuse is burned out. | Plug the iron into the wall outlet.Increase the temperature by using the temperature button. Be sure to follow the maintenance instructions for the fabric.Contact technical assistance. |
| No steam is coming out. | There is not enough water in the water tank.The pump is still drawing water from the water tank. | Pour water in the water tank.Hold down the steam button so that water can pump into the iron; it may take approximately 1 minute. |
| Excess water drips from the sole plate of the iron. | Condensation on the inside of the sole plate. | Allow the iron to heat to the selected temperature before using. |
| The hose hums. The hose is tangled. Unwind the hose. | ||
| The temperature indicator is not lit. | The appliance is not plugged into the wall outlet.The fuse is burned out. | Plug the iron into the wall outlet.Contact technical assistance. |
GÉNÉRATEUR DE VAPEUR
CONSIGNES DE SÉCURITÉ
natural_image
Close-up of a white appliance lid with a circular inset showing a small white object, no visible text or symbols.DYSFONCTIONNEMENTS ET RÉPARATIONS
natural_image
Symbol of a trash bin with crossed lines indicating no waste or discharge, and a solid black rectangle below (no text or labels)We declare, under our own responsibility, that the above appliance covered by this declaration is in conformity with the following directive(s), standard(s) or other normative document(s), provided that the products are used in accordance with our instructions -
The product is in conformity with the following(s) directive(s) -
The product is in conformity with the following(s) harmonized european standard(s) -
- Keep the proof of purchase (receipt) for this product carefully. When a repair is made under these conditions, the technician will require proof of purchase. This assistance can only be provided once you have proven, with the proof of purchase, that your appliance is within the warranty period.
- The warranty period for this appliance is defined by the respective EU Directive in force on the date of purchase/delivery.
- Within the guarantee period, we will repair or replace, free of charge, any parts which, during the normal use of the appliance, have deteriorated as a result of a proven material or manufacturing defect.
- This warranty does not cover consumable items, light bulbs, easily breakable parts made of glass or plastic, or any other defects that do not impair its proper functioning.
- We accept no liability for damage caused by incorrect or careless use of the appliance, by its connection to an electrical current other than that indicated on the appliance's rating plate, by faulty electrical installation, or by atmospheric, chemical or electrochemical causes. Other claims or demands for compensation relating to objects which are not an integral part of the appliance will be denied.
- The provision of assistance under warranty does not extend the warranty period. Only within this period will assistance be provided under warranty. The right to assistance is only granted to the first purchaser of the device and cannot be transferred to a third party.
- The warranty expires when unauthorized persons have attempted to repair, modify or replace parts of the appliance.
- All expenses and risks of transportation to our factory or vice versa will always be borne by the buyer.
WARRANTY CONDITIONS
To benefit from the Technical Assistance service during the 36-month warranty period after the date of purchase, you will need to:
Present the Invoice/Proof of Purchase, stating the model and the manufacturing number of the product (whenever possible).
Note: Failure to present the aforementioned documents will be grounds for not providing services under warranty.
CONDITIONS DE GARANTIE
CONDITIONS DE GARANTIE

- DESCRIPTION
- GENERAL INFORMATION
- WARNING
- Temperature button
- Steam button
- Continuous steam button
- Temperature indicator
- Water tank
- Storage and transport lock
- Cable organizer
- OPERATING INSTRUCTIONS
- NOTES:
- Use
- Filling the water tank
- Dry ironing
- Steam ironing
- CAUTION:
- CLEANING AND MAINTENANCE
- Limescale filter
- Replacing the limescale filter
- Storage
- ANOMALIES AND REPAIR
- PROTECTING THE ENVIRONMENT
- GÉNÉRATEUR DE VAPEUR
- CONSIGNES DE SÉCURITÉ
- DYSFONCTIONNEMENTS ET RÉPARATIONS
- WARRANTY CONDITIONS
- CONDITIONS DE GARANTIE
Brand : Flama
Model : 5501FL
Category : Iron