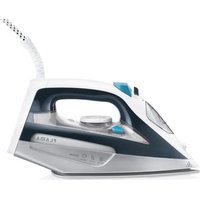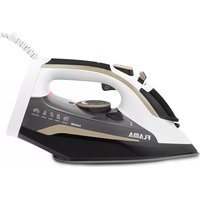
5342FL - Iron Flama - Free user manual and instructions
Find the device manual for free 5342FL Flama in PDF.


User questions about 5342FL Flama
0 question about this device. Answer the ones you know or ask your own.
Ask a new question about this device
Download the instructions for your Iron in PDF format for free! Find your manual 5342FL - Flama and take your electronic device back in hand. On this page are published all the documents necessary for the use of your device. 5342FL by Flama.
USER MANUAL 5342FL Flama
natural_image
Black and white image of a Flama air iron with visible branding and mounting marks (no text or symbols on the device itself)5342FL / 5343FL
PT FERRO DE ENGOMAR A VAPOR 1
ES PLANCHA DE VAPOR 9
EN STEAM IRON 17
FR FER À REPASSER 24

text_image
FLAMA 1 2 3 4 5 6 7 8 9 10 11FERRO DE ENGOMAR A VAPOR
INSTRUÇÕES DE SEGURANÇA
Please read these instructions carefully before using the appliance for the first time and keep them for future reference. FLAMA shall not be liable for any use that is not in accordance with the instructions.
This appliance must be connected to an earthed socket.
Please check that the circuit breaker to which the appliance will be connected is suitable for the stipulated power of the steam iron.
This appliance may be used by children aged 8 and over and by persons with limited physical, sensory or mental abilities or lack of experience and knowledge, if they are supervised or have received instructions concerning the safe use of the appliance and understand the risks involved. Children must not play with the appliance. Cleaning and maintenance must not be carried out by unsupervised children.
The plug must be removed from the socket before the water container is filled.
Use only tap water. Distilled and/or demineralized water renders the limescale-prevention system ineffective by altering its physical and chemical properties.
The filling hole must not be opened when the appliance is switched on.
The iron must be used and rest on a flat, stable surface.
Keep the iron and the power cord out of the reach of children under the age of 8, when it is switched on or cooling down.
Always remove the plug from the socket after each use and when cleaning.
It must be cleaned as indicated in the Cleaning and Maintenance instructions.
Please allow the appliance to cool down before carrying out with any cleaning or storage operations.
Make sure you place the steam iron on its stand and that the surface on which the stand is placed is stable.
Never leave the appliance unattended if it is switched on.
Do not remove the plug from the socket by pulling the power cord.
Do not use the appliance if it is not working properly, or if it is in any way damaged. Any intervention other than cleaning must be carried out by an Authorized FLAMA Technical Assistance Service.
The iron should not be used if it has tipped over and there are visible signs of damage or if there are leaks. Please visit the Flama Technical Assistance Service.
Do not use the appliance if the power cord or plug are damaged. If the power cord is damaged, it must be replaced by the manufacturer, its after-sales service or similarly qualified personnel in order to avoid a hazard.
This product complies with the Low-Voltage and Electromagnetic Compatibility Directives.
This instruction manual is also available in PDF format at www.flama.pt.
DESCRIPTION
- Sole plate of the iron
- Spray nozzle
- Water tank lid
- Steam control
- Spray button
- Steam button
- Power cord
- Pilot light
- Thermostat control
- Cleaning button
- Maximum water level
GENERAL INSTRUCTIONS
When using the iron for the first time, it may release some smoke and you may hear some noise coming from the expanding plastic. This is normal and will stop in a short while. We also recommend that you run the iron over a cloth, before using it for the first time.
WARNING: Use only tap water. Distilled and/or demineralized water renders the lime scale removal system ineffective, changing its physical-chemical properties.
Anti-drip system
With the anti-drip system, you can iron the most delicate fabrics perfectly.
Always iron these fabrics at low temperatures. The sole plate of the iron may cool down to the point where o more steam comes out, but rather drops of boiling water that may leave marks or stains. In those cases, the anti-drip system is activated automatically to avoid steaming, so that you can iron the most
delicate fabrics without the risk of ruining or staining them.
Steam function
Make sure there is water in the water tank. Press the steam button for an extra shot of steam.
Spray function
Make sure there is water in the water tank. Press the spray button slowly for a dense spray, or quickly for a scattered spray
Fabric care
Iron clothes according to the international symbols on the clothing tags, or if you cannot find the tags, according to the type of fabric.
| Label on the clothing | Type of fabric | Regulating the thermostat | Steam -. variable | Steam -. extra | Sprayer |
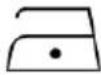 | synthetics | low temperature | X | X | √ |
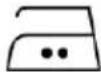 | silk-wool | medium temperature | X | X | √ |
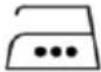 | cotton linen | high temperature | √ | √ | √ |
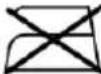 | Not ironing | ||||
Begin ironing clothes that require a low temperature.
This reduces waiting time (the iron takes less time to heat up than to cool down) and eliminates the risk of burning the fabric.
TEMPERATURE GUIDE
Follow the instructions on the label of the piece of clothing. If it does not have a label, but you know what type of material it is, follow the recommendations on the previous table.
The previous table is only valid for single fabrics, with applications, finishes or shiny decorations, etc. Fabrics with these types of applications should be ironed at low temperatures.
Divide the clothing according to the categories described in the care table: wool with wool, cotton with cotton, etc.
The iron heats faster than it cools. Start by ironing articles that require a lower temperature, such as synthetic fibers.
If the fabric consists of different fibers, always select the temperature suitable to the most delicate fibers, i.e., the lowest temperature. Example: If the article consists of 60% polyester (synthetic) and 40% cotton, according to the care table, it should be ironed as a polyester (synthetic) and without steam.
If you don't know what type of material the article is, experiment on a piece that is invisible when being worn, and test the most suitable temperature for this fabric.
Pure wool fabric (100% wool) should be ironed with steam. It is advisable to select the "MAX" temperature and use a protective cloth.
When ironing wool fabric with steam, shine may appear. This situation can be prevented by ironing the article on the reverse side.
After using the steam iron for cotton, do not immediately iron articles that require lower temperatures (synthetics, etc.). We recommend that you adjust the temperature to a lower level and wait until
the pilot light goes off. You may then iron.
Attention - Do not fill the water tank with vinegar or chemically treated water.
OPERATING INSTRUCTIONS
Before first use
Remove all labels, stickers and tags, except for the technical information label.
Make sure that the current in your home is identical to that indicated on the characteristics plate of the appliance.
Fully unwind the power cable of the iron.
Place the appliance on a horizontal surface, sufficiently stable and level, such as an ironing board.
Steam ironing
Filling the water tank
Make sure the plug is disconnected from the wall outlet.
Turn the thermostat command to the MIN position.
Open the lid on the water tank.
Place the iron vertically, with the tip facing upward, to help the water enter the opening without spilling over.
Slowly pour water into the tank, being careful not to exceed the maximum limit (about 370ml), indicated by the “MAX” on the water tank.
Close the lid on the water tank.
Selecting the temperature
Place the iron in the vertical position.
Plug it into the wall outlet.
Regulate the thermostat control, according to the international symbol found on the clothing label. The pilot light (8) comes on, indicating that the iron is heating up.
The pilot light goes off when the iron reaches the temperature according to the regulation command of the thermostat.
Warning: while ironing, the pilot light goes on and off repeatedly, indicating that the temperature selected remains constant. If you reduce the thermostat control to the temperature selected, after ironing at a high temperature, wait for the pilot light to come on again.
Select the steam
The amount of steam is regulated by the steam command.
The steam command has 3 positions:
- Dry iron (closed).
• Medium steam output.
• Maximum steam output.
Select the position that is most convenient.
Warning: The iron continuously releases steam when the iron is held horizontally. You can stop the continuous release of steam by placing the iron in a vertical position or by regulating the seam control to the dry iron position.
As indicated in the steam control and as indicated in the initial table, you may only use steam at the highest temperatures.
If the temperature selected is too low, water may drip from the sole plate.
If the temperature selected is too low, water may drip from the sole plate.
Select extra steam and steam when you are using the iron vertically
Press the extra steam button to generate a powerful release of steam, that can penetrate fabrics and smooth the most difficult creases. Wait a few seconds before pressing the button again.
By pressing the extra steam button several times, you may use the iron in a vertical position (drapes, hanging clothes, etc.).
Warning: the extra steam function may only be used at high temperatures. Stop the emission if the pilot light comes on. Next, continue ironing only when the light goes off.
Dry ironing
To iron without steam, follow the instructions mentioned in the “Steam ironing” section, leaving the steam command in the dry iron (closed) position.
MAINTENANCE AND CLEANING
Attention: before cleaning the iron, make sure the appliance is not connected to the electrical current.
Any type of deposit, starch or glue residue left on the sole plate may be removed with a damp cloth or a non-abrasive liquid detergent.
NEVER scrape the sole plate with steel wool or any other metal object.
Plastic parts may be cleaned with a damp cloth, and then dried with a dry cloth.
How to store the iron
After using the iron, regulate the steam command to dry iron (closed).
When there is no steam, regulate the thermostat control to the "MIN" position.
Unplug the iron from the wall outlet.
Empty the water tank, turning the water tank upside down and shaking it slightly.
Place the iron in the vertical position, until it is completely cold.
Wind the power cord on the back of the iron.
Always place the iron in the vertical position when putting it away.
Self-cleaning function
NOTE - After using the iron's self-cleaning function, some mineral residues may have been released, that came loose, but that were not expelled during the procedure. In the next use, press the steam button 3 to 4 times before starting to use the iron, to expel the remaining mineral residues.
The automatic internal cleaning function cleans the interior of the sole plate of the iron, removing impurities. We recommend using this function every 10 to 15 days.
Regulate the steam command to the dry iron (closed) position
Fill the water tank to the maximum level indicated. Never fill the water tank with vinegar or chemically treated water.
Plug the power cable into the electrical socket.
Regulate the thermostat control to the highest temperature (MAX) and wait for the pilot light to go off.
Maintain the iron in a horizontal position on the dishwasher.
Disconnect the plug from the wall outlet.
Press the cleaning button.
Hot water and steam will come from the sole plate, along with impurities.
Release the button as soon as the water in the tank finishes.
When the sole plate of the iron is cold, you may clean it with a damp cloth.
Warning: During the self-cleaning process a lot of very hot water and steam is released from the base. Be careful you don't burn yourself.
TIPS FOR BEST IRONING
We recommend the use of lower temperatures for fabrics with unusual finishes (sequins, embroidery, inlays, etc.). If the fabric is mixed (e.g., 40% cotton and 60% synthetic), adjust the thermostat to the temperature of the fiber, requiring the lowest temperature.
If you don't know the composition of the fabric, determine the proper ironing temperature on a corner of the piece of clothing that is not visible. Start with a low temperature and gradually increase the temperature until you reach the ideal temperature.
Starch is more effective when using a dry iron, at moderate temperature: excessive heat burns the fabric, with the risk of forming yellow patches.
To avoid the formation of shiny patches on silk, wool or synthetic clothing, iron these pieces on the back.
To avoid the formation of shiny patches on velvet clothing, iron these items in only one direction (according to the fiber), not pressing on the iron.
The more clothes you put in the washing machine, the more wrinkled the clothes will be. This also occurs with very high drying rotations.
It is easier to iron most fabrics when they are not completely dry. For example, you should always iron silk when it is still damp.
ANOMALIES AND REPAIR
In case of malfunction, please take the appliance to an authorized Technical Assistance Service. Do not attempt to disassemble or repair the appliance, as this may be dangerous.
PROTECTING THE ENVIRONMENT
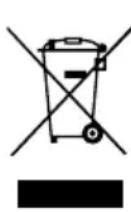
This symbol indicates the separate collection of electrical and electronic equipment.
The main objective of the separate collection of this waste is to reduce the quantity to be disposed of, promote reuse, recycling and other forms of recovery in order to reduce its negative effects on the environment.
When it is no longer in use, this appliance must not be disposed of together with other unsorted municipal waste.
The user is responsible for delivering it free of charge to the selective collection facilities available for that purpose.
Pieces of equipment that are no longer in use can also be taken back at points of sale, by purchasing new pieces of equipment that are equivalent and have the same functions.
For more detailed information on collection points, please contact your City Council or a point of sale for this equipment.
FER À REPASSER
CONSIGNES DE SÉCURITÉ
DYSFONCTIONNEMENTS ET RÉPARATIONS
This page has been deliberately left blank
- Keep the proof of purchase (receipt) for this product carefully. When a repair is made under these conditions, the technician will require proof of purchase. This assistance can only be provided once you have proven, with the proof of purchase, that your appliance is within the warranty period.
- The warranty period for this appliance is defined by the respective EU Directive in force on the date of purchase/delivery.
- Within the guarantee period, we will repair or replace, free of charge, any parts which, during the normal use of the appliance, have deteriorated as a result of a proven material or manufacturing defect.
- This warranty does not cover consumable items, light bulbs, easily breakable parts made of glass or plastic, or any other defects that do not impair its proper functioning.
- We accept no liability for damage caused by incorrect or careless use of the appliance, by its connection to an electrical current other than that indicated on the appliance's rating plate, by faulty electrical installation, or by atmospheric, chemical or electrochemical causes. Other claims or demands for compensation relating to objects which are not an integral part of the appliance will be denied.
- The provision of assistance under warranty does not extend the warranty period. Only within this period will assistance be provided under warranty. The right to assistance is only granted to the first purchaser of the device and cannot be transferred to a third party.
- The warranty expires when unauthorized persons have attempted to repair, modify or replace parts of the appliance.
- All expenses and risks of transportation to our factory or vice versa will always be borne by the buyer.
WARRANTY CONDITIONS
To benefit from the Technical Assistance service during the 36-month warranty period after the date of purchase, you will need to:
Present the Invoice/Proof of Purchase, stating the model and the manufacturing number of the product (whenever possible).
Note: Failure to present the aforementioned documents will be grounds for not providing services under warranty.