BS 300 - Breast pump Hartig & Helling - Free user manual and instructions
Find the device manual for free BS 300 Hartig & Helling in PDF.

| Brand | Hartig & Helling |
| Model | BS 300 |
| Product type | Electric breast pump |
| Power supply | 5V mains adapter (microUSB cable) or computer USB port |
| Number of suction levels | 9 adjustable levels |
| Memory function | Yes, saves the last suction level used |
| Box contents | Pump unit, pump body, silicone membrane, breast shield, protective cover, 2 valves, bottle, stand, lid, teat, 3 tubes, microUSB cable with mains adapter, instruction manual |
| Care and cleaning | Clean parts in contact with the breast/milk with warm water and mild dish soap, or in the dishwasher. Disinfect by boiling in water for 10 minutes. The pump unit must not come into contact with water. |
| Safety | Automatic shut-off after 10 minutes per breast is recommended. Do not use in case of breast lesions or pain. Use only after childbirth. Keep out of reach of children. |
| Spare parts and repairability | BS301 accessory set available for simultaneous expression. BS29 electronic steam sterilizer recommended. For missing or damaged parts, contact customer service. |
| General information | Manual available in several languages. Warranty: return to the store with original packaging and receipt. |
Frequently Asked Questions - BS 300 Hartig & Helling
User questions about BS 300 Hartig & Helling
0 question about this device. Answer the ones you know or ask your own.
Ask a new question about this device
Download the instructions for your Breast pump in PDF format for free! Find your manual BS 300 - Hartig & Helling and take your electronic device back in hand. On this page are published all the documents necessary for the use of your device. BS 300 by Hartig & Helling.
USER MANUAL BS 300 Hartig & Helling
natural_image
Product photo of a baby washing machine with a close-up of its internal components (no visible text or symbols)Milchpumpe BS 300
DEUTSCH
Bedienungsanleitung

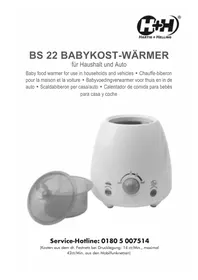
text_image
Diagram of a baby bottle assembly with numbered parts and labeled connectorsService Center Hattingen
Zum Kraftwerk 1
45527 Hattingen
ENGLISH
Operating Manual

Please read and observe the following information and keep this operating manual for future reference!
Safety Instructions
DANGER!
• Danger to life and limb!
Breast milk which has been expressed can become harmful to health due to bacterial contamination or other factors if improperly stored, frozen or thawed, thus representing a risk to your child.
It is essential to pay strict attention to the information on cleaning, sterilising and storage provided in this operating manual.
→Always consult your doctor or midwife in the case of doubt regarding handling the expressed breast milk.
▲ WARNING!
- Risk of fatal injury through cables!
Children can get tangled up in the cables and strangle themselves.
→Ensure that the breast pump and power cable are always out of reach of children. - Risk of explosion!
→Only use the power adapter plugs supplied! - Risk of suffocation through small parts, packaging and protective foil!
→Keep the product and packaging out of reach of children!
CAUTION!
- Risk of injury!
The vacuum produced by the breast pump can cause haematomas (bruising) or similar bodily harm such as rhagade (chapped skin).
→Switch the breast pump off before removing it from your breast.
If your let-down reflex (milk flow) is not stimulated within a maximum of 10 minutes, stop the pumping process.
→Always begin expressing breast milk at the lowest level. Adjust the pump power in steps to suit your own physical needs.
It is essential to consult your doctor or midwife in the case of any physical complaints or other discomfort following your pregnancy. - Risk of injury!
The breast pump can cause hormonal imbalance or similar body-chemical disorders.
It is essential to consult your doctor or midwife in the case of any physical complaints or other discomfort following your pregnancy. - Risk of fire through power adapter plugs!
Power adapter plugs can heat up.
→Never cover the power adapter plug with any objects.
▶Never block access to the power adapter plug by furniture or other objects. - Risk of tripping through improperly laid cable!
→Lay cables so that nobody can trip over them!
CAUTION!
Intended Use
The breast pump may only be used when the pregnancy has ended.
Always ask your doctor or midwife whether use of the breast pump is necessary in your case.
- The breast pump and accessories are suitable for expressing, storing and feeding breast milk.
- The breast pump is exclusively intended for use by women whose pregnancy has already ended.
- Any other use is considered unintended use.
- Unauthorised modification or reconstruction is not permitted. Under no circumstances open the breast pump and accessories or complete any repair work yourself.
Do Not Use When ...
Never use the breast pump when
→parts of the breast pump or accessories are damaged.

In such cases, contact our Service department (refer to last page).
→the breast concerned is obviously affected by a disorder
or
→other risks or side effects related to use of the breast pump become apparent.
It is essential to stop using the breast pump and consult your doctor or midwife in the case of any physical complaints or other discomfort following your pregnancy.
Before Using for the First Time
Clean and sterilise the parts depicted in the diagram on Page 6 before using the breast pump for the first time (refer to Chapter Cleaning and Sterilising the Breast Pump).
Package Contents
- 1 breast pump with function buttons
- 1 pump housing
• 1 silicone membrane - 1 breast shield
- 1 cover
- 2 valves
- 1 feeding bottle
- 1 base
- 1 fastening ring
- 1 teat
- 3 hoses
• 1 microUSB cable with adapter plug - 1 operating manual
Please check the contents of the package carefully. If anything is missing or has been damaged during transport, DO NOT put the breast pump into operation!
Useful Tips
Read and observe the information and instructions provided in this operating manual.
→The breast pump is intended to help you maintain a supply of breast milk for your child if your child is absent, you are suffering breast engorgement or have had a premature birth, for example.
→The breast pump can alleviate symptoms of a possible breast engorgement and aid the healing process in the event of mastitis.
It is essential to consult your doctor or midwife in the case of any physical complaints or other discomfort following your pregnancy.
→Express your breast milk during periods in which you are not in a hurry and will not be disturbed.
→While expressing breast milk, liquids are drawn from your body. Therefore, drink a sufficient quantity of fluid before, during and after expressing breast milk.
→Stimulate the let-down reflex, if necessary, by applying warmth (e.g. a heated cushion).
Do not worry if the flow of milk does not start immediately. Relax for a few minutes and then resume expressing (using the other breast, if necessary).
Hygiene
Hygiene is of particular importance with regard to the supply of breast milk to your child.
Only when the breast pump has been thoroughly cleaned and sterilised can you be sure that the breast milk will be collected, stored and fed free of contamination.

It is particularly important to read and observe all the information in Cleaning and Sterilising the breast pump and in
Recommendations on Storage of the breast milk.
Frequency of Expressing
Expressing breast milk can be completed on an individual basis and according to the purpose (e.g. in the event of breast engorgement).
After Breastfeeding
If you have just breastfed and no longer can or want to breastfeed directly from the breast, it is recommended to maintain your natural breastfeeding rhythm.
Without Prior Breastfeeding
If it is not possible to breastfeed your child directly, we recommend you express 6 - 8 times a day.
Milk Quantity
Your body automatically adapts the quantity of breast milk produced to the daily requirements. Therefore, do not worry if it takes a little longer for the breast milk to start flowing or the milk quantity appears low when you initially start to use the breast pump.
On average, it takes about 10 minutes to express 80 to 100 ml breast milk.
This value only represents a guideline value and differs from woman to woman. Therefore, you should attempt to adapt the output of the breast pump, in steps, to your personal flow of milk.
Changing Breasts
We recommend using the breast pump alternately on both breasts.
i Since breast milk is produced independent of the breast from which you prefer to express or breastfeed, you can set-up and use the breast pump entirely according to your own "feeling of well-being".
Operating Elements (Overview)
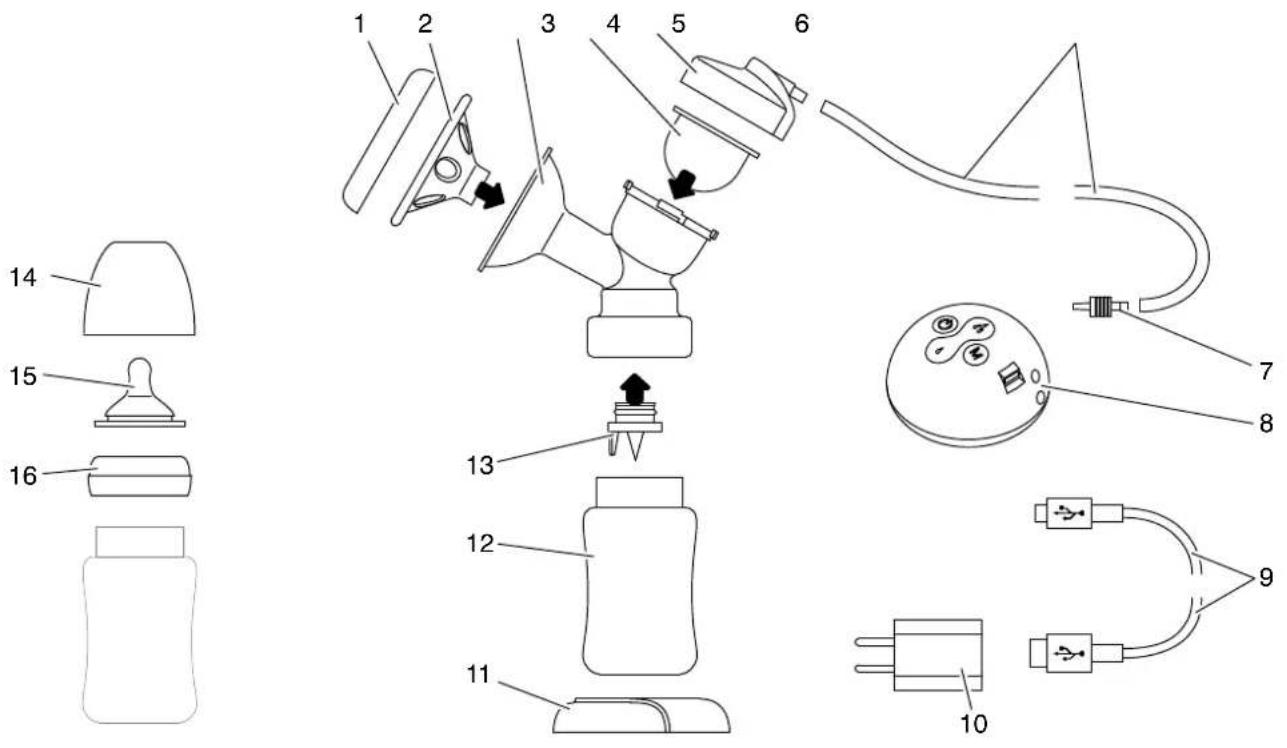
text_image
Diagram of a baby bottle assembly with numbered parts and labeled connectors1 Cover
2 Breast shield
3 Pump housing
4 Silicone membrane
5 Lid with vacuum connection
6 Vacuum hose
7 Plug
8 Pump unit
9 MicroUSB cable
10 Adapter plug, vacuum hose
11 Base
12 Feeding bottle
13 Valve (with grip)
14 Lid for feeding bottle
15 Teat
16 Fastening ring for feeding bottle
Operating Elements (Pump Unit)

text_image
20 19 18 17 21 2217 Button, reduce suction power
18 Button, switch on/off
19 Button, increase suction power
20 Button, memory function
21 MicroUSB connection
22 Vacuum connection
Assembling the Breast Pump

flowchart
graph TD
    A["Handheld Gun"] --> B["Device"]
    B --> C["USB"]
    B --> D["Plug"]
    B --> E["Electrical outlet"]
Complete the following steps carefully to ensure that the breast pump can achieve the suction effect required.
→Insert the valve (13) from below in the pump housing.
→Carefully screw the feeding bottle (12) clockwise on the thread of the pump housing (3) as far as possible.
→Insert the silicone membrane (4) in the pump housing (3) as illustrated.
→Set the lid (5) on the pump housing (3) as illustrated.
→Carefully screw the lid (5) clockwise on the thread of the pump housing (3) as far as possible.
→Fit the breast shield (2) in the pump housing (3) as illustrated.

Pay attention that the breast shield (2) is fitted properly and fully against your breast.
→Connect the hose (6) to the vacuum connection in the lid (5).
→Connect the hose (6) to the vacuum connection (22) in the pump unit.
i
The second vacuum connection is provided with a rubber plug. Do not remove the rubber plug, otherwise the breast cannot generate a vacuum.
i
Only use the second vacuum connection if you want to express breast milk from both breasts simultaneously, e.g. if you e mother of twins.
We recommend Accessory Kit BS301. Simply contact our Service department.
Expressing Breast Milk
Connect one end of the microUSB cable (9) supplied to the microUSB connection (21) on the pump unit and the other end to a properly installed power socket. Use the power adapter plug (10) supplied.

Alternatively, you can use a USB port on a computer.
→Position the breast shield (2) onto your breast so that the breast milk can flow into the feeding bottle.

Your teat should be in the middle of the breast shield (2).
→Press the button (18). The breast pump generates a vacuum between the breast shield (2) and your breast.
→As a result of the vacuum, your let-down reflex is stimulated and breast milk is expressed.
i Refer to Useful Tips if it takes a little longer for the breast milk to start flowing or the milk quantity appears low when you initially start to use the breast pump.
→Press the button (19) to increase the pump output in steps and button (17) to reduce the pump output in steps.
The output of the breast pump can be set to one of 9 settings. We recommend you always start expressing at the lowest setting and increase the output in steps according to your needs.
The breast pump is equipped with a Memory function. Press the button (20) when you want to use the current suction power setting the next time the breast pump is switched on.
→Express breast milk for a maximum of 10 minutes on each breast.
→Press the button (18). The breast pump is switched off.
→Loosen the breast shield (2) from your breast. Use your finger as a lever, if necessary.

Refer to Recommendations on Storage if you cannot or do not want to feed the breast milk directly after expressing it.
→Clean and sterilise all the parts which have come into contact with your breast or breast milk (refer to Cleaning and Sterilising the Breast Pump).
Feeding Expressed Breast Milk
Before starting to feed expressed and/or stored breast milk, read the information on handling stored breast milk carefully (refer to Recommendations on Storage).

WARNING!
- Risk of scalding!
Breast milk which is too hot can lead to burns in areas of the mouth and throat!
▶Try the breast milk before giving it to your child.
→Insert the teat (15) in the fastening ring (16) of the feeding bottle.
→Carefully screw the fastening ring (16) on the feeding bottle (12) clockwise as firmly as possible.
→Slowly turn the feeding bottle (12) upside down and back to mix any fat sediment in the milk. Do not shake or stir the milk.
→Heat the breast milk to body temperature (approx. 37°C).
→Try the breast milk before giving it to your child.
→Feed your child according to its needs.
Storing Expressed Milk
Expressed milk can be stored and frozen in suitable containers.
It is essential to observe the information in Recommendations on Storage.
→Fill the container maximally three-quarters full.
→Label the containers with the date and time at which the breast milk was expressed.
Recommendations on Storage
It is essential to observe the information in Recommendations on Storage. The values specified could vary from the those which must be implemented according to the ambient conditions.
→NEVER use a microwave oven or boiling water to thaw or warm up breast milk.
If breast milk is not warmed carefully, it loses some of its natural vitamins, minerals and other valuable nutritional content.
To retain the nutritional content of the breast milk, it is preferable to thaw the breast milk in a refrigerator overnight.
Alternatively, you can hold the breast milk container under lukewarm water (max. 37 °C).
Storing at Room Temperature
For a period of 15 to 30 minutes at a storage temperature between 19° and 26°C.
Storing in a Refrigerator
For a period of 12 hours at a maximum storage temperature of 4°C.
The temperature in a refrigerator door is higher than that recommended for storing breast milk. Therefore, keep the breast milk in a middle or lower shelf of your refrigerator.
Storing in a Freezer
WARNING!
- Risk of injury!
Impairment of the immune system or other health risks due to germs!
→Store and feed breast milk according to the recommendations on storage.
→Do not thaw breast milk and freeze it again!
→ For a period of 4 to 6 weeks at a storage temperature between -18^ and -20^ C.
Storing Thawed Breast Milk
WARNING!
- Risk of injury!
Impairment of the immune system or other health risks due to germs!
→Store and feed breast milk according to the recommendations on storage.
→Do not thaw breast milk and freeze it again!
→ For a period of 12 hours at a maximum storage temperature of 4°C.
Cleaning and Sterilising the Breast Pump
Only when the breast pump has been thoroughly cleaned and sterilised can you be sure that the breast milk can be collected, stored and fed free of contamination.

We recommend using the BS29 electronic steam steriliser. Simply contact our Service department.
→Before beginning with cleaning and sterilising, wash your hands, breasts and teats thoroughly so that there is no residual cream or ointment on the skin.
→Clean and sterilise all parts which come into contact with your breast or the breast milk after each feed.
Cleaning
→Press the button (18) to switch the breast pump off.

DANGER!
- Risk of fatal injury through electric shock!
→Disconnect the breast pump from the power supply before starting any cleaning work.
→Ensure that the pump unit never comes into contact with water.
→Disconnect the power adapter plug from the power socket (or the USB plug from the computer).
→Disassemble the breast pump and accessories into their individual parts.

CAUTION!
- Property damage!
Electronic components could be damaged.
→Never clean the pump unit with water.
→Use a slightly moistened, lint-free cloth to clean the pump unit.

Pull the valve (13) from the pump housing using the handle.
→Flush all the individual parts thoroughly under running water.

CAUTION!
- Property damage!
Milk residues could lead to material damage.
→Clean the individual parts thoroughly.
→Use a mild washing-up liquid and then rinse with running water.

The individual parts of the breast pump are dishwasher-proof. Please note that cleaning the individual parts in a dish-
washer DOES NOT sterilise the individual parts.
Sterilising
Sterilisation of the breast pump and accessories ensures that the breast milk is not contaminated when collected, stored and fed.

Before sterilising the individual parts of the breast pump, the individual parts must have been cleaned as described in
Chapter Cleaning.

CAUTION!
- Property damage!
Electronic components could be damaged.
→It is not necessary to sterilise the pump unit.
→Fill a suitably sized, household cooking pot with sufficient water and bring it to the boil.

WARNING!
- Risk of scalding!
Boiling water can lead to severe burns.
→Avoid direct contact with hot water and steam.
→Insert the individual parts in the boiling water.
→Remove the individual parts from the boiling water after about 10 minutes.
→Allow the individual parts to drip-dry. The clean, sterile parts are now ready to be used again (refer to Chapter Assembling the Breast Pump).

Keep the breast pump and all the individual parts dust-free, as far as possible, until they are used again; wrapped in a
clean, lint-free tea towel for example.
In the Case of Problems
Problem Solution
Breast pump does not work Check the power adapter plug and microUSB plug are connected properly, plug in again if necessary.
No breast pump suction or it is too weak
Check that the breast shield (2) fits properly and fully against your breast.
Hold the pump housing (3) against your breast so that breast milk can flow into the feeding bottle (12).
Increase the suction power by pressing the button (19).
Breast pump suction is too strong Reduce the suction power by pressing the button (17).
Disposal

In order to dispose of your device, take it to a collection point provided by your local public waste authorities (e.g. recycling centre). According to laws on the disposal of electronic and electrical devices, owners are obliged to dispose of old electronic and electrical devices in a separate waste container. The adjacent symbol indicates that the device must not be disposed of in normal domestic waste!
You are obliged to dispose of batteries and power packs at shops which sell batteries or collection points which provide the corresponding containers. Disposal is free of charge. The symbols indicate that the batteries must not be disposed of in normal domestic waste and that they must be brought to collection points provided by local public waste authorities.

Packaging materials must be disposed of according to local regulations.
CE Mark

The CE Mark on the device confirms conformity. To view the complete Declaration of Conformity, please refer to the free download available on our website www.olympia-vertrieb.de.
Guarantee
Dear Customer,
we are pleased that you have chosen this equipment.
In the case of a defect, please return the device together with the receipt and original packing material to the point-of-sale.
FRANÇAIS
Mode d'emploi