Victor - Barbecue BARBECOOK - Free user manual and instructions
Find the device manual for free Victor BARBECOOK in PDF.
User questions about Victor BARBECOOK
0 question about this device. Answer the ones you know or ask your own.
Ask a new question about this device
Download the instructions for your Barbecue in PDF format for free! Find your manual Victor - BARBECOOK and take your electronic device back in hand. On this page are published all the documents necessary for the use of your device. Victor by BARBECOOK.
USER MANUAL Victor BARBECOOK
text_image
QR code image containing encoded data, with a central logo or watermarkGO TO WWW.BARBECOOK.COM, REGISTER YOUR BARBECOOK AND YOUR BARBECOOK EXPERIENCE WILL BE FURTHER IMPROVED!
THIS IS YOUR UNIQUE SERIAL N°
[EN] Go to barbecook.com, register your Barbecook and your Barbecook experience will be further improved!
[NL] Ga naar barbecook.com, registreer uw Barbecook om uw Barbecook-ervaring nog meer te verbeteren!
[FR] Rendez-vous sur barbecook.com et enregistrez votre appareil Barbecook pour nous aider à améliorer votre expérience Barbecook.
[DE] Registrieren Sie Ihren Barbecook auf barbecook.com, damit Sie ein noch umfangreicheres Barbecook-Erlebnis genießen können!
[ES] Visite barbecook.com, registre su Barbecook y su experiencia con el producto será aún mejor.
EN - User guide 4
Thank you for purchasing a Barbecook appliance! A whole new world is waiting for you to explore, whether it be in the peace and quiet of nature or amidst the hustle and bustle of the city. Become a grill master in our #barbecook community and let us put your grill skills in the spotlight.
Register your Barbecook appliance online and get some major benefits:
- You get access to the full user manual and get to know every bit of your appliance.
- You benefit from a personalized after sales service, allowing you to quickly find spare parts and to profit from an optimal warranty service.
• We inform you about product updates and give you tips, tricks and grillspiration to bring out the grill master in you.
Ready for an adventure? Register your product and join the #barbecook community!

For more information about registering your appliance, refer to www.barbecook.com.

Barbecook respects your privacy. Your data will not be sold, distributed or shared with third parties.
2 IMPORTANT SAFETY INSTRUCTIONS
2.1 Read and follow the instructions
Read the instructions before using the appliance. Always follow the instructions carefully. Assembling or using the appliance differently can cause fires and material damage.

Damages caused by not following the instructions (improper assembly, misuse, inadequate maintenance...) are not covered by the warranty.
2.2 Be cautious with gas
Working with gas is perfectly safe, but requires some extra caution:
- Always store gas cylinders outdoors, in a well-ventilated area. Make sure they are not exposed to excessive heat or direct sunlight.
- Never store your gas cylinder or spare gas cylinder in the cabinet of your appliance.
- While in use, put your gas cylinder on the flip stand at the side of the appliance.
- Never store your spare gas cylinder near a gas appliance in use.
• Always turn off the gas supply at the gas cylinder after use. - Never smoke near a gas appliance in use or near a gas cylinder (full/empty).

If you smell gas, immediately close the gas supply, extinguish all flames and open the lid of the appliance. If the smell lasts, call your gas supplier or the fire department.
2.3 Select an appropriate location
Use the appliance outdoors only. Using it indoors, even in a garage or shed, can cause carbon monoxide poisoning.
When selecting an outdoor location, always:
- Place the appliance at least three meters away from any building, in an open and well-ventilated area.
• Make sure there is a free air flow to the burners and the vent holes in the cabinet at all times.
• Make sure the appliance is not under an overhanging structure (a porch, a shelter...) or under foliage. - Put the appliance on a firm and stable surface. Never put it on a moving vehicle (a boat, a trailer...).
2.4 Safety warnings
• Use outdoors only.
- Read the instructions before using the appliance.
• Do not move the appliance during use.
- Do not leave the appliance unattended during use, especially in the presence of children and animals.
- WARNING: accessible parts may be very hot. Keep young children away.
- Use appropriate protection when handling hot parts (lid, grill...).
- This appliance must be kept away from flammable materials during use.
- Do not use wood, charcoal, lava rocks or ceramic briquettes on a gas appliance.
- Do not use the appliance when you have consumed alcohol or taken drugs.
• Tum off the gas supply at the gas cylinder after use.
• Do not modify the appliance.
• Any modification of the appliance can be dangerous.
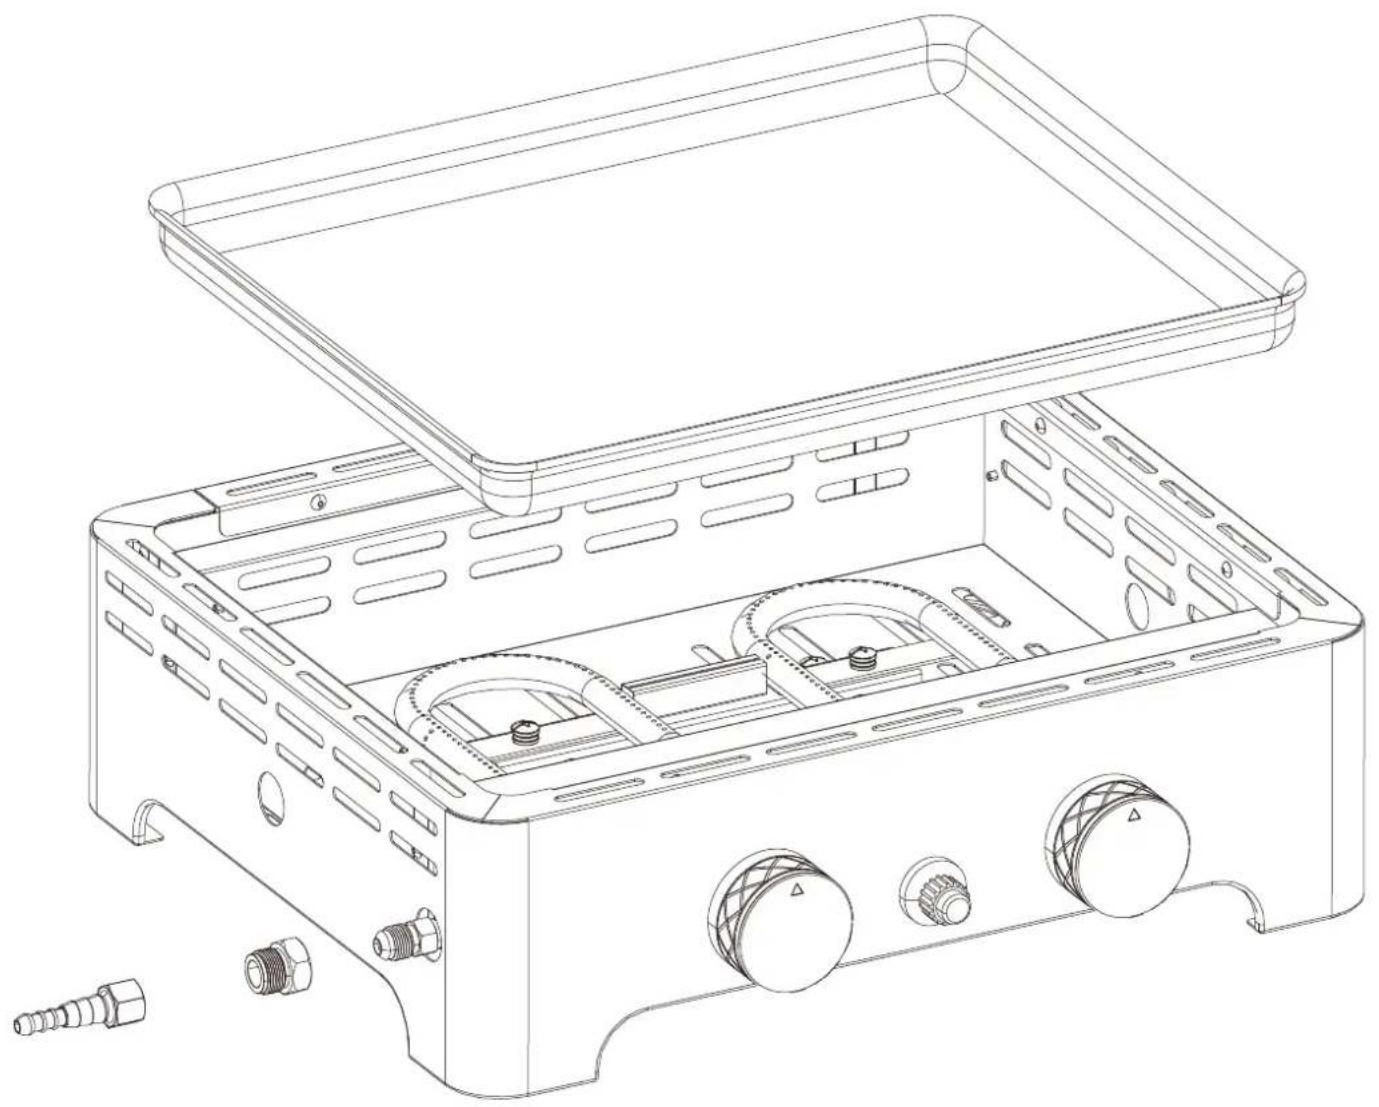
3 ASSEMBLING THE APPLIANCE
3.1 Safety instructions
- Do not modify the appliance when assembling it. It is very dangerous and not allowed to alter parts that are pre-assembled and/or sealed by the manufacturer.
• Always follow the assembly instructions carefully. - The user is responsible for the correct assembly of the appliance. Damages caused by improper assembly are not covered by the warranty.
3.2 To assemble the appliance
- Put the appliance on a flat and clean surface.
- Assemble the appliance as shown on the assembly drawings. You find them in the second part of this manual, after the exploded view of your appliance..
4 CONNECTING GAS TO THE APPLIANCE
4.1 Which cylinder, hose and regulator?
Before you can connect gas to the appliance, you must buy a gas cylinder, hose and pressure regulator. The table below shows you which cylinder, hose and regulator you must use. In Belgium (BE), for example, you must use a propane cylinder with a hose and regulator for 37 mbar or a butane cylinder with a hose and regulator for 28-30 mbar.

Use only regulators complying with EN 16129.
| Country | Cylinder, hose and regulator |
| DK, GR, NO, SE, EE, LT, LV, CZ, PL, MT, HU, SI, SK, NL | Propane, 30 mbar / Butane, 30 mbar |
| ES, GB., IE, PT, BE, FR, LU, IT, CY | Propane, 37 mbar / Butane, 28-30 mbar |
text_image
Technical diagram showing a gas cylinder with height dimension H and diameter D, alongside a mechanical device with cross symbol indicating failure or absence.
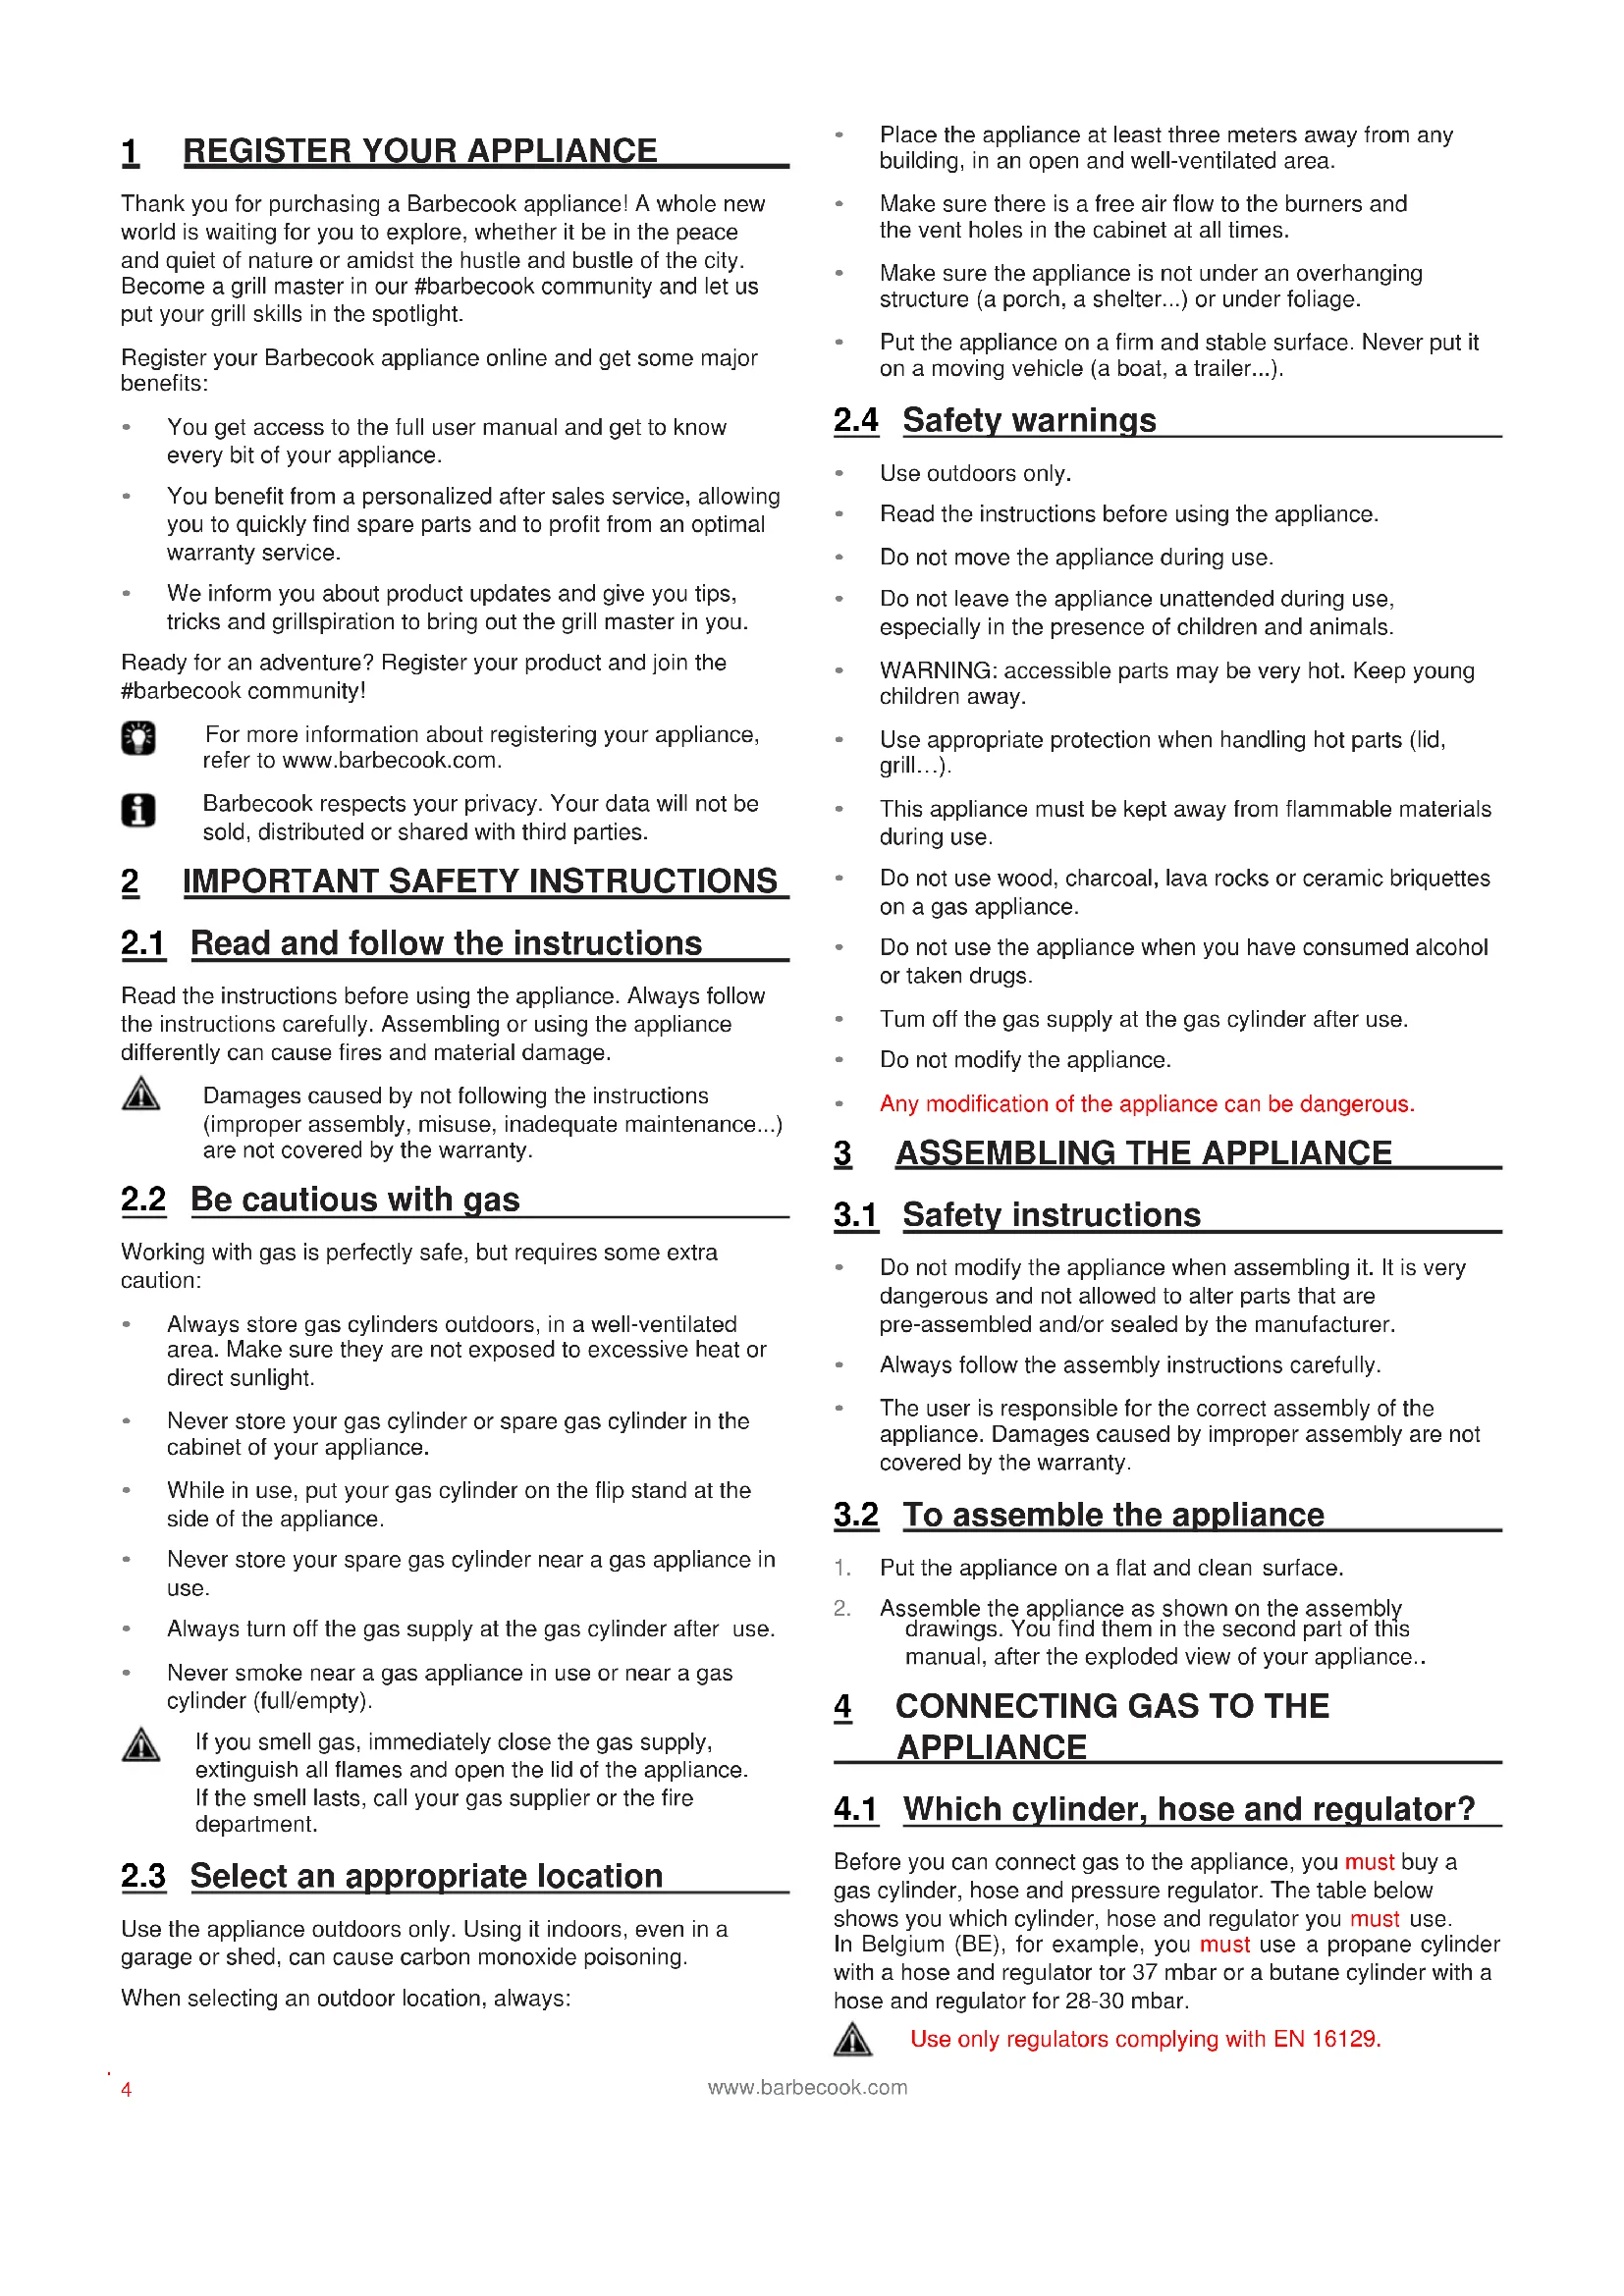
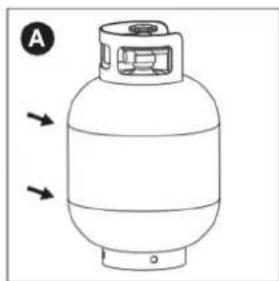
This barbecue has been adjusted to be operate with 4,5 to 15 kg butane/propane cylinders with an appropriate low pressure regulator. We recommend connecting the appliance to propane. Propane offers a high-quality combustion and is less sensitive to frost. The height H of the cylinder must be less than 70 cm, regardless of the cylinder's width or diameter D.

Buy your pressure regulator and gas cylinder together. Not all regulators fit all cylinders.

Use only a gas hose and regulator that is homologated for the country of use.
4.2 Safety instructions
- Never connect the cylinder directly to the appliance. Always mount a pressure regulator on the cylinder first.
- Never modify pre-assembled or sealed parts of the cylinder, the hose or the pressure regulator.
- Keep the hose as short as possible (1,5 m maximum) to prevent it from dragging on the ground.
- Never distort or twist the hose. Do not pull or pierce the hose. Keep the hose away from any parts of the barbecue that get hot. Check that the flexible hose stretches out normally, without twisting or pulling.
- It should be replaced if it is damaged or cracked, when required by national regulations or at the end of the part lifecycle (f.ex France)
• Never open the gas supply.
• Always keep the cylinder in an upright position. - Check for leaks each time you make changes to the gas connection. See "5 Checking for gas leaks".
4.3 Connecting the hose to the appliance
France:
The equipment may be used with two types of flexible hose:
- Flexible hose designed to be joined onto ringed tailpieces on both the barbecue and regulator sides, held firm with collars (in accordance with standard XP D 36-110). recommended length 1.25 m.
- Flexible hose (according to standard XP D 36-112) fitted with a G 1/2 threaded nut for fixing to the barbecue and a M 20x1.5 threaded nut for fixing to the regulator, recommended length 1.25 m.
Other countries:
It should be used with flexible hose that is suitable for use with butane and propane gas. Hose length should not exceed 1.50 m.
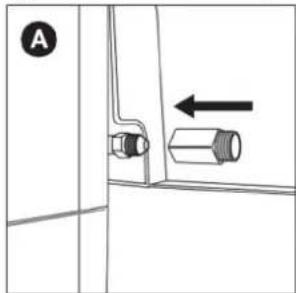
To connect the gas hose to the appliance, you have to mount a coupling on the gas tube of the appliance. The appliance comes with two couplings, both intended for particular countries:
| Country Coupling | ||
| 223.7420.100 | BE, CH, CZ, DK, ES,FI, GB, IE, IT, PT, SI | Coupling A |
| FR | Coupling B | |
| 223.7420.000 FR | / | |

If your country is not in the table, use the coupling that complies with your national standards.
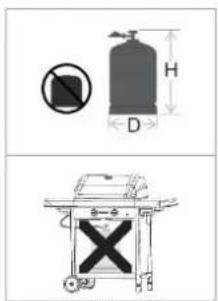
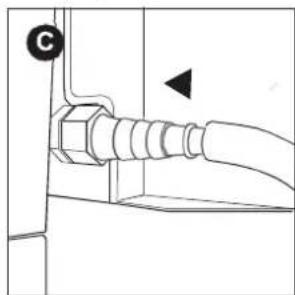
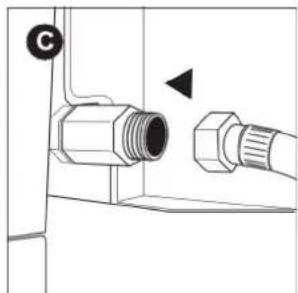
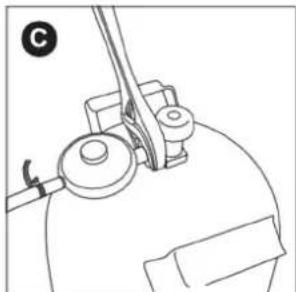
4.3.1 Coupling A
You need a 19 mm spanner and a cross-slotted screwdriver.
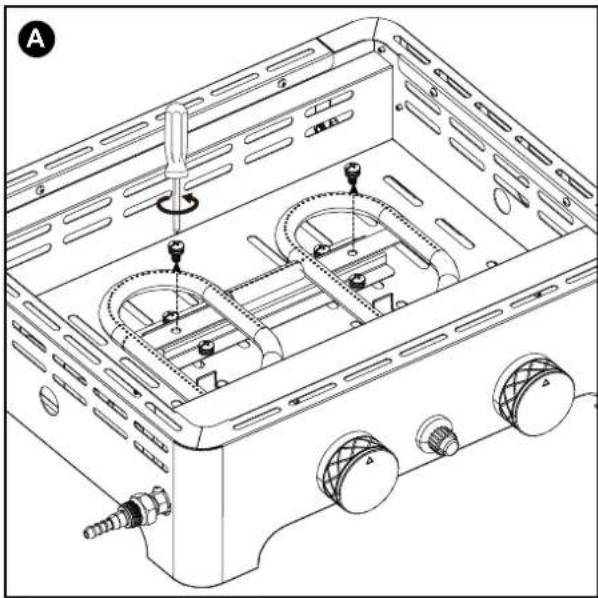
- Screw the coupling on the gas tube of the appliance (A) and tighten it with a 19 mm spanner (B).
natural_image
Technical line drawing of a mechanical component with a labeled section (A), showing no text or symbols beyond the label.
text_image
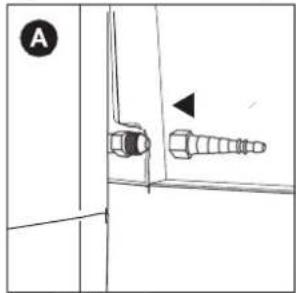
B- Slide the hose over the coupling (C) and tighten the clamping ring with a cross-slotted screwdriver (D).
natural_image
Pure diagram of a mechanical or electrical component with no visible text, numbers, or symbols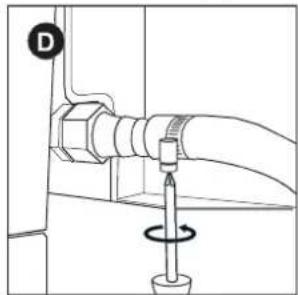
natural_image
Technical diagram of a pipe connection with a screw and rotating knob (no text or symbols)4.3.2 C oupling B
You need a 22 mm spanner and an adjustable spanner.
- Screw the coupling on the gas tube of the appliance (A) and tighten it with a 22 mm spanner (B).
natural_image
Diagram of a door handle with a valve and directional arrow, no text or symbols present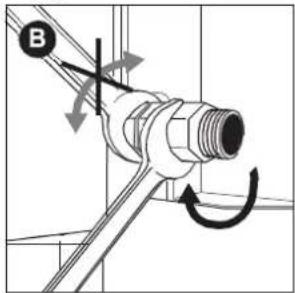
text_image
Technical diagram showing pipe connection with directional arrows and labeled component B- Screw the gas hose on the coupling (C) and tighten it with two spanners. Hold the coupling with a 22 mm spanner, while turning the hose with an adjustable spanner (D).
natural_image
Technical diagram of a mechanical connector with two connectors and a labeled component (no text or symbols present)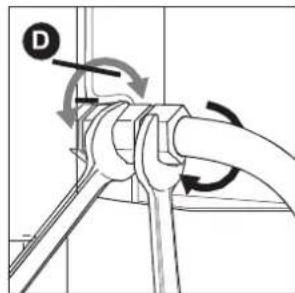
text_image
Technical diagram showing pipe connection with labeled component D and directional arrows indicating flow or movement4.4 Connecting the hose and cylinder to the regulator
Depending on the type of pressure regulator you use, you need a cross-slotted screwdriver and/or an adjustable spanner.
-
Connect the hose to the pressure regulator. Do one of the following:
-
If the hose has a clamping ring, slide the hose over the regulator and tighten the clamping ring with a cross-slotted screwdriver (A).
- If the hose has a nut, screw the hose on the regulator and tighten the nut with an adjustable spanner (B).
natural_image
Illustration of a medical procedure with a syringe and tubing (no text or symbols)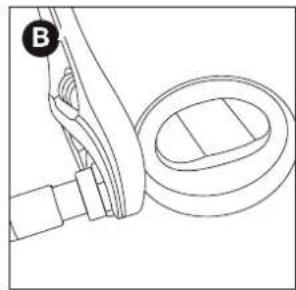
natural_image
Technical line drawing of a mechanical component with a circular housing and a tool, no text or symbols present-
Connect the pressure regulator to the gas cylinder. Do one of the following:
-
If the regulator has a nut, screw the regulator clockwise on the cylinder and tighten the nut with an adjustable spanner (C).
- If the regulator has a screw thread, screw the regulator counter-clockwise on the cylinder (D).
natural_image
Line drawing of a mechanical device with a lever and cylindrical components (no text or symbols)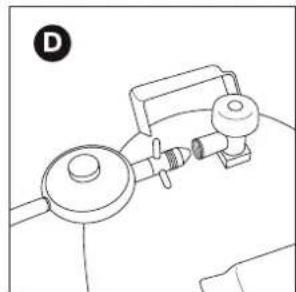
natural_image
Line drawing of a medical device with a bulb and connector (no text or symbols)4.5 Replacing the cylinder
- Close the gas supply and set all control knobs to OFF
- Disconnect the empty cylinder and connect the full cylinder.
- Check the cylinder, the hose and all gas connections for leaks. See "5 Checking for gas leaks".
5 CHECKING FOR GAS LEAKS
5.1 Why check for gas leaks?
Propane and butane are heavier than air. As a result, they do not float away when leaking from the appliance. Especially on windless days, a leak can cause the gas to collect in and around the appliance. That accumulated gas can then ignite and explode.
5.2 When check for gas leaks
- Before the first use or before the first use after a long period of non-use.

Also check for gas leaks if your appliance was assembled by your dealer.
• Each time you replace a gas component.
- At least once a year, preferably at the beginning of the season.
5.3 Safety instructions
- Put the appliance outdoors, in a well-ventilated area. Make sure there are no flames or heat sources near the appliance.
• Never use a lighter or match to check for gas leaks. - Do not smoke and do not light the burners when checking for gas leaks.
5.4 Which materials do I need?
To check for gas leaks, you need:
- A testing liquid. You can use a ready-made leak spray or a mixture of water (50%) and dish-washing soap (50%).
• The leak test tool
5.5 To check for gas leaks
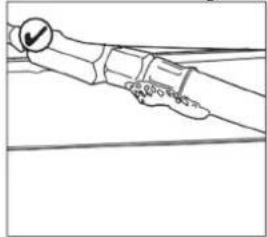
You check for gas leaks by applying a testing liquid to all gas components and connections. If the bubbles on a particular component or connection grow, there is gas leak:
natural_image
Line drawing of a hand holding a tool or device against a plain background (no text or symbols)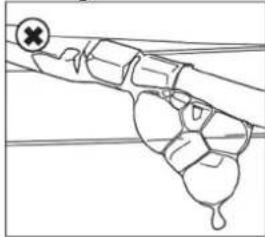
natural_image
Simple line drawing of a hand holding a tool or device with a cross mark and droplet (no text or symbols)To check for gas leaks, proceed as follows:
- Put the appliance outside.
- Get your brush and testing liquid (leak spray or water/soap mixture).
- Set all control knobs to OFF.
- Open the gas supply slightly. Turn the valve of the gas cylinder only once.
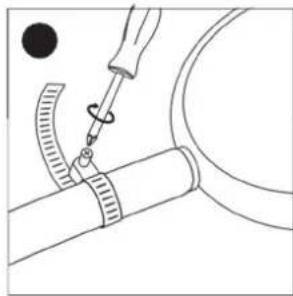
- Suck up some testing liquid and apply it to the area that you want to check. You have to check:
• The welds of the gas cylinder (A)
- The hose (B)
- The connections between the cylinder and the pressure regulator and between the pressure regulator and the hose (C)
• The connection between the hose and the appliance (D)
natural_image
Line drawing of a gas cylinder with directional arrows indicating flow or movement (no text or symbols)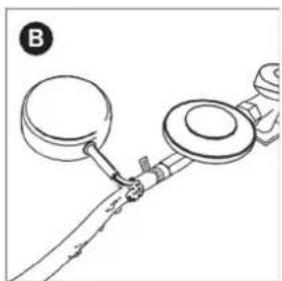
natural_image
Line drawing of a mechanical device with two circular components connected by a rod (no text or symbols)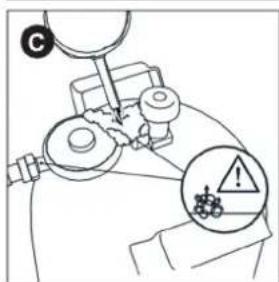
text_image
Diagram showing a lab procedure with labeled components and warning symbols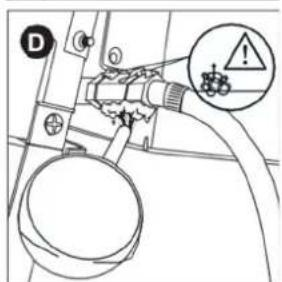
text_image
Technical diagram showing a mechanical assembly with labeled components and warning symbolsYour pressure regulator and coupling may be different from the ones in the illustrations.
- Do one of the following:
- If you detect a leak, continue as described in "In case of a gas leak".
- If there are no leaks, close the gas supply, rinse all components thoroughly with water and dry them well.
5.6 In case of a gas leak
- Close the gas supply and do one of the following:
- If you detected a leak on one of the connections, tighten that connection.
- If you detected a leak on the cylinder or hose, replace the cylinder or hose.
-
Recheck the connection or component on which you detected the leak.
-
If the leak is not repaired, contact a Barbecook dealer. Do not use the appliance until the leak is repaired.

For a list of nearby Barbecook dealers, refer to www.barbecook.com.
6 GETTING THE APPLIANCE READY FOR USE
6.1 Before each use
Do not use the Plancha before you have read, understood and checked all information in this manual. Ensure that:
• The Plancha is correctly installed
• There is no leak in the gas supply (see "5")
- The burners are correctly installed, the venturi tubes are properly placed over the openings of the gas valves, and there are no obstructions (see safety information and cleaning of the burners)
• None of the gas supply hoses can come into contact with a hot surface
• Your Plancha is installed in a safe place
6.2 Lighting the burners
To light the burners with the electrical igniter, you have to install an AA battery in the igniter. That battery is not supplied with the appliance. You find the battery case of the igniter on the control panel of your appliance.
Do not lean directly over the Plancha when lighting the burners. The control knobs on the Plancha must be in the OFF position.
• Never try to light the 2 burners at once.
6.3 Lighting the burners using the igniter
• Set the control knob of one burner to HIGH
- Press the ignitor button and keep pressing the ignitor button until you have verified that the burner has ignited (noise & visible through view holes side panel).
- If the burner does not light within 5 seconds, set its control knob to OFF, close the gas supply and wait 5 minutes. This allows any accumulated gas to escape
- Retry lighting the burner, if it still does not light, refer to "Troubleshooting" to determine the cause of the problem.
- Once one burner is lit, light the other burner by setting the control knob to high.
6.4 Lighting the burners using a match
On left & right-side panel there is a view/ignitor hole. You can light the burners using a long match if the electronic ignition does not work.
• Open the tap on the gas cylinder.
- Hold the lighted match through the hole about 13 mm from the burner.
- Press in the desired knob and turn to 'High'. The fire should light within five seconds. If not, turn the knob off and wait for five minutes to allow the gas to disperse.
- Repeat above steps. If the burner still fails to ignite after three attempts, read the "Troubleshooting" section.
natural_image
Line drawing of a toaster oven with cooling fans and a hand adjusting the tray (no text or symbols)6.5 Lighting the other burner
The second burner is lit in the same way as the first.
6.6 Visual check of the flames
Each time you light a burner, you have to check its flames. A perfect flame is almost completely blue, with some yellow at the top. Sporadic yellow flames are normal and not harmful. If there is something wrong with the flames, do one of the following to solve the problem:
| If the flames are... | Do the following... |
| Low and entirely yellow | 1. Immediately close the gas supply and set all control knobs to OFF.2. Refer to “Troubleshooting” to determine the cause of the problem. Most likely, the venturis are blocked. |
| Higher than the bowl | 1. Immediately close the gas supply and set all control knobs to OFF.2. Wait 5 minutes to allow any accumulated gas to escape.3. Relight the burner(s).4. If the problem persists, refer to “Troubleshooting” to determine the cause of the problem. |
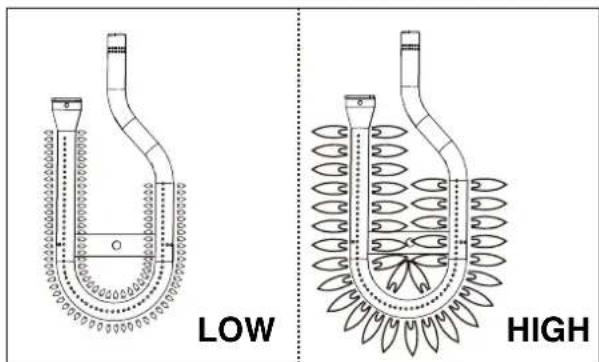
text_image
LOW HIGH6.7 Switching the burners off
If you no longer use the burners, you must switch them off. Proceed as follows:
-
Close the gas supply.
-
Set the control knobs of the burners to OFF.

By closing the gas supply first, you make sure there is no gas left in the appliance.
6.8 Relighting the burners
If a burner goes out while in use, proceed as follows:
-
Close the gas supply.
-
Set all control knobs to OFF and wait 5 minutes. This allows any accumulated gas to escape.
-
Relight the burner(s).
7 USEFUL TIPS AND TRICKS
7.1 First use
Before using your Plancha for the first time, allow the unit to 'run in' by operating it for a short period of time without food. To 'run in' your Plancha, ignite the appliance. Keep the temperature on 'HIGH' for 10 minutes. The Plancha is now ready for use.
7.2 Preheating the plancha
The Plancha must be pre-heated on 'HIGH' for at least ten minutes before you put food on it. If you want to cook at a lower temperature than 'HIGH', turn the control knob to the low position before you put the food on the Plancha.
7.3 Cooking time
The actual cooking time will depend on several factors, including your taste, the ambient temperature and the wind. Experience will enable you to estimate this time.
7.4 Preventing food from sticking
To prevent your food from sticking to the griddle:
- Oil the food lightly with a brush before you put it on the griddle. You can also oil the griddle itself.
- Preheat the appliance. The warmer the griddle when you put food on it, the less the food will stick.
- Do not turn the food too quickly. Let it catch some heat first.
8 MAINTAINING THE APPLIANCE
8.1 Cleaning the griddle

We recommend cleaning the griddle after each use. See 12. Never use oven cleaners on the grill.
8.2 Cleaning the burners and venturis
8.2.1 Venturis
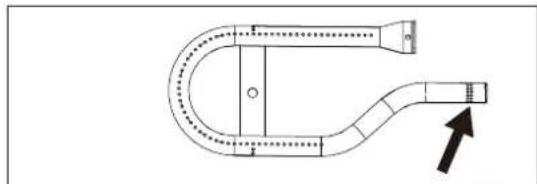
The venturis are the small tubes attached to the entrance of the burners. At the side of the venturis, there is a hole. This is visible on the main burners and on the side burner:
natural_image
Technical line drawing of a U-shaped pipe or duct with a directional arrow indicating flow or movement (no text or symbols)When the gas is on its way to the burners, it passes through the venturis. Thanks to the holes at the sides, the gas is then mixed with air and - as a result - with oxygen. This is necessary for a good ignition in the burners: only the correct mixture of gas and oxygen will ignite properly and will result in nice flames.
8.2.2 Why clean the burners and venturis?
Spiders and insects can make webs and nests in the burners and venturis. This may block the gas supply to the burners. As a result:
- You cannot light the burners. If you manage to light them anyway, they will only produce smoky and yellow flames.
- The gas can start burning outside the venturis, at the control knobs. These fires are called flash-backs and can result in serious injuries and material damage.

natural_image
Diagram of a fish-shaped structure with internal components and no visible text or symbols
Damages caused by blocked burners and venturis are regarded as inadequate maintenance and are not covered by the warranty.
8.2.3 When do you clean the burners and venturis?
You have to clean the burners and venturis of your appliance:
• Before the first use after a long period of non-use.
- At least twice a year, of which once at the beginning of the season.
8.2.4 How to clean the burners and venturis?
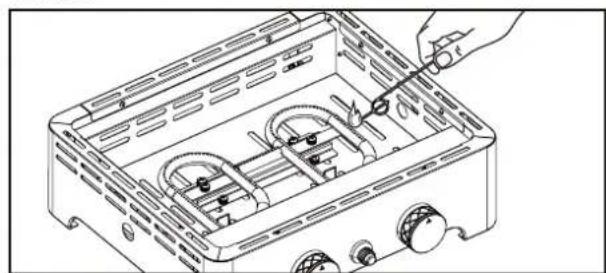
- Remove the burners from the appliance as shown on the illustrations. If you notice that a burner is damaged, you have to replace it.
- Clean the burners and venturis with a small brush or a homemade pipe cleaner (an unfolded paperclip, a pipe brush...).
- Put the burners back. Make sure to place the venturis over the openings of the gas valves.
natural_image
Technical line drawing of a toaster oven with cooling fans and handlebars (no text or symbols)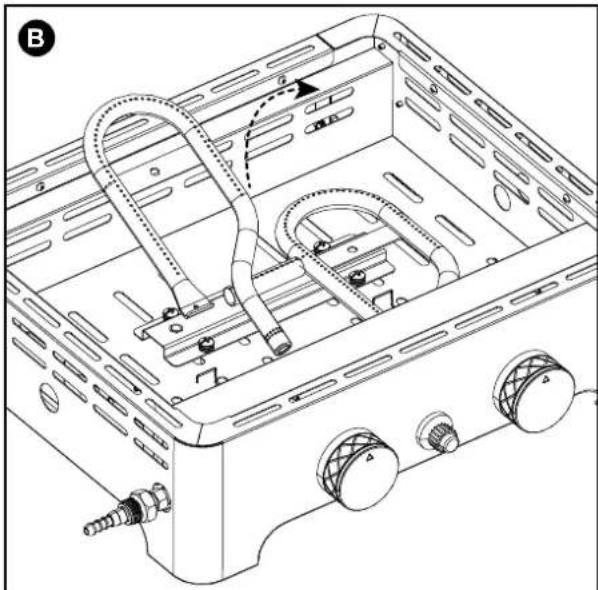
natural_image
Technical line drawing of a portable toaster oven with ventilation ducts and control knobs (no text or symbols)8.3 Maintaining stainless steel and powder coated parts
The appliance is composed of stainless steel and powder coated parts. Each material has to be maintained differently:
| Material How to maintain this material | |
| Stainless steel | Do not use aggressive, abrasive or metal detergents.Use soft detergents an steel.Use a soft sponge or cloth.Rinse thoroughly after cleaning and dry well before storing. |
| Powder coated | Do not use sharp objects. Use soft detergents and a soft sponge or cloth.Rinse thoroughly after cleaning and dry well before storing. |

To prevent formation of rust contact with chlorine, salt and iron. We recommend not using the appliance near the coast, near railways or near swimming pools.

Damages caused by not following these instructions are regarded as inadequate maintenance and are not covered by the warranty
Below the exploded view of your appliance (second part of the manual), you find a list with all parts of which the appliance is composed. This list includes a symbol that specifies the material of each part, so you can use it to check how you have to maintain a particular part. The parts list uses the following symbols:
| Symbol Material | |
| ■ | Stainless steel |
| ★ | Powder coated |
8.4 Storing the appliance
If you do not use your appliance for a longer period of time, store it in a dry place. Before you store the appliance:
- Disconnect the gas cylinder. Never store your appliance indoors (not even in a garage or shed) as long as it is connected to the gas cylinder.
- Clean the burners and the griddle, rub them with oil and wrap them in paper.
- Cover your appliance with a Barbecook cover. Register your appliance at www.barbecook.com to find out which cover you need.
8.5 Storing gas cylinders
These instructions apply to both empty and full gas cylinders.
- Always store gas cylinders outdoors, in a well-ventilated area. Make sure they are not exposed to excessive heat or direct sunlight.
- Never store a gas cylinder in an area that can become very hot (in a car, on a boat...).
- Never store your gas cylinder or spare gas cylinder in the cabinet of your appliance.
- Never store your spare gas cylinder near a gas appliance in use.
• Always store gas cylinders outside the reach of children.
• Always store and transport gas cylinders in upright position.
8.6 Ordering spare parts
Parts that are directly exposed to fire or intense heat have to be replaced from time to time. To order a spare part:
- Look up the reference number of the part you need. You find a list of all reference numbers below the exploded views in the second part of this manual and on www.barbecook.com.

If you registered your appliance online, you will automatically be guided to the correct list in your MyBarbecook account. There you have the possibility to order your parts online.
2 Order the spare part via www.barbecook.com or at your point of sale. Parts under warranty can only be ordered at your point of sale.
9.1 Covered
Your appliance comes with a warranty of two years, starting from the date of purchase. This warranty covers all manufacturing defects, provided that:
- You used, assembled and maintained your appliance according to the instructions in this manual. Damages caused by misuse, incorrect assembly or inadequate maintenance are not regarded as manufacturing defects.
- You can present the receipt and the unique serial number of your appliance. This serial number starts with a G, followed by 15 digits. You can find it:
- On this manual and on the starter pack that included the manual.
- On the packaging of the appliance.
- On the type label on the inside of the cabinet door.
- The Barbecook quality department confirms that the parts are defective and that they proved defective under normal use, correct assembly and adequate maintenance.
If one of the above conditions is not met, you cannot claim any form of contribution. In all cases, the warranty is limited to the repair or replacement of the defective part(s).
9.2 Not covered
The following damages and defects are not covered by the warranty:
- Normal wear and tear (rusting, distortion, discolouration...) of parts that are directly exposed to fire or intense heat. It is normal to replace these parts from time to time.
- Visual irregularities that are inherent to the manufacturing process. These irregularities are not regarded as manufacturing defects.
- All damages caused by inadequate maintenance, incorrect storage, improper assembly or modifications made to pre-assembled parts.
- All damages caused by misuse and abuse of the appliance (not using it according to the instructions in this manual, using it for commercial purposes...).
- All consequential damages caused by careless or non-compliant use of the appliance.
- Rust or discolouration caused by external influences, the use of aggressive detergents, exposure to chlorine... These damages are not regarded as manufacturing defects.
10 TECHNICAL SPECIFICATIONS
10.1 Type label
The type label lists all the technical specifications of your appliance. You can find it:
• In the second part of this manual.
- On the product.
10.2 Injector diameters
• Main burner: 0.55
| Problem Probable cause(s) Solution(s) | ||
| Not enough heat | Gas supply not openVenturis not placed over openings of gas valvesBurner openings blockedGas cylinder (almost) emptyPressure regulator not connected correctly to cylinder and/or hose | Open gas supplyPlace venturis over openings of gas valvesClean burner openings or replace burnersReplace gas cylinderReconnect pressure regulator to cylinder and/or hose |
| Heat not distributed evenly over griddle surface | Some heat differences are normal.Probable cause(s) for big heat differences:Appliance not preheated | Preheat appliance |
| Yellow flames | Burners or venturis blockedSalt on burnersAppliance connected to butane | Clean burners and venturisClean burnersConnect appliance to propane, using an appropriate pressure regulator |
| Incomplete flame | Burner blocked, pierced or rusted | Clean or replace burner |
| Flash-backs (flames outside venturis/at control knobs) | Burners or venturis blocked | Close gas supply and set burners to OFF.Let appliance cool down.Clean burners and venturis. |
| Flames higher than edge of bowl | Lots of windGas cylinder (almost) emptyFat in bowl or on burners | Put appliance with rear side towards windReplace gas cylinderClean bowl or burners |
| Pressure regulator hums | Hot weatherNew (full) gas cylinder | Not a hazard or defect. Should stop automatically after a while. |
| Burner whistles when set to LOW | Gas injector, venturi and/or burner dirty | Clean gas injector, venturi and burner |
| Impossible to light burner(using either igniter or match) | Burner or venturi blockedNo gas supply | Clean burner and venturiOpen gas supply and press safety knob on pressure regulator (not present on all regulators) |
| Sparks present that do not originate from burners | Faulty wiring | Replace wiring |
12 USING YOUR PLANCHA THERMICORE COOKING GRIDDLE
CLEANING
- Wash before using for the first time; THERMICORE cooking griddle is dishwasher-safe. Dry completely before storing.
- Do not use abrasive cleansers like steel wool, cleansers with chlorine bleach, or oven cleaning solutions as they may permanently damage the pan and void the guarantee.
TO DEEP CLEAN :
- For stainless-only portions of the pan (not the area with non-stick), use a stainless-steel cleanser to restore the luster and remove buildup and discoloration.
- For non-stick portion of the pan, use a non-abrasive sponge or cloth to deep clean. For tougher food buildup or occasional deep cleaning, prepare a baking soda paste by mixing 1/2 cup (125 mL) of baking soda with 3 tbsp (45 mL) of water. Apply to the desired areas and let it stand for 15–20 minutes. Wipe off excess paste, rinse thoroughly, and towel dry.
- To remove water spots or discoloration, use a vinegar solution of equal parts water and vinegar. Apply vinegar solution with sponge or cloth. Allow to sit for 10 minutes. Rinse and dry completely.
USE AND CARE
- Storing: To help reduce scratches on interior and exterior coatings, place paper, soft cloth towels, or cookware protectors between pans when storing.
- Hob use: THERMICORE cooking griddle may be used on an induction, gas, electrical, halogen and ceramic hobs, but main intention is to use on your VICTOR plancha. Exterior surfaces of cookware and induction, glass top, and ceramic cooking surfaces should be clean and free of food residue before heating. Consult your stove manufacturer's instructions for more details.
- Select a burner size that matches the diameter of the cookware base. For gas stoves, flames should not extend beyond base of cookware.
- Use appropriate heat level for cooking application. Overheating cookware can cause discoloration. Discoloration (blue-colored tint on exterior surface) will not affect the performance of the cookware.
- Low heat: Simmering liquids, warming food, and preparing delicate sauces.
• Medium to medium-high heat: Preheating, sautéing, searing, frying, stir-frying and maintaining a boil.
• High heat: Boiling and reducing liquids only.
- For best results when sautéing or searing, preheat cookware before adding food.
- Do not preheat empty cookware: Before you begin cooking, add a small amount of cooking oil (Note: aerosol non-stick sprays are not recommended and may create a sticky residue which is difficult to clean if not washed promptly or overheated). Preheat for 1–2 minutes on medium to medium-high heat.
Add food and adjust the heat setting as needed. - Add salt to liquids once a boil is reached. Salt will not absorb into cold water and may leave small white marks on stainless surface. Salt should be added to foods toward the end of cooking.
- Oven use: Cookware is oven-safe to 450^ (230°C).
- Broiler use: Never place this product under the broiler in the oven. The non-stick coating will be severely damaged and it will void the warranty.
- Microwave and outdoor grill: Not microwave- or outdoor grill-safe.
- Non-stick sprays and oils: Do not use non-stick sprays on the cookware as they cause an invisible buildup and impair the non-stick coating performance. Do not overheat oil, butter, or shortening. This will create a sticky residue that will affect the release of the non-stick and result in a reduced life of the coating.
- Utensils: Nylon, wooden, and plastic tools are recommended to maintain the beauty of the stainless steel. Metal whisks and non-sharp metal utensils can be used, but may scratch the surface. In time, the stainless steel will show wear from normal use.
- Sliding pans: Avoid sliding or dragging cookware over the surface of your stovetop, especially glass top ranges, as scratches may result and are not covered by the guarantee.
SAFEGUARDS
- Steam and splatter: Keep children away from the sto-ve while cooking. Be careful around the stove as heat, steam, and splatter can cause burns.
- Unattended cooking: Never allow cookware to boil dry or leave an empty pan on a hot burner as the pan can get extremely hot. This could lead to warping or damage of the non-stick coating.
- Fumes: Do not overheat your non-stick pan as smoke or fumes from burning foods, oils, and the non-stick coating itself can be hazardous to the respiratory systems of pet birds.
- Gas flames: Gas flames should not extend up the sides of the pan. This will damage the exterior of the pan and handle, voiding the guarantee.
• Hot handles: Always use a heat-resistant oven mitt or pad when handling hot handles. - Cooktop surface: For use on induction, flat glass, or ceramic cooktop surfaces, consult the manufacturer's instruction manual before first use.
TROUBLESHOOTING
| Problem | Caused By | How to Fix |
| The nonstick coating has browned. | Overheating and/or using improper diameter size on gas or flattop stoves. | Nonstick coating cannot be restored if browned. |
| The nonstick is peeling. | Overheating and/or using improper diameter size on gas or flattop stoves. | Nonstick coating cannot be restored if it's peeling. |
| There's exposed metal (besides the pattern) under the nonstick. | Overheating and/or using improper diameter size on gas or flattop stoves.Using a knife or sharp utensil on the surface. | Nonstick coating cannot be restored if metal is exposed. |
| Sticking/nonstick coating does not release | Using nonstick spray or overheating oil, butter, or shortening.Failure to properly clean after every use. | Follow deep cleaning directions to remove residues. |
GUARANTEE
- 5 Year guarantee for noncommercial use (5 year guarantee only covers your THERMICORE cooking griddle NOT the VICTOR Plancha cooking unit see 9 Warranty). Refer to sales receipt or website for details. The guarantee is limited and covers defects in materials and workmanship. The guarantee excludes damage by abuse or misuse (such as lack of or improper cleaning, overheating, use of caustic or other unapproved cleaners or use of nonstick sprays), ordinary wear and tear, or act of God. Product returned is subject to inspection for proper use and care.
1 UW TOESTEL REGISTREREN
natural_image
Diagram of a door with a bolt and connector, labeled 'A' (no text or symbols beyond label)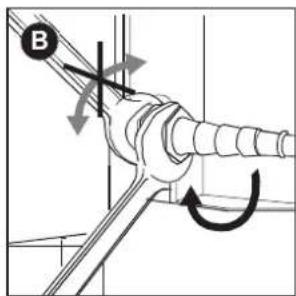
text_image
Bnatural_image
Pure mechanical diagram showing a pipe connection with a valve and handle, no text or symbols present
natural_image
Technical diagram of a pipe connection with a screw and rotating base (no text or symbols)4.3.2 KoppelingB
natural_image
Diagram of a mechanical joint or bracket with an arrow indicating direction (no text or symbols present)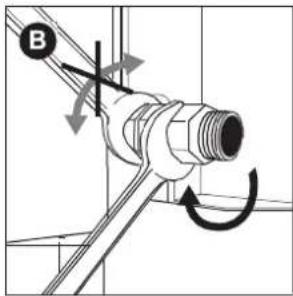
text_image
Btext_image
Technical diagram showing pipe connection and valve assembly with labeled components C and Dnatural_image
Technical line drawing of a mechanical assembly with a circular component and a bracket (no text or symbols)natural_image
Technical line drawing of a mechanical assembly with no visible text or symbols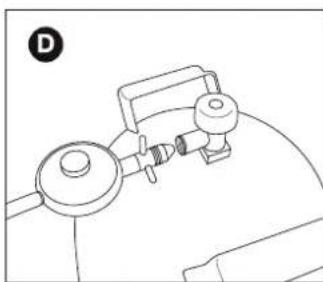
natural_image
Line drawing of a medical device with a bulb, connector, and arm (no text or symbols)natural_image
Pure technical line drawing of a pipe joint with a valve, no text or symbols present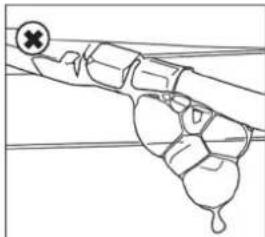
natural_image
Simple line drawing of a mechanical or electrical component with no visible text, numbers, or symbols.natural_image
Line drawing of a gas cylinder with directional arrows indicating flow or movement (no text or symbols)
text_image
B Ischemia
text_image
C hürfe !
text_image
D ! barbecook
natural_image
Line drawing of a portable stove with internal compartments and fans (no text or symbols)natural_image
Pure technical diagram of a U-shaped pipe or duct with internal components and an arrow indicating direction (no text or symbols)8.2.2 WAArom de VenturiBuizen reinigen?
natural_image
Diagram of a fish-shaped structure with internal components and no visible text or symbolsnatural_image
Technical line drawing of a toaster oven with handlebars and control knobs (no text or symbols)
natural_image
Technical line drawing of a toaster front panel with coiled tubing and control knobs (no text or symbols)text_image
Technical diagram showing a gas cylinder with height H and diameter D, alongside a cross-marked mechanical device with warning symbol.
natural_image
Diagram of a door with a screw and directional arrow, no text or symbols present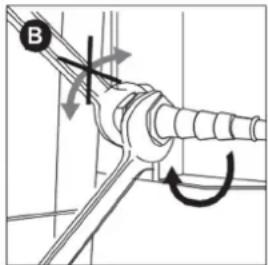
text_image
Bnatural_image
Pure mechanical diagram showing a pipe fitting with a valve and connector (no text or symbols)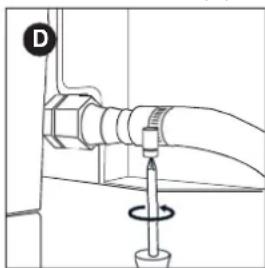
natural_image
Technical diagram of a pipe connection with a screw and rotating component (no text or symbols)4.3.2 Manchon B
natural_image
Diagram of a mechanical component with a cylindrical shaft and directional arrow (no text or symbols)
natural_image
Technical diagram of a pipe fitting with directional arrows indicating movement (no text or symbols)natural_image
Technical diagram of a mechanical joint or connector with two connectors and a directional arrow (no text or symbols)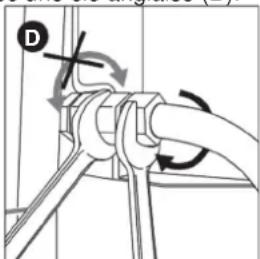
text_image
Diagram showing pipe connection with directional arrows and label D, likely illustrating fluid or piping system movement.natural_image
Technical line drawing of a micrometer measuring a cylindrical object (no text or symbols)
natural_image
Technical line drawing of a mechanical assembly with a circular component and a handle (no text or symbols)natural_image
Technical line drawing of a mechanical assembly with no visible text or symbols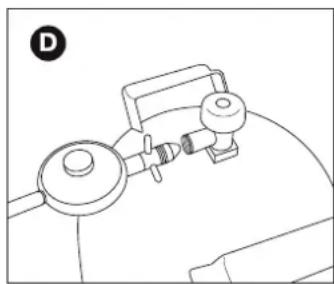
natural_image
Line drawing of a medical or laboratory device with no visible text, numbers, or symbolsnatural_image
Simple line drawing of a hand holding a tool or device, no text or symbols present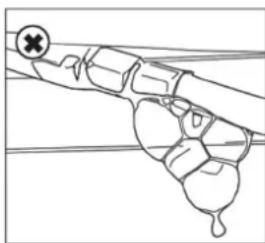
natural_image
Simple line drawing of a mechanical or electrical component with no visible text, numbers, or symbols.natural_image
Line drawing of a gas cylinder with directional arrows indicating flow or movement (no text or symbols)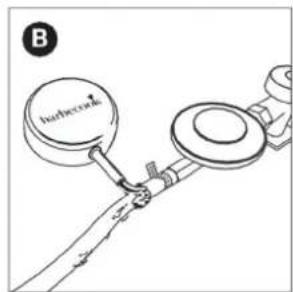
text_image
B Barbec-------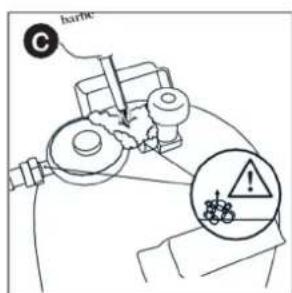
text_image
C Isorlik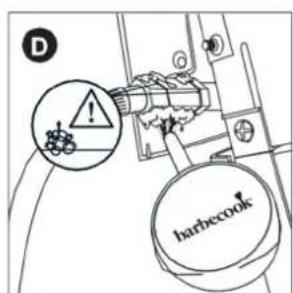
text_image
D barbecooknatural_image
Line drawing of a portable stove with cooling fans and a hand holding a tool (no text or symbols)natural_image
Technical line drawing of a U-shaped pipe fitting with a handle and arrow indicator (no text or symbols)natural_image
Diagram of a fish-shaped object with internal structures and no visible text or symbolsnatural_image
Line drawing of a toaster oven with cooling fans and heat exchangers (no text or symbols)
natural_image
Technical line drawing of a portable toaster oven with ventilation ducts and control knobs (no text or symbols)text_image
Technical diagram showing a gas cylinder with height H and diameter D, alongside a cross symbol indicating no protection or failure.
natural_image
Pure diagram of a mechanical joint or connector without any text, numbers, or symbols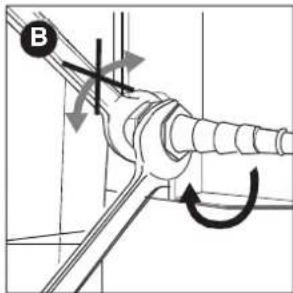
text_image
Bnatural_image
Pure mechanical diagram showing a pipe connection with a valve and label C (no text or symbols)
natural_image
Technical diagram of a pipe connection with a screw and rotating knob (no text or symbols)4.3.2 AnsChluss B
natural_image
Technical diagram of a mechanical connector with labeled component C (no text or symbols beyond label)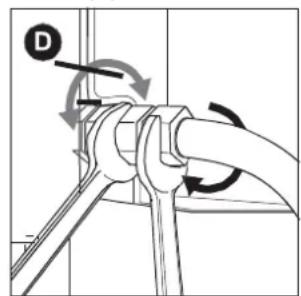
text_image
Technical diagram showing a mechanical assembly with labeled component D and directional arrows indicating motion or flow.natural_image
Technical line drawing of a micrometer measuring a cylindrical object (no text or symbols)
natural_image
Technical line drawing of a mechanical assembly with a circular component and a bracket (no text or symbols)natural_image
Technical line drawing of a mechanical assembly with no visible text or symbols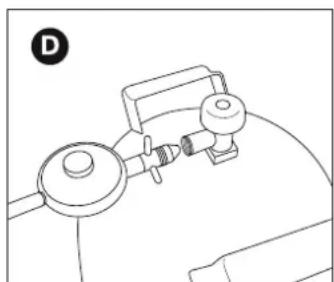
natural_image
Line drawing of a medical or laboratory setup with a device and tubing (no text or symbols)natural_image
Line drawing of a hand holding a tool or pipe (no text or symbols present)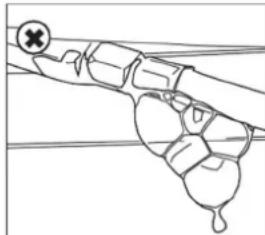
natural_image
Simple line drawing of a hand holding a tool or device with a circular mark and a cross symbol (no text or labels)natural_image
Line drawing of a gas cylinder with directional arrows indicating flow or movement (no text or symbols)
text_image
Isabella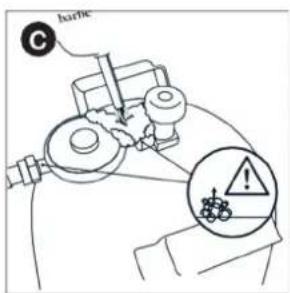
text_image
C hertle !
text_image
D barbecooknatural_image
Line drawing of a portable stove with handles and a hand adjusting the interior (no text or symbols)natural_image
Technical line drawing of a U-shaped mechanical component with a curved handle and mounting holes, showing no text or symbols.natural_image
Diagram of a fish-shaped structure with internal components and no visible text or symbolsnatural_image
Technical line drawing of a toaster oven with handlebars and control knobs (no text or symbols)
natural_image
Technical line drawing of a toaster oven with attached hoses and control knobs (no text or symbols)natural_image
Technical line drawing of a mechanical joint or bracket with a bolt and nut, no text or symbols present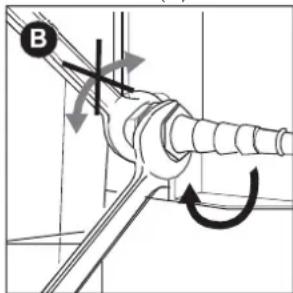
text_image
Bnatural_image
Pure mechanical diagram showing a pipe fitting with a valve and connector (no text or symbols)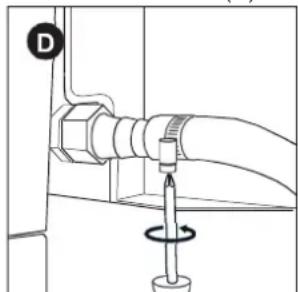
natural_image
Technical diagram of a mechanical assembly with a screw and rotating component (no text or symbols)4.3.2 A CoplAmiento B
natural_image
Technical diagram of a mechanical component with two threaded connectors and a labeled connection point (no text or symbols present)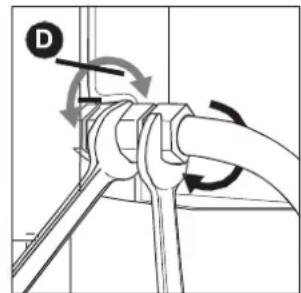
natural_image
Mechanical diagram showing a pipe connection with rotating arrows and a labeled point D (no text or symbols present)natural_image
Technical line drawing of a mechanical component with a circular housing and clamping tool (no text or symbols)natural_image
Technical line drawing of a mechanical device with a lever and base mount (no text or symbols)
natural_image
Line drawing of a mechanical device with a circular component and a handle (no text or symbols)4.5 Sustituir la bombona
natural_image
Line drawing of a hand holding a tool or device against a horizontal line, with no visible text or symbols.natural_image
Line drawing of a gas cylinder with a top cap and side outlet, showing two arrows indicating flow direction (no text or symbols)
text_image
Barbersack B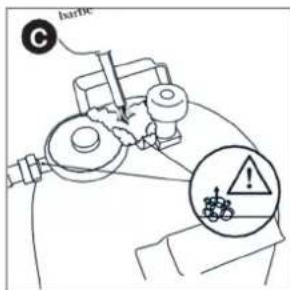
text_image
Isertic C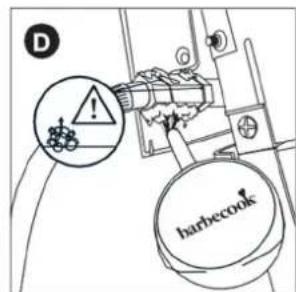
text_image
D ! barbecooknatural_image
Line drawing of a toaster oven with handles and a hand adjusting the tray (no text or symbols)natural_image
Pure diagram of a U-shaped pipe or duct with dotted lines indicating internal structure, no text or symbols present.natural_image
Diagram of a fish-shaped structure with internal components and no visible text or symbolsnatural_image
Technical line drawing of a toaster oven with cooling fans and a screwdriver (no text or labels)
natural_image
Technical line drawing of a portable toaster oven with ventilation ducts and control knobs (no text or symbols)text_image
Exploded view diagram of a device with numbered parts for identificationVICTOR 223.7020.000
| 1 | 2277920010 | |
| 2 | 2277920020 | |
| 3 | 2277920030 | |
| 4 | 2277920040 | |
| 5 | 2277920050 | |
| 6 | 2279900210 | |
| 7 | 2277920060 | |
| 8 | 2277920070 | |
| 9 | 2277920080 | |
| 10 | 2273002070 | |
| 11 | 2277920100 | |
| 12 | 2243002070 | |
| 13 | 2277920110 |
natural_image
Technical line drawing of a rectangular electronic device with internal components and mounting holes (no text or symbols)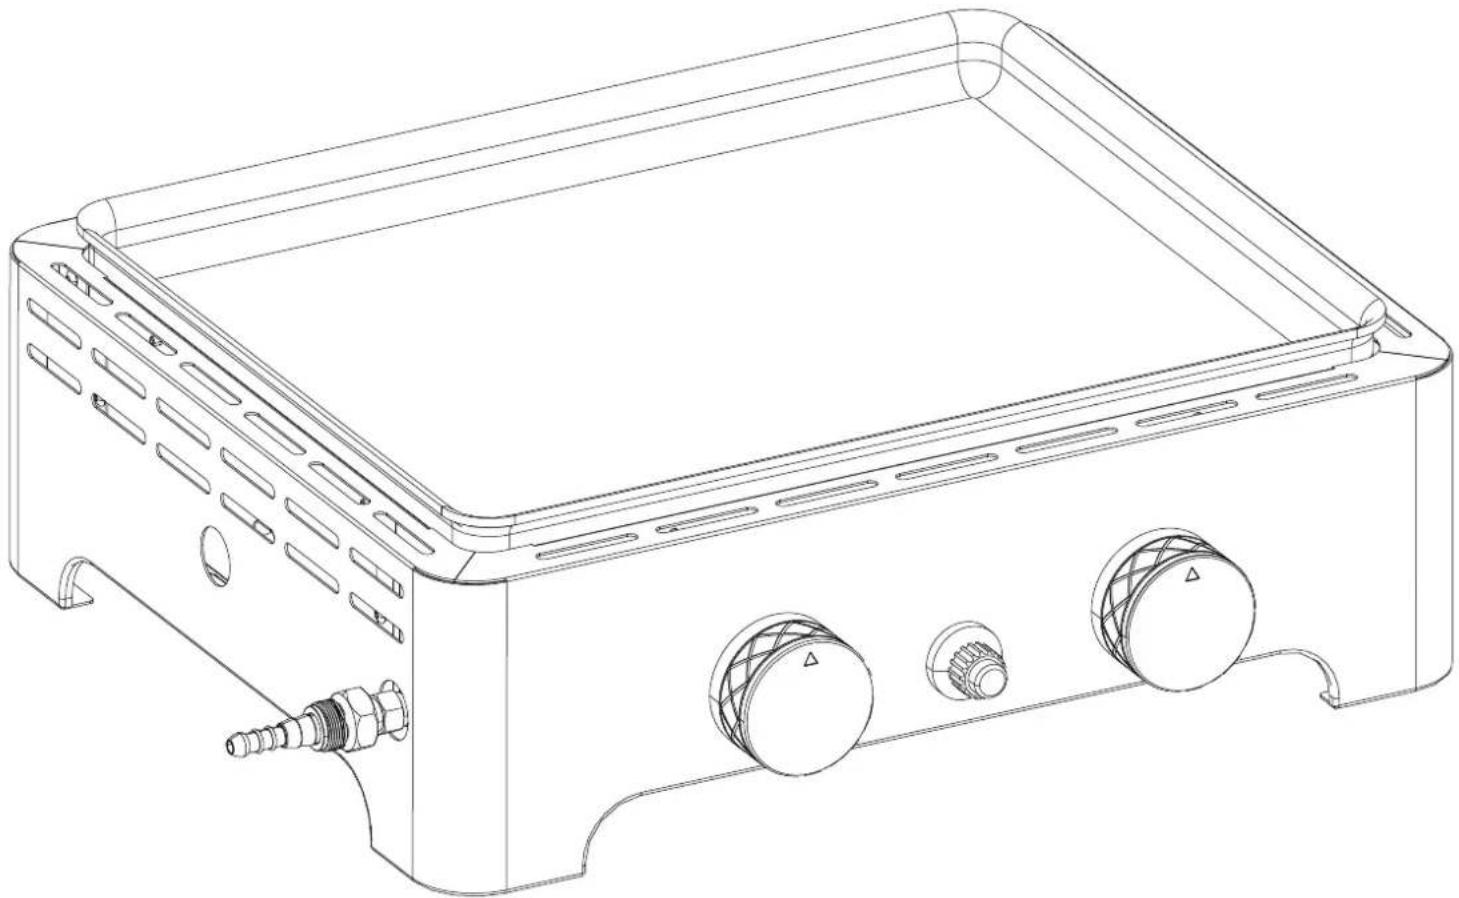
natural_image
Line drawing of a rectangular electronic device with ventilation slots and control knobs (no text or symbols)| A | B C | D E F G H | |||||||
| G30 G31 | |||||||||
| barboecook® | C-DE-HE-FI-DI-IT-LT-3L-30-SI-SI SK-20-HR-TX-50-2S-LU-MT | 28 30 nbar | process, butane or their mixtures | 1.3 4/4 (30) | 1.5 V battery (not included) | 2.6 kW | 189 g/h | 186 g/h | |
| HE-III-CY-CZ-ES-IR-6S-GIIE-IT-LT-LU-LV-PT-SI-SX | 28-30 nbar | butane | 1.3 + (28 30/37) | 2.6 kW | 189 g/h | 186 g/h | |||
| 37 nbar | propone | ||||||||
Insputer ho#themster - Ijecteur ho#ter principale - Injector main home - Injector Hauptnomer - Hiellone brusidstore espo - Ijecteur pera homla princal - Injector qualmador principa - Insprutingspumpon head gasordinnaren - Den store breenders dysolype - Studh p#tpelitman - Tryska hovnich ho#kli - Tryska bodenich ho#kvi
Type - Typ - Tipo - Trappi: 0.56 (28-30-37 mbo)
A: Mark - Marca - Marce - Brand - Mapes - Zuzika - Marke - Mipen - Marcs - Kultamark - Turbamericki - robra marka - Marca - Zeiklas - Pročtme - Marke - Marca - Marco - Marca - Zuzika - Zromka - Mlga
B: Model - Appliance model - Model des Gertle - Applancer model - Mogen na yousa - Model zanzani - Markers model - Modelo duwangj - Modelo de spanen - Sestre model - Leibner mali - model 1.50192 - A kostelik fipasa - Modelo apnescento - Pénirano modelo - Leibner modelo - Model - Model aizovania - Modelo do spanen - Modeli apnescento - Model zeideris - Model raprara - Aardimacumocel
C. Land van bestermung: Pays de destination - Landesverzeichnung - Country identifikation - Idienkapazopas na opvansa - Identificase zomé - Identifizionsland - Aluja automöhnem, identifikcider de pale - Rigibahre - Muzanumstius - Orzawa za Identificasi u - Sarmazasi onzig - Pausen - Identifizionpierne na Identifizion par latke - Oprimaatssandel - Identifizienja krajna - Identifiziecen da pale - Tava de identifizien - Identifiziossa krajny - Identifiziepena orzawa - Landesident bason
Dr. Gas dr.lk - Presson de gaz - Gascrucs - Gas Pressure - ra ngal ananarc. Tak plynu - gastryek. H micron oelice. La preslon del gas - gas rink - losca un peire - disk pline - Gasyrmies - cu y elagir negul saino - gluee specifentus - spaslyek - presuna gas - presocana del gas - presso de gaz - tak plynu - otisk pline - Gasryes
F: Type gas - Type de gaz - Gasyp - Sea Type - run mo - Druh phyu - gastype - Tímaz, gaspou - lipo de gas - quaal třílp - kassurýypal - vesta al ro - Oáz třípus - el.ju třípus - pícios třípus - gnootype - lipo de gaz - lipo di gas - lipo de glás - druh phyu - vesta plins - gnotyp
F. Gauzakogorii - Typi die gaz - Bauzakogorii - Bau categorii - Katsan prima na risa - Kategorii plyni - Gas kategorii - Kattajegorii yacJogi - Categorii de gaz - Ganellik - Kassukategorii - kategorija plma - Gazekogorii - Categorii gaz - Duy kategorija - Gaze kategorija - Gauzakogorii - Radizal gami - Tipo de gla - Categorii da gaz - Kategorii plyni - Kategorii plna - Gazakogorii
- Elektrode s encircling - Alimentation electricus - Strombusgangs - Electric supply - electrocience electricus - electric shock pump - membrane - Filosgammajein - napayj nijkpano pozumus - semi-nidro electricus - electric bar - electricohydro - electric nano rapajeja - nanoblastus - electric barbus - electricogaste - nanoblastus - aluminum bar ou energy electricus - aluminumize and electricus - alimentazione electricus - electricnolo nasciagie - osoba z elektride energio - osoba z electrico energio
H. Nominal hemogen - Capacitinominside - Nominal capacity - Nominal Kapacitil - Capacitinominside - Capacitid nominal - Capacitide nominal - Nominal kapacitol - Nominal ydole - Mitohent kapasitista.

Home & Garden
Industriplean
B - 8581 3067E1JK - Eenle Belgium
text_image
GRILL MASTER barbecookREGISTER NOW & GET ACCESS TO:

text_image
badfinesca MY CREAMS NAME: 2014 MY PRODUCTS / BANNEEBOOK SCDAY BLACK ACCESSORIES SPRING PARTS MANUALS BEEKQUINT• Online Product Manuals
• Personalised Grillspiration
• Product Tips & Tricks
• Barbecook Challenges
- Spare Parts Lists
...
WWW.BARBECOOK.COM
Barbecook® is a registered trade mark of SAEY Home & Garden N.V. Industrielaan 4, B-8501, Heule (Kortrijk) Belgium