
Minecraft Portal Dash - Board game RAVENSBURGER - Free user manual and instructions
Find the device manual for free Minecraft Portal Dash RAVENSBURGER in PDF.
| Product type | Board game |
| Brand | Ravensburger |
| Model | Minecraft Portal Dash |
| Number of players | 1 to 4 players |
| Recommended age | Ages 8 and up |
| Game duration | Approximately 30 minutes |
| Available languages | French, English, Dutch |
| Main features | Cooperative game, Nether exploration, monster combat, resource management, Piglin missions, final boss |
| Included components | 20 monsters, 4 character bases, 64 blocks, 8 boards, 48 hearts, 48 items, dice, player aids, mat, template |
| Care and cleaning | Clean with a dry cloth. Store in a dry, dust-free place. |
| Safety | Contains small parts that may pose a choking hazard. Not suitable for children under 3 years. |
| Spare parts and repairability | Game pieces are not available separately. In case of loss or damage, contact Ravensburger customer service. |
Frequently Asked Questions - Minecraft Portal Dash RAVENSBURGER
User questions about Minecraft Portal Dash RAVENSBURGER
0 question about this device. Answer the ones you know or ask your own.
Ask a new question about this device
Download the instructions for your Board game in PDF format for free! Find your manual Minecraft Portal Dash - RAVENSBURGER and take your electronic device back in hand. On this page are published all the documents necessary for the use of your device. Minecraft Portal Dash by RAVENSBURGER.
USER MANUAL Minecraft Portal Dash RAVENSBURGER
This cooperative board game features a system for ever-changing gameplay. Once you have familiarized yourselves with the rules, replay the game with new mobs, additional game board parts, and different end bosses to make the game more varied and increasingly challenging! Many rules refer to special tiles, mob abilities or exceptional situations. Look up those rules when they come up in the game. The rules in your language can be found on the following pages:
I. Before the first game 3
II. Game setup 3
III. Aim of the game 6
IV. How to play the game 6
V. The blocks die 6
VI. The mob die 7
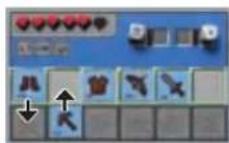
VII. Your actions 9
Boots 9
Armor 10
Swords and bows 10
Enchantments 11
Pickaxes 12
Block color abilities 12
Piglin tasks 13
Basic actions 13
VIII. End of turn & revealing
game board parts 14
IX. End boss 14
X. Additional levels 15
XI. Mob glossary 16
Instead of reading the rules, you can also watch the introduction video! To access it, just scan the following QR code:
FR
In Minecraft: Portal Dash you must escape from Minecraft's fiery Nether dimension. Use your equipment and the dwindling local resources wisely to face a fearsome horde of mobs. Will you be able to reach the Nether portal in time and find your way to safety together?
I. BEFORE THE FIRST GAME
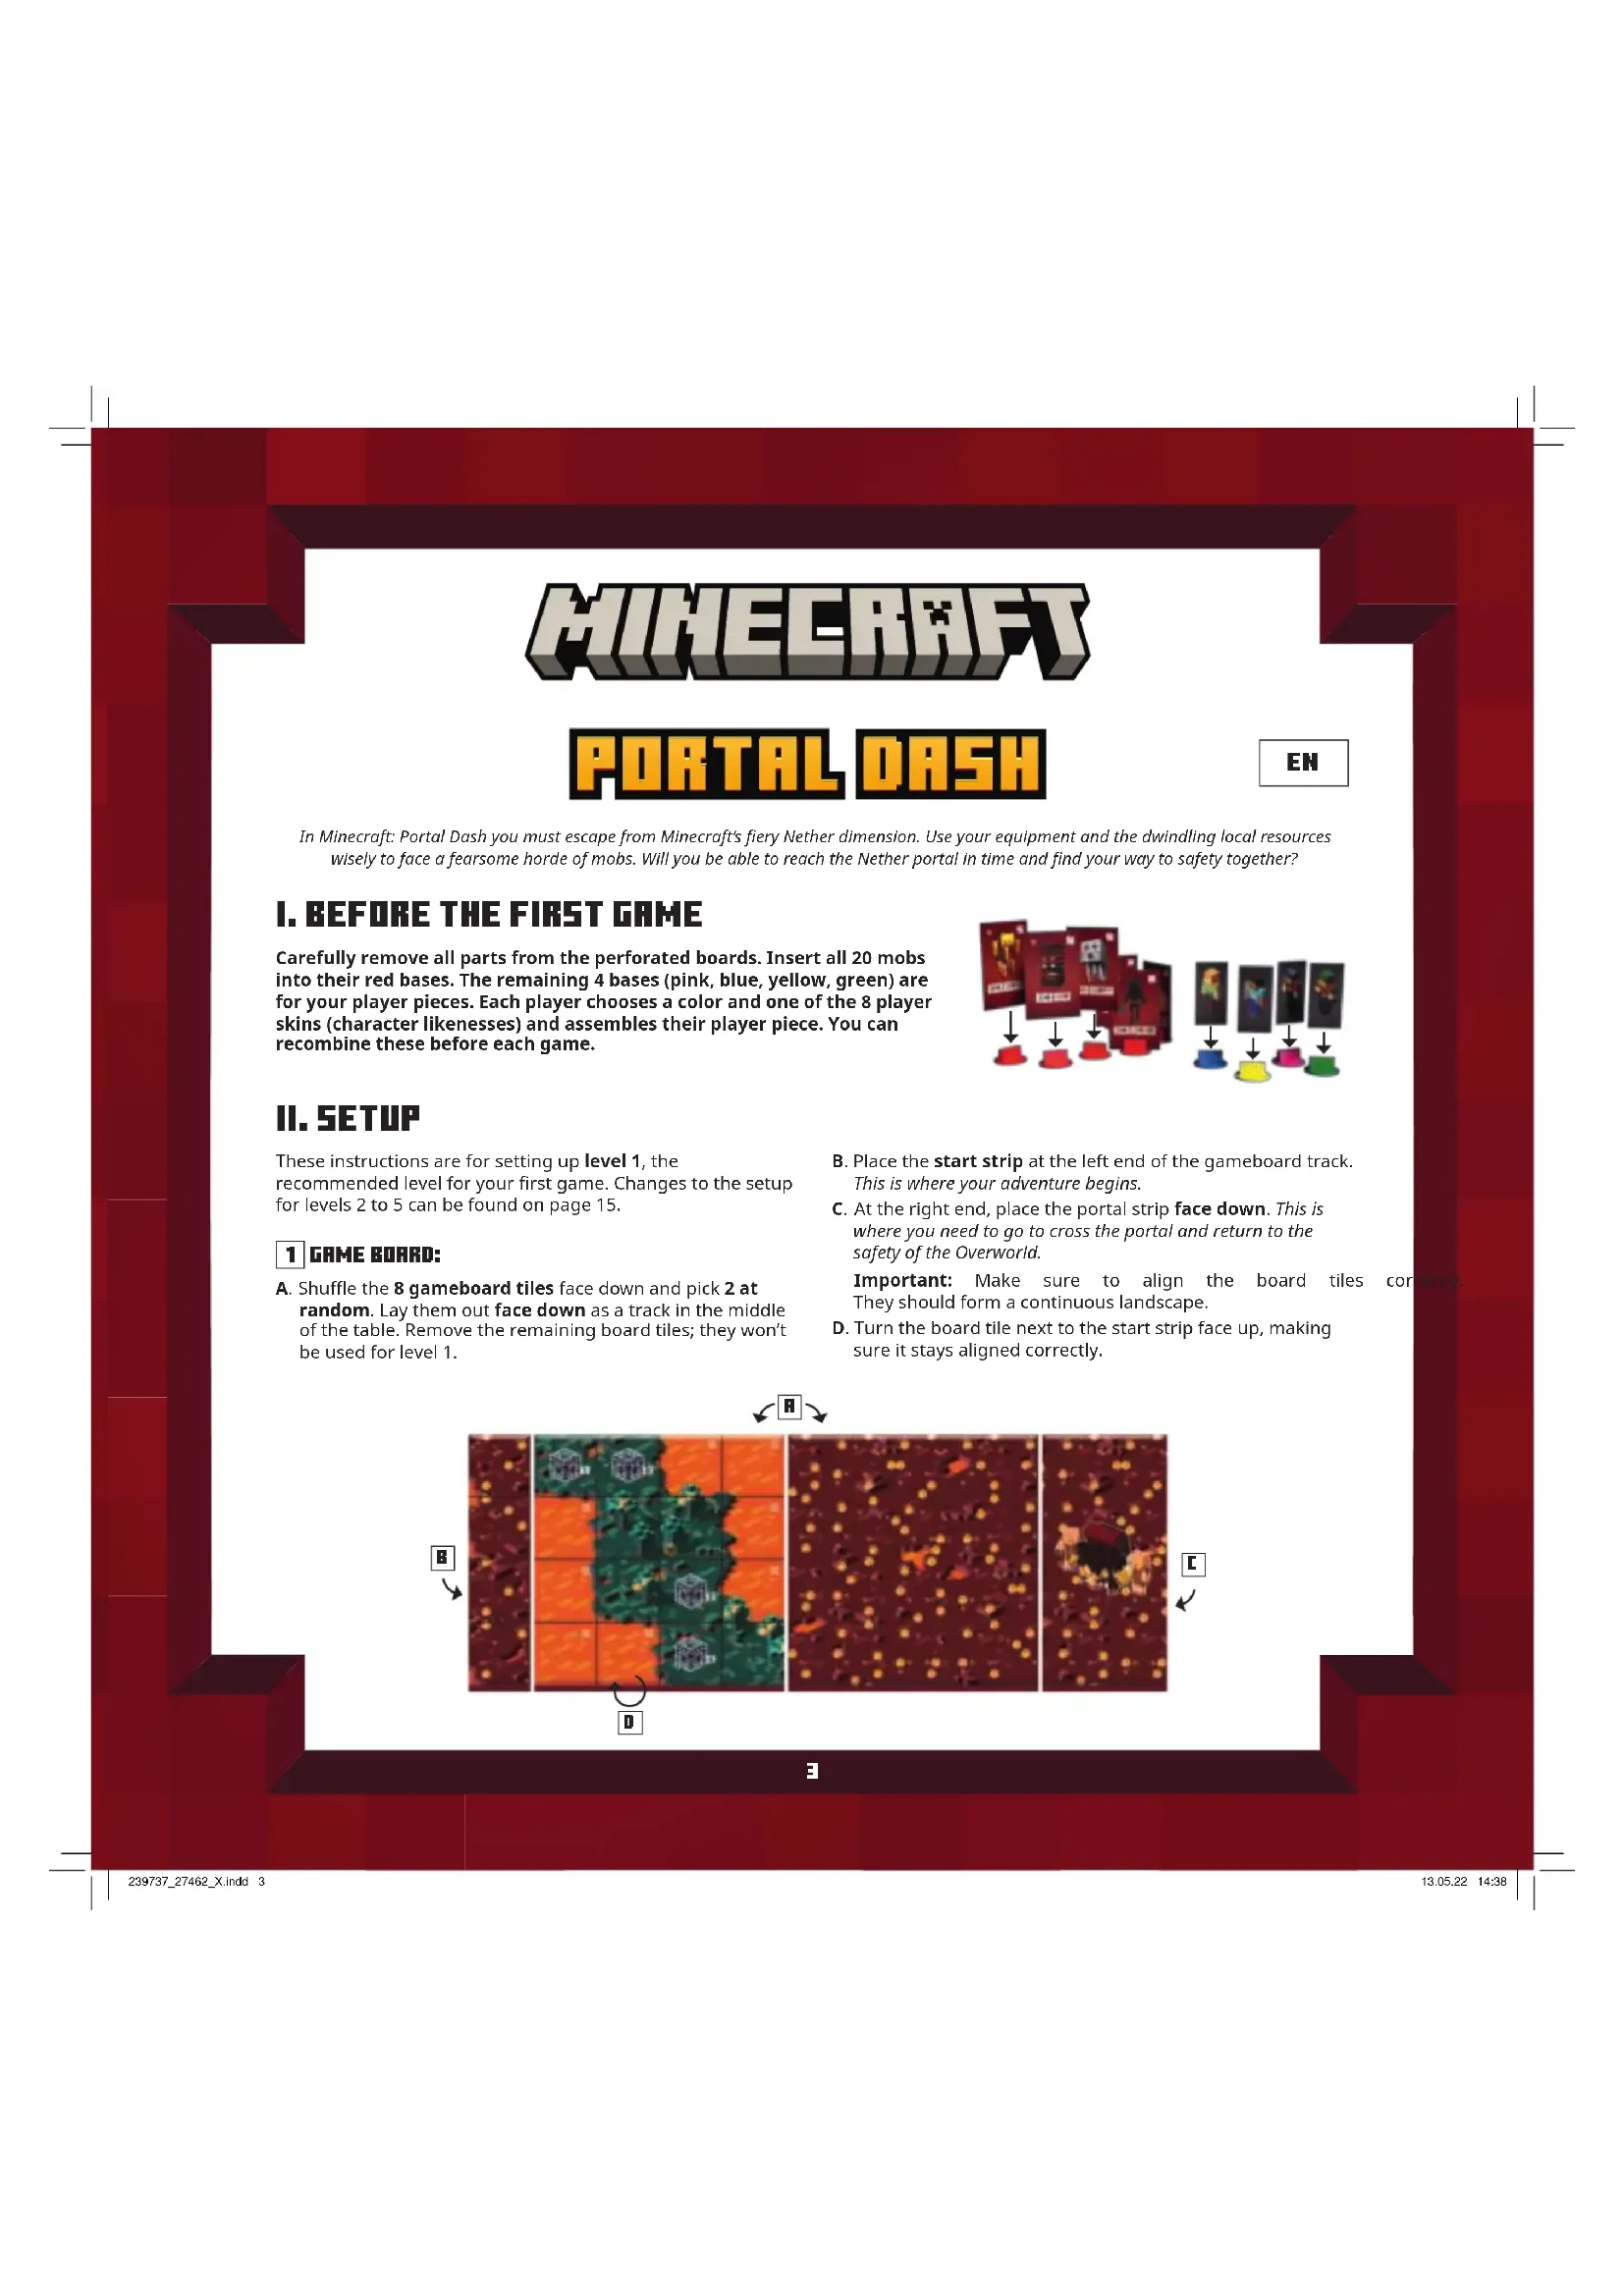
Carefully remove all parts from the perforated boards. Insert all 20 mobs into their red bases. The remaining 4 bases (pink, blue, yellow, green) are for your player pieces. Each player chooses a color and one of the 8 player skins (character likenesses) and assembles their player piece. You can recombine these before each game.
flowchart
graph TD
    A["Card Submission"] --> B{Decision}
    B -->|Yes| C["Red icon"]
    B -->|No| D["Blue icon"]
    C --> E["Final Confirmation"]
    D --> E
    style A fill:#f9f,stroke:#333
    style E fill:#bbf,stroke:#333
II. SETUP
These instructions are for setting up level 1, the recommended level for your first game. Changes to the setup for levels 2 to 5 can be found on page 15.
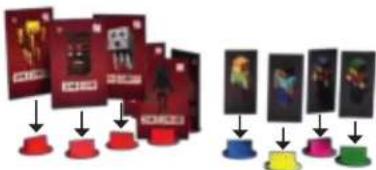
1 GAME BOARD:
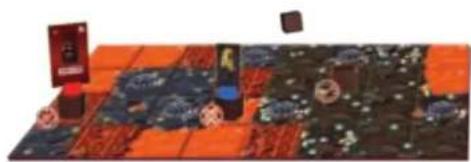
A. Shuffle the 8 gameboard tiles face down and pick 2 at random. Lay them out face down as a track in the middle of the table. Remove the remaining board tiles; they won't be used for level 1.
B. Place the start strip at the left end of the gameboard track. This is where your adventure begins.
C. At the right end, place the portal strip face down. This is where you need to go to cross the portal and return to the safety of the Overworld.
Important: Make sure to align the board tiles con They should form a continuous landscape.
D. Turn the board tile next to the start strip face up, making sure it stays aligned correctly.
3
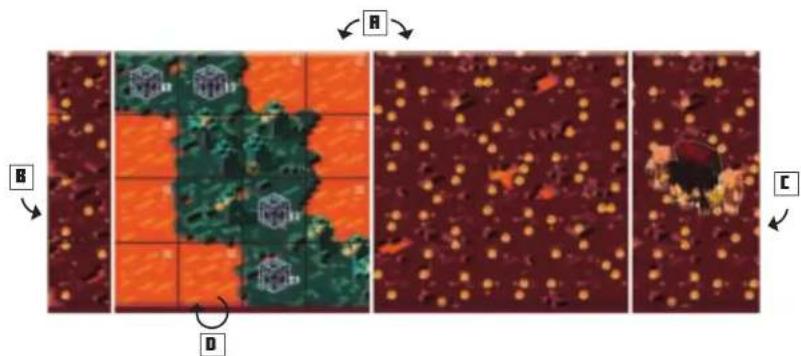
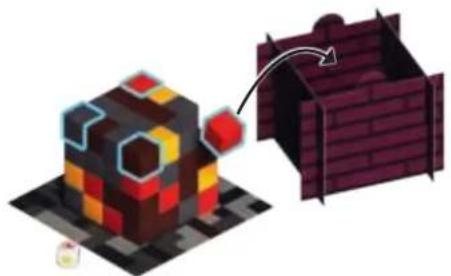
2 RESOURCE CUBE
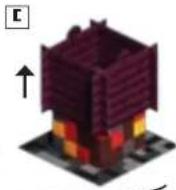
A. Place the block base next to the gameboard. Assemble the 4-part support structure and place it on the block base.
B. Fill it with the 64 wooden blocks (16 red, 16 gray, 12 gold, 12 brown, 8 black) in random order. Gently shake until the blocks form a big cube.
C. Remove the support structure by lifting up on the flaps. Put it next to the support cube. This is where you put used blocks.
D. Place the piglin board next to the blocks. Make sure it shows the face corresponding to the number of players ( or ). To complete the Nether portal and escape to safety, you must trade with the native pigtins that inhabit the Nether.
flowchart
graph TD
    A["Original Building A"] --> B["Building B"]
    B --> C["Building C"]
    C --> D["Final Product D"]
    style A fill:#f9f,stroke:#333
    style B fill:#ccf,stroke:#333
    style C fill:#cfc,stroke:#333
    style D fill:#fcc,stroke:#333
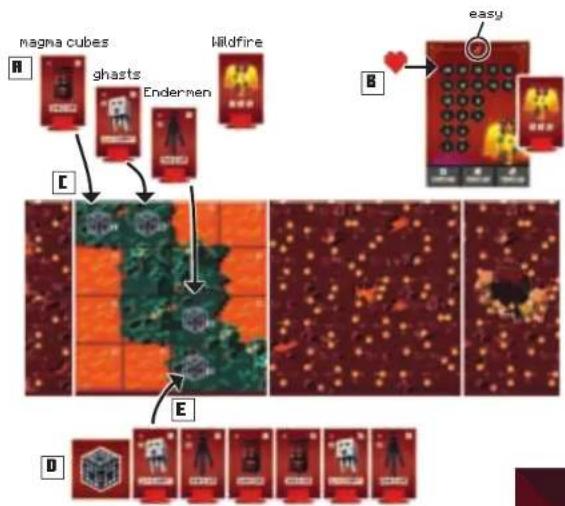
3 MOBS
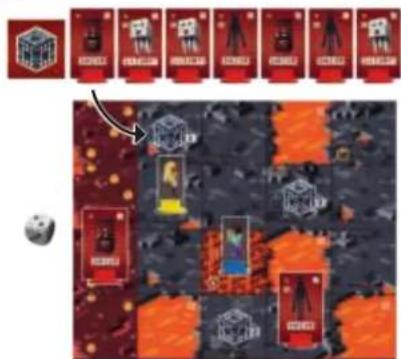
A. For your first game, you will play against the following mobs: 3 magma cubes, 3 ghasts, and 3 Endermen. You will also need The Wildfire, your end boss for this game. It is guarding the Nether portal; to win the game, you will have to defeat it. Set aside the other mobs (3 hoglins, 3 blazes, 3 wither skeletons, and The Ancient Hoglin). You won't need them in this game.
B. Place The Wildfire end boss board close to the portal strip. Make sure it shows the ✗ side (easy). Place The Wildfire mob on it. Place 1 heart token on space 20 of the end boss life tracker.
C. Choose a random magma cube mob and place it on mob spawner space 1 of the face-up gameboard tile. Place a random ghast on spawner space 2 and a random Enderman on spawner space 3.
D. Build a "queue" of the remaining magma cubes, ghasts, and endermen by lining them up in random order next to the gameboard. Put the mob spawner at one end of the line. It marks the beginning of the line. During the game, whenever a mob spawns, take it from the start of the line. Defeated mobs are added to the end of the line.
E. If your face-up gameboard part shows more than 3 spawner spaces, fill them with mobs from the line, starting with the first one in line.
flowchart
graph TD
    A["magma cubes"] --> B["ghasts"]
    B --> C["Endermen"]
    C --> D["Wildfire"]
    D --> E["easy"]
    style A fill:#f9f,stroke:#333
    style B fill:#ccf,stroke:#333
    style C fill:#cfc,stroke:#333
    style D fill:#fcc,stroke:#333
    style E fill:#cff,stroke:#333
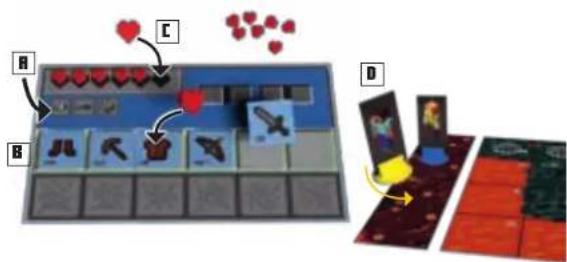
4 YOUR INVENTORY
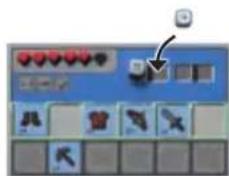
A. Each player takes 1 of the 4 inventory boards of their player color.
B. They also take the 5 item tiles of their player color. Place those items on 5 spaces in the top row of your inventory board in any order.
C. Put the pile of 48 heart tokens next to the gameboard in easy reach of all players. Each player takes 7 hearts. Put 6 heart tokens on the life tracker on your inventory board. Place the final heart token on the item that represents your leather chestplate.
D. Finally, take the player piece of your color (consisting of colored base and a player skin of your choice) and put it on the start strip.
Hint: Before starting the game, agree in which position on the start strip each player will start. Multiple players (or even all of you) can share the same start position space!
5 ITEMS
A. Take the 8 Netherite items (dark background) and lay them out face up.
B. Shuffle the remaining 40 items (white background) face down and put them in a stack. Leave space for a discard pile.
R


6 ADDITIONAL MATERIALS
A. Put the chest tokens in a pile next to the item stack. Place 1 chest token on the ● space on the face up part of the gameboard.
B. Lay out the player aid boards in your language ("Turn structure" and "Block color abilities"). Keep the 6 black combat dice within easy reach.
C. Decide who is going to play first. That player takes the 2 white dice.

III. AIM OF THE GAME
You play as a team—you win or lose the game together.
- You win the game if you successfully cross all game boards, turn the portal strip face up and defeat the end boss that awaits you there. To turn the portal strip face up, you must first finish the 3 piglin tasks shown on the piglin board.
The native piglins also mine blocks in the Nether. If you help them and fulfill their tasks, they will trade you obsidian, which you will need to activate the Nether portal. But you have to be quick—whenever a certain number of blocks has been depleted, one of the piglins will disappear. Complete their tasks as soon as you can!
- You lose the game if you cannot complete the piglin tasks in time. Task A must be completed before the top layer of the resource cube has been depleted. Task B must be completed before layer 2 has been depleted, and Task C must be completed before layer 3 has been depleted. More information can be found on page 13.
- You also lose if all 64 blocks from the resource cube have been depleted.
- You lose if any player removes the final heart token from their life tracker. Help and protect each other, and always keep an eye on your life totals!
IV. HOW TO PLAY
Take turns in clockwise order until you win or lose the game. The active player takes the 2 white dice. Each turn consists of the following steps, which are explained in more detail in the next section of the instructions:
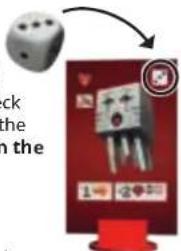
1 ROLL THE WHITE DICE AND CHECK THEIR RESULTS.
a. The blocks die (colors and "?") depletes 1 block of the rolled color from the resource cube.
b. The mob die (numbers 1 to 3) activates every mob of that number, or spawns new ones.
2 EXECUTE 2 ACTIONS. YOUR OPTIONS ARE:
a. Choose a basic action: pick one of three different basic actions to execute (you can execute the same action twice for your two actions).
b. Choose to use your items: Each item allows you to execute a powerful action. Executing the action damages the item, and it must be repaired with another action before it can be used again. Later in the game, you will find new, even more powerful items. Instead of repairing a damaged item, you can replace it.
3 AFTER EXECUTING YOUR 2 ACTIONS, PASS THE 2 WHITE DICE TO THE PERSON TO YOUR LEFT. THEY BECOME THE ACTIVE PLAYER.
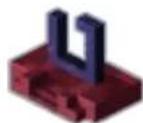
V. THE BLOCKS DIE
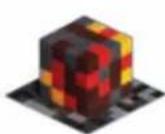
At the beginning of your turn, roll the 2 white dice. First, check the result of the blocks die (colors and "?"). Each turn, you must mine (remove) 1 block of the corresponding color from the resource cube. Discard it into the support structure.
natural_image
Illustration of a pixelated 3D cube with a red-and-yellow top and a dark brick wall structure, no text or symbols present.The following rules apply:
- The block must be exposed. Blocks are exposed if their top side and at least two other sides are visible. In the first turn, only the corner blocks of the top layer are exposed. The image above has these blocks highlighted with a blue border.
- The block you discard must be of the rolled color.
-
You must choose a block of that color from the topmost layer with at least one exposed block of that color. If there are multiple exposed blocks of that color in that layer, you choose one of them.
-
Special case "?: If you roll the wild card ", choose any exposed block of any color from the top layer and mine it.
If there is no block of the rolled color exposed, you are lucky! You don't have to remove a block this turn. However, if you roll a “?,” you must always remove a block.
VI. THE MOB DIE
Check the result of the mob die (numbers 1 to 3). The mob die activates mobs on the gameboard or spawns new ones. First, check if there are mobs of the rolled number on the gameboard. The mob number is printed in the top right corner of the mob.
Activate all mobs of that number.
The following rules apply to mob activation:
- One after the other, activate each mob of the rolled number. You may choose the order in which you activate them.
- For each activated mob, execute all the action printed underneath the mob likeness from left to right. Most of the mobs will move closer, and then attack if they are close enough.
- Important: Specific rules for each mob type appear in the Mob Glossary on page 1.
Movement
Mobs can move the number of spaces indicated by the number next to the →. They always move horizontally or vertically from space to space, never diagonally. Mobs cannot move onto lava spaces (marked with an ×), but they ignore all other obstacles. Exception: Certain mobs like Ghasts and Wildfire can fly. Flying allows these mobs to cross lava spaces. Their movement is indicated by the → icon color.
Mobs block the spaces they occupy. Mobs cannot move onto spaces blocked by other mobs or occupied by at least one player piece. Mobs attack from an adjacent space.
Target search
Mobs always travel the shortest path to attack one of your team. They always move toward the player that is closest to them. Count the number of spaces between the mob and each player piece to determine the closest target. If the distance is the same to multiple player pieces, the active player decides which player piece will be the targeted by that mob.
Move the activated mob along the shortest path from one space to the next, until:
- It has used up all its available steps (as indicated by the number next to the icon) or
- It is in attack range of a player piece.
The mob doesn't have to travel in a straight path to reach its target. Because most mobs cannot move onto lava spaces or occupied spaces, they have to move around them.
Attack range
Most mobs can only attack from the space adjacent to a player piece.
However, ghasts, blazes, and The Wildfire have ranged attacks. You can identify mobs with a ranged attack by the 📄 icon printed on the mob (or end boss board). The number next to the 📄 indicates the distance (number of spaces) they can attack you from. Count the number of spaces between the mob and the target as you would for movement, vertically and horizontally. An attack doesn't have to follow a straight path but can change direction. If a player piece is close enough, it is within attack range. The mob stops on their current space.
Attack
If at least one player piece is in attack range of a mob, the mob attacks and deals damage. The following rules apply:
- A mob attack only deals damage to a single player piece.
-
If multiple player pieces are in attack range (for example, if they are occupying the same space), the active player chooses which player piece is dealt damage.
-
The negative number next to the mob indicates the amount of damage it deals. The attacked player removes that many hearts from their life tracker. Important: Remove hearts from your armor first (items with heart icons). If there are no armor hearts left, begin removing hearts from your life tracker.
For each mob of the rolled number, follow the above steps for targeting, movement, range check, and attack until you have activated each mob. This might result in the same player being attacked multiple times during the same turn.
Remember: Once a player removes their final heart, you lose the game! Take care to avoid accidentally getting into dangerous situations.
Example 1: Alex rolls a 3 and activates the ghast and the magma cube. The magma cube has movement 2 → and moves toward Steve, because he is closer than Alex. After moving 2 spaces, the magma cube is adjacent to Steve. It deals 2 damage to Steve (-2 ♥), and Steve loses 2 hearts. The ghast is already within attack range of Alex (2 ♥), so it stays put. It deals 2 damage to Alex (-2 ♥) The Enderman has die number 2 and is not activated.
flowchart
graph TD
    A["Player 1"] --> B["Player 2"]
    B --> C["Player 3"]
    C --> D["Player 4"]
    D --> E["Player 5"]
    E --> F["Player 6"]
    F --> G["Player 7"]
    G --> H["Player 8"]
    H --> I["Player 9"]
    I --> J["Player 10"]
    style A fill:#f9f,stroke:#333
    style B fill:#f9f,stroke:#333
    style C fill:#f9f,stroke:#333
    style D fill:#f9f,stroke:#333
    style E fill:#f9f,stroke:#333
    style F fill:#f9f,stroke:#333
    style G fill:#f9f,stroke:#333
    style H fill:#f9f,stroke:#333
    style I fill:#f9f,stroke:#333
    style J fill:#f9f,stroke:#333
Example 2: Steve rolls a 1 and activates all 3 mobs on the board. Alex and Steve agree to activate the Enderman first. It is unable to move, because it is blocked by lava and occupied spaces. Next, they activate the magma cube. It moves 1 space and is now adjacent to both Alex and Steve. It attacks, and Alex and Steve choose which player will be dealt 2 damage by the magma cube. Note: Damage cannot be divided between players! Finally, the ghast moves, but it is not within attack range of either player. It cannot attack.
Mob spawning
If the rolled number does not match a mob in play, a new mob spawns (appears) on the gameboard.
Take the mob from the front of the line and put it on an unoccupied spawner space ( ) on the board. If there are multiple unoccupied spawner spaces, place it on the one closest to the active player's piece.
If there are no unoccupied spawner spaces, you are lucky! No new mob is spawned. The line remains unchanged.
Important: The newly spawned mob is not activated. Each turn, one or more mobs are activated, or a new mob is spawned, but never both.
Example 3: Alex rolls a 2. There is no mob of that number on the board. Alex takes the front mob from the line and places it on the unoccupied spawner space closest to their player piece. Nothing else happens.
VII. YOUR ACTIONS
After you've rolled the white dice and resolved the associated effects, you execute your actions. First, place the white dice on your inventory board on the designated spaces.
Next, choose and execute 2 actions. You can choose either basic actions or to use your items.
Some actions have multiple steps. The white dice will help you keep track: Before you choose and execute your first action, push one of the white dice from the left space to the right. Then, complete the execution of that action. When you're finished, push the second white die to the right and execute your second action.
Items
Your items let you execute powerful actions. Each item can only be used once before it becomes damaged. Damaged items are moved to the bottom inventory row. Items in the bottom row cannot be activated to execute an action. A damaged item must be repaired first, then moved by items (see Option A for blocks, page
During the game, you will occasionally find new items by defeating a mob, mining a golden block, or opening a treasure chest. Whenever you find an item:
- Draw the top 2 item tiles from the item stack and reveal them. Choose one to keep, and discard the other face up on the discard pile.
- Place the new item in a vacant slot in the top (active) row of your inventory. Your inventory has space for up to 6 items.
- If you already own 6 items, you must remove one in order to keep the new item. Choose one of your old items and discard it. Place the new item in that slot in the active row of your inventory. If you would rather keep all your old items, discard the new one.
Important:
- You may replace any item with any other item—you don't have to replace a sword with another sword! You may own multiple swords, or none.
- Always put the new item in the active row, even if you're replacing a damaged item.
- If you replace one of the items you started the game with (the same color as your player piece), remove it from the game completely rather than putting it on the discard pile: if you need to shuffle the discard pile to create a new item stack during the game, you do not want to include the less-powerful starting items.
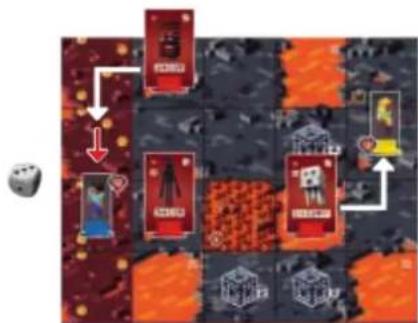
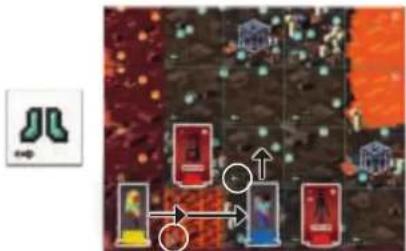
Boots: Movement
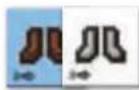
Your boots allow you to move on the board. The number next to the → indicates how many spaces your player piece can be moved with this action. You may move up to that number of spaces.
You may only move vertically or horizontally, never diagonally. You may not move onto a space with a mob or a lava space (marked ✗).
You may move onto a space occupied by other players. Hint: Sometimes, having multiple players occupy the same space offers benefits. For example, when you are attacked by a mob, this lets you choose which player will take the damage.
Special spaces
OBSTACLES
- Lava spaces (marked ×) can never be entered or passed.
- You can move onto a magma space (marked 📄), but when doing so you will take 1 damage, losing 1 heart. Important: Only entering the space deals damage; you do not continue to take damage when you rest there or when you leave it.
- You must have 2 steps available to enter soul sand spaces (marked ← 2).
Example: Alex uses their diamond boots to move. First, they enter the magma space (1 step). They take 1 damage. Then they move onto the space occupied by Steve (1 step). Finally, they move onto the soul sand space (2 steps). They have used up all 4 steps of their diamond boots.
flowchart
graph TD
    A["Player 1"] --> B["Player 2"]
    B --> C["Player 3"]
    C --> D["Player 4"]
    D --> E["Player 5"]
    E --> F["Player 6"]
    F --> G["Player 7"]
    G --> H["Player 8"]
    H --> I["Player 9"]
    I --> J["Player 10"]
    style A fill:#f9f,stroke:#333
    style B fill:#f9f,stroke:#333
    style C fill:#f9f,stroke:#333
    style D fill:#f9f,stroke:#333
    style E fill:#f9f,stroke:#333
    style F fill:#f9f,stroke:#333
    style G fill:#f9f,stroke:#333
    style H fill:#f9f,stroke:#333
    style I fill:#f9f,stroke:#333
    style J fill:#f9f,stroke:#333

NETHERITE ROOTS allow you to enter magma and soul sand spaces (not lava spaces) as if they were regular spaces. You won't take damage, and you use only 1 step.
TREASURE CHESTS

At the end of your movement action, if you stop on a space with a chest token, you may open that chest. Remove the token from the board and return it to the supply.
Each player immediately receives a new item. Each of you draws 2 item tiles from the top of the item stack. Reveal your 2 items. Choose one you want to keep. Discard the other one. Put the new item in the active row of your inventory. If you already own 6 items, you must discard one (see Items, page 9).
Armor: Additional life points
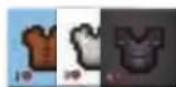
Pieces of armor are passive items that provide you with additional life points so you can survive more damage. They don't let you execute an action. The number
next to the ♥ indicates how many additional heart tokens can be placed on the piece of armor. Whenever you receive new armor, put it into the active item row and immediately place the maximum allowed number of hearts on the item.
Whenever you take damage—either because of stepping on magma, or because of a mob attack—you must first remove heart tokens from your armor, until none are left. Then continue by removing hearts from your life tracker. If you own multiple pieces of armor, you choose the order in which you remove hearts from those items. Whenever a piece of armor is “empty,” (it has no more heart tokens on it), move it to the bottom inventory row. The armor is now damaged. When you repair it, move it to the active row and replenish its maximum allowed number of hearts.
You can repair a piece of armor that is partially damaged. If you repair a piece of armor that's in the active row, just fill it up with hearts.

LEGGINGS are a special combination of boots and armor. When you find leggings, you decide whether you want to use them for movement or as a piece of armor. This is indicated by the
or the don, whichever is right side up. If you choose , put the indicated number of hearts on it. Important: Each time you repair leggings, you choose again whether to use them for movement or armor. Turn the tile so the correct symbol is right side up when you place it in the active row.
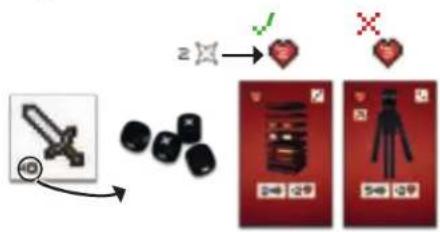
Swords and bows: Fight mobs
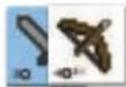
Swords and bows let you fight mobs. The number next to the ✗ indicates how many black combat dice you may roll when fighting a mob.
You need to be in range to attack your target:
- A sword allows you to attack a mob on a space adjacent to your player piece.
-
A bow allows you to attack from a distance. The attack range of a bow is indicated by the number next to the (usually 3 spaces). Count the spaces, starting from any space adjacent to your player piece, to the space occupied by the mob. (Your shot travels only vertically and horizontally, changing direction if necessary.)
-
First, choose the mob you want to attack and push the weapon you are fighting with into the bottom inventory row.
-
Next, roll a number of black combat dice equal to the number next to the ✗ on your weapon. Count the number of hits ( ✗ ).
To defeat a mob, you must roll at least as many hits as the mob's life total (the number printed in the ♥ on the mob).
flowchart
graph TD
    A["Action"] --> B["Key"]
    B --> C{Heart Icon}
    C -->|Yes| D["Product Image"]
    C -->|No| E["OK"]
If you rolled fewer hits, tough luck! The mob survived the fight and remains on the board. Your weapon is damaged, but there is no other penalty. You may try again with a later action.
If you rolled a number of hits equal to the mob's life total or more, you have defeated the mob! Remove it from the board and put it at the end of the mob line. As a reward, you immediately get a new item. Draw the top 2 item tiles from the stack and keep 1, placing the other tile in the discard pile.
Important:
- Mobs heal after each fight! If you don't defeat a mob with a single action, you must try again later. However, see page 14 for defeating the end boss.
- Some mobs are immune against certain attacks. For example, ghasts fly, so you cannot reach them with your sword (✗). Endermen cannot be attacked with bows (✗)

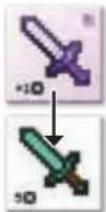
If you are fighting with a NETHERITE SWORD, you may reroll any number of combat dice one time. First, roll all 6 combat dice. Choose the ones you want to reroll to get a better result. Only count the total number of hits after the second roll.
Enchantments: Item improvements

- tiles are enchantments.
When you reveal an enchantment, you may only keep it if you own at least one item of the corresponding type. If you do, choose one item to be
The item's action is buffed (improved) by the enchantment. Whenever you use or repair an enchanted item, the enchantment stays attached.
Important: When you enchant a damaged item, it is immediately repaired. Put it in the active row of your inventory.
The entchantments

This enchantment can only be attached to a sword (any material). Whenever you attack with this sword, roll an additional combat die. If it enchants a Netherite sword, roll all 6 combat dice, then roll one die again for a seventh die roll result.

This is also a sword enchantment. Whenever you fight with this enchanted sword, you may reroll any number of combat dice one time. Only count the total hits after you have rerolled. An enchanted Netherite let you reroll twice.

This enchantment can only be attached to a bow. Whenever you attack with the enchanted bow, roll 1 additional combat die. In addition, the attack range of the enchanted bow is increased by 1.

This enchantment can only enchant boots (any material). Whenever you move with the enchanted boots, you may move an additional 2 spaces.

This is also a boots enchantment. The enchanted boots allow you to move onto magma and soul sand spaces (not lava) as if they were regular spaces. You don't take damage, and you only use 1 step.
Pickaxes: Mine blocks
The pickaxe allows you to mine blocks from the resource cube. The number next to the 📋 indicates the maximum number of blocks you may mine. It's okay to mine fewer than the maximum blocks.
To mine a block, the block must be exposed (the top and at least two sides visible), but you can mine it from any layer.
After mining each block, put it next to the resource cube. When you're finished mining, you must immediately use the blocks. You may not store them for a later action or a later turn! Choose either Option A or Option B to use each block.
Option A for using blocks: Block color abilities
Each block color is assigned an ability. When you mine one or more blocks, you may immediately activate its color ability. After resolving its ability, that block is used up. Discard it into the support structure.
RED BLOCKS: HEALING
When you activate a red block, choose any player (yourself or another player). That player immediately replenishes their life tracker.
GRAY BLOCKS: REPAIR
When you activate a gray block, choose any player (yourself or another player). That player immediately repairs all their items. They move all their items from the bottom inventory row to the active row and replenish all hearts on their armor.
YELLOW BLOCKS: NEW ITEMS
When you use a yellow block, choose any player (yourself or another player). That player immediately receives a new item. They draw the top 2 items from the stack, keep one and discard the other.


BLACK BLOCKS: NETHERITE ITEMS
When you use a black block, choose 1 available face-up Netherite item from the item supply. Then carefully take the top 5 item tiles from the item stack without revealing them. Shuffle them together with the Netherite item, face down. Then replace the 6 item tiles face down on the item stack.
The player who draws the Netherite item decides if they want to keep it or discard it. If they choose to discard it, put it on the regular item discard pile. If the discard pile is shuffled into a new item stack, the Netherite item is already "unlocked," and you don't have to use a black block to access that item.
Netherite items are very powerful; don't underestimate them! By shuffling them into the top 5 items, you ensure that one of the next three players who find an item will get it.
BROWN BLOCKS: COVER AN OBSTACLE
These special blocks are not discarded after use. Instead, you place them directly on the gameboard. First, choose any unoccupied obstacle space (lava, magma, or soul sand). The space cannot be occupied by a mob or player piece. Place the block in the center of the obstacle space, turning it into a regular space. It can be moved onto, does not deal any damage, and uses only 1 step. When you move a piece onto a covered space, place it directly on the brown block.
natural_image
Illustration of a colorful, patterned surface with scattered objects and no visible text or symbolsImportant: When you cover a lava space, mobs will also be able to move onto that space if it's along the shortest route.
The SPECIAL NETHERITE and DIAMOND PICKAXES let you reuse used-up blocks. When you activate either one of these items, instead of mining a block from
the resource cube, close your eyes and choose a number of discarded blocks from the support structure equal to the number next to the ☐. The diamond pickaxe allows you to mine up to 2 additional blocks from the support structure. All mined blocks must be used immediately—either for their ability or for a piglin task.
Option B for using blocks: Piglin tasks
To escape from the Nether and win the game, you will need obsidian. Piglins offer obsidian for trade, but in exchange, they need your help. They have three tasks for you to complete. Each requires you to deliver a certain number of blocks.

The piglin board shows the 3 tasks: A, B, and C. You must complete each task before the first (task A), second (task B), and third (task C) layers of the resource cube are empty. For example, before the top layer of the resource cube is empty, you must have put all the blocks you need for task A
on the piglin board. Otherwise, you lose the game.
Whenever you mine a block, instead of activating its ability, you may put it on the piglin board. You may put the block on any task slot. For example, you can start with task C before finishing (or even beginning) tasks A and B.

flowchart
graph TD
    A["Player at top"] --> B["Player at bottom"]
    B --> C{Action}
    C -->|Red Arrow| D["Player at bottom"]
    C -->|Green Arrow| E["Player at top"]
    E --> F["Player at bottom"]
    style A fill:#f9f,stroke:#333
    style F fill:#bbf,stroke:#333
There is only one rule for placing blocks on the piglin board: Each column on the board must consist of blocks of the same color. The first block you place in each column determines the color of the rest of the blocks in that column.
"Minecraft: Portal Dash" is easier with a smaller number of players, which is why pigtins demand more blocks in exchange. The two sides of the piglin board show different tasks, but they work the same.
Basic actions
During your turn, instead of using (and damaging) one of your items, you may execute a basic action. You may execute the same basic action twice during the same turn.

Mine 1 block from the resource cube. Follow the standard rules for mining (see page 12). Use the block immediately.

Move your player piece 1 step. Follow the standard rules for movement (see page 9). Note that you cannot move onto soul sand with just 1 available step.

Repair 1 of your items. While the gray block ability allows you to repair any player's items, this action only repairs 1 item in your own inventory. Push one of your damaged items back into the active row of your
inventory or replenish one of your pieces of armor. If this is your first action in this turn, you may use the repaired item for your second action.
VIII. END OF THE TURN
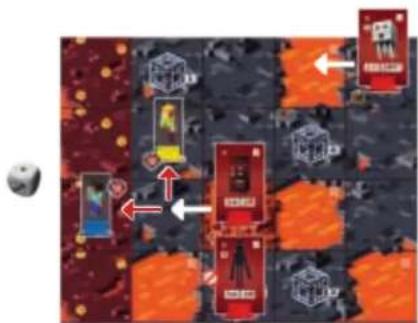
After executing your 2 actions, pass the two white dice to the player on your left. Before their turn begins, check to see if you can reveal a new gameboard part.
REVEALING GAMEBOARD PARTS
If any of your player pieces occupy a space next to a face-down gameboard part, decide together if you want to reveal that board part before the next turn begins. Consider carefully! Who knows what dangers lurk in the unexplored parts of the Nether?
If you decide to reveal the next part of the Nether, follow these steps:
- Turn the hidden part face up. Make sure it is aligned correctly.
- Place a chest token from the supply on the chest space (☐) of the newly revealed part.
- Fill every spawner space of the newly revealed part with mobs from the line. Start with the front mob and put it on the spawner space with the lowest number, and so on.
IX. END BOSS
Once you have revealed the portal strip, you must defeat the end boss to win the game. Fight it as you would any other mob. However, because the end boss has lots of life (see end boss board), you don't have to defeat it in a single action. Whenever you deal damage to the end boss, move the heart token on the end boss board that many spaces closer to 0.
When the life total of the end boss is 0 or lower, the path through the Nether portal is free! You have won the game.
Important: No matter what number is rolled on the mob die, the end boss mob will become activated and attack you every turn. If there are other mobs of the rolled number, those will also become activated. However, no new mobs will be spawned.
The end boss attacks in different ways, depending on the rolled number. Follow the corresponding icons on the end boss board, and see The Wildfire and The Ancient Hoglin in the Mob Glossary, page 17.
PORTAL STRIP
To reveal the portal strip, follow the same steps as above. However, you may only reveal the portal strip after completing all 3 piglin tasks! The piglins printed on the back of the board serve as a reminder.
When you turn the portal strip face up, immediately put the end boss on the space with the portal.
Now it's the next player's turn. Start the turn as usual by rolling the white dice. If you have revealed a new region of the Nether, that will surely activate new mobs...
Then, execute your 2 actions and finish your turn by passing the white dice to your left, and so on.
Take turns until your team wins or loses (see "Aim of the game" on page 6). When you do, the game ends.
Remember: You lose the game if you fail to complete the piglin tasks in time, or there are no blocks left in the resource cube, or a player loses the final heart token of their life tracker. You win the game if you complete all piglin tasks, reveal the portal strip, and defeat the end boss.
natural_image
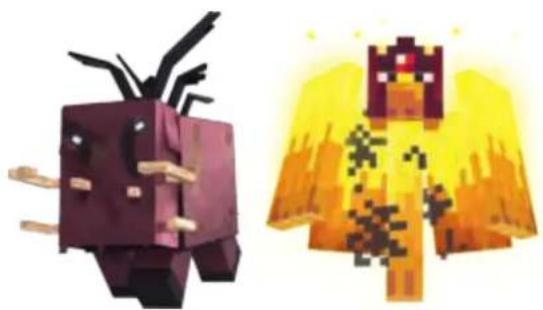
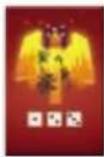
Two pixel-art 3D-rendered objects: a purple mechanical device with black protrusions and a yellow wing-like figure (no text or symbols)X. ADDITIONAL LEVELS
Once you have won the game on level 1, increase the difficulty level for your next game! The game rules are the same. Only the board setup and the game materials change.
Level 2 Ad

12 hoglins at random to the mobs waiting in line. Use The Ancient Hoglin as the end boss. Use the "easy" side of the end boss board. The rest of the game setup is unchanged.
Level 3 Ad
3 hoglins and 2 blazes at random to the mob line. Choose your preferred end boss. Use its "easy" mode. The rest of the game setup is unchanged.
Level 4 Ad

I a third gameboard part to the track, making sure it is aligned correctly. Use The Wildfire as the end boss in "hard" mode. The rest of the game setup is unchanged from level 1 (you will face only magma cubes, ghasts, and endermen).
Level 5 Ad

I all remaining mobs to the line (hoglins, blazes, and wither skeletons). Use The Ancient Hoglin as the end boss in "hard" mode. The rest of the game setup is unchanged from level 1 (you are using 2 parts for the gameboard).
The level number (difficulty) is determined by the game components used. You can make the game more varied and more difficult by designing your own levels. This is how it works:
- Gameboard: Use at least 2 gameboard parts, plus start and portal strips (base level 0). Each additional gameboard part increases the level by 2.
- Mob types: Always use magma cubes, ghasts, and endermen (base level 0). Each additional mob type (hoglins, blazes, wither skeletons) that you add increases the level by 1.
- End boss: The Wildfire and The Ancient Hoglin are equally powerful. Each game, choose one of them to guard the Nether portal. If you use the boss in "easy" mode, the level is increased by 1. If you use the boss in "hard" mode, the difficulty level is increased by 2.
Examples: A game with 3 gameboard parts (+2), hoglins and blazes (+2), as well as The Wildfire in "hard" mode (+2) equals difficulty level 6. A game with 4 gameboard parts (+4), hoglins only (+1) and an end boss in "easy" mode also equals difficulty level 6.
Of course, you may break the above rules to create extra wonky or ludicrously hard scenarios. For example, how about starting with different items? Or playing without magma cubes? Or fighting both end bosses? Go wild and share your best ideas with your friends!
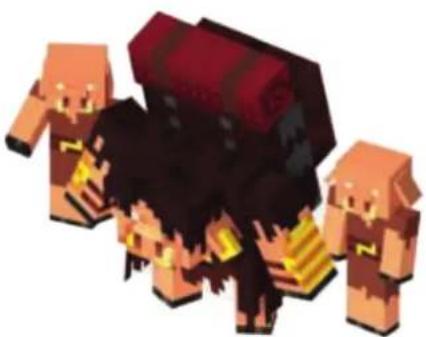
natural_image
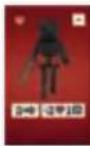
Pixel art illustration of three anthropomorphic figures with a large red object, no text or symbols presentXI. MOB GLOSSARY
Magma cubes
These weak mobs have 2 life. When they are activated, they move up to 2 spaces and attack an adjacent player for 2 damage.
Ghasts
These flying mobs have 2 life. When they are activated, they move 1 space. They can move onto lava spaces. If they are within attack range (2 spaces), they attack that player for 2 damage.

Important: Ghasts cannot be fought with a sword, they are too high up in the air!
Endermen
The tall Endermen have 3 life. When they are activated, they move up to 5 spaces and attack an adjacent player for 2 damage.

Important: Endermen cannot be fought with a bow; they are too nimble and will dodge your arrows!
Hoglins
Hoglins are tough. They have 4 life. When they are activated, they move up to 3 spaces and attack an adjacent player for 2 damage. When they deal damage, they "push" that player onto an adjacent space that is not occupied by a mob. You choose which space that player is pushed onto. If it's a magma space, that player is dealt an additional 1
damage. If that player is completely surrounded by mobs and/or lava spaces, they are not pushed and remain where they are.
Blazes

Blazes are creatures of fire. They have 4 life and they don't move. When they are activated, they attack and deal 2 damage to all player pieces within range (2 spaces). Avoid standing too close, and especially not in a group! Run past them as quickly as you can, then they pose no danger.
Wither skeletons
The sinister wither skeletons have 4 life. When they are activated, they move up to 2 spaces and attack an adjacent player for 2 damage. Additionally, their attack damages 1 item in that player's inventory! If you are dealt damage by a wither skeleton, move an item of your choice to the bottom row of your inventory. You won't be able to use its action until
you have repaired it. If you move a piece of armor, remove all hearts from it. If you have only damaged items in your inventory, nothing happens.
End boss: The Wildfire
This hot-headed creature can cross lava and will attack you from a distance. Depending on the rolled number, it will use the following attacks:
EASY MODE €20 LIFE:
The Wildfire moves up to 2 spaces. It can move onto lava spaces. Then it deals 1 damage to a player within range (3 spaces).
The Wildfire moves up to 2 spaces. It can move onto lava spaces. Then it deals 2 damage to a player within range (3 spaces).
The Wildfire moves up to 2 spaces. It can move onto lava spaces. Then it deals 3 damage to a player within range (3 spaces).
HARD MODE (25 LIFE):
The Wildfire moves up to 2 spaces. It can move onto lava spaces. Then it deals 1 damage to all players within range (3 spaces).
The Wildfire moves up to 2 spaces. It can move onto lava spaces. Then it deals 2 damage to a player within range (3 spaces). Additionally, it damages 1 item in the attacked player's inventory. Move 1 item of your choice to the bottom row of your inventory. You won't be able to use its action until you have repaired it. If you move a piece of armor, remove all hearts from it. If you have only damaged items in your inventory, nothing happens.
The Wildfire moves up to 2 spaces. It can move onto lava spaces. Then it deals 3 damage to a player within range (3 spaces). Additionally, you must remove 1 block of any color from the top layer of the resource cube. Use the same rules as if you rolled a ☐ with the blocks die.
End boss: The Ancient Hoglin
This fearsome beast charges you and attacks you with great force. Depending on the rolled number, it will use the following attacks:
EASY MODE (20 LIFE):
The Ancient Hoglin moves up to 3 spaces. Then it deals 2 damage to an adjacent player.
The Ancient Hoglin moves up to 3 spaces. Then it deals 3 damage to an adjacent player.
The Ancient Hoglin moves up to 3 spaces. Then it deals 4 damage to an adjacent player.
HARD MODE <25 LIFE>:
The Ancient Hoglin moves up to 3 spaces. Then it deals 2 damage to an adjacent player. This special attack cannot be blocked by armor! If you are hit, you must remove heart tokens directly from your life tracker, even if you still have heart tokens on your armor.
The Ancient Hoglin moves up to 3 spaces. Then it deals 3 damage to an adjacent player. When it does, they "push" that player onto an adjacent space that is not lava and not occupied by a mob. You choose the space that player is pushed onto. If it's a magma space, that player is dealt an additional 1 damage. If that player is completely surrounded by mobs and/or lava spaces, they are not pushed and remain where they are.
The Ancient Hoglin moves up to 3 spaces. Then it deals 4 damage to an adjacent player. In addition, you must remove 1 block of any color from the top layer of the resource cube. Use the same rules as if you rolled a ? with the blocks die.
MINECRAFT
PORTAL DASH
FR
18
2 GRAND CUBE DE RESSOURCES :
natural_image
Diagram of a layered electronic component with downward arrows indicating direction (no text or symbols)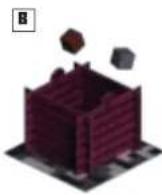
D
3 MONSTRES:
natural_image
Two panels showing a person interacting with a photo frame, one with a yellow arrow indicating rotation (no text or symbols)5 OBJETS :
natural_image
Isometric illustration of a pixelated cube with a red-and-yellow top and a dark brick wall structure, no text or symbols present.flowchart
graph TD
    A["Player at top"] --> B["Player at bottom"]
    B --> C["Player at top"]
    C --> D["Player at bottom"]
    D --> E["Player at top"]
    style A fill:#f9f,stroke:#333
    style B fill:#f9f,stroke:#333
    style C fill:#f9f,stroke:#333
    style D fill:#f9f,stroke:#333
    style E fill:#f9f,stroke:#333
Nouveau monstre
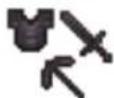
VII. VOS ACTIONS
natural_image
Game map with red and blue tiles, scattered objects, and a small red box (no visible text or symbols)flowchart
graph TD
    A["Stacked Block"] --> B["R"]
    A --> C["B"]
    A --> D["C"]
flowchart
graph TD
    A["Player at top"] --> B{Action}
    B -->|Red Arrow| C["Player at bottom"]
    B -->|Green Arrow| D["Player at top"]
    D --> E["Player at bottom"]
    style A fill:#f9f,stroke:#333
    style E fill:#bbf,stroke:#333
LA SEULE RÈGLE :
natural_image
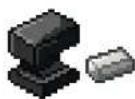
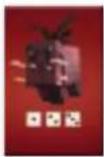
Two pixelated industrial components: a purple industrial plug and a yellow industrial tower with glowing elements (no text or symbols)X. AUTRES NIYEAUX
33
2 GRONDSTOFFEN-STAPEL:
natural_image
Two panels showing a person in a blue shirt and a yellow arrow pointing to the top panel, with red flooring on both sides (no text or symbols visible)
VOORWERPEN:
natural_image
Illustration of a pixelated 3D cube with a red-and-yellow top and a purple brick wall structure, no text or symbols present.flowchart
graph TD
    A["Player at top"] --> B["Player at bottom"]
    B --> C["Player at top"]
    C --> D["Player at bottom"]
    D --> E["Player at top"]
    style A fill:#f9f,stroke:#333
    style B fill:#ccf,stroke:#333
    style C fill:#cff,stroke:#333
    style D fill:#ffc,stroke:#333
    style E fill:#cfc,stroke:#333
Nieuwe monsters
VII. JE ACTIES
natural_image
Game layout with red and blue patterned tiles, scattered stones, and a small bottle (no text or symbols visible)flowchart
graph TD
    A["Player at top"] --> B{Player Step 1}
    B --> C["Player at bottom"]
    C --> D["Player at top"]
    style A fill:#f9f,stroke:#333
    style D fill:#bbf,stroke:#333
DE EINIGE REGEL:
natural_image
Two pixelated industrial components: a purple electrical plug and a yellow industrial bell with green foliage (no text or symbols)X. MEER LEVELS
Imported into the UK by Ravensburger Ltd.
Units 3-5, Avonbury Business Park
Howes Lane | BICESTER | OX26 2UA | GB
Ravensburger North America, Inc.
PO Box 22868 | Seattle WA 98122 | USA
Game Development: Daniel Greiner
Art Direction: Sophia Shimamura
Cover Illustration: Erin Caswell
Graphic Design: Fiore GmbH, Andry Laurence,
Shane Smith, Razzleberries AB
Creative direction: Marc Watson, Patrick Geuder, Jens Bergensten
Business management: Shabnam Elmi
Art production: Marie-Louise Bengtsson
Art direction: Ninni Landin, Jan Cariaga
Product design: Adrian Ward, Filip Thoms
natural_image
Pixel art illustration of two characters in dynamic poses, one holding a sword and the other a sword (no text or symbols)
©2022 Mojang AB. All Rights Reserved. Minecraft, the MINECRAFT logo and the MOJANG STUDIOS logo are trademarks of the Microsoft group of companies.
239737-A
Ravensburger
48


- FR
- BEFORE THE FIRST GAME
- SETUP
- GAME BOARD:
- RESOURCE CUBE
- MOBS
- YOUR INVENTORY
- ITEMS
- ADDITIONAL MATERIALS
- AIM OF THE GAME
- HOW TO PLAY
- ROLL THE WHITE DICE AND CHECK THEIR RESULTS.
- EXECUTE 2 ACTIONS. YOUR OPTIONS ARE:
- AFTER EXECUTING YOUR 2 ACTIONS, PASS THE 2 WHITE DICE TO THE PERSON TO YOUR LEFT. THEY BECOME THE ACTIVE PLAYER.
- THE BLOCKS DIE
- The following rules apply:
- THE MOB DIE
- The following rules apply to mob activation:
- Movement
- Target search
- Attack range
- Attack
- Mob spawning
- YOUR ACTIONS
- Items
- Important:
- Boots: Movement
- Special spaces
- OBSTACLES
- TREASURE CHESTS
- Armor: Additional life points
- Swords and bows: Fight mobs
- Enchantments: Item improvements
- The entchantments
- Pickaxes: Mine blocks
- Option A for using blocks: Block color abilities
- RED BLOCKS: HEALING
- GRAY BLOCKS: REPAIR
- YELLOW BLOCKS: NEW ITEMS
- BLACK BLOCKS: NETHERITE ITEMS
- BROWN BLOCKS: COVER AN OBSTACLE
- Option B for using blocks: Piglin tasks
- Basic actions
- END OF THE TURN
- REVEALING GAMEBOARD PARTS
- END BOSS
- PORTAL STRIP
- ADDITIONAL LEVELS
- Level 2 Ad
- Level 3 Ad
- Level 4 Ad
- Level 5 Ad
- MOB GLOSSARY
- Magma cubes
- Ghasts
- Endermen
- Hoglins
- Blazes
- Wither skeletons
- End boss: The Wildfire
- EASY MODE €20 LIFE:
- HARD MODE (25 LIFE):
- End boss: The Ancient Hoglin
- EASY MODE (20 LIFE):
- HARD MODE <25 LIFE>:
- MINECRAFT
- PORTAL DASH
- GRAND CUBE DE RESSOURCES :
- MONSTRES:
- OBJETS :
- Nouveau monstre
- VOS ACTIONS
- LA SEULE RÈGLE :
- AUTRES NIYEAUX
- GRONDSTOFFEN-STAPEL:
- VOORWERPEN:
- Nieuwe monsters
- JE ACTIES
- DE EINIGE REGEL:
- MEER LEVELS
Brand : RAVENSBURGER
Model : Minecraft Portal Dash
Category : Board game