Bistro Eco 220 - Barbecue Garden Grill - Free user manual and instructions
Find the device manual for free Bistro Eco 220 Garden Grill in PDF.

User questions about Bistro Eco 220 Garden Grill
0 question about this device. Answer the ones you know or ask your own.
Ask a new question about this device
Download the instructions for your Barbecue in PDF format for free! Find your manual Bistro Eco 220 - Garden Grill and take your electronic device back in hand. On this page are published all the documents necessary for the use of your device. Bistro Eco 220 by Garden Grill.
USER MANUAL Bistro Eco 220 Garden Grill
natural_image
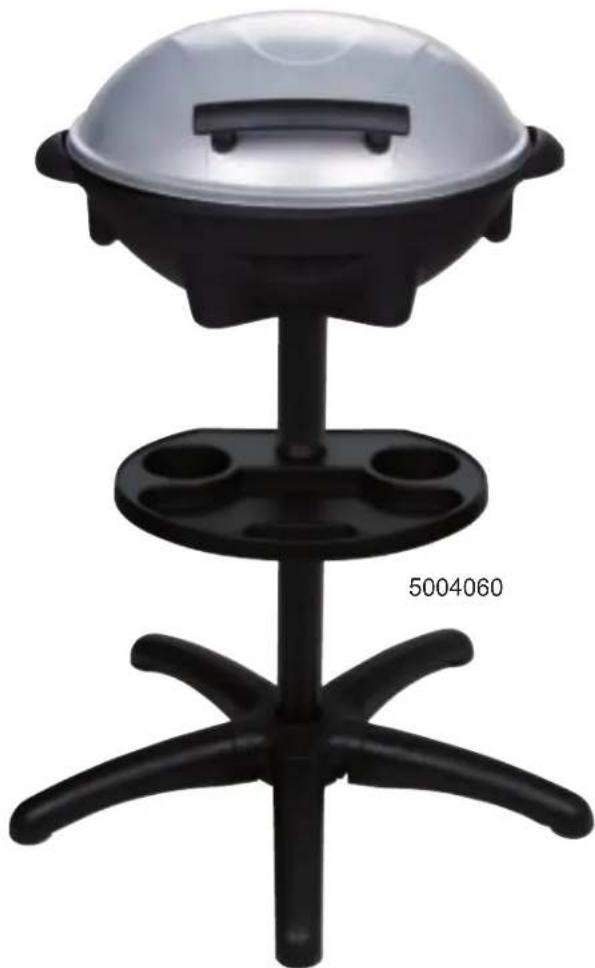
Black and white photo of a portable food stand with a dome-shaped lid and six arms (no text or symbols visible)natural_image
Cross-sectional diagram of a mechanical device with internal components (no text or labels)natural_image
Technical line drawing of a portable stove or cooking pot with lid and side panel (no text or symbols)natural_image
Technical line drawing of a mechanical device with labeled parts (10 and 13), no readable text or symbols beyond labelsnatural_image
Line drawing of a medical or laboratory equipment device with a central stand and top-mounted base (no text or symbols)Bistro Eco 220
Mode d'emploi

natural_image
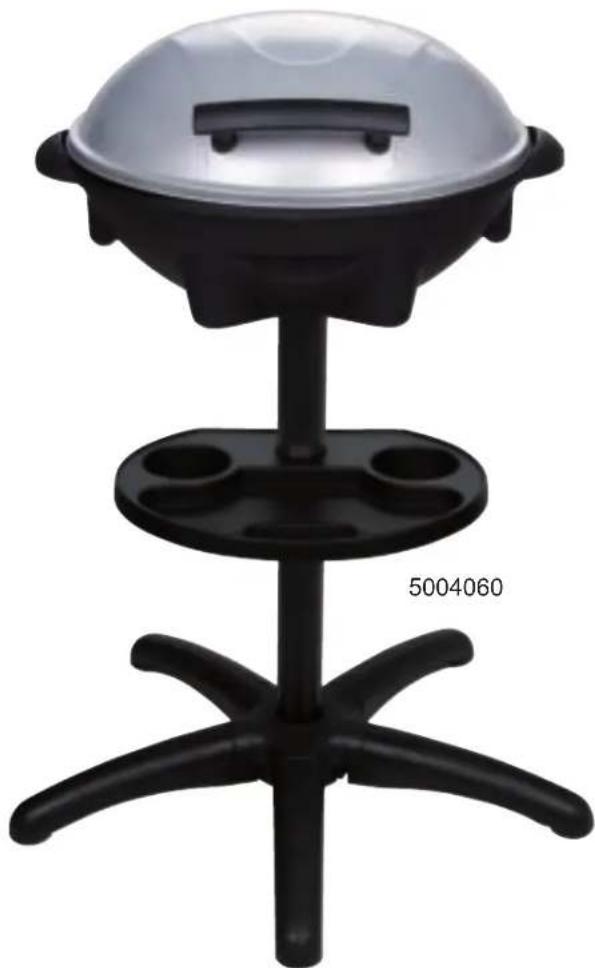
Black and white photo of a portable food stand with a dome-shaped top and six arms (no text or symbols visible)natural_image
Technical line drawing of a mechanical assembly with no visible text or symbolsnatural_image
Technical line drawing of a portable stove or cooking pot with lid and side panel (no text or symbols)natural_image
Technical line drawing of a mechanical device with labeled parts (10 and 13), no readable text or symbols beyond labelsnatural_image
Line drawing of a medical or laboratory equipment device with a central stand and top-mounted base (no text or symbols)Bistro Eco 220
Instructions manual
natural_image
Black and white portable stand with a dome-shaped top and six arms, no visible text or symbols on the base.If a replacement is necessary, please contact your local dealer.
The use of unauthorised parts can create unsafe conditions and environment.
Please keep this manual for future references
Before use
Please read these instructions attentively. They will give you important pieces of advice for the use, the security and the maintenance of the appliance. Keep the instructions carefully and, should the situation arise, pass them on to further users.
The appliance must only be used for the intended purpose according to these instructions.
Observe the notes on stately regulations.
Keep the packaging properly.
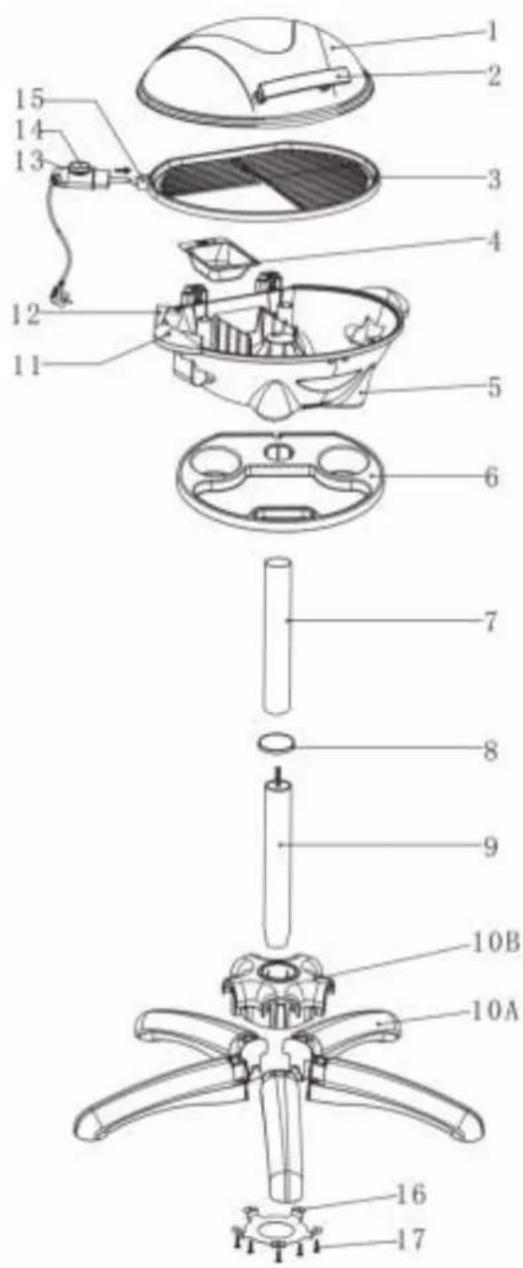
- Metal grill hood
- Handle of hood
- Grill Plate
- Fat collecting bowl
- Base of appliance
- Condiment tray
- Upper stand tube
- Decoration
- Nether stand tube
10A. Stand foot
10B. Stand base - Handle of base
- Opening for appliance socket
- Detachable temperature Regulator with cable
- Temperature indicator lamp
- Appliance socket
- Fixed washer
- Screws
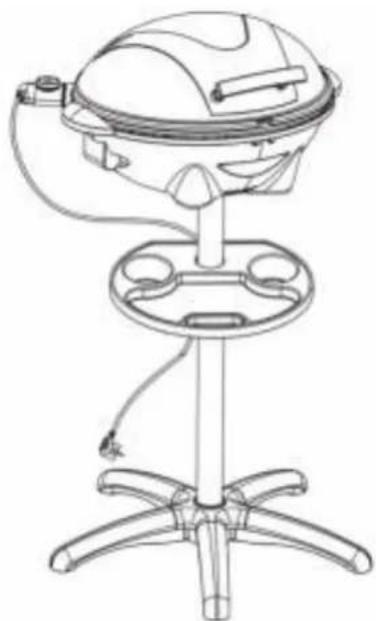
Installations instructions
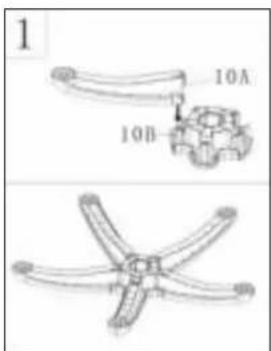
Install the stand foot (10A) into the stand base (10B) properly. That will be a "click" sound when the stand foot is fixed completely.
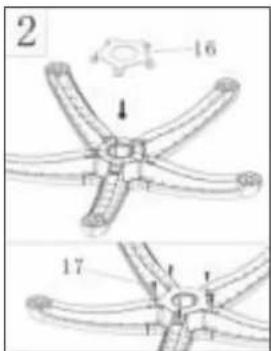
Place the fixed washer (16) onto the stand base, and then install the screws (17) into the fixed washer to fix the stand foots and stand base firmly.

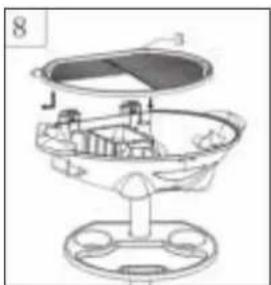
Install half of the threaded rod (a) in the nether tube (9) Put the decoration (8) on the nether tube (9) and assemble both tubes together; ensure that they are fixed well
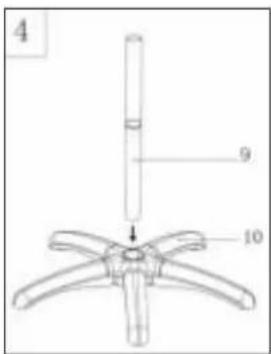
Connect the grill stand base (10) and the nether tube (9) together to form the complete grill stand. (The grill can be used with or without this stand).
Installations instructions
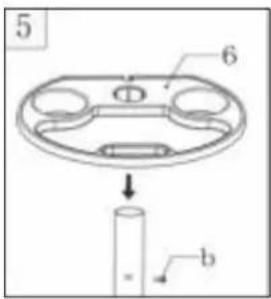
Install the screw (b) into upper tube (7), and then put the condiment tray on the upper tube. (Making sure that the tray is fixed well)
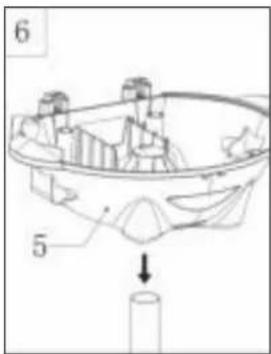
Place the bowl-shaped base of the appliance (5) onto the grill stand. (Making sure that the grill stand is placed on a dry flat, stable surface)
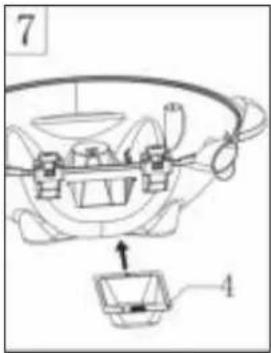
Put the fat collecting bowl (4) into the bracket supplied for it in the base of the appliance, buckle the hole of fat collecting bowl onto the screw to fix it well. (The flat collecting bowl can be filled with little water to make it easier to clean)
natural_image
Cross-sectional diagram of a mechanical device with labeled parts (no text or symbols present)Place the grill plate (3) on the base of the appliance (5). First of all insert the appliance socket (15) into the opening intended for it (12), then set the grill plate horizontally on the appliance base.
Installations instructions
natural_image
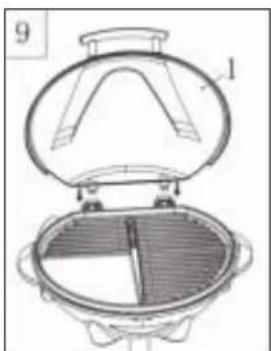
Technical line drawing of a portable stove or cooking pot with lid and side panel (no text or symbols)Install the Metal grill hood (1) into the Base. (5)
(If you are using the grill in the open air, position the metal grill hood so that it acts as a wind break)
natural_image
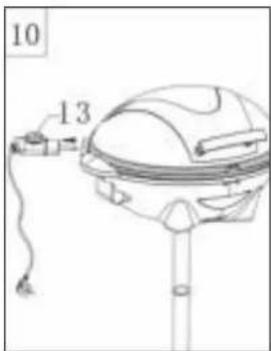
Technical line drawing of a mechanical device with labeled parts (10 and 13), no readable text or symbols beyond labelsPush the detachable temperature regulator (13) as far as it will go into the grill's appliance socket.
Before using the appliance for the first time
- Remove all the packaging materials and wash the grill plate (3), fat collecting bowl (4) and metal grill hood (1) thoroughly. The grill plate and the fat collecting bowl are both dishwasher safe.
Important: Dry all the different parts thoroughly. This applies especially to the appliance socket (15). Never immerse the detachable temperature regulator (13) in water.
- Heat the grill to its maximum setting for about 3-5 minutes, with the metal grill hood closed and without putting any food on it. Residues left from the manufacturing process may cause some smell and smoke when the appliance is used for the first time.
Operating the appliance
- Connect the appliance to the mains electricity supply.
- Set the temperature regulator (13) to the required temperature level (it usually takes about 3 minutes to heat up).
- The temperature indicator lamp (14) will go out as soon as the required temperature has been reached.
- Place the food to be grilled on the grill plate (3)
Cooking times
The following are recommended cooking times. Different times will be required for different weights and sizes of foods to be grilled, and depending on whether you are grilling with or without the metal grill hood.
Food to be grilled Temperature setting Cooking time
Steak/beet 5 20-25 mins
Lamb 5 20-25 mins
Chicken drumsticks 5 30-35 mins
Chicken wings 5 20-25 mins
Chops 5 25-30 mins
Fillet of pork 4-5 9-10 mins
Whole fish 5 15 mins
Kebabs 3-4 10-12 mins
Various sausages 3-4 12-15 mins
Tips for grilling
- Your meat will be tendered if you marinade it overnight before cooking (the marinade is always made of oil (to and moistness), vinegar (to tenderize) and a mixture of seasonings).
- Always use tongs or some form of scoop to turn the grilled food (using a fork to turn the food will dry it out and damage the non-stick coating).
- Only turn meat and fish once during grilling. You do not need to turn it more than once and too much turning dries food out.
- Never cook meat for too long. Even pork is better if it is served when it is still somewhat pink and juicy.
- If cooked food sticks to the grill plate, rub the plate with a piece of kitchen paper soaked in oil from time to time.
- Cleaning and looking after the appliance
- Disconnect the appliance from the mains electricity supply.
- Allow the grill to cool completely.
- Take the detachable temperature regulator (13) out of the appliance socket.
- Wash the grill plate (3) and fat collecting bowl (4) with hot washing-up water (they are dishwasher safe). Do not use steel wool pads or abrasives.
- Wipe the base of the appliance (5) with a damp cloth. Fat splashes can be removed with a mild cleaning agent.
Note:
- The grill plate has a non-stick coating. Do not scratch this coating during either the grilling or the cleaning stages.
- Tip: Use a washing-up brush with plastic bristles to clean the grill plate
Protect the appliance from dust and dirt if it is not to be used for a prolonged length of time (wrap it in a plastic bag). Store it in a dry place.
Disposal
Disable unserviceable appliances immediately. Remove the mains plug and cut up the mains connection cable. If possible, bring unserviceable appliances to an official waste collection point. Most local authorities provide removal services for bulky refuse at least once a year.
Safety regulations
- Plug the appliance only in on outlet as mentioned on the rating plate and only plus it into an earthed, three-pin socket.
- An electric appliance is not a children's toy. Children are not aware of the hazards of electrical appliances. Therefore close supervision is necessary when the appliance is used by children. Do not allow power cable to hang down within easy reach. Keep children away from packing material, e.g. plastic bags.
- The installation of a faulty current protective device with a rated breaking current offers you additional safety by ensuring that 30 mA will not be exceeded in the house installation. Let your installation electrician advice you. Danger also exists with appliance which have been switched off, this is why, after use, the plug should be removed for the mains.
- Do not use this appliance near the water contained in bath-tubs, washbasins or other receptacles neither expose it to rain or other humidity.
- Regularly check whether the wire is defective. In this case the appliance must not be put into operation (immediately pull the plug). Send it to the manufacturer for repair.
-
The appliance must not be operated (disconnect the mains plug immediately) when:
a. the appliance, casing or cable is damaged
b. the appliance shows visible signs of damage.
c. a fault is suspected after a fall or the like -
Disconnect the main plug:
a. in case of faults during use.
b. before cleaning or moving the appliance from place to place.
After use
- Never pull the plug out of the socket by the flex or with wet hands.
- Never carry nor pull the appliance by the flex.
- Don't pull the flex over sharp edges. Don't wedge it.
- Never immerse the mains cord or the thermostat plug in water or any other liquid.
- Only use extension leads after having made sure that their condition is faultless and use an earthed wise with a minimum capacity of 10A.
- Put the wire so that unintentional touching or drawing is impossible.
- Never bring the extension wire in touch with the hot grill plate.
- Always switch off the appliance before removing the mains plug.
- Before removing attachments or cleaning the grill, allow to cool completely.
- Take care! The grill plate will get very hot, and it stays hot for a long time after it has been switched off. Beware of burns! Do not touch any hot surfaces and take care when handling the appliance after use.
- Do not stand the grill over the edge or corner of the table and avoid contact with the hot surfaces.
- Do not place the appliance on or near a hot gas electrical burner, or in a heated oven.
- Only use the appliance when it is placed on a stable and dry surface.
- Do not leave the appliance unattended.
- Always switch off the appliance when it is not in use.
- This appliance is not meant for commercial use but exclusively for private use.
- Do not use the appliance without the fat collecting bowl or the base.
- Never cover the grill plate with aluminum foil or trays (this might damage the non-stick coating)
- Make sure without fail that the device is installed correctly before you put this into operation (first of all if using the stand).
- Please, ensure that the grill plate must not touch the heating element-injury danger!
- Beware of fat spitting while grilling fat or juicy meat.
- Place the appliance on a surface that is resistant to heat. Keep the electric grill at least 10 cm from any walls when in operation.
- Use this appliance only as described in this manual. Any other use not recommended by the manufacturer may cause fire, electric shock or injury to persons.
- For safety reasons do not use attachments that were not recommended or supplied by the manufacturer.
- Only trained personnel should repair electrical appliances. Unskilled repairs can cause considerable danger to the user.
- If the connection cord is damaged, it must be replaced by the manufacturer, his after-sales service department or a similarly qualified person in order to avoid risks.
- No warranty for any possible damage can be accepted if the appliance is used for improper purpose, wrongly operated or unprofessionally repaired. In such a case, any warranty claim is void.
natural_image
Line drawing of a medical or laboratory equipment device with a central stand and top-mounted base (no text or symbols)Bistro Eco 220
Bedienungsanleitung