TaskVac CH53000 - Vacuum Cleaner HOOVER - Free user manual and instructions
Find the device manual for free TaskVac CH53000 HOOVER in PDF.

User questions about TaskVac CH53000 HOOVER
0 question about this device. Answer the ones you know or ask your own.
Ask a new question about this device
Download the instructions for your Vacuum Cleaner in PDF format for free! Find your manual TaskVac CH53000 - HOOVER and take your electronic device back in hand. On this page are published all the documents necessary for the use of your device. TaskVac CH53000 by HOOVER.
USER MANUAL TaskVac CH53000 HOOVER
Operating and Servicing Instructions
Español - página E1

text_image
COVERwww.hoover.com
natural_image
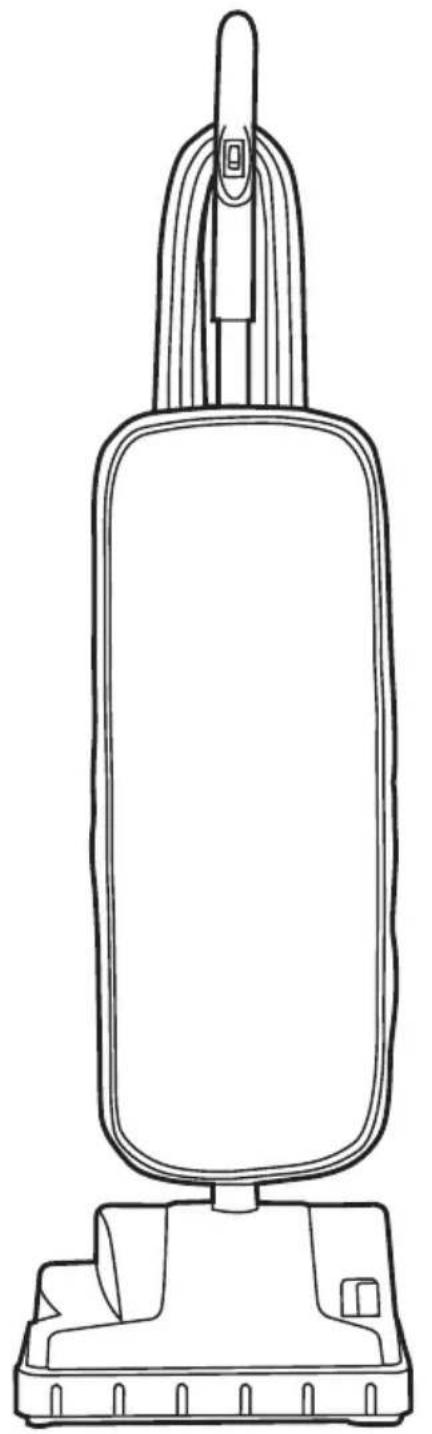
Line drawing of a vacuum cleaner with handle and base (no text or symbols)iMPoRtant: Read CaReFully BeFoRe asseMBIY and use.
Questions or concerns? For assistance, please call Customer Service at
1-800-944-9200 Mon-Fri 8am-7pm EST.
tHis ProduCt is intended FoR CoMMeRCial use only.
Please enter the complete model and serial number in the spaces provided.
Model:
Serial Number: ____
Hint: Attach your sales receipt to this owner's manual. Verification of date of purchase may be required for warranty service of your HOOVER® product.
natural_image
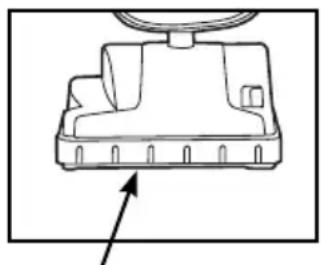
Technical line drawing of a mechanical component with a circular head and base, showing no text or symbols.seRial nuMBeR
(Label located on bottom of vacuum)
Contents
Important Safety Instructions .... 3
Features 5
Cleaner Assembly 6
Attach Lower Handle 6
Attach Bag....6
Attach Upper Handle 6
How To Use....7
On/Off Switch 7
Recline 7
Cord Storage 7
Maintenance....7
Filter Bag....7
Belt Or Brushroll 8
If you need assistance:
Visit our website at hoover.com. Follow the authorized dealer locator link to find the Hoover® authorized dealer nearest you or call 1-800-944-9200 for an automated referral of Hoover® authorized dealer locations (U.S. only) or to speak with a customer service representative; Mon- Fri 8am- 7pm EST.
iMPoRtant saFetY instRuCtions saVe tThese instRuCtions
When using an electrical appliance, basic precautions should always be followed, including the following:
Read all instRuCtions BeFoRe usinG tHis aPPIianCe.
waRninG: to ReduCte tHe RisK oF FiRe, eleCtRiC sHoCK oR inJuRY:
• Fully assemble before operating.
- Operate cleaner only at voltage specified on data label on bottom of cleaner.
- Do not leave appliance when plugged in. Unplug from outlet when not in use and before cleaning or servicing.
- Do not use outdoors or on wet surfaces.
- Do not allow to be used as a toy. Not intended for use by children age 12 and under. Close supervision is necessary when used near children. To avoid injury or damage, keep children away from product, and do not allow children to place fingers or other objects into any openings.
- Use only as described in this manual. Use only manufacturer's recommended attachments and products.
- Do not use with damaged cord or plug. If appliance is not working as it should, has been dropped, damaged, left outdoors, or dropped into water, take it to a service center prior to continuing use.
- Do not pull or carry by cord, use cord as a handle, close a door on cord, or pull cord around sharp edges or corners. Do not place product on cord. Do not run appliance over cord. Keep cord away from heated surfaces.
- Do not unplug by pulling on cord. To unplug, grasp the plug, not the cord.
- Do not handle plug or appliance with wet hands.
- Do not put any object into openings. Do not use with any opening blocked; keep free of dust, lint, hair, and anything that may reduce air flow.
- Keep hair, loose clothing, fingers, and all parts of body away from openings and moving parts. Brushroll continues to rotate when in the upright position.
- Turn off all controls before unplugging.
- Use extra care when cleaning on stairs. To avoid personal injury or damage, and to prevent the cleaner from falling, always place cleaner at bottom of stairs on floor. Do not place cleaner on stairs or furniture, as it may result in injury or damage.
- Do not use to pick up flammable or combustible liquids, such as gasoline, or fine wood sandings, or use in areas where they may be present.
- Do not pick up anything that is burning or smoking, such as cigarettes, matches, or hot ashes.
- Do not use without Dust bag in place.
- waRninG: This product contains chemicals known to the State of California to cause cancer, birth defects or reproductive harm. WASH HANDS AFTER HANDLING.
Caution: to ReduCe tHe RisK oF daMaGe:
- Avoid picking up hard, sharp objects with this product, as they may cause damage.
- Store appropriately indoors in a dry place. Do not expose machine to freezing temperatures.
- Brushroll continues to turn while product is turned on and handle is in upright position. To avoid damage to carpet, rugs, furniture and flooring, avoid tipping cleaner or setting it on furniture, fringed area rugs, or carpeted stairs.
- Do not use sharp objects to clean out hose as they can cause damage.
- With brushroll on, do not allow cleaner to sit in one location for an extended period of time, as damage to floor can result.
GroundinG instructions
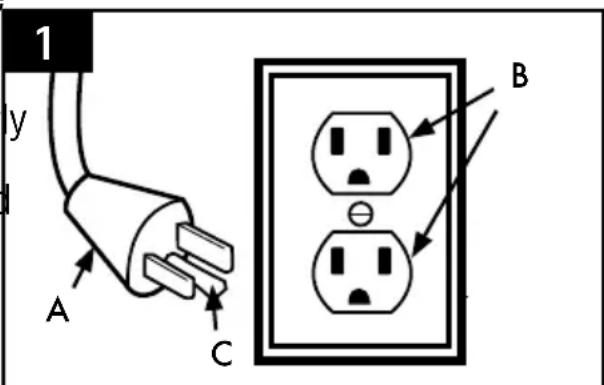
This appliance must be grounded. If it should malfunction or breakdown, grounding provides a path of least resistance for electric current to reduce the risk of electric shock. This appliance is equipped with a cord having an equipment-grounding conductor (C) and grounding plug (A). The plug must be inserted into an appropriate outlet (B) that is properly installed and grounded in accordance with all local codes and ordinances.
WArning: Improper connection of the equipment-grounding conductor can result in the risk of electric shock. Check with a qualified electrician or service person you are in doubt as to whether the outlet is properly grounded. Do not modify the plu provided with the appliance - if it will not fit the outlet, have a proper outlet installed by a qualified electrician. This appliance is for use on a nominal 120-volt circuit and
has a grounding plug that looks like the plug (A) illustrated in Fig. 1. A temporary adapter (D) may be used to connect this plug to a 2-pole receptacle (E) if a properly grounded outlet is not available (Fig. 2). The temporary adapter should be used only until a properly grounded outlet (B) can be installed by a qualified electrician (Fig. 1). The green colored rigid ear, lug, or the like (F) extending from the adapter must be connected to a permanent ground (G) such as a properly grounded outlet box cover (Fig. 2). Whenever the adapter is used, it must be held in place by a metal screw. NOTE: In Canada, the use of a temporary adapter is not permitted by the Canadian Electrical Code.
text_image
1 y A C B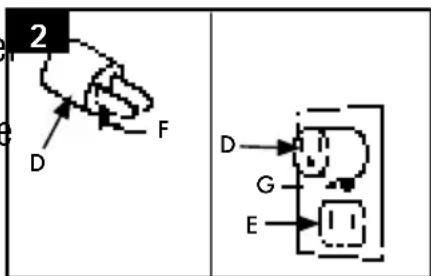
text_image
2 D F D G E1. FeatuRes
text_image
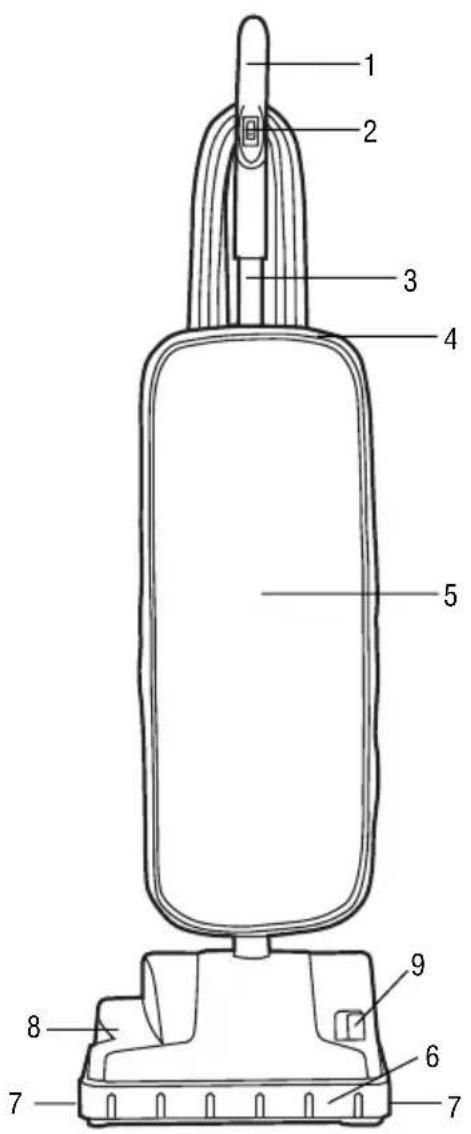
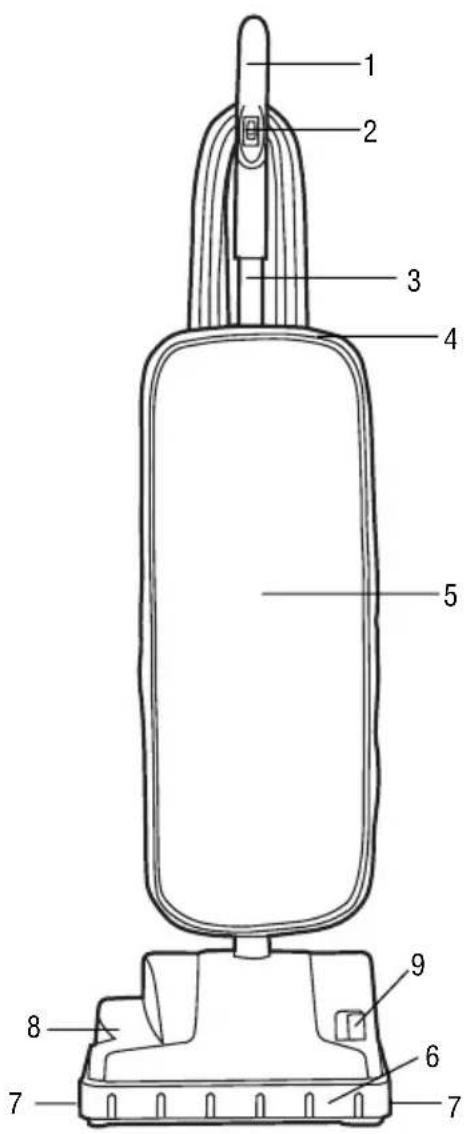
Technical diagram of a vacuum cleaner with numbered parts labeled for identification.FRont
- Handle Grip
- ON/OFF Switch
- Upper Handle
- Zipper
- Outer Cloth Bag
- Bumper
- Edge Cleaning Bristles
- Nozzle
- Belt View Window
text_image
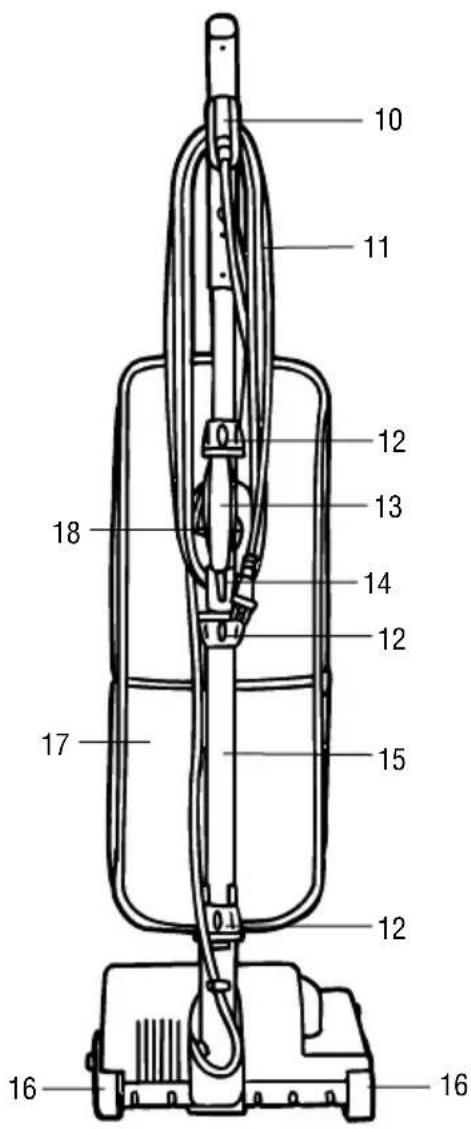
10 11 12 13 14 12 15 17 18 12 16 16BaCK
- Upper Cord Wrap with Quick Cord Release
- Power Cord
- Collars (3)
- Carry Handle
- Lower Cord Wrap
- Lower Handle
- Wheels
- Bag Pocket
- Cord Clip
2. CleaneR asseMBIY
- iMPoRtant
To ensure proper operation of the cleaner, verify that the rubber O-ring is in place and tighten all collars.
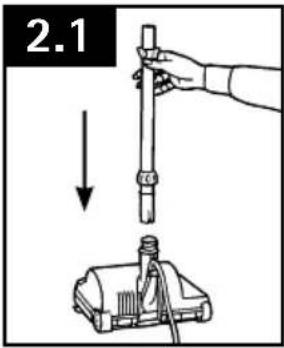
attaCH loweR Handle
2.1 To attach the lower handle, align with nozzle opening in the base of the cleaner.
2.2 Push together firmly and turn the knob clockwise to tighten.
text_image
2.1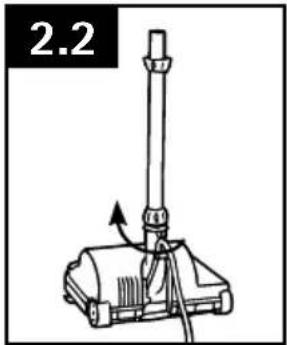
text_image
2.2attaCH BaG
2.3 To attach the bag, hold the handle and firmly push into lower handle (A). Turn the top knob counterclockwise to tighten and snap bag clip onto lower handle (B).

text_image
2.3 a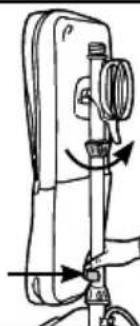
natural_image
Line drawing of a mechanical device with directional arrows indicating motion (no text or symbols)attaCH uPPeR Handle
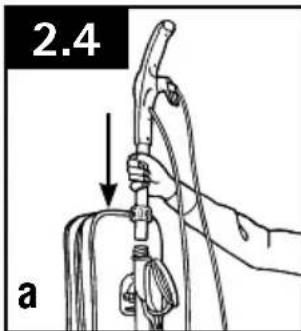
2.4 To attach the upper handle, align with middle section of cleaner and push firmly into place (A). Turn the knob clockwise to tighten (B).
2.5 To keep the cord out of the way while vacuuming, snap it into the cord clip on the back of the upper handle.
text_image
2.4 a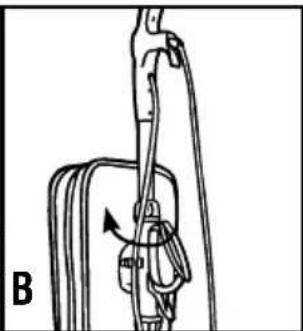
natural_image
Diagram of a mechanical device with a lever and rotating component (no text or symbols)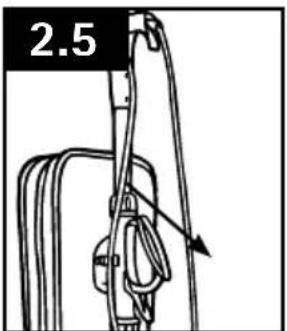
natural_image
Line drawing of a mechanical device with a labeled section '2.5' and an arrow indicating direction (no text or symbols on the diagram itself)3. HOW TO USE

FULLY ASSEMBLE BEFORE OPERATING.
ON/OFF SWITCH
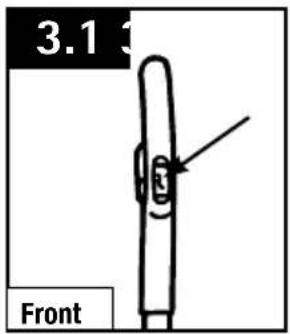
3.1 Plug cord into electrical outlet. Turn power switch to the "ON" position.
RECLINE
3.2 Tilt the cleaner back before you start vacuuming. At the same time, use your foot to press the nozzle down onto the carpet.
CORD STORAGE
3.3 For tidy cord storage, wrap cord around upper and lower cord wraps on back of cleaner.
text_image
3.1 Front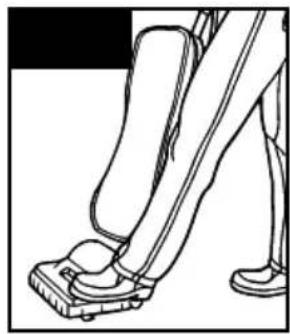
natural_image
Line drawing of a person's lower legs and foot stepping on a foot (no text or symbols)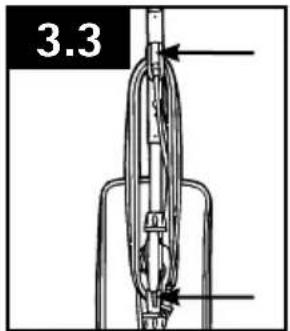
text_image
3.34. MAINTENANCE
Familiarize yourself with these maintenance tasks as proper use and care of your vacuum will ensure continued cleaning effectiveness.
Any other servicing should be done by an authorized service representative.
If appliance is not working as it should, has been dropped, damaged, left outdoors, or dropped into water, take it to a sevice center prior to continuing use.

A Thermal Protector has been designed into your cleaner to protect it from overheating. When the thermal protector activates the cleaner will stop running.
If this happens proceed as follows:
- Turn cleaner OFF and unplug it from the electrical outlet.
- Check fullness of filter bag; change if needed.
- Inspect the: nozzle, nozzle inlet, filter bag inlet. Clear obstructions if present.
- When cleaner is unplugged and motor cools for 30 minutes, the thermal protector will deactivate and cleaning may continue.
If the thermal protector continues to activate after following the above steps, your cleaner needs servicing.
FILTER BAG: How to Replace

To reduce the risk of personal injury - Unplug before cleaning or servicing.
Do not use vacuum without bag in place.

Very fine materials, such as face powder or cornstarch, may seal the filter bag and may cause it to burst even though it is partially full of dirt. When the cleaner is used to remove material of this nature, change filter bag often.
REMOVE OLD BAG
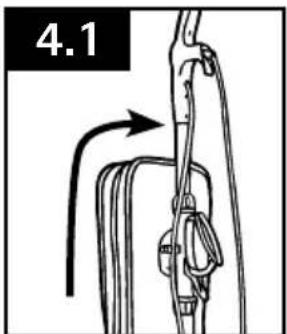
4.1 Unzip the soft outer bag.
4.2 Insert hand into the top of the cloth bag and grasp top of paper bag collar. Pull collar away from the dirt tube. Dispose of old paper bag.
natural_image
Diagram of a rope or cable being lifted by a hook, showing motion direction (no text or symbols)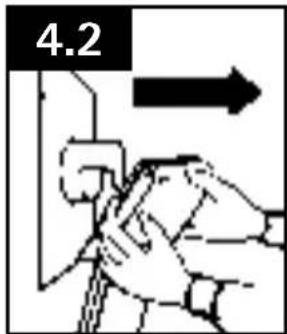
text_image
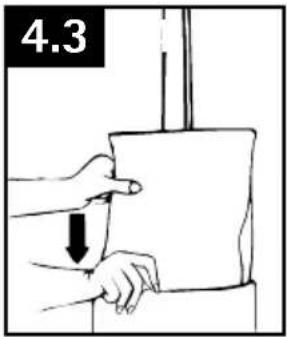
4.2INSTALL NEW BAG
4.3 Install the paper bag into the outer cloth bag. Be sure paper bag is fully extended inside the cloth bag.
4.4 Push collar of paper bag onto the dirt tube past the raised tabs on the sides of the dirt tube to ensure bag is securely in place.
4.5 Completely zip up the soft outer cloth bag.
text_image
4.3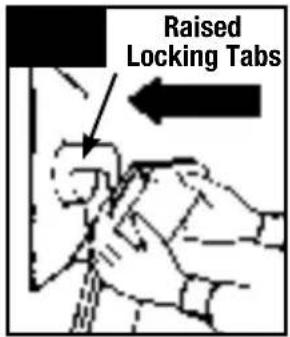
text_image
Raised Locking Tabs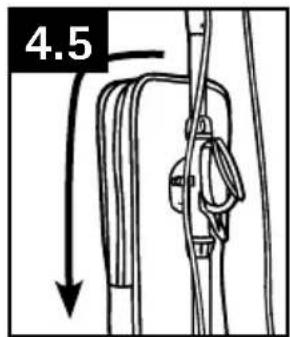
text_image
4.5What to Buy: Filter Bag
Use only genuine Hoove® bags with your vacuum. When purchasing a new bag, ask for Hoover® Type B bags.
BELT OR BRUSHROLL: REMOVAL & REPLACEMENT
CAUTION
To reduce the risk of injury from moving parts - Unplug cleaner before servicing.
REMOVE OLD BELT
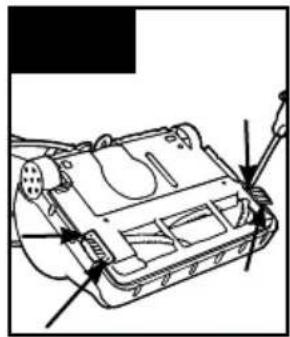
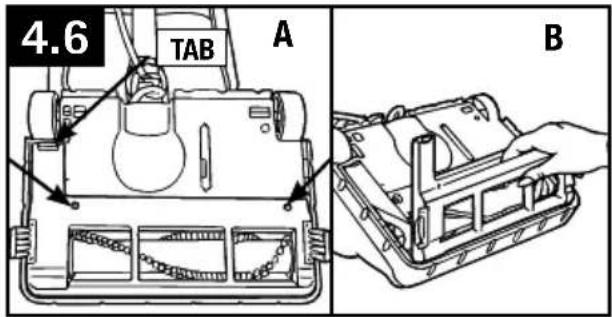
4.6A Turn cleaner over. Base should lay flat and face up. To remove nozzle guard, remove two (2) screws near rollers.
4.6B Release the nozzle guard by pulling tab toward the front of the cleaner and rotate/pivot the nozzle guard up to lift off.
4.7 Be sure belt is off motor shaft. Lift and remove brushroll. Dispose of old belt.
What to Buy: Belt
Use only genuine Hooverbalt with your vacuum. When purchasing a new bag, ask for Hoover Belt Style 18.
text_image
4.6 TAB A B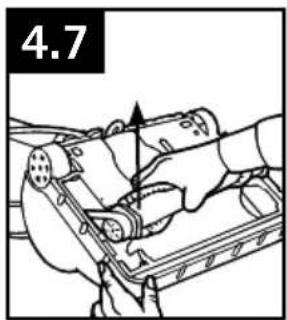
natural_image
Line drawing of hands operating a mechanical device with a numbered label '4.7' (no text or symbols on the device itself)TO REPLACE NEW BELT
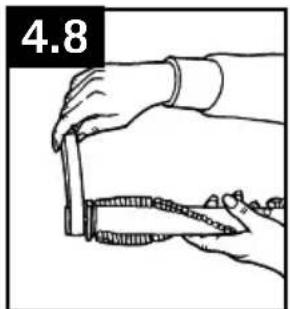
4.8 Slip brushroll through belt. Place belt in area of brushroll without bristles.
4.9 Loop belt around motor shaft.
4.10 With new belt in place, pull and slide brushroll into nozzle making sure that the brushroll end caps are in the correct orientation (see inset). Rotate brushroll manually to make sure belt is properly aligned.
4.11 To reassemble the nozzle guard, align the three (3) tabs on the front of the nozzle guard with the slots in the base. Rotate/pivot the nozzle guard back into position making sure that the tab is fully engaged back by the rear wheel.
4.12 Replace the two (2) screws to secure nozzle guard.
natural_image
Line drawing of hands using a knife to cut a piece of meat (no text or symbols)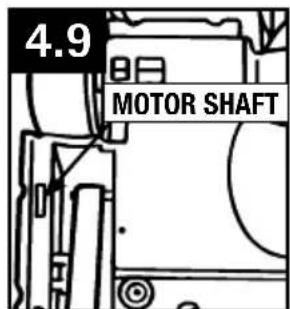
text_image
4.9 MOTOR SHAFT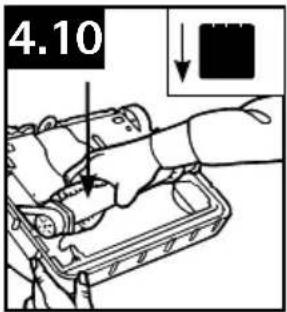
text_image
4.10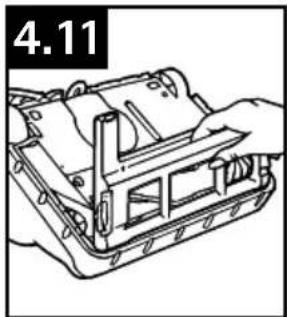
natural_image
Technical line drawing of a mechanical assembly with no visible text or symbols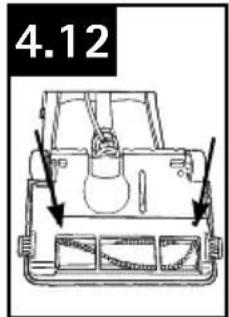
text_image
4.12EDGE CLEANING BRISTLES: REMOVAL & REPLACEMENT
to rePLAce edGe cLeAninG BristLes

CAUTION
To reduce the risk of injury from moving parts - Unplug cleaner before servicing.
TOOL REQUIRED: PHILLIPS OR FLATHEAD SCREWDRIVER
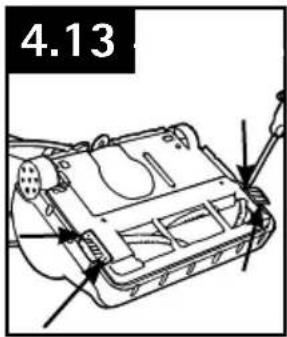
4.13 Remove two (2) screws from each edge cleaning bristle.
4.14 Remove and dispose of old bristles and replace with new bristles on each side.
4.15 Replace all four (4) screws to secure.
text_image
4.13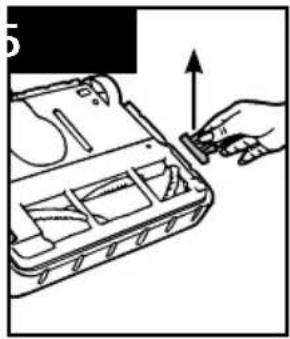
natural_image
Illustration of a hand inserting a small component into a device casing (no text or symbols visible)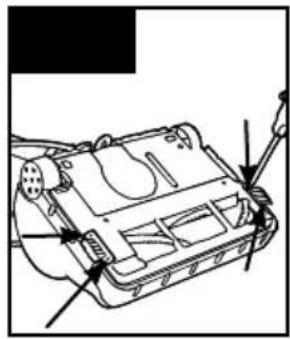
natural_image
Technical line drawing of a mechanical device with arrows indicating assembly or component (no text or symbols)What to Buy: Bristle
Use only genuine Hoover® bristles with your vacuum. For bristle replacements, please call 1-800-944-9200 or visit hoover.com.
5. TROUBLESHOOTING
If a minor problem occurs, it usually can be solved quite easily when the cause is found by using the checklist below.
Any other servicing should be done by an authorized service representative.
If appliance is not working as it should, has been dropped, damaged, left outdoors, or dropped into water, take it to a sevice center prior to continuing use.

WARNING

To reduce risk of personal injury - Unplug before cleaning or servicing
| PROBLEM POSSIBLE REASON POSSIBLE SOLUTION | ||
| Cleaner won't run | 1. Not firmly plugged in. | 1. Plug unit in firmly. |
| 2. No voltage in wall receptacle. | 2. Check fuse or breaker in home. | |
| 3. Blown fuse or tripped breaker. | 3. Replace fuse or reset breaker in home. | |
| 4. Thermal protector activated . | 4. Unplug and allow cleaner to cool for 30 minutes (this will reset the thermal protector). | |
| Cleaner/ tools won't pick up or low suction | 1. Paper bag not installed correctly. | 1. Review paper bag removal and replacement. |
| 2. Filter bag full and/or clogged. | 2. Change filter bag. | |
| 3. Brushroll worn. | 3. Replace brushroll. | |
| 4. Broken or worn belt. | 4. Replace belt. | |
| Dust escaping from vacuum | 1. Bag full. | 1. Change filter bag. |
| 2. Filter bag not installed correctly. | 2. Review filter bag removal and replacementpage. | |
liMited one YeaR waRRantY
(Commercial Use)
WHAT THIS WARRANTY COVERS
When used and maintained in normal Commercial use and in accordance with the Owner's Manual, your HOOVER® product is warranted against original defects in material and workmanship for a full one year from date of purchase (the "Warranty Period"). During the Warranty Period, as described in this Warranty, Hoover will provide labor and parts, at no cost to you, to correct any such defect in products purchased in the United States, U.S. Military Exchanges and Canada.
HOW TO MAKE A WARRANTY CLAIM
If this product is not as warranted, take or send the product to a Hoover Authorized Warranty Service Dealer along with proof of purchase. For an automated referral to authorized service outlets, phone: 1-800-944-9200 OR visit Hoover online at www.hoover.com (U.S. Customers) or www.hoover.ca (Canadian Customers). For additional assistance or information concerning this Warranty or the availability of warranty service outlets, phone 1-800-944-9200, Mon-Fri 8am-7pm EST. In Canada, call 1-800-263-6376, Mon-Fri 8am-7pm EST.
WHAT THIS WARRANTY DOES NOT COVER
Certain parts for your Hoover Commercial product require replacement in the ordinary course of use due to normal wear. These items include belts, agitator roll sleeves, agitator bearings, brushes, bags, filters and bulbs. These parts are not covered by this Warranty.
This Warranty also does not cover: improper maintenance of the product, damage due to misuse, acts of God, nature, vandalism or other acts beyond the control of Hoover, owner's acts or omissions, use outside the country in which the product was initially purchased, resale of the product by the original owner, defects or damages caused by repair or alteration by anyone other than an Authorized Hoover Warranty Service Dealer. Hoover, Inc. reserves the right to inspect any alleged defective product and make final decisions on any warranty claim.
This warranty does not cover pick up, delivery, transportation or house calls. However, if you mail your product to a Hoover Authorized Warranty Service Dealer for warranty service, cost of shipping will be paid one way.
OTHER IMPORTANT TERMS
This Warranty is not transferable and may not be assigned. This Warranty shall be governed and construed under the laws of the state of Ohio. The Warranty Period will not be extended by any replacement or repair performed under this Warranty.
THIS WARRANTY IS THE EXCLUSIVE WARRANTY AND REMEDY PROVIDED BY HOOVER. ALL OTHER WARRANTIES, EXPRESSED OR IMPLIED, INCLUDING WARRANTIES OF MERCHANTABILITY OR FITNESS FOR PARTICULAR PURPOSE, ARE DISCLAIMED. IN NO EVENT WILL HOOVER BELIABLE FOR ANY SPECIAL, INDIRECT, INCIDENTAL OR CONSEQUENTIAL DAMAGES OF ANY KIND OR NATURE TO OWNER OR ANY PARTY CLAIMING THROUGH OWNER, WHETHER BASED IN CONTRACT, NEGLIGENCE, TORT OR STRICT PRODUCTS LIABILITY OR ARISING FROM ANY CAUSE WHATSOEVER. Some states do not allow the exclusion of consequential damages, so the above exclusion may not apply to you. This warranty gives you specific rights; you may also have others that vary from state to state.
Manual del PRoPietaRio
natural_image
Line drawing of a vacuum cleaner with handle and base (no text or symbols)iMPoRtante: lea atentaMente antes de ensaMBlaR Y usaR.
natural_image
Technical line drawing of a mechanical component with a circular head and base, showing no text or symbols.nÚMeRo de seRie
text_image
2 D F E G1. CaRaCteRístiCas
text_image
Labeled diagram of a vacuum cleaner with numbered parts for identificationPaRte FRontal
ate una ManiJa Más BaJa
natural_image
Line drawing of a mechanical device with a vertical rod and base, no text or symbols presentate el Bolso
natural_image
Line drawing of a sewing machine with directional arrows indicating movement (no text or symbols)ate la ManiJa suPeRioR
natural_image
Diagram of a mechanical device with a rotating arm and connecting rod (no text or symbols)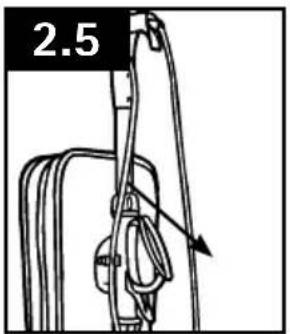
text_image
2.52. CÓMO FUNCIONA
ADVERTENCIA
ENSAMBLE TOTALMENTE ANTES DE USARLA.
INTERRUPTOR DE ENCENDER/APAGAR (ON/OFF)
text_image
3.1 Front
natural_image
Line drawing of a person's lower legs and foot stepping on a pedal (no text or symbols)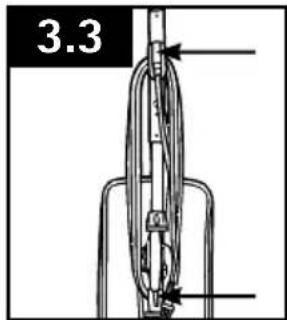
text_image
3.34. MANTENIMIENTO
natural_image
Line drawing of hands using a measuring tool (no text or symbols)
text_image
4.9 MOTOR SHAFT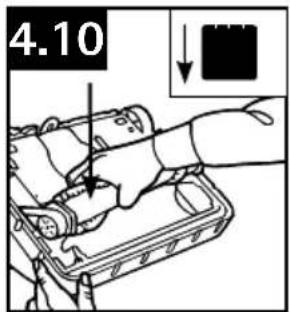
text_image
4.10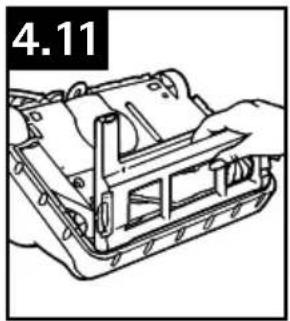
natural_image
Technical line drawing of a mechanical assembly with no visible text or symbols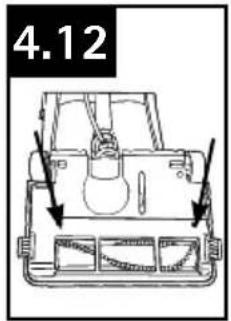
text_image
4.12CERDAS PARA LA LIMPIEZA DE BORDES: RETIRO Y REEMPLAZO
reeMPLAZo de LAs cerdAs PArA LA LiMPieZA de Bordes
CAUTION
To reduce the risk of injury from moving parts - Unplug cleaner before servicing.
natural_image
Illustration of a hand inserting a small component into a device casing (no text or symbols)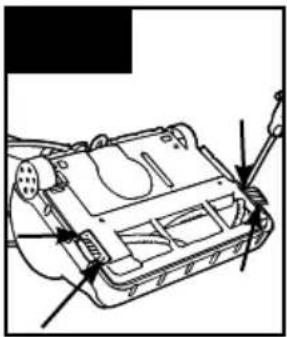
natural_image
Technical line drawing of a vehicle chassis with no visible text or symbolsQué comprar: Cerdas
natural_image
Line drawing of a vacuum cleaner with handle and base (no text or symbols)natural_image
Technical line drawing of a mechanical component with a circular head and mounting base (no text or symbols)nuMÈRo de sÈRie
text_image
2 D F E G1. CaRaCtÉRistiQues

text_image
Technical diagram of a vacuum cleaner with numbered parts labeled for identification.aVant
natural_image
Technical line drawing of a mechanical device with a lever and base, labeled '2.2' (no text or symbols on the diagram itself)attaCHez le saC
natural_image
Line drawing of a sewing machine with directional arrows indicating motion (no text or symbols)attaCHez la PoiGnÉe suPÉRieuRe
natural_image
Diagram of a mechanical device with a lever and cable, labeled 'B' (no text or symbols on the diagram itself)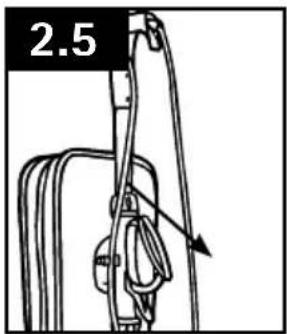
text_image
2.52. UTILISATION
▲AVertisseMent ▲
ASSEMBLEZ COMPLÈTEMENT L'APPAREIL AVANT DE VOUS EN SERVIR.
PÉDALE ON/OFF (MARCHE/ARRÊT)
natural_image
Line drawing of a person's lower legs and feet wearing foot markers (no text or symbols)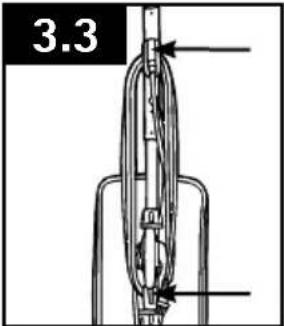
text_image
3.33. ENTRETIEN
natural_image
Illustration of a hand inserting a plug into a device casing (no text or symbols visible)