HushTone CH34006 - Vacuum Cleaner HOOVER - Free user manual and instructions
Find the device manual for free HushTone CH34006 HOOVER in PDF.

User questions about HushTone CH34006 HOOVER
0 question about this device. Answer the ones you know or ask your own.
Ask a new question about this device
Download the instructions for your Vacuum Cleaner in PDF format for free! Find your manual HushTone CH34006 - HOOVER and take your electronic device back in hand. On this page are published all the documents necessary for the use of your device. HushTone CH34006 by HOOVER.
USER MANUAL HushTone CH34006 HOOVER
natural_image
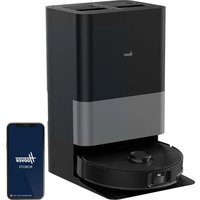
Commercial air purifier with coiled tube and brand logo (no text or symbols on device body)
text_image
OOVERCOMMERCIAL
HUSHTONE™
6Q BACKPACK
USER MANUAL
For use with model CH34006.
IMPORTANT: READ CAREFULLY BEFORE ASSEMBLY AND USE. THIS PRODUCT IS INTENDED FOR COMMERCIAL USE ONLY.
ASSEMBLED IN THE
USA
natural_image
Close-up of a black vacuum cleaner on a rectangular base (no text or symbols visible)Welcome.
Thank you for choosing a Hoover® Commercial product.

IF YOU NEED ASSISTANCE
Please call 1-800-944-9200 (Mon-Fri 8am-7pm EST) to speak with a customer service representative; or visit our website at HooverCommercial.com.
Table of Contents
Safety Instructions 1 Ground Instructions 6 Extension Cord Guideline 7
Features 8
Getting Started 10 Assembling Wand & Attaching The Tools 10 Harness Ergonomics & Height Adjustment 11 Using Your HUSHTONE™ 6Q Backpack 12 Harness Adjustment 12
Maintenance 14 How To Replace The Filter Bag 15 Filters 16
Troubleshooting 18
Warranty 19
Spanish 20
French 38
IMPORTANT SAFETY INSTRUCTIONS
SAVE THESE INSTRUCTIONS!
IMPORTANT: READ CAREFULLY BEFORE ASSEMBLY AND USE. WHEN USING AN ELECTRICAL APPLIANCE, BASIC PRECAUTIONS SHOULD ALWAYS BE FOLLOWED, INCLUDING THE FOLLOWING: READ ALL INSTRUCTIONS BEFORE USING THIS APPLIANCE.
WARNING: TO REDUCE THE RISK OF FIRE, ELECTRIC SHOCK OR INJURY:
• Fully assemble before operating.
- Operate cleaner only at voltage specified on data plate on back of cleaner.
- Do not leave appliance when plugged in. Unplug from outlet when not in use and before cleaning or servicing.
- Do not use outdoors or on wet surfaces.
- Do not allow to be used as a toy. Not intended for use by children age 12 and under. Close supervision is necessary when used near children. To avoid injury or damage, keep children away from product, and do not allow children to place fingers or other objects into any openings.
- Use only as described in this manual. Use only manufacturer's recommended attachments and products.
- Do not use with damaged cord or plug. If appliance is not working as it should, has been dropped, damaged, left outdoors, or dropped into water, take it to a service center prior to continuing use.
- Do not pull or carry by cord, use cord as handle, close a door on cord, or pull cord around sharp edges or corners. Do not run appliance over cord. Keep cord away from heated surfaces.
- Do not unplug by pulling on cord. To unplug, grasp the plug, not the cord.
- Do not handle plug or appliance with wet hands.
- Do not put any objects into openings. Do not use with any opening blocked; keep free of dust, lint, hair, and anything that may reduce airflow.
- Keep hair, loose clothing, fingers, and all parts of body away from openings and moving parts.
- Turn off all controls before unplugging.
- Use extra care when cleaning on stairs. To avoid personal injury or damage, do not remove the backpack when on stairs. And to prevent damage to the cleaner, do not place backpack on stairs or furniture, as it may result in damage or personal injury.
- Do not use to pick up flammable or combustible liquids, such as gasoline, or fine wood sandings or use in areas where they may be present.
- Connect to a properly grounded outlet only. See GROUNDING INSTRUCTIONS on page 6.
- Do not pick up anything that is burning or smoking, such as cigarettes, matches, or hot ashes.
- Do not use without Filter Bag and Filters in place.
WARNING: THIS PRODUCT CONTAINS CHEMICALS, KNOWN TO THE STATE OF CALIFORNIA TO CAUSE CANCER AND BIRTH DEFECTS OR OTHER REPRODUCTIVE HARM. WASH HANDS AFTER USING.
- Make sure your extension cord is in good condition and is the correct size for your appliance. Table (A) on page 7 shows the correct size to use depending on cord length and nameplate ampere rating. If in doubt, use the next heavier gauge. The smaller the gauge number, the heavier the cord. An undersized extension cord will cause a drop in line voltage resulting in loss of power and overheating.
- Use only three-wire SJ or SJT-type cords that have three-prong grounding plugs and grounding receptacles that accept the appliance's plug.
• To reduce the risk or personal injury due to a loose connection between the appliance's plug and the extension cord, firmly and fully attach the appliance plug to the extension cord. Periodically check the connection while operating to ensure it is fully attached. Do not use an extension cord that provides a loose connection. A loose connection may result in overheating, fire and increase the risk of burning. - To reduce the risk of disconnection of the appliance cord from the extension cord during operation; secure the extension cord to the appliance plug as shown in the Cord Lock Instructions on Page 7.
- Maintain Appliance With Care- Inspect extension cords periodically and replace if damaged.
CAUTION: TO REDUCE THE RISK OF DAMAGE:
- Avoid picking up hard, sharp objects with this product, as they may cause damage.
- Store appropriately indoors in a dry place. Do not expose machine to freezing temperatures.
- Do not use sharp objects to clean out hose as they can cause damage.
Important Safety Instructions
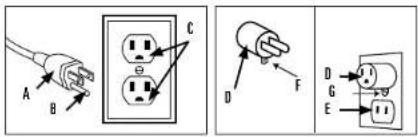
GROUNDING INSTRUCTIONS
This appliance must be grounded. If it should malfunction or breakdown, grounding provides a path of least resistance for electric current to reduce the risk of electric shock. This appliance is equipped with a cord having an equipment-grounding conductor (B) and grounding plug (A) (Fig. 1). The plug must be inserted into an appropriate outlet (C) that is properly installed and grounded in accordance with all local codes and ordinances (Fig. 1).
WARNING: Improper connection of the equipment-grounding conductor can result in the risk of electric shock. Check with a qualified electrician or service person if you are in doubt as to whether the outlet is properly grounded. Do not modify the plug provided with the appliance - if it will not fit the outlet, have a proper outlet installed by a qualified electrician. This appliance is for use on a nominal 120-volt circuit and has a grounding plug that looks like the plug (A) illustrated in (Fig. 1). A temporary adapter (D) may be used to connect this plug to a 2-pole receptacle (E) if a properly grounded outlet is not available (Fig. 2). The temporary adapter should be used only until a properly grounded outlet (C) can be installed by a qualified electrician (Fig. 1). The green colored rigid ear, lug, or the like (F) extending from the adapter must be connected to a permanent ground (G) such as a properly grounded outlet box cover (Fig. 2). Whenever the adapter is used, it must be held in place by a metal screw. NOTE: In Canada, the use of a temporary adapter is not permitted by the Canadian Electrical Code.
FIGURE 1 FIGURE 2
text_image
Electrical wiring diagram showing plug connections and socket placement for three different socket configurationsEXTENSION CORD GUIDELINE
Do not use appliance with damaged cords or plugs. When servicing, refer to a qualified electrician or service person only. Use only identical replacement parts.
- Make sure your extension cord is in good condition and is the correct size for your appliance. Table (A) shows the correct size to use depending on cord length and nameplate ampere rating. If in doubt, use the next heavier gauge. The smaller the gauge number, the heavier the cord. An undersized extension cord will cause a drop in line voltage resulting in loss of power and overheating.
TABLE A-MINIMUM GAUGE EXTENSION CORDS
| Ampere Rating Volts Total length of cord | ||||||
| More than A Not more than A 120 V | 25 ft (7.62 m) 50 ft (15.24 m) | 100 ft (30.48 m) | 150 ft (45.72 m) | |||
| AWG ( mm^2 ) | ||||||
| 0 | 6 | - | 18 (0.82) | 16 (1.3) | 16 (1.3) | 14 (2.1) |
| 6 | 10 | - | 18 (0.82) | 16 (1.3) | 14 (2.1) | 12 (3.3) |
| 10 | 12 | - | 18 (0.82) | 16 (1.3) | 14 (2.1) | 12 (3.3) |
CORD LOCK INSTRUCTIONS
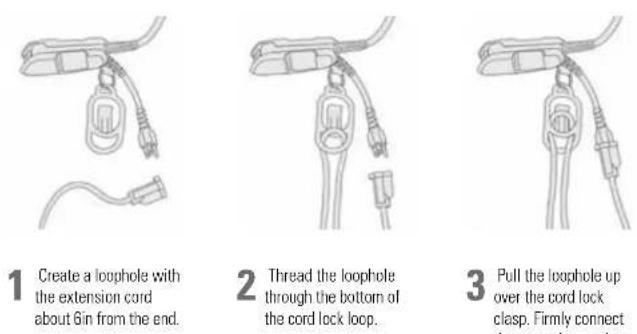
1 Create a loophole with the extension cord about 6in from the end.
2 Thread the loophole through the bottom of the cord lock loop.
3 Pull the loophole up over the cord lock clasp. Firmly connect the extension cord to the quick-change cord on the backpack.
Product Features
A Hose
B Upper Wand
© Vacuum Assembly
D Lower Ward
E Hexaguard® Filters

text_image
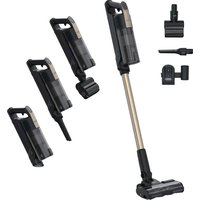
A B C D ETools
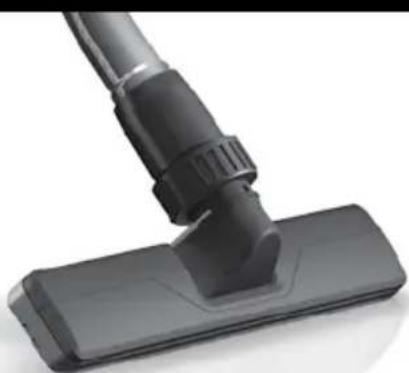
Carpet Tool
Hard Floor Tool

Crevice Tool

Upholstery Tool

Dusting Brush
Assembling Wand & Attaching The Tools Harness Ergonomics & Height Adjustment
CAUTION NOT TO BE USED FOR GROOMING A PET.
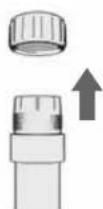
1 Assemble the wand by first unscrewing the cuff from the end of the upper wand and sliding onto the lower wand.
2 Align the groove of lower wand with upper wand and push firmly to slide wand into position at desired length.

3 Tighten outer cuff by twisting clockwise.
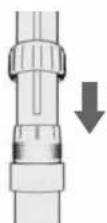
4 Firmly push hose end over the open end of the upper wand.
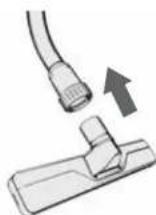
5 To use floor tools, insert floor tool into cuffed end of lower wand and align metal ring with groove in tool. Tighten cuff by twisting clockwise.
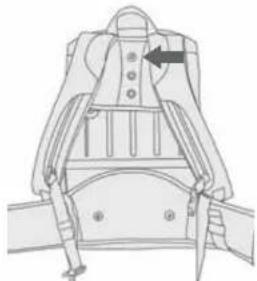
NOTE: The Harness has been designed and engineered to accommodate a wide range of users and can be adjusted to fit, according to height. The Upper Harness should sit between the shoulder blades for a comfortable fit. The backpack is shipped with the Upper Harness positioned with the center hole mounted to the middle Height Adjustment Boss.
natural_image
Technical line drawing of a mechanical device with no visible text or symbolsFor taller users, move the Upper Harness up to the lower Height Adjustment Boss.
natural_image
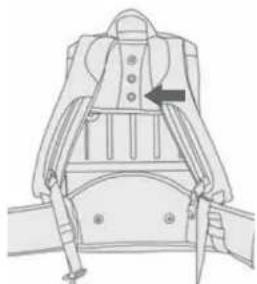
Line drawing of a mechanical seat assembly with a directional arrow indicating movement (no text or symbols)For shorter users, move to the top Height Adjustment Boss.
natural_image
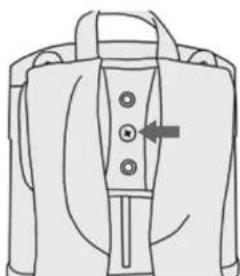
Line drawing of a jacket with buttons and an arrow indicating direction (no text or symbols)1 To adjust the Upper Harness, use a Phillips screwdriver to remove the screw from the Height Adjustment Boss.
natural_image
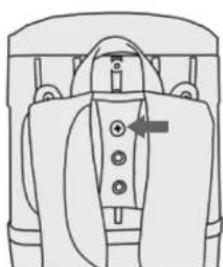
Diagram of a mechanical device with labeled parts and an arrow indicating a specific component (no text or symbols present)2 Move the Upper Harness and fully tighten screw into the correct Height Adjustment Boss.
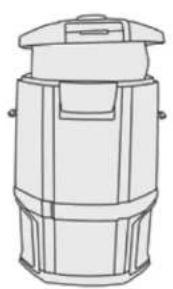
Using Your HUSHTONE™ 6Q Backpack
NOTE: Do not use vacuum without both filter bag and HEPA filters in place.
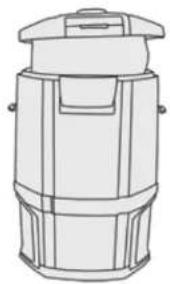
natural_image
Line drawing of a cylindrical container with lid and side panels (no text or symbols)1 Check to ensure both filter bag and HEPA filters are assembled in the unit. Insert hose end firmly into hose inlet, with elbow turned toward vacuuming side.
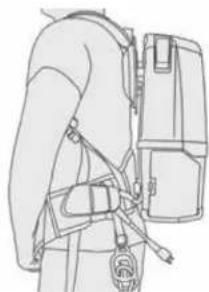
natural_image
Line drawing of a person wearing a backpack and harness (no text or symbols)3 Position lower rear pad into the small of back so that weight of machine is resting on the hips, and not shoulders.
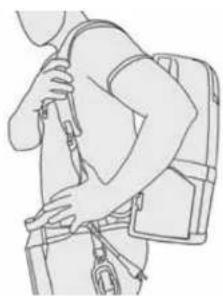
natural_image
Line drawing of a person wearing a backpack and holding a bag (no text or symbols)2 Loosen shoulder straps then lift backpack, sliding both arms through shoulder straps.
CAUTION TO REDUCE THE RISK OF PERSONAL INJURY: UNGPLUG BEFORE CLEANING OR SERVICING.
Harness Adjustment
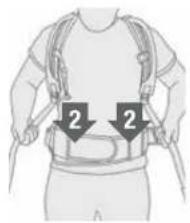
NOTE: The ergonomic harness is designed to easily identify the steps for wearing the backpack correctly. Look for the numbered arrows on the corresponding parts called out in the directions below.
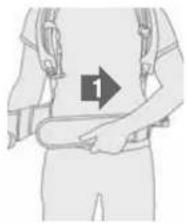
natural_image
Illustration of a person holding a medical device with a numbered arrow pointing to the chest area (no text or symbols present)1 Tighten waist strap until secure and comfortable. NOTE: Should you require additional length, the extension belt can be placed between belt ends and adjusted to desired length.
text_image
2 22 Pull down on ends of shoulder straps until upper harness touches shoulder blades. Nearly all weight of machine should be on hips. You should be able to easily slide your finger between each strap and shoulder. Retighten waist band if necessary.

natural_image
Illustration of a person wearing a harness and belt, with a numbered arrow pointing to the belt area (no text or symbols present)3 Connect the sternum strap buckle and tighten or loosen as needed.
natural_image
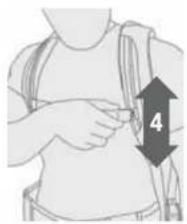
Illustration of a person adjusting a chest buckle with a numbered arrow indicating size (no text or symbols present)4 Slide sternum straps up or down for adjustment.
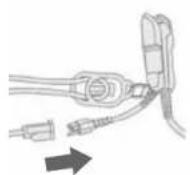
5 Plug in quick-change cord to extension cord and thread extension cord through the Cord Lock on waist belt.
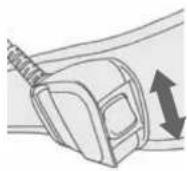
Press orange switch to power up the unit.
ON: Hush™ mode quiet cleaning
BOOST: High traffic area cleaning
Turn off by returning switch to center position.
Maintenance How To Replace The Filter Bag
Any other servicing should be done by an authorized service representative.
If appliance is not working as it should, has been dropped, damaged, left outdoors, or dropped into water, take it to a service center prior to continuing use.
THERMAL PROTECTOR STATEMENT
A thermal protector has been designed into your cleaner to protect it from overheating. When the thermal protector activates the cleaner it will stop running. If this happens proceed as follows:
- Tum cleaner OFF and unplug it from the electrical outlet.
- Check fullness of bag, change if needed.
- Inspect the air path for any obstructions. Clear obstructions if present.
- When cleaner is unplugged and motor cools for 30 minutes, the thermal protector will deactivate and cleaning may continue.
If the thermal protector continues to activate after following the above steps, your cleaner needs servicing.
⚠ WARNING ⚠ TO REDUCE THE RISK OF PERSONAL INJURY: UNGPLUG BEFORE CLEANING OR SERVICING.
NOTE: When using the vacuum to pick up very fine dust, such as sawdust or drywall dust, it will be necessary to replace the bag and clean the filters at more frequent intervals to maintain maximum suction. Fine dust will clog bag pores and reduce suction, prior to bag becoming full.
natural_image
Line drawing of a cylindrical container with lid and side panels (no text or symbols)1 Check filter bag. Change, if full.
natural_image
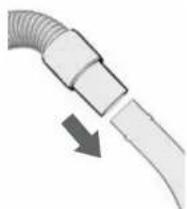
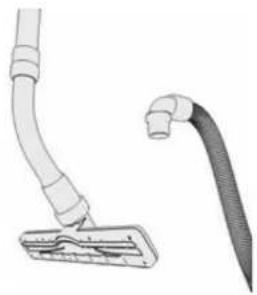
Illustration of a medical or laboratory device with a curved tube and a coiled tube attached to a rectangular component (no text or symbols visible)2 Check for clogs in nozzle, wand, hose, and bag inlet. Clear any obstructions.
⚠ WARNING ⚠ TO REDUCE THE RISK OF PERSONAL INJURY: UNGPLUG BEFORE CLEANING OR SERVICING.
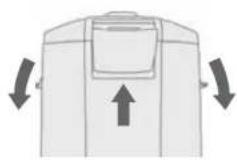
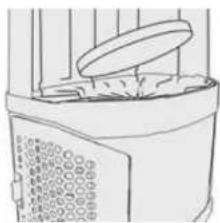
1 Open top cover by unlocking the 3 latches.
natural_image
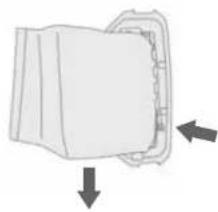
Simple line drawing of a mechanical component with two downward arrows indicating direction (no text or symbols)2 Release full bag by pressing the orange tab and pulling bag out.
3 Insert new bag by sliding cardboard under tabs until bag is securely in place.
4 Press down to latch bag holder.

5 Replace top cover and secure latches.

REPLACEMENT BAGS
Standard Filtration 10 Pack Part No. AH10173 Allergen Filtration 10 Pack Part No. AH10273
Filters
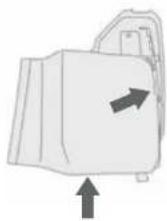
⚠ WARNING ⚠ TO REDUCE THE RISK OF PERSONAL INJURY – UNPLUG BEFORE CLEANING OR SERVICING. DO NOT OPERATE VACUUM WITHOUT BOTH INLET FILTER AND FINAL FILTERS IN PLACE.
HEPA MEDIA FINAL FILTER
The final filters assist in the filtration process to return cleaner air to the room. There are 2 HEPA Filters, one on each side of the backpack.
natural_image
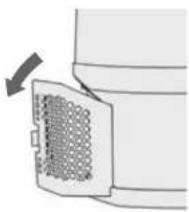
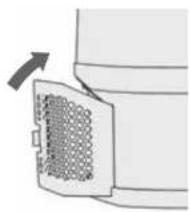
Diagram of a mechanical component with a meshed side panel and directional arrow (no text or symbols)1 Remove filter door by pulling rear tab forward and rotating out.
2 Pull filter out by the frame. Hand rinse in cold water under low pressure. Rinse only surface facing inside of machine. Allow to dry and reposition into filter housing.
natural_image
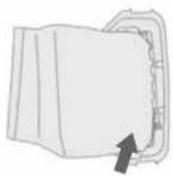
Diagram of a device's air vent with an arrow indicating direction (no text or symbols)3 To replace filter door, align the two forward facing tabs and rotate into place. Press rear tab until door snaps into place.
IMPORTANT ALLOW FILTER TO DRY COMPLETELY BEFORE REPLACING. DRY FILTER ON EDGE SO AIR CIRCULATES ON BOTH SIDES OF FILTER. THIS MAY TAKE UP TO 24 HOURS.

REPLACEMENT FILTER
Inspect HEPA Media Final Filter every month, rinsing when necessary. Check for wear of media and replace if pleats are damaged. Change filter regularly to maintain maximum performance. Part No. 440009096
⚠ WARNING ⚠ TO REDUCE THE RISK OF PERSONAL INJURY — UNPLUG BEFORE CLEANING OR SERVICING. DO NOT OPERATE VACUUM WITHOUT BOTH INLET FILTER AND FINAL FILTERS IN PLACE.
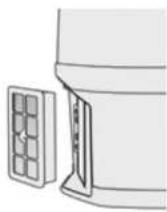
HEXAGUARD™ ACTIVATED CARBON FILTER
natural_image
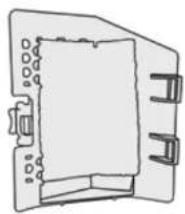
Simple line drawing of a rectangular device with internal components and mounting brackets (no text or symbols)1 The HexaGuard ^™ Filters are located on the inside of the filter door. Pull to remove.
INLET FILTER
The inlet filter is located on the inside, bottom of bag housing and protects the motor from damage.
natural_image
Line drawing of a microwave oven with lid and ventilation slots (no text or symbols)1 If the filter becomes dirty, pull off the grill and lift out the filter. Hand rinse in cold water under low pressure. Let filter dry for 24 hours. Reposition dry filter and snap grill into place.
IMPORTANT ALLOW FILTER TO DRY COMPLETELY BEFORE REPLACING. DRY FILTER ON EDGE SD AIR CIRCULATES ON BOTH SIDES OF FILTER. THIS MAY TAKE UP TO 24 HOURS.

REPLACEMENT FILTER
Replace HexaGuard™ Filter yearly for optimum performance. Part No. 440009176

REPLACEMENT FILTER
Inspect Inlet Filter every 2 weeks to keep vacuum running at peak performance. Part No. 440009175
LUBRICATION
The motor is equipped with bearings which contain sufficient lubrication for its lifetime. The addition of lubrication could cause damage. Do not add lubrication to motor.
Troubleshooting
WARNING TO REDUCE THE RISK OF PERSONAL INJURY: UNGPLUG BEFORE CLEANING OR SERVICING.
Any other servicing should be done by an authorized service representative.
If appliance is not working as it should, has been dropped, damaged, left outdoors, or dropped into water, take it to a service center prior to continuing use.
Problem Possible Cause Possible Solution
| Vacuum won't run 1. Power Cord not firmly plugged into outlet. | 1. Plug unit in firmly. |
| 2. Brown fuse or tripped breaker. | 2. Check fuse or breaker in building. Replace fuse/reset breaker in building. |
| 3. Thermal Protector activated. | 3. Unplug and allow vacuum to cool for 30 min. (This will reset the Thermal Protector). |
| Bag Check Indicator has turned red OR vacuum won't pick up OR low suction | 1. Filter Bag full and/or clogged. |
| Dust escaping from vacuum | 1. Filter Bag full. 1. Empty Filter Bag - Pg. 15. |
| 2. Filter Bag not installed correctly. | |
| 3. Hose not installed correctly. 3. Review Hose installation - Pg. 10. | |
| Wand is difficult to push or won't move forward | 1. Incorrect Floor Tool. 1. Check that the Carpet Tool is being used for carpet and Hard Floor Tool is being used for hard floors. |
| 2. Adjust angle of floor tool by tilting up, making easier to push. |

IF YOU NEED ASSISTANCE
Please call 1-800-944-9200 (Mon-Fri 8am-7pm EST) to speak with a customer
service representative; or visit our website at HooverCommercial.com.
2 YEAR LIMITED WARRANTY
WHAT THIS WARRANTY COVERS
When used and maintained in normal Commercial use and in accordance with the User's Manual, your Hoover® Commercial product is warranted against original defects in material and workmanship for a full two years from date of purchase (the "Warranty Period"). During the Warranty Period, as described in this Warranty, Hoover® Commercial will provide labor and parts, at no cost to you, to correct any such defect in products purchased in the United States, U.S. Military Exchanges and Canada.
HOW TO MAKE A WARRANTY CLAIM
If this product is not as warranted, take or send the product to a Hoover ^® Commercial Authorized Warranty Service Dealer along with proof of purchase. For an automated referral to authorized service outlets, phone: 1-800-944-9200 OR visit Hoover ^® Commercial online at www.hoovercommercial.com (U.S. Customers) or www.hoover.ca (Canadian Customers). For additional assistance or information concerning this Warranty or the availability of warranty service outlets, phone 1-800-944-9200, Mon-Fri 8am-7pm EST. In Canada, call 1-800-263-6376, Mon-Fri 8am-7pm EST.
WHAT THIS WARRANTY DOES NOT COVER
Certain parts for your Hoover® Commercial product require replacement in the ordinary course of use due to normal wear. These items include belts, agitator roll sleeves, agitator bearings, brushes, begs, filters and bulbs. These parts are not covered by this Warranty. This Warranty also does not cover: improper maintenance of the product, damage due to misuse, acts of God, nature, vandalism or other acts beyond the control of Hoover® Commercial, owner's acts or omissions, use outside the country in which the product was initially purchased, resale of the product by the original owner, defects or damages caused by repair or alteration by anyone other than an Authorized Hoover® Commercial Warranty Service Dealer. Hoover® Commercial reserves the right to inspect any alleged defective product and make final decisions on any warranty claim. This warranty does not cover pick up, delivery, transportation or house calls. However, if you mail your product to a Hoover® Commercial Authorized Warranty Service Dealer for warranty service, cost of shipping will be paid one way.
OTHER IMPORTANT TERMS
This Warranty is not transferable and may not be assigned. This Warranty shall be governed and construed under the laws of the state of Ohio. The Warranty Period will not be extended by any replacement or repair performed under this Warranty. THIS WARRANTY IS THE EXCLUSIVE WARRANTY AND REMEDY PROVIDED BY HOOVER® COMMERCIAL ALL OTHER WARRANTIES, EXPRESSED OR IMPLIED, INCLUDING WARRANTIES OF MERCHANTABILITY OR FITNESS FOR PARTICULAR PURPOSE, ARE DISCLAIMED. IN NO EVENT WILL HOOVER ^26 BE LIABLE FOR ANY SPECIAL INDIRECT, INCIDENTAL OR CONSEQUENTIAL DAMAGES OF ANY KIND OR NATURE TO OWNER OR ANY PARTY CLAIMING THROUGH OWNER, WHETHER BASED IN CONTRACT, NEGLIGENCE, TORT OR STRICT PRODUCTS LIABILITY OR ARISING FROM ANY CAUSE WHATSOEVER. Some states do not allow the exclusion of consequential damages, so the above exclusion may not apply to you. This warranty gives you specific rights, you may also have others that vary from state to state.
MANUAL DEL USUARIO
text_image
A B C D F G Enatural_image
Technical line drawing of a mechanical device with no visible text or symbolsnatural_image
Line drawing of a mechanical seat assembly with an arrow indicating direction (no text or symbols)natural_image
Line drawing of a jacket with buttons and an arrow indicating direction (no text or symbols)natural_image
Diagram of a mechanical component with labeled parts and an arrow indicating direction (no text or symbols present)natural_image
Line drawing of a cylindrical container with lid and side panels (no text or symbols)natural_image
Line drawing of a person wearing a backpack and harness (no text or symbols)natural_image
Line drawing of a person wearing a backpack and holding a bag (no text or symbols)natural_image
Illustration of a person holding a medical device with a numbered arrow pointing to the chest area (no text or symbols present)natural_image
Illustration of a person adjusting a medical device with a numbered arrow pointing to the chest area (no text or symbols present)natural_image
Illustration of a person adjusting a backpack with a numbered arrow indicating width (no text or symbols present)natural_image
Line drawing of a cylindrical container with lid and side supports (no text or symbols)natural_image
Illustration of a vacuum cleaner with attached hose and cover (no text or symbols)natural_image
Simple line drawing of a mechanical component with two arrows indicating direction (no text or symbols)natural_image
Diagram of a device with a grid-patterned panel and directional arrow (no text or symbols)natural_image
Diagram of a mechanical component with a meshed side panel and an arrow indicating direction (no text or symbols)natural_image
Simple line drawing of a rectangular device with internal components and mounting brackets (no text or symbols)natural_image
Line drawing of a microwave oven with lid and ventilation slots (no text or symbols)CONSERVEZ CES INSTRUCTIONS!
IMPORTANT : LISEZ ATTENTIVEMENT AVANT L'ASSEMBLAGE ET L'UTILISATION. LORSQUE VOUS UTILISEZ DES APPAREILS ÉLECTRIQUES, VEUILLEZ TOUJOURS RESPECTER ENTRE AUTRES LES CONSIGNES DE SÉCURITÉ ÉLÉMENTAIRES SUIVANTES : VEUILLEZ LIRE TOUTES LES INSTRUCTIONS AVANT D'UTILISER CET APPAREIL.