USER MANUAL SHD90FLIGNE SIGNATURE
natural_image
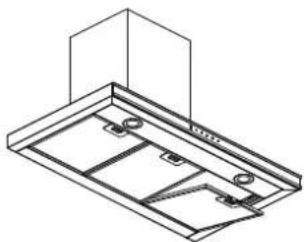
Exterior view of a stainless steel kitchen range hood (no text or symbols visible)
SIGNATURE
HOTTE DÉCORATION
SHD60FLIGNE/3 SHD90FLIGNE/3
TABLE DES MATIERES
natural_image
Isometric line drawing of a brick wall with embedded arrows indicating direction (no text or symbols)
natural_image
Diagram of a box mounted on a platform inside a brick wall, with no visible text or symbols.
natural_image
Architectural diagram of a brick wall with a central column and support structure (no text or symbols)
natural_image
Simple line drawing of a hand pressing down on a flat surface with an arrow indicating direction (no text or symbols)
natural_image
Simple line drawing of a hand pressing down on a laptop (no text or symbols)
3. INSTRUCTIONS D'INSTALLATION
Commande tactile LED


4. + Bouton (Augmenter) :
natural_image
Isometric line drawing of a mechanical assembly with mounting holes and internal components (no text or symbols)
schéma.10
text_image
Open
Close
schéma.11
5. ENTRETIEN ET NETTOYAGE
Changez la lampe
natural_image
Line drawing of a circular mechanical component with mounting bracket (no text or symbols)
- DEPANNAGE
natural_image
Exterior view of a stainless steel kitchen range hood (no text or symbols visible)
SIGNATURE
COOKER HOOD
SHD60FLIGNE/3 SHD90FLIGNE/3
TABLE OF CONTENTS
- Safety instructions - 20 -
- Function and feature - 24 -
- Installation -24-
- How to use your cooker hood - 29 -
- Cleaning and maintenance - 30 -
- Trouble shooting - 32 -
- Technical specifications - 33 -
- Environmental protection - 35 -

THIS PRODUCT IS FOR HOUSEHOLD USE ONLY!
Please read these instructions carefully before the first use of this product and save this manual for your future reference
1. SAFETY INSTRUCTIONS
- Before installation and usage, make sure that the voltage (V) and the frequency (Hz) indicated on your cooker hood are exactly the same as the voltage (V) and the frequency (Hz) in your home.
- Keep your children from using the cooker hood.
-
This appliance can be used by children aged from 8 years and above and persons with reduced physical, sensory or mental capabilities or lack of experience and knowledge if they have been given supervision or instruction concerning use of the appliance in a safe way and understand the hazards involved.
Children shall not play with the appliance. Cleaning and user maintenance shall not be made by children without supervision.
-
Your cooker hood is for domestic use only, not suitable for barbecue, roast shop and other commercial use.
- Any installation work must be carried out by a qualified electrician or competent person.
- Do not flame under the range hood.
- CAUTION: Accessible parts may become hot when used with cooking appliances.
- If there is any fault with your cooker hood, please call the service department appointed by agent for servicing.
- This appliance has been incorporated with a grounded plug. Please ensure the wall outlet in your house is well earthed.
- Keep the appliance and its cord out of reach of child less than 8 years.
- If the supply cord is damaged, it must be replaced by the manufacturer, its service agent or similarly qualified persons in order to avoid a hazard.
-
There shall be adequate ventilation of the room when the range hood is used at the same time as appliances burning gas or other fuels.
-
Please keep the room draughty when your cooker hood and gas hob are working.
-
The air must not be discharged into a flue that is used for exhausting fumes from appliances burning gas or other fuels.
-
The cooker hood and its filter mesh should be cleaned regularly in order to keep in good working order.
-
Before cleaning, always ensure that you have switched your cooker hood off.
-
Clean the cooker hood according to the instruction manual and keep the cooker hood from the danger of burning.
-
In order to get the most out of your cooker hood, please read the instruction manual before installing & using, and keep it in a safe place.
-
The appliance is not intended to be operated by means of an external timer or a separate remote-control system.
-
It is recommended to check regularly the supply cord for any sign of possible deterioration, and the appliance should not be used if the cable is damaged.
-
Regarding the information for installation, for cleaning and for changing the light, thanks to refer to the below paragraph of the manual.
-
For safety reason, please use only the same size of fixing or mounting screw which are recommended in this instruction manual.
-
Warning: Failure to install the screws or fixing device in accordance with these instructions may result in electrical hazards
-
ILCOS D code for this lamp is: DSR-1.5/65-S-64.
-
When installing the appliance, make sure that the following distances between the top of cooker or hob and the lowest part of the cooker hood must be observed:
Gas hobs: 750mm.
Electric hobs: 650mm.
-
Warning: There is a risk of electric shock and fire if cleaning is not carried out in accordance with the instructions.
-
Regulations concerning the discharge of air have to be fulfilled.
LED light replacement
LED lighting source
Replaceable by professional
Warning: the LED light must not be replaced by the user! If the LED light is damaged, contact an authorized service representative for repairing.
The product contains a light source of energy efficiency class G.
2. FUNCTION AND FEATURE
* The cooker hood is made of high quality materials with streamlined design accordingly to technical and physical engineering theory, high end and luxury with age aesthetic feeling, also there are kinds of styles for your option to perfect your kitchen.
* Equipped with a large power low noise electric motor and centrifugal leaf, it produces strong suction, low noise, non stick grease filter and easy to clean.
* With the isolated low voltage circuit board control, DC 12V input, the lights are more concentrative and use is much safer.
* The grease filter is easy to remove and clean, and only wipe lightly for the motor and other interior parts.
* Special wind tunnel construction and oil collector design, avoiding redundant grease left in the flue.
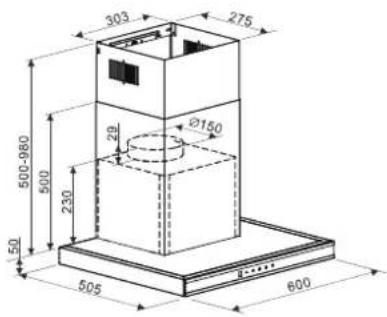
3. INSTALLATION
Installation drawing
text_image
303
275
29
Ø150
500-980
500
230
50
505
600
SHD60FLIGNE/3
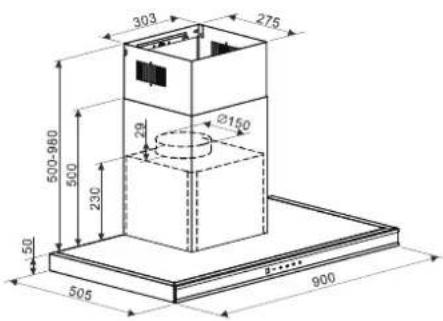
text_image
303
275
Ø150
500-960
500
230
50
505
900
SHD90FLIGNE/3
Length of chimney: 500+500mm (before assembly)
CAUTION :
Failure to observe the following instructions regarding the installation and securing the unit and screws may result in a risk of electric shock. When the range hood and a cooking appliance that is powered by an energy other than electricity operate simultaneously, the negative pressure in the room must not exceed 4 Pa (4 x 10⁻⁵ Bar).
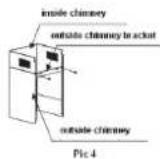
- If the room in which the hood will be installed has an opening outside, follow the instructions below to connect the hood to an air extraction duct (enamelled flexible duct, in aluminum or non-flammable material, with an internal diameter of 150 mm).
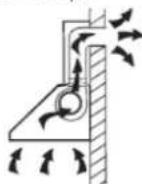
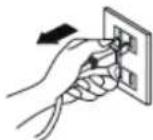
- Please switch off the cooker hood and unplug it from the mains before any installation.
3. INSTALLATION
- For optimum vacuuming results, the hood should be placed at a height distance of 65 to 75 cm above the hob.
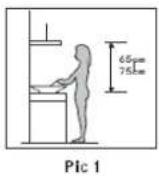
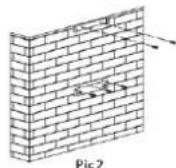
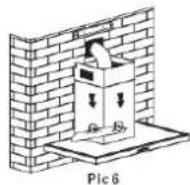
- Drill 5 x 8mm holes in the wall where you want to mount the wall bracket. Secure it using the screws and dowels provided.
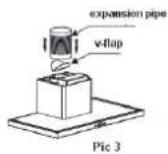
- Connect the exhaust duct and the V-shaped flap to the hood.
- Lift the hood and hang it on the wall bracket.
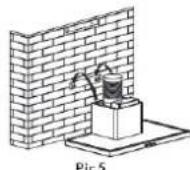
Installing the chimney
- Screw the outer chimney support onto the outer chimney, make sure the inner chimney can move up and down freely.
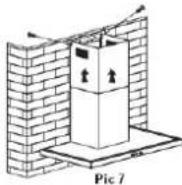
3. INSTALLATION
- Slide the upper part of the chimney inside the part lower part, then pull the upper part up to the height desired.
Attach 2 x Security Screws (4mm x 30mm) to the back of the 6mm thick case, diameter.
- Mount the chimney on the hood then fix them together with 2 screws.
- Installing the charcoal filter.
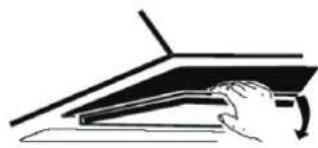
First, remove the grease filter by pulling it down after having unblocked.
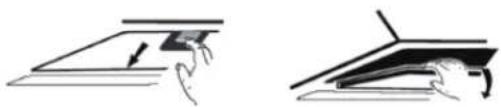
natural_image
Two technical diagrams showing a hand holding a tool and a curved object, both without any text or symbols.
Mount the charcoal filter on the hood by turning it clockwise.
Clockwise. Do the same for the second filtered. Replace the grease filter.
- Make sure the filter is securely attached; otherwise, it may come loose and pose a hazard.
4. HOW TO USE YOUR COOKER HOOD
LED touch control

text_image
8
- + ⓣ
LED touch control has five buttons, see pic.
— (Decrease), + (Increase), ⚙ (Lamp), ⏱ (Timer), ⏻ (Power)
-
Power-on: After connecting the cooker hood to the main supply, the backlight of button will turn on, output will be closed and the cooker hood will enter into stand-by mode.
-
(Power) button:
2.1. Press ⏻ (Power) button, the backlight of button will be on and the hood will work at the low speed, and the light will be on. The backlight of the buttons — (Decrease), + (Increase), ⚙ (Lamp), and ⏻ (Power) will be on. Press ⏻ (Power) button again, the backlight of button will be off and the cooker hood will be turn off and return into stand-by mode and operate by the circle.
2.2. The button of ⏻ (Lamp) button could be operated without pressing the ⏻ (Power) button. Press ⏻ (Power) button, the cooker hood will be turn off.
- ⚙ (Lamp) button:
Press ⚙ (Lamp) button, the backlight of this button and the lights will be on. Press again, the backlight of lamp button and the lights will be off. The above steps can be operated repeatedly.
-
4.1 Press + (Increase) button, the backlights of + (Increase) button, - (Decrease) button and ⏻ (Power) button will be on. The cooker hood starts to work at the low speed and the LED display will display "1".
4. HOW TO USE YOUR COOKER HOOD
4.2 Press + (Increase) button again when it works at low speed, the backlights of + (Increase) button, — (Decrease) button and ⏻ (Power) button keep bright. The cooker hood works at the mid speed and the LED display will display "2".
4.3 Press + (Increase) button again when it works at mid speed, the backlights of + (Increase) button will be off. The — (Decrease) button and ⏻ (Power) button keep bright. The cooker hood works at the high speed and the LED display will display "3".
4.4 Press + (Increase) button again when it works at high speed, the cooker hood will still work at the high speed.
- = ( Decrease) button
Press — (Decrease) button, the cooker hood will decrease one speed, and the display will show the current working speed. Press — (Decrease) button when it works at high speed, the cooker hood works at the mid speed. The backlights of the + (Increase) button, — (Decrease) button and ⏻ (Power) button will be on. Press — (Decrease) button when it works at mid speed, the cooker hood will work at the low speed. The backlights of the + (Increase) button, — (Decrease) button and ⏻ (Power) button keep bright. When press — (Decrease) button again when it works at low speed, the cooker hood will turn off and the backlight of the — (Decrease) button will be off.
- Ⓜ (Timer) button:
6.1 The ⏻ (Timer) button works when the motor and light is on only. The timer setting is 5mins. The timer could be repeat setting. When the time is up, the cooker hood will be turn off and the light will be off.
6.2 When the timer is set, if adjusting the speeds, the timer will re-calculate the working time.
5. CLEANING AND MAINTENANCE
Changing and cleaning the anti-grease filters
- Removing the filters as the instruction in Pic. 10.
- You can clean the filter as below measure:
Soak them for about 3 minute in hot water (40-50 degrees) with a grease-loosening detergent then brush it gently with a soft brush. Please do not apply too much pressure, avoid damaging it.
- Please do not use abrasive detergent for it will damage the hood.
• Make sure that the hood is shut off before cleaning.
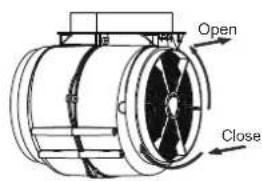
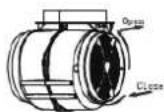
Change the charcoal filter (see Pic. 11).
- Remove the filters see Pic.10.
- The charcoal filters (Pic.11) are located at both end of the motor. Turn the charcoal filters until they are unscrewed.
- Apply reverse procedure to uninstall the charcoal filter.
Warning: the charcoal filer cannot be washed or recycled.
It should be replaced after approximately 120 hours of use.
natural_image
Isometric line drawing of a mechanical assembly or mounting bracket (no text or symbols)
Pic.10
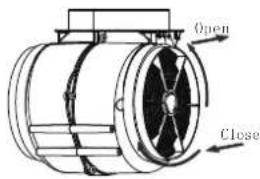
text_image
Open
Close
Pic.11
5. CLEANING AND MAINTENANCE
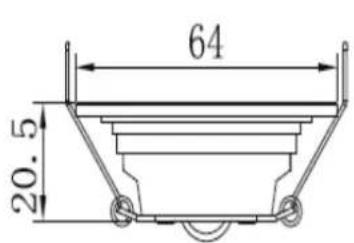
Change the lamp
ILCOS D code for this lamp is: DSR-1.5/65-S-64
- LED modules, self-ballasted - round lamp
- Max wattage: 1.5 W
- Voltage range: DC 12V
- Dimensions:64 mm
text_image
64
20.5
natural_image
Line drawing of a mechanical component with a circular top and mounting bracket (no text or symbols)
- TROUBLE SHOOTING
| Symptom | Solution |
| The cooker hood does not start. | Check that the hood is connected to the electricity supply.Check that the fan speed control is set properly. |
| The cooker hood is not working Effectively. | The fan speed is not set high enough.The grease filter is dirty.The kitchen is not ventilated well enough.If the hood is set for recirculation, check that the carbon filters have not expired.If the hood is set for extraction, check that the ducting and outlets are not blocked. |
| The cooker hood has switched off during operation | The safety cut-out device has been tripped.Turn off the hob and then wait for the device to reset.Note that if you have installed your cooker hood too low, this will happen.If it happens frequently, it will be damaged. |
7. TECHNICAL SPECIFICATION
| Model | SHD60FLIGNE/3, SHD90FLIGNE/3 |
| Volatge / Frequecy | 220-240V~50Hz |
| Rated motor input power | 73W |
| Illumination | ≤2X1.5W |
| Rated input power | 76W |
* The above table indicate the information for the cooker hood. The test result is done as per the relevant requirement of EU No 65/2014 and EU No 66 / 2014. (The front panel is open.)
| Model identification | | |
| S ymbol | Value | Unit |
| Model no. SHD60FLIGNE/3 SHD90FLIGNE/3 | | | |
| Annual Energy Consumption | AEC_hood | 10,9 | 11,1 | kWh/a |
| Time increase factor f 0,9 0,9 - | | | | |
| Fluid Dynamic Efficiency | FDE_hood | 29,2 | 29,2 | - |
| Fluid Dynamic Efficiency class | - | Class A | Class A | - |
| Energy Efficiency Index | EEI_hood | 35,4 | 35,7 | - |
| Energy Efficiency class | - | Class A++ | Class A++ | - |
| Maximum air flow - highest setting/at 0 pa | | 587,5 | 600 | m^3/h |
| Maximum air flow - lowest setting/at 0 pa | | 195,5 | 195,5 | m^3/h |
| Maximum air flow - highest setting at working point in normal use | Q_max | 556,6 | 561,6 | m^3/h |
| Maximum air flow - lowest setting at working point in normal use | Q_max | 184,4 | 185,2 | m^3/h |
7. TECHNICAL SPECIFICATION
| Measured air flow rate at best efficiency point | Q_BEP | 201,6 208,6 | | m^3/h |
| Measured air pressure at best efficiency point | P_BEP 126 | 125 Pa | | |
| Measured electric power input at best efficiency point | W_BEP | 24,2 | 24,8 | W |
| Nominal power of the lighting system | W_L | 4,0 4,0 W | | |
| Average illumination of the lighting system on the cooking surface | E_middle | 150 130 lux | | |
| Lighting efficiency | LE_hood | 38,0 | 33,0 | Lux/W |
| Lighting efficiency class | - | Class A | Class A | - |
| Grease Filtering Efficiency | GFE_hood | 65,5 | 65,5 | - |
| Grease Filtering Efficiency(GFEhood)class | - Class D | Class D | - | |
| Measured power consumption in standby mode | Ps | - | | W |
| Measured power consumption off mode | Po | 0,40 | 0,40 | W |
| Sound power level | L_WA | Highest setting:64Lowest setting:45 | Highest setting:64Lowest setting:43 | dB |
| Measurement Standard | EN 61591:1997 + A1:2006 + A2:2011 + A11:2014 + A12:2015 |
* We decline liability for any damage or accident derived from any use of this product which is not in conformity with the instructions contained in this booklet.
ENVIRONMENTAL PROTECTION
This product is marked with the symbol on the selective sorting of waste electronic equipment. This means that this product must not be disposed of with household waste but must be supported by a system of selective collection in accordance with Directive 2012/19/EU. It will then be recycled or dismantled to minimize impacts on the environment, electrical and electronic products are potentially dangerous for the environment and human health due to the presence of hazardous substances.
For more information, please contact your local or regional authorities.
Note :
a. In order to reduce the environmental impact (e.g. energy use) of the cooking process, please be sure that your product is installed according to the user manual, keep the operation place ventilated, keep the extraction duct be direct and short as possible as it can be.
b. For the product with manual operation mode, we suggest switch the motor off within 10 minutes after finishing the cooking process.
c. Please be sure to dismantle related components according to the user manual when maintaining for non-destructive, protect the parts to make the re-installed work can be favoring and avoid damage.