
KMI 754 000 C - Cooker AMICA - Free user manual and instructions
Find the device manual for free KMI 754 000 C AMICA in PDF.
User questions about KMI 754 000 C AMICA
0 question about this device. Answer the ones you know or ask your own.
Ask a new question about this device
Download the instructions for your Cooker in PDF format for free! Find your manual KMI 754 000 C - AMICA and take your electronic device back in hand. On this page are published all the documents necessary for the use of your device. KMI 754 000 C by AMICA.
USER MANUAL KMI 754 000 C AMICA
natural_image
Simple geometric diagram of four curved circles arranged in a 2x2 grid within a square frame (no text or symbols)KMI 754 000 C / DI 6402 B
GARANTIE, NACHVERKAUF-SERVICE 30
GARANTIE 30
EN- Table of contents
SAFETY INSTRUCTIONS 32
UNPACKING 34
DISPOSAL 34
HOW TO SAVE ELECTRICITY 35
INSTALLATION INSTRUCTIONS 36
MAKE THE WORKTOP RECESS 36
INSTALL THE HOB IN THE OPENING 38
TIPS FOR THE INSTALLER 38
WIRING DIAGRAM 39
BASIC INFORMATION ABOUT YOUR APPLIANCE 40
INDUCTION HOB OPERATION PRINCIPLE 40
COOKWARE CHARACTERISTICS 40
RESIDUAL HEAT INDICATOR "H" 42
BEFORE USING THE APPLIANCE FOR THE FIRST TIME 42
IF THE APPLIANCE DOES NOT DETECT THE COOKWARE ON THE OPERATING COOKING
ZONE 42
COOKWARE SIZE 42
OPERATION 43
FEATURES AND COMPONENTS 43
CONTROL PANEL 43
CONNECT THE POWER SUPPLY 44
USE A COOKING ZONE 44
BOOSTER FUNCTION 44
ADJUST THE HEAT SETTING 44
TURN OFF A COOKING ZONE 44
CHILD LOCK 44
COOKING ZONE AUTO OFF 45
KITCHEN TIMER 45
SET COOKING ZONE TIMER 45
TROUBLESHOOTING 46
ERROR CODES 47
CLEANING AND MAINTENANCE 48
CLEANING AFTER EACH USE 48
REMOVING STAINS 48
PERIODIC INSPECTIONS 49
WARRANTY AND AFTER SALES SERVICE 50
WARRANTY 50
CS- Obsah
POKYNY TÝKAJÍCÍ SE BEZPEČNÉHO POUŽÍVÁNÍ 52
VYBALENI 54
ODSTRAŇOVÁNÍ OPOŤŘEBOVANÝCH SPOTŘEBIČŮ 55
JAK ŠETRIT ENERGIÍ 55
INSTALACE 56
PŘÍPRAVA DESKY NÁBYTKU DO VESTAVĚNÍ VARNÉ DESKY 56
INSTALOVÁNÍ DESKY V MONTÁŽNÍM OTVORU 58
POKYNY PRO INSTALATÉRA 58
SCHÉMA PŘÍPUSTNÝCH ZAPOJENÍ 59
ZÁKLADNÍ INFORMACE O ZAŘÍZENÍ 60
ZÁSADA FUNGOVÁNÍ INDUKČNÍ DESKY 60
CHARAKTERISTIKA NÁDOBÍ 60
UKAZATEL ZBYTKOVÉHO TEPLA „H“ 62
PŘED PRVNÍM ZAPNUTÍM VARNÉ DESKY 62
NENALEZENÝ HRNEC NA ZAPNUTÉM VARNÉM POLI 62
ROZMĚRY NÁDOB 62
OBSLUHA 63
SOUČÁSTI ZAŘÍZENÍ 63
OVLÁDACÍ PANEL 63
PŘIPOJENÍ NAPÁJENÍ 63
ZAPNUTÍ VARNÉ ZÓNY 63
FUNKCE BOOSTER 64
UPRAVENÍ NASTAVENÉHO VÝKONU ZÓNY 64
VYPNUTÍ VARNÉ ZÓNY 64
RODIČOVSKÁ BLOKÁDA 64
AUTOMATICKÉ VYPNUTÍ ZÓNY 64
FUNKCE MINUTKY 65
NASTAVENÍ ČASU VYPNUTÍ VARNÉ ZÓNY. 65
ČINNOST V HAVARIJNÍCH SITUACÍCH 66
CHYBOVE KODY 67
CISTENI A UDRZBA 68
ČIŠTĚNÍ PO KAŽDÉM POUŽITÍ 68
ODSTRAŇOVÁNÍ SKVRN 68
PERIODICKÉ PROHLÍDKY 69
ZÁRUKA, POPRODEJNÍ SERVIS 70
ZÁRUKA 70
SK- Obsah
BEZPEČNOSTNÉ POKYNY POUŽÍVANIA 72
VYBAL'OVANIE 74
LIKVIDÁCIA ZARIADENÍ 75
ÚSPORA ENERGIE 75
MONTAZ 76
PRÍPRAVA KUCHYNSKEJ DOSKY NA VSTAVANIE VARNEJ DOSKY 76
MONTÁŽ DOSKY V MONTÁŽNOM OTVORE 78
POKYNY PRE MONTÁŽNEHO TECHNIKA 78
SCHÉMA PRÍPUSTNÝCH ZAPOJENÍ 79
ZÁKLADNÉ INFORMÁCIE O ZARIADENÍ 80
PRINCÍP FUNGOVANIA INDUKČNEJ VARNEJ DOSKY 80
CHARAKTERISTIKA RIADU 80
UKAZOVATEL' ZVYŠKOVÉHO TEPLA „H” 82
PRED PRVÝM POUŽITÍM 82
NEDETEGOVANIE HRNCA NA SPUSTENEJ VARNEJ ZÓNE 82
ROZMERY RIADU 82
OBSLUHA 83
PRVKY ZARIADENIA 83
OVLÁDACÍ PANEL 83
PRIPOJENIE K EL. NAPÄTIU 83
ZAPNUTIE VARNEJ ZÓNY 83
FUNKCIA BOOSTER 84
UPRAVENIE NASTAVENÉHO VÝKONU ZÓNY 84
VYPNUTIE VARNEJ ZÓNY 84
DETSKÁ ZÁMKA 84
AUTOMATICKÉ VYPNUTIE ZÓNY 84
ČASOVAČ 85
NASTAVENIE ČASU VYPNUTIE VARNEJ ZÓNY 85
ODSTRANOVANIE PORUCH 86
KODY CHYB 87
ČISTENIE A ÚDRŽBA 88
ČISTENIE PO KAŽDOM POUŽITÍ 88
ODSTRAŇOVANIE ŠKVŘN 88
PERIODICKÁ PREHLIADKA SPOTREBIČA 89
ZÁRUKA, POPREDAJNÝ SERVIS 90
ZÁRUKA 90
RESTWARMTE-INDICATOR "H" 122
VOOR HET EERSTE GEBRUIK VAN DE KOOKPLAAT 122
DE PAN WORDT NIET ONTDEKT OP DE INGESCHAKELDE KOOKZONE. 122
AFMETINGEN KOOKGEREI 122
BEDIENING 123
ELEMENTEN VAN HET APPARAAT 123
BEDIENINGSPANEEL 123
AANSLUITING OP DE STROOMVOORZIENING 123
INSCHAKELEN VAN DE KOOKZONE 123
BOOSTERFUNCTIE 124
WIJZIGING VAN HET INGESTELDE VERMOGEN VAN DE KOOKZONE. 124
UITSCHAKELEN VAN DE KOOKZONE 124
KINDERSLOT 124
AUTOMATISCH UITSCHAKELEN VAN EEN KOOKZONE 125
FUNCTIE KOOKWEKKER 125
INSTELLEN VAN DE UITSCHAKELTIJD VOOR EEN KOOKZONE 125
natural_image
Recycling symbol composed of three chasing arrows forming a triangle (no text or labels)natural_image
Symbol of a trash bin crossed out by two diagonal lines (no text or numbers present)
natural_image
Simple black-and-white line drawing of a tree with cloud-like canopy and two wavy lines below (no text or symbols)natural_image
Pure mechanical cross-section diagram without any text, numbers, or symbols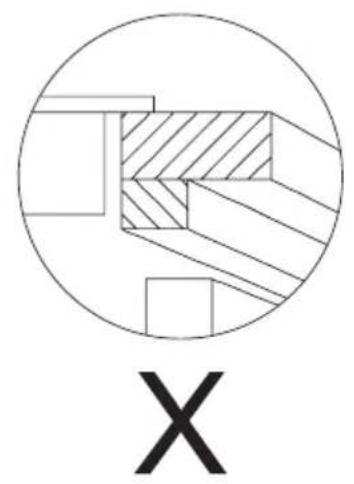
natural_image
Abstract geometric diagram with concentric circles and crosshatched regions, labeled 'X' below (no text or symbols within the diagram itself)
natural_image
Pure mechanical cross-section diagram without any text, numbers, or symbolsnatural_image
Illustration of a cooking pot and three circular kitchen utensils (no text or symbols)natural_image
Five identical cooking pots with crossed-out black X marks, arranged horizontally (no text or symbols)natural_image
Crossed construction lines with no text or symbolsnatural_image
Metallic adjustable wrench tool with handle and clasp (no text or symbols visible)GARANTIE, NACHVERKAUFSERVICE
Garantie
From now on, your daily housework will be easier than ever before. Your appliance Air*optionally easy to use and extremely efficient. After reading these Operating Instructions, operating the appliance will be easy.
Before being packaged and leaving the manufacturer, the appliance was thoroughly checked with regard to safety and functionality.
Before using the appliance, please carefully read these Operating Instructions. By following these instructions carefully you will be able to avoid any problems in using the appliance. It is important to keep these Operating Instructions and store them in a safe place so that they can be consulted at any time.
Follow these instructions carefully in order to avoid possible accidents.
Sincerely,
Amica
SAFETY INSTRUCTIONS
- Warning: The appliance and its accessible parts become hot during use. Care should be taken to avoid touching heating elements. Children less than 8 years of age shall be kept away unless continuously supervised.
- This appliance can be used by children aged from 8 years and above and persons with reduced physical, sensory or mental capabilities or lack of experience and knowledge if they have been given supervision or instruction concerning use of the appliance in a safe way and understand the hazards involved. Children shall not play with the appliance. Cleaning and user maintenance shall not be made by children without supervision.
- Warning: Unattended cooking on a hob with fat or oil can be dangerous and may result in fire.
- NEVER try to extinguish a fire with water, but switch off the appliance and then cover flame e.g. with a lid or a fire blanket.
- Warning: Danger of fire: do not store items on the cooking surfaces.
- Warning: If the surface is cracked, switch off the appliance to avoid the possibility of electric shock.
- Metallic objects, such as knives, forks, spoons and lids should not be placed on the hob surface since they can get hot.
- After use, switch off the hob element by its control and do not rely on the pan detector.
- The appliance is not intended to be operated by means of an external timer or separate remote-control system.
-
You should not use steam cleaning devices to clean the appliance.
-
Before using the induction hob for the first time, carefully read its user manual. This will ensure user safety and prevent damage to the appliance.
- If the induction hob is operated in immediate vicinity to the radio, television set or other radio-frequency-emitting device, make sure that the hob's touch sensor controls operate correctly.
- The hob must be connected by a qualified installer.
- Do not install the appliance near a refrigerator.
- Furniture, where the hob is installed must be resistant to temperatures up to 100°C. This applies to veneers, edges, surfaces made of plastics, adhesives and paints.
- The appliance may only be used once fitted in kitchen furniture. This will protect the user against accidental touching the live part.
- Repairs to electrical appliances may only be conducted by specialists. Improper repairs can be dangerous to the user.
- The appliance is not connected to mains when it is unplugged or the main circuit breaker is switched off.
- Plug of the power cord should be accessible after appliance has been installed.
- Ensure that children do not play with the appliance.
- This appliance is not intended for use by persons (including children) with physical, mental or sensory handicaps, or by those who are inexperienced or unfamiliar with the appliance, unless under supervision or in accordance with the instructions as communicated to them by persons responsible for their safety.
- Persons with implanted devices, which support vital functions (eg, pacemaker, insulin pump, or hearing aids) must ensure that these devices are not affected by the induction hob (the frequency of the induction hob is 20-50 kHz).
- Once power is disconnected all settings and indications are erased. When electric power is restored caution is advisable. If the cooking zones are hot, "H" residual heat indicator will be displayed. Also child lock key will be displayed, as when the appliance is connected for the first time.
- Built-in residual heat indicator can be used to determine if the appliance is on and if it is still hot.
- If the mains socket is near the cooking zone, make sure the cord does not touch any hot areas.
- When cooking using oil and fat do not leave the appliance unattended, as there is a fire hazard.
- Do not use plastic containers and aluminium foil. They melt at high temperatures and may damage the cooking surface.
- Solid or liquid sugar, citric acid, salt or plastic must not be allowed to spill on the hot cooking zone.
- If sugar or plastic accidentally fall on the hot cooking zone, do not turn off the hob and scrape the sugar or plastic off with a sharp scraper. Protect hands from burns and injuries.
- When cooking on induction hob only use pots and pans with a flat base having no sharp edges or burrs as these can permanently scratch the cooking surface.
- Induction hob cooking surface is resistant to thermal shock. It is not sensitive to cold nor hot.
- Avoid dropping objects on the cooking surface. In some circumstances, point impacts such as dropping a bottle of spices, may lead to cracks and chipping of the cooking surface.
- If any damage occurs, seething food can get into the live parts of the induction hob through damaged areas.
- If the cooking surface is cracked, switch off power to avoid the risk of electric shock.
- Do not use the cooking surface as a cutting board or work table.
-
Do not place metal objects such as knives, forks, spoons, lids and aluminium foil on the cooking surface as they could become hot.
-
Do not install the hob over a heater without a fan, over a dishwasher, refrigerator, freezer or washing machine.
- If the hob has been built in the kitchen worktop, metal objects located in a cabinet below can be heated to high temperatures through the air flowing from the hob ventilation system. As a result it is recommended to use a partition (see Figure 2).
- Please follow the instructions for care and cleaning of induction hob. In the event of misuse or mishandling warranty may be void.
UNPACKING

natural_image
Recycling symbol composed of three chasing arrows forming a triangle (no text or labels)The appliance was protected from damage at the time of transport. After unpacking, please dispose of all elements of packaging in a way that will not cause damage to the environment. All materials used for packaging the appliance are environmentally friendly; they are 100% recyclable and are marked with the appropriate symbol.
Important! Keep the packaging material (bags, Styrofoam pieces, etc.) out of reach of children during unpacking.
DISPOSAL
natural_image
Symbol of a trash bin crossed out by two diagonal lines (no text or numbers present)In accordance with European Directive 2002/96/EC and Polish legislation regarding used electrical and electronic goods, this appliance is marked with the symbol of the crossed-out waste container.
This marking means that the appliance must not be disposed of together with other household waste after it has been used. The user is obliged to hand it over to waste collection centre collecting used electrical and electronic goods. The collectors, including local collection points,
shops and local authority departments provide recycling schemes. Proper handling of used electrical and electronic goods helps avoid environmental and health hazards resulting from the presence of dangerous components and the inappropriate storage and processing of such goods.
HOW TO SAVE ELECTRICITY

natural_image
Simple black-and-white line drawing of a tree with cloud-like canopy and two wavy lines below (no text or symbols)Using the electricity in a responsible manner not only saves money, but also helps protect the environment. So let's save electricity! This is how it's done:
- Use the correct cookware.
- Cookware with flat and a thick base can save up to 1/3 of electricity. Please remember to cover cookware with the lid, otherwise electricity consumption increased four times!
-
Always keep the cooking zones and cookware bases clean.
-
Dirt prevents proper heat transfer. Often burnt stains can be removed only with agents harmful to the environment.
- Avoiding unnecessary lifting the lid to peek into the pot.
- Do not install the hob in the immediate vicinity of refrigerator / freezer.
- The electricity consumption is then unnecessarily increased.
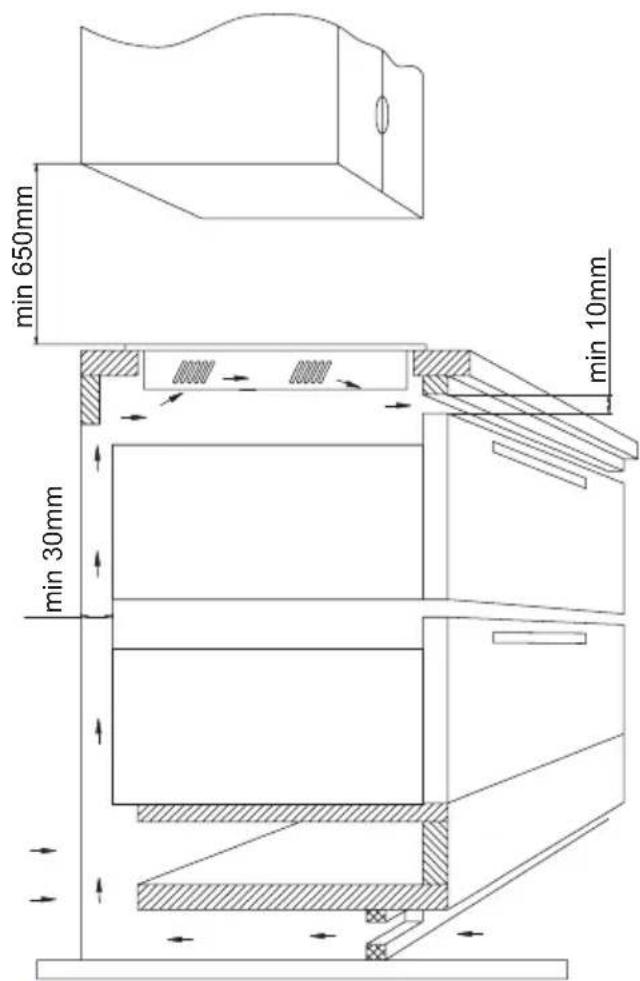
INSTALLATION INSTRUCTIONS
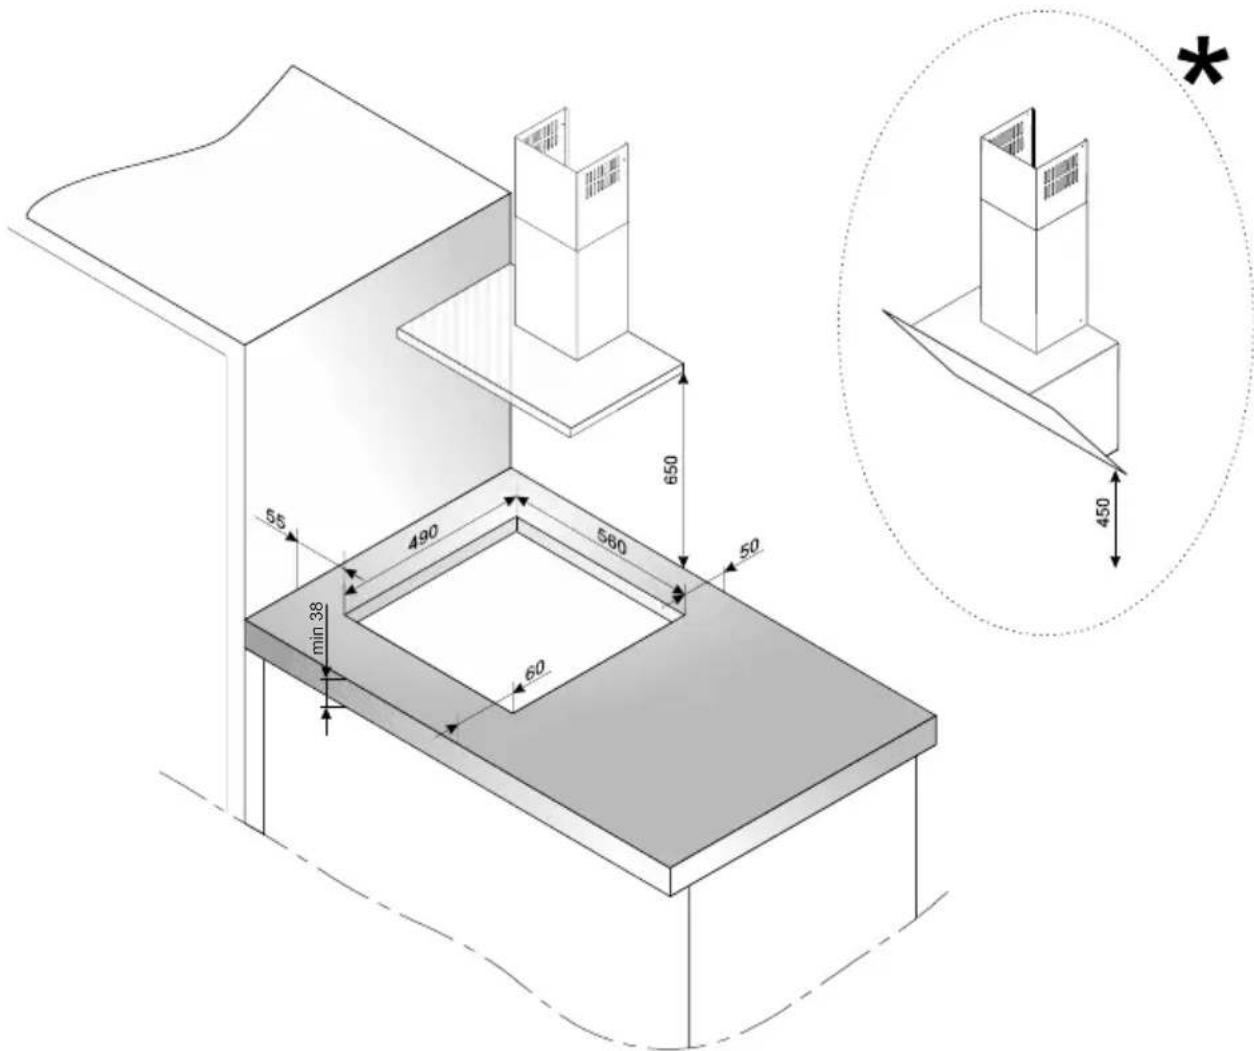
Make the worktop recess
The worktop must be flat and level. Edge of the worktop near the wall must be sealed to prevent ingress of water or other liquids.
Worktop must be made of materials, including veneer and adhesives, resistant to a temperature of 100^ C. Otherwise, veneer could come off or surface of the worktop become deformed.
Edge of the opening should be sealed with suitable materials to prevent ingress of water.
Ensure sufficient clearance below the hob to allow proper air circulation and prevent overheating. Please read on for more information on correct clearance.
Worktop opening must be cut to dimensions as shown on figure below (measurement unit [mm]):
text_image
55 490 560 650 50 min 38 60 450 ** For straight hoods, the minimum distance of the hood from the worktop should be 650 mm, for inclined hoods, the distance should be 450 mm
natural_image
Pure mechanical cross-section diagram without any text, numbers, or symbols
natural_image
Abstract geometric diagram with shaded and unshaded regions inside a circle, labeled 'X' below (no text or symbols within the diagram itself)
natural_image
Pure geometric diagram with circles and diagonal hatching, no text or symbols presentBuilt-in hob above the oven
Built-in hob above kitchen cabinets
text_image
min 650mm min 10mm min 30mm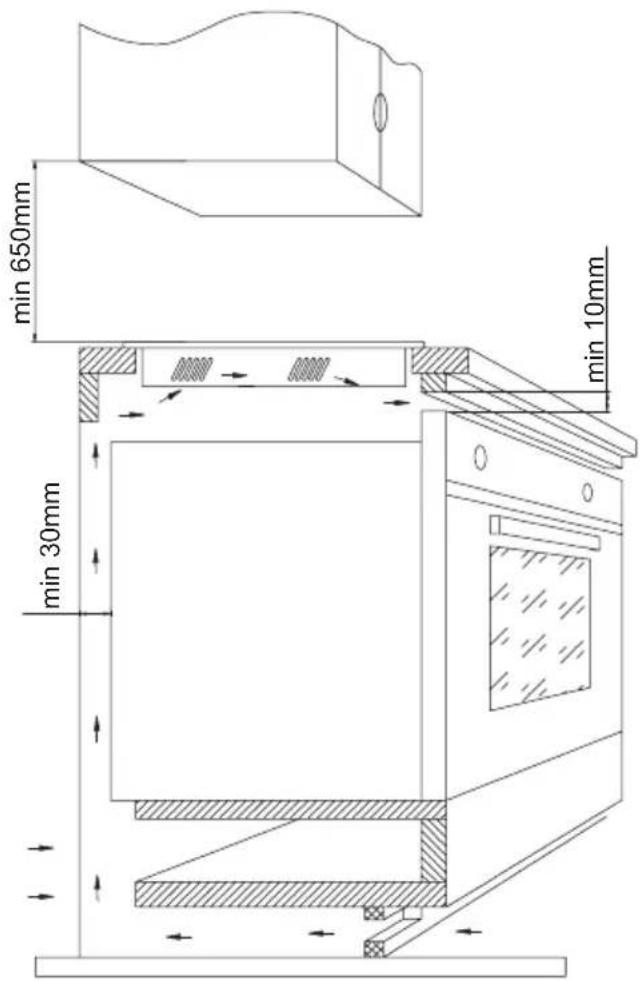
text_image
min 650mm min 10mm min 30mm
Do not install the hob above the oven without ventilation
Install the hob in the opening
Using an electrical cord, connect the hob according to electrical diagram provided Remove dust from the worktop, insert hob into the opening and press in firmly
Tips for the installer
The hob is equipped with a terminal block allowing different connections appropriate for a specific type of power supply.
Terminal block allows the following connections:
- Single-phase 230V \~
- Two-phase 400V 2N\~
The hob can be adapted to a specific type of power supply by bridging the appropriate terminals according to wiring diagram. Wiring diagram is placed on the hob's underside. The terminal block can be accessed by removing the lid on hob's underside. Remember to match the power cord to the type of connection and the hob's power rating.
Note: Remember to connect the protective conductor to correctly marked terminal block clamp. The electrical system supplying the hob must be protected by a properly selected tripping device or a circuit breaker allowing to disconnect the power supply in an emergency.
Before connecting the appliance to power, please carefully read the information provided on the rating plate and wiring diagram. Connecting the hob other than shown on the wiring diagram may damage the hob.
Note: Electrical connection must be made by a properly certified qualified installer. Do not make any alterations in the appliance electrical system.
Note: The installer is obliged to provide the user with "appliance electrical connection certificate" (enclosed with the warranty card). After installation, the installer should also provide information on the connection made:
- single-phase, two-phase or three-phase,
• conductor cross-section,
• electrical protection (fuse type).
Wiring diagram
| Note: For each connection the protective conductor must be connected to the terminal marked | Type / Conductor cross section | Fuse protection | |||
| 1 | For a 230V network, single phase connection with a neutral lead, L1 and L2 terminals bridged, neutral lead is connected to N terminal, and the protective conductor to | 1N~ | 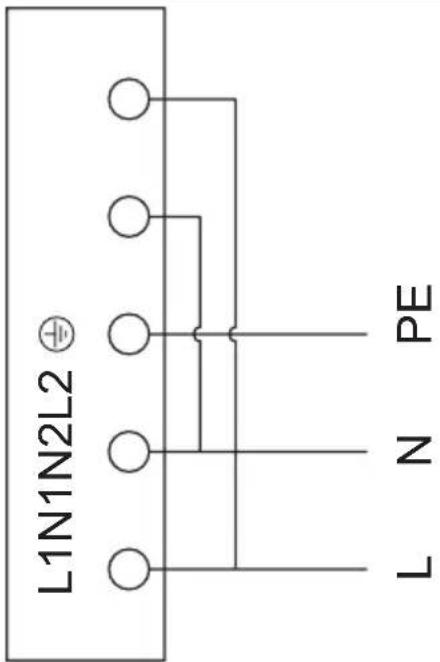 | min. 30A | |
| 2 | For a 230/400V, two phase connection with a neutral lead, neutral lead is connected to N terminal, and the protective conductor to | 2N~ | 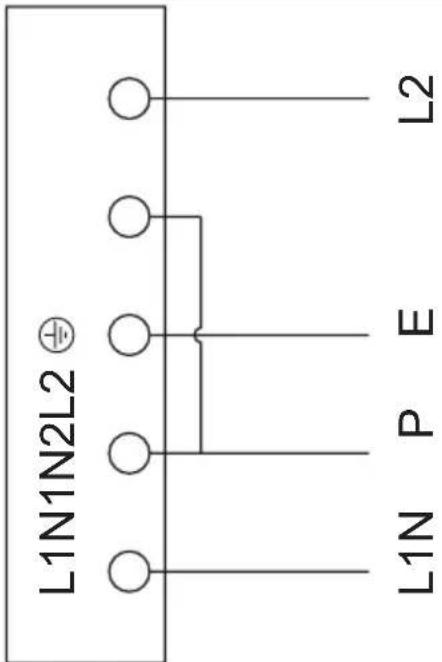 | min. 16A | |
BASIC INFORMATION ABOUT YOUR APPLIANCE
Induction hob operation principle
Under the surface glass, there are induction coils that produce pulsing magnetic field. This magnetic field penetrates a pot placed on the hob surface causing the pot to heat up. It is important to use pots with a suitable base.
The cooking zone is powered intermittently, which is normal. The intermittent power depends on the heat setting.

Depending on the pots used and heat setting during cooking, the appliance produces a distinctive whiz. This is normal and does not constitute grounds for a complaint.
Cookware characteristics
- To check that the pot is suitable for your induction hob, make sure that a magnet strongly attracts its base. The greater the attraction force, the better the pot.
- Always use high-quality cookware with a perfectly flat base. The use of this kind of cookware prevents hot spots that may result in food sticking to the pot. Pots and pans with thick steel walls provide superior heat distribution. The concave base or deep embossed logo of the manufacturer interfere with the temperature induction control module and can cause overheating of the pot or pan.
- Do not use damaged cookware such as cookware with deformed base due to excessive heat.
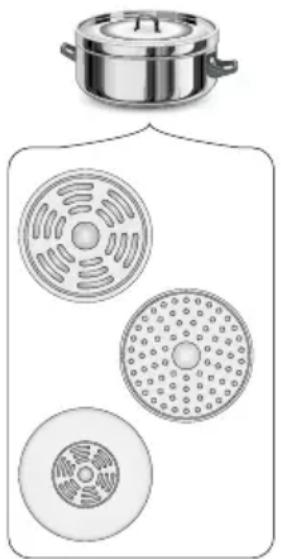
natural_image
Illustration of a cooking pot and three circular kitchen utensils (no text or symbols)- When you use large ferromagnetic base cookware, whose diameter is less than the total diameter of the cookware, only the ferromagnetic base heats up. This results in a situation where it is not possible to uniformly distribute the heat in the cookware. If the ferromagnetic area is reduced due to inclusion of aluminium parts then the effective heated area can be reduced. Problems with the detection of the cookware could arise or cookware may not be detected at all. To achieve optimum cooking results, the diameter of the ferromagnetic base should match that of the cooking zone. If cookware is not detected in a given cooking zone, it is advisable to try it in a smaller cooking zone.

The high-quality cookware is essential for efficient induction cooking.

It is not recommended to use external induction adapters.
- For induction cooking use only ferromagnetic base materials such as:
- enamelled steel
- cast iron
- special stainless steel cookware designed for induction cooking.
- Lid prevents heat from escaping and thus reduces heating time and lowers energy consumption.
- Make sure that cookware base is dry. When filling a pot or when using a pot taken out of the refrigerator make sure its base is completely dry before placing it on the cooking zone. This is to avoid soiling the surface of the hob.

natural_image
Five identical cooking pots with crossed X marks, no text or symbols present| Kitchen cookware marking |  | Check for marking indicating that the cookware is suitable for induction cooking. |
Stainless Steel Cookware is not detected With the exception of the ferromagnetic steel cookware
Aluminium Cookware is not detected
Cast iron
High efficiency
Note: cookware can scratch the hob surface
Enamelled steel
High efficiency
Cookware with a flat, thick and smooth base is recommended
Glass Cookware is not detected
Porcelain Cookware is not detected
Cookware with copper base
Cookware is not detected
Residual heat indicator "H"
When you have finished cooking, the induction hob glass within the cooking zone is still hot, this is called residual heat.
If the glass surface is hot, the "H" is shown on the cooking zone display.
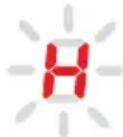

When residual heat indicator is on, do not touch the cooking zone as there is a risk of burns and do not place on it any items sensitive to heat!

The "H" residual heat indicator is not displayed during a power outage. However, cooking zones may still be hot!
Before using the appliance for the first time
- Thoroughly clean the induction hob. The hob has a glass surface, therefore handle it with care.
- Odours may be released when you first start your appliance. If this happens, turn on exhaust hood or open the window in the room. Emission of odour is temporary.
If the appliance does not detect the cookware on the operating cooking zone
If there is no cookware on the active cooking zone or the cookware is unsuitable, the symbol indicated on the side will be shown on the display. If you do not place a suitable cookware on the cooking zone, it will turn off after 1 minute. If no other cooking zones are used, your induction hob will be in standby mode for another minute, an then turn off completely.

Cookware size
In order to achieve best cooking results, use cookware with bottoms (ferromagnetic part) of the size corresponding to the size of the cooking zone.
Using cookware with the bottom diameter smaller than the cooking zone size will reduce the effectiveness of the cooking zone and increase cooking time.
Cookware detection sensitivity of a cooking zone is affected by the diameter of ferromagnetic component embedded in the cookware base and its material.
Cooking zone diameter Cookware diameter [mm]
| 160 120 |
| 180 140 |
| 210 180 |
OPERATION
Features and components
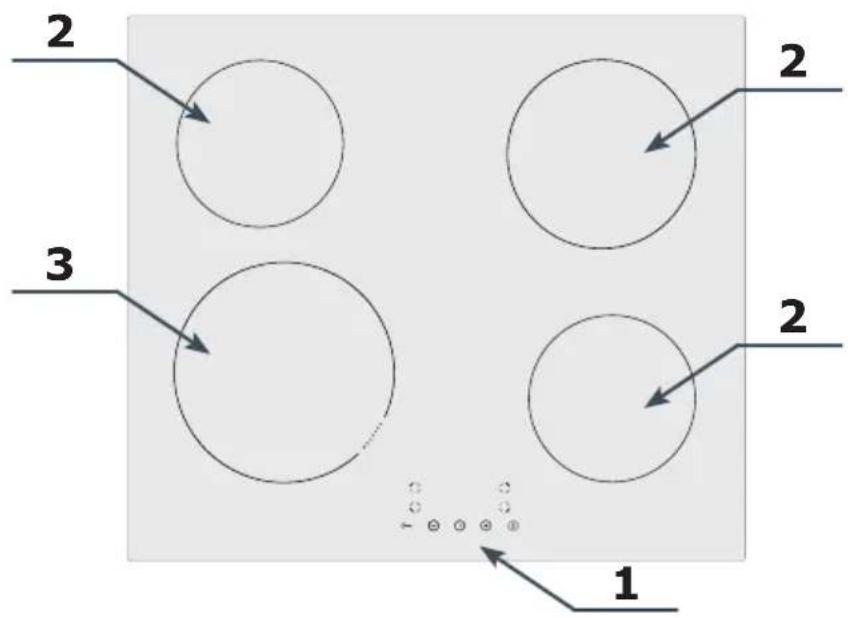
text_image
2 3 1 2 2 2- Control Panel
- Induction cooking zones
- Booster induction cooking zone
Control Panel
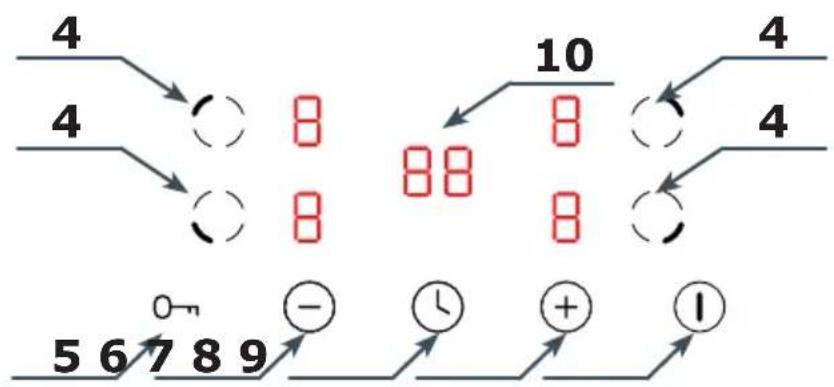
text_image
4 4 8 10 4 8 8 8 4 5 6 7 8 9 - ①- Cooking zone selection sensor
- Child Lock
- (-) Lower heat setting
- Kitchen Timer
- (+) Higher heat setting
- On / off
- Timer display
Note: You will hear a beep each time you touch a sensor. It is not possible to turn off the acoustic beeps.
Connect the power supply
When you connect the power supply, all displays will light up for about 1 second and you will hear a beep. The appliance is on.
Use a cooking zone
Place the cookware on the cooking zone, for example on the rear left cooking zone. Touch the ⓘ sensor and ⚡ will be shown on all cooking zone displays. Touch ⚙ to select a cooing zone and then use ⚠ and ⚡ to select a heat setting 1-9 (some cooking zones are Booster type - read on for more details). Touch the ⚡ sensor again to confirm the heat setting or simply wait a few seconds until it is confirmed automatically. If there is no cookware on the selected cooking zone, the ⚗ symbol will be displayed and the cooking will only start when you place the cookware on the cooking zone.
Note:
You can place the cookware on the cooking zone at any time, also before selecting a heat setting for the cooking zone.
If you do not select a heat setting within 1 minute, the appliance will turn off automatically.
When you select a cooking zone with ⚙ a default heat setting of 5 will be displayed and it is not possible to have a different default setting.
Booster function
When active, this function temporarily boosts the power output of a specific cooking zone. You can set the heat setting in the range from 1 to P, where P the highest possible heat setting.
Note: The Booster function can only operate for a maximum of 5
minutes and then heat setting is automatically reduced to level 9.
Adjust the heat setting
Touch ◦ to select the desired cooking zone and then use ⊕ and ⊖ to adjust the heat setting 1 to 9 (or 1 to P for the Booster cooking zones). Touch ◦ to confirm the new heat setting.
Turn off a cooking zone
To turn off a cooking zone touch to select it then proceed as follows:
- Touch ⓣ to reduce the heat setting down to 0.
- Touch and simultaneously and the heat setting will be reduced to 0.
In both cases, touch ⚙confirm, or simply wait a few seconds.
To turn off all the cooking zones at once, touch ① and the appliance will turn off completely.
Child Lock
The Child Lock function disables all touch controls except ① and the L8 symbol is shown on the display.
In order to activate Child Lock touch and hold 0 for 3 seconds and L will be displayed. To deactivate Child Lock touch and hold 0 for 3 seconds and L will disappear.
You can enable Child Lock when the appliance and the ① sensor is active. In the event of an emergency, touch ① to turn off the appliance without having to unlock it first. To turn on the appliance again you need to deactivate the Child Lock first.
Cooking zone auto off
The cooking zone will turn off automatically after a specified time has elapsed, which depends on its heat setting. This is a safety feature that cannot be disabled.
Heat setting Auto off time
| 1 | 8h |
| 2 | 8h |
| 3 | 8h |
| 4 | 4h |
| 5 | 4h |
| 6 | 4h |
| 7 | 2h |
| 8 | 2h |
| 9 | 2h |
Kitchen Timer
In order to set the Kitchen Timer for 25 minutes, first touch Ⓤto turn on the appliance and ⏻will be shown on cooking zone displays. Now touch ⏱and the right digit on the display ⏱will flash. Use ⏱and ⏱to select the value of 5, then touch ⏱once again, and the left digit on the display ⏱will flash. Use ⏱and ⏱to select the value of 2. Touch ⏱to confirm and start the countdown. The Kitchen Timer has been set to 25 minutes, and after this time elapses you will hear beeping for about 30 seconds. Touch any sensor to mute the beeping. You can also use the Kitchen Timer during cooking on any of the cooking zones.
Set cooking zone Timer
You can set the cooking zone to turn off after a specific time. To do this, select the desired cooking zone and set its heat setting. Touch while the heat setting is flashing on the display. Proceed to set the Timer in the same way as the Kitchen Timer. Touch to confirm the Timer setting and start the countdown. A dot will flash on the cooking zone display for which a Timer countdown is running. When the set time has elapsed, the cooking zone will turn off automatically. You can set the Timer independently for each cooking zone.
Note: For both the Timer and Kitchen Timer functions:
- You can set the time from 1 to 99 minutes.
- Countdown starts when you touch Ⓤto confirm.
- You can adjust the set time. To cancel the running Timer adjust the set time down to 00.
- Touch to cancel the running timers and to turn off the appliance completely.
TROUBLESHOOTING
In the event of any fault:
- Turn off the appliance
- Disconnect the power supply
- Have the appliance repaired
- Based on the instructions given in the table below, some minor issues can be corrected by the user. Please check the consecutive points in the table before you refer the repair to customer service.
| PROBLEM POSSIBLE CAUSE REMEDY | ||
| 1.The appliance does not work | - no power -Check the fuse, replace if blown | |
| 2.Sensor fields do not respond when touched | - Appliance is not turned on - Turn on the appliance | |
| - Sensor field touched too briefly (less than one second) | - Touch the sensor field longer | |
| - Multiple sensors touched at the same time | - Always touch only one sensor field (except when a cooking zone is switched off) | |
| 3.The appliance does not respond and emits and extended beep | - Improper use (wrong sensor fields touched or sensors touched too briefly) | - Reconnect the hob |
| - Sensor fields covered or dirty - Undover or clean the sensor fields | ||
| 4.The appliance switches itself off | - No sensor field is touched for 10 seconds of activating the appliance | - Switch on the appliance and set heat setting without delay |
| - Sensor fields covered or dirty - Undover or clean the sensor fields | ||
| 5.A single cooking zone switches off and residual heat indicator „H” is shown. | - Limited cook time - Switch on the cooking zone again | |
| - Sensor fields covered or dirty | - Uncover or clean the sensor fields | |
| - Electronic components overheated | ||
| 6.Residual heat indicator extinguished even though the cooking zones are hot | - A power outage or the appliance has been disconnected | - Residual heat indicator will be shown again the next time the appliance is turned on and off again |
| 7.Hob cooking surface is cracked. |  Danger! Immediately unplug the appliance or switch off the main circuit breaker. Refer the repair to the nearest service centre. Danger! Immediately unplug the appliance or switch off the main circuit breaker. Refer the repair to the nearest service centre. | |
| 8.When the problem is still not remedied. | Immediately unplug the appliance or switch off the main circuit breaker (fuse). Refer the repair to the nearest service centre.Important!You are responsible for operating the appliance correctly and maintaining its good condition. If you call service as a result of operating the appliance incorrectly you will be responsible for the costs incurred even under warranty.The manufacturer shall not be held liable for damage caused by failure to follow this manual. | |
| 9.Induction hob makes buzzing sound. | This is normal. Cooling fan is operating to cool down internal electronics. | |
| 10. Induction hob makes hissing and whistling sounds. | This is normal. When using several cooking zones at full power, the hob makes hissing and whistling sounds due to the frequencies used to power the coils. | |
| 11. The hob does not work. The cooking zones will not operate. | - Faulty electronics | - Reset the appliance, unplug it for a few minutes (disconnect the fuse). |
ERROR CODES
During appliance operation, an error code may appear on the display. For details, please refer to the table below:
| PROBLEM POSSIBLE CAUSE REMEDY | ||
| E4/E5 Temperature sensor damaged Contact the Service Centre | ||
| E7/E8 IGBT temperature sensor damaged Contact the Service Centre | ||
| E2/E3 Incorrect supply voltage: | Make sure the supply voltage is correct. | |
| E6/E9 Hob overheated | Allow the hob to cool down before using it again. | |
CLEANING AND MAINTENANCE
Proper routine maintenance and cleaning of the appliance can significantly extend its trouble-free operation.
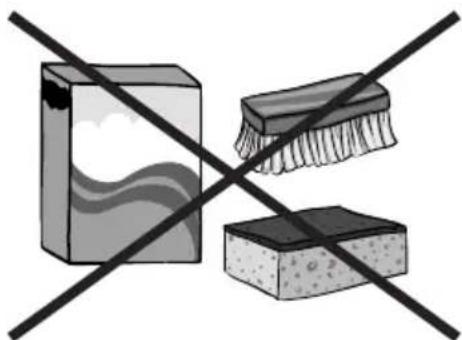
natural_image
Crossed construction lines with no text or symbolsWhen cleaning induction hobs, the same principles apply as for glass surfaces. Do not use under any circumstances any abrasive or caustic cleaners or scouring powders or pads! Do not use steam or pressure cleaners.
Cleaning after each use
Wipe light stains with a damp cloth without detergent. The use of dish-washing liquid may cause a bluish surface discolouration. These persistent stains cannot always be removed right away, even using a special cleaner.
natural_image
Metallic adjustable wrench tool with handle and clasp (no text or symbols visible)Firmly adhering dirt can be carefully removed with a scraper. Then wipe the cooking surface with a damp cloth.
Removing stains
Bright stains of pearl colour (residual aluminium) can be removed from the cool hob using a special cleaning agent. Limestone residue (eg. after evaporated water) can be removed by vinegar or a special cleaning agent.
Do not turn off the cooking zone when removing sugar, food containing sugar, plastic and aluminium foil. Immediately and thoroughly scrape the leftovers off the hot cooking zone using a sharp scraper. Once the bulk of the stain is removed the hob can be turned off and clean the cooled off cooking zone with a special cleaning agent.
Special cleaners are available in supermarkets, electrical and home appliance shops, drug stores, as well as retail food shops and kitchen show-rooms. Scrapers can be purchased in DIY and construction equipment stores, as well as in shops carrying painting accessories.
Never apply a detergent on the hot cooking zone. It is best to let the cleaner dry and then wipe it wet. Any traces of the detergent should be wiped off clean with a damp cloth before re-heating. Otherwise, it can be corrosive.
Warranty will be void if you do not follow the above guidelines!
Periodic inspections
In addition to normal cleaning and maintenance:
- carry out periodic checks of touch controls and other elements. After the warranty expires, have authorised service inspect the appliance every two years,
• repair and identified problems, - carry out periodic maintenance of the hob.
Important!
If the hob's controls do not respond for whatever reason, then turn off the main circuit breaker or remove the fuse and contact customer service.
Important!
In the event of breakage or chipping of the hob cooking surface, turn off and unplug the appliance. To do this, disconnect the fuse or unplug the appliance. Then refer the repair to professional service.
Important!
All repairs and adjustments must be performed by a competent technician or by an authorised installer.
WARRANTY AND AFTER SALES SERVICE
Warranty
Warranty service as stated on the warranty card. The manufacturer shall not be held liable for any damage caused by improper use of the product.

The manufacturer recommends that all repairs and adjustments be carried out by the Factory Service Technician or the Manufacturer's Authorized Service Point. Repairs should be carried out by a qualified technician only.
Manufacturer's Declaration
The manufacturer hereby declares that this product meets the requirements of the following European directives:
• Low Voltage Directive 2014/35/EC
• Electromagnetic Compatibility (EMC) Directive 2014/30/EC
• ErP Directive 2009/125/EC
• Directive RoHS 2011/65/EC
and has thus been marked with the symbol and been issued with a declaration of compliance made available to market regulators.
Vážený kliente,
natural_image
Recycling symbol composed of three chasing arrows forming a triangle (no text or labels)natural_image
Symbol of a trash bin crossed with a diagonal line, no text or labels presentnatural_image
Simple black-and-white line drawing of a tree with cloud-like canopy and two wavy lines below (no text or symbols)natural_image
Pure mechanical cross-section diagram without any text, numbers, or symbols
natural_image
Abstract geometric diagram with concentric circles and cross-hatched regions, labeled 'X' below (no text or symbols within the diagram itself)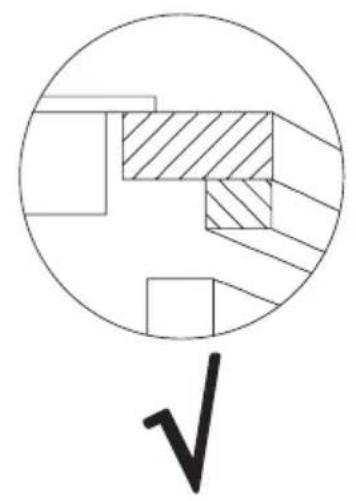
natural_image
Pure geometric diagram with circles and diagonal hatching, no text or symbols presentVestavba desky nad trou- bou
natural_image
Illustration of a cooking pot and two circular kitchen utensils (no text or symbols)natural_image
Five identical cooking pots with crossed-out black X marks, arranged horizontally on a base (no text or symbols)natural_image
Crossed construction lines with no text or symbolsnatural_image
Metallic adjustable wrench tool with handle and clasp (no text or symbols visible)natural_image
Recycling symbol composed of three chasing arrows forming a triangle (no text or labels)natural_image
Symbol of a trash bin crossed out by two diagonal lines (no text or numbers present)
natural_image
Simple black-and-white line drawing of a tree with cloud-like canopy and two wavy lines below (no text or symbols)natural_image
Pure mechanical cross-section diagram without any text, numbers, or symbols
natural_image
Abstract geometric diagram with concentric circles and diagonal hatching, labeled 'X' below (no text or symbols within the diagram itself)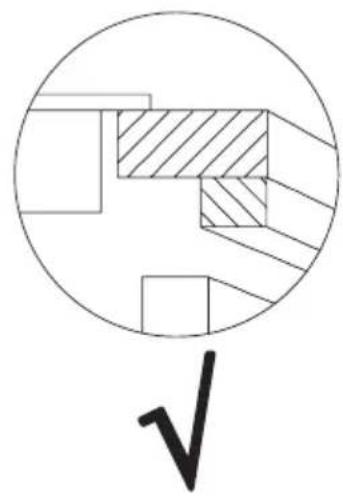
natural_image
Pure geometric diagram with circles and diagonal hatching, no text or symbols presentVstavanie dosky nad skrinkami Vstavanie dosky nad rúrou
text_image
min 650mm min 10mm min 30mm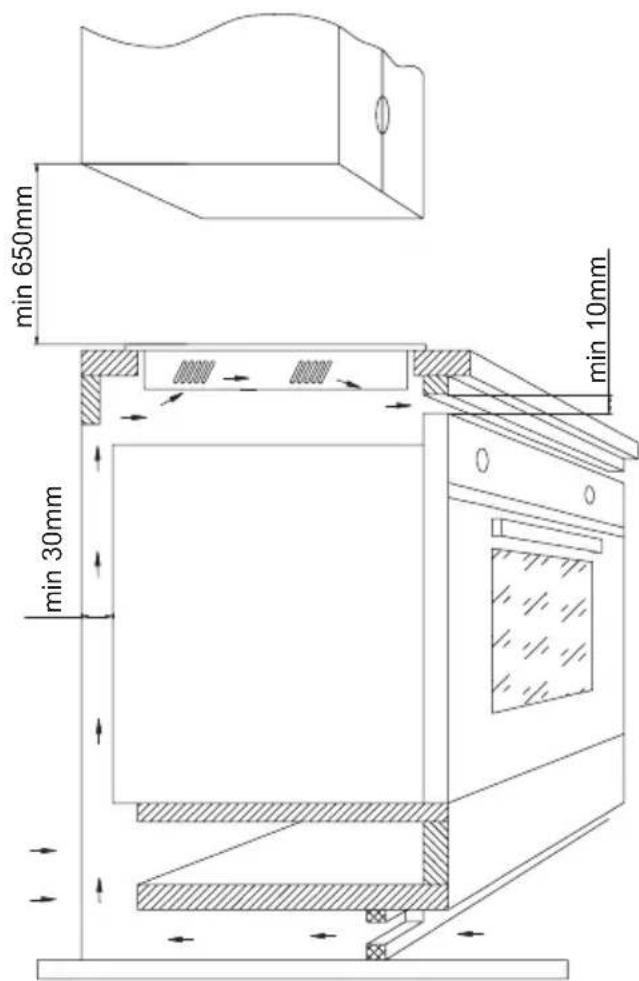
text_image
min 650mm min 10mm min 30mmnatural_image
Illustration of a cooking pot and two circular kitchen utensils with different patterns (no text or symbols)natural_image
Five cooking pots with crossed X marks, no text or symbols presentOznačenie riadu
natural_image
Crossed construction lines with no text or symbolsnatural_image
Metal adjustable wrench tool with multiple slots and a handle (no text or symbols visible)Nečistoty, ktoré pevne lipnú na doske, odstraňujte pomocou ostrej škrabky. Nasledovne utrite tabulů vlhkou handričkou.
Odstraňovanie škvín
natural_image
Recycling symbol composed of three chasing arrows forming a triangle (no text or labels)natural_image
Symbol of a trash bin crossed with a diagonal line, no text or numbers presentnatural_image
Simple black-and-white line drawing of a tree with cloud-like canopy and two wavy lines below (no text or symbols)natural_image
Pure mechanical cross-section diagram without any text, numbers, or symbols
natural_image
Abstract geometric diagram with concentric circles and crosshatched regions, labeled 'X' below (no text or symbols within the diagram itself)
natural_image
Pure geometric diagram with circles and diagonal hatching, no text or symbols presentnatural_image
Illustration of a cooking pot and two circular kitchen utensils with different patterns (no text or symbols)natural_image
Illustration of five cooking pots with crossed-out black X marks, no text or symbols presentnatural_image
Crossed construction lines showing a paint box and a brush on a stone block (no text or symbols)natural_image
Metal adjustable wrench tool with handle and clasp (no text or symbols visible)natural_image
Recycling symbol composed of three chasing arrows forming a triangle (no text or labels)natural_image
Symbol of a trash bin crossed with two crossed lines, no text or labels presentnatural_image
Simple black-and-white line drawing of a tree with cloud-like canopy and two wavy lines below (no text or symbols)natural_image
Pure mechanical cross-section diagram without any text, numbers, or symbols
natural_image
Abstract geometric diagram with concentric circles and crosshatched regions, labeled 'X' below (no text or symbols within the diagram itself)
natural_image
Pure mechanical cross-section diagram without any text, numbers, or symbolsBASISINFORMATIE OVER HET APPARAAT
natural_image
Illustration of a cooking pot and two circular kitchen utensils (no text or symbols)natural_image
Five identical cooking pots with crossed-out black X marks, arranged horizontally (no text or symbols)natural_image
Crossed construction lines with no text or symbolsnatural_image
Metal adjustable wrench tool with handle and clasp (no text or symbols visible)natural_image
Recycling symbol composed of three chasing arrows forming a triangle (no text or labels)natural_image
Symbol of a trash bin crossed out by two diagonal lines (no text or numbers present)Ovaj uređaj je označen u skladu s europskom uredbom 2012/19/UE i poljskim zakonom o potrošenom električnom i elektroničkom otpadu. Ujedno je označen simbolom pre- križenog spremnika za otpatke.
Oznaka na proizvodu pokazuje da ovaj proizvod nakon njegovog životnog vijeka ne može biti tretiran kao obični kućanski otpad.
natural_image
Simple black-and-white line drawing of a tree with cloud-like canopy and two wavy lines at the base (no text or symbols)natural_image
Pure mechanical cross-section diagram without any text, numbers, or symbols
natural_image
Abstract geometric diagram with concentric circles and diagonal hatching, labeled 'X' below (no text or symbols within the diagram itself)
natural_image
Pure mechanical cross-section diagram without any text, numbers, or symbolsnatural_image
Illustration of a cooking pot with three circular kitchen utensils (no text or symbols)natural_image
Five identical cooking pots with crossed-out black lines, no text or symbols presentOznake na kuhinjskim posudama
natural_image
Crossed construction lines with no text or symbolsnatural_image
Metal adjustable wrench tool with metal contacts and handle (no text or symbols visible)Tvrdokornu, zapečenu nečistoću uklanjamo oštrom strugalicom. Nakon toga grijaću površinu prebrisati vlažnom krpom.
Uklanjanje mrlja
Svijetle mrlje biserne boje (ostaci aluminija) uklanjati z grijaće ploče pomoću specijalnog sredstva za čišćenje. Ostatke kamenca (koje stvara ki-puća voda) možemo ukloniti octom ili specijalnim sredstvom za čišćenje. Prilikom uklanjanja šećera, jela koja sadržavaju šećer, sintetičkih materijala i aluminijske folije zabranjeno je isključivanje danog grijaćeg polja! Odmah ostrugati ostatke (dok su vrući) ošstrom strugalicom s vrućeg gri- jaćeg polja. Nakon uklanjanja zaprljanija možemo isključiti ploču, a kad se ohladi dodatno očistiti specijalnim sredstvom za čišćenje.
Specijalna sredstva za čišćenje možemo kupiti u trgovačkim centrima, specijalnim elektrotehničkim prodavaonicama, drogerijama, prehrambenim trgovinama i salonima s kuhinjskim namještajem. Oštre strugalice možemo nabaviti u trgovinama s alatom ili s građevinskom opremom, ali i u prodavaonicama s opremom za bojanje.
natural_image
Simple line drawing of a three chasing recycling symbol (no text or labels)natural_image
Symbol of a trash bin crossed with no visible text or labelsnatural_image
Simple black-and-white line drawing of a tree with cloud-like canopy and two wavy lines below (no text or symbols)natural_image
Pure mechanical cross-section diagram without any text, numbers, or symbols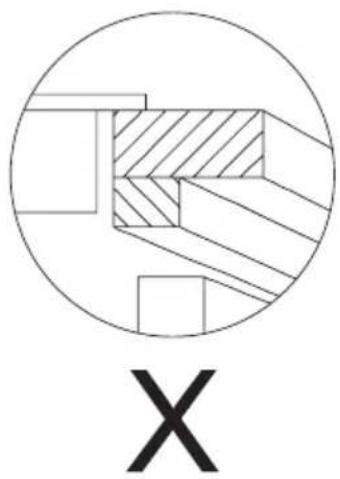
natural_image
Abstract geometric diagram with concentric circles and a labeled X symbol (no text or symbols within the diagram itself)
natural_image
Pure geometric diagram with cross-hatched and shaded regions inside a circle, no text or symbols presentnatural_image
Illustration of a cooking pot and two circular kitchen utensils (no text or symbols)natural_image
Five identical cooking pots on a heating scale with crossed-out black X marks, no text or symbols presentnatural_image
Crossed construction lines with no text or symbolsnatural_image
Metallic adjustable wrench tool with handle and clasp (no text or symbols visible)Močno sprijeto umazanijo odstranjati z ostrim strgalom. Nato grelno površino prebrisati z vlažno krpo.