AFB55X - Cooker AYA - Free user manual and instructions
Find the device manual for free AFB55X AYA in PDF.

User questions about AFB55X AYA
0 question about this device. Answer the ones you know or ask your own.
Ask a new question about this device
Download the instructions for your Cooker in PDF format for free! Find your manual AFB55X - AYA and take your electronic device back in hand. On this page are published all the documents necessary for the use of your device. AFB55X by AYA.
USER MANUAL AFB55X AYA
natural_image
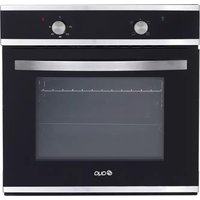
Front view of a stainless steel oven with control knobs and a transparent oven (no visible text or symbols)Four Encastrable
TABLE DES MATIERES
AVERTISSEMENTS -3-
SPECIFICATIONS TECHNIQUES -23-
PANNEAU DE COMMANDE -25-
FONCTIONS DU FOUR -25-
INSTRUCTIONS DE CUISSON -28-
NETTOYAGE ET ENTRETIEN -30-
INSTALLATION ELECTRIQUE -34-
NOTES D'INSTALLATION -35-
GUIDE DE DEPANNAGE -37-
ENLEVEMENT DES APPAREILS MENAGERS USAGES -39-

natural_image
Symbolic icon of a person walking with arrows indicating rotation or cycle (no text or symbols)FAITES UN GESTE ECOCITOYEN EN TRIANT VOS EMBALLAGES CARTON
À LA FIN DE VIE DE VOTRE PRODUIT, PENSEZ À LE RAPPORTER DANS UN POINT DE COLLECTE OU DÉPOSER LE À LA DÉCHETERIE PROCHE DE VOTRE DOMICILE

CET APPAREIL EST DESTINE A UN USAGE DOMESTIQUE UNIQUEMENT!
Attention ! Surfaces chaudes !
text_image
Warning symbol image with exclamation mark inside triangletext_image
Technical diagram of an oven with labeled parts A, B, and C, showing internal structure and assembly details.FIG. 1
natural_image
Line drawing of a rectangular electronic device with mounting brackets and ventilation slots (no text or symbols)FIG. 2
text_image
Warning symbol image with exclamation mark inside trianglenatural_image
Simple line drawing of a trash bin with crossed lines indicating no waste or restriction (no text or symbols)
natural_image
Front view of a stainless steel oven with control knobs and a transparent oven (no visible text or symbols)Built-In Electric Oven
Contents
WARNING -2-
SPECIFICATIONS -19-
CONTROL PANEL -20-
PRODUCTION FUNCTIONS -21-
COOKING GUIDELINES -24-
CLEANING AND MAINTENANCE -26-
ELECTRICAL INSTALLSTION -30-
INSTALLATION NOTES -31-
TROUBLESHOOTING -33-
ENVIRONMENTAL NOTE -35-

THIS PRODUCT IS INTENDED FOR HOUSHOLD USE ONLY!
Please read these instructions carefully before the first use of this product and save this manual for your future reference.
WARNING
The appliance and its accessible parts become hot during use.
Care should be taken to avoid touching heating elements.
Children less than 8 years of age shall be kept away unless continuously supervised.
This appliance can be used by children aged from 8 years and above and persons with reduced physical, sensory or mental capabilities or lack of experience and knowledge of they have been given supervision or instruction concerning use of the
appliance in a sage way and understand the hazards involved. Children shall not play with the appliance. Cleaning and user maintenance shall not be made by children without supervision.
Operation
Warning! Danger of fire!
- Do not allow paper or cloth to come in contact with any heating element.
- Never store or use corrosive chemicals, vapors, flammables or nonfood products in or near oven. It is specifically designed for use when heating or cooking food. The use of corrosive chemicals in heating or cleaning will damage the appliance and could result in injury.
- If food inside an oven should ignite, keep door closed. Switch off the oven and disconnect from supply power. - Exercise caution when opening the door. Standing to the side, open the door slowly and slightly to let hot air and/or steam escape. Keep your face clear of the opening and make sure there are no children or pets near the oven. After the release of hot air and/or steam, proceed with your cooking. Keep doors closed at all time unless necessary for cooking or cleaning purposes.
- Only use utensils that are suitable for use with ovens.

Warning! Danger of explosion!
Liquids and other foods must not be heated in sealed containers since they are liable to explode.
- If smoke is observed, switch off the
oven and keep the door closed in order to stifle any flames.
- Do not allow any accessories or electric cables to contact the hot parts of the appliance.
Warning! Hot surfaces! Risk of burns!
- During use the appliance becomes hot. Care should be taken to avoid touching heating elements inside the oven.
- Warning! Accessible parts may become hot during use. Young children should be kept away.
- Never move racks or pans when they are hot. Wait until they cool.
Safety Advices

IMPORTANT!
Always switch off the electricity supply at the mains during
installation and maintenance.
General Information
- This appliance is designed for domestic household use and can be built into a standard kitchen cabinet or housing unit.
- IMPORTANT: The adjacent furniture or housing and all materials used in the installation must be able to withstand a minimum temperature of 85^ above the ambient temperature of the room it is located in, whilst in use.
-
Certain types of vinyl or laminate kitchen furniture are particularly prone to heat damage or discolouration at temperatures below the guidelines given above.
-
The appliance surfaces will become hot during use and retain heat after operation.
- Any damage caused by the non-compliance of temperature tolerance of oven during installation or by the too close distance between the furniture and the oven will be borne by the owner.
Installation
- The oven must be installed in accordance with the installation instructions and all measurements must be followed.
- All installation work must be carried out by a competent person or qualified electrician.
The appliance must not be installed behind a decorative door in order to avoid overheating.
- Regarding the instructions for the installation of the accessories, replacement of the bulb, please refer to below paragraphs of this manual.
- Regarding the instructions for the installation of the oven and connection to power supply, please refer to below paragraphs of this manual.
Children
- Please dispose of the packaging material carefully. Packaging material can be dangerous to children.
- Make sure to keep children away from the appliance, children should be supervised to ensure that they do not play with the appliance. It might be
dangerous to allow the children to touch the appliance
General Safety
- Do not place heavy objects on the oven door or lean them on the oven door when it is open, as it may cause damages to the oven door hinges.
- Do not place those baked hot oil or fat unattended on unattended areas, as it will be a fire risk.
- Do not place pans or baking trays directly on the base of the oven cavity, even if aluminum foil is placed below them.
- Do not allow cable or plug to come into contact with the heating areas of appliance.
- Do not install the appliance next to curtains or soft furnishings.
- Do not attempt to lift or move cooking appliances by using the oven door or handle, as this may cause damage to the appliance or result in injury to the person lifting the appliance.
Electrical safety
- If the supply cord is damaged, it must be replaced by the manufacturer, its service agent or similarly qualified persons in order to avoid a hazard.
- The appliance must be placed in such a way, that the power supply is accessible at all times.
- Before connecting the appliance to the power supply, check that the power supply voltage and current rating corresponds with the power supply details shown on the appliance rating label.
- Never use a damaged appliance! Disconnect the appliance from the power source and contact your supplier if it is damaged.
- Danger of electric shock! Do not attempt to repair the appliance yourself. In case of malfunction, repairs are to be conducted by qualified personnel only.
- To avoid damaging the cord, do not squeeze, bend or chafe it on sharp edges. Keep it away from hot surfaces and open flames as well.
- Lay out the cord in such a way that no unintentional pulling or tripping over it is possible.
- Do not open the appliance casing under any circumstances. Do not insert any foreign objects into the inside of the casing.
- Never use accessories which are not recommended by the manufacturer. They could pose a safety risk to the user and might damage the appliance. Only
use original parts and accessories.
- Keep the appliance away from any hot surfaces and open flames. Always operate the appliance on a level, stable, clean and dry surface. Protect the appliance against heat, dust, direct sunlight, moisture, dripping and splashing water.
- Do not place objects with open flames, e.g. candles, on top of or beside the appliance.
WARNING: Ensure that the appliance is switched off before replacing the lamp to avoid the possibility of electric shock.
The fixed wiring for applicant shall have an all-pole disconnection device.
If the surface is cracked, switch off the appliance to avoid the possibility of electric shock.

Safety:
Attention, the glass is an extremely fragile.
Always wear gloves when handling.
For your safety, this product is made of tempered glass. This type of glass is highly resistant but has the feature to retain the "memory" of shocks.
Therefore, it should handle the product with the greatest care to avoid shocks and twists, especially during installation.
Avoid installing this type of product in areas where it would be highly exposed to shocks.
Do not let children play with the product.
Do not stick adhesive film on the glass surface. In case of breakage, it would
generate large pieces that could be dangerous
1. INTRODUCTION
- Read this manual carefully before assembling, installing or using the appliance. It contains important information for your safety as well as operating and maintenance advices.
- Observe all safety instructions to avoid damage through improper assembly, installation or use! Follow all warnings on the appliance.
- Keep this manual for future use.
Electrical connection

Danger of electric shock!
EN-14
Any electrical installation must be carried out by an authorised professional.
- All fittings must be installed by a competent person in accordance with local regulations. If in doubt, consult a qualified electrician.
- Important! Always switch off the electricity supply at the mains during installation and maintenance. We recommend that the fuse is withdrawn or circuit breaker switched off at the distribution board whilst work is in progress.
- This product must be earthed – if no earth feed wire is available, consult an electrician.
- Means for disconnection must be incorporated in the fixed wiring in accordance with the wiring rules. To achieve this install appropriate switched fused connection unit.
- Note! A switched fused connection
unit having a contact separation of at least 3mm in all poles should be connected in fixed wiring.
- Connect the incoming positive, neutral and earth cables to the terminals of the switched fused connection unit. Ensure connections are tight.
- The spur outlet must still be accessible even when your oven is located in its housing to enable the appliance to be disconnected from the mains supply.
Warnings
- A steam cleaner is not to be used.
- Warning: Accessible parts may become hot during use. Young children should kept well away when in use.
- Do not use harsh abrasive cleaners or metal scrapers to clean the oven door glass as this can scratch the surface, which may result in the oven glass shattering.
Cleaning
• Always disconnect the power supply prior to cleaning the appliance. If the switched fused connection unit is difficult to reach, shut off the power supply by using the corresponding circuit breaker at the distribution board.
- Clean the appliance thoroughly before first use. The oven should be cleaned regularly and any food deposits removed.
- Never clean the oven surfaces by steam cleaning.
- The oven cavity should only be
cleaned with warm soapy water, using either a sponge or soft cloth. No abrasive cleaners should be used.
- Any stains that may appear on the bottom of the oven will have originated from food splashes or spilt food, these splashes occur during the cooking process. These could possibly be a result of the food being cooked at an excessively high temperature or being placed in cookware that is too small.
- You should select a cooking temperature and function that is appropriate for the food that you are cooking. You should also ensure that the food is placed in an adequately sized dish and that you use the drip tray where appropriate.
- Warning! Do not use abrasive products to clean the glass door panel to avoid scratching it. Otherwise, severe failure might happen to the appliance.
2. INTENDED USE
- This appliance is only suitable for cooking food. Do not use it for other purposes, i.e. for storage purposes. Otherwise, it might lead to damage to the appliance or personal injury.
SPECIFICATIONS
text_image
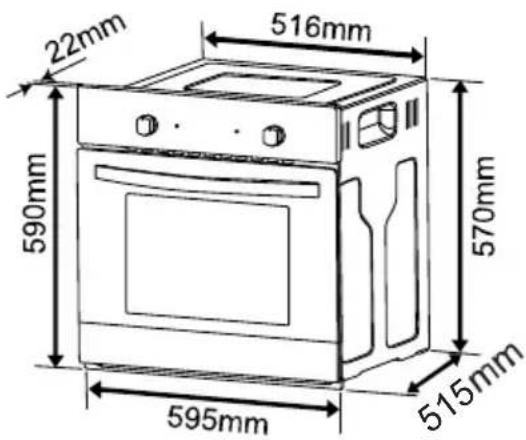
22mm 516mm 590mm 570mm 515mm 595mmDimensions
Height: 590 mm
Width: 595 mm
Depth: 537 mm
Specifications:
4 functions
Oven capacity: 55 litres
Thermostatically controlled grill
Cooling fan
Cooling fan
A tangential cooling fan is fitted inside of this appliance, to make the internal temperature of the oven stable and the external surface temperature lower. After the oven has been used the cooling fan will run on for a period of time, until the oven is sufficiently cooled.
Electrical details
Rated Voltage:
220-240V\~50-60Hz
Max Rated Inputs:
2350W
Mains Supply Lead: 3 x 1.5mm²
Oven Light Bulb:
25
pigmy
CONTROL PANEL

text_image
1 2 ~ 3 44-function control panel with mechanical timer
- function select
- power indicator light
- oven operating light
- knob for temperature control
IMPORTANT
Cut off the power after the ring reminds. If you have finished broiling, you should turn the knobs for function selector and temperature control to "0".
PRODUCTION FUNCTIONS
- The oven is controlled by a thermostat between 50°C and 250°C, depending on the temperature required. The thermostat pilot light turns on and off to indicate the temperature control during use.
- The required cooking mode is selected using the multi-functional control button. The functions that may be selected are:
 | Oven light Turning control knob to this setting, the oven light will illuminate in the oven cavity, and will operate on all selected functions. (illumination for oven cooking only, not suitable for household room illumination) |
 | Conventional Upper and lower heating element come on. Heat is distributed by natural convection and this means the top half of the oven is warmer than the bottom half, food should be placed on a higher shelf if the food is to be crisped. It is recommended that the oven is pre-heated for 10-15 minutes before commencing cooking. |
 | Lower Element Lower element comes on, heat radiates by natural convection from the base of the oven. |
 | Upper Element | Upper element comes on |
Read the information of the food packaging for the cooking temperatures and times. Once familiar with performance of the appliance, the temperatures and times may be varied to adapt them to your personal tastes. (Remark: Cooling fan will operate no matter what the setting (off,


, , ) it is , if the inside temperature is high.
- Check that frozen food is completely thawed before cooking, unless indicated otherwise.
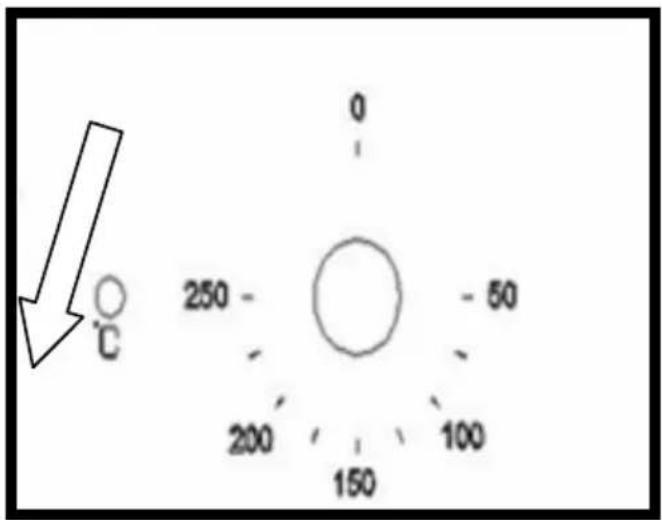
Thermostat control knob

text_image
0 250 - 50 200 - 150 100 ℃The oven thermostat control knob sets the required temperature of the oven. It is possible to regulate the temperature within a range of 50 - 250°C.
Turn the control knob clockwise.
Oven operating light
text_image
0 - 250 - 50 - 200 - 100 150 °CThis light will come on to indicate that the oven's heating elements are in operation. The light will turn off when the temperature set on the thermostat control knob has been reached. It will cycle on and off throughout the cooking time. You should not place food inside the cavity, until the correct cooking temperature has been reached.
Accessories

text_image
A B 1 2 3 4 1 2 3 4Your oven will come supplied with the following oven furniture:
1、(A)oven rack
2、(B)bake tray
The numbers 1 – 4, indicate the different shelf positions that you can utilise within the oven.
It is optional and can be matched freely according to the customer themselves.
Please refer to the information given on food packaging for guidance on cooking temperatures and times. Once familiar with the performance of your appliance, temperatures and times can be varied to suit personal preference.
If you are using the fan oven function, then you should follow the information given on the food packaging for this particular mode of cooking.
o Make sure that frozen foods are thoroughly thawed before cooking, unless the instructions on the food packaging advise that you can "cook from frozen".
- You should pre-heat the oven and not place food inside of it until the oven operating light has gone off. You can choose not to pre-heat when using the fan oven mode; however you should extend the cooking time given on the food packaging by approximately ten minutes.
Before cooking, check that any accessories that are not required are removed from the oven.
o Place cooking trays in the centre of the oven and leave gaps between the trays to allow air to circulate.
o Try to open the door as little as possible to view the dishes.
o The oven light will remain on during cooking.
o Note: There will be much pungent smoke when use the appliance first time (because there is anti-rust oil on the heating tube), but it will disappear about 10 minutes later.
Warnings
o Keep the oven door closed when using any of the grill functions.
Do not use aluminium foil to cover the grill pan or heat items wrapped in aluminium foil under the grill. The high reflectivity of the foil could potentially damage the grill element.
o You should also never line the base of your oven with aluminium foil.
During cooking, never place pans or cookware directly onto the bottom of your oven. They should always be placed on the shelves provided.
The grill heating element and other internal components of the oven becomes extremely hot during operation, avoid touching it inadvertently when handling the food which you are grilling.
o Important: Be careful when opening the door, to avoid contact with hot parts of the oven and steam.
The drip tray handle should only be used to reposition the drip tray and NOT for removing it from the oven cavity. When removing the drip tray, you should ALWAYS use an oven glove.
- The drip tray handle should not be left in position when the appliance is switched on.
o A steam cleaner is not to be used.
o Warning: Accessible parts may become hot during use. Young children should kept well away when in use.
Do not use harsh abrasive cleaners or metal scrapers to clean the oven door glass as this can scratch the surface, which may result in the oven glass shattering.
Cooking instructions
 | CONVENTIONAL | ||||
 Conventional oven-using top heating element + bottom heating element Conventional oven-using top heating element + bottom heating element | |||||
| food | weight | preheat | Placement of tray | Setting temperature | Finish time |
| beef | 1kg | 15 minutes | The second layer | 220°C | 40-50 minutes |
| pork | 1kg | 15 minutes | The second layer | 220°C | 70-80 minutes |
| chicken | 1.2kg | 15 minutes | The second layer | 220°C | 50-60 minutes |
| duck | 1.5kg | 15 minutes | The second layer | 220°C | 50-60 minutes |
| steak | 0.8kg | 15 minutes | The second layer | 220°C | 20-30 minutes |
| bread | 0.5kg | 15 minutes | The second layer | 220°C | 35-45 minutes |
Pre-heat the oven for 10 minutes.
CLEANING AND MAINTENANCE

text_image
Warning symbol with exclamation mark inside triangleCleaning operations must only be carried out when the oven is cool.
The appliance should be disconnected from your mains supply before commencing any cleaning process.
The oven should be thoroughly cleaned before it is operated for the first time and after each use. This will avoid residual food stuffs becoming baked on the oven cavity. After residues have been baked on several times, they are far more difficult to remove.
o Never clean the oven surfaces by steam cleaning.
The oven cavity should only be cleaned with warm soapy water, using either a sponge or soft cloth. No abrasive cleaners should be used.
o Any stains that may appear on the bottom of the oven will have originated from food splashes or spilt food, these splashes occur during the cooking process. These could possibly be a result of the food being cooked at an excessively high temperature or being placed in cookware that is too small.
- You should select a cooking temperature and function that is appropriate for the food that you are cooking. You should also ensure that the food is placed in an adequately sized dish and that you use the drip tray where appropriate.
Outer parts of the oven should only be cleaned with warm soapy water, using either a sponge or soft cloth. No abrasive cleaners should be used.
If you use any form of oven cleaner on your appliance, then you must check with the manufacturer of the cleaner that it is suitable for use on your appliance.
○ Any damage that is caused to the appliance by a cleaning product will not be fixed free of charge, even if the appliance is within the guarantee period.
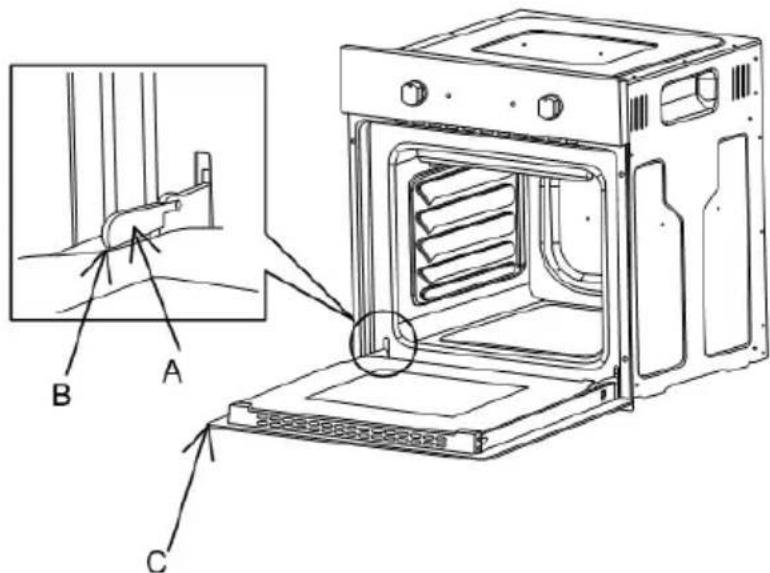
Removing the door from the oven (Fig.1)
To simplify cleaning the interior of the oven, the door can be removed.
o The process of removing the door is shown below:
- Open the door fully to position "C" Lift the two mobile links "A" of the hinges, until fixing at point "B".
o Then close the door to the half-way position.
o Next, lift the door upwards and remove it, sliding it outwards; hold the door by the side close to the hinges when doing this.
To replace the door, first slide the hinges into their grooves and open the door completely.
Remember to turn the two moving links "B" used to engage the two hinges before closing the door.(Fig.1)
Warning
Take care not to remove the hinge locking system when taking off the door, as the hinge mechanism can spring back suddenly.
o Never submerge the door in water for any reason.
text_image
Technical diagram of an oven with labeled components A, B, and C, showing internal structure and assembly details.FIG.1
Cleaning the glass door (Fig.2)
If possible, remove the oven door glass following the manufacture's instructions. Use warm water with a little detergent to clean the glass sections of the door.
Do not use abrasive products which could damage the glass. Remember that if the surface of the glass panel becomes scratched, it could cause a dangerous failure.
To simplify the cleaning, the inner glass panel can be taken out of the door. The method for removing the glass from the door is shown below.
- After removing the screws fixing the glass, located on the inner face of the door, lift the glass out carefully.

natural_image
Technical line drawing of a rectangular electronic device with mounting brackets and a central square cutout (no text or symbols)FIG.2
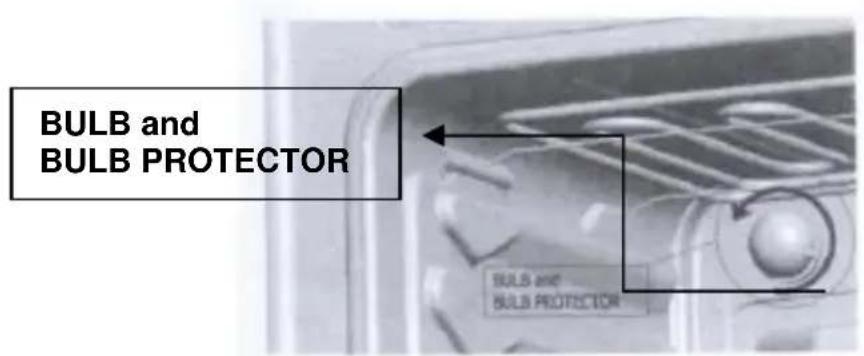
Replacement of the oven light bulb (Fig.3)
Not covered by the appliance guarantee.
flowchart
graph LR
    A["Sensor input"] --> B["Temperature-treated chamber"]
    B --> C["Directional control: 90°"]
    C --> D["Output: 90°"]
FIG.3

WARNING : Disconnect the appliance from the electricity supply, open the oven door remove the oven shelves.
The oven has a light with the following characteristics:
25 W, 300 °C and type E-14
- During use the appliance becomes hot. Care should be taken to avoid touching heating elements inside the oven
- WARNING: Ensure that the appliance is switched off before replacing the lamp to avoid the possibility of electric shock
- Remove the glass cover that protects the light bulb by turning it anti-clockwise.
- Unscrew the old light bulb and dispose of it safely and ecologically.
Note:
The glass cover may be tight and, therefore, may need a grip to release it.
text_image
BULB and BULB PROTECTOR BULB and BULB PROTECTIONELECTRICAL INSTALLATION

The installation must be carried out by a suitably qualified person, in accordance with the current version of the following.
Before connecting the appliance, make sure that the supply voltage marked on the Rating Plate corresponds with your mains supply voltage.
WARNING: THIS APPLIANCE MUST BE EARTHED.

text_image
MAINS POWER SUPPLY LIVE L EARTH NEUTRAL N BROWN YELLOW/GREEN BLUE POWER CORDThis appliance should be wired into a 13 A double pole switched fused spur outlet, having 3 mm contact separation and placed in an easily accessible position adjacent to the appliance. The spur outlet must still be accessible even when your oven is located in its housing to enable the appliance to be disconnected from the mains supply.
To connect the oven power cord, loosen and remove the cover on the terminal block, in order to gain access to the contacts inside. Make the connection, securing the cord in place with the cable clamp provided and then immediately close the terminal block cover again.
- If you have to change the oven power cord, the earthing (yellow/green) conductor must always be 10 mm longer than the line conductors.
o Care must be taken to ensure that the temperature of the mains supply cable does not exceed 50^ C.
o If the mains supply cable is damaged, then it must be replaced by an appropriate replacement which can be obtained from Spares Department.
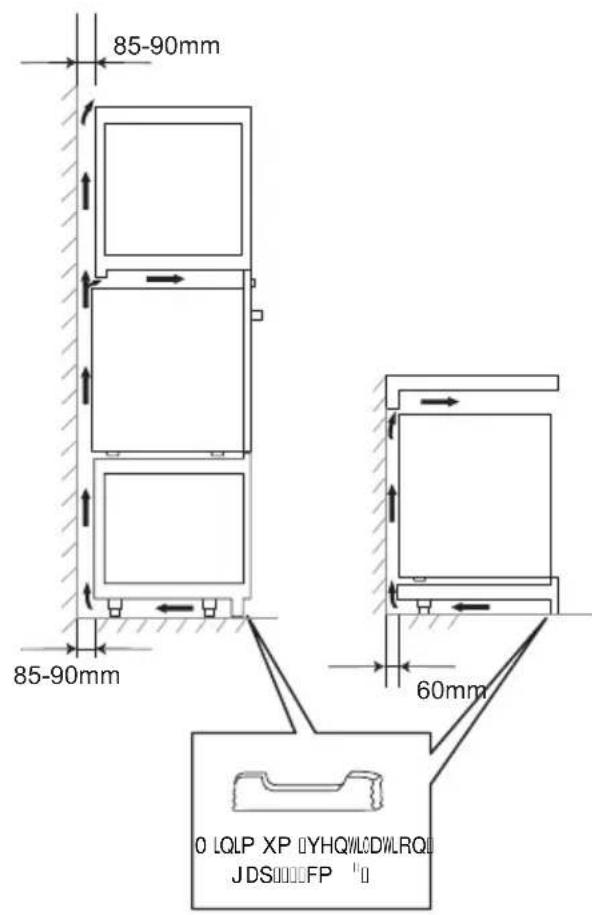
INSTALLATION NOTES
- The oven has to be installed as indicated in Fig.4, Whether under a hob or in a column.
- On inserting the oven in a column, it is essential in order to ensure there is enough ventilation, to remove the rear panel of the fur niture and have an opening of at least 85 – 90 mm as indicated in Fig.4.
- Check that the oven has been fixed securely in the housing. Fixing the oven into the cupboard is done using 4 screws. One in each corner of the oven door frame.

text_image
85-90mm 580-583mm 560mm 22mm 516mm 570mm 590mm 515mmFIG.4a
text_image
85-90mm 85-90mm 60mm 0 LQLP XP 0YHQWLCDWLRQU JDS00FP "0FIG.4b
| Fault | Cause | |
| Oven doesn’t work. | Something at the connection is wrong, or it ‘s not connected. | Turn off main supply and check if some wire has been disconnected. |
| Power supply connections are loose. | Turn off main supply and check if some wire has been disconnected. | |
| Something at house installation is wrong. | Turn off main supply and check if some wire has been disconnected. | |
| Oven light doesn’t work. | Light bulb is blown. | Replace bulb as described in the manual in the section “Care and maintenance”. |
| Oven will not heat. | No function is selected. | Choose a cooking function turning the selector. |
| No temperature is selected. | Choose a temperature turning the selector. |
Solution

text_image
Warning symbol with exclamation mark inside triangleIMPORTANT: If your appliance appears not to be operating correctly, Please contact with dealer.
DO NOT ATTEMPT TO REPAIR THE APPLIANCE YOURSELF.
Information for domestic ovens
| Symbol | Unit | ||
| Model identification | AFB55X | - | |
| Type of oven Build in Electric Oven | - | - | |
| Mass of the appliance | M | 25 | Kg |
| Number of cavities - 1 - | |||
| Heat source per cavity(electricity or gas) | Electricity | - | |
| Volume per cavity V | 55 | L | |
| Energy consumption (electricity)required to heat a standardized load in a cavity of an electric heated oven during a cycle in conventional mode per cavity(electric final energy) | EC electric cavity | 0.65 | kWh/cycle |
| Energy consumption required to heat a standardised load in a cavity of an electric heated oven during a cycle in fan-forced mode per cavity(electric final energy) | EC electric cavity | - | kWh/cycle |
| Energy Efficiency Index per cavity | EEI cavity | 83.3 | - |
| Energy efficiency class | - | A | - |
1kWh/cycle = 3.6MJ/cycle
The measurement and calculation method of the above table was done in accordance with commission regulation (EU) No 65/2014 & 66/2014.
We decline liability for any damage or accident derived from any use of this product which is not in conformity with the instructions contained in this booklet.
ENVIRONMENTAL PROTECTION:
This product is marked with the symbol on the selective sorting of waste electronic equipment. This means that this product must not be disposed of with household waste but must be supported by a system of selective collection in accordance with Directive 2012/19/EU. It will then be recycled or dismantled
to minimize impacts on the environment, electrical and electronic products are potentially dangerous for the environment and human health due to the presence of hazardous substances.
For more information, please contact your local or regional authorities.
Note :
a. In order to reduce the environmental impact (e.g. energy use) of the cooking process, please be sure that your product is installed according to the user manual, keep the operation place ventilated, keep the extraction duct be direct and short as possible as it can be.
b. For the product with manual operation mode, we suggest switch the motor off within 10 minutes after finishing the cooking process.
c. Please be sure to dismantle related components according to the user manual when maintaining for non-destructive, protect the parts to make the re-installed work can be favoring and avoid damage.