
751835 - Food thermometer Dangrill - Free user manual and instructions
Find the device manual for free 751835 Dangrill in PDF.
| Product type | Wireless cooking thermometer |
| Brand | Dangrill |
| Model | 751835 |
| Power (transmitter) | 2 AA 1.5V batteries |
| Power (receiver) | 2 AAA 1.5V batteries |
| Range without obstacles | 60 meters |
| Temperature range | 0 to 250 °C |
| Display | Meat type, doneness level, actual temperature, target temperature |
| Units of measurement | °C or °F (selectable) |
| Backlight | Yes, automatic activation by button |
| Preset meat types | Beef, lamb, veal, hamburger, pork, turkey, chicken, fish, PGM (programmable) |
| Doneness levels (depending on meat) | Blue rare, rare, medium, done, well done |
| Transmission function | Wireless, every 30 seconds or in case of temperature change |
| Automatic shutdown | After about 30 minutes of inactivity |
| Included accessories | Cooking probe, receiver |
| Probe cleaning | Water and dish soap |
| Housing cleaning | Damp cloth |
| Safety | Probe withstands up to 250 °C; do not expose to flame; only one device within range |
| Manufacturer | Schou Company A/S, Denmark |
| Origin | Made in the People's Republic of China |
Frequently Asked Questions - 751835 Dangrill
User questions about 751835 Dangrill
0 question about this device. Answer the ones you know or ask your own.
Ask a new question about this device
Download the instructions for your Food thermometer in PDF format for free! Find your manual 751835 - Dangrill and take your electronic device back in hand. On this page are published all the documents necessary for the use of your device. 751835 by Dangrill.
USER MANUAL 751835 Dangrill
natural_image
Technical line drawing of a mechanical component or device (no text or symbols visible)
natural_image
Line drawing of a mobile phone rear panel with buttons and display (no text or symbols)Stegetermometerets dele
Stegetermometer
- Kødtype
- Stegningsgrad
- Transmissionsikon
- Aktuel temperatur
- Måltemperatur
- Alarmikon
- Temperaturudvikling
- MEAT (kødtype)
- OP
- NED
- TASTE (stegningsgrad)
- Stik til spyd
- Batterirum
Modtager
-
Modtagelsesikon
-
Lysdiode
-
Alarmikon
-
Aktuel temperatur
-
Batterirum
-
Tænd/sluk-knap
Tænde og slukke
natural_image
Technical line drawing of a mechanical component or device (no text or symbols visible)
natural_image
Line drawing of a mobile phone rear panel with display and keypad (no text or symbols)Steketermometerets deler
Steketermometer
natural_image
Technical line drawing of a mechanical part with no visible text or symbols
natural_image
Technical line drawing of a mobile phone casing with front panel and door (no text or symbols)Stektermometerns delar
Stektermometer
natural_image
Technical line drawing of a mechanical part with no visible text or symbols
natural_image
Technical line drawing of a mobile phone casing with front panel and display (no text or symbols)WIRELESS MEAT THERMOMETER
Introduction
To get the most out of your new meat thermometer, please read this instruction manual before use. Please also save the instructions in case you need to refer to them at a later date.
Technical data
Power supply, meat thermometer:
2 × 1.5 V AA batteries
Power supply, receiver:
2 × 1.5 V AAA batteries
Range: 60 metres (without obstacles)
Temperature range: 0-250 °C
Display: Meat type, doneness,
current temperature, target temperature
Measurement unit: °C/°F
With background light
The meat thermometer has a magnet and the receiver has a clip
Special safety instructions
The probe and cord may only be used at temperatures below 250 °C. Never place the probe or cord under the grill or in the oven if the actual temperature is above 250 °C!
Note! As the meat thermometer uses a fixed frequency between the transmitter and receiver, only one meat thermometer can be used at a time within the transmitter's and receiver's range.
Inserting the batteries
- Remove the battery cover from the neat thermometer. Insert 2 new 1.5 V AA batteries. Align the batteries correctly, as shown in the battery compartments. Replace the battery cover.
- When you insert the batteries, a beep will be heard and all the segments will be shown briefly in the display. The meat:hermometer is now ready for use.
- Remove the battery cover from the 'receiver. Insert 2 new 1.5 V AAA batteries. Align the batteries correctly, as shown in the battery compartments. Replace the battery cover.


natural_image
Technical line drawing of a mechanical part with no visible text or symbols
natural_image
Line drawing of a mobile phone rear panel with display and keypad (no text or symbols)Main components
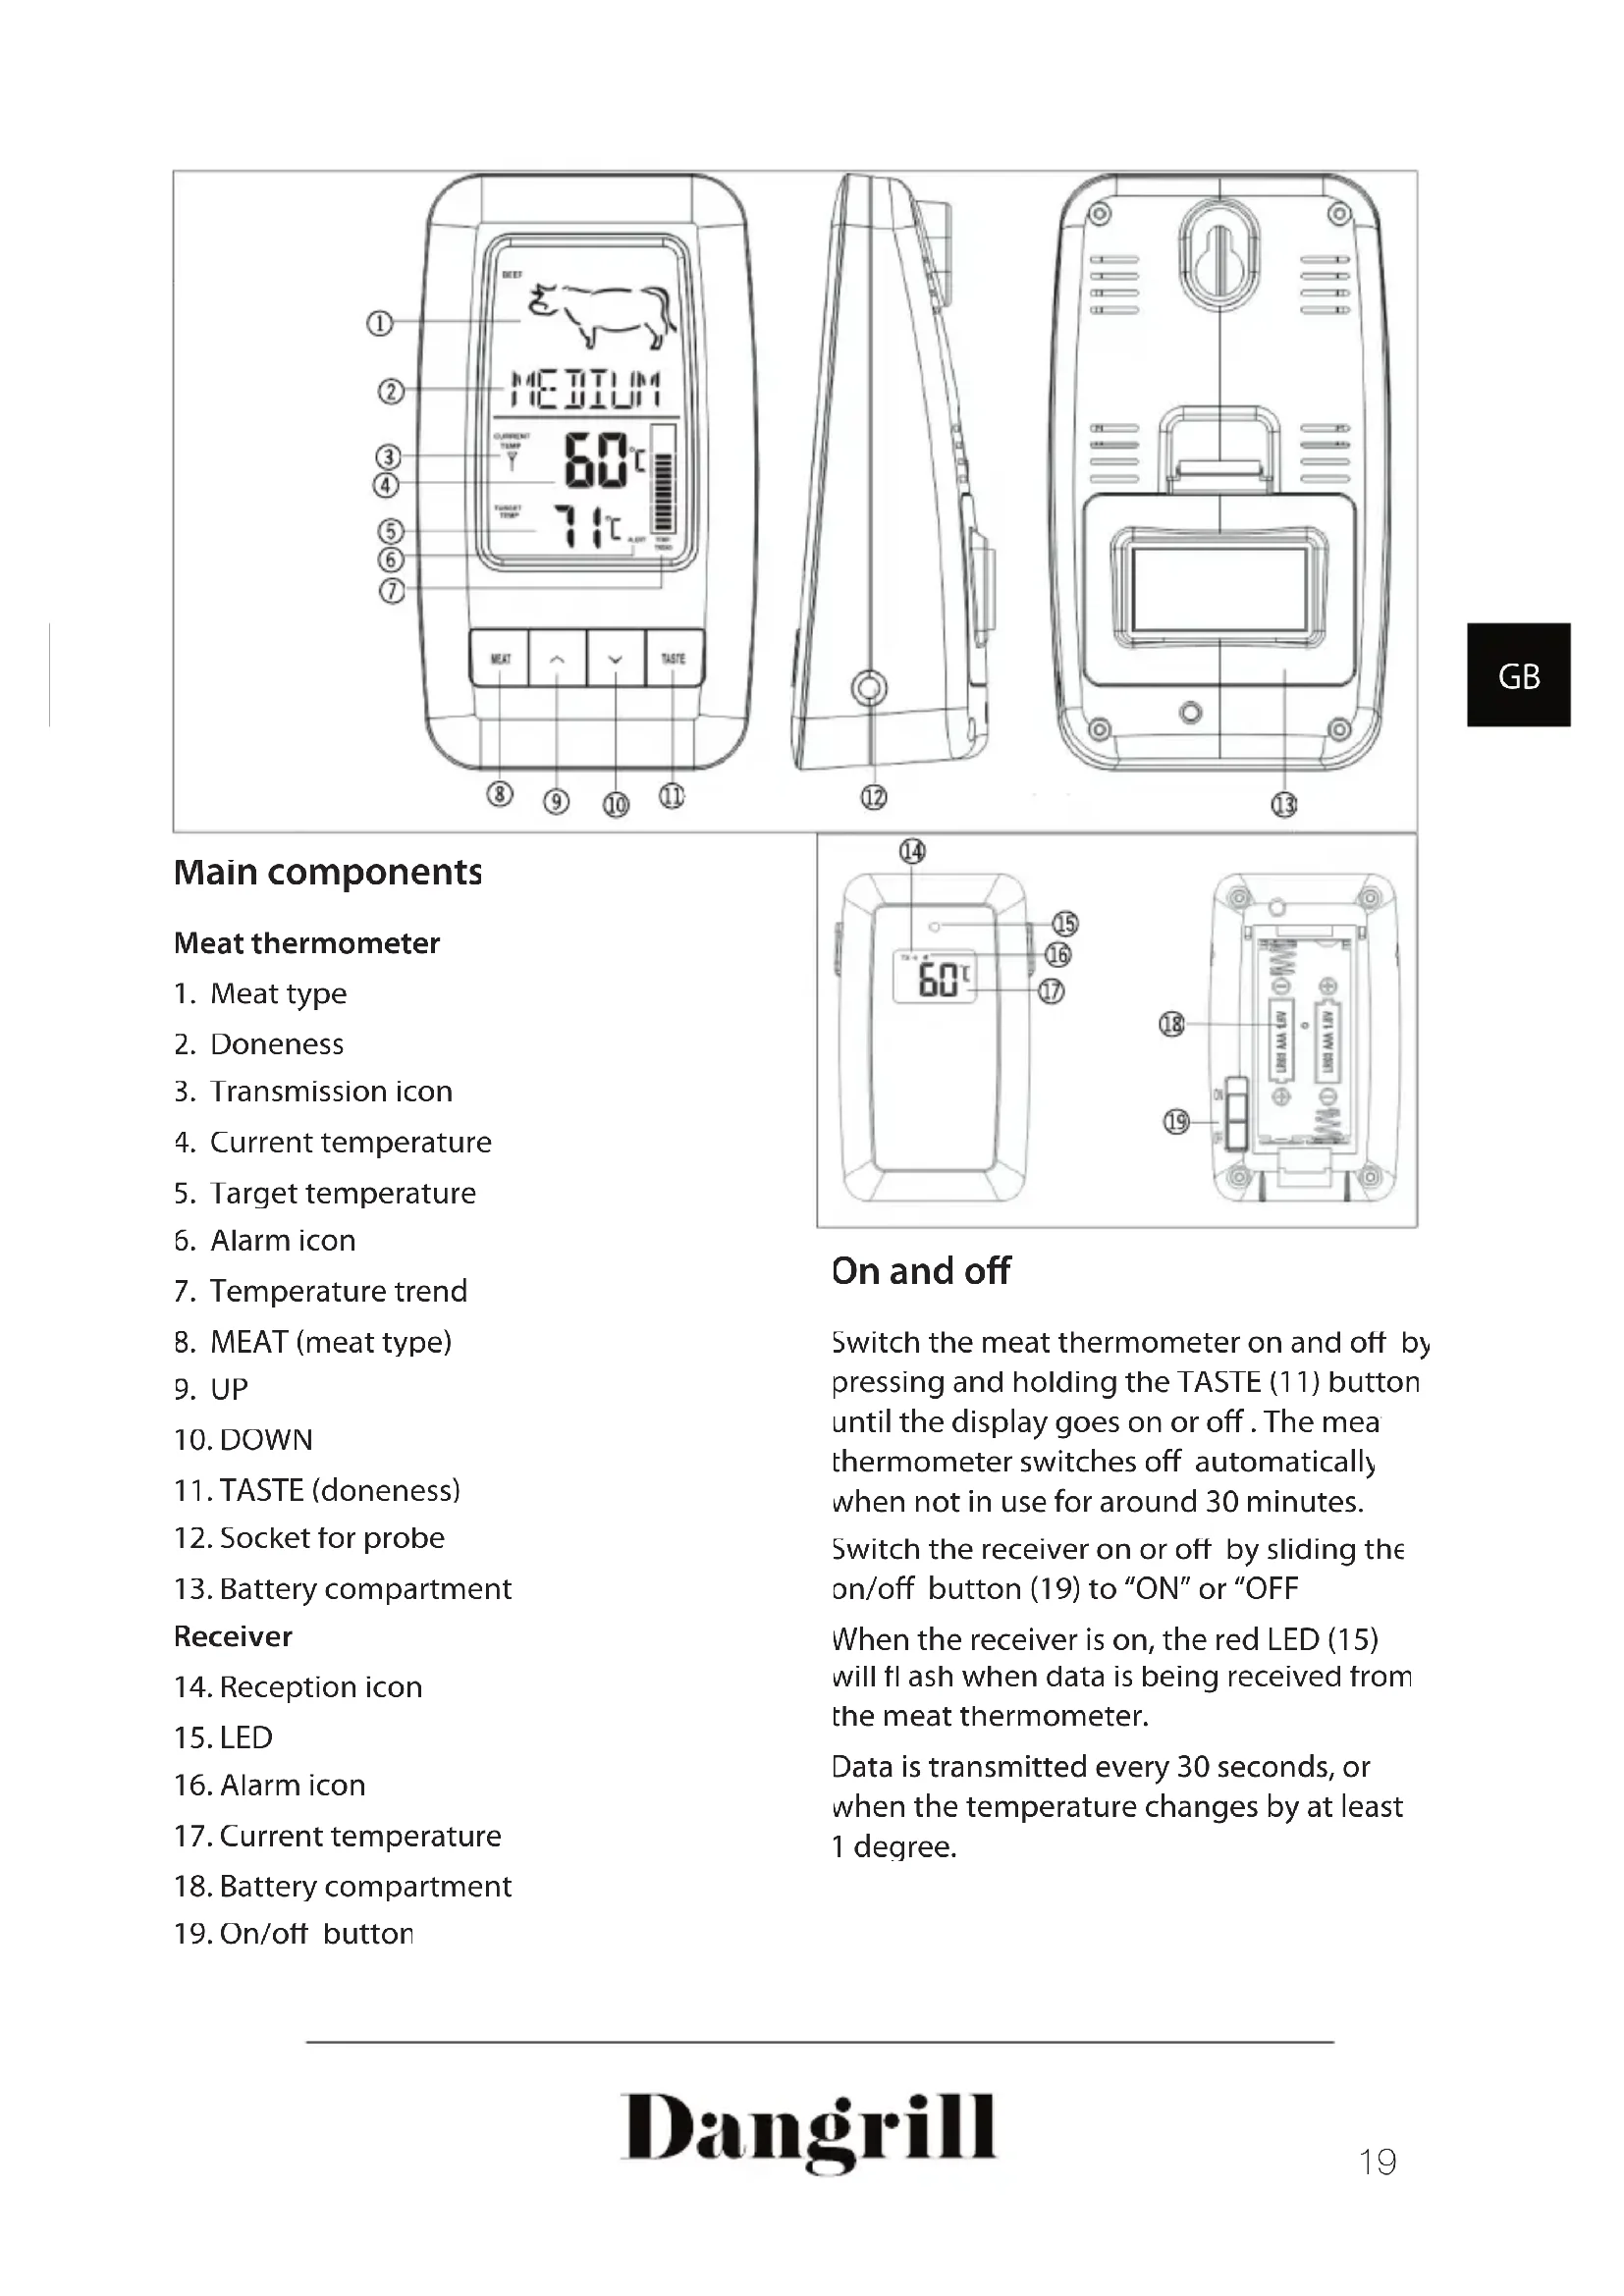
Meat thermometer
- Meat type
- Doneness
- Transmission icon
- Current temperature
- Target temperature
- Alarm icon
- Temperature trend
- MEAT (meat type)
- UP
- DOWN
- TASTE (doneness)
- Socket for probe
- Battery compartment
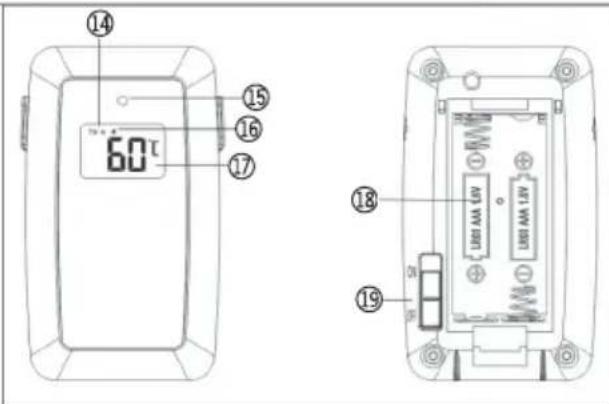
Receiver
- Reception icon
- LED
- Alarm icon
- Current temperature
- Battery compartment
- On/off button
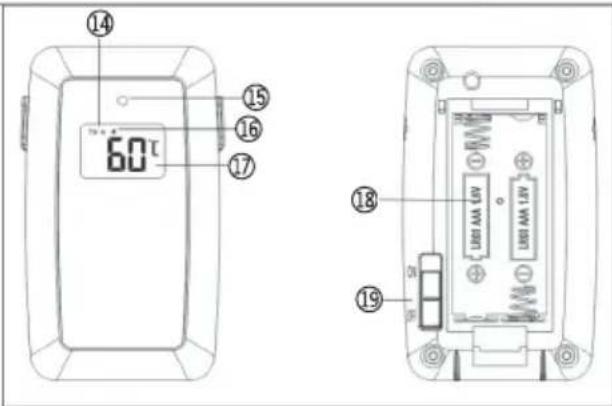
On and off
Switch the meat thermometer on and off by pressing and holding the TASTE (11) button until the display goes on or off. The mea thermometer switches off automatically when not in use for around 30 minutes.
Switch the receiver on or off by sliding the on/off button (19) to "ON" or "OFF
When the receiver is on, the red LED (15) will flash when data is being received from the meat thermometer.
Data is transmitted every 30 seconds, or when the temperature changes by at least 1 degree.
Setting
Select meat type and doneness
Press the MEAT button (8) to choose the desired meat type in this order:
Beef - Lamb - Veal - Hamburger - Pork
- Turkey - Chicken - Fish - PGM (any temperature).

flowchart
graph LR
    A["BEEF"] --> B["LAMB"]
    B --> C["VEAL"]
    C --> D["HAMBURGER"]
    D --> E["PORK"]
    E --> F["TURKEY"]
    F --> G["CHICKEN"]
    G --> H["FISH"]
    H --> I["PGM"]
- Press the TASTE (11) button to chosen between Rare, Medium Rare, Medium Medium Well Done or Well Done
The target temperature for the selected meat type and doneness is then shown in the display
Only the degrees of doneness suitable for the selected meat type are displayed.
- If you select PGM as meat type, you can set the required target temperature yourself, from 50 to 300^ , by pressing the UP (9) and DOWN (10) buttons.
If you push and hold the button, the number changes rapidly
- Start cooking.
- The alarm sounds on both the meat thermometer and the receiver once the meat has reached the target temperature.
Changing the measurement unit
Press the UP button (9) to switch the display between Celsius and Fahrenheit. However, this option is not available if you have set the target temperature yourself with PGM as meat type.
Use
Set the meat thermometer as described above.
Insert the connector from the probe into the socket (12) on the meat thermometer
Switch the meat thermometer and receiver on.
Push the probe into the middle of the meat (at the thickest point). Make sure not to go right through the meat.
The probe must not be close to any meat bone
The probe must not be exposed to a naked flame
Background light
When you press a button, the background light automatically comes on for around 30 seconds and then goes off
After cooking
Switch the meat thermometer and receiver off
Remove the probe from the meat (use ar oven glove or pot holder).
Clean the probe with water and washing-up liquid.
The meat thermometer and receiver can be cleaned with a damp cloth.
Service centre
Note: Please quote the product model number in connection with all inquiries.
The model number is shown on the front of this manual and on the product rating plate.
For:
- Complaints
- Replacements parts
- Returns
- Guarantee issues
- www.schou.com
Environmental information

Electrical and electronic equipment (EEE) contains materials, components and substances that may be hazardous and harmful to human health and the environment if waste electrical and electronic equipment (WEEE) is not disposed of correctly. Products marked with a crossed-out wheeled bin are electrical and electronic equipment. The crossed-out wheeled bin indicates that waste electrical and electronic equipment must not be disposed of with unsorted household waste, but must be collected separately
Manufactured in P.R.C
Manufacturer
Schou Company A/S
Nordager 3
DK-6000 Kolding
All rights reserved. The content of this manual may not be reproduced, either in full or in part, in any way by electronic or mechanical means, e.g. photocopying or publication, translated or saved in an information storage and retrieval system without written permission from Schou Company A/S
DRAHTLOSES BRATENTHERMOMETER
Einleitung
natural_image
Technical line drawing of a mechanical part with no visible text or symbols
natural_image
Technical line drawing of a mobile phone casing with front panel and display (no text or symbols)natural_image
Technical line drawing of a mechanical component or device (no text or symbols visible)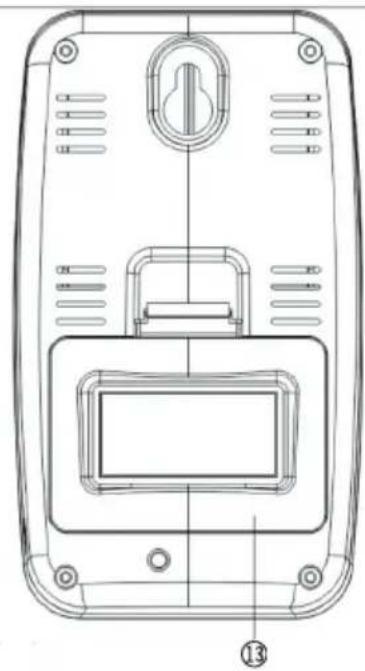
natural_image
Line drawing of a mobile phone rear panel with display and keypad (no text or symbols)Główne elementy
Termometr do mięsa
natural_image
Technical line drawing of a mechanical part with no visible text or symbols
natural_image
Technical line drawing of a mobile phone rear panel with buttons and display (no text or symbols)Pöhikomponendic
Lihatermomeeter
natural_image
Technical line drawing of a mechanical part with no visible text or symbols
natural_image
Technical line drawing of a mobile phone rear panel with buttons and display (no text or symbols)natural_image
Technical line drawing of a mechanical component or device (no text or symbols visible)
natural_image
Technical line drawing of a mobile phone rear panel with display and keypad (no text or symbols)DRAADLOZE VLEESTHERMOMETER
Inleiding
natural_image
Technical line drawing of a mechanical component or device (no text or symbols visible)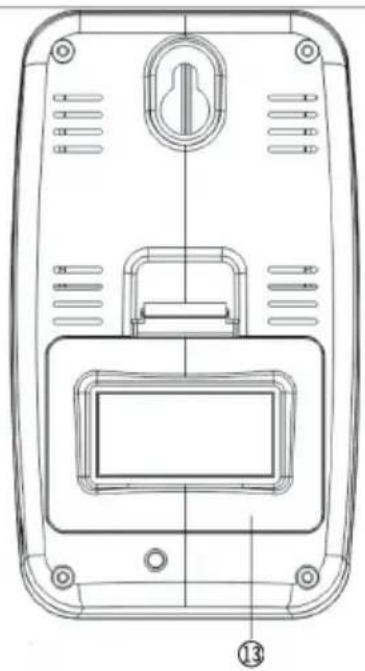
natural_image
Technical line drawing of a mobile phone casing with front panel and door (no text or symbols)Basisonderdeler
Vleesthermometer
natural_image
Technical line drawing of a mechanical part with no visible text or symbols
natural_image
Technical line drawing of a mobile phone casing with front panel and door (no text or symbols)- Stegetermometerets dele
- Stegetermometer
- Modtager
- Tænde og slukke
- Steketermometerets deler
- Steketermometer
- Stektermometerns delar
- Stektermometer
- WIRELESS MEAT THERMOMETER
- Introduction
- Technical data
- Special safety instructions
- Inserting the batteries
- Main components
- Meat thermometer
- Receiver
- On and off
- Setting
- Select meat type and doneness
- Changing the measurement unit
- Use
- Background light
- After cooking
- Service centre
- Environmental information
- DRAHTLOSES BRATENTHERMOMETER
- Einleitung
- Główne elementy
- Termometr do mięsa
- Pöhikomponendic
- Lihatermomeeter
- DRAADLOZE VLEESTHERMOMETER
- Inleiding
- Basisonderdeler
- Vleesthermometer
Brand : Dangrill
Model : 751835
Category : Food thermometer