GCM 254 Professional - Saw BOSCH - Free user manual and instructions
Find the device manual for free GCM 254 Professional BOSCH in PDF.
| Product type | Radial miter saw |
| Brand | Bosch |
| Model | GCM 254 Professional |
| Rated power | 1750 W |
| No-load speed | 5000 rpm |
| Weight (according to EPTA) | 11.1 kg |
| Blade diameter | 254 mm |
| Blade bore | 25.4 mm |
| Integrated laser | Class 2 diode laser, 650 nm, <1 mW |
| Miter angle range (horizontal) | From -47° to +52° |
| Bevel angle range (vertical) | From 45° (left) to 0° (right) |
| Max workpiece dimensions (0°/0°) | 90 x 90 mm (height x width) |
| Max workpiece dimensions (0°/45°) | 60 x 93 mm |
| Max workpiece dimensions (45°/0°) | 90 x 63 mm |
| Dust extraction | Integrated dust bag; compatible external vacuum (Ø 35 mm) |
| Power supply | Mains 230 V, 50/60 Hz |
| Protection class | II (double insulation) |
| Manual page count | 119 pages |
| Available languages | FR, EN, ID, PT, TH, VI, ZH |
| Included accessories | Saw blade, clamp, hex key, rip fence, dust bag, workpiece supports (2x) |
| After-sales service | Spare parts available at www.bosch-pt.com |
Frequently Asked Questions - GCM 254 Professional BOSCH
User questions about GCM 254 Professional BOSCH
0 question about this device. Answer the ones you know or ask your own.
Ask a new question about this device
Download the instructions for your Saw in PDF format for free! Find your manual GCM 254 Professional - BOSCH and take your electronic device back in hand. On this page are published all the documents necessary for the use of your device. GCM 254 Professional by BOSCH.
USER MANUAL GCM 254 Professional BOSCH
GCM 254 Professional
Robert Bosch Power Tools GmbH
70538 Stuttgart
GERMANY
www.bosch-pt.com
1609 92A 88J (2023.03) PS/119

natural_image
3D rendering of a mechanical cutting machine with no visible text or symbolsen Original instructions
fr Notice originale
pt Manual original
zh 正本使用说明书
zh原始使用說明書
English ...... Page 12
Français Page 21
natural_image
3D rendering of a cutting machine with a flat blade and metal frame, labeled A2 (no text or symbols on the machine itself)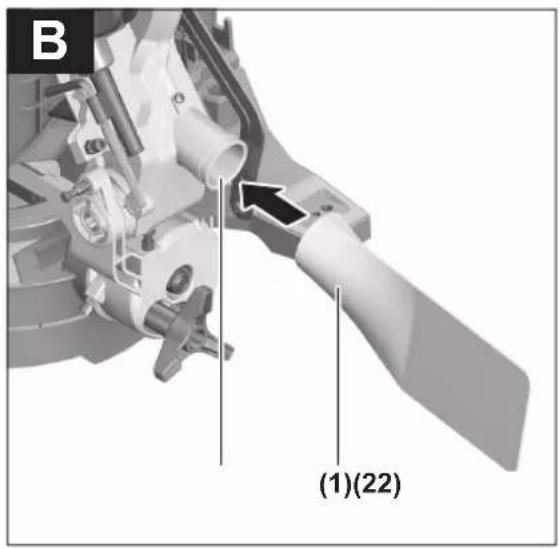
natural_image
Mechanical assembly diagram showing a rotating component with labeled part (25), no readable text or symbols present.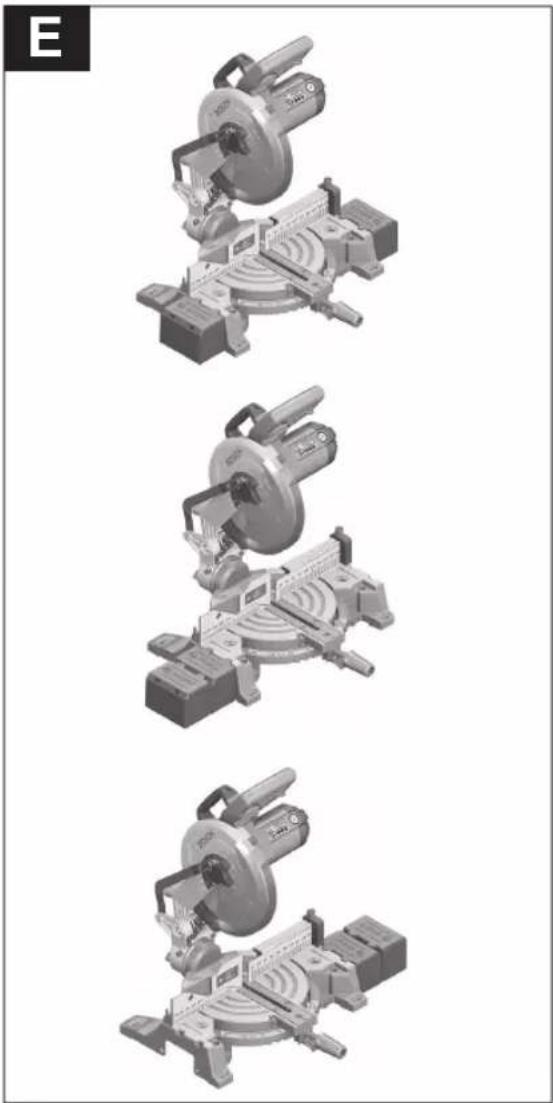
natural_image
Three identical 3D mechanical assembly diagrams showing a cutting cutter, blade, and base work (no text or labels)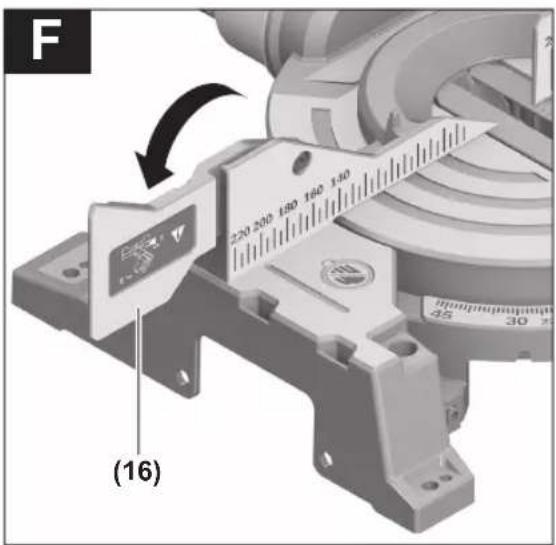
Bosch Power Tools 1 609 92A 88J | (14.03.2023)
8

natural_image
Person using a power tool on a workbench (no visible text or symbols)1 609 92A 88J | (14.03.2023) Bosch Power Tools
natural_image
Mechanical assembly diagram of a Bosch cutting machine with an inset close-up showing a component labeled (20), no readable text or symbols present.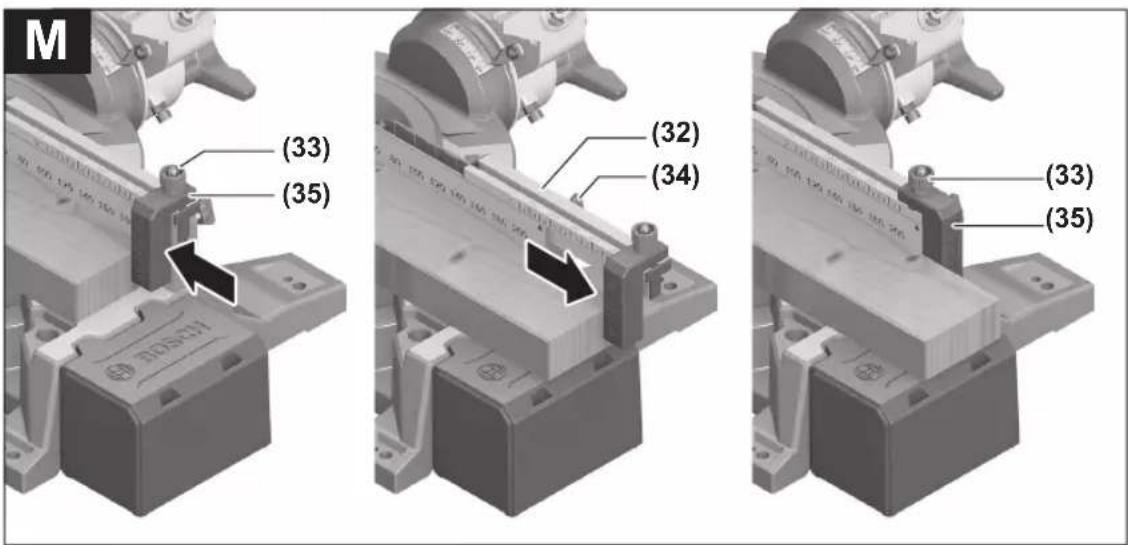
10

natural_image
Mechanical assembly diagram showing a motor and gear assembly with labeled component (53), no readable text or symbols beyond labels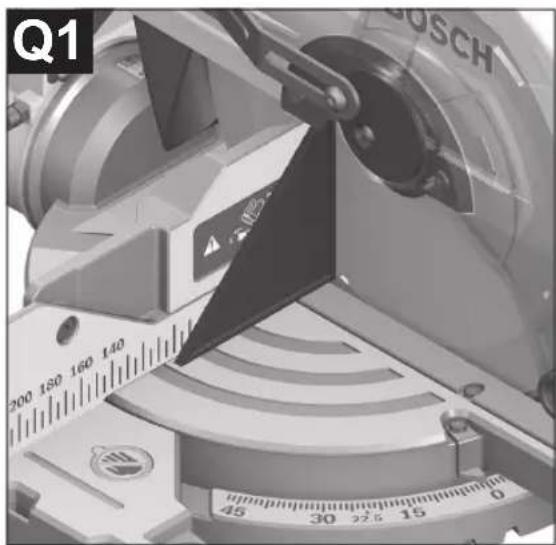
natural_image
Close-up of a mechanical caliper with a scale and metric dial (no readable text or symbols)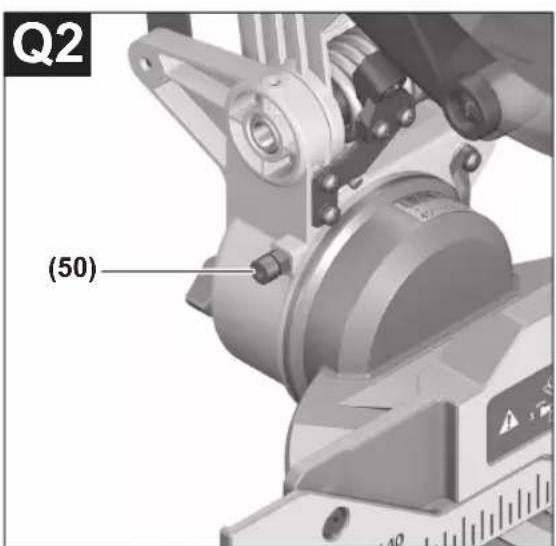
natural_image
Close-up of a Bosch 140mm radial measuring instrument with scale markings (no readable text or symbols beyond branding)|11
English
Safety instructions
General Power Tool Safety Warnings
WARNING
Read all safety warnings, instructions, illustrations and specifica-
tions provided with this power tool. Failure to follow all instructions listed below may result in electric shock, fire and/or serious injury.
Save all warnings and instructions for future reference.
The term "power tool" in the warnings refers to your mains-operated (corded) power tool or battery-operated (cordless) power tool.
Work area safety
▶ Keep work area clean and well lit. Cluttered or dark areas invite accidents.
▶ Do not operate power tools in explosive atmospheres, such as in the presence of flammable liquids, gases or dust. Power tools create sparks which may ignite the dust or fumes.
▶ Keep children and bystanders away while operating a power tool. Distractions can cause you to lose control.
Electrical safety
▶ Power tool plugs must match the outlet. Never modify the plug in any way. Do not use any adapter plugs with earthed (grounded) power tools. Unmodified plugs and matching outlets will reduce risk of electric shock.
▶ Avoid body contact with earthed or grounded surfaces, such as pipes, radiators, ranges and refrigerators. There is an increased risk of electric shock if your body is earthed or grounded.
▶ Do not expose power tools to rain or wet conditions. Water entering a power tool will increase the risk of electric shock.
▶ Do not abuse the cord. Never use the cord for carrying, pulling or unplugging the power tool. Keep cord away from heat, oil, sharp edges or moving parts.
Damaged or entangled cords increase the risk of electric shock.
▶ When operating a power tool outdoors, use an extension cord suitable for outdoor use. Use of a cord suitable for outdoor use reduces the risk of electric shock.
▶ If operating a power tool in a damp location is unavoidable, use a residual current device (RCD) protected supply. Use of an RCD reduces the risk of electric shock.
Personal safety
▶ Stay alert, watch what you are doing and use common sense when operating a power tool. Do not use a power tool while you are tired or under the influence of drugs, alcohol or medication. A moment of inatten-
tion while operating power tools may result in serious personal injury.
▶ Use personal protective equipment. Always wear eye protection. Protective equipment such as a dust mask, non-skid safety shoes, hard hat or hearing protection used for appropriate conditions will reduce personal injuries.
▶ Prevent unintentional starting. Ensure the switch is in the off-position before connecting to power source and/or battery pack, picking up or carrying the tool. Carrying power tools with your finger on the switch or energising power tools that have the switch on invites accidents.
Remove any adjusting key or wrench before turning the power tool on. A wrench or a key left attached to a rotating part of the power tool may result in personal injury.
▶ Do not overreach. Keep proper footing and balance at all times. This enables better control of the power tool in unexpected situations.
▶ Dress properly. Do not wear loose clothing or jewellery. Keep your hair and clothing away from moving parts. Loose clothes, jewellery or long hair can be caught in moving parts.
▶ If devices are provided for the connection of dust extraction and collection facilities, ensure these are connected and properly used. Use of dust collection can reduce dust-related hazards.
Do not let familiarity gained from frequent use of tools allow you to become complacent and ignore tool safety principles. A careless action can cause severe injury within a fraction of a second.
Power tool use and care
▶ Do not force the power tool. Use the correct power tool for your application. The correct power tool will do the job better and safer at the rate for which it was designed.
▶ Do not use the power tool if the switch does not turn it on and off. Any power tool that cannot be controlled with the switch is dangerous and must be repaired.
▶ Disconnect the plug from the power source and/or remove the battery pack, if detachable, from the power tool before making any adjustments, changing accessories, or storing power tools. Such preventive safety measures reduce the risk of starting the power tool accidentally.
▶ Store idle power tools out of the reach of children and do not allow persons unfamiliar with the power tool or these instructions to operate the power tool. Power tools are dangerous in the hands of untrained users.
- Maintain power tools and accessories. Check for misalignment or binding of moving parts, breakage of parts and any other condition that may affect the power tool's operation. If damaged, have the power tool repaired before use. Many accidents are caused by poorly maintained power tools.
▶ Keep cutting tools sharp and clean. Properly maintained cutting tools with sharp cutting edges are less likely to bind and are easier to control.
▶ Use the power tool, accessories and tool bits etc. in accordance with these instructions, taking into account the working conditions and the work to be performed. Use of the power tool for operations different from those intended could result in a hazardous situation.
▶ Keep handles and grasping surfaces dry, clean and free from oil and grease. Slippery handles and grasping surfaces do not allow for safe handling and control of the tool in unexpected situations.
Service
▶ Have your power tool serviced by a qualified repair person using only identical replacement parts. This will ensure that the safety of the power tool is maintained.
Safety Warnings for Mitre Saws
- Mitre saws are intended to cut wood or wood-like products, they cannot be used with abrasive cut-off wheels for cutting ferrous material such as bars, rods, studs, etc. Abrasive dust causes moving parts such as the lower guard to jam. Sparks from abrasive cutting will burn the lower guard, the kerf insert and other plastic parts.
▶ Use clamps to support the workpiece whenever possible. If supporting the workpiece by hand, you must always keep your hand at least 100 mm from either side of the saw blade. Do not use this saw to cut pieces that are too small to be securely clamped or held by hand. If your hand is placed too close to the saw blade, there is an increased risk of injury from blade contact.
The workpiece must be stationary and clamped or held against both the fence and the table. Do not feed the workpiece into the blade or cut "freehand" in any way. Unrestrained or moving workpieces could be thrown at high speeds, causing injury.
▶ Never cross your hand over the intended line of cutting either in front or behind the saw blade. Supporting the workpiece “cross handed” i.e. holding the workpiece to the right of the saw blade with your left hand or vice versa is very dangerous.
▶ Do not reach behind the fence with either hand closer than 100 mm from either side of the saw blade, to remove wood scraps, or for any other reason while the blade is spinning. The proximity of the spinning saw blade to your hand may not be obvious and you may be seriously injured.
Inspect your workpiece before cutting. If the workpiece is bowed or warped, clamp it with the outside bowed face toward the fence. Always make certain that there is no gap between the workpiece, fence and table along the line of the cut. Bent or warped workpieces can twist or shift and may cause binding on the spinning saw blade while cutting. There should be no nails or foreign objects in the workpiece.
Do not use the saw until the table is clear of all tools, wood scraps, etc., except for the workpiece. Small debris or loose pieces of wood or other objects that contact the revolving blade can be thrown with high speed.
▶ Cut only one workpiece at a time. Stacked multiple workpieces cannot be adequately clamped or braced and may bind on the blade or shift during cutting.
▶ Ensure the mitre saw is mounted or placed on a level, firm work surface before use. A level and firm work surface reduces the risk of the mitre saw becoming unstable.
▶ Plan your work. Every time you change the bevel or mitre angle setting, make sure the adjustable fence is set correctly to support the workpiece and will not interfere with the blade or the guarding system. Without turning the tool "ON" and with no workpiece on the table, move the saw blade through a complete simulated cut to assure there will be no interference or danger of cutting the fence.
▶ Provide adequate support such as table extensions, saw horses, etc. for a workpiece that is wider or longer than the table top. Workpieces longer or wider than the mitre saw table can tip if not securely supported. If the cut-off piece or workpiece tips, it can lift the lower guard or be thrown by the spinning blade.
▶ Do not use another person as a substitute for a table extension or as additional support. Unstable support for the workpiece can cause the blade to bind or the workpiece to shift during the cutting operation pulling you and the helper into the spinning blade.
The cut-off piece must not be jammed or pressed by any means against the spinning saw blade. If confined, i.e. using length stops, the cut-off piece could get wedged against the blade and thrown violently.
▶ Always use a clamp or a fixture designed to properly support round material such as rods or tubing. Rods have a tendency to roll while being cut, causing the blade to "bite" and pull the work with your hand into the blade.
▶ Let the blade reach full speed before contacting the workpiece. This will reduce the risk of the workpiece being thrown.
If the workpiece or blade becomes jammed, turn the mitre saw off. Wait for all moving parts to stop and disconnect the plug from the power source and/or remove the battery pack. Then work to free the jammed material. Continued sawing with a jammed workpiece could cause loss of control or damage to the mitre saw.
▶ After finishing the cut, release the switch, hold the saw head down and wait for the blade to stop before removing the cut-off piece. Reaching with your hand near the coasting blade is dangerous.
▶ Hold the handle firmly when making an incomplete cut or when releasing the switch before the saw head is completely in the down position. The braking action of the saw may cause the saw head to be suddenly pulled downward, causing a risk of injury.
14 | English
▶ Do not let go of the handle once the saw head has reached the lowest position. Always guide the saw head back to the top position by hand. There is a risk of injury if the saw head moves in an uncontrolled manner.
- Keep your work area clean. Material mixtures are particularly hazardous. Light metal dust may catch fire or explode.
▶ Do not use dull, cracked, bent or damaged saw blades. Unsharpened or improperly set saw blades produce narrow kerf causing excessive friction, blade binding and kickback.
▶ Do not use saw blades made from high speed steel (HSS). Such saw blades can easily break.
▶ Always use saw blades with correct size and shape (diamond versus round) of arbour holes. Saw blades that do not match the mounting hardware of the saw will run off-centre, causing loss of control.
▶ Never remove cuttings, wood chips, etc. from the cutting area while the power tool is running. Always guide the tool arm back to the neutral position first and then switch the power tool off.
▶ Do not touch the saw blade after working before it has cooled. The saw blade becomes very hot while working. Products sold in GB only:
Your product is fitted with an BS 1363/A approved electric plug with internal fuse (ASTA approved to BS 1362).
If the plug is not suitable for your socket outlets, it should be cut off and an appropriate plug fitted in its place by an authorised customer service agent. The replacement plug should have the same fuse rating as the original plug.
The severed plug must be disposed of to avoid a possible shock hazard and should never be inserted into a mains socket elsewhere.
The power tool is delivered with a laser warning sign (see table: "Symbols and their meaning").
If the text of the laser warning label is not in your national language, stick the provided warning label in your national language over it before operating for the first time.
▶ Never make warning signs on the machine unrecognisable.
Do not direct the laser beam at persons or animals and do not stare into the direct or reflected laser beam yourself. You could blind somebody, cause accidents or damage your eyes.
▶ If laser radiation hits your eye, you must close your eyes and immediately turn your head away from the beam.
▶ Do not make any modifications to the laser equipment. The setting options described in these operating instructions can be used safely.
▶ Do not let children use the power tool unsupervised. They could unintentionally blind themselves or other persons
Symbols
The following symbols may be important for the operation of your power tool. Please take note of these symbols and their meaning. Correctly interpreting the symbols will help you to operate the power tool more effectively and safely.
Symbols and their meaning
Laser radiation Do not look directly into the beam Laser class 2

Keep hands away from the cutting area while the power tool is running. Contact with the saw blade can lead to injuries.

Wear a dust mask.

Wear safety goggles.

Wear hearing protection. Exposure to noise can cause hearing loss.

Danger area! Keep hands, fingers and arms away from this area.

Take note of the dimensions of the saw blade. The hole diameter must match the tool spindle without play. If it is necessary to use reducers, ensure that the dimensions of the reducer are suitable for the base blade thickness and the saw blade hole diameter, as well as the tool spindle diameter. Wherever possible, use the reducers provided with the saw blade.
The saw blade diameter must match the information specified on the symbol.
The folding fence must be folded outwards to saw bevel angles.
Product Description and Specifications

Read all the safety and general instructions.
Failure to observe the safety and general instructions may result in electric shock, fire and/or serious injury.
Please observe the illustrations at the beginning of this operating manual.
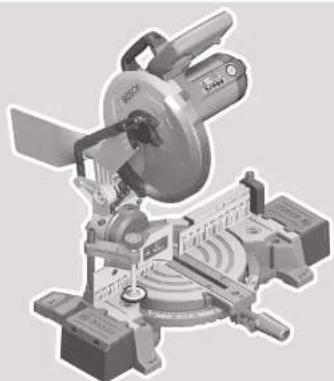
Intended Use
The power tool is intended as a stationary machine for making straight cuts in wood with and against the grain. Mitre angles of -47^ to +52^ as well as bevel angles of 45^ (left-hand side) to 0^ (right-hand side) are possible.
The power tool is designed with sufficient capacity for sawing hardwood and softwood as well as chipboard and fibreboard.
When using appropriate saw blades, sawing aluminium profiles and plastic is also possible.
Product Features
The numbering of the product features refers to the diagram of the power tool on the graphics page.
(1) Dust bag
(2) Protective guard
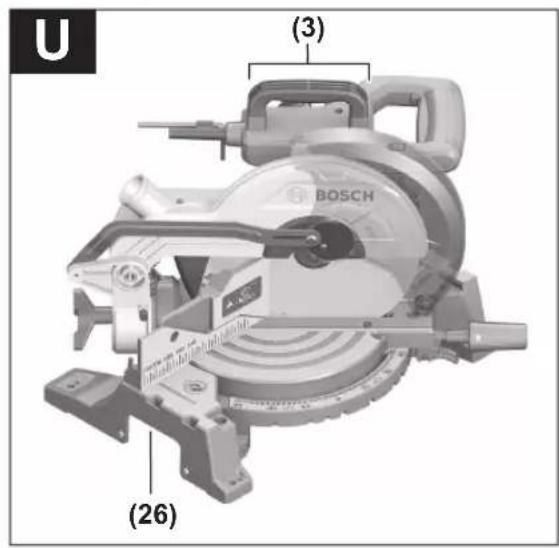
(3) Transport handle
(4) Handle
(5) Lock-off function for On/Off switch
(6) Laser warning label
(7) Retracting blade guard
(8) Fence
(9) Workpiece support (flexibly pluggable)
(10) Saw table
(11) Locking knob for all mitre angles
(12) Mitre pre-setting lever
(13) Angle indicator for mitre angles
(14) Scale for mitre angles
(15) Screw clamp
(16) Folding fence
(17) Guide roller
(18) Chip deflector
(19) On/off switch
(20) On/Off switch for laser (cutting line indication)
(21) Holes for screw clamp
(22) Chip ejector
(23) Mounting holes
(24) Clamping bolt for all bevel angles
(25) Transport safety lock
(26) Recessed handles
(27) Spindle lock
(28) Hex key
(29) Laser beam outlet aperture
(30) Angle indicator for bevel angles
(31) Scale for bevel angles
(32) Guide rail for length gauge
(33) Clamping screw for length stop
(34) Wing bolt for fixing the guide rail for length gauge
(35) Length stop
(36) Insert plate
(37) Hex socket screw for mounting the saw blade
(38) Clamping flange
(39) Saw blade ^a)
(40) Inner clamping flange
(41) Wing bolt for adjusting the height of the threaded rod
(42) Threaded rod
(43) Wing bolt for screw clamp
(44) Screw clamp pins
(45) Detents for standard mitre angles
(46) Screws for insert plate
(47) Set screw for positioning the laser
(48) Set square
(49) Hex socket screw for fence
(50) Stop screw for 0^ bevel angle
(51) Stop screw for 45^ bevel angle
(52) Screw for bevel angle indicator
(53) Screw for mitre angle indicator
a) Accessories shown or described are not included with the product as standard. You can find the complete selection of accessories in our accessories range.
Technical Data
| Mitre saw GCM 254 | ||
| Article number | 3 601 M52 0.. | |
| Rated power input W 1750 | ||
| No-load speed min | -1 | 5000 |
| Laser type nm 650 | ||
| mW < 1 | ||
| Laser class 2 | ||
| Weight according to EPTA-Procedure 01:2014 | kg 11.1 | |
| Protection class | ☐ / II | |
Permitted workpiece dimensions (maximum/minimum): (see "Permissible workpiece dimensions", page 19)
The specifications apply to a rated voltage [U] of 230 V. These specifications may vary at different voltages and in country-specific models.
16 | English
The appliance meets IEC 61000-3-11 requirements and is subject to conditional connection. The appliance can lead to occasional voltage fluctuations under unfavorable power conditions. The impedance of this appliance is set as Z_actual = 0.101 . The user must make sure, that the connection point, with the impedance Z_max , on which the appliance shall be plugged in meets the impedance requirement: Z_ac ≥ Z_max . If Z_max is unknown, determine Z_max in consultation with the network supplier or supply authority.
Values can vary depending upon the product and are subject to application and environmental conditions. For further information www.bosch-professional.com/wac.
Dimensions of suitable saw blades
| Saw blade diameter mm 254 |
| Base blade thickness mm 1.4–2.5 |
| Max. cutting width mm 3 |
| Hole diameter mm 25.4 |
Assembly
▶ Avoid starting the power tool unintentionally. The mains plug must not be connected to the power supply during assembly or when carrying out any kind of work on the power tool.
Items included

See the list of items included at the start of the operating manual.
Check to ensure that all the parts listed below have been supplied before using the power tool for the first time:
- Mitre saw with mounted saw blade
Note: Bosch sells some power tools without a saw blade. You can tell whether a saw blade is included with the power tool by looking at the packaging. - Only if product is delivered without a saw blade: Clamping flange (38) and inner clamping flange (40)
- Screw clamp (15)
- Hex key (28)
- Length stop (35)
- Dust bag (1)
- Workpiece supports (9) (2x)
Note: Check the power tool for possible damage. Before continuing to use the power tool, carefully check that all protective devices or slightly damaged parts are working perfectly and according to specifications. Check that the moving parts are working perfectly and without jamming; check whether any parts are damaged. All parts must be fitted correctly and all the conditions necessary to ensure smooth operation must be met.
If the protective devices or any parts become damaged, you must have them properly repaired or replaced by an authorised service centre.
Fitting individual components
- Carefully remove all parts included in the delivery from their packaging.
- Remove all packing material from the power tool and the accessories provided.
Stationary or flexible mounting
▶ To ensure safe handling, the power tool must be mounted on a flat, stable work surface (e.g. work bench) before use.
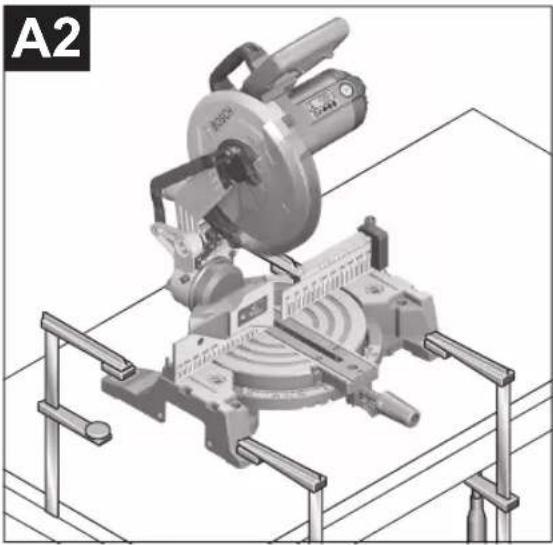
Mounting on a work surface (see figure A1-A2)
- Use suitable screw fasteners to secure the power tool to the work surface. The holes (23) are used for this purpose.
or
- Firmly clamp the base of the power tool to the work surface with commercially available screw clamps.
Mounting on a Bosch saw stand
With the height-adjustable legs, Bosch GTA saw stands provide firm support for the power tool on any surface. The workpiece supports of the saw stand are used for underlaying long workpieces.
▶ Read all the warnings and instructions included with the saw stand. Failure to observe the warnings and follow instructions may result in electric shock, fire and/or serious injury.
▶ Assemble the saw stand properly before mounting the power tool. Correct assembly is important to prevent the risk of collapsing.
- Mount the power tool on the saw stand in the transport position.
Dust/Chip Extraction
The dust from materials such as lead paint, some types of wood, minerals and metal can be harmful to human health. Touching or breathing in this dust can trigger allergic reactions and/or cause respiratory illnesses in the user or in people in the near vicinity.
Certain dusts, such as oak or beech dust, are classified as carcinogenic, especially in conjunction with wood treatment additives (chromate, wood preservative). Materials containing asbestos may only be machined by specialists.
- Use a dust extraction system that is suitable for the material wherever possible.
- Provide good ventilation at the workplace.
- It is advisable to wear a P2 filter class breathing mask.
The regulations on the material being machined that apply in the country of use must be observed.
- Avoid dust accumulation at the workplace. Dust can easily ignite.
The dust/chip extraction system can be blocked by dust, chips or fragments of the workpiece.
- Switch the power tool off and pull the mains plug out of the socket.
- Wait until the saw blade has come to a complete stop.
- Determine the cause of the blockage and eliminate it.
Self-generated dust extraction (see figure B)
For basic chip collection, use the dust bag (1) provided.
- Attach the dust bag (1) to the chip ejector (22).
During sawing, the dust bag must not come into contact with moving tool components.
Always empty the dust bag in good time.
▶ Check and clean the dust bag each time after using.
▶ When sawing aluminium, remove the dust bag to avoid the risk of fire.
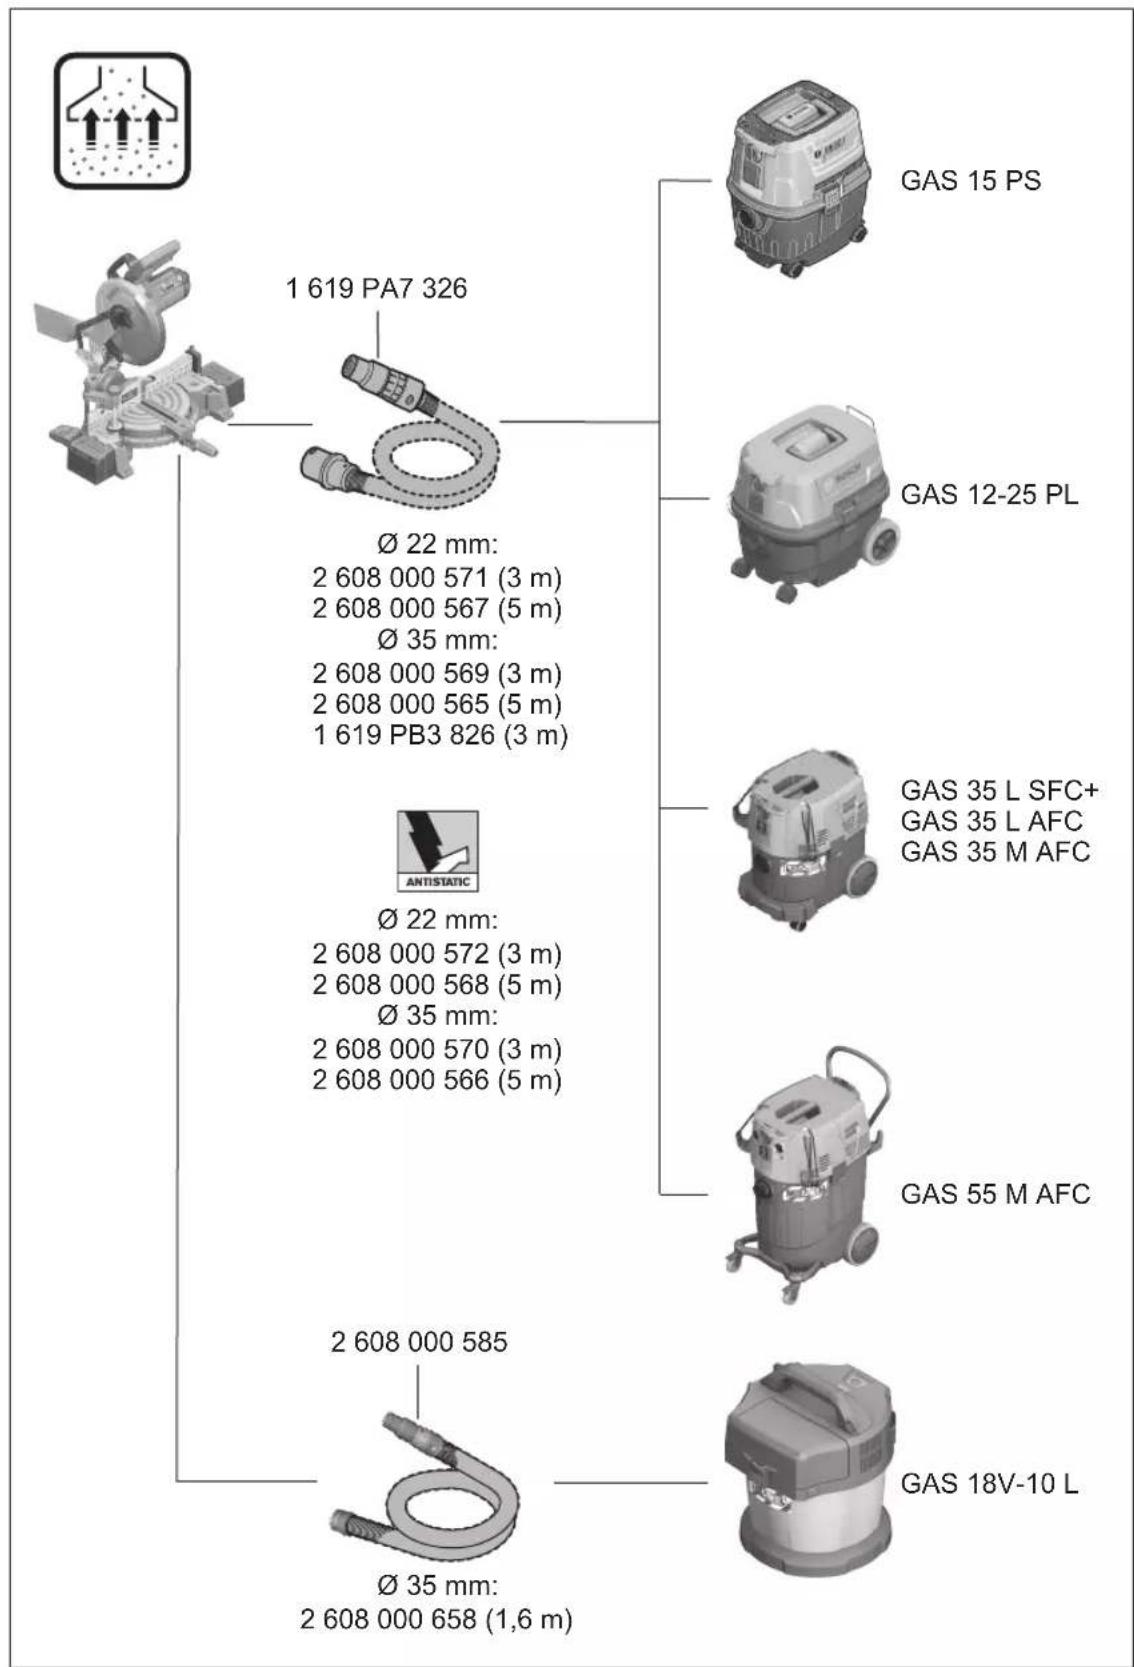
External Dust Extraction
You can also attach a dust extraction hose (35 mm diameter) to the chip ejector (22) for extraction.
- Connect the dust extraction hose to the chip ejector (22).
The dust extractor must be suitable for the material being worked.
When extracting dry dust that is especially detrimental to health or carcinogenic, use a special dust extractor.
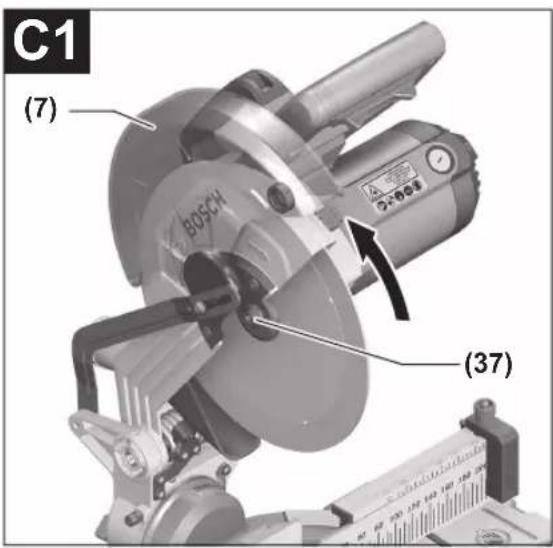
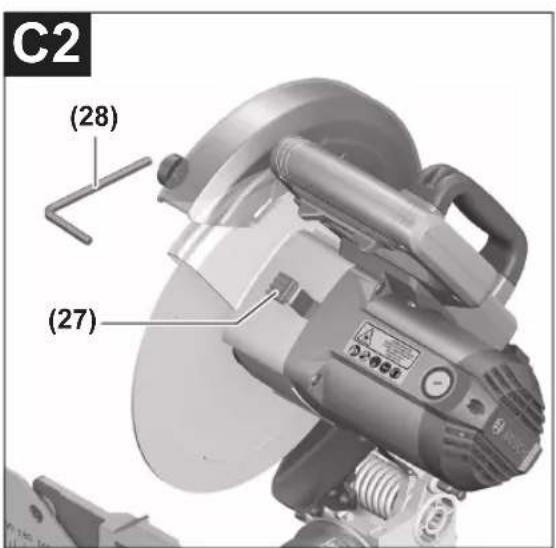
Changing the saw blade (see figures C1-C3)
▶ Pull the plug out of the socket before carrying out any work on the power tool.
▶ Wear protective gloves when fitting the saw blade.
There is a risk of injury when touching the saw blade.
Only use saw blades that have a maximum permitted speed higher than the no-load speed of the power tool.
Only use saw blades that match the specifications given in this operating manual and that have been tested and marked in accordance with EN 847-1.
Only use saw blades that are recommended by the power tool manufacturer and are suitable for use on the material you want to saw. This will prevent the saw teeth overheating when sawing.
Removing the Saw Blade
- Bring the power tool into the work position.
- Swivel the retracting blade guard (7) to the back and hold it in this position.
- Turn the hex socket screw (37) with the hex key (8 mm) and at the same time push the spindle lock (27) until it engages.
- Keep holding the spindle lock (27) and loosen the hex socket screw (37) by turning it clockwise (left-hand thread).
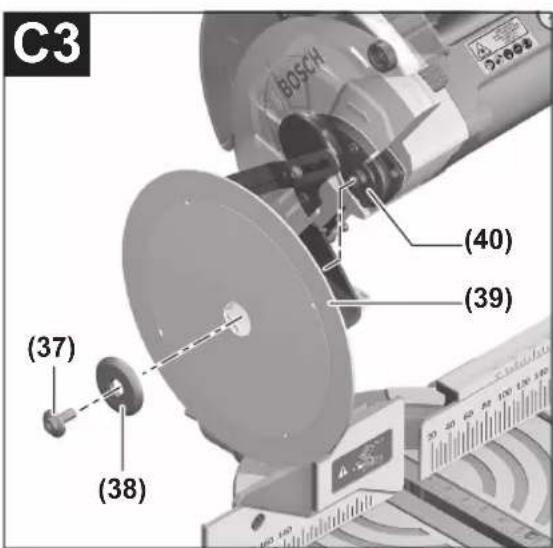
- Remove the clamping flange (38).
- Remove the saw blade (39).
- Slowly push the retracting blade guard back down.
Fitting the saw blade
When fitting the saw blade, make sure that the cutting direction of the teeth (arrow direction on the saw blade) matches the direction of the arrow on the protective guard.
If required, clean all the parts you want to fit before installing them.
- Swivel the retracting blade guard (7) to the back and hold it in this position.
- Place the new saw blade on the inner clamping flange (40).
- Fit the clamping flange (38) and the hex socket screw (37). Press the spindle lock (27) until it engages and tighten the hex socket screw by turning it anticlockwise.
- Slowly push the retracting blade guard back down.
Operation
▶ Pull the plug out of the socket before carrying out any work on the power tool.
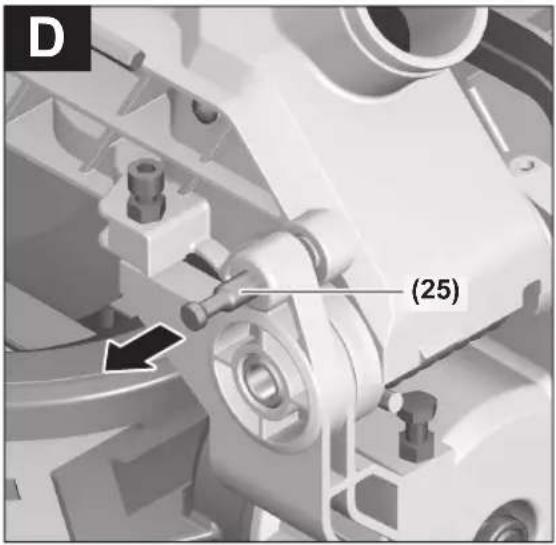
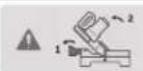
Transport Safety Lock (see figure D)
The transport safety lock (25) makes it easier to handle the power tool when transporting it to various working locations.
Unlocking the power tool (work position)
- Press the tool arm down slightly by the handle (4) to release the transport safety lock (25).
– Pull the transport safety lock (25) all the way out. - Slowly guide the tool arm upwards.
Locking the power tool (transport position)
- To lock the saw table (10) in place, tighten the locking knob (11).
- Swing the tool arm downwards by the handle (4) until you can press the transport safety lock (25) all the way in.
The tool arm is now securely locked and ready for transportation.
Preparing for operation
To ensure precise cuts, the basic settings of the power tool must be checked and adjusted as necessary after intensive use.
Experience and suitable special tools are required for this.
A Bosch after-sales service point will handle this work quickly and reliably.
Extending the saw table (see figure E)
The free end of long and heavy workpieces must have something placed underneath it or be supported.
The flexible connector system of the workpiece supports (9) enables a multitude of extension variants.
- Insert the workpiece support (9) into the openings on the power tool or into the openings of the second workpiece support as required.
▶ Never carry the power tool using the workpiece supports. Only use the transport devices to transport the power tool.
Folding Out the Fence (see figure F)
You have to fold out the folding fence (16) to saw bevel angles.
- Fold out the folding fence (16).
18 | English
After sawing the bevel angles, fold back the folding fence (16).
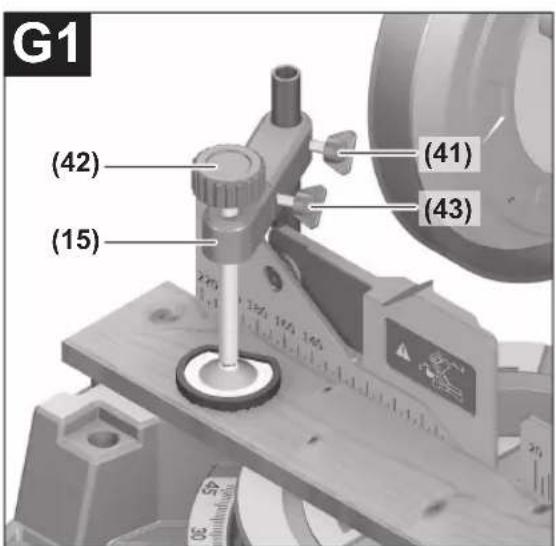
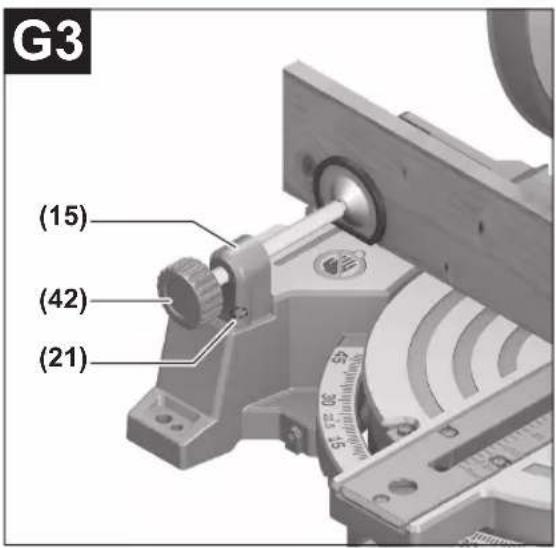
Clamping the workpiece (see figures G1-G3)
To ensure maximum safety while working, the workpiece must always be firmly clamped. Do not saw workpieces that are too small to clamp firmly.
Vertical Clamping
- Press the workpiece firmly against the (8) and (16) fences.
- Insert the supplied screw clamp (15) into one of the corresponding holes (21).
- Loosen the wing bolt (41) and adjust the screw clamp to the workpiece. Tighten the wing bolt again.
- Tighten the threaded rod (42) to fix the workpiece in place.
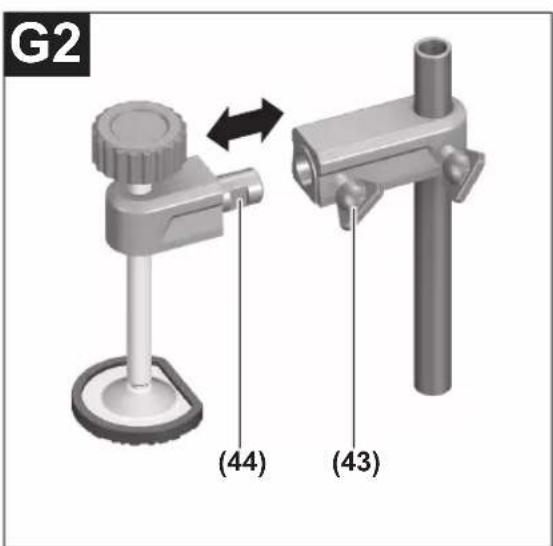
Horizontal clamping
- Unscrew the wing bolt (43) and pull apart the screw clamp.
- Insert the screw clamp (15) that has now been taken apart with the pin (44) into one of the corresponding holes (21).
- Press the workpiece firmly onto the saw table (10).
- Tighten the threaded rod (42) to fix the workpiece in place.
Releasing the workpiece
- To loosen the screw clamp, turn the threaded rod (42) anticlockwise.
Adjusting mitre angles
- Bring the power tool into the work position.
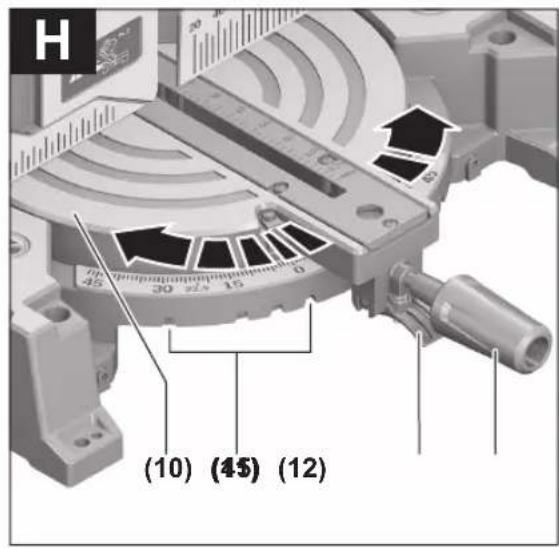
Setting Standard Mitre Angles (see figure H) For quick and precise setting of commonly used mitre angles, detents (45) are provided on the saw table:
Left Right
0^
45^;30^;22.5^;15^15^;22.5^;30^;45^
- Loosen the locking knob (11) if it is tightened.
- Pull the lever (12) and rotate the saw table (10) left or right to the required detent.
- Release the lever again. The lever must be felt to engage in the detent.
- Retighten the locking knob (11).
Setting Any Mitre Angle (see figure H)
The mitre angle can be set between 47^ (left-hand side) and 52^ (right-hand side).
- Loosen the locking knob (11) if it is tightened.
- Push the lever (12), turn the saw table (10) left or right by the locking knob and set the required mitre angle using the angle indicator (13).
- Retighten the locking knob (11).
Adjusting bevel angles
The bevel angle can be set between 45^ (left-hand side) and 0^ (right-hand side).
For quick and precise setting of frequently used bevel angles, fixed positions have been provided for the angles 0^ and 45^ .
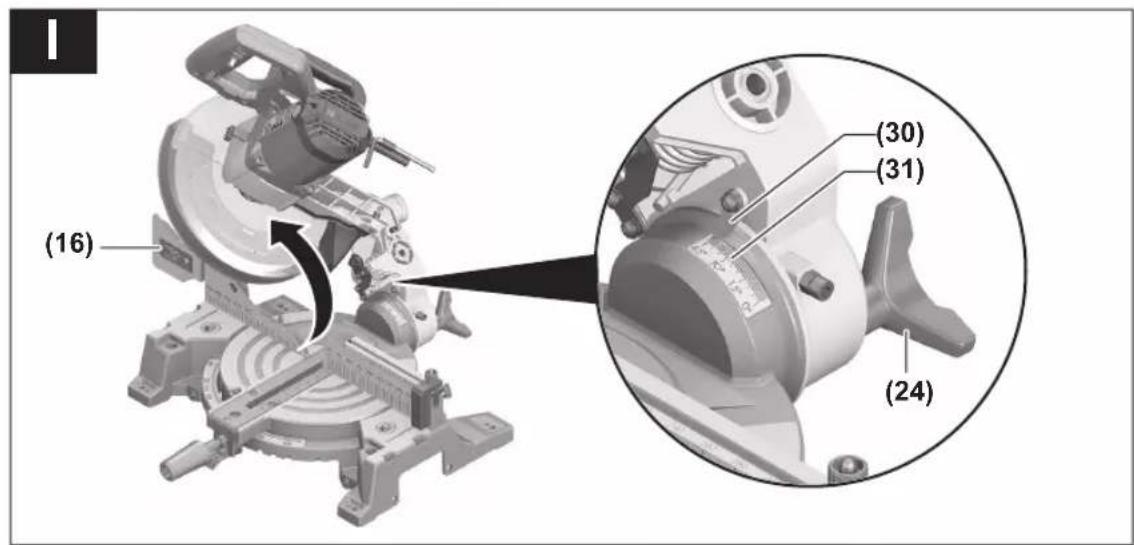
Setting Any Bevel Angle (see figure I)
- Loosen the clamping bolt (24).
- Use the handle (4) to swivel the tool arm until the angle indicator (30) shows the required bevel angle.
- Hold the tool arm in this position and retighten the clamping bolt (24).
Start-up
▶ Products that are only sold in AUS and NZ: Use a residual current device (RCD) with a nominal residual current of 30 mA or less.
▶ Pay attention to the mains voltage. The voltage of the power source must match the voltage specified on the rating plate of the power tool.
Pay attention to the mains voltage! The voltage of the power source must match the voltage specified on the rating plate of the power tool. Power tools marked with 230 V can also be operated with 220 V.
Switching on (see figure J)
- To switch on the power tool, first slide the lock-off button (5) to the middle and then press and hold the on/off switch (19).
Note: For safety reasons, the on/off switch (19) cannot be locked; it must remain pressed during the entire operation.
Switching off
- To switch off, release the on/off switch (19).
Sawing
General sawing instructions
▶ Always tighten the locking knob (11) and the clamping bolt (24) firmly before sawing. Otherwise the saw blade can become wedged in the workpiece.
For all cuts, it must first be ensured that the saw blade at no time can come in contact with the fence, screw clamps or other machine parts. Remove any mounted auxiliary stops or adjust them accordingly.
Protect the saw blade against impact and shock. Do not subject the saw blade to lateral pressure.
Only saw materials which are permitted within the scope of the intended use.
Do not saw warped/bent workpieces. The workpiece must always have a straight edge to face against the fence.
The free end of long and heavy workpieces must have something placed underneath it or be supported.
Make sure that the retracting blade guard operates properly and that it can move freely. The retracting blade guard must open when the tool arm is guided downwards. When the tool arm is guided upwards, the retracting blade guard must
close again over the saw blade and lock in the uppermost position of the tool arm.
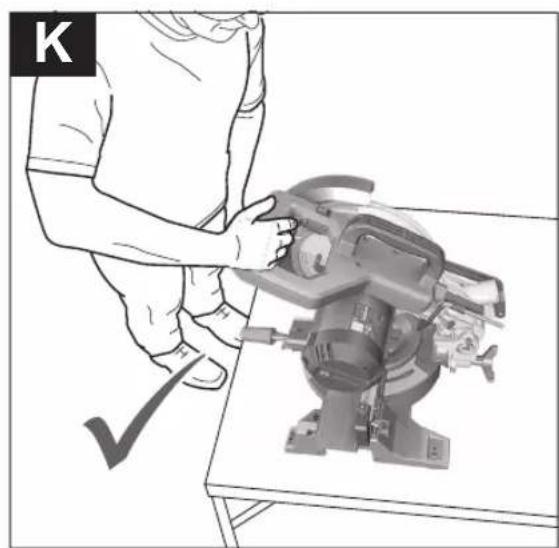
Position of the operator (see figure K)
▶ Do not stand in line with the saw blade in front of the power tool. Always stand to the side of the saw blade. This protects your body against possible kickback.
- Keep hands, fingers and arms away from the rotating saw blade.
- Do not reach one hand across the other when in front of the tool arm.
Sawing (cutting)
- Firmly clamp the workpiece as appropriate for its dimensions.
- Set the required mitre and/or bevel angle. When sawing mitre angles from left to right, you must pull the length stop (35) all the way out or remove it completely.
- Switch on the power tool.
- Slowly guide the tool arm downwards using the handle (4).
- Saw through the workpiece applying uniform feed.
- Switch off the power tool and wait until the saw blade (39) has come to a complete stop.
- Slowly guide the tool arm upwards.
Practical advice
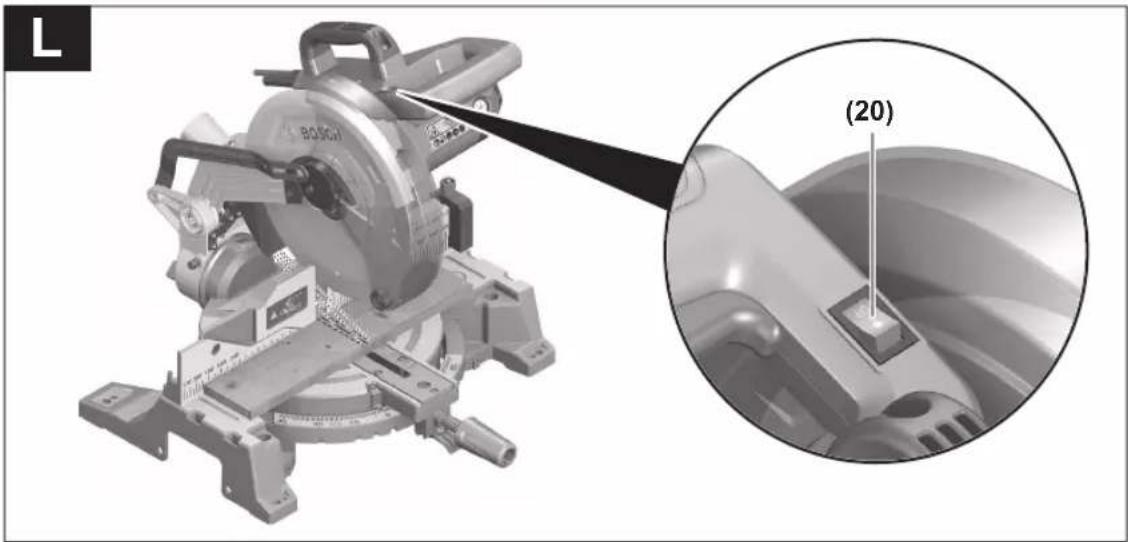
Marking the Cutting Line (see figure L)
A laser beam shows you the cutting line of the saw blade. This allows for exact positioning of the workpiece for sawing, without having to open the retracting blade guard.
- To activate this, turn on the laser beam using the switch (20).
- Align your mark on the workpiece with the right-hand edge of the laser line.
Note: Before sawing, check whether the cutting line is still indicated correctly. The laser beam can be misaligned due to vibrations from intensive use, for example.
Permissible workpiece dimensions
Maximum workpiece dimensions:
| Mitre angle | Bevel angle | Height x width [mm] |
| at max. height at max. width | ||
| 0° 0° 90 x 90 65 x 130 | ||
| 0° 45° 60 x 93 45 x 130 | ||
| 45° (left/right) | 0° 90 x 63 65 x 91 | |
| 45° (left) | 45° 55 x 70 35 x 91 | |
| 45° (right) | 45° 55 x 70 45 x 91 | |
Minimum workpiece dimensions (= all workpieces that can be secured left or right of the saw blade using the supplied screw clamps (15)): 130 x 50 mm (length x width)
Maximum cutting depth (0°/0°): 90 mm
Sawing workpieces of the same length (see figure M)
The length gauge (35) can be used for easily sawing workpieces of the same length.
- Loosen the clamping screw (33) and move the length gauge (35) in the guide rail (32) to the required workpiece length.
- Retighten the clamping screw (33).
Longer workpieces:
- Loosen the wing bolt (34) and pull out the guide rail (32) as far as it will go.
- Retighten the wing bolt (34).
- Adjust the length gauge (35) to the required workpiece length.
Sawing without a length gauge:
- Loosen the clamping screw (33) and move the length gauge (35) in the guide rail (32) all the way out.
- Rotate the length gauge by 90^ until it is flush with the fence (8).
- Retighten the clamping screw (33).
Special workpieces
When sawing curved or round workpieces, these must be especially secured against slipping. At the cutting line, there should be no gap between the workpiece, fence and saw table.
If necessary, you will need to manufacture special fixtures.
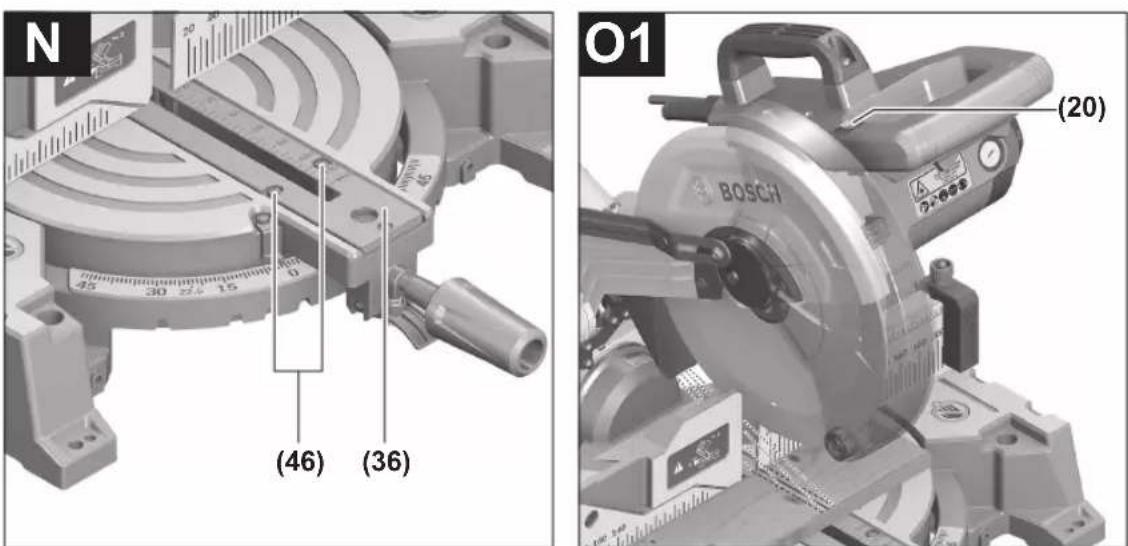
Replacing insert plates (see figure N)
The insert plate (36) can become worn after long use of the power tool.
Replace a defective insert plate.
- Bring the power tool into the work position.
- Unscrew the screws (46) using a commercially available cross-headed screwdriver and remove the old insert plate (36).
- Insert the new insert plate and screw the screws (46) in tight again.
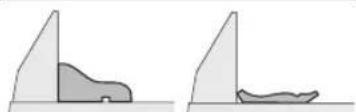
Working on mouldings
Mouldings can be sawn in two different ways:
| Positioning of workpiece | Base moulding Crown moulding |
| - Placed against the fence | 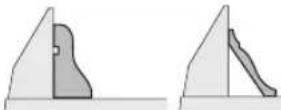 |
| - Lying flat on the saw table | 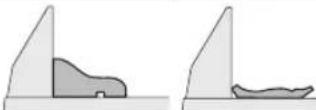 |
Always check the set mitre and/or bevel angle first by making trial cuts in scrap wood.
20 | English
Adjusting the laser
Note: To test the laser function, the power tool must be connected to the power supply.
▶ While adjusting the laser (e.g. when moving the tool arm), never activate the on/off switch. Starting the power tool accidentally can lead to injuries.
- Bring the power tool into the work position.
- Turn the saw table (10) to the 0^ detent (45). The lever (12) must be felt to engage in the detent.
To ensure precise cuts, the laser beams must be checked and adjusted as necessary after intensive use.
Experience and suitable special tools are required for this. A Bosch after-sales service point will handle this work quickly and reliably.
Checking (see figure 01)
- Draw a straight cutting line on the workpiece.
- Slowly guide the tool arm downwards using the handle (4).
- Position the workpiece so that the teeth of the saw blade line up with the cutting line.
- Hold the workpiece in this position and slowly guide the tool arm back up.
- Clamp the workpiece.
- Turn on the laser beam using the switch (19) without pressing the lock-off button (5).
The laser beam must be flush with the cutting line on the workpiece along its entire length, even if the tool arm is guided downwards.
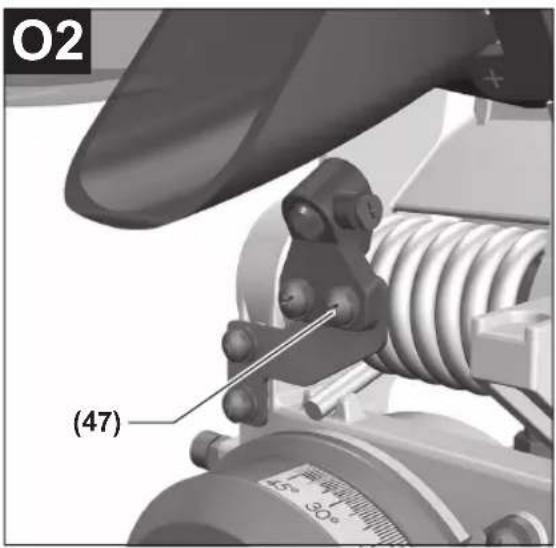
Setting (see figure 02)
- Turn the set screw (47) with a suitable screwdriver until the laser beam is parallel to the entire length of the cutting line on the workpiece.
One rotation anticlockwise moves the laser beam from left to right; one rotation clockwise moves the laser beam from right to left.
Checking and Adjusting the Basic Settings
To ensure precise cuts, the basic settings of the power tool must be checked and adjusted as necessary after intensive use.
Experience and suitable special tools are required for this.
A Bosch after-sales service point will handle this work quickly and reliably.
Aligning the fence
- Bring the power tool into the transport position.
- Turn the saw table (10) to the 0^ detent (45). The lever (12) must be felt to engage in the detent.
- Fold out the folding fence (16).
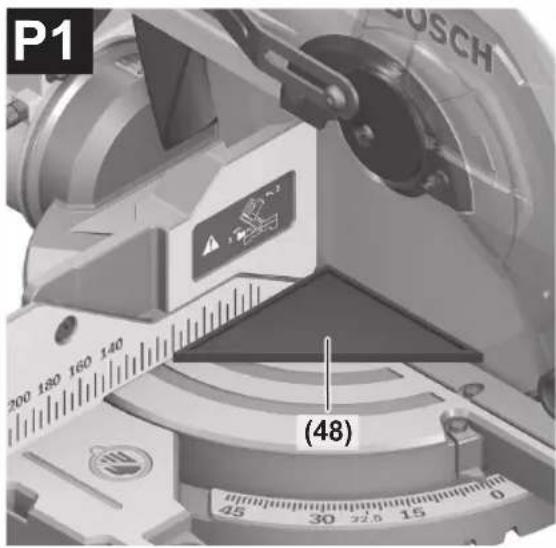
Checking (see figure P1)
- Position the set square (48) with the 90° angle flush with the saw blade (39) between the fence (8) and the saw blade on the saw table (10).
The leg of the set square must be flush with the fence along its entire length.
Setting (see figure P2)
- Loosen all hex socket screws (49) with the hex key (28) provided.
- Rotate the fence (8) until the set square is flush along its entire length.
- Retighten the screws.
Setting the Standard 0° Bevel Angle
- Bring the power tool into the transport position.
- Turn the saw table (10) to the 0^ detent (45). The lever (12) must be felt to engage in the detent.
Checking (see figure Q1)
- Position the set square (48) with the 90^ angle flush with the saw blade (39) between the saw table (10) and the saw blade on the saw table (10).
The leg of the set square must be flush with the saw blade (39) along its entire length.
Setting (see figure Q2)
- Loosen the clamping bolt (24).
- Loosen the lock nut of the stop screw (50) using a commercially available box-ended or open-ended spanner.
- Turn the stop screw as far in or out as needed until the leg of the set square is flush with the saw blade along its entire length.
- Retighten the clamping bolt (24).
- Then re-tighten the lock nut of the stop screw (50).
If the angle indicator (30) is not aligned with the 0^ mark on the scale (31) following adjustment, loosen the screw (52) using a commercially available cross-headed screwdriver and align the angle indicator along the 0^ mark. (See figure S)
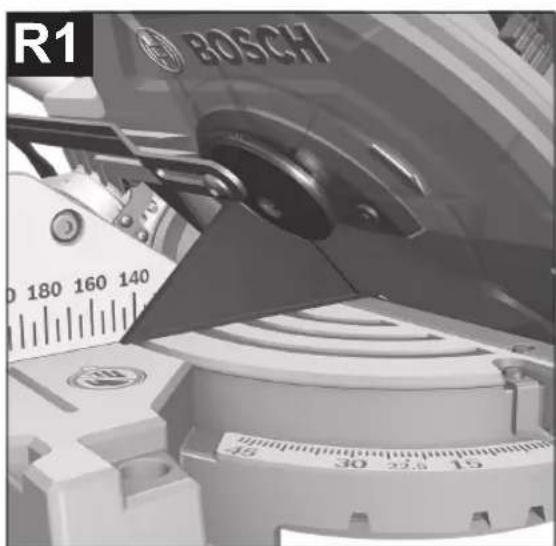
Setting the standard 45° bevel angle
- Bring the power tool into the work position.
- Turn the saw table (10) to the 0^ detent (45). The lever (12) must be felt to engage in the detent.
- Loosen the clamping bolt (24) and use the handle (4) to swivel the tool arm all the way to the left (45°).
Checking (see figure R1)
- Position the set square (48) with the 45^ angle flush with the saw blade (39) between the saw table (10) and the saw blade on the saw table (10).
The leg of the set square must be flush with the saw blade (39) along its entire length.
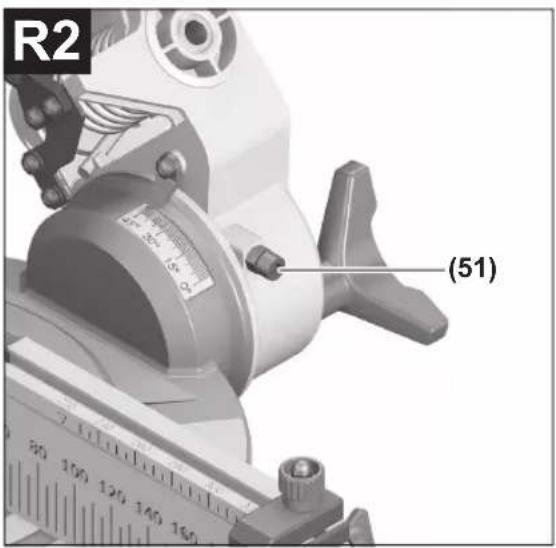
Setting (see figure R2)
- Loosen the lock nut of the stop screw (51) using a commercially available box-ended or open-ended spanner.
- Turn the stop screw as far in or out as needed until the leg of the set square is flush with the saw blade along its entire length.
- Retighten the clamping bolt (24).
- Then re-tighten the lock nut of the stop screw (51).
If the angle indicator (30) is not aligned with the 45^ mark on the scale (31) following adjustment, first check the 0^ setting for the bevel angle and the angle indicator once more. Then repeat the adjustment of the 45^ bevel angle.
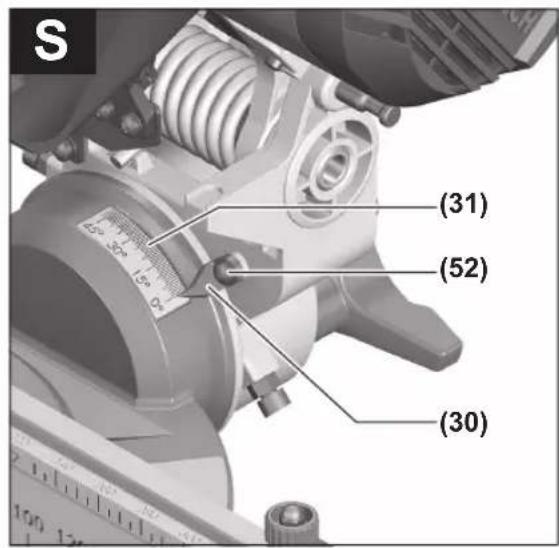
Aligning the Angle Indicator (Vertical) (see figure S)
- Bring the power tool into the work position.
- Loosen the clamping bolt (24).
- Use the tool arm to set the saw blade to a bevel angle of 0^ .
- Retighten the clamping bolt (24).
Checking
The angle indicator(30) must be in line with the 0^ mark of the scale (31).
Setting
- Loosen the screw (52) using a cross-headed screwdriver and align the angle indicator along the 0^ mark.
- Retighten the screw.
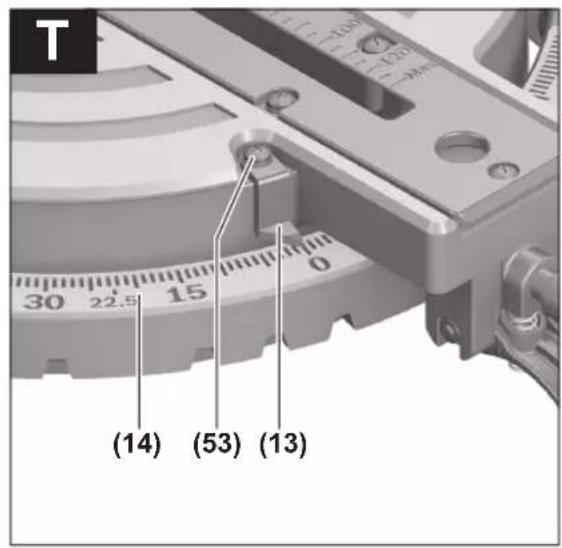
Aligning the mitre angle indicator (see figure T)
- Bring the power tool into the work position.
- Turn the saw table (10) to the 0^ detent (45). The lever (12) must be felt to engage in the detent.
Checking
The angle indicator(13) must be in line with the 0^ mark of the scale (14).
Setting
- Loosen the screw (53) using a cross-headed screwdriver and align the angle indicator along the 0^ mark.
- Retighten the screw.
Transport (see figure U)
Before transporting the power tool, the following steps must be carried out:
- Bring the power tool into the transport position.
- Remove all accessories that cannot be securely fitted to the power tool. If possible, transport unused saw blades in a closed container.
- Carry the power tool by the transport handle (3) or hold it by the recessed handles (26) on the sides of the saw table.
▶ Only use the transport devices to transport the power tool and never the protective devices.
Maintenance and Service
Maintenance and Cleaning
▶ Pull the plug out of the socket before carrying out any work on the power tool.
▶ To ensure safe and efficient operation, always keep the power tool and the ventilation slots clean.
In order to avoid safety hazards, if the power supply cord needs to be replaced, this must be done by Bosch or by an after-sales service centre that is authorised to repair Bosch power tools.
The retracting blade guard must always be able to move freely and retract automatically. It is therefore important to keep the area around the retracting blade guard clean at all times.
Always remove dust and chips after working by blowing out with compressed air or using a brush.
Clean the guide roller (17) regularly.
After-Sales Service and Application Service
Our after-sales service responds to your questions concerning maintenance and repair of your product as well as spare parts. You can find explosion drawings and information on spare parts at: www.bosch-pt.com
The Bosch product use advice team will be happy to help you with any questions about our products and their accessories.
In all correspondence and spare parts orders, please always include the 10-digit article number given on the nameplate of the product.
Malaysia
Robert Bosch Sdn. Bhd.(220975-V) PT/SMY
No. 8A, Jalan 13/6
46200 Petaling Jaya
Selangor
Tel.: (03) 79663194
Toll-Free: 1800 880188
Fax: (03) 79583838
E-Mail: kiathoe.chong@my.bosch.com
www.bosch-pt.com.my
You can find further service addresses at:
www.bosch-pt.com/serviceaddresses
Disposal
The power tool, accessories and packaging should be recycled in an environmentally friendly manner.

Do not dispose of power tools along with household waste.
Français
Transport (voir figure U)
Robert Bosch Morocco SARL
53, Rue Lieutenant Mahroud Mohamed
20300 Casablanca
Tel.: +212 5 29 31 43 27
E-Mail : sav.outillage@ma.bosch.com
www.bosch-pt.com/serviceaddresses
www.bosch-pt.com/serviceaddresses
Eliminação
natural_image
Two diagrams showing a mechanical or structural component with shaded areas, no text or symbols present.工件定位 地板条 天花板条
- 平放在锯台上

natural_image
Two abstract geometric shapes with shaded regions, no text or symbols presentwww.bosch-pt.com/serviceaddresses
处理废弃物
natural_image
Two diagrams showing a mechanical or structural component with shaded areas, no text or symbols present.- 平放在鋸台上
natural_image
Two abstract diagrams showing a curved surface with shaded regions, possibly illustrating a geometric or mechanical concept (no text or symbols present)www.bosch-pt.com/serviceaddresses
廢棄物處理
natural_image
Two abstract geometric shapes with shaded areas, no text or symbols presentwww.bosch-pt.com/serviceaddresses
การกําจัดขยะ
Menggergaji (memotong)
PT Robert Bosch Indonesia Arkadia Green Park Tower G – 7th floor
Jl. Let. Jend. TB. Simatupang Kav.88 Jakarta 12520
Tel.: (021) 3005 5800
Fax: (021) 3005 5801
E-Mail: boschpowertools@id.bosch.com www.bosch-pt.co.id
www.bosch-pt.com/serviceaddresses
Sự thải bổ
م Expected Retention
تجاويف التركيب
Robert Bosch Morocco SARL
www.bosch-pt.com/serviceaddresses
45^:30^:22.5^:15^ 15^:22.5^:30^:45^
کنید.
- رت مximo بودن، شل
- تا (10) و ميز اره
www.bosch-pt.com/serviceaddresses
natural_image
3D rendering of a gray electronic component with mounting holes and a logo (no readable text or symbols)1 619 PB9 050