Odyssey KM0547 - Soundbar Krüger&Matz - Free user manual and instructions
Find the device manual for free Odyssey KM0547 Krüger&Matz in PDF.

| Brand | Krüger&Matz |
| Model | Odyssey KM0547 |
| Product type | Active soundbar with wireless subwoofer |
| Sound technology | Dolby Atmos |
| Total power (RMS) | 380 W (200 W bar + 180 W subwoofer) |
| Number of channels | 2.1 channels (7 speakers in bar + 1 subwoofer) |
| Inputs | 2x HDMI, 1x HDMI ARC, optical, coaxial, USB (5V/0.5A), AUX 3.5 mm |
| Bluetooth | Version 4.2, range up to 8 m |
| Supported audio formats | MP3 (USB), A2DP, AVRCP (Bluetooth) |
| Equalizer | Presets News, Movie, Music |
| Additional features | Surround sound, bass adjustment, auto standby (15 min) |
| Soundbar dimensions (L) | 1106 mm (distance between wall mounts) |
| Weight | Not specified in the manual |
| Soundbar power supply | External adapter 23 V / 4 A (input 220-240 V, 50/60 Hz) |
| Subwoofer power supply | Mains 220-240 V, 50/60 Hz, 3 A |
| Power consumption standby | < 0.5 W |
| Mounting | Horizontal (on furniture) or wall-mounted (brackets included) |
| Maintenance | Soft cloth slightly damp, no chemicals |
| Safety | Do not expose to water or heat sources; disconnect before cleaning |
| Spare parts / repairability | Remote control with CR2025 battery included; no user-serviceable parts |
| General information | Made in China by Lechpol Electronics; CE conformity |
Frequently Asked Questions - Odyssey KM0547 Krüger&Matz
User questions about Odyssey KM0547 Krüger&Matz
0 question about this device. Answer the ones you know or ask your own.
Ask a new question about this device
Download the instructions for your Soundbar in PDF format for free! Find your manual Odyssey KM0547 - Krüger&Matz and take your electronic device back in hand. On this page are published all the documents necessary for the use of your device. Odyssey KM0547 by Krüger&Matz.
USER MANUAL Odyssey KM0547 Krüger&Matz
text_image
Diagram showing connection between a device panel and a device rear panel with labeled pins and componentsnatural_image
Line drawing of a hand holding a device with a curved arrow indicating rotation (no text or symbols)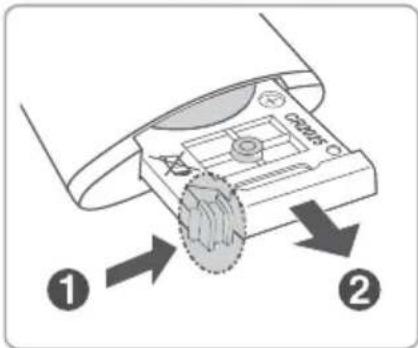
text_image
Diagram showing a device with labeled parts and directional arrows, likely illustrating a mechanical or electronic component.Hinweis:
text_image
Diagram showing a mechanical device with labeled parts and directional arrows indicating motion or movement.natural_image
Simple line drawing of a room layout with a monitor, cabinet, and window (no text or symbols)
natural_image
Simple line drawing of a room layout with a monitor, cabinet, and wall (no text or symbols)B - WANDHALTERUNG
text_image
Diagram showing connection between a device with labeled ports and cable, including two electrical socket installations.Thank you for purchasing this system. Please read these operating instructions before operating the unit. The operating instructions should be retained for future reference.
For your safety
Before operating this system, check the voltage of this system to see if it is identical with the voltage of your local power supply.
Don't obstruct the ventilation openings of the equipment with items such as newspaper, table-cloths, curtains, etc.. Overheating will cause damage and shorten the life of the equipment.
When you disconnect the power cord, always pull the plug, never the cable.

NEVER let anyone especially children push anything into holes, slots or any other opening in the case - this could result in a fatal electrical shock;
Protect the power cord from being walked on or pinched, particularly at plugs, convenience receptacles, and the point where they exit from the device.
Never hit the product using sharp objects.
Never place the product and accessories near naked flames or other heat sources, including direct sunlight.
ALWAYS disconnect this device from power supply mains before cleaning. Clean this device with soft, slightly damp cloth. Do not use any abrasives or chemical agents to clean this product.
To avoid electric shock, do not open the cabinet. Refer all servicing to qualified service personnel.

Avoid using/storing it in the strong magnetic environment.
Never expose the product and accessories to rain or water. Never place liquid containers, such as vases, near the product.
WARNING:
TO PREVENT FIRE OR SHOCK HAZARD, DO NOT EXPOSE THIS APPLIANCE TO DRIPPING OR SPLASHING.
CAUTION:
TO REDUCE RISK OF ELECTRIC SHOCK DO NOT REMOVE COVER (OR BACK). NO USER SERVICEABLE PARTS INSIDE. REFER SERVICING TO QUALIFIED SERVICE PERSONNEL.


This lightning flash with arrowhead symbol, within an equilateral triangle is intended to alert the user to the presence of uninstalled "dangerous voltage" within the product's enclosure that may be of sufficient magnitude to constitute a risk of electric shock to persons.

The exclamation point within an equilateral triangle is intended to alert the user to the presence of important operating and maintenance (servicing) instructions in the literature accompanying the appliance.
IMPORTANT!
This appliance may be used by children who are above 8 years old and by persons with reduced physical, sensory or mental capabilities, or lack of experience and knowledge, if they are supervised and guided by a person who is responsible for their safety in a cautious manner, and all the safety precautions are understood and followed. Children should not play with this device. Children should not perform cleaning and servicing of the device unsupervised.
Hearing safety
Listen at a moderate volume:
* Sound can be deceiving. Over time your hearing “comfort level” adapts to higher volumes of sound. So after prolonged listening, what sounds “normal” can actually be loud and harmful to your hearing. To guard against this, set your volume to a safe level before your hearing adapts and leave it there.
To establish a safe volume level:
* Set your volume control at a low setting.
* Slowly increase the sound until you can hear it comfortably and clearly, without distortion.
Listen for reasonable periods of time:
* Prolonged exposure to sound, even at normally “safe” levels, can also cause hearing lose.
* Be sure to use your equipment reasonably and take appropriate breaks.
text_image
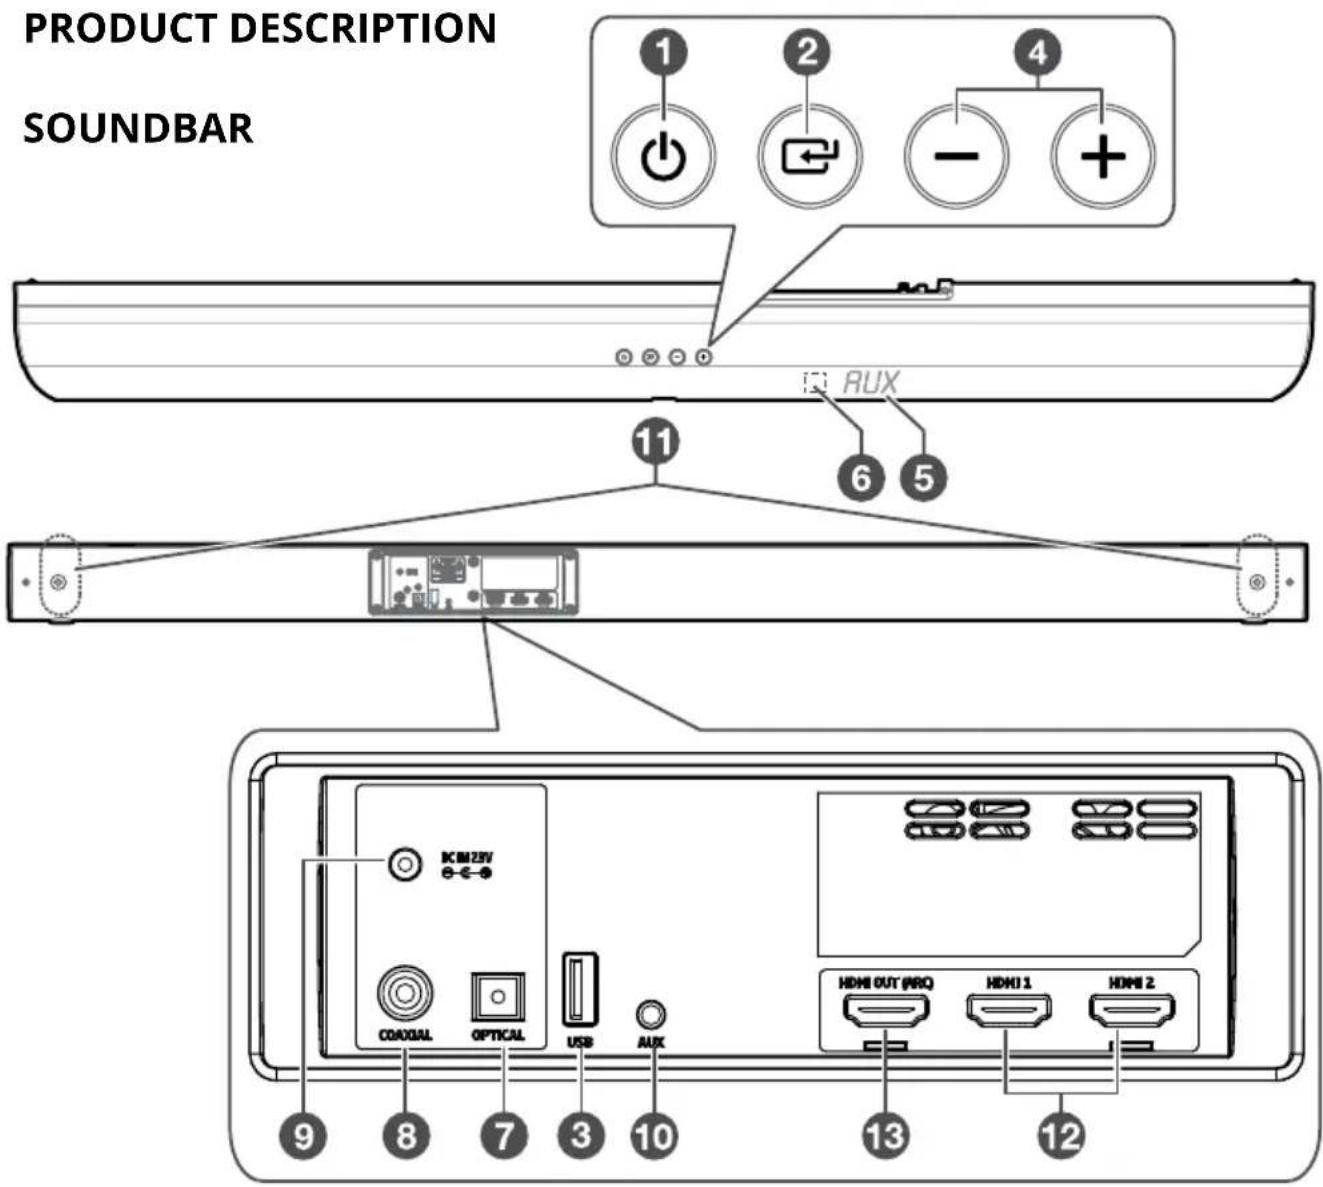
PRODUCT DESCRIPTION SOUNDBAR 1 2 4 - + - RUX 11 6 5 ICM23V COADAL OPTICAL USB AUX HDHI OUT (PRO) HDHI 1 HDHI 2 9 8 7 3 10 13 12① Standby button
② Source button
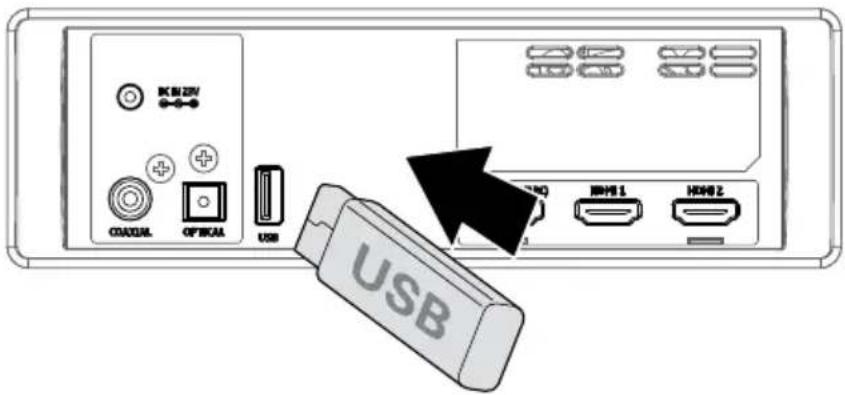
③ USB port
④ Volume +/-
⑤ Display window
⑥ IR sensor
⑦ Optical input
⑧ Coaxial input
⑨ Power adapter socket
⑩ AUX-in (Jack 3,5 mm)
⑪ Wall bracket screws
⑫ HDMI input
⑬ HDMI output (ARC)
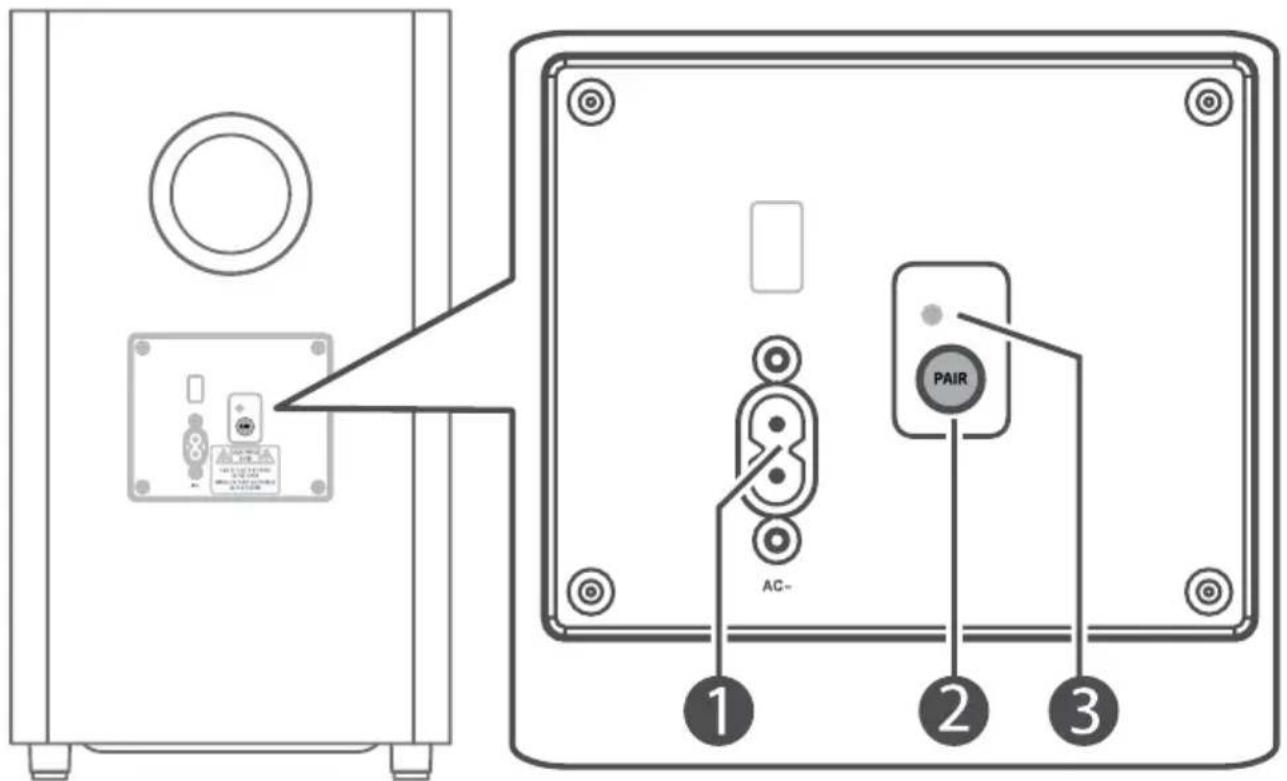
SUBWOOFER
text_image
Diagram showing connection between a device panel and a device rear panel with labeled pins and components① Power cord socket
② Pair button
③ Pair indicator
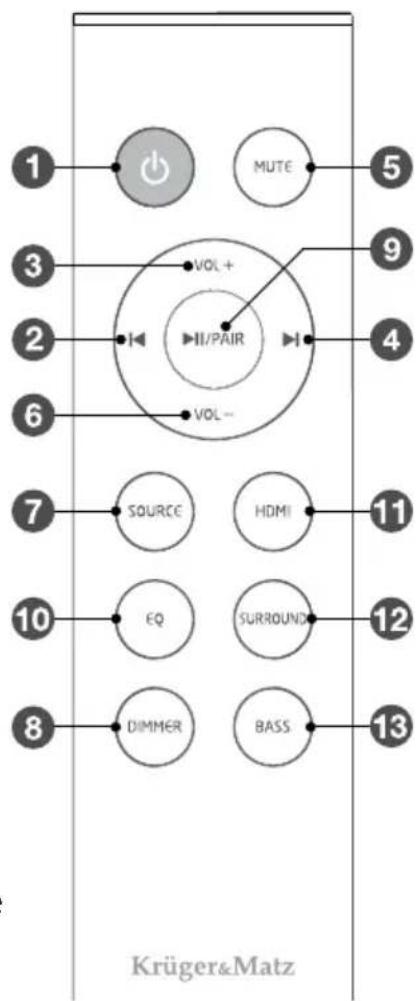
REMOTE CONTROL
① Standby button
② Previous button (BT/USB mode)
③ Volume+
④ Next button (BT/USB mode)
⑤ Mute
⑥ Volume-
⑦ Source button
⑧ Dimmer button
⑨ Play/pause/pair
- press to play/pause/resume playback (BT/USB mode)
- press and hold to disconnect with currently connected device and activate pairing (BT mode)
⑩ EQ settings buttons
⑪ HDMI button - press to select HDMI 1 / 2 / ARC mode
⑫ Surround button
⑬ Bass setup button
text_image
1 3 2 6 7 10 8 MUTE VOL+ VOL- II/PAIR VOL- SOURCE EQ DIMMER MUTI SURROUND BASS Krüger&MatzBATTERY INSTALLATION
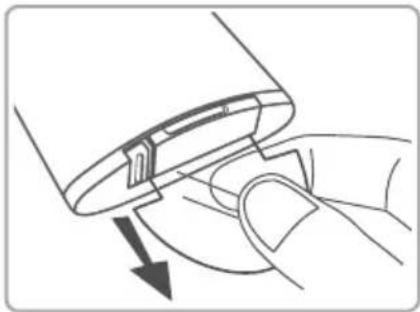
The unit has a pre-installed CR2025 battery. Remove the protective tab to activate the remote control battery.
To replace the remote control battery:
- Push the tab on the side of the battery tray towards the tray.
- Slide the tray out.
- Retrieve used battery and insert new CR2025 battery with correct polarity (+/-) as indicated.
- Slide in the tray to close the battery compartment.
Note:
- If you are not going to use the remote control for a long time, remove the batteries.
- Batteries contain chemical substances, so they should be disposed of properly.
- Caution: Risk of explosion! Keep batteries away from heat, sunshine, or fire. Never discard batteries in fire.
- The remote control sensor on the front unit is sensitive to the remote control's commands up to a maximum of 6 meters away and within a maximum of a 30^ angle.
- Please note that the operating distance may vary depending on the brightness of the room.
- Any obstacles between remote control and the device or exposing it to direct sunlight or other strong light as it will reduce operational range.
- Using this remote near other products which generate infrared rays may disturb proper operation.
- DO NOT use other batteries than those specified.
natural_image
Line drawing of a hand holding a device with a scroll wheel, showing a curved arrow indicating rotation (no text or symbols)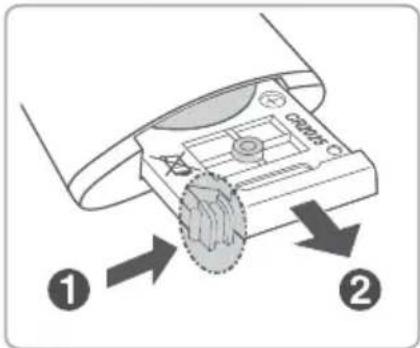
text_image
Diagram showing a device with labeled parts and directional arrows, likely illustrating a mechanical or electronic component.
text_image
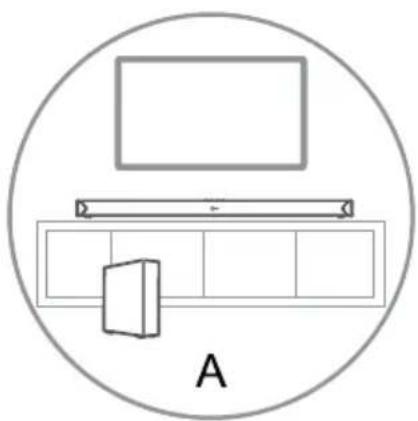
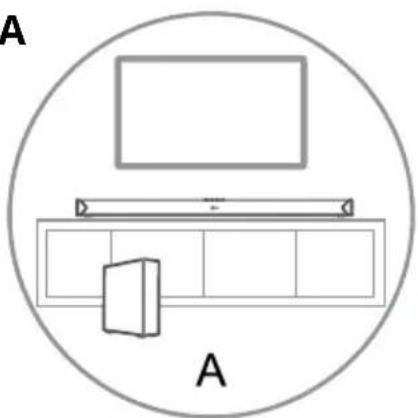
Diagram showing a device with labeled parts and directional arrows, likely illustrating a mechanical or electrical assembly.MOUNTING
natural_image
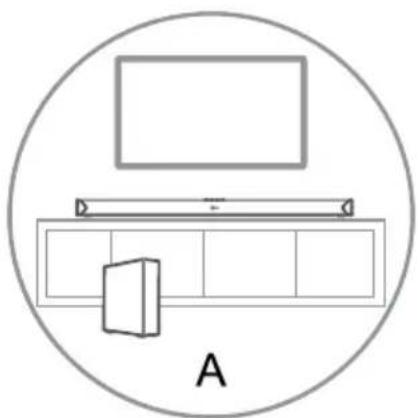
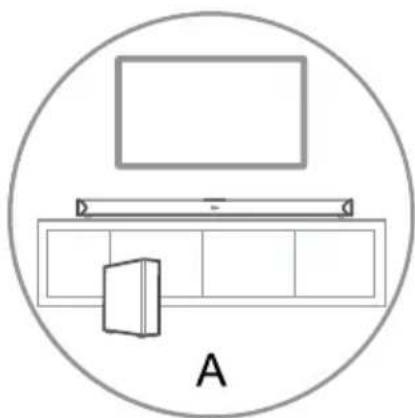
Simple line drawing of a room layout with a monitor, cabinet, and door, labeled A (no text or symbols on the diagram itself)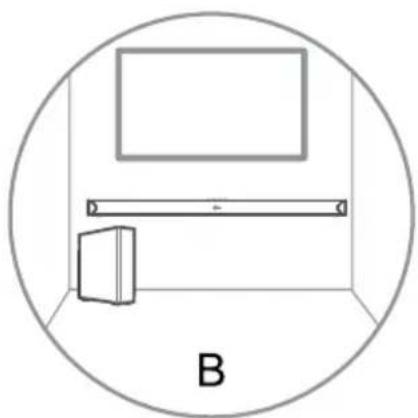
natural_image
Simple line drawing of a room layout with a monitor, cabinet, and window (no text or symbols)B - WALL MOUNTING
Note: Wall mounting must be carried out by qualified personnel only. Incorrect assembly may result in severe personal injury and property damage. During mounting, make sure the electric/plumbing installation will not get damaged when drilling holes in walls! The supplied wall brackets are only for use on vertical walls suitable for such mounting. It is the installer's responsibility to verify that the wall will safely support the total load of the soundbar and wall brackets. Additional tools required for the installation are not included. Do not overtighten screws.
text_image
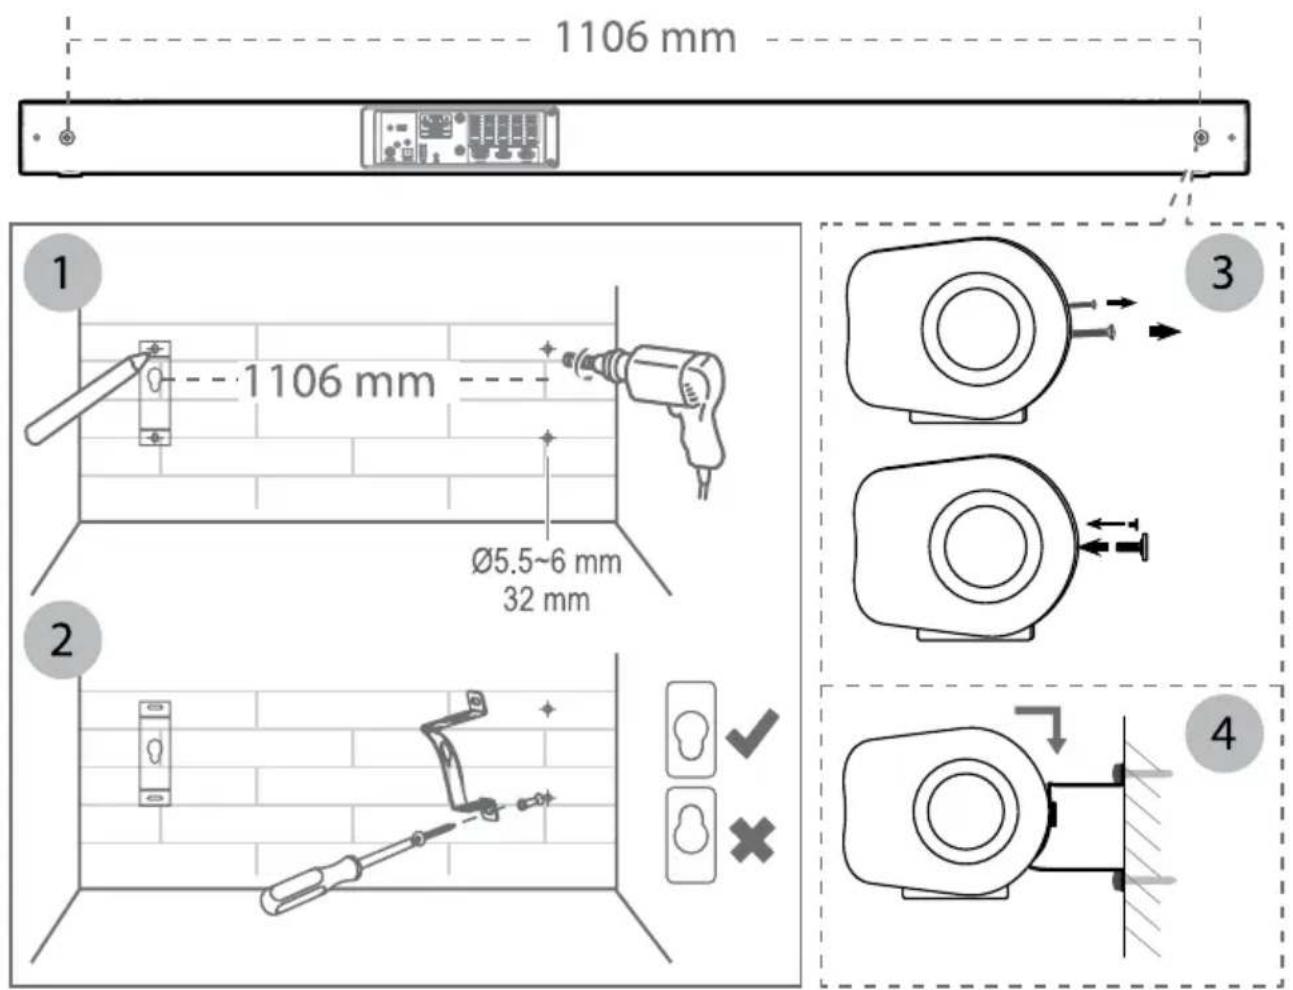
1106 mm 1 1106 mm Ø5.5~6 mm 32 mm 2 3 4- Drill 4 parallel holes ( 5,5-6 mm each according to wall type) in the wall. The distance between the holes should be 1106 mm. Firmly fix 1 dowel into each hole in the wall if necessary.
- Tighten the wall mount brackets on the wall with screws and screwdriver (not included). Make sure the they are securely installed.
- Remove the screws at the back of the unit. Install the wall mounting screws into the back of the unit.
- Lift the unit onto the wall mount brackets and slot into place.
CONNECTIONS

Dolby Atmos®
IMPORTANT: Dolby Atmos ^® is available only in HDMI mode.
- To use Dolby Atmos ^® in HDMI mode, your TV has to support Dolby Atmos ^® .
- Make sure that "No Encoding" is selected for bitstream in the audio output of the connected external device (e.g. Blu-ray DVD player, TV etc.).
- While entering Dolby Atmos / Dolby Digital / PCM format, the soundbar will show DOLBY ATMOS / DOLBY AUDIO / PCM AUDIO.
- While the soundbar is using Dolby Atmos audio, you can only adjust the bass level of the subwoofer. All other EQ effects will not be available.
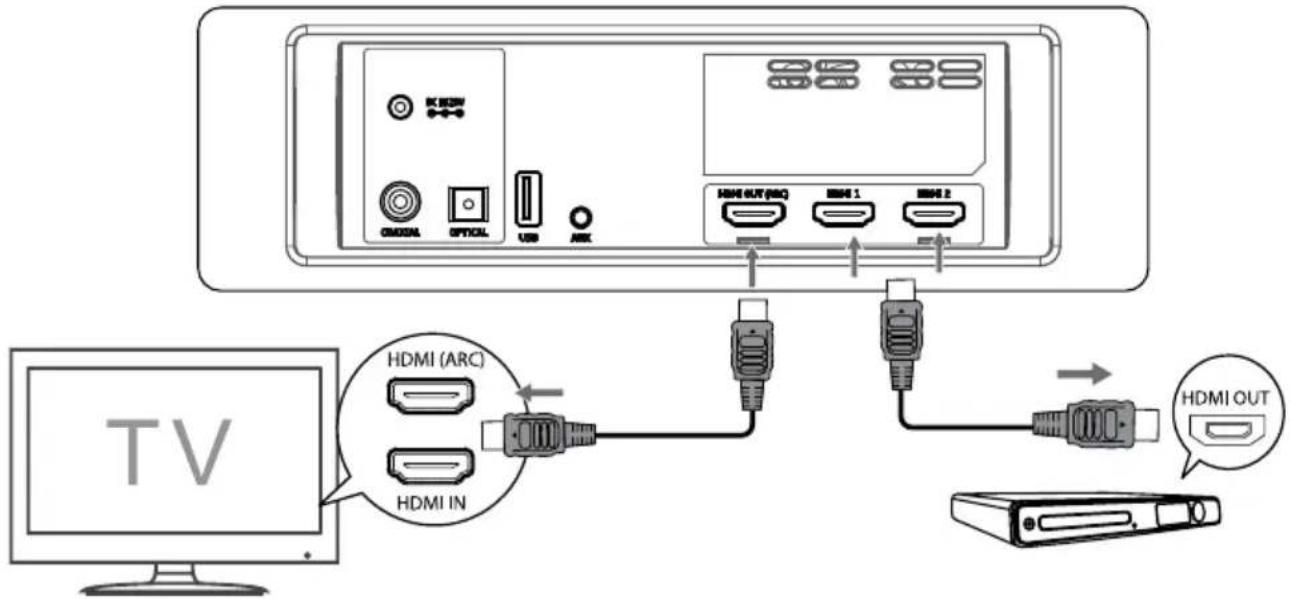
HDMI
Using HDMI to connect the soundbar, AV equipment and TV refer to below illustration:
text_image
K-DM OMOSL OPTOL USB ARC HDMI OUT (REQ) HMI 1 HMI 2 HDMI (ARC) HDMI IN HDMI OUT TVZ
Method 1: ARC (Audio Return Channel)
The ARC (Audio Return Channel) function allows you to send audio from your ARC-compliant TV to your soundbar through a single HDMI connection. To enjoy the ARC function, please ensure your TV is both HDMI-CEC and ARC compliant and set up accordingly. When correctly set up, you can use your TV remote control to adjust the volume output (VOL+/- and MUTE) of the soundbar.
Connect the HDMI cable from unit's HDMI (ARC) socket to the HDMI (ARC) socket on your ARC compliant TV. Then press the remote control to select HDMI ARC.
Tips:
- Your TV must support the HDMI-CEC and ARC function. HDMI-CEC and ARC must be set to On.
- The setting method of HDMI-CEC and ARC may differ depending on the TV. For details about ARC function, please refer to the owner's manual of your TV.
- Please note, only HDMI 1.4 cables can support the ARC function.
Method 2: Standard HDMI
If your TV is not HDMI ARC-compliant, connect your soundbar to the TV through a standard HDMI connection.
- Use an HDMI cable to connect the soundbar's HDMI OUT socket to the TV's HDMI IN socket.
- Use an HDMI cable to connect the soundbar's HDMI IN (1 or 2) socket to your external devices (e.g. games consoles, DVD players and Blu-ray).
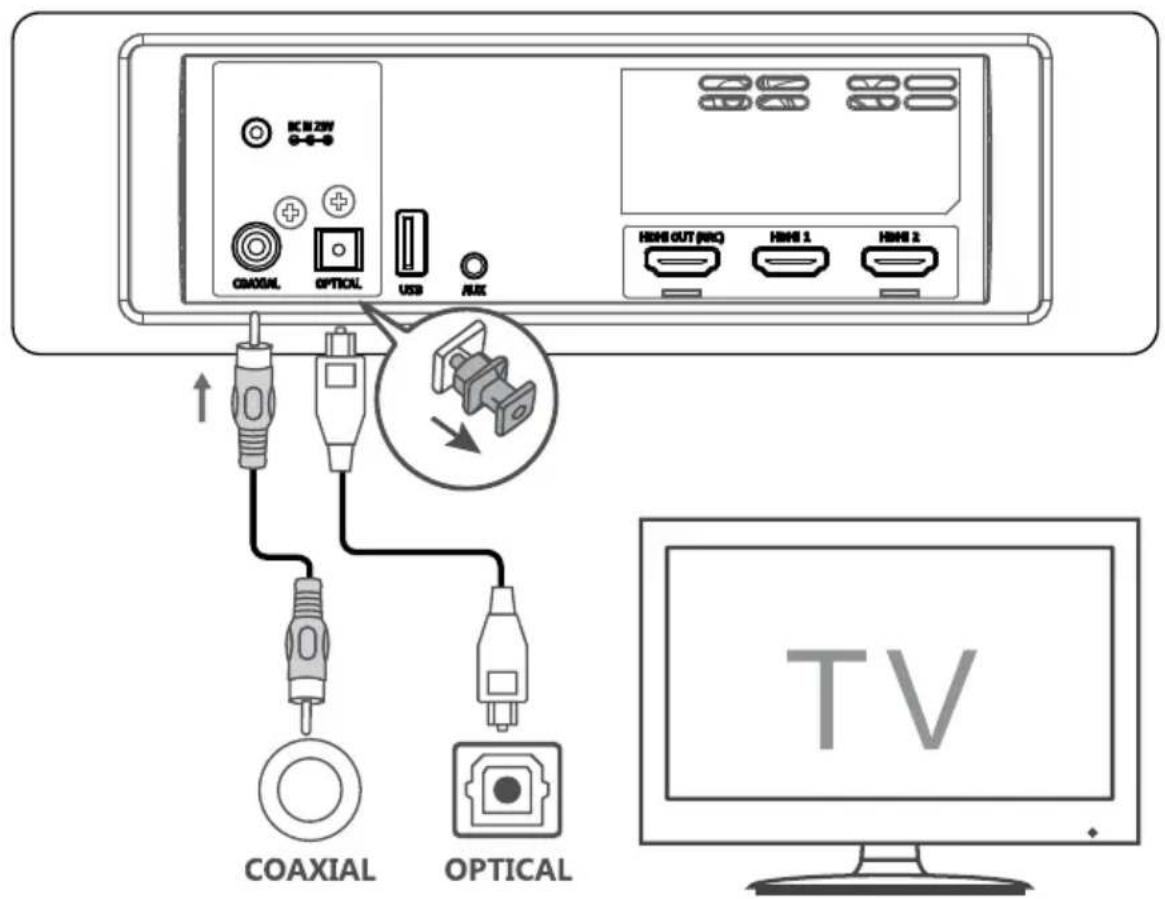
Optical
Connect an OPTICAL cable (not included) to the TV's OPTICAL OUT socket and the OPTICAL socket on the unit.
Note: before use remove the protective cap from the OPTICAL socket.
Coaxial
Connect a COAXIAL cable (not included) to the TV's COAXIAL OUT socket and the COAXIAL socket on the unit.
text_image
DC IN 2W CMOSAL OPTICAL USB ALEX HDMI OUT (ADC) HDMI 1 HDMI 2 COAXIAL OPTICAL TV
Tip: The unit may not be able to decode all digital audio formats from the input source. In this case, the unit will mute. This is NOT a defect. Ensure that the audio setting of the input source (e.g. TV, game console, DVD player, etc.) is set to PCM or Dolby Digital (refer to the user manual of the input source device for its audio setting details) with HDMI / OPTICAL / COAXIAL input.
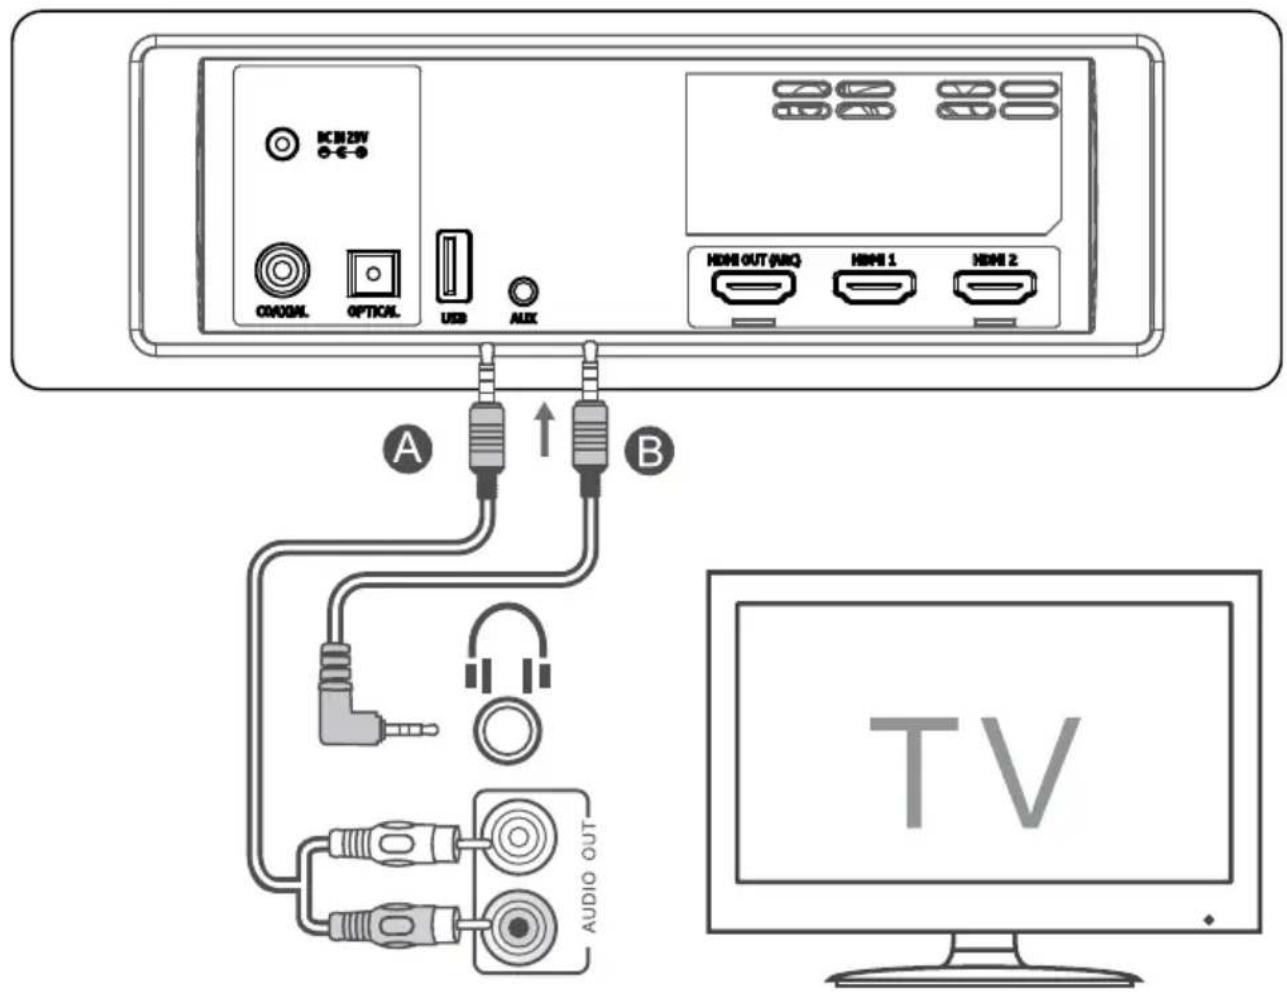
AUX-in
text_image
IC 322W ON/OAL OPTICAL USB AUX HDMI OUT (HDI) HDMI 1 HDMI 2 A ↑ B AUDIO OUT TVA. Use a RCA to 3,5 mm audio cable (not included) to connect the TV's audio output sockets to the AUX socket on the unit.
B. Use a 3,5 mm to 3,5 mm audio cable to connect the TV's or external audio device headphone socket to the AUX socket on the unit.
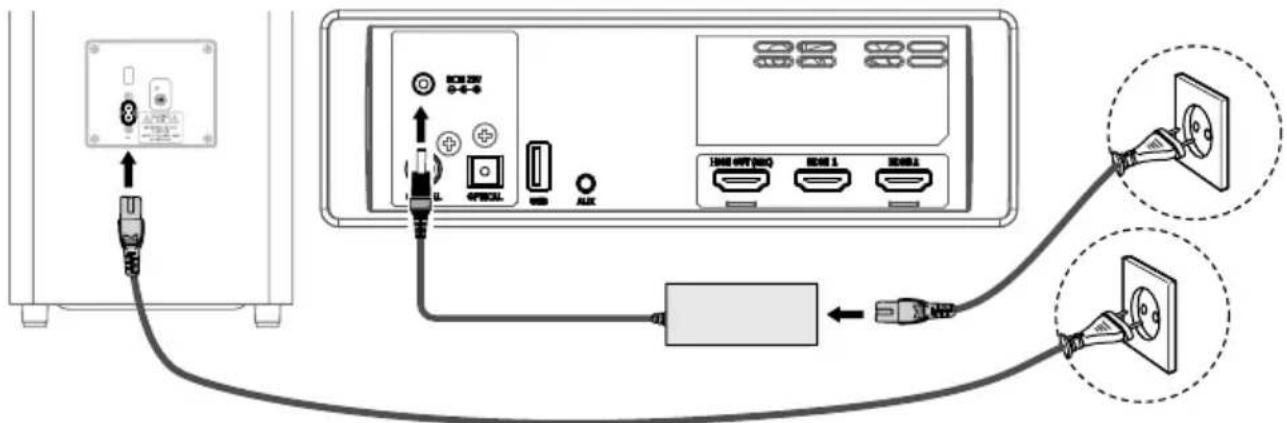
Connecting to power mains
text_image
Diagram showing connection between a device with labeled ports and cable, including two electrical socket installations.Soundbar: Unwind the power adapter and mains cable to their full length. Connect the power adapter to the DC IN 23V socket of the soundbar, then connect the power cable to the adapter and into a power mains socket.
Subwoofer: Connect the power cable to the AC\~ socket of the subwoofer and then into a power mains socket.
Note:
- Before connecting the AC power cord, ensure you have completed all other connections.
- Risk of product damage! Ensure that the power mains voltage corresponds to the voltage required by this device.
- Disconnect the mains plug from the mains socket if you want to switch the unit OFF completely.
Connecting subwoofer
Automatic pairing
The subwoofer and soundbar will automatically pair when both units are plugged into the mains sockets and turned on. No cable is needed for connecting the two units.
- When the subwoofer is pairing with the main unit, the pair indicator will flash fast.
- When the subwoofer is paired with the main unit, the pair indicator will light up.
NOTE:
- Do not press the pair button on the rear of the subwoofer, except for manual pairing.
- If the automatic pairing fails, pair the subwoofer with the main unit manually.
Manual pairing
- Ensure that all the cables are properly connected and the device is in standby mode.
- Press and hold the pair button on the rear of the subwoofer for a few seconds.
The subwoofer will enter the pairing mode and the pair indicator will blink quickly.
-
Press the ⏻ button on the main unit or on the remote control to switch the main unit on.
-
After the wireless connection succeeded, the pair indicator will light up.
-
If the pair indicator blinks, the wireless connection has failed. Unplug the power cable of the subwoofer, wait for around 4 minutes and connect it again. Repeat steps 1 \~ 4.
NOTE:
- If the wireless connection fails again, check if there is conflict or strong interference (for example, interference from another electronic device nearby). Remove these conflicts or strong interferences and repeat the above procedures.
- The subwoofer should be within 6 m of the soundbar in an open area.
- If the main unit is not connected with the subwoofer and it is turned on, the indicator will flash. Follow step 1 \~ 4 above to pair the subwoofer to the main unit.
- Do not connect this soundbar to any other subwoofer nor connect this subwoofer to any other audio amplifier.
OPERATION
Standby/ON
When you first connect the main unit to the power mains, the main unit will be in standby mode.
- Press the ⏻ button on the unit or on the remote control to switch the unit ON.
- Press the ⏻ button again to switch the unit back to STANDBY mode.
- Disconnect the mains plug from the mains socket if you want to switch the unit OFF completely.
- If a TV or an external device is connected via AUX or HDMI (CEC) connection, the soundbar and the subwoofer will switch on automatically when the TV or the external device is switched on:
- when connected via HDMI, the TV or external device has to support CEC standard; otherwise the function will not be available. - when connected via AUX, the function will be active on condition that the input source level is high enough.
- When there is no input signal from the unit in over 15 minutes, then it will automatically switch to standby mode.
Select modes
Press the button repeatedly on the unit or the SOURCE / HDMI buttons on the remote control to select the AUX / OPTICAL / COAXIAL / HDMI 1 / HDMI 2 / HDMI ARC / USB / BT (Bluetooth) mode. The selected mode will show on the display.
Adjust the bass level
Press the BASS button on the remote control to activate bass setup, then press the VOL+/- button to adjust the bass level (+5 \~ -5).
Turn the surround sound ON/OFF
Press the SURROUND button on the remote control to turn on the surround sound.
Press this button again to turn off the surround sound.
Adjust the volume
- Press the VOL+/- buttons on the unit or on the remote control to adjust the volume.
- Press the MUTE button on the remote control to mute sound. Press the MUTE button again or press the VOL+/- buttons on the unit or on the remote control to resume normal listening.
Adjust the brightness
Press the DIMMER button on the remote control to change brightness level.
While playing, press the EQ button on the remote control to select preset equalisers: Movie (recommended for viewing movies), Music (recommended for listening to music), NEWS (recommended for listening to NEWS).
AUX / OPTICAL / COAXIAL / HDMI
- Ensure that the unit is connected to the TV or audio device.
- Press the button repeatedly on the unit or the SOURCE / HDMI buttons on the remote control to select AUX / OPTICAL / COAXIAL / HDMI 1 / HDMI 2 / HDMI ARC mode.
- Operate your audio device directly for playback features.
Tips:
- The unit may not be able to decode all digital audio formats from the input source. In this case, the unit will mute. This is NOT a defect. Ensure that the audio setting of the input source (e.g. TV, game console, DVD player, etc.) is set to PCM or Dolby Digital (Refer to the user manual of the input source device for its audio setting details) with HDMI 1 / HDMI 2 / HDMI ARC / OPTICAL / COAXIAL input.
- When the DOLBY DIGITAL audio format is entered, the Soundbar display shows DOLBY AUDIO.
- When the PCM audio format is entered, the soundbar display shows PCM AUDIO.
- When entering non-PCM or DOLBY DIGITAL audio formats, if there's no sound output from the unit and the display show NO SUPPORT.
BLUETOOTH
Pairing Bluetooth-enabled devices
Note:
- Pairing needs only to be done once. The operational range is approximately 8 meters.
- Compatibility with all Bluetooth devices is not guaranteed.
-
Any obstacle can reduce the operational range.
-
Press the button repeatedly on the unit or press the SOURCE button on the remote control to select Bluetooth mode. The display will show "NO BT" if the unit is not paired with any device.
Note: if the previously connected mobile device has Bluetooth function on and is within operational range, this unit will connect to it automatically. To connect with a different mobile device press and hold the ▶AIR button on the remote to disconnect from the currently connected device.
- Activate your Bluetooth device and search for external devices. Connect with the "KM0547". Note: if you cannot find the unit, press and hold the ▶/PAIR button on the remote control to be searchable. The display will show "PAIR" and you will hear "Pairing" from the unit. Enter default password „0000" if necessary.
- After successful pairing, the device will issue "Paired" voice prompt and the display will show "BT".
- Play music from the connected Bluetooth device.
Note:
- The devices will disconnect when moved beyond the operation range.
- If you want to reconnect the device to the unit, place it within the operational range.
- If no other Bluetooth device pairs with this player within two minutes, the player will recover its previous connection.
- If the connected Bluetooth device supports Advanced Audio Distribution Profile (A2DP), you can listen to the music stored on the device through the player.
- If the device also supports Audio Video Remote Control Profile (AVRCP), you can use the player's remote control to play music stored on the device.
USB
- Insert the USB device.
- Press the button repeatedly on the unit or press the SOURCE button on the remote control to select USB mode.
- During playback:
• To pause or resume play, press the ▶AIR button on the remote control. - To skip to the previous/next file, press the ◀ / ▶ buttons on the remote control.
Tips:
- The unit can support USB devices with up to 32 GB of memory.
• This unit can play MP3.
text_image
DCB22V CDAC/AL OPT/BCAM USB USB USB 1 USB 2CLEANING
- Before cleaning the unit, make sure it's fully unplugged from the mains supply.
• To clean the unit, wipe the case with a slightly moist, soft cloth. - Do not use any cleaning fluids containing alcohol, ammonia or abrasives.
TROUBLESHOOTING
If you are having a problem with your system, check this list for a possible solution before calling for service. If you can not solve the problem from the hints give here, or the system has been physically damaged, call a qualified person, such as your dealer, for service.
No power
- Ensure the unit is properly connected to power mains.
• Make sure that the device is turned on.
I cannot find soundbar on my Bluetooth device
Ensure the bluetooth function is activated on your bluetooth device.
TV has display problem while viewing HDR content from HDMI source
Some 4K HDR TVs require the HDMI input or picture settings to be set for HDR content reception. For further setup details on HDR display, please refer to the instruction manual of your TV.
The subwoofer is idle or the indicator of subwoofer do not light up
Unplug power cord from the mains socket, and plug it in again after 4 minutes to reset the subwoofer.
No sound
- Make sure that the unit is not muted. Press MUTE or VOL+/VOL- button to resume sound.
- Switch the soundbar to standby mode. Then press the power button again to switch the soundbar on.
- Unplug both the soundbar and the subwoofer from the mains socket, then plug them again. Switch on the soundbar.
- Ensure the audio setting of the input source (e.g. TV, game console, DVD player, etc.) is set to PCM or Dolby Digital mode while using digital (e.g. HDMI, OPTICAL, COAXIAL) connection.
- The subwoofer is out of range, please move the subwoofer closer to the soundbar. Make sure the subwoofer is within the operational range (the closer the better).
- The soundbar may have lost connection with the subwoofer. Re-pair the units by following the steps on the section "Connecting subwoofer".
- The unit may not be able to decode all digital audio formats from the input source. In this case, the unit will mute. This is NOT a defect.
Remote control does not work
- Use the remote control near the unit.
- Point the remote control at the remote sensor on the unit.
- Replace the battery in the remote control with a new one.
- Remove any obstacles between the remote control and the unit.
The device turns off on its own
When the unit's external input signal level is too low, the unit will be turned off automatically in 15 minutes. Please increase the volume level of your external device.
SPECIFICATIONS
GENERAL
• Sound technology: Dolby Atmos
- Bluetooth: 4.2
- Bluetooth range: up to 8 m
• Frequency bands: 2402 \~ 2480 MHz
• Max. power transmitted: < 5 dBm
- I/O: 2x HDMI input, HDMI output (ARC), optical input, coaxial input, USB port, AUX-in (Jack 3,5 mm)
• External devices charging: yes (5 V; 0,5 A)
• Supported formats: A2DP, AVRCP
- Mounting: horizontally, on a wall
SOUNDBAR
- Type: active
-
Speakers
-
Center: 2x 2", 50 W RMS, 4 Ω
- Left: 2", 25 W RMS, 8 Ω
- Right: 2", 25 W RMS, 8 Ω
- Upper left: 2"+20 mm, 25 W RMS, 8 Ω
- Upper right: 2"+20 mm, 25 W RMS, 8 Ω
- Side left: 2", 25 W RMS, 8 Ω
- Side right: 2", 25 W RMS, 8 Ω
• Frequency response: 120 Hz - 20 kHz
- THD: 10%
• Audio input sensitivity: 700 mV
- S/N: 70 dB
• Power consumption in standby: <0,5 W
- Power adapter
- Input: 220-240 V; 50/60 Hz; 4 A
- Output: 23 V; 4 A
SUBWOOFER
- Type: active
- Speaker: 8", 180 W RMS, 3 Ω
- Frequency response: 40 Hz – 120 Hz
- THD: 10%
• Frequency bands: 2400 \~ 2483 MHz
• Max. power transmitted: < 10 dBm
• Power supply: 220-240 V; 50/60 Hz; 3 A
REMOTE CONTROL
• Distance: up to 6 m
- Angle: 30^
• Power supply: CR2025 battery

Bluetooth®
The Bluetooth word mark and logos are registered trademarks owned by Bluetooth SIG, Inc.

Manufactured under license from Dolby Laboratories. Dolby, Dolby Atmos, Dolby Audio, and the double-D symbol are trademarks of Dolby Laboratories.
LEARN MORE
For more information on this device visit: www.krugermatz.com.
Read owner's manual carefully before using your device.
Visit www.krugermatz.com website for more products and accessories.
In case of any doubts or questions reach out to our Frequently Asked Questions section.
Lechpol Electronics Sp. z o.o. Sp.k. hereby declares that soundbar KM0547 is consistent with directive 2014/53/UE. Full text of the EU Declaration of Conformity is available at following Internet address: www.lechpol.eu.

English Correct Disposal of This Product (Waste Electrical & Electronic Equipment)


(Applicable in the European Union and other European countries with separate collection systems) This marking shown on the product or its literature, indicates that it should not be disposed with other household wastes at the end of its working life. To prevent possible harm to the environment or human health from uncontrolled waste disposal, please separate this from other types of wastes and recycle it responsibly to promote the sustainable reuse of material resources. Household users should contact either the retailer where they purchased this product, or their local government office, for details of where and how they can take this item for environmentally safe recycling. Business users should contact their supplier and check the terms and conditions of the purchase contract. This product should not be mixed with other commercial wastes for disposal.
Made in China for LECHPOL ELECTRONICS Sp. z o.o. Sp.k., ul. Garwolińska 1, 08-400 Miętne.
Avant l'utilisation
text_image
Diagram showing connection between a device panel and a device with labeled pins including AC, PAIR, and numbered components 1, 2, 3.natural_image
Line drawing of a hand holding a device with a scroll wheel, showing a press or grip mechanism (no text or symbols)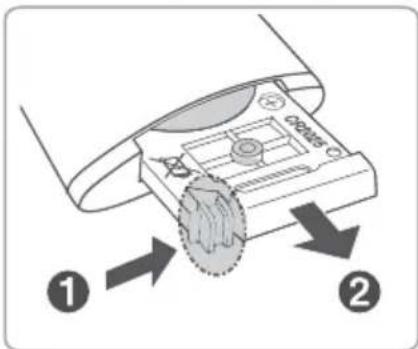
text_image
Diagram showing a device with labeled parts and directional arrows indicating motion or movement.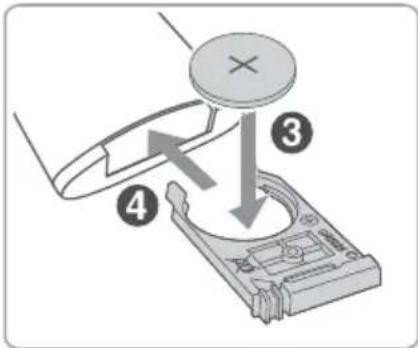
text_image
Diagram showing a device with labeled parts and directional arrows indicating movement or process flow.natural_image
Simple line drawing of a room layout with a monitor, cabinet, and window (no text or symbols)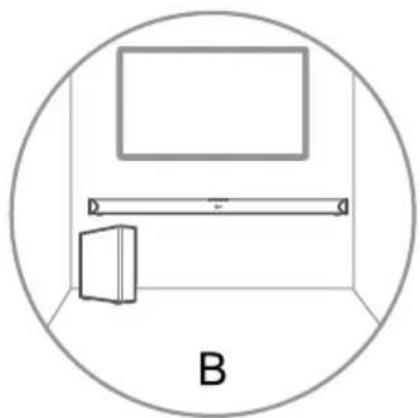
natural_image
Simple line drawing of a room layout with a monitor, cabinet, and wall (no text or symbols)B - MONTAGE MURAL
text_image
Diagram showing connection between a device with labeled ports and cable, including two electrical outlets with power plug connections.text_image
Diagram showing connection between a device panel and a device back panel with labeled pins and components① Aansluiting netsnoer
② Koppelknop
③ Koppelindicator
AFSTANDSBEDIENING
① Standby-knop
② Vorige (in USB/BT-modus)
③ Volume verhogen
④ Volgende (in USB/BT-modus)
⑤ Stil-knop
⑥ Volume verlagen
⑦ Modusknop
⑧ Schermhelderheidsknop
⑨ Afspelen/pauzeren/koppelen
natural_image
Line drawing of a hand holding a device with a scroll wheel, showing a finger pressing a button (no text or symbols)
text_image
Diagram showing a device with labeled parts and directional arrows, likely illustrating a mechanical or electronic component.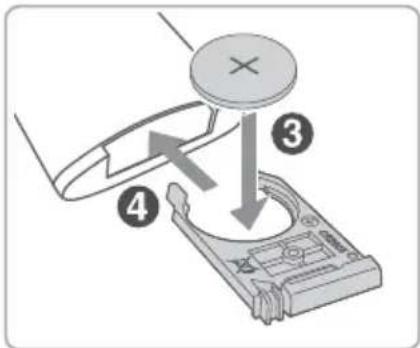
text_image
Diagram showing mechanical assembly with labeled parts and directional arrows indicating motion or forcenatural_image
Simple line drawing of a room layout with a monitor, cabinet, and door, enclosed in a circle (no text or symbols)
natural_image
Simple line drawing of a room layout with a monitor, cabinet, and window (no text or symbols)B - MONTAGE AAN DE WAND
Methode 1: ARC (Audio Return Channel)
text_image
IC182W G-E-O CD30AL OPTICAL USB AUX HDMI OUT (AUC) HMI 1 HMI 2 A B AUDIO OUT TVtext_image
Diagram showing connection between a device with labeled ports and cable, including two electrical socket installations.text_image
Diagram showing connection between a device panel and a device back panel with labeled pins and componentsnatural_image
Line drawing of a hand holding a device with a curved arrow indicating rotation (no text or symbols)
text_image
Diagram showing a device with labeled parts and directional arrows, including numbered annotations ① and ②.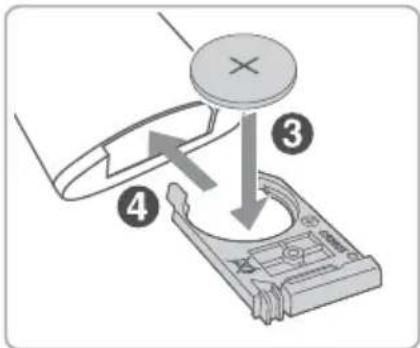
text_image
Diagram showing mechanical assembly with labeled parts 3, 4, and a central component marked with an '×'MONTAŻ
natural_image
Simple line drawing of a room layout with a monitor, cabinet, and window (no text or symbols)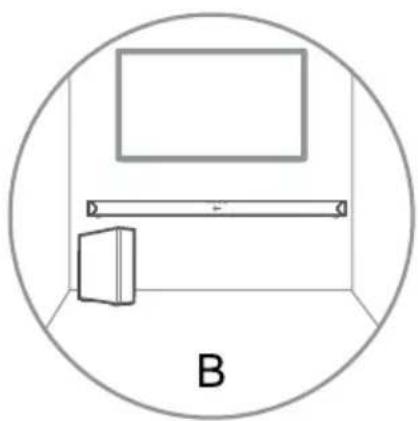
natural_image
Simple line drawing of a room layout with a monitor, a door, and a ruler inside a circular frame (no text or symbols)B - MONTAŻ NA ŚCIANIE
text_image
Diagram showing connection between a device with labeled ports and cable, including two electrical plug installations.text_image
Diagram showing connection between a device panel and a device back panel with labeled pins and componentsnatural_image
Line drawing of a hand holding a device with a scroll wheel, showing a curved arrow indicating rotation (no text or symbols)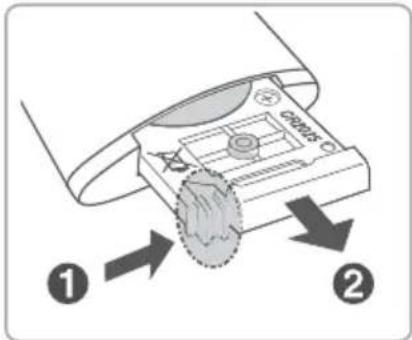
text_image
Diagram showing a device with labeled parts and directional arrows, likely illustrating a process or assembly step.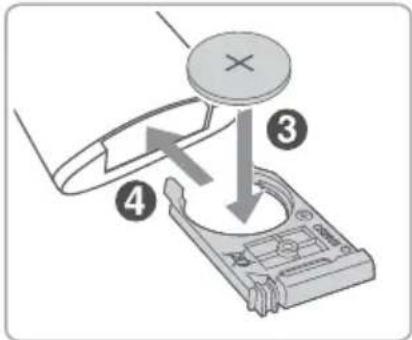
text_image
Diagram showing mechanical assembly with labeled parts 3, 4, and a cross symbol indicating a component or feature.MONTAREA
natural_image
Simple line drawing of a room layout with a monitor, cabinet, and door (no text or symbols)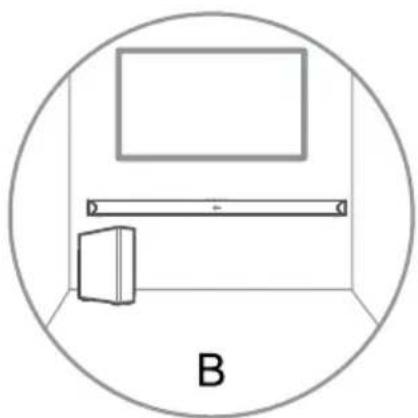
natural_image
Simple line drawing of a room layout with a monitor, a door, and a cabinet, enclosed in a circle (no text or symbols)B - MONTAREA PE PERETE
text_image
Diagram showing connection between a device with labeled ports and cable, including two electrical socket installations.text_image
Diagram showing connection between a device panel and a device rear panel with labeled components including AC, PAIR, and pin 1-3.① Zásuvka napájacieho kábla
② Tlačidlo párovania
③ Indikátor párovania
DIAL'KOVÉ OVLÁDANIE
natural_image
Line drawing of a hand holding a device with a scroll wheel, showing a finger pressing a button (no text or symbols)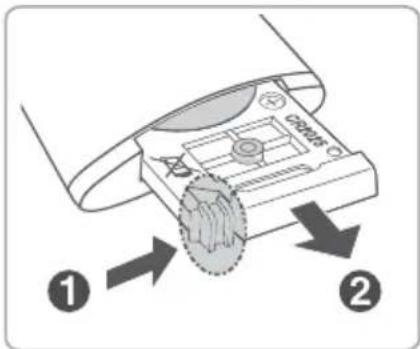
text_image
Diagram showing a device with labeled parts and directional arrows, likely illustrating a mechanical or electronic component.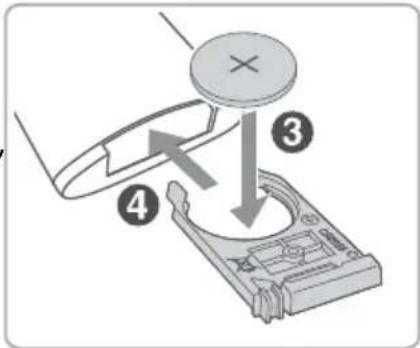
text_image
Diagram showing mechanical assembly with labeled parts and directional arrows indicating motion or forceMONTÁŽ
natural_image
Simple line drawing of a room layout with a monitor, cabinet, and window (no text or symbols)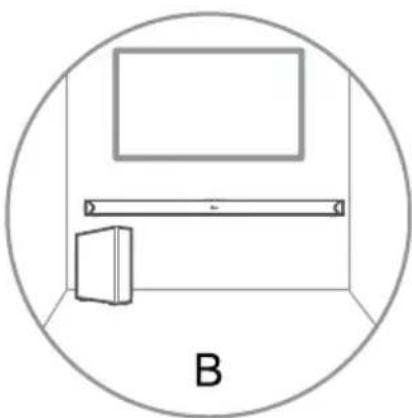
natural_image
Simple line drawing of a room layout with a monitor, a door, and a ruler inside a circular frame (no text or symbols)B - MONTÁŽ NA STENU
text_image
Diagram showing connection between a device with labeled ports and cable, including two electrical plug installations.natural_image
Completely black image with no visible content or text.
line
| X | Y | |---|---| | 0.0 | 0.0 | | 0.1 | 0.1 | | 0.2 | 0.2 | | 0.3 | 0.3 | | 0.4 | 0.4 | | 0.5 | 0.5 | | 0.6 | 0.6 | | 0.7 | 0.7 | | 0.8 | 0.8 | | 0.9 | 0.9 | | 1.0 | 1.0 | | 1.1 | 0.9 | | 1.2 | 0.8 | | 1.3 | 0.7 | | 1.4 | 0.6 | | 1.5 | 0.5 | | 1.6 | 0.4 | | 1.7 | 0.3 | | 1.8 | 0.2 | | 1.9 | 0.1 | | 2.0 | 0.0 |
text_image
QR code image containing encoded data, no visible human-readable textwww.krugermatz.com
Krüger&Matz is a registered trademark