
LM400 - Lawn mower OREGON SCIENTIFIC - Free user manual and instructions
Find the device manual for free LM400 OREGON SCIENTIFIC in PDF.
| Product Type | Cordless Lawn Mower |
| Brand | Oregon Scientific |
| Model | LM400 |
| Cutting Width | 51 cm (20 in) |
| Cutting Height | 6 positions: 25 mm to 75 mm |
| Grass Collection Bag Capacity | 60 liters |
| Weight (with one battery) | 26.6 kg |
| Power Source | Oregon 40V B-Series Lithium-Ion Battery (B425E, B600E, B650E) |
| Runtime (with 4.0 Ah battery) | Approximately 350 m² per charge |
| Compatible Charger | Oregon C600, C650, or C750 |
| Sound Pressure Level (LpA) | 80 dB(A) (K=3 dB(A)) |
| Sound Power Level (LwA) | 95 dB(A) |
| Hand/Arm Vibration | < 0.54 m/s² (K=1.5 m/s²) |
| Cutting Functions | Mulching, Side Discharge, Rear Bagging |
| Cutting Height Adjustment | Central, 6-position lever |
| Handlebar Folding | Yes, for vertical storage |
| Safety | Safety key, safety button + contact lever (two hands) |
| Battery Charge Indicator | 4-level LED on battery |
| Maintenance | Blade sharpening and replacement, deck cleaning |
| Spare Parts Available | Blade, grass collection bag, mulching plug, side discharge chute |
| Warranty | 3 years tool and charger, 2 years battery (domestic use) |
Frequently Asked Questions - LM400 OREGON SCIENTIFIC
User questions about LM400 OREGON SCIENTIFIC
0 question about this device. Answer the ones you know or ask your own.
Ask a new question about this device
Download the instructions for your Lawn mower in PDF format for free! Find your manual LM400 - OREGON SCIENTIFIC and take your electronic device back in hand. On this page are published all the documents necessary for the use of your device. LM400 by OREGON SCIENTIFIC.
USER MANUAL LM400 OREGON SCIENTIFIC
natural_image
Line drawing of a lawn mower with visible blades and wheels (no text or symbols)Original Instruction Manual Lawn Mower Model LM400
⚠ WARNING: Read and understand all safety warnings and all instructions.
Failure to follow the warnings and instructions may result in electric shock, fire and/or serious injury. Save all warnings and instructions for future reference.
This instruction manual contains translations of a manual drafted in English and are provided to assist those who do not speak English as their first language. Being a technical writing, some terms may not have a like or equivalent meaning as translated. Therefore, you should not rely on this translation, and should cross-reference the English version, where relying on the translated instructions could result in harm to your person or property.
Français. 18
Important Safety Instructions .... 5
General Operation....5
Slope Operation 6
Children 6
Service....7
Battery Packs and Charging . . . . . . . . . . . . . . . . . . . . . . . . . . . . . . . . . . . . . . . . . . . . . . . . . . . . . . . . . . . . 7
Storage 8
Transport .8
Disposal 8
Symbols and Labels. 9
Product Identification 10
Assembly....11
Battery Pack and Charger....13
Troubleshooting. 14
Specifications 16
Warranty and Service 17
Figures 60
© 2017 Blount, Inc. Pricing and specifications subject to change without notice. All rights reserved. Oregon® is a registered trademark of Blount, Inc. in the United States and/or in other countries.
Important Safety Instructions
SAFE PRACTICES FOR PEDESTRIAN-CONTROLLED MOWERS
⚠ WARNING: When using cordless lawn mowers, basic safety precautions should always be followed to reduce the risk of fire, electric shock, and personal injury, including the following:
This cutting machine is capable of amputating hands and feet and throwing objects. Failure to observe the following safety instructions could result in serious injury or death.
General Operation
Read, understand, and follow all instructions on the machine and in the manual(s) before starting.
Prevent unintended starting. Ensure the switch is in the off position before inserting battery pack. Inserting the battery pack into machines that have the switch on invites accidents.
Keep hands and feet away from cutting area. Keep clear of the discharge opening at all times.
Only allow responsible adults who are familiar with the instructions to operate this machine. This tool is not intended for use by persons (including children) with reduced physical, sensory or mental capabilities, or lack of experience and knowledge.
Maintain Lawn Mower With Care – Keep cutting edges sharp and clean for best and safest performance.
Follow instructions for lubricating and changing accessories.
Keep handles dry, clean, and free from oil and grease.
Objects struck by the lawn mower blade can cause severe injuries to persons. Clear the area of objects such as rocks, wire, toys, etc., which could be thrown by the blade prior to each mowing. Stay behind the handle when the motor is running.
If lawn mower strikes a foreign object, follow these steps:
- Stop lawn mower. Release the switch.
- Remove battery pack.
- Inspect for damage.
- Repair any damage before restarting and operating the lawn mower.
Be sure the area is clear of children and other bystanders before operating. Stop machine if anyone enters the area. The operator or user is responsible for accidents or hazards occurring to other people or their property.
Do not operate machine barefooted or while wearing sandals. Always wear substantial footwear.
Dress Properly – Do not wear loose clothing or jewelry. They can be caught in moving parts. Use of rubber gloves and footwear is recommended when working outdoors. Wear long pants.
Always wear eye protection when operating machine.
Always use face or dust mask if operation is dusty.
Never mow by pulling the mower towards you. Disengage the switch lever to turn off the machine and use extreme caution when stepping back or pulling the machine towards you.. Always look down and behind before and while moving backward.
Always stand clear of the discharge zone when operating the machine. Never direct discharged material toward anyone. Avoid discharging material against a wall or obstruction. Material may ricochet back toward the operator.
Turn off the machine by disengaging the switch lever when crossing gravel and other surfaces other than grass.
Never pick up or carry the machine while the motor is running.
Always inspect all guards, shields and safety devices prior to each use. Do not operate machine without the entire grass catcher, discharge guard, rear guard, or other safety protective devices in place and working.
Do not tilt the machine when starting or switching on the motor, except if the machine has to be tilted for starting in long grass. In this case, do not tilt it more than absolutely necessary and tilt only the part which is away from the operator.
Always ensure that both hands are in the operating position before returning the machine to the ground.
Switch on the motor according to the instructions with feet well away from rotating parts.
Never leave a running machine unattended.
Stop the motor, wait until the blade comes to a complete stop and remove the battery before cleaning the machine, removing grass catcher, or unclogging the discharge guard.
Operate machine only in daylight or good artificial light.
Do not operate machine while under the influence of alcohol or drugs.
Do not use battery-operated lawn mower in rain.
Avoid Dangerous Environment – Don't use lawn mowers in damp or wet locations.
Never operate mower in wet grass. Wet grass may cause the operator to slip. Always be sure of your footing; walk, never run.
If the machine should start to vibrate abnormally, stop the motor and check for the cause immediately. Vibration is generally a warning of trouble.
Use Right Appliance – Do not use lawn mower for any job except that for which it is intended.
Don't Force Lawn Mower – It will do the job better and safer at the rate for which it was designed.
Don't Overreach – Keep proper footing and balance at all times.
Stay Alert – Watch what you are doing. Use common sense. Do not operate lawn mower when you are tired.
See manufacturer's instructions for proper operation and installation of accessories. Only the accessories and attachments originally provided with the lawn mower are approved by the manufacturer.
Always store the lawn mower in a cool, dry place and out of direct sunlight. Long exposure to sunlight and UV rays can degrade plastics overtime, potentially causing guards to fail.
Slope Operation
Slopes are a major factor related to slip and fall accidents, which can result in severe injury. Operation on all slopes requires extra caution. If you feel uneasy on a slope, do not mow it.
Mow across the face of slopes; never up and down. Exercise extreme caution when changing direction on slopes.
Watch for holes, ruts, bumps, rocks, or other hidden objects. Uneven terrain could cause a slip and fall accident. Tall grass can hide obstacles.
Avoid mowing on wet grass or excessively steep slopes ( >15^ ). Poor footing could cause a slip and fall accident.
Exercise extreme caution when changing direction, especially on slopes.
Do not mow near drop offs, ditches, or embankments. You could lose your footing or balance.
Children
Tragic accidents can occur if the operator is not alert to the presence of children. Children are often attracted to the machine and the mowing activity. Never assume that children will remain where you last saw them.
Remove the safety key whenever you leave or store the machine. Store in a secure and locked-up place – out of reach of children.
Keep children out of the mowing area and under the watchful care of a responsible adult other than the operator.
Be alert and turn mower off if a child enters the area.
Never allow children to operate the machine.
Use extra care when approaching blind corners, shrubs, trees, or other objects that may block your view of a child.
Service
Always remove the battery pack before adjusting, cleaning, repairing, or storing to prevent unintended starting. Such preventative safety measures reduce the risk of starting the lawn mower accidentally.
Cleaning is never to be done by children and only by adults familiar with the product
Store Idle Lawn Mower Indoors – When not in use, lawn mower should be stored in an indoor dry and locked-up place – out of reach of children
Keep guards in place and in working order.
Keep blades sharp.
Use identical replacement blades only. Use of any other accessory or attachment might increase the risk of injury.
Keep all nuts and bolts tight to be sure the equipment is in safe working condition.
Never remove or tamper with safety devices. Check their proper operation regularly. Never do anything to interfere with the intended function of a safety device or to reduce the protection provided by a safety device.
Keep machine free of grass, leaves, or other debris build up.
If you strike a foreign object, stop and inspect the machine. Repair, if necessary, before starting.
Never make any adjustments or repairs with the motor running.
Check grass catcher components and the discharge guard frequently and replace with manufacturer's recommended parts, when necessary.
Ensure that all replacement or service parts are approved by the manufacturer.
Mower blades are sharp. Wrap the blade or wear gloves, and use extra caution when servicing them.
Be careful during adjustment of the machine to prevent entrapment of the fingers between moving blade and fixed parts of the machine
When servicing the blades be aware that, even though the power source is switched off, the blade can still be moved.
Maintain or replace safety and instruction labels, as necessary.
Battery Packs and Charging
Do not charge battery pack in rain, or in wet locations. Keep the battery charger away from rain or moisture. Penetration of water in the battery charger increases the risk of an electric shock.
Do not use battery-operated lawn mower in rain.
Remove or disconnect battery before servicing, cleaning, or removing material from the lawn mower.
Use lawn mower only with Oregon Series B specifically designated battery packs B425E, B600E, or B650E. Use of any other battery packs may create a risk of injury and fire.
Recharge only with the charger specified by the manufacturer, Oregon C600, C650, or C750. A charger that is suitable for one type of battery pack may create a risk of fire when used with another battery pack.
Do not charge other batteries on the charger. The battery charger is suitable only for charging manufacturer specific and approved lithium ion batteries within the listed voltage range. Otherwise there is danger of fire and explosion.
Before each use, check the battery charger, cable and plug. If damage is detected, do not use the battery charger. Never open the battery charger yourself. Have repairs performed only by a qualified technician and only using original spare parts. Damaged battery chargers, cables and plugs increase the risk of an electric shock.
Keep the battery charger clean. Contamination can lead to danger of an electric shock.
Occasionally clean the venting slots of the battery using a soft, clean and dry brush.
Do not dispose of the battery in a fire. The cell may explode. Check with local codes for possible special disposal instructions.
Do not open or mutilate the battery. Released electrolyte is corrosive and may cause damage to the eyes or skin. It may be toxic if swallowed.
Exercise care in handling batteries in order not to short the battery with conducting materials such as rings, bracelets, and keys. The battery or conductor may overheat and cause burns
When battery pack is not in use, keep it away from other metal objects like paper clips, coins, keys, nails, screws, or other small metal objects that can make a connection from one terminal to another. Shorting the battery terminals together may cause burns or a fire.
Under abusive conditions, liquid may be ejected from the battery; avoid contact. If contact accidentally occurs, flush with water. If liquid contacts eyes, additionally seek medical help. Liquid ejected from the battery may cause irritations or burns.
In case of damage and improper use of the battery, vapors may be emitted. Ventilate the area and seek medical help in case of complaints. The vapors can irritate the respiratory system.
Do not use a battery pack or lawn mower that is damaged or modified. Damaged or modified batteries may exhibit unpredictable behavior resulting in fire, explosion or risk of injury.
Do not expose a battery pack or lawn mower to fire or excessive temperature such as continuous intense sunlight or stored in a hot vehicle. Exposure to fire or temperature above 130°C may cause explosion. Store the battery only within a temperature range between 0 °C and 40 °C.
Follow all charging instructions and do not charge the battery pack or lawn mower outside of the temperature range specified in the instructions. Charging improperly or at temperatures outside the specified range may damage the battery and increase the risk of fire.
Do not operate the battery charger on easily inflammable surfaces (e.g., paper, textiles, etc.) or surroundings. The heating of the battery charger during the charging process can pose a fire hazard.
Have servicing performed by a qualified repair person using only identical replacement parts. This will ensure that the safety of the product is maintained.
Do not attempt to repair the lawn mower or battery pack except as indicated in the instructions for use and care.
Storage
Always store the lawn mower in a cool, dry place and out of direct sunlight. Long exposure to sunlight and UV rays can degrade plastics overtime, potentially causing guards to fail.
Transport
The contained lithium-ion batteries are subject to the Dangerous Goods Legislation requirements. The user can transport the batteries by road without further requirements.
When being transported by third parties (e.g.: air transport or forwarding agency), special requirements on packaging and labeling must be observed. For preparation of the item being shipped, consulting an expert for hazardous material is required.
Ship batteries only when the housing is undamaged.
Tape or mask off open contacts and pack up the battery in such a manner that it cannot move around in the packaging.
Please also observe possibly more detailed national regulations.
Disposal
Do not dispose of garden products, battery chargers and batteries/rechargeable batteries into household waste.
SAVE THESE INSTRUCTIONS
Symbols and Labels
These symbols and labels appear on the lawn mower, battery, and charger.
| SYMBOL NAME EXPLANATION | ||
 | General Hazard Safety Alert | The text that follows explains a danger, warning, or caution. |
 | Read Instruction Manual | The original instruction manual contains important safety and operating information. Read and follow the instructions carefully. |
 | Maintain Safety Devices | Do not open or remove safety shields while the tool is running. |
 | Keep Bystanders Away | Do not mow when children or others are too close. |
 | Look Behind While Backing | Look down and behind first to avoid tripping when pulling back. |
 | Steep Slope Hazard | Use extra caution on slopes. Do not mow slopes greater than 15 degrees. |
 | Remove Safety Key | Switch off and remove safety key before adjusting, cleaning and before adjusting. Cleaning leaving the product unattended for any period. |
 | Wear Eye Protection | Wear eye protection when operating the machine. |
 | Wear Hearing Protection | Wear hearing protection when operating the machine. |
 | Wear Hand Protection | Wear gloves when operating the machine or touching the stopped blades. |
 | Wear Long Pants Wear | Wear long pants when operating the lawn mower. |
 | Wear Foot Protection | Wear appropriate closed-toe work boot when operating the lawn mower. |
 | Do Not Incinerate Do not dispose in flames. | |
 | Do Not Dispose | Do not throw in the household waste. Take to an authorized recycler. |
 | Do Not Expose To Rain | Do not operate the charger in wet conditions. |
 | Operating Temperature | Only use the battery pack at a temperature between 32°F to 104°F (0°C and 40°C). |
 | Remove Battery Remove the battery before performing any maintenance. | |
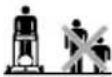
Product Identification
① Safety Button
② Handlebar
③ Switch Lever
④ Handlebar Knobs
⑤ Reat Discharge Cover
⑥ Battery Cover
⑦ Locking Handle
⑧ Battery Ports
⑨ Battery Release Levers
⑩ Safety Key
⑪ Side Discharge Cover
⑫ Cutting Height Adjustment Lever
⑬ Handle Adjustment Knob
⑭ Cable Clip
⑮ Side Discharge Chute
⑯ Mulching Plug
⑰ Debris Bag
⑱ Mesh Debris Bag
⑲ Metal Debris Frame
Assembly
Intended Use
The garden product is intended for domestic lawn mowing.
WARNING: Make sure the battery is removed from the machine.
Assembling the Handle (Fig. A)
Fix the upper handle to the frame of the lower handle and secure using the knobs, bolts, and washers (Fig. A). Hand tighten the knobs.
Inserting and Removing the Battery Pack (Fig. B - C)
WARNING: Ensure the safety key is turned off before inserting or removing the battery pack.
To insert the battery pack, lift the locking handle (1) on the machine battery cover and lift the cover (2) (Fig. B). Insert the battery pack into the desired battery position, ensuring the small rails on the cover align with the rail slots on the battery pack. Firmly push the battery pack into place, until you hear an audible click sound. The unit is capable of holding two batteries. However it requires only one to operate. Close the battery cover.
To remove the battery pack, open the battery cover. Lift the battery release lever (1) in front of the battery pack to release the battery pack (Fig. C). The spring loaded lever will release the battery pack, allowing you to pull the battery pack out of the machine. Close the cover to prevent accidental damage to the machine.
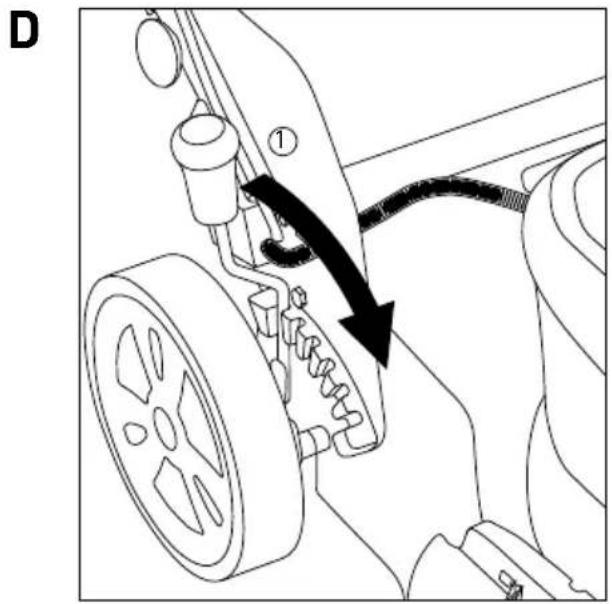
Adjusting the Cutting Height (Fig. D)
Your lawn mower is equipped with a central height adjustment system, offering six height settings. The settings are approximately 1 in (25 mm), 1 3/8 in (35 mm), 1 3/4 in (45 mm), 2 1/8 in (55 mm), 2 1/2 in (65 mm), and 3 in (75 mm). The actual cutting height may vary slightly.
To adjust the cutting height of the machine, position the lever (1) to the desired height position (Fig. D). The numbers indicated on the body of the machine (1, 2, 3, 4, 5, 6) indicates the approximate cutting height of the machine in that position. The lower the number, the shorter the grass will be cut.
Always perform a small test by cutting the grass at higher settings and adjusting down to determine your desired cutting height.
Adjusting the Handle (Fig. E)
Pull and twist the knob on the left side of the unit (1), so that the knob rests on the handle. On the opposite side, with one hand pull the knob (2) and adjust the handle to the desired position (Fig. E). Release the knob so that the spring loaded shaft sits in the location hole (3). Pull and twist the opposite knob so that the spring loaded shaft returns to its seated position (4).
Using the Safety Key (Fig. F)
The safety key is an important safety device on the machine. The motor and blades of the machine can only be started when the safety key is inserted and rotated to the "ON" position. Only insert the safety key when you intend to start the machine and turn the blades.
To insert the safety key, push the safety key into the socket, by aligning the small tab on the key to the slot in the socket (1) (Fig. F).
To turn the machine to the "ON" position, point the arrow on the safety key towards the desired battery you want to use (2). When the lawn mower stops because the battery is discharged, open the battery cover, and if you have two batteries inserted, turn the key towards the other battery. This is an opportune time to place the discharge battery in an Oregon charger.
To turn the machine to the "OFF" position, and to remove the key, rotate the key so the small indicator arrow on the key points to the "O". You may remove the key.
The motor can be started only when the safety key is fitted.
Operation (Fig. G)
First, make sure you are in the proper cutting area. Ensure the cutting area is free of bystanders and foreign objects. Inspect the machine for any possible damage or unsafe conditions.
Ensure the cutting height of the machine is at your desired height.
Ensure the safety key points toward one battery position.
Press and hold the safety button (1), squeeze the switch lever (2) towards the handlebar (Fig. G).
When the unit starts, release the safety button (1). Maintain squeezing the switch lever with two hands during use.
Releasing the switch lever will disengage power to the unit. The blades may continue to rotate for a period of time after power is disengaged.
Stopping the Machine (Fig. H)
Release the switch lever (1) (Fig. H). Releasing the switch lever will disengage power to the unit. The blades may continue to rotate for a period of time after power is disengaged.
Using Rear Bagging (Fig. I - J)
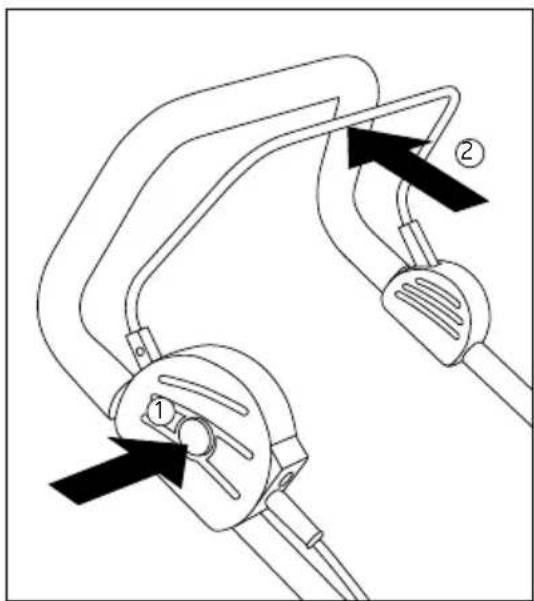
Assemble the debris bag by inserting the metal frame into the soft mesh bag (1) and connecting the plastic clips from the soft mesh bag to the metal frame (2) (Fig. I).
To attach the debris bag to the machine, lift and hold the discharge cover (1) with one hand, and with the opposite hand, place the two hooks (2) from the debris bag onto the metal shaft (3) on each side of the discharge cover (Fig. J). Release the spring loaded discharge cover, allowing the cover to collapse over the opening between the debris bag and the machine.
Using the Side Discharge (Fig. K)
First, take the debris bag off. In a slight downward angle, position the front and rear hooks of the discharge chute onto the metal pin of the side cover (1) (Fig. K). Rotate the chute down causing the hooks to lock in place (2). Release the side cover with your hand, check the chute is properly in place.
Using the Mulching Plug (Fig. L)
Lift the discharge cover and remove the debris bag (1) (Fig. L). Hold the discharge cover with one hand, and with the opposite hand, place the mulching plug in the rear discharge chute (2). Release the spring loaded discharge cover.
Replacing or Sharpening the Cutting Blade
WARNING: Always remove the battery and the safety key when performing any maintenance.
The cutting blade is designed to be a replacement item and may need sharpening from time to time. Sharpen when dull. Replace when damaged. Contact your dealer or the manufacturer for proper instructions.
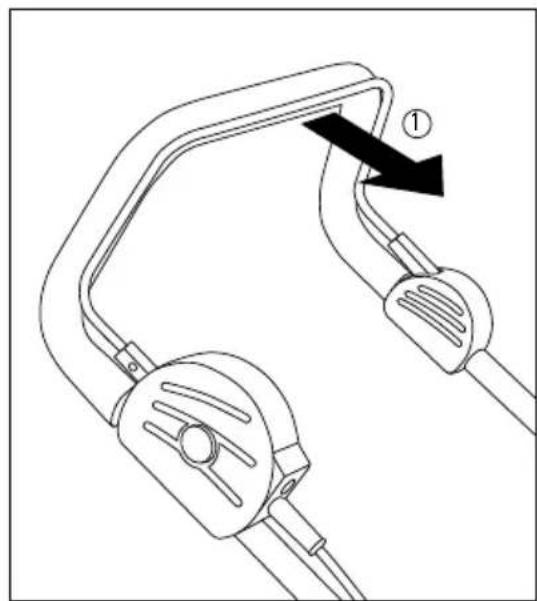
Storage (Fig. M - N)
Pull and twist the knob on the left side of the unit, so that the knob rests on the handle (1). On the opposite side, with one hand pull the knob (2) and with the other hand pull down the handle to the front of the lawn mower (3) (Fig. L). Then, lift the machine from the front until it rests safely on the rear frame of the machine (Fig. M).
Battery Pack and Charger
WARNING: To reduce the risk of shock, do not charge the battery pack in the rain.
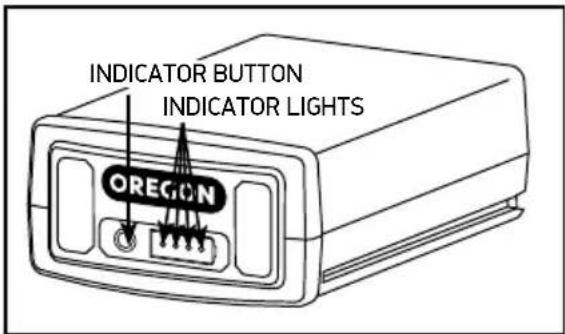
BATTERY PACK LED CHARGE-LEVEL INDICATOR
The lithium ion battery pack is equipped with an LED charge-level indicator. To test the charge level of the battery pack, press the indicator button on the battery pack's face.
No lights: recharge.
One steady green light:
less than 25% charged.
Charge battery pack before use.
Two steady green lights:
26–50% charged.
Three steady green lights:
51–75% charged.
Four steady green lights:
76–100% charged.
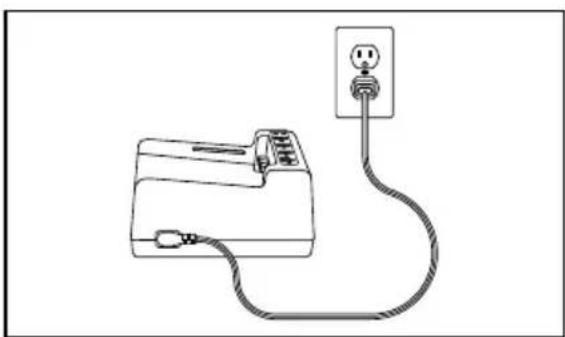
CONNECTING THE CHARGER
If the charger includes a separate power cord, connect the charger cord to the charger and to the proper electrical outlet.
natural_image
Line drawing of a telephone connected to a power outlet (no text or symbols)Only use the cord set that was supplied with the charger. At first use, verify that the plug type matches the receptacle.
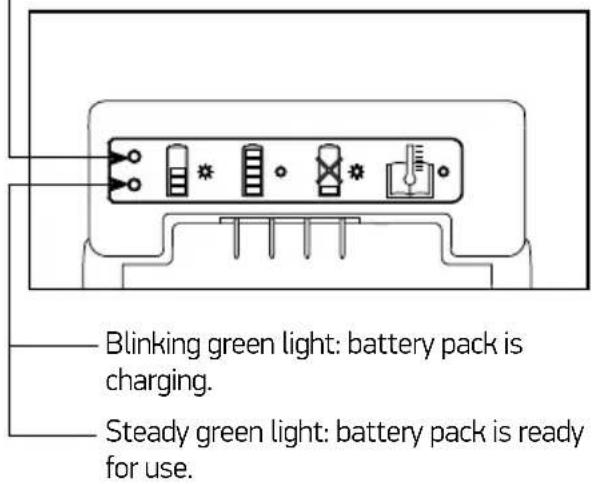
CHARGER LED CHARGE-STATE INDICATOR
The battery charger is equipped with an LED charge-state indicator that indicates the state of charging as well as conditions that may delay or prevent charging.
Note: Until a battery pack is inserted, no lights will be visible.
Blinking orange light: a fault condition exists. There are several potential causes. See "Troubleshooting" in this manual. Steady orange light: the battery pack temperature is beyond the acceptable range (32°F/0°C to 104°F/40°C). Allow the battery pack to reach the acceptable temperature range before charging. The pack may be left on the charger as the temperature adjusts. Charging will begin when the proper temperature is reached.
CHARGING THE BATTERY
WARNING: Failure to follow proper charging procedures may cause excessive voltage, excessive current flow, loss of control during charging, leakage of hazardous chemicals, heat generation, bursting or fire. Follow these charging instructions.
With the charger cord connected to the charger and plugged into a electrical outlet, align the grooves on the battery with the rails on the charger and slide the battery pack onto the charger until fully seated.
For more information, please refer to your battery and charger manuals.
Troubleshooting
Use this table to see possible solutions for possible problems with the lawn mower. If these suggestions do not solve the problem, see “Warranty and Service”.
| SYMPTOM POSSIBLE CAUSE RECOMMENDED ACTIONS | ||
| Tool fails to operate | Possible clogging | Remove battery, remove safety key.Clear obstructions.Check underneath the garden product and clear out as necessary (always wear gardening gloves). |
| Battery not fully charged Charge battery. | ||
| Battery not inserted (properly) | Properly insert battery. | |
| Grass too long | Increase height of cut and tilt garden product to reduce starting load. | |
| Motor protector has activated | Allow motor to cool and increase height of cut. | |
| Safety key pointing towards a discharge battery | Check if the safety key points towards a charged battery. | |
| Battery too hot/cold Allow to cool/warm. | ||
| Safety key not inserted correctly/fully | Insert safety key correctly. | |
| There is a short delay in the motor starting after engaging the safety button switch | Hold safety button for 1 – 3 seconds before engaging switch lever to start motor. | |
| Motor starts and stops immediately | Battery not fully charged Charge battery. | |
| Isolator key not inserted correctly/fully | Insert safety key correctly. | |
| Battery not inserted (properly) | Properly insert battery. | |
| Battery too hot/cold Allow to cool/warm. | ||
| Tool functions intermittently | Internal wiring of garden product damaged | Contact service agent. |
| Motor protector has activated | Allow motor to cool and increase height of cut. | |
| Garden product leaves ragged finish and/or Motor labours | Height of cut too low Increase height of cut. | |
| Cutting blade dull Replace the blade or sharpen the blade. | ||
| Possible clogging | Remove battery, remove safety key.Check underneath the garden product and clear out as necessary (always wear gardening gloves). | |
| Blade fitted upside down | Remove battery, remove safety key.Refit blade correctly. | |
| Area of cut (battery duration) not large enough | Height of cut too low Increase height of cut and walk slower. | |
| Grass too high Increase height of cut and walk slower. | ||
| Grass wet or damp Wait until grass is dry and walk slower. | ||
| Grass is dense | Increase height of cut, walk slower and cut more frequently. | |
| Cutting blade not rotating while garden product switched on | Cutting blade obstructed | Remove battery, remove safety key.Clear obstruction (always wear gardening gloves). |
| Blade nut/bolt loose | Remove battery, remove safety key.Tighten blade nut/bolt (15 Nm). | |
| Excessive vibrations/noise | Blade nut/bolt loose | Remove battery, remove safety key.Tighten blade nut/bolt (15 Nm). |
| No charging procedure possible | Battery contacts contaminated | Clean the battery contacts by inserting and removing the battery several times or replace the battery. |
| The battery is defective, due to a disconnection in the battery | Replace the battery. | |
| The charge control LEDs and respectively, do not light up after inserting the mains plug into the socket | Mains plug of battery charger not plugged in (properly) | Insert mains plug (fully) into the socket outlet. |
| Socket outlet, mains cable or battery charger defective | Check the mains voltage and, if necessary, have the battery charger checked by an authorized customer service station for power tools. | |
Specifications
| REPLACEMENT COMPONENTS PART NUMBER | |
| Side Discharge Chute 596871 | |
| Mulching Plug 597342 | |
| Debris Bag 596862 | |
| Mesh Debris Bag 596862 | |
| Metal Debris Frame 596862 | |
| Replacement Blade Kit 596866 | |
| BATTERY RECHARGEABLE LAWN MOWER LM400 | |
| Blade width 20 in (51 cm) | |
| Height of cut in (mm) 1 in (25 mm) – 3 in (75 mm) | |
| Grassbox, capacity 60 l (15.9 gal) | |
| Weight with battery 58.8 lb (26.6 kg) with one battery | |
| Serial number | Refer to label on the machine(under discharge cover) |
| BATTERY OREGON BRAND 40V B SERIES BATTERY PACK | |
| Battery pack rated voltage As indicated on the battery pack label | |
| Battery pack capacity As indicated on the battery label | |
| Charging period (battery discharged) | Depends on battery capacity and charger output. |
| Lawn area per battery charge | Depends on battery pack capacity; approximately 3500 ft ^2 (350 m ^2 ) with a 4.0 Ah battery pack |
| Sound power level: acoustical energy emitted by the source | LwA.d: 95 dB(A) |
| Sound pressure level: what the operator hears | Lpa.d: 80 dB(A), Kpa: 3 dB(A)3.5 m/s ^2 , K=1.5 m/s ^2 |
| Hand/arm vibration avhw | < 0.54 m/s ^2 k= 1.5 m/s ^2 |
Warranty and Service
Warranty
Blount, Inc. warrants all registered Oregon® Cordless Tools and Chargers for a period of three (3) years and all registered Oregon® Cordless Battery packs for two (2) years from original date of purchase. Registered Oregon® Cordless Tools, Battery Packs and Chargers are warranted for two (2) years if used for commercial purchases. This limited warranty applies to Oregon® Cordless Tools System manufactured products. During the warranty period, Blount will replace or, at its option, repair for the original purchaser only, free of charge, any product or part which is found upon examination by Blount to be defective in material and/or workmanship. The purchaser shall be responsible for all transportation charges and any cost of removing any part submitted for replacement under this warranty.
To register your product, visit the "support" section of OregonCordless.com.
Service and Support Information
Visit us on the web at OregonCordless.com for service center information, or contact our customer service department at 888.313.8665 for assistance, additional technical advice, repair, or replacement parts.
For safety, use only genuine factory replacement parts on the power tool. Our service center is staffed with trained personnel to efficiently provide support and assistance with adjustment, repair, or replacement of all Oregon® Cordless Tool System products.
Table des matières
natural_image
Line drawing of a telephone connected to a power outlet (no text or symbols)natural_image
Line drawing of a telephone connected to a power outlet (no text or symbols)natural_image
Mechanical linkage diagram showing lever and guide components with directional arrows (no text or labels)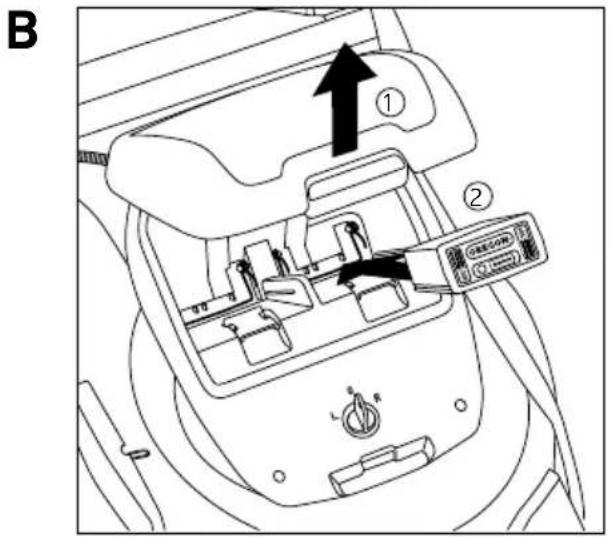

natural_image
Mechanical assembly diagram showing a gear mechanism with a black arrow indicating motion direction (no text or symbols present)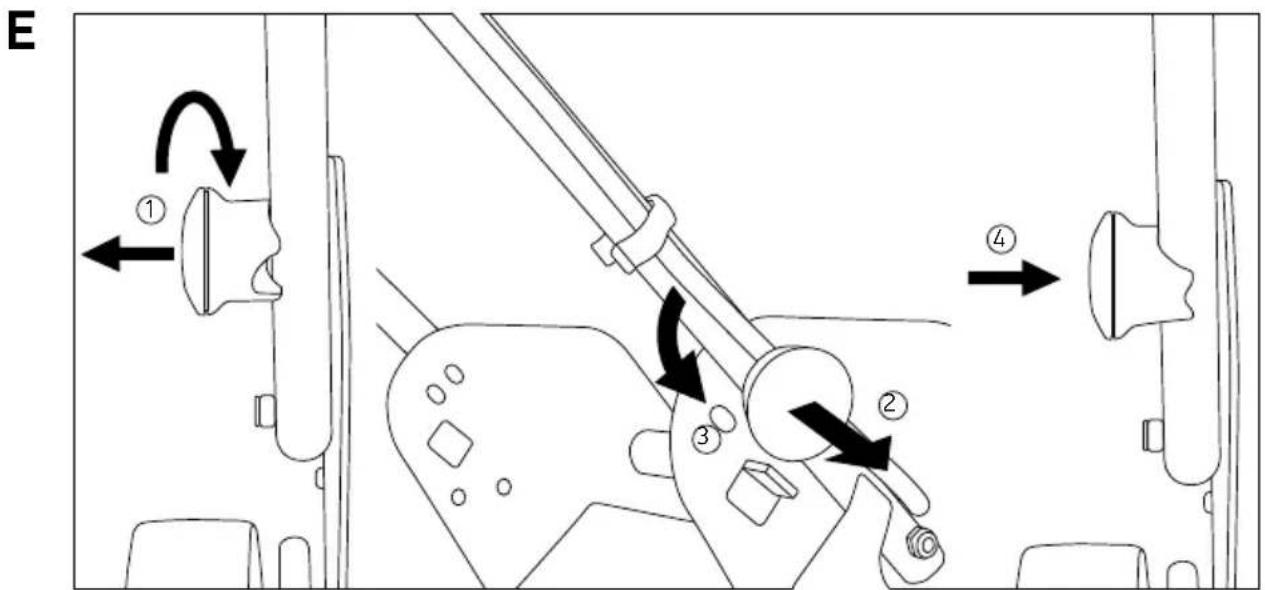

G
H
natural_image
Diagram of a mechanical clamp or bracket with a black arrow indicating direction (no text or symbols present)|

natural_image
Line drawing of a mechanical device with a labeled component (1) and directional arrow, no text or symbols present.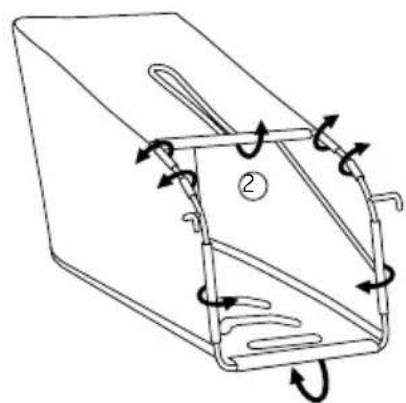
natural_image
Diagram of a mechanical device with rotating arms and internal components (no text or symbols)


M

N

natural_image
Line drawing of a lawn mower with a rotating wheel and blade, showing no text or symbols
OregonProducts.com

- Original Instruction Manual Lawn Mower Model LM400
- ⚠ WARNING: Read and understand all safety warnings and all instructions.
- Français. 18
- Important Safety Instructions
- SAFE PRACTICES FOR PEDESTRIAN-CONTROLLED MOWERS
- General Operation
- Slope Operation
- Children
- Service
- Battery Packs and Charging
- Storage
- Transport
- Disposal
- SAVE THESE INSTRUCTIONS
- Symbols and Labels
- Product Identification
- Assembly
- Intended Use
- Assembling the Handle (Fig. A)
- Inserting and Removing the Battery Pack (Fig. B - C)
- Adjusting the Cutting Height (Fig. D)
- Adjusting the Handle (Fig. E)
- Using the Safety Key (Fig. F)
- Operation (Fig. G)
- Stopping the Machine (Fig. H)
- Using Rear Bagging (Fig. I - J)
- Using the Side Discharge (Fig. K)
- Using the Mulching Plug (Fig. L)
- Replacing or Sharpening the Cutting Blade
- Storage (Fig. M - N)
- Battery Pack and Charger
- BATTERY PACK LED CHARGE-LEVEL INDICATOR
- CONNECTING THE CHARGER
- CHARGER LED CHARGE-STATE INDICATOR
- CHARGING THE BATTERY
- Troubleshooting
- Warranty and Service
- Warranty
- Service and Support Information
- Table des matières
Brand : OREGON SCIENTIFIC
Model : LM400
Category : Lawn mower