HUVI S1 - Vacuum Cleaner KALORIK - Free user manual and instructions
Find the device manual for free HUVI S1 KALORIK in PDF.


| Product type | Cordless stick vacuum |
| Model | VC 50692 BK (HUVI S1) |
| Brand | Kalorik |
| Nominal voltage | 28.8 V |
| Nominal power | 450 W |
| Battery type | Li-ion 28.8 V, 2500 mAh |
| Maximum runtime | Up to 40 minutes (Eco mode) |
| Maximum suction power | 25 kPa |
| Filtration | HEPA H13 filter (medical grade), stainless steel mesh |
| Integrated technologies | UV-C lamp, bipolar ionization, aroma diffuser |
| Speed modes | 3 modes: Eco, Normal, Max |
| Included accessories | Motorized brush, crevice tool, combination brush, cleaning tool with blade, wall mount, power adapter |
| Dust cup capacity | Approx. 0.5 L (max level indicator) |
| Weight | Approx. 3.5 kg |
| Dimensions (L x W x H) | Approx. 28 x 25 x 115 cm |
| Power supply | Power adapter: input 100-240 V~50/60 Hz, output 35 V 0.55 A |
| Charging temperature | 4 °C to 40 °C |
| Noise level | Not specified in the manual, estimated 75 dB |
| Maintenance | Clean the dust cup regularly, wash the mesh with cold water once a month, replace the HEPA filter every 6 months |
| Replacement parts available | Filter replacement kit (VCP 51964), flexibility kit (VCP 51965), pet care kit (VCP 51966), battery and charger (VCP 52014) |
| Warranty | 1 year (United States and Canada) |
| Use | Household use only, indoor |
Frequently Asked Questions - HUVI S1 KALORIK
User questions about HUVI S1 KALORIK
0 question about this device. Answer the ones you know or ask your own.
Ask a new question about this device
Download the instructions for your Vacuum Cleaner in PDF format for free! Find your manual HUVI S1 - KALORIK and take your electronic device back in hand. On this page are published all the documents necessary for the use of your device. HUVI S1 by KALORIK.
USER MANUAL HUVI S1 KALORIK
Thank you for choosing HUVI!
We hope you're delighted with your HUVI. If you are, we'd love it if you'd shout it from the rooftops, tell your friends or leave us a review. We'd love to hear from you, so tag @kalorik on social media to share.
LEARN MORE ABOUT YOUR PURCHASE
Learn more about your product by scanning the QR code below.

TECHNICAL SPECIFICATIONS
| Model | VC 50692 BK |
| Rated Voltage | 28.8V |
| Rated Power | 450W |
| Battery | 28.8V Li-ion, 2500mAh |
| Adapter Input | 100-240V ~ 50/60 Hz, 0.6A |
| Adapter Output | 35V 0.55A |
| Max Run Time | 40 minutes |
| Max Suction Power | 25 kPa |
When using electrical appliances, basic safety precautions should always be followed, including the following:
- Read all instructions before use.
- This device can be used by children aged 8 years and up, persons with reduced physical, sensory, or mental capabilities, and persons with lack of experience and knowledge, if they have been given supervision or instruction concerning use of this device in a safe way and understand the hazards involved.
- Cleaning and maintenance shall not be performed by children without adult supervision.
- This device is only to be used with the power supply unit provided.
- For the purposes of recharging the battery, use only the detachable power supply unit that came with this device.
- The external flexible cable or cord of the power supply unit cannot be replaced. If the cord is damaged, the power supply unit shall be disposed of.
- This device is for indoor use only.
- This device is not a toy. Do not sit or stand on this device. Small children and pets should be supervised when this device is operating.
- Store and operate this device in room temperature environments only.
- Clean with a cloth dampened with water only.
- Do not use this device to pick up bleach, paint, or chemicals spills, or anything wet.
- Before using this device, pick up objects like clothing and loose paper. Lift up cords for blinds or curtains, and move power cords and fragile objects out of the way. If this device passes over a power cord and drags it, an object could be pulled off a table or shelf.
- If the room to be cleaned has a balcony, a physical barrier should be used to prevent access to the balcony and to ensure safe operation.
- Do not place anything on top of this device.
- Be aware that this device moves around on its own. Take care when walking in the area where this device is operating to avoid stepping on it.
- Do not operate this device in areas with exposed electrical outlets on the floor.
-
Do not attempt to alter the electronics of this device or the charging adapter. There are no user-serviceable parts inside.
-
Do not use this device on an unfinished, unsealed, waxed or rough floor. It may result in damage to the floor and this device. Use only on hard floor surfaces or low-pile carpet.
- This device has been designed to be used on floors without scratching them. We still recommend that you test this device on a small area of the room to be cleaned to ensure no scratches are made before cleaning the whole room.
- Check the dustbin regularly for signs of damage. Do not use with a damaged or broken dustbin. If any signs of damage, look for immediate replacement. Some discoloration is normal with regular use.
- Use only as described in this manual. Use only manufacturer's recommended attachments.
- This appliance is intended for domestic use only. It should not be used for commercial purposes. Do not use the appliance for anything other than its intended use.
- Switch off the appliance before changing or fitting accessories.
- Always ensure that the appliance has cooled fully after use and before performing any cleaning or user maintenance.
- Do not use with an extension power cord.
- Do not immerse the appliance in water or any other liquid. Do not operate the appliance with wet hands. Do not expose the appliance to rain.
- Do not remove the adaptor from the power supply by pulling the cord; switch it off and remove the plug by hand.
- Do not use any parts / accessories or adaptors other than those supplied with this appliance, as this may cause damage.
- Do not use the appliance if it has been dropped or if there are visible signs of damage.
- Do not use any damaged accessories or adaptors. Do not use the adaptor to recharge non-rechargeable batteries.
- Do not store the appliance in direct sunlight or in high humidity conditions.
- Do not use the appliance to pick up flammable liquid, matches, cigarette ends, hot ashes or any hot, burning or smoking objects.
- Do not use to pick up water or any other liquid, as this may cause electric shock.
- Do not use to pick up sharp objects such as glass or screws, etc.
-
Prevent unintentional activation. Ensure the switch is in the off position before connecting to the battery pack, picking up or carrying the appliance. Carrying the appliance with your finger on the switch or powering on the appliance with the switch on may cause accidents.
-
When the battery pack is not in use, keep it away from other metal objects, like paper clips, coins, keys, nails, screws, or other small metal objects that can make a connection from one terminal to another. Failure to do so may result in shorting the battery terminals and may cause bums or a fire.
- If the battery pack becomes exhausted, it should be removed from the product to avoid leakage. In the event of the battery pack leaking, do not allow any liquid to come into contact with the skin or eyes. If contact accidentally occurs, flush with water. If liquid contacts eyes, seek medical help immediately. Liquid ejected from the battery may cause irritation or burns.
- Do not use a battery pack or appliance that is damaged or modified. Damaged or modified batteries may exhibit unpredictable behavior resulting in fire, explosion or risk of injury.
- Do not expose the battery pack or appliance to fire or excessive temperature. Exposure to fire or temperature above 265°F ( 130°C ) may cause an explosion.
- Follow all charging instructions and do not charge the battery pack or appliance outside of the temperature range specified in the instructions. Charging improperly or at temperatures outside of the specified range may damage the battery and increase the risk of fire.
- Keep the battery pack out of the reach of children.
- Secondary battery packs need to be charged before use. After extended periods of storage, it may be necessary to charge and discharge the batteries several times to obtain maximum performance.
- Do not leave battery packs charging for prolonged periods of time.
- Do not store above 140°F (60°C) . Avoid storing in direct sunlight.
- Do not crush, puncture, dismantle, or otherwise damage the battery pack.
- Do not dismantle, open or shred battery packs.
- Do not expose the battery pack to heat or fire as it may explode.
- Do not subject the battery pack to mechanical shock.
- Do not dispose of an exhausted battery pack, take it to a local recycling station.
- Do not put any object into openings. Do not use with any openings blocked; keep free of dust, lint, hair, and anything that may reduce air flow.
- Keep hair, loose clothing, fingers, and all parts of your body away from openings and moving parts.
-
Use extra care when cleaning on stairs.
-
Always turn off this appliance before connecting or disconnecting motorized nozzle.
The appliance complies with US Federal requirements, including CFR 21, Part 1040, Chapter 1, Subchapter J, Radiological Health
WARNING: Read all safety warnings and instructions. Failure to follow the warnings and instructions may result in electric shock, fire and/or serious injury. Normal Charging temperature: 4 -- 40 °C.
For use only with charger model: CS20A350055FUF
HOUSEHOLD USE ONLY
KEEP OUT OF THE REACH OF CHILDREN
READ THE LABEL AND ANY OPERATING MANUAL BEFORE USING
For inquiries, please contact:
KALORIK Customer Service Department
100 Kellogg Lane, London, ON, N5W 0B4.
888-521-8326
service@kalorik.com
PRECAUTIONS
WARNING - UV radiation emitted from this device. Unintended use of the device, or damage to the housing, may result in exposure to ultraviolet radiation. Ultraviolet radiation may cause eye and skin irritation. Avoid exposing eyes and skin to ultraviolet radiation.
DIRECTIONS FOR USE
The use of this device is a supplement to and not a substitute for following best practices to control transmission of infections; users are to follow those best practices, including those related to the cleaning and disinfection of surfaces. Do not operate with a damaged dust container. Damage to the dust container may result in exposure to ultraviolet radiation.
FIRST AID INSTRUCTIONS
For UV overexposure of the eye, place a sterile dressing over the eye and get medical attention. For UV overexposure of the skin, apply cold water or ice to any skin burns and get medical attention.
SAVE THESE INSTRUCTIONS
HOUSEHOLD USE ONLY
KNOW YOUR HUVI
HUVI combines one-of-a-kind advanced cleaning technology with a powerful cordless vacuum. Harnessing the power of UV-C technology, medical grade filtration, and air purification, HUVI provides a multi-stage cleaning experience. Customize your cleaning with cordless operation and adjustable suction power with 3 speed settings. HUVI also features a built-in aroma diffuser you can use with your favorite essential oil to mists your home with refreshing fragrance.
UV FUNCTION
HUVI features UV-C lights in the dustbin that helps to disinfect the contents inside. The UV-C light's strategic location inside the dust bin increases the exposure time to more effectively help disinfect contaminants, which helps prevent pathogens from reentering the air when emptying the dustbin.
HEPA FILTER
HUVI features an H13 medical-grade HEPA filter. A normal HEPA-standard filter removes at least 99.97% of airborne particles with a size of 0.3 microns (µm) . Beyond this, HEPA filters are further classified by their level. A filter's HEPA level indicates its effectiveness removing all particles that are 0.2µm in diameter.
"True HEPA" filters on the market (H10-H12 grade filters) only trap 85 - 99.5% of all particles that are 0.2µm in diameter. A HEPA H13 filter, like the one in HUVI, traps 99.95% of such particles. They are within the highest tier of HEPA and are considered medical-grade quality, being utilized in hospitals, operating rooms and more.
| HEPA Grade | Filtration Efficiency |
| H14 | 99.995% |
| H13 | 99.95% |
| H12 | 99.5% |
| H11 | 95% |
| H10 | 85% |
BIPOLAR IONIZATION
HUVI features an advanced bipolar ionization system to deliver air purification while cleaning. Conventional air ionizers generate negative ions to remove particles from the air. HUVI uses a newer, more advanced
form of ionization that works by emitting a blend of positively and negatively charged ions. These ions of opposite charges attach to airborne particles, weighing them down to the floor to be picked up by HUVI. Bipolar ionization is used in hospitals, assisted living facilities, and more, for its effective air purification.
AROMA DIFFUSER
HUVI features a built-in aroma diffuser. Simply place a few drops of the aroma included or any essential oil of your choosing on the aroma pad and load it inside HUVI. While HUVI runs, the aroma is dispersed into the air, misting your home with soothing fragrance. Since the HUVI's diffuser works while it is moving, the aroma disperses wherever HUVI goes, expanding the range of coverage compared to a standard, stationary diffuser.
PARTS

- Power switch
- Handle
- Dust bin release button

- Dust bin bottom release button
- Tube release button
-
Tube
-
Motorized floor brush connector
- Display panel
- Aroma diffuser & Air exhaust
- Battery pack
- Dust bin
- UVC/ION control button
- Speed control button
- Charging adapter
-
Motorized floor brush release button
-
Motorized floor brush large wheel
- Motorized floor brush
- LED lights
- Battery pack release button
- Charging wall mount storage
- Combination brush
- Crevice tool
- Cleaning tool & blade tool
- Roller brush
- Motorized floor brush small wheel
LED DISPLAY PANEL
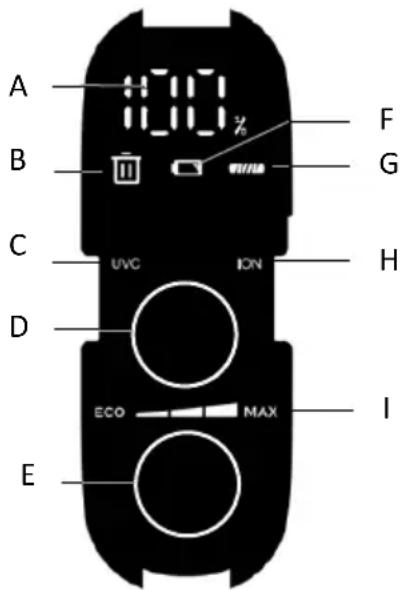
A. Battery power indicator (by percentage)
B. Clean the dust bin indicator
C. UVC Indicator light
D. UVC/ION control button
E. Speed mode button
F. Low battery reminder
G. Brush roll blocked indicator
H. ION indicator
- Speed mode indicator
i. Eco mode
ii. Normal mode
iii. Max mode
INDICATOR LIGHTS

- Ion Indicator
Light up when the ion function is on.
Turns off when ion function is off.
UVC Indicator
Lights up when the UVC function is on.
Turns off when UVC function is off
HEPA Indicator
- Flashes as a reminder to empty the dust bin and to clean the filters.
UVC/ION control button
When you power on your HUVI, the UVC light inside the dust bin and the air ionizer are on by default. Use the UVC/ION button to adjust:
- Press 1 time to disable the ionizer while leaving the UVC light enabled.
- Press 2 times to enable the ionizer while disabling the UVC light.
Press 3 times to disable both the UVC light and ionizer.
Press 4 times to reenable both UVC and ionizer again.
Note:
- When the power switch is off, the UVC light will continuously work 10 minutes before turning off automatically.
- Pressing the UVC/ION control button can control UVC function individually as long as there is sufficient battery power, even when main power switch is off or the vacuum is charging.
SPEED MODE BUTTON
Press speed mode button to switch between the 3 speed settings.

ECO

MEDIUM

MAX
| SPEED SETTING | APPROXIMATE RUN TIME |
| ECO | 40 mins |
| MEDIUM | 30 mins |
| MAX | 14 mins |
ASSEMBLY
- Align and insert the desired accessory to the tube until it clicks in place.
- Insert the tube into the main body. To detach, press and hold the corresponding release button before removing.
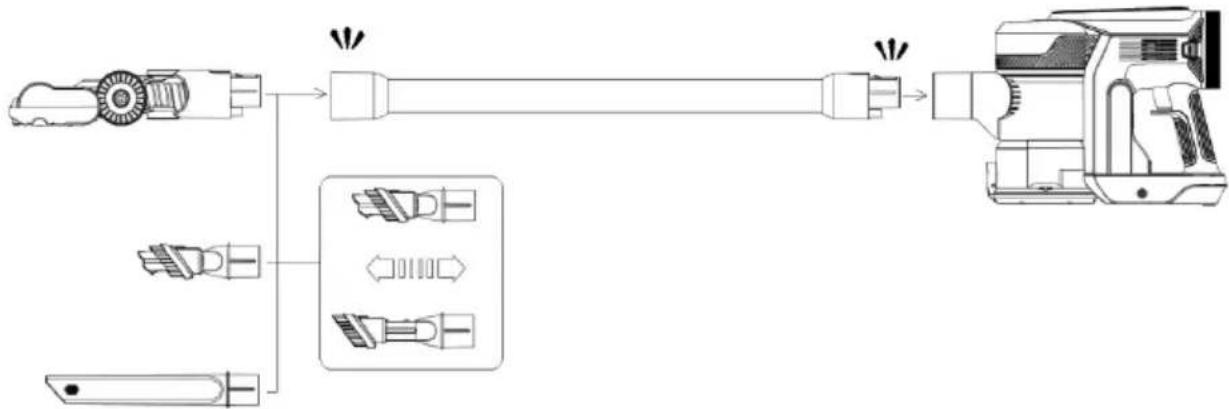
You can also use your HUVI in handheld mode by connecting the accessories directly to the main body.
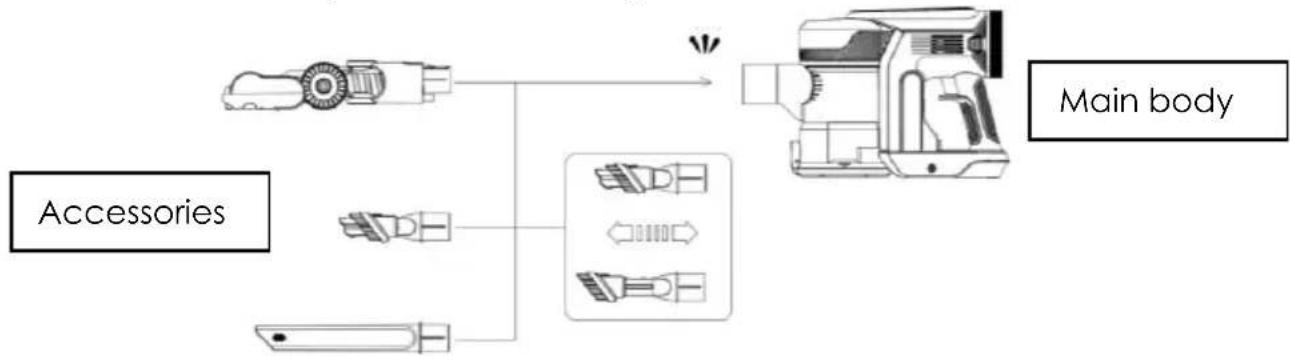
MOTORIZED CLEANER HEAD
Can be connected to the metal tube for cleaning floors or carpets.
CREVICE TOOL
For corners and other hard-to-reach places; can be connected to the metal tube to access higher ceiling.
COMBINATION BRUSH
Can be switched into a brush or a wide crevice tool; suitable for fabric surfaces or corners.
CLEANING BRUSH & BLADE TOOL
Use the end with the brush to clean the dust bin and the floor brush, as required. Use the end with the small blade to remove hair and debris wrapped around the roller.
CHARGING
METHOD 1
Insert the battery pack into the main motor; insert the power plug into the battery pack; connect the power adaptor with the power supply.
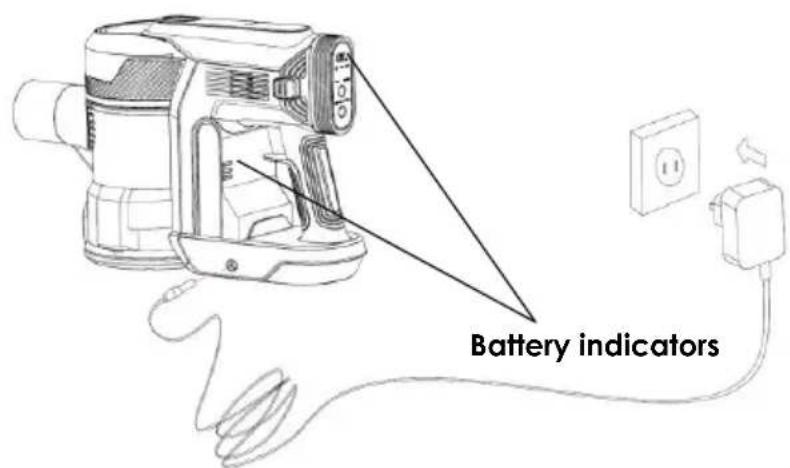
METHOD 2
Detach the battery from the main body and charge the battery directly.

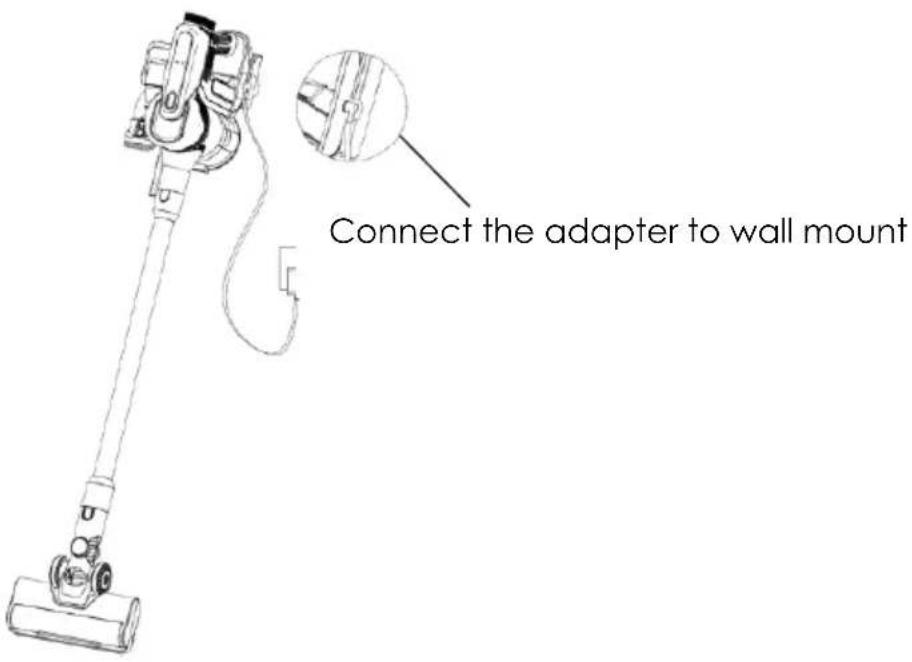
METHOD 3
Charge the battery directly on the wall mount by aligning the back of the main body with the charging pins on the wall mount.

Charging pins
Once in place, connect the charging adapter to the wall mount.
INDICATOR LIGHTS
Indicates battery power with 3 solid lights. The number of lights decreases as battery power is used.
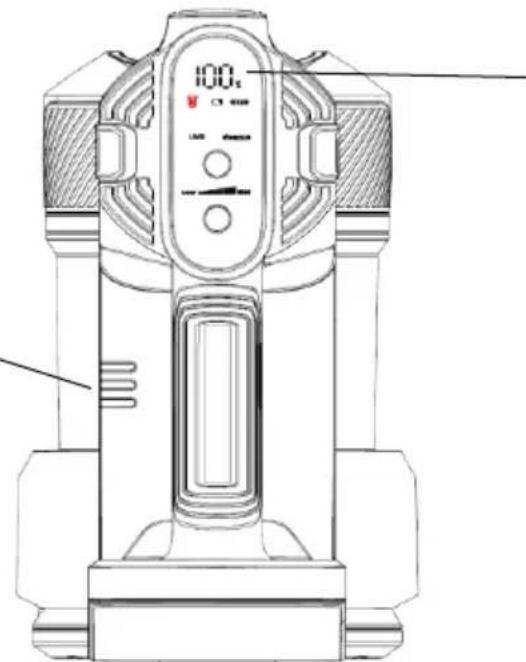
Indicates battery power remaining by precise percentage.
NOTE:
- The machine cannot be turned on during charging
- Charge the battery only with the adaptor provided by Kalorik.
- If you do not plan on using the battery for a prolonged time, please store it in a cool dry place and ensure that the battery has been half charged.
OPERATION

NOTE: Please check if the battery power is sufficient before operating. You can connect the adapter to the main unit (D) to charge the product. Make sure you have chosen your desired attachment and have assembled the product your cleaning needs.
- Press the power switch (A) once to turn on the main unit and the motorized brush. Press the button twice to turn off the motorized brush. Press three times to turn the main unit off.
- Press speed control button (B) to adjust to the desired level.
- Empty the dust bin when done by pressing the release button (C).
NOTE:
- Turning off the Operating at the max setting for a prolonged time may result in hot air expelling from the air vents on the main body. This is normal and is intended to protect the motor from overheating. If the hot air is bothersome, reduce the speed setting or turn the unit of to allow to cool.
AROMA DIFFUSER
- HUVI has an aroma diffuser compartment, located above the vent on the side of the vacuum.
- To access the aroma diffuser compartment, press the Aroma Diffuser button on both sides, then pull out the tray holding the aroma pads.

- Place a few drops of the aroma included with HUVI or an essential oil of your choice on the pads within.
-
Reinsert the tray into the aroma diffuser compartment until it clicks in place.
-
The diffuser will disperse the aroma whenever the HUVI is running, until the oil is used up.
REPLACING PADS
- Pull each side pad out from the tray, then replace with new ones until they click in place to the tray. NOTE: you can use the presented pads included with HUVI or use one of the unscented pads with any essential oil of choice.
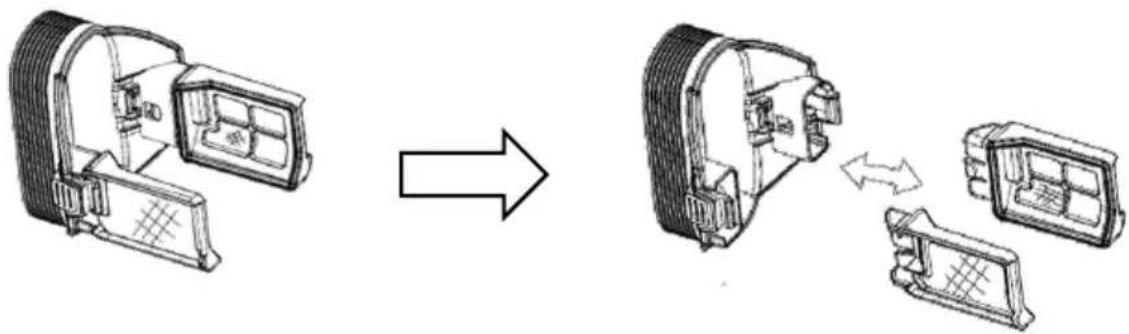
- Once the new pads are in place, insert the tray back into the main body.
NOTE:
- When using your own essential oils with the aroma pads, it is recommended to use 3 to 4 drops.
- Do not reuse or clean aroma pads when they are fully saturated. Replace with fresh pads. Reusing saturated pads may result in excess moisture and potentially damage the unit.
CLEANING AND MAINTENANCE
CLEANING THE BODY
Please turn off the vacuum before cleaning. Wipe the surface with a clean cloth; make sure not to get any water in the inner part of the vacuum. Do not place the vacuum under direct sunlight or in wet places after cleaning.
CLEANING THE DUST BIN
Make sure to empty the dust bin regularly or when the debris in the dust bin reaches the MAX line, as outlined in the OPERATION section.
CLEANING THE FLOOR BRUSH
Unlock the latch on the underside of brush head, then remove the side cover and take out the roller brush to clean. Use the cleaning brush & blade tool to remove or cut any debris on the brush.
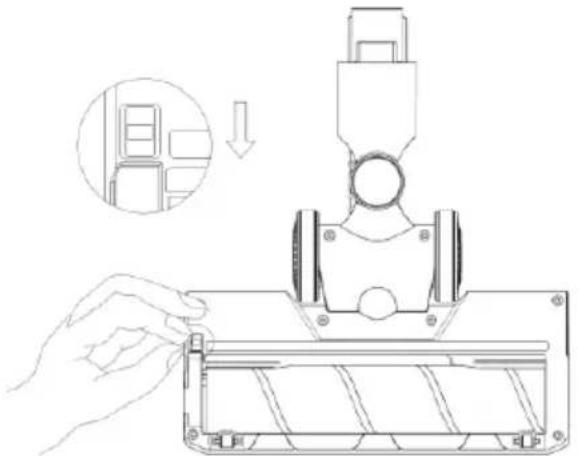
NOTE: If necessary, you can remove the side cover of the roller brush to remove any stubborn debris.
CLEANING THE STRainer AND MAINTAINING THE FILTER
Hold the main body, then press the button on top to detach the dustbin cover. Rotate the top dust bin cover to open by following the lock and unlock silkscreen for reference, then remove the stainless steel strainer and HEPA filter.
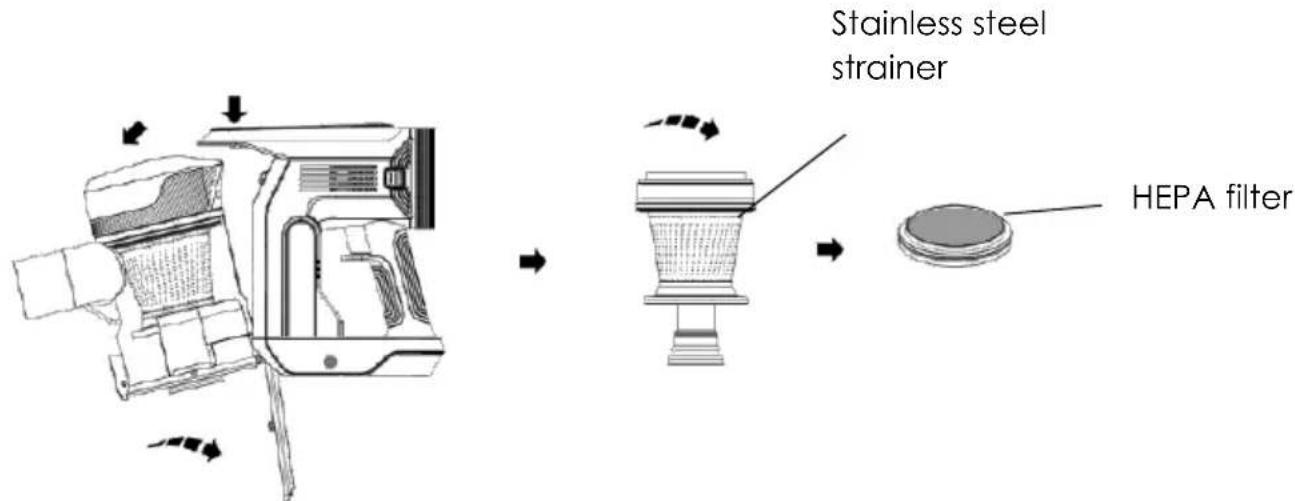
The arrows on the top of the dust bin show how to disassemble and reassemble as shown below.

NOTE:
-
The stainless steel filter should be cleaned with cool water at least every month.
-
Ensure the strainer and filter are completely dry before reassembling.
-
The HEPA filter should not be cleaned with water and should be replaced every 6 months.
AVAILABLE ACCESSORIES
Enhance your HUVI experience with the accessories outlined in this section, available for purchase on Kalorik.com.
| ITEM NUMBER | KIT | INCLUDES |
| VCP 51964 | Filter Replenishment Kit | 2x Filters 4x Sets of aroma pads |
| VCP 51965 | Flexibility Kit | 1x Folding tube 1x Flexible hose 1x Upholstery tool |
| VCP 51966 | Pet Care Kit | 1x Pet grooming tool 1x Mini power brush 1x Flexible hose |
| VCP 52014 | Battery and Charging Adapter | 1x Battery pack 1x Charging adapter |
| ISSUE | POSSIBLE REASON | POSSIBLE SOLUTION |
| Machine stops working or doesn't work | Low battery or no battery power | Charge the battery |
| There is a blockage | Remove the blockage | |
| Roller brush is tangled by hair | Clean the roller brush. You can also remove the side covers of the roller to remove the tangled hair | |
| Roller brush stops spinning | Roller brush is tangled by hair | Clean the roller and also remove the side covers if the roller to remove the tangled hair |
| Weak suction power | Dust bin, strainer or filter is full of dust | Clean the dust bin, strainer or filter replace the filter if necessary |
| The strainer or filter are not properly installed | Install the strainer and filter | |
| There is blockage or the roller brush is tangled by hair | Remove the blockage | |
| Abnormal motor sound | There is blockage | Remove the blockage |
| Battery cannot be charged | Wrong adaptor is used | Make sure to use the correct adaptor offered by Kalorik |
| Connection between power cord power cord and battery is loose | Make sure the power cord is plugged tightly | |
| Hot air expels from the main unit | This is a result of operating at the max setting for a prolonged period of time. This is normal and is intended to safely protect the motor from overheating. | Reduce speed to a lower setting or turn the unit off. Please note, continuing to operate at max speed is safe. |
If additional assistance is needed, please contact our Customer Assistance at 1-888-525-6745.
We suggest that you complete and return the enclosed Product Registration Card promptly to facilitate verification of the date of original purchase. However, return of the Product Registration Card is not a condition of these warranties. You can also fill out this warranty card online, at the following address: www.KALORIK.com
This KALORIK product is warranted in the U.S.A. and in Canada for 1 year from the date of purchase against defects in material and workmanship. This warranty is not transferable. Keep the original sales receipt. Proof of purchase is required to obtain warranty performance.
During this period, if the KALORIK product, upon inspection by KALORIK, is proven defective, it will be repaired or replaced, at Kalorik's option, without charge to the customer. If a replacement product is sent, it will carry the remaining warranty of the original product.
This warranty does not apply to any defect arising from a buyer's or user's misuse of the product, negligence, failure to follow KALORIK instructions noted in the user's manual, use on current or voltage other than that stamped on the product, wear and tear, alteration or repair not authorized by KALORIK, or use for commercial purposes. There is no warranty for glass parts, glass containers, filter basket, blades and agitators, accessories outlined in this manual, and accessories in general. There is also no warranty for parts lost by the user.
ANY WARRANTY OF MERCHANTABILITY OR FITNESS WITH RESPECT TO THIS PRODUCT IS ALSO LIMITED TO THE ONE YEAR LIMITED WARRANTY PERIOD.
Some states do not allow limitation on how long an implied warranty lasts or do not allow the exclusion of incidental or consequential damages, so the above limitations may not apply to you. This warranty gives you specific legal rights, and you may also have other rights which vary from state to state.
If the appliance should become defective within the warranty period and more than 30 days after date of purchase, do not return the appliance to the store: often, our Customer Service Representatives can help solve the problem without having the product serviced. If
servicing is needed, a Representative can confirm whether the product is under warranty and direct you to the nearest service location.
If this is the case, bring the product, or send it, postage prepaid by the user (all Kalorik customers are responsible for the initial shipment back to the warranty center), along with proof of purchase and a return authorization number indicated on the outer package, given by our Customer Service Representatives. Send to the authorized KALORIK Service Center (please visit our website at www.KALORIK.com or call our Customer Service Department for the address of our authorized KALORIK Service Center).
When sending the product, please include a letter explaining the nature of the claimed defect.
If you have additional questions, please call our Customer Service Department (please see below for complete contact information), Monday through Thursday from 9:00am - 5:00pm (EST) and Friday from 9:00am - 4:00pm (EST). Please note hours are subject to change.
If you would like to write, please send your letter to:
KALORIK Customer Service Department
Team International Group of America Inc.
16175 NW 49th Avenue
Miami Gardens, FL 33014 USA
Or call:
Toll Free: +1 888-521-TEAM / +1 888-KALORIK
Only letters can be accepted at this address above. Shipments and packages that do not have a return authorization number will be refused.
REEMPLACEMENT DES COUSSINETS
ACCESSIONS DISCONTINUES
Team International Group of America Inc.
16175 NW 49th Ave.
Miami Gardens, FL 33014 USA
© 2022 All rights reserved.
User manual content and recipes courtesy of Team International Group - Do not reproduce without consent of the authors.

- LEARN MORE ABOUT YOUR PURCHASE
- TECHNICAL SPECIFICATIONS
- HOUSEHOLD USE ONLY
- KEEP OUT OF THE REACH OF CHILDREN
- FOR INQUIRIES, PLEASE CONTACT
- PRECAUTIONS
- DIRECTIONS FOR USE
- FIRST AID INSTRUCTIONS
- SAVE THESE INSTRUCTIONS
- KNOW YOUR HUVI
- UV FUNCTION
- HEPA FILTER
- BIPOLAR IONIZATION
- AROMA DIFFUSER
- PARTS
- LED DISPLAY PANEL
- INDICATOR LIGHTS
- UVC/ION CONTROL BUTTON
- SPEED MODE BUTTON
- ASSEMBLY
- MOTORIZED CLEANER HEAD
- CREVICE TOOL
- COMBINATION BRUSH
- CLEANING BRUSH & BLADE TOOL
- CHARGING
- METHOD 1
- METHOD 2
- METHOD 3
- NOTE
- OPERATION
- REPLACING PADS
- CLEANING AND MAINTENANCE
- CLEANING THE BODY
- CLEANING THE DUST BIN
- CLEANING THE FLOOR BRUSH
- CLEANING THE STRAINER AND MAINTAINING THE FILTER
- AVAILABLE ACCESSORIES
- KALORIK CUSTOMER SERVICE DEPARTMENT
- REEMPLACEMENT DES COUSSINETS
- ACCESSIONS DISCONTINUES
Brand : KALORIK
Model : HUVI S1
Category : Vacuum Cleaner