
21836 - Lawn mower TORO - Free user manual and instructions
Find the device manual for free 21836 TORO in PDF.

User questions about 21836 TORO
0 question about this device. Answer the ones you know or ask your own.
Ask a new question about this device
Download the instructions for your Lawn mower in PDF format for free! Find your manual 21836 - TORO and take your electronic device back in hand. On this page are published all the documents necessary for the use of your device. 21836 by TORO.
USER MANUAL 21836 TORO
Model No. 21836 —Serial No. 326000000 and Up
Model No. 21836T —Serial No. 326000000 and Up
Model No. 21843 —Serial No. 326000000 and Up
Model No. 21843T —Serial No. 326000000 and Up
Model No. 21844 —Serial No. 326000000 and Up
Model No. 21844T —Serial No. 326000000 and Up
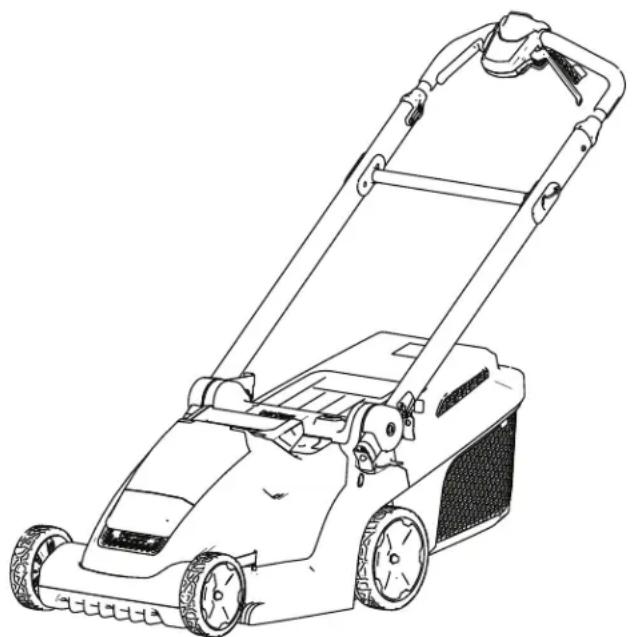
natural_image
Line drawing of a lawn mower with visible blades and handle (no text or symbols)
For assistance, please see www .T oro.com/support for instructional resources or contact your Authorized Service Dealer before returning this product.
Whenever manufacturer an Authorized
Customer numbers the location product.
Service and of your product of the model W rite the numbers
Do not tamper with or machine, and check Do not attempt to adjust speed control; doing operating condition,
This product complies directives; for details, specific Declaration
Important:
scan the disable equipped) proper their product or tamp
so 1 may resulting with please of Conformity
W ith your safety code devices on to access information with the create an unsafe in personal in (DOC)
Figure 1
- Model and serial number
Introduction
This rotary-blade, to be used by residential primarily for cutting on residential properties. brush or for agricultural Flex-Force® 60V Power lithium-ion packs. These battery charged only by Flex- chargers. Using these products intended use could bystanders.

Safety-Alert
Force The packs safety-alert are manual messages
designed symbol 60V on lithium-ion machine that you must other that to you
Models 21836T, 21843T a battery or a charger

g000502
, and Figure 21844T 2 do Safety-alert symbo
Read and injury operating this maintain and this information your product the product V isit www .T oro.com safety tips, training help finding a dealer
carefully to learn how product properly and symbol to damage safety-alert ou are responsible that alerts you and to unsafe is followed by the word CAUTION more information, materials accessory DANGER indicates your product. which, register not avoided, injury . W ARNING indicates which, if not avoided, injury . CAUTION indicates a which, if not avoided, injury . This manual uses two information. Important
© 2026—The
81 1 1 L yndale
Bloomington,
T oro®
A venue
MN
Company
South 2
55420
Contact
Printed
All Rights
at w
in
Reserv
mechanical information and Note emphasizes general information worthy of special attention.
Safety
General W arnings
Machin
Contents
| Safety-A Alert Symbol | |||||||||
| General Lawn Additional Safety Setup 1 Mounting (Optional) 2 Assembling Product Specifications Before Installing Adjusting During Starting Using Adjusting Recycling Bagging Shutting Removing Machine Operating After Charging Cleaning Folding Storing Position Maintenance Lubricating Replacing Preparing Recycling Storage Service T roubleshooting | |||||||||
| C. | Do not conditions. | expose | W | pater | |
| will | increase | the | risk | ||
| D. | Do cord the heat, Damaged risk | not for power oil, | abuse carrying, tool, sharp or | entangled shock. | |
| E. | When | operating | |
| use | an | extension | |
outdoor use. Use of a cord suitable for outdoor use reduces the risk of electric shock.
4.
Power tool use and
| F. | If operating location current | a power is unavoidable, device (RCD) |
| Use of an shock. | RCD reduces |
A.
Do not force the correct power tool
The toolcorrect in a damper better use and a residual at designed protected supply
B.
Do the risk use of electric the po
does not turn it on that cannot be controlled
dangerous you are and doing must
Personal safety
| A. | Stay | alert, | watch | |
| use | common | ser | ||
| power | tool. | Do | ||
| you | are | tired | or | |
| drugs, | alcohol | |||
| of | inattention | while | ||
| may | result | serious | ||
C.
| when | disconnect | operating | the |
| use | a | power | and/or tool |
| source | the | if influence | dete |
| pack, | before | detachable | A |
| dication. | power | making | moment |
| tool | personal | such | accessories, tools |
| erating | preventative |
| B. | Use | personal | |
| Always | wear | eye | |
| equipment | such | ||
| safety | shoes, | hard | |
| protection | used | ||
| will | reduce | personal |
| protective | reduce | the | equipment | risk | of | st |
| proteactive | dentially | Protective | ||||
| as | D. a | dust | mask, | idle | non-skid | |
| hat | store | or | hearing | power | ||
| for | of | children | and | do | ||
| appropriate | conditions | the | ||||
| unfamiliar | with | oper | ||||
| instructions | to |
| C. | Prevent | unintentional | ||
| the | switch | is | in | |
| connecting battery tool. | pack, Carrying | to | pic pow | |
| on have | the switch | or | ||
| the switch | ||||
| Power | startings. | are | Edsunge | |
| OFFrained | position | users. | before | |
| E. | Maintain up | or for carrying | and/or power | misalignment, finger |
| moving | with parts, | your tools | breaka | |
| ng | any | power | condition | |
| invites | accidents. | operation |
| D. | Remove | any | ||||
| before | turning | |||||
| wrench | or | a | key | |||
| part | of | the | power | |||
| injury | ||||||
| g | the | powerkey | or | tool | wrench | repair |
| power | ents | tool | are | on. | caused | |
| attached | power | tools | to | a | rotating | |
| may | F | result | in | personal | ||
| Keep | F | cutting | in | personal | ||
| E. | Do not | overreach. | ||
| footing | and | balance | ||
| enables | better | co | ||
| unexpected | situation | |||
| G. | Use | the | power | power | to |
| easier of | at all the | times to power | control. | This tool | le |
| F . Dress clothing clothing clothes, in moving | properly or jewelry away jewelry parts. | . Do from or long |
| tool not bits | etc. | in | accor |
| instructions, | wear | loose | taking |
| working | your | hair | an |
| be moving | performed. | parts. | Loos |
| operations | can | be | caught |
| could | result | in | a hazard |
| G. | If devices connection collection connected dust collection hazards. | are of facilities, and | provided dust properly can reduce |
| Slippery | Keepextraction | clean | forhandles | theandthese | andfreeare |
| not | allow | used. | handles | Use | al |
| the | dust-related | in | for | safe | ha |
| tool | unexpected |
| H. | Do not let familiarity | ||
| frequent | use | of | |
| become complacent safety | principles. | ||
| cause | severe | injury | |
| second. | |||
| gained | from | |||
| tools and ignore | allow | you | to | |
| tool | ||||
| A careless within | action | car of | ||
| a fraction | ||||
5. Battery tool use and care
A. Recharge only with the charger specified by the manufacturer. A charger suitable for one to create a risk of fire battery pack.
B. Use power tools designated battery packs other battery packs injury and fire.
C. When battery it away from other paper clips, coins, or other small m make a connection to another . Shorting together may cause
D. Under abusive ejected from the If contact accidentally with water . If liquid additionally seek ejected from the or burns.
E. Do not use is damaged modified batteries behavior resulting of injury
F . Do not expose fire or excessive to fire temperature may cause a
G. Follow all do not charge outside the in the instructions. at temperatures may damage risk of fire.
6. Service
A. Have a qualified identical ensure that maintained. your power repair replacement that the
B. Never service Service of battery be performed by authorized service
Lawn W that arnings
Do of nobattery operate pack themay comelitions. used with This another shock.
- Do only not with use the specifically lawn conditions packs. Use especially any lightning may create This a risk of by lightning.
• Thoroughly is not in use, keep to the metal lawn by objects, lawn screws that inspect can injured keys, nails, that used stick, mower from sticks, the battery, terminals thrown burns objects a fire. can c
• Before conditions, inspect assembly, damaged contacts the help grass eyes, which catch deterioration. may cause A work may increase the risk
• Keep working modified. • guard may correctly fire, • Keep a battery overheating temperature. • While above non-slip operation • keep all cooling air inlets or risk exposure (265°F) to protective lawn move
wearing instructions open sandals. and of battery to packe feet or toolm re blade. range specified • While Charging operating improperly the outside long trousers. specified Exposed ra battery and of increase from likelihood
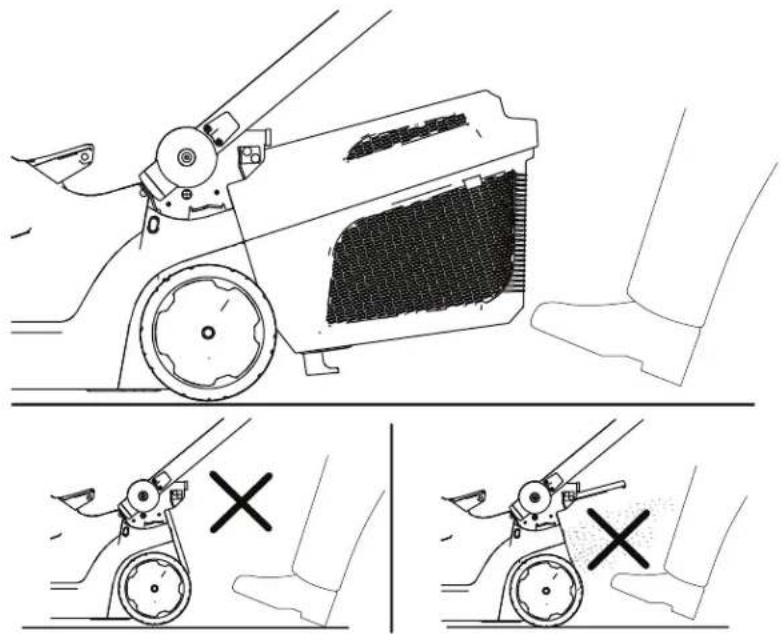
- Do not operate the W alk, never run. This and tool falling serviced which may - Person not operating on the steep parties. This This will reety control, of the slippingwer and personal injury
When working battery on packs.
your footing should always
the slopes manufacturer never up or
caution when changing
the risk of loss of control,
may result in personal
Use extreme caution
the lawn mower towards
of your surroundings. This reduces the risk of tripping during operation.
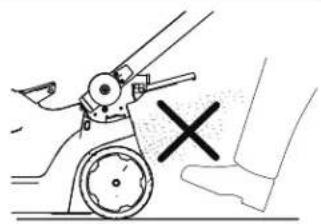
- Do not touch blades and other hazardous
| moving reduces | parts the risk | while of injury |
| When the lawn are off | clearing mower and the battery | |
| Unexpected result | in serious operation personal | |
- Charge the battery area only.
- Do not expose a batt they charger are still fire in motion 68°C from (154°F) moving parts.
- Follow material all charging or cleanir not sure charge all power the battery sw the pack temperature is disconnected. rang of the lawn mower. Otherwise, the injury battery pack and
Additional
1. T raining
• The operator of the for any accidents or others or their property
- Do not allow children the machine, battery charger; local regulations age of the operator.
- Do not allow people sensory, or mental cap experience and knowledge machine, battery pack, unless they receive in on using it safely and involved while using
- Before charging cautionary using the battery, read all the markings
2. Preparation
- Replace any damaged
• Use only the battery Using other accessories may increase the risk - Plugging the battery that is not of the proper fire or electric shock. connection, use an of the proper configuration outlet if needed.
- Do not use a damaged pack or battery charger unpredictable explosion, or risk of
• If the supply cord to damaged, dealer to contact replace it.
- Do not use non-rechargeable
- Charge the battery charger specified by for one type of battery of fire when used with
3. Operation Safety Keep
- Disengage machine is responsible before hazards occurring - Prevent unintentional the electric-start button to use or before play with Montana, Montana, Montana and pack, handling or the battery connected to the machine. - Stop the machine, button, reduced remove the physical, machine, capabilities before servicing or without or damage to use the or other edge. Remove battery the charger instruction from or the supervisory machine is understood it unattended the hazard accessories.
Do not pack direct and the battery disc instructions A void and dischargir a on wall these or obstructions. toward you. Stop the gravel surfaces. or unreadable
- W pack atch for holes, by ruts hidden and objects. Uneven you of injury lose attachments and your fire. balance
- If charger machine into an strike outlet vibrate voltage immediately cause remove a dif the rent electric-style attachment battery pack, adaptive to stop before the power mining damage. Make all resuming or modified operation. battery
- Stop, which the machine exhibit electric-stall that results button in fire injmachine. for hauling.
- the Under battery abusive charger condition an may Authorized subject liquid; Service avoid accidently come into flush with water batteries. If t eyes, seek medical pack with only the battery from or to the A charger suitable burns. may create a pack another battery pack
4. Maintenance and Storage
- Stop the machine, remove the electric-start button, remove the battery pack from the machine, and wait for all movement before servicing
• Do not as indicated Authorized on the parts.
• Sharpen maintain ensure - When
blade ca
source
• For best replacement replacement be dangerous, product warranty - Maintain sharp and performance. free from
place and
or
sharp. Use identical only .
• Unless Authorized cleaningdamaged
indicated Service the machine.
repair When the instructions.
the machine battery from have one
Dealer, perform nails, service a a identification replacement Shorting the battery terminals may burns on both or a sides. to
GleanCheck the the blade blade and and frequently for tightness.
- blade be aware A mistrea even though a risk the of fire present not disassemble the heat use the only battery genuine pack and/or in parentheses. it. Replace and accessoriesa genuine could oro suenother use tyeld of volbattersy fire or explosion. Kee
of the reach of children packaging and cutting until you safest best - handles not dispose, clean, of t cell keep explogards in possible. Keepspecial blades disp
Safety
and
Instructional

Safety of potential
decals
and danger
instructions . Replace
are easily any decal
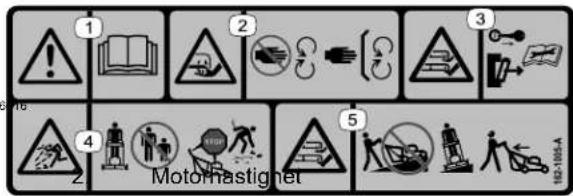
| Battery or Charger Symbol | Explanation | ||
 | Read the Operator's Manual | ||
 | Contact your local municipalityDealer or distributor for more recycle the battery. | ||
134-6016
decal134-6016
- Engine
speed—sloEngine
speed—fast
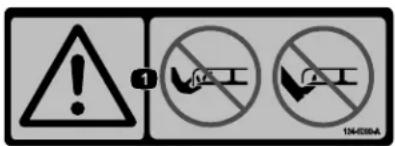
134-5099
decal134-5099
- W
arning—keep
hands

134-5297
decal134-5297
- Max Power Mode

natural_image
Pure electrical circuit lines without any symbols161-3764
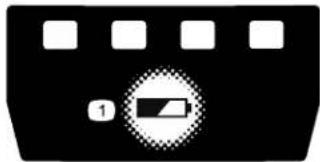
decal161-3764
- Battery charge status

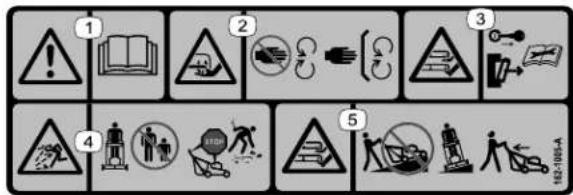
162-1005
-
Warning—read the Operator's Manual.
-
Thrown object hazard—keep bystanders away; shut of f the engine before leaving the operating pick up any deb mowing.
-
Cutting/dismemberment hazard of hand, blade—stay moving parts; guards and place.
-
Cutting/dismemberment mazard of hand or move awaylade—do from operatekeep allp and slopeids operate to side on slopes; behind you whe in reverse.
-
Cutting/dismemberment hazard of hand or foot, mower blade—remove the key, remove the battery pack, and read the Operator's Manual before performing maintenance.
Setup
Important:
the first
time,
The
refer
battery
to
pack
Charging
is
not
the
fully
Battery
Note:
ensure
The
that
safety
you
key
remove
and
[Non-Text]
of
her
from
loose
the
parts
compartme
1
Mounting Charger
2
the semblin battery (Optional)
Parts
needed
for
this proc
Parts
needed
for
this
| 2 | Mounting hardware | (not included) |
| procedure | Upper | handle | assembly |
| 2 | Bolt | ||
| 2 | Locknut |
Procedure
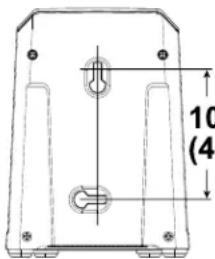
If desired,
wall using
the charger
mount
the
the
wall-mount
Mount
near
Refer
charger
Slide
hardware
not included).
it indoors
power
Figure
(such
outlet,
3 for
charger
to
secure
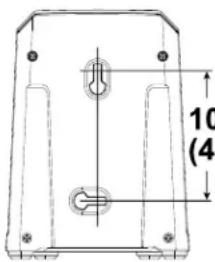
Figure
101.6 mm (4 inches)
g290534
3
Procedure
battery
Important:
charger
key
holes
plastic
sheet
plastic or
ic
as
wrapping
gârage
aNote:
out
Removethe
assembly
assistance
manufactu
lower
in
securely
Remoye
that
on
or
other
the r
reach
the
ofubbe
[Non-Text]
in
[Non-Text]
mounting handling
to
prevent
the
appropriately
th ⚠️ W ARNIN
Folding
can
damage
or
unfolding
the
cables
operating
condition.
Do
unfolding
damage
[Non-Text]
the
the
handle.
• If
Authorized
is
damaged,
Service Dealer
1.
Install
handle
as
the
and
upper
secure
in
Figure
handl
it
4
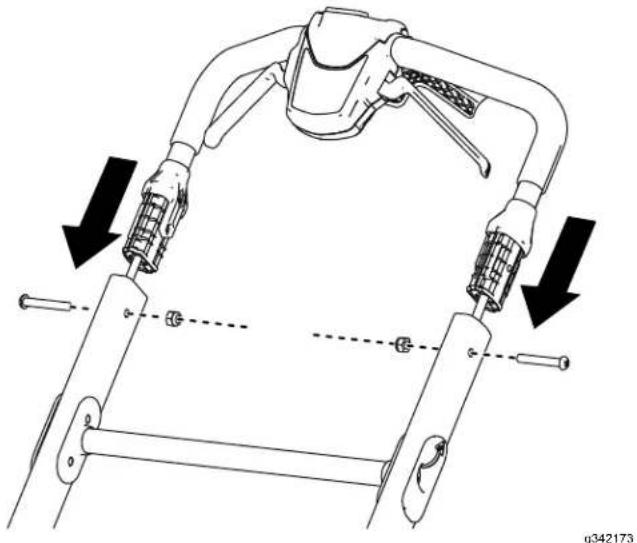
natural_image
Technical diagram of a robotic arm with multiple joints and directional arrows indicating movement or assembly (no text or symbols present)Figure 4
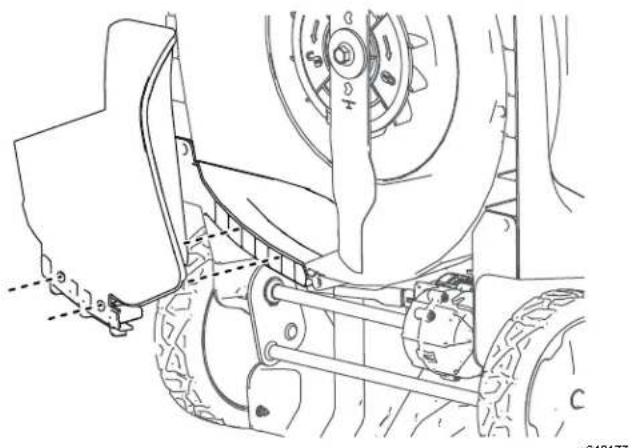
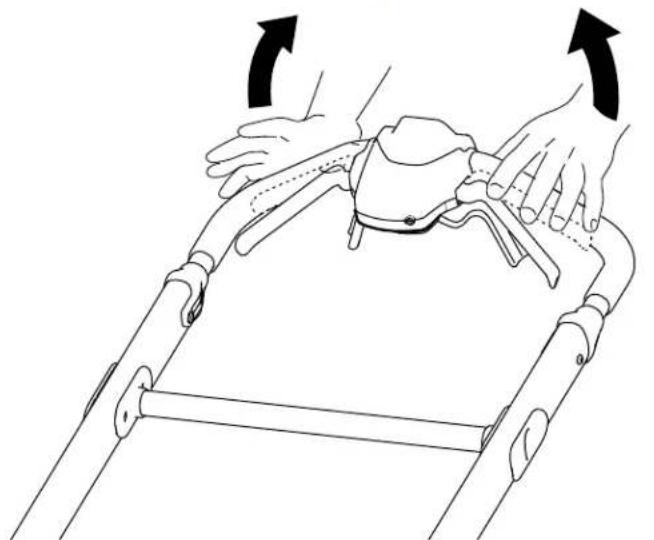
- Pull the handlebar release brace toward the upper handle to release the handle lock (Figure 5).
- Move the handle position and let go brace ( Figure 5 ).
Note:
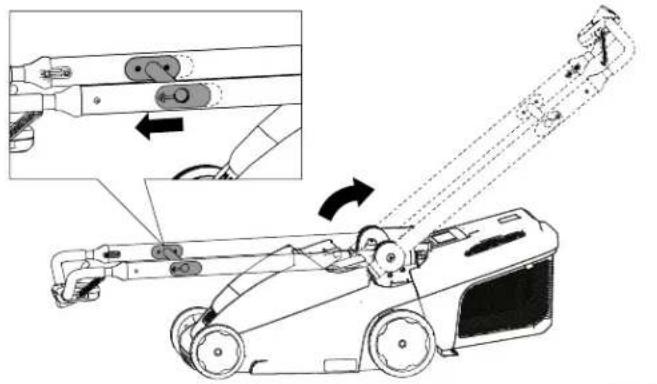
Figure 5
rearward to the operating of the handlebar release
the
handle
clicks
into
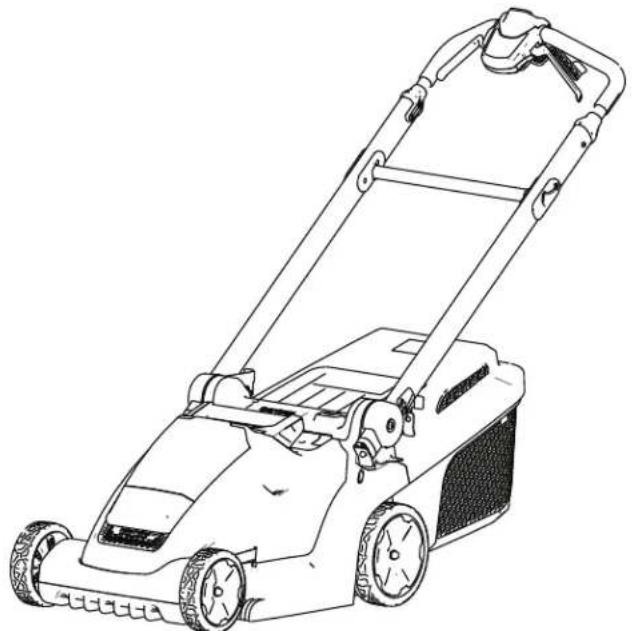
Product Overview

Figure 6
- Battery compartment
- Self-propel drive handles (Model 21844 only)
- Rear deflector 7. Grass box full indicator
- Handlebar release brace
- Grass box
- Blade-control handles
- Height-of-cut
- Handlebar
- Height-of-cut window

g342171
Figure 7
- Battery 86902PPK Models 21844)
charger McBlettery \$3625
21836, Model 21843, 21836)
- Battery 88941PPK Models
pack Model (included
21843 and 21844)
pack Mode
81602549E1K
wit
with
[Non-Text]
m = 311
1
with*Charging
^h Charging
battery
The Ground Truth image displays a single, solid horizontal line. According to Rule 2 (UNDERSCORE & LINE RULES), if the GT contains lines used for stylistic emphasis or as background elements (like ruled paper), the OCR result must ignore them. The provided OCR content is "____", which consists of four underscores. This is incorrect because underscores are not equivalent to a solid line and are not permitted under the “Stylistic/Background Lines (Ignore)” rule. The OCR has hallucinated underscores where none should exist in the GT, violating the “Stylistic/Background Lines (Ignore)” rule. Therefore, the OCR result is inconsistent with the Ground Truth.
Store
in
[Non-Text]
[Non-Text]
[Non-Text]
[Non-Text]
[Non-Text]
[Non-Text]
一
Specifications
| Model | (without battery) | Wengtight | idtha | He |
| 21836/T | 20.2(44.5) | kglb)inches) | 130.6(1654.4 inches) | cm(42.2 inches) |
| 21843/T | 22.1(48.7) | kglb)inches) | 136.2(1653.6 inches) | cm(42.7 inches) |
| 21844/T | 24.0(52.9) | kglb)inches) | 136.2(1653.6 inches) | cm(42.7 inches) |
41
48
48
SmartStow
Dimensions
| Model | Length | ||
| 21836/T | inches) | 41.7 .2 inches) | cm1 13. (16.2cm (44.7 |
| 21843/T | inches) | 48.5 .0 inches) | cm1 14. (18.1cm (44.9 |
| 21844/T | 41. 0 (16.1 inches) | c48.5 | cm1 14. (19.1cm (44.9 |
W id1
inches)
inches)
inches)
Battery
Pack
| Model | 88 | 925PPK | |||
| Battery deck indicator | capacity | 2.5 | Ah | 5.0 | |
| 135 | Wh | 270 | Wh | ||
| Battery actual voltage | manufacturer varies with load. | ||||
Af
ting
Battery
Charger
| Model | 86902PPK | |
| T ype | 60V | MAX Lithium-Ion |
| Input | 100 to 240V AC | |
| Output | 60V MAX | |
50/60F
C
Appropriate
T emperature
| Charge/store at | 5°C the (41°F) battery | |||
| n (included use and | the | battery pa | 30°C | at (-22°F) |
| Use | the | machine | 0°C | (32°F) |
to 40
t
to 49
increas
range.
batter
(
Operation
Note: Determine the left and right sides of the machine from the normal operating position.
Before Operation
Installing the Battery Pack
| Important: | Operate | the | battery | pack | only | ||||
| to | Specifications | (page) | 1 | 1). | |||||
| 1. | Ensure | that | the | safety | key | is | not | installed | |
| 2. | Ensure | that | the | vents | on | the | battery | are | |
| 3. | Lift up | the | battery-compartment | (A of | |||||
| 4. | Line compartment | up the | cavity until | in it | the locks | battery into | pack place | (B of | |
| 5. | Close | the | battery-compartment | (C of | |||||
| Note: | If the | battery-compartment | does | ||||||
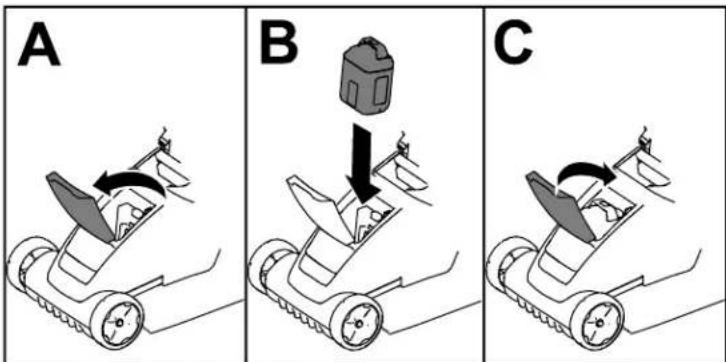
Figure
8
g341293
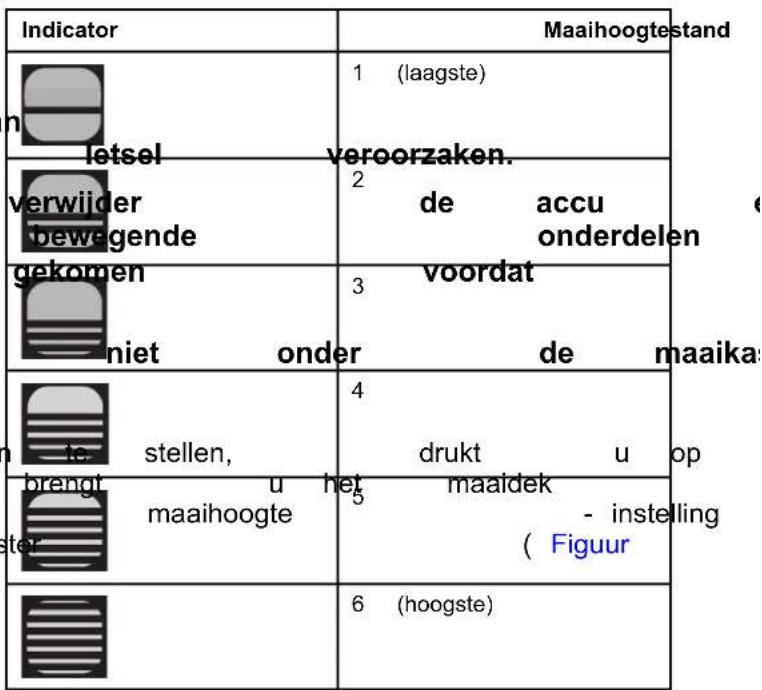
Adjusting the Cutting Height
⚠️ W ARNING
Adjusting the height-of-cut could bring your hands into contact with a moving blade and result in serious injury.
| Shut wait adjusting | off for | the all | motor moving the cutting |
| Do when | not | put adjusting | your |
| T o adjust height-of-cut the desired height-of-cut | the | cutting button height-of-cut window |
Figure 9
- Height-of-cut button
| Indicator | Height of Cut |
 | 1 (lowest) |
 | 2 |
| parts height. | to the battery to stop before |
| HMare ting under height. | |
 | |
| 5YXA] raise press down or lower the setting is shown gure 9). | |
 | 6 (highest) |
- Height-of-cut view window
During Operation
Starting the Machine
- Ensure that the battery pack is charged and installed in the machine; refer to Installing Battery Pack (page
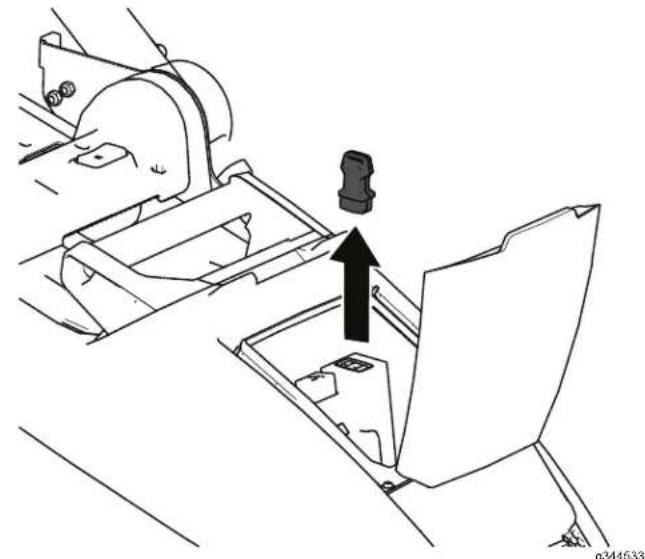
- Install the safety
natural_image
Technical line drawing of a mechanical assembly with a downward arrow indicating a component (no text or symbols present)Figure 10
- Press upper
the handle
Power
to
turn
- Squeeze machine.
the
blade-control ^2
24
MAX
3.
Self-propel
Using the Sel Model 21844/T
- T o adjust the speed self-propel control - T the engage the self-propel drive hand key hold to the machine (Figure) (Figure) - T o disengage the se self-propel drive hand
Note: T o reduce the speed control to the le the right.
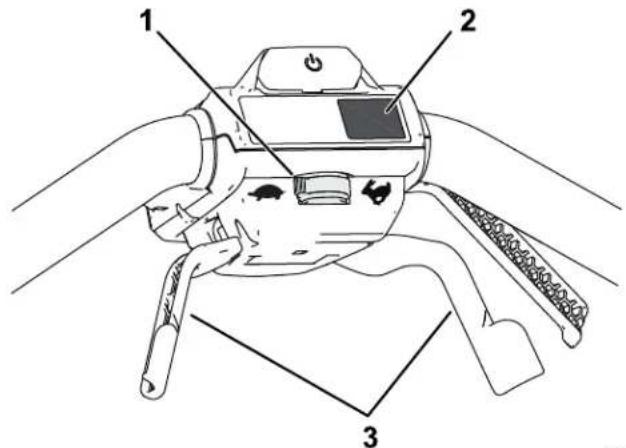
g342174
Figure 12 at the center of machine. speed control button handles to drive handles
natural_image
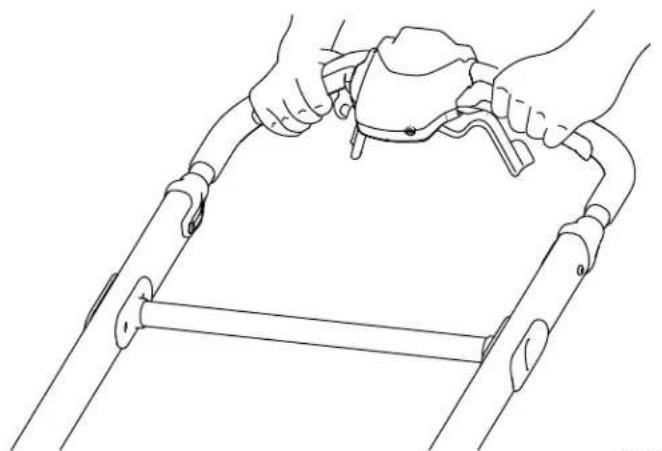
Line drawing of hands holding a tool on a metal frame (no text or symbols)Figure 1 1
Adjusting th
This machine has 2 blade and M AX .
- When adjusted changes the blade maintain set to R unSMART automatically in cutting speed and increases quality of cut. - When the highest set to the M AX at press machine the to M AX button speed
Recycling the Clippings
Y our machine comes from the factory ready to recycle the grass and leaf clippings back into the lawn.
| If the recycling Box | grass ( page | box the 17 | is clippings. | on | the | machine, Refer | to | remove Removing |
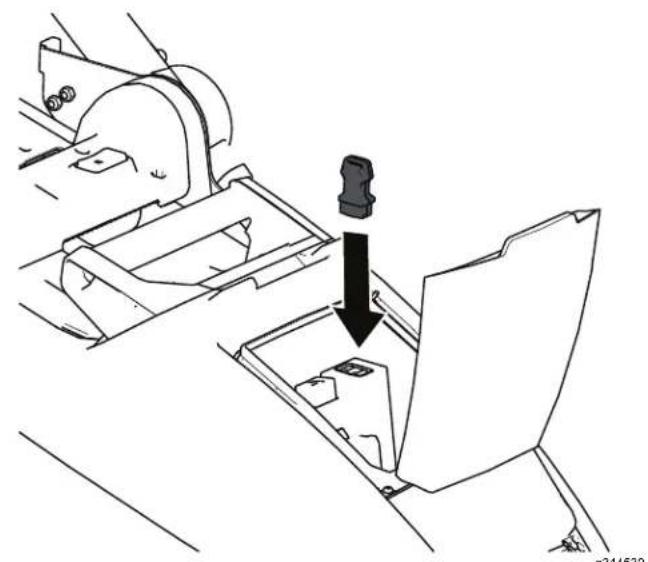
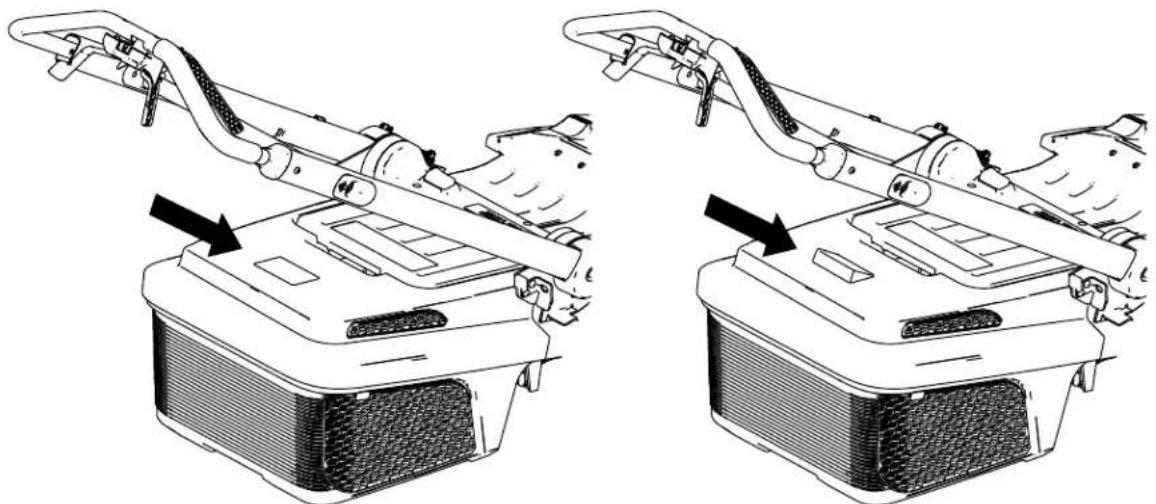
Installing
| 1. | ShutpackBattery | of and | f safetyPack | the machinefrom | key;the Machine | and referMachine | remove toRemoving(page) | the batteryth18 |
| 2. | PlacereferPosition | to | the Storing(page) | machinethe 21 | in the Machine | the verticalMachine | vertical in the | stow V ertical-Stowpo |
| 3. | CleaninstallsMachine | the bottomproperly;(page) | of refer20 | the deck toCleaning | to ensureunder | ensure 1 | ||
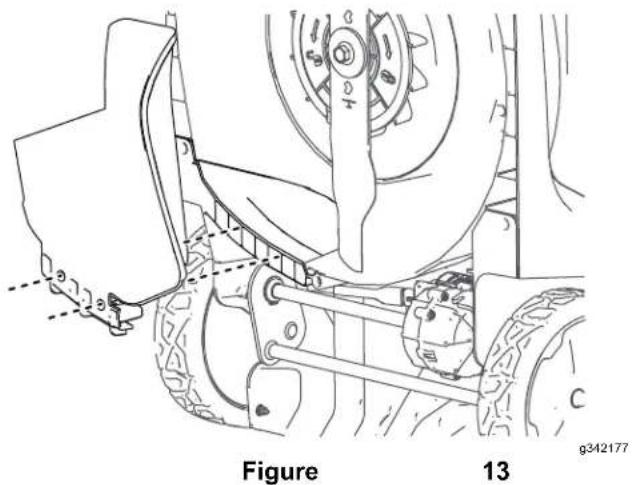
| 4. | Alignplugpins | until as | the itshown | mulch snaps | plugintoFigure | and place13 | push onto | the bottom the 2 retainir |
| Important:shouldwhendoescontact | The be properlynotyour | bottom with installed;correctly Authorized | the | of the bottom if the ,do Service | mulch of themulch not use Dealer | |||
Removing
| T o and Plug | remove then (page | the reverse 15 | mulch the | plug, steps | remove in Installing | the | battery the |
Bagging the Clippings
Use the grass box when you want to collect grass and leaf clippings from the lawn.
If the mulch plug is on the machine, remove (page 15).
Installing
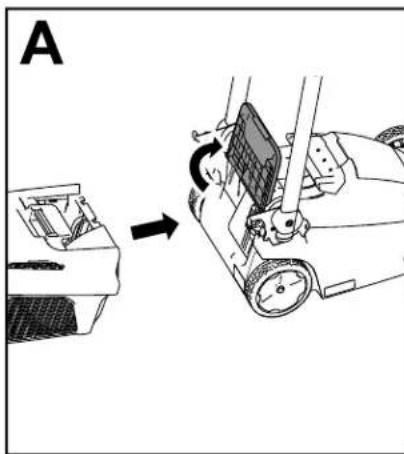
| 1. | Move | the | handle | into | the | upright | position | ||
| 2. | Install | the | hooks | of the | grass | box | into | the | |
| 3. | Allow | the | rear | deflector | to | rest | on | the | box |
| 4. | Return | the | handle | back | to | the | operating | ||
the
natural_image
Diagram showing a mechanical device being adjusted to form a motor or fan assembly (no text or symbols present)
natural_image
Mechanical assembly diagram showing gear and bracket components with directional arrows (no text or labels)Grass
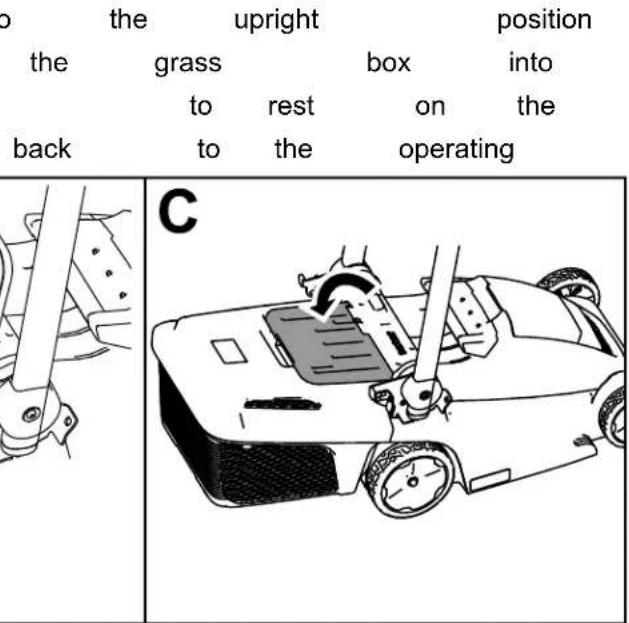
Figure 14
g341400
Grass
| The through blocked, | grass | box is the grass and the | fitted box, indicator | with raising | a full flap | indicator the indicator closes. | at | |
Box Full
natural_image
Technical line drawing of two mechanical components with arrows indicating assembly or movement (no text or symbols present)Figure 15
g363501
Removing the Grass Box
To remove the box, reverse the steps in Installing the Grass Box (page 16).
Do
box
not
only
operate
when
the
mulching,
machine
with
transporting
the
grass
the
n
Figure
natural_image
Illustration of a hand operating a mechanical device with a cross mark indicating cancellation (no text or symbols present)16
g356991
Shutting Off the Machine
- Release the blade-control bar (Figure 10).

natural_image
Line drawing of a person performing a physical maneuver on a roller coaster (no text or symbols)Figure 17
- Remove the safety key from the machine 10).
natural_image
Technical line drawing of a mechanical assembly with a black arrow indicating direction (no text or symbols)Figure 18
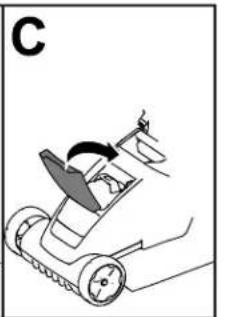
- Remove Battery
Note: remove
the
Pack
battery
from
Whenever the battery
Removing from
- Lift up
- Press battery
- Close

natural_image
Diagram of a robotic lawn mower with a blade and directional arrow (no text or symbols)

the
the battery-compartment
the
pack
battery-pack
and
the battery-compartment
Machir
natural_image
Diagram of a robotic arm with motion arrows indicating movement (no text or symbols)g341360
Figure 19
(Figure
| the | pack; Machine | refer | to ( page | Removing 18 |
| you pack. | are not | using | the ma |
Operating T ips
General Mowing T ips
- A void striking solid objects with the blade. Never deliberately mow over any object.
• For best performance, before the cutting necessary.
Cutting
- Cut
For
cut
only
improved
grass
about
[Non-Text]
at
[Non-Text]
[Non-Text]
[Non-Text]
[Non-Text]
[Non-Text]
[Non-Text]
a
qu
ality
higher
Do
unless
grass
cut
the
growth
at
grass
•
[Non-Text]
ss
he
[Non-Text]
begins
- When
height
a lower
the grass
cause
cutting
setting
setti
[Non-Text]
[Non-Text]
the mo
[Non-Text]
[Non-Text]
[Non-Text]
[Non-Text]
too
[Non-Text]
.
and
fo
lc
to
|
1
or
long,
[Non-Text]
• W
and
stal
et
[Non-Text]
void
;
[Non-Text]
g
[Non-Text]
cause
[Non-Text]
and
[Non-Text]
[Non-Text]
[Non-Text]
[Non-Text]
in wet
of
[Non-Text]
[Non-Text]
[Non-Text]
fol
[Non-Text]
a
OW
free
ter
[Non-Text]
[Non-Text]
es
[Non-Text]
C
[Non-Text]
m
on
[Non-Text]
all
[Non-Text]
[Non-Text]
ac
iti
-
(
n
/
[Unreadable]
4
m = 311
0
1
•
C
-
[Unreadable]
1
[Non-Text]
动
•
C
-
al
30
[Non-Text]
[Unreadable]
[Unreadable]
gr
•
re
re
[Non-Text]
fi
无法识别
a
.
et
el
-
[Non-Text]
[Non-Text]
21
an k
K
K
[Non-Text]
rgn
..
[Non-Text]
[Non-Text]
。
3
•
le
:
C
or
s
[Non-Text]
e
at
[Non-Text]
[Unreadable]
•
S
1
c
1
C
[Non-Text]
[Non-Text]
16
ve
N
[Non-Text]
[Non-Text]
le
.
IF
[Non-Text]
[Non-Text]
to
to
ire
n
,
d
u
[Non-Text]
er
t
[Non-Text]
[Non-Text]
[Non-Text]
[Non-Text]
[Non-Text]
[Non-Text]
[Non-Text]
[Non-Text]
[Non-Text]
[Non-Text]
[Non-Text]
[Non-Text]
[Non-Text]
[Non-Text]
[Non-Text]
[Non-Text]
u
[Non-Text]
er
t
[Non-Text]
[Non-Text]
[Non-Text]
[Non-Text]
[Non-Text]
[Non-Text]
[Non-Text]
[Non-Text]
[Non-Text]
u
[Non-Text]
er
t
[Non-Text]
[Non-Text]
[Non-Text]
[Non-Text]
[Non-Text]
to
to
ire
u
[Non-Text]
er
t
ir
[Non-Text]
[Non-Text]
to
to
ire
[Non-Text]
[Non-Text]
[Non-Text]
[Non-Text]
[Non-Text]
。
1
[Non-Text]
[Non-Text]
E
ha
[Non-Text]
[Non-Text]
[Non-Text]
th
+
,
[Non-Text]
ne
[Non-Text]
M
r
ov
[Non-Text]
m
[Non-Text]
[Non-Text]
[Non-Text]
(
-
[Unreadable]
•
S
st
C
1
-
[Non-Text]
[Non-Text]
15
ve
N
[Non-Text]
[Non-Text]
le:
.
"
[Non-Text]
[Non-Text]
to
广力云智慧零售收银系统
ire
[Non-Text]
,
d
[Non-Text]
[Non-Text]
er
[
[Non-Text]
[Non-Text]
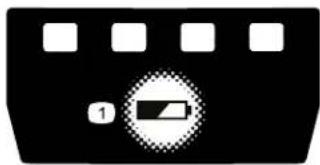
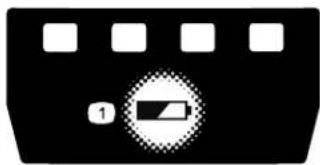
- Refer to the following table to interpret the LED indicator light on the battery charger.
| Charger Symbol | Indicator Light | Indicates |
| Green blinking | Battery pack is charging | |
| Green | Battery pack is charged | |
| Red | Battery pack and/or charger is over appropriate | |
| Red blinking | Battery pack charging | |
| Of f | No battery pack |
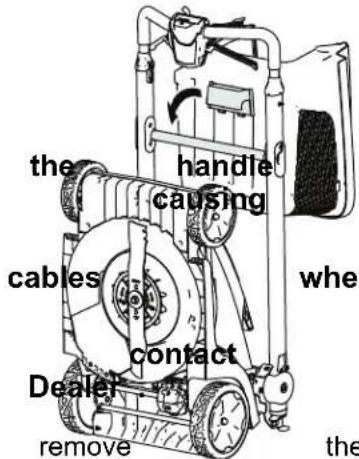
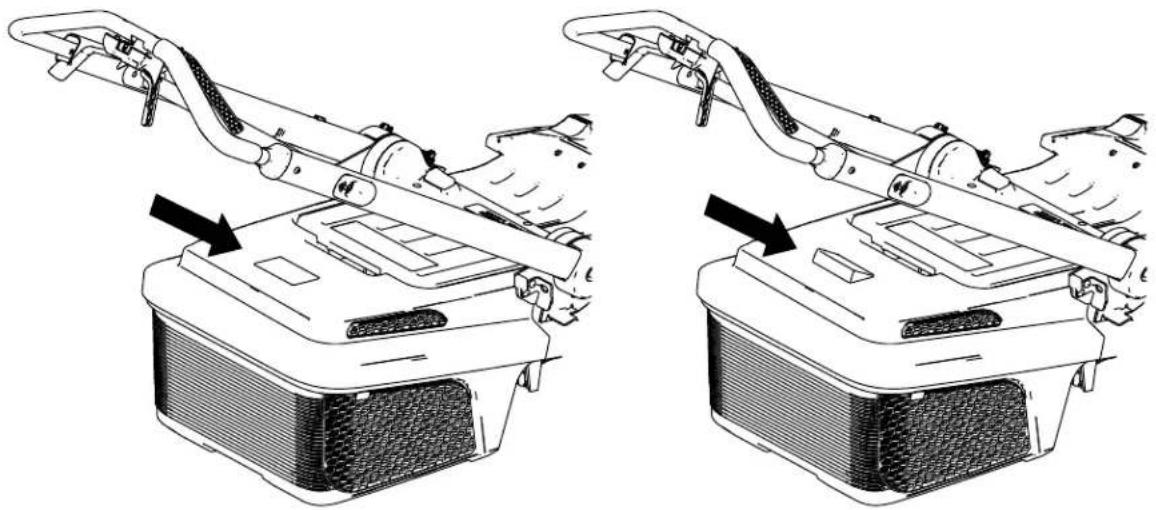
Folding
the
⚠️ W ARNIN
Folding
can
damage
or
unfolding
cables
operating
condition.
• Do battery
of unfolding
not
damage
[Non-Text]
the
perature
• 5.014*
If a cable
tault*
Authorized
the
range
is
damaged,
Service Dealer
inserted
*Refer
information.
to
T roubleshooting
⚠️ W ARNIN
page
24
[Non-Text]
1
or
more
Ensure
that
the
handle
position
batterly prevent periods
pack
prior can
bo
starti
between thrown
uses.
ill
will,
not Shut
of
used the
for machine
longe
battery and
remove
22 the
from
battery
Of f
the 1 page Machine
(page
Important:
charger
If the
periods,
charger;
battery
[Non-Text]
refer
to
2.
Pull
the
handlebar
the
upper 21 ).
Machine
to
release
Cleaning
Cleaning
Service
Interval
under
: After
3.
Fold the
the
Machine or fully
halfwa
position,
position
use as
shown
in
For
best
results,
clean
you
have completed
mowing.
- Shut
pack
of
f the
machine
and
the
safety
- Lower
setting.
the
machine
- Set
refer
the
machine
the
Position
[Non-Text]
(page
21
- Using
from
a brush
the underside
or
broom
f the machine.
t
use
V
ter
[NO TEXT]
clean
Important:
machine;
components.
water
Do
not
may
damage
Figure
electrical 21
g342175
- Clean
the grass
box.
1.
ertical-stow
3.
Operapogition
pc
Cleaning
Service
Frequently
collection
Interval
clean
capability
the
: After
the
Grass
4.
T o
unfold
Box
the
handle,
Handbach
use page
9).
grass
Brush
box
away
to
ensure
any
ma
debris.
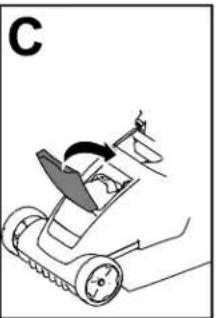
Storing the Machine in the V ertical-Stow Position
Note: handlebar 23 ).
Y ou can hook
release
br
You can store your machine in the vertical position to minimize storage space.
⚠️ W ARNING
Folding can damage operating
or unfolding the cables, condition.
- Do not unfolding
damage the the handle.
• If a cable Authorized
is damaged, Service
improperly an
folding
an
-
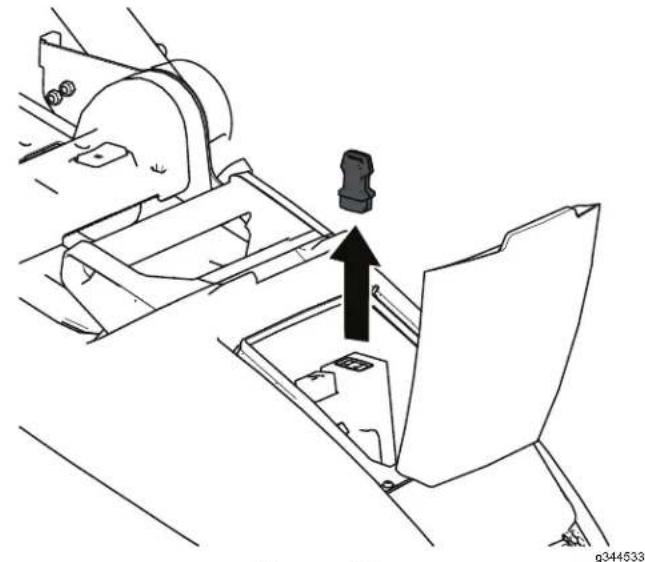
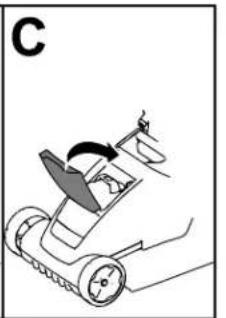
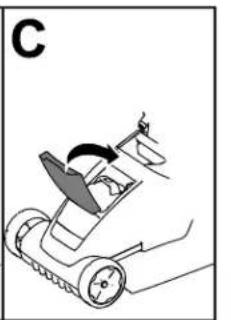
Shut of the machine, remove the safety and remove the battery pack; Figure refer to ^g35092 Battery Pack from the Machine ( page
-
Fold the handle all ____ the way ____ forward ____ until into position; refer to Folding the Handle 20 ) .
-
Ensure machine; the Grass that it is, remove Box (page 17) . box it. is not not installed to Removing
-
Ensure set to the highest the cutting-height setting (setting 6); if it is raise it. Refer to Adjusting the Cutting Height (page 13).
-
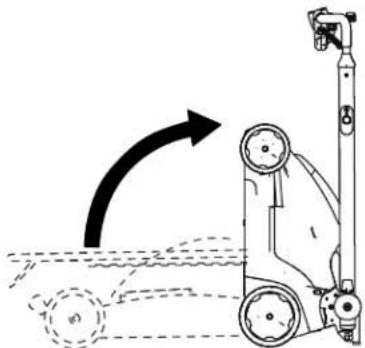
T ilt the machine back and roll it by the hand into a storage space (Figure 22).
⚠️ W ARNING
Pulling unlocks the ground. mower
the handlebar the handlebar to suddenly
release , which drop to brace may the
Do not pull the handlebar to move the machine.
release br

natural_image
Diagram of a mechanical device with rotating components and an arrow indicating rotational motion (no text or symbols)Figure
22
g342176
Maintenance
Remove the safety key and battery pack from the machine before maintaining or cleaning the machine.
Always parts to shut of f the r and allowing, adjusting, servicing,
Use only the manufacturer replacement parts and
Inspect the machine and maintain repaired
Dealer
Lubricating
Y ou do not need to lubricate the machine; bearings have been lubricated at the factory life of the machine. Figure 24

Figure 24
Replacing
Service Interval : Y early
Important: Y ou will install the blade properly torque wrench or are this procedure, contact
Dealer . If the blade is damaged immediately . If the blade it sharpened and balanced,
W ARNIN
When blade source the blade servicing can still move is off. The blade can can result
W ear gloves when
- Remove the safety the machine.
- Use a block of wood (Figure 24).
- Remove the and blade the washer
- Install the new blade, ( Figure 25 ).
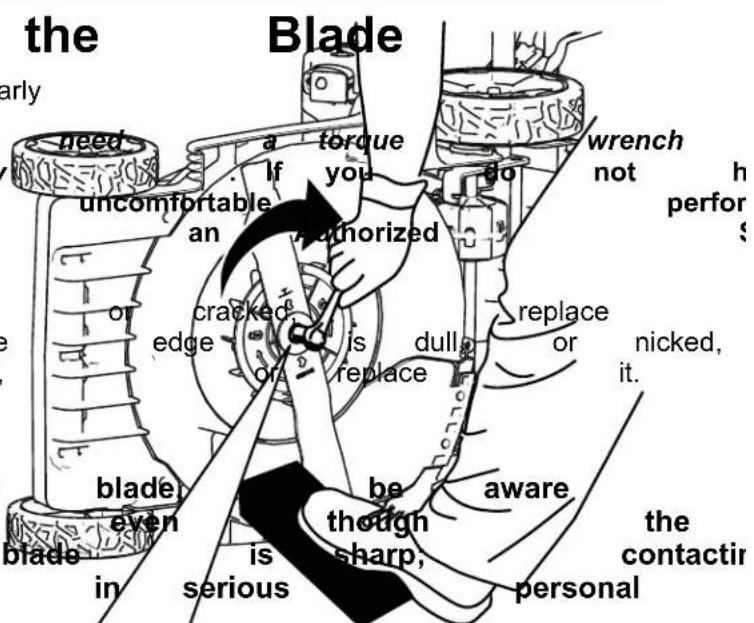
Important: blade Use to 35 facing a torque N·m (26) Position up toward wrench ft-lb). the the machine to tighten curved ends the hou blad
Preparing the Battery Pack Storage for Recycling Important:
Important: Upon removal, cover the terminals of charger the battery pack with heavy-duty adhesive tape. appropriate Do not attempt to destroy battery pack or remove important: any Contact your local municipality or Authorized Service Dealer information on how to 2 responsibly
 | Lithium-ion batteryCall2Recycle sealparticipating retailerfacility in the Call2Recycand Canada only).retailer or facility1-800-822-8837 |
 | Lithium-ion batteryEnergy Battery (HBany 60V Flex-Forcecan be recycled atretailer in the Call2Recylocate a participatingto you, please visit |
| If you nearby program visit manual on how | cannot, the the for how are please distributor recycle | locate, or have your customer for how to | questions support tool/equipment | participating of children about pack, keep charger garden recycle | pack, may site the away chemicals and the battery | retainer, which qualify, in from more battery | battery recycl for the co- ing de-icing pa of Canada Cento to re |
| to responsibly outside not authorized information | store charger | the machine, in an | enclosed |
Service
| Service | Interval | : Y | early | |
| Should | this | machine | no | |
| Authorized | Service | Deal | ||
T roubleshooting
Perform only the steps described in these instructions. All further inspection, maintenance, and repair work
must be performed by an authorized service
problem yourself.
| Problem | Possible | Cause | Correctiv |
| The machine does | 1 not staff battery is machine.2. The battery pack3. The battery pack4. There is another with the machine. | 1 not Remplify installed and into the machine, fully installed and2. Remove not charged machine and charge4. Coelectrical an praliorized | then in battery charge |
| The machine does continuously . | 1. There run is ormoistores battery pack.2. The battery is tool. | 1. nAllowon run the the lead battery dry .2 not Remplify installed and into the tool making installed and latched. | of theninto |
| The machine does | 1. Thet readiness full pack too low .2. The air vents | power Rembrange. capacity machine and fully pack.are Cleaned. the air | battersvents. |
| The battery pack | 1. lose the battery parkly appropriate temperature where it is ridge. and between 5°C (41°F)2. The machine | 2s overload the grass or walk at a slower | at a |
| The battery charger | 1. The is nd battery working. charger Unplug is over the dratter under the appropriate temperature place where range temperature is and 40°C (104°F).2. The outlet that plugged into that does repair not have outlet. power | 2. the Contad battery your charger repair not have outlet. power | licensed |
| The machine does | not self-propel. cable is damaged. | 1. Contact 1. The an se#uthorizeprop | |
| The LED indicator charger is red. | 1. Tight battery the batterger Unplug and/or the battery pack is over or range. undhe battery appropriager temperature to a place where temperature and 40°C (104°F). | it between |
| Problem | Possible Cause Corrective | Action |
| The LED indicator charger is blinking | 1. There's an error in the con-unication battery between the battery pack and the charger.2. The battery pack | 1. Remove the battery pack battery charger, unplug charger from the seconds. Plug the outlet again pack on the battery indicator light of still blinking red, again. If the LED the battery charger after 2 attempts, the battery pack facility.2. is contact your if the battery is dispose of the recycling facility. |
| The machine is sound. | prodining battery a beaping2. The machine for operation.3. The machine is4. There is another with the machine. | 1. Rensovet charged. the battery pack machine and charge2s in Ensuean unsafe that the extreme angle3.overloaded. the grass or walk at a slower4. Attemptelectrical the other problem actions, if the a contact an Authorized |
| The quality of cut unsatisfactory. | 1. is The decreased blade is dull.2. The cutting deck2. Clean under debris the machine. buil | 1. Ha |
| The bagging is unsatisfactory. | decreased machine or is2. The grass box | 1.overloaded. the grass2. ventClean are the blockpass soft brush. |
| 1. The blade is dull.2. The cutting deck is damagedContact an Auth | The machine Ha | |
| The machine is | vibrating. | 1. Inspeed the blade is necessary. |
TORO®
Count on it.
Bedienungsanleitung
Flex - Force Power System 60V MAX 36 cm Rasenmäher
| Modellnr | . 21836 | —Seriennr |
| Modellnr | . 21836T | —Seriennr |
| Modellnr | . 21843 | —Seriennr |
| Modellnr | . 21843T | —Seriennr |
| Modellnr | . 21844 | —Seriennr |
| Modellnr | . 21844T | —Seriennr |
natural_image
Line drawing of a lawn mower with visible blades and handle (no text or symbols)
decal134 - 5297
134 - 5297
- Max Power
Modus

natural_image
Pure electrical circuit lines without any symbolsdecal161 - 3764
161 - 3764
- Akkuladestand

decal162 - 1005
162 - 1005
Bild
3
g290534
⚠️ W ARNUN
natural_image
Diagram of a robotic arm gripping a frame with arrows indicating force or movement (no text or symbols present)Bild 4
Bild 5
Bild 6
Bild 7
Bild 9
g364065
- Schnitthöhen
natural_image
Line drawing of hands holding a tool over a mechanical component, labeled 'Bild' and numbered 1 (no text or symbols on the diagram itself)natural_image
Diagram showing a mechanical device being processed with a rotating component (no text or symbols present)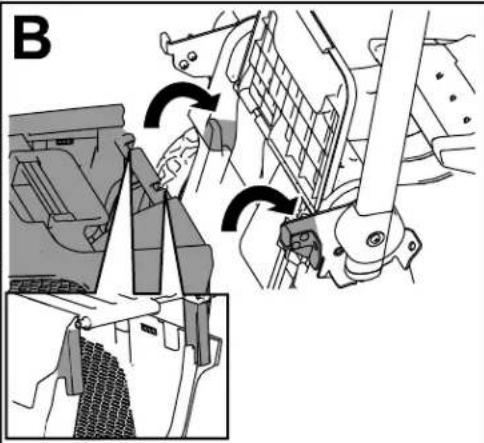
natural_image
Mechanical assembly diagram showing gear shift and mounting mechanism (no text or labels)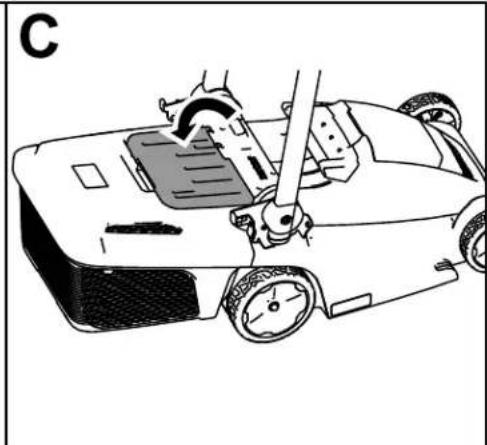
natural_image
Line drawing of a car with a hand operating the steering wheel (no text or symbols)Bild
14
g341400
Füllstandanzeige
natural_image
Technical line drawing of two mechanical components with arrows indicating assembly or movement (no text or symbols)Bild
15
g363501
Bild
16
g356991
natural_image
Line drawing of a person performing a manual exercise on a mobility device (no text or symbols)Bild 17
Entfernen aus
natural_image
Diagram of a lawn mower with a blade and handle, showing motion direction (no text or labels)
natural_image
Diagram of a robotic arm with motion arrows indicating movement (no text or symbols)Bild 19
natural_image
Technical diagram of a mechanical assembly with a central component and an upward arrow indicating motion (no text or symbols)Bild 18
- Entfernen
des
Akkupacks
Sie
den
aus
Akkupack,
der
Maschine
siehe
Entferne
(Seite
Hinweis:
Mal,
wenn
Entnehmen
Sie
die
Sie
den
Maschine
nicht
Akkupack
verwenden.
Betriebshinweise
Allgemeine Mähtipps
natural_image
Technical illustration of a manual lawn saw tool in operation, showing blade turning and wheel assembly (no text or symbols)Bild 25
g357350
natural_image
Line drawing of a lawn mower with visible blades and handle (no text or symbols)
134 - 5297
decal134 - 5297
natural_image
Pure electrical circuit lines without any symbols161 - 3764
decal161 - 3764
162 - 1005
Figura 3
Procedimiento
natural_image
Technical diagram of a robotic arm with multiple joints and arrows indicating motion or assembly (no text or symbols present)Figura 4
natural_image
Technical line drawing of a manual lawn mower with mechanical components and directional arrows (no text or symbols)Figura 5
hacia
de
atrás
liberación
a
la
posición
del
manillar
de
que
el
manillar
encaje
El producto

Figura 6
Figura 7
Figura
9
1.
Botón
de
altura
altura
de
corte
de
corte
natural_image
Mechanical assembly diagram showing a component being inserted into a housing (no text or symbols visible)Figura
10
3.
Pulse
el
botón
de
del
manillar
superior
4.
Apriete
[Non-Text]
las
palancas
la máquina.

natural_image
Line drawing of hands holding a tool on a metal frame (no text or symbols)Figura
1 1
Figura
12
encendido Control
natural_image
Technical line drawing of a vehicle's lower suspension system with brake and wheel components (no text or labels)Figura
13
Retirada
Figura
16
g356991
natural_image
Line drawing of a person performing a physical maneuver on a roller coaster (no text or symbols)Figura 17
Cómo
retirar
la máquina
natural_image
Diagram of a lawn mower with a blade and handle, showing motion direction (no text or symbols)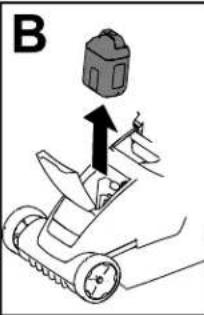

natural_image
Diagram of a robotic arm with a rotating mechanism and motion arrow (no text or symbols)Figura 19
- Retire (Figura
la llave 10).
de
seguridad
de la máquina
natural_image
Technical line drawing of a mechanical assembly with a highlighted component (no text or symbols)Figura 18
- Retire batería
Figura 21
natural_image
Technical illustration of a manual lawn saw tool in operation, showing blade turning and tool path (no text or symbols)Figura 25
g357350
natural_image
Line drawing of a lawn mower with visible blades and handle (no text or symbols)
dandereluses. responsible
'A TTENTION
pour
ge securite correctement
signalant
ou
utilisation suivi
PRUDENCE
The Ground Truth image displays a single, solid horizontal line. According to Rule 2 (UNDERSCORE & LINE RULES), this is a stylistic or background line, not a placeholder underscore. Therefore, the OCR result must ignore it and output nothing or only meaningful text. The provided OCR content is "____", which consists of four underscores. This is an incorrect interpretation of the line as a placeholder, violating the rule that stylistic lines must be ignored. The OCR has hallucinated underscores where none should exist based on the GT's visual context. Hence, the OCR result is inconsistent with the Ground Truth.
Utilisation de
d'inattention
A Ne électriques
Utilisez
la tâche
correct
sera toujoursplus
prévues équipements
les masques
es N'utilisez
l'interrupteur les
ipas de
correctement.
commandé
est dangereux
accidentels.
Débranchez
d'alimentation
util est
réglages, la
ranger le
réduisentse
electriquétil
D
einstructions. rotative
dangereux des
inexpérimentés.
penchez
avec
bien d'aplom
V
'outil l'siutil un
électrique
es vêtements
134 - 5297
decal134 - 5297
- Mode Max Power
natural_image
Pure electrical circuit lines without any symbols161 - 3764
decal161 - 3764
162 - 1005
decal162 - 1005
| 2 | Fixations | (non | incluses) |
Procédure
Si vous
batteries
de fixation
le
souhaitez,
solidement
situées
au
Montez
ou tout
d'une
enfants.
- le
autre
prise
à l'intérieur
endroit
de
courant
V oir
chargeur
la Figure
3 pour
Pour
fixations
incluses).
Figure
101.6 mm (4 inches)
g290534
3
Procédure
vous
pouvez
Important: un
mur
à
fixer
le cha
Retirez
des
de dos. plastique
tout autre
utilise par example
natural_image
Technical diagram of a robotic arm with multiple joints and arrows indicating motion or assembly (no text or symbols present)Figure 4
Figure 5
Figure 6
Figure 7
Dimensions SmartStow
Figure
9
g364065
- Bouton coupe
natural_image
Mechanical assembly diagram showing a component being inserted into a housing (no text or symbols visible)Figure 10
natural_image
Line drawing of hands holding a tool on a metal frame (no text or symbols)Figure 1 1
Installation mulching
- Coupez
batterie
batterie
le moteur
et
1
clé
de
sécurité
la machine,
[Non-Text]
(page
puis
Retrait
[Non-Text]
(
- Placez
rangement
la verticale
la machine
; voir
(page
à la verticale
Rangement
24 ) .
de
en
la
position
machine
- Nettoyez
pouvoir
Nettoyage
le dessous
installer
[Non-Text]
l'obturateur
du
dessous
du plateau
[Non-Text]
[Non-Text]
de
correctement
de
la
machine
coupe
[Non-Text]
(page
- Installez
jusqu'à
goupilles
13
l'obturateur
ce
qu'il
de
s'enclenche
fixation,
et
poussez
:
[Non-Text]
sur
le
à la
Important:
mulching
plateau
ne l'utilisez
contactez
agréé.
Le
doit
quand
pas
votre
bas
être
il est
dans
concessionnaire
l'obturateur
parfaitement
installé
le
cas
correctement
contraire
- réparat
natural_image
Technical line drawing of a vehicle's lower suspension system with visible components and mounting brackets (no text or labels)Figure
13
g342177
natural_image
Diagram showing a mechanical device being adjusted to form a motor or fan assembly (no text or symbols present)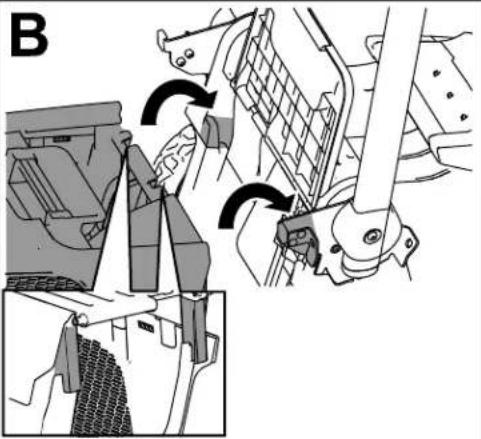
natural_image
Mechanical assembly diagram showing gear shift and mounting mechanism (no text or labels)
natural_image
Line drawing of a robotic car with a hand operating the steering wheel (no text or symbols)Figure 14
g341400
Indicateur
natural_image
Technical line drawing of two mechanical components with arrows indicating assembly or movement (no text or symbols present)Figure 15
g363501
Figure
16
g356991
Arrêt de la machine
natural_image
Line drawing of a person performing a physical maneuver on a roller coaster (no text or symbols)Figure 17
Retrait machine
natural_image
Diagram of a robotic lawn mower with a blade and wheel, labeled 'A' (no text or symbols on the diagram itself)
Figure 19
de la
natural_image
Diagram of a robotic car with a rotating arm and handle, labeled 'C' (no text or symbols on the diagram itself)0341360
- Retirez 10).
la clé de
sécurité
de la machine
natural_image
Technical line drawing of a mechanical assembly with a black arrow indicating direction (no text or symbols)Figure 18
- Enlevez la machine
Figure 21
m = 311
-
7
-
[Unreadable]
5
。
。
[Unreadable]
T
T
The image is too blurry to recognize any text content.
[NO TEXT]
[Non-Text]
[Non-Text]
[Non-Text]
1
4
-
C
-
E
[Unreadable]
三
[Unreadable]
式
1
m = 311
7
-
[Non-Text]
[Non-Text]
[Non-Text]
[Non-Text]
[Non-Text]
[Non-Text]
[Non-Text]
[Non-Text]
[Non-Text]
Graissage
m = 311
□
2
ou si vous
ne vous
sentez
pa
B
。
7
4
广力云
[Non-Text]
[Non-Text]
C
点
p
a
b
b
[Unreadable]
The image is too blurry to recognize any text content.
5
2
1
[Non-Text]
。
d'effectuer
cette
concessionnaire
procédure.
Si la lame
endommagée
immédiatement.
Si
ébréchée,
faites
- la
remplacez
- la.
A TTENTIO
Quand
vous
faites
n'oubliez
pas
qu'elle
même
l'alimentation
La lame
est
tranchante
blesser
gravement
Portez
des
gants
la lame.
m = 311
8
2
2
-
-
[Non-Text]
[Non-Text]
pa
。
-
广力云智慧零售收银系统
[Non-Text]
Z
广力云
ou
[Non-Text]
[Non-Text]
[Non-Text]
[Non-Text]
lam
uga
uge
st
[Non-Text]
[Non-Text]
广力云
en
[Non-Text]
[Non-Text]
de
•
广力云
d
[Non-Text]
-
et
[Non-Text]
[Non-Text]
1
•
[Non-Text]
lame, Figure 25 la rondelle).
plus vehicle informations
de la
batterie. Serrez
toutes
les
fixation
Hors
votre
plus
de la
des
États
- Unis
réparation
•et Rangez
Canada,
la ma
chineuillez
batterie ou
distributeur un
un local a
sur le recyclage
res
Entretien
Périodicité
des
entretiens
Si cette
machine
votre
concessionnaire
nécessite
natural_image
Line drawing of a lawn mower with extended blades and wheels (no text or symbols)
134 - 5297
decal134 - 5297
natural_image
Pure electrical circuit lines without any symbols161 - 3764
decal161 - 3764
162 - 1005
decal162 - 1005
natural_image
Diagram of a robotic device with attached sensors and lever mechanism, showing force application arrows (no text or symbols)Figura 4
Figura 5
Figura 6
Figura 7
Dimensioni SmartStow
Figura 9
natural_image
Technical line drawing of a mechanical assembly with a downward arrow indicating a component (no text or symbols present)Figura
10
natural_image
Line drawing of hands holding a tool on a curved mechanical component (no text or symbols)Figura
1 1
natural_image
Technical line drawing of a vehicle's lower suspension system with visible components and mounting brackets (no text or labels)Figura
13
Rimozione
natural_image
Diagram showing a mechanical device being adjusted to form a grid on a cart, with no visible text or symbols.
natural_image
Mechanical assembly diagram showing gear shift and mounting mechanism (no text or labels)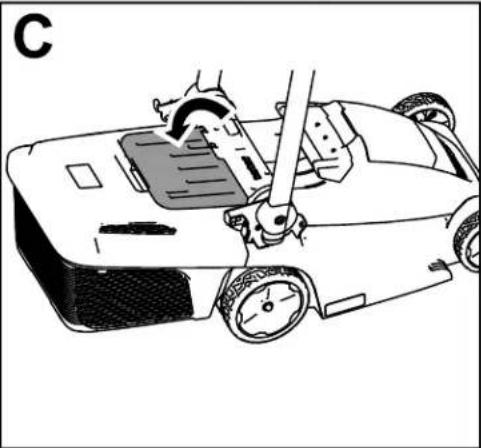
natural_image
Line drawing of a robotic car with a hand operating the wheel (no text or symbols)Figura 14
g341400
Indicatore
natural_image
Technical line drawing of two mechanical components with arrows indicating assembly or movement (no text or symbols present)Figura 15
g363501
Figura
16
g356991
natural_image
Line drawing of a person performing a medical or rehabilitation procedure on a device, with arrows indicating motion direction (no text or symbols)Figura 17
Rimozione batteria
natural_image
Diagram of a robotic lawn mower with a blade and handle, labeled 'A' (no text or symbols on the diagram itself)

natural_image
Diagram of a robotic arm with a rotating handle and gear mechanism (no text or symbols)Figura 19
dalla
il coperchio
il fermo
batteria
del
e rimuo
il coperchio
natural_image
Technical line drawing of a mechanical assembly with a highlighted component (no text or symbols)Figura 18
- Rimuovete
Rimozione
( pagina
Nota:
togliete
20).
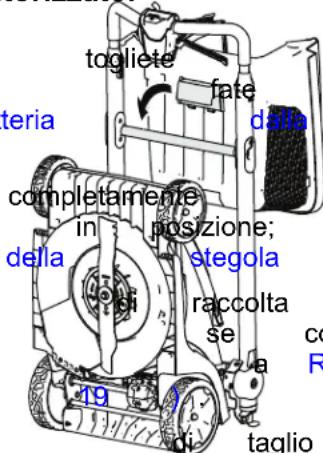
Ogniqualvolta
il pacco
il pacco
del
pacco
batteria.
batteria;
batteria
non
fate
dalla
utilizzate
riferimento
macchina
la
maccl
Suggerimenti
Figura
21
natural_image
Diagram of a mechanical device with a rotating arrow indicating rotation, no text or symbols presentstegola i cavi
e Figura
22
g342176 condizioni
natural_image
Technical illustration of a manual lawn saw tool with a close-up view of the blade assembly (no text or symbols)Figura 25
g357350
natural_image
Line drawing of a lawn mower with adjustable arms and wheels (no text or symbols)
134 - 5297
decal134 - 5297
- Modus 'Max
Power
natural_image
Pure electrical circuit lines without any symbols161 - 3764
decal161 - 3764
- Laadstatus
van accu
162 - 1005
decal162 - 1005
Figuur 3
Procedure
natural_image
Technical diagram of a robotic arm with multiple joints and arrows indicating motion or assembly (no text or symbols present)Figuur 4
natural_image
Technical line drawing of a lawn mower with mechanical components and directional arrows (no text or symbols)Figuur 5
Figuur 6
Figuur 7
- Acculadermodel 86902PPK
Figuur 9
- Maaihoogteknop
maaihoogte
De maaihoogte is verstelbaa 19 mm en 70 mm.
 |
 |
 |
 |
 |
 |
T ijdens gebruik
De machine starten
natural_image
Technical line drawing of a mechanical assembly with a downward arrow indicating a component (no text or symbols present)Figuur 10
natural_image
Line drawing of hands holding a tool on a mechanical device (no text or symbols)Figuur 1 1
natural_image
Technical line drawing of a vehicle's suspension system showing wheel, brake, and suspension components (no text or labels)Figuur
13
De mulchplug
natural_image
Diagram showing a mechanical device being adjusted to a motor or cart, with no visible text or symbols.
natural_image
Mechanical assembly diagram showing gear shift and mounting mechanism (no text or labels)
natural_image
Line drawing of a car with a hand operating the steering wheel, showing motion and control buttons (no text or symbols)Figuur 14
g341400
V olstand
natural_image
Technical line drawing of two mechanical components with arrows indicating assembly or movement (no text or symbols present)Figuur 15
g363501
Figuur
16
g356991
natural_image
Line drawing of a person performing a physical maneuver on a roller coaster, with arrows indicating motion direction (no text or symbols)Figuur 17
natural_image
Diagram of a lawn mower with directional arrow indicating motion (no text or symbols)

natural_image
Diagram of a robotic arm with a hand operating the motion, showing no text or symbolsFiguur 19
natural_image
Technical line drawing of a mechanical assembly with a central component and an upward arrow (no text or symbols)Figuur 18
Figuur
20
Figuur 21
natural_image
Technical illustration of a manual lawn saw tool in operation, showing blade turning and tool path (no text or symbols)Figuur 25
g357350
natural_image
Line drawing of a lawn mower with adjustable handle and wheels (no text or symbols)
Hvis du trenger hjelp, kan du se www .T oro.com/support for instruksjonsressurser eller kontakte et autorisert forhandlerverksted før du returnerer dette produktet.
| Hvis maskinen originale kontakte kundeserviceavdeling. for hånden produktet inn numrene | T oro et autorisert | må - deler | reparere elle | |
| når modell | - og i de tomme feltene. |
V iktig: Du kan skanne
serienummermerket
utformet for bruk mied
60 V litiumionbatteripakker
134
- 5297
- Maks strømmodus
natural_image
Pure electrical circuit lines without any symbols161
- 3764
- Status for batterilading
162
- 1005
natural_image
Technical diagram of a robotic arm with multiple joints and arrows indicating motion or assembly (no text or symbols present)Figur 4
Figur 5
Figur 6
Figur 7
- Batterilader,
Figur
9
natural_image
Mechanical assembly diagram showing a component being inserted into a housing (no text or symbols visible)Figur 10
natural_image
Line drawing of hands holding a tool on a metal frame (no text or symbols)Figur 1 1
g341398
Bruke
selvdrift
Kun
modell
21844
- Juster hastighetskontrollen selvdriftshastigheten
3
i midten Figur
12
av ^g342174 det
på maskinen.
- Hastighetskontroll for kniven
-
MAX - knapp
-
Selvdriftshändtak
for for se
Justere
knivhast
Denne maskinen
har 1
R UNSMART
og
AX
•
natural_image
Diagram showing a mechanical device being adjusted to form a motor or fan assembly (no text or symbols present)
natural_image
Mechanical assembly diagram showing gear shift and mounting mechanism (no text or labels)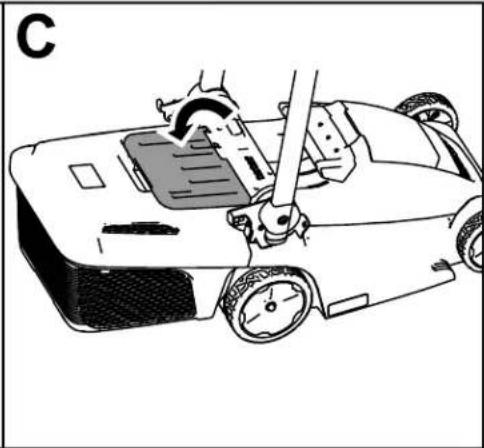
natural_image
Line drawing of a robotic car with a hand operating the steering wheel (no text or symbols)Figur 14
g341400
Indikator
for
full
gresskasse
Gressboksen
er
utstyrt
med
en
oppfylt
- indikato
inn, strømmer
luft
gjennom
gresskassen
blokkeres
og
indikatorklaf
fen
natural_image
Technical line drawing of two mechanical components with arrows indicating assembly or movement (no text or symbols present)Figur 15
g363501
Fjerne gresskassen
Figur
16
g356991
Slå av maskinen
- Slipp knivkontrollbøylen (Figur 10).
natural_image
Line drawing of a person performing a physical maneuver on a ladder, with arrows indicating motion direction (no text or symbols)Figur 17
natural_image
Mechanical assembly diagram showing a component with an arrow indicating direction (no text or symbols present)Figur 18
natural_image
Diagram of a lawn mower with a blade and directional arrow indicating motion (no text or symbols)

natural_image
Diagram of a robotic arm with motion arrows indicating movement (no text or symbols)Figur 19
batteripakken
natural_image
Diagram of a robotic arm with motion arrows indicating movement (no text or symbols)0341360
bruker maskinen, må
Brukstips
Generelle klippetips
The image is too blurry to recognize any text content.
) ut
skade
håndtake
utgjøre
广力云智慧零售收银系统
The Ground Truth image displays a single, solid horizontal line. According to Rule 2 (UNDERSCORE & LINE RULES), this is a stylistic or background line, not a placeholder underscore. Therefore, the OCR result must ignore it and output nothing or only meaningful text. The provided OCR content is "____", which consists of four underscores. This is an incorrect interpretation of the line as a placeholder, violating the rule that stylistic lines must be ignored. The OCR has hallucinated underscores where none should exist based on the GT's visual context. Hence, the OCR result is inconsistent with the Ground Truth.
ikke
[Non-Text]
montert
på
er
må
du fjerne
(
maskinen.
Se
。
gresskassen
( side
17
[Non-Text]
4.
Påse
at
klippehøyden
[Non-Text]
på
maskinen
[Non-Text]
(innstilling
6).
den
høyeste
[Non-Text]
innstillingen
ikke
er
det,
hev
den.
Se
Justere
klippehøyden
5.
V
maskinen
tilbake
og
rull den
med
22 ).
inn
i en
oppbevaringsplass
( Figur
ADV ARSEL
Når
du
trekker
i håndtakets
låses
håndtaket
opp,
utløsersikring,
kan
føre
til
at
gressklipperen
noe
som
faller
ned
i bakken.
plutselig
Ikke
trekk
håndtakets
utløsersikring
å flytte
maskinen.

natural_image
Diagram of a mechanical device with a rotating arm and wheels, showing motion direction (no text or symbols)Figur
22
g342176
V edlikehold
natural_image
Line drawing of a lawn mower with adjustable arms and wheels (no text or symbols)
134 - 5297
decal134 - 5297
natural_image
Pure electrical circuit lines without any symbols161 - 3764
decal161 - 3764
162 - 1005
decal162 - 1005
natural_image
Diagram of a mechanical device with two arms and a central handle, showing directional arrows indicating movement or force (no text or symbols present)Rysunek 4
Rysunek 5
Przegląd produktu

Rysunek 6
Rysunek 7
- Ladowarka akumulatora, 86902PPK modeli
-
Alemulator 88925PKRkdel rnodkapazona 21836, 21843
-
Akumulator 88941PPK, model (dołączona do modeli 21843 i 21844)
Specyfikacje
Rysunek
9
g364065
- Przycisk
koszenia
2wysokoś/ziernik
wysokości
ze
wskaźnikiem
koszenia
W czasie pracy
natural_image
Line drawing of hands holding a tool over a metal frame, labeled 'Rysunek' and page number 1 (no text or symbols on the diagram itself)Rysunek
16
g356991
W yłączanie maszyny
natural_image
Line drawing of a person performing a manual task on a mobility device, with arrows indicating motion direction (no text or symbols)Rysunek 17
W yjmowanie maszyny
- Otwórz
pokrywę
komory
- Naciśnij akumulator
zatrzask
a
, a następnie
- Zamknij
pokrywę
komor
natural_image
Diagram of a lawn mower with a blade and handle, showing motion direction (no text or symbols)
natural_image
Diagram of a robotic car with motion arrows indicating rotation (no text or symbols)Rysunek 19
natural_image
Technical line drawing of a mechanical assembly with a central component and an upward arrow (no text or symbols)Rysunek 18
- W yjmij akumulatora
akumulator
z maszyny
patrz
W yjmowanie
( Strona
19 ) .
Informacja: gdy nie
używasz
W yjmuj maszyny
akumulator
zawsze
natural_image
Diagram of a mechanical device with a rotating arrow indicating rotational motion (no text or symbols)natural_image
Technical illustration of a tractor's wheel assembly and steering wheel (no text or symbols)Rysunek 25
g357350
natural_image
Line drawing of a lawn mower with extended blades and wheels (no text or symbols)
© 2026—The 81 1 1 L yndale Bloomington, T oro® Company A venue South 2 MN 55420
134
- 5297
natural_image
Pure electrical circuit lines without any symbols161
- 3764
natural_image
Diagram of a mechanical device with multiple arms and connectors, showing directional arrows indicating movement or force (no text or symbols present)Figur 4
Figur 5
g341335
Produktöversikt

Figur 6
Figur 7
Figur 9
natural_image
Mechanical assembly diagram showing a component being inserted into a housing (no text or symbols visible)Figur
10
natural_image
Line drawing of hands holding a tool on a metal frame (no text or symbols)Figur
1 1
g341398
Använda
Endast
modell
Figur
12
natural_image
Technical line drawing of a mechanical assembly with springs and gears (no text or symbols)Figur
13
Figur
16
g356991
Stänga av maskinen
natural_image
Line drawing of a person performing a physical maneuver on a roller coaster, with arrows indicating motion direction (no text or symbols)Figur 17
T a ut batteripaketet maskinen
- L yft batterifackets
lock - T ryck batteripaketets ut batteripaketet.
- Stäng batterifackets

natural_image
Diagram of a robotic lawn mower with a blade and directional arrow indicating motion (no text or symbols)
natural_image
Diagram of a robotic arm with a rotating component and directional arrow (no text or symbols)Figur 19
natural_image
Technical line drawing of a mechanical assembly with a black arrow indicating direction (no text or symbols)Figur 18
- T a bort batteripaketet.
ur maskinen
( sida
18 ) .
Obs: T a ut batteripaketet maskinen.
Se T a ut batteripaketet
när du inte använde
Arbetstips
Allmänna klipptips
The Ground Truth image displays a single, solid horizontal line. According to Rule 2 (UNDERSCORE & LINE RULES), this is a stylistic or background line, not a placeholder underscore. Therefore, the OCR result must ignore it and output nothing or only meaningful text. The provided OCR content is "____", which consists of four underscores. This is an incorrect interpretation of the line as a placeholder, violating the rule that stylistic lines must be ignored. The OCR has hallucinated placeholder underscores where none exist in the GT. Hence, the OCR result is inconsistent with the Ground Truth.
[Non-Text]
(1) 设定的参数
[Non-Text]
[Non-Text]
(1) 本说明仅供参考。
[Non-Text]
( Fi
V ARNING
Om
du
drar
i frigöringsstången
handtaget
upp,
vilket
kan
leda
till
a1
gräsklipparen
marken.
plötsligt
faller
ned
i
Dra
inte
i f
frigöringsstången
för
att
maskinen.
natural_image
Diagram of a mechanical device with a rotating arm and dashed lines indicating motion (no text or symbols)Figur
22
g342176