
68801 - Heating HYUNDAI - Free user manual and instructions
Find the device manual for free 68801 HYUNDAI in PDF.

| Product type | Gas patio heater |
| Brand | Hyundai |
| Model | 68801 |
| Usage | Outdoor only, well-ventilated areas |
| Gas type | Butane or propane |
| Supply pressure | 29 mbar |
| Maximum power | 13 000 W |
| Minimum power | 5 000 W |
| Gas consumption | 450 - 870 g/h |
| Burner injector size | 1.9 mm |
| Pilot injector size | 0.18 mm |
| Weight (without bottle) | 15.5 kg |
| Gas category | I3B/P(30) |
| Ignition | Piezoelectric with ignition button |
| Safety | Pilot flame detection, automatic shutdown if flame goes out |
| Reflector material | Steel with protective coating |
| Dimensions (approx.) | Height: ~220 cm, Reflector diameter: ~80 cm |
| Package contents | Partially disassembled heater, gas regulator and hose, fasteners, manual |
| Maintenance | Regular cleaning of burner and flame guard, leak test before each use |
| Storage | In a dry, dust-free place, gas bottle removed and stored separately |
| Warranty | See attached warranty conditions |
Frequently Asked Questions - 68801 HYUNDAI
User questions about 68801 HYUNDAI
0 question about this device. Answer the ones you know or ask your own.
Ask a new question about this device
Download the instructions for your Heating in PDF format for free! Find your manual 68801 - HYUNDAI and take your electronic device back in hand. On this page are published all the documents necessary for the use of your device. 68801 by HYUNDAI.
USER MANUAL 68801 HYUNDAI
natural_image
Line drawing of a Hyundai outdoor patio lamp with a vertical support structure (no text or symbols on the lamp body)HYUNDAI
Nederlands 7
Français 13
Deutsch 19
English 25
Declaration of conformity
text_image
1 2 3 4 5 6 7 8 HYUNDAI HYUNDAI HYUNDAI HYUNDAI HYUNDAI HYUNDAI A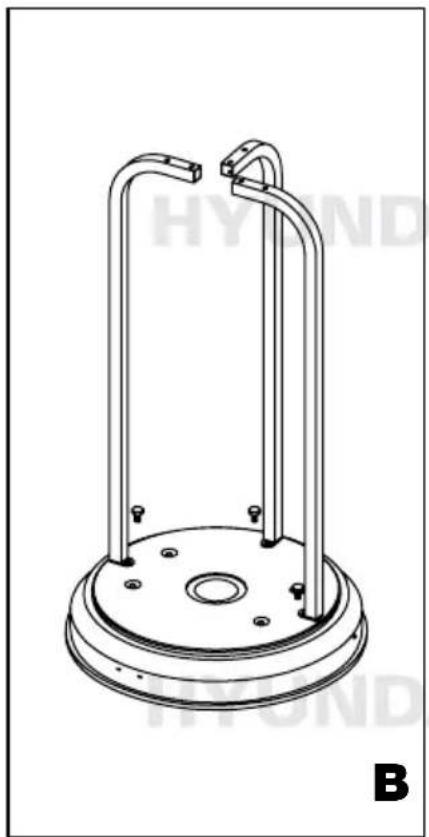
natural_image
Technical line drawing of a mechanical component with three vertical rods and a circular base (no text or symbols)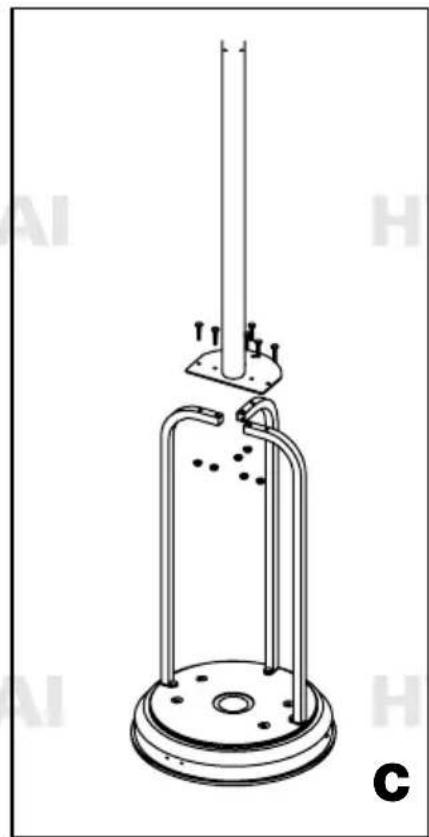
natural_image
Technical line drawing of a laboratory apparatus with a central column and two vertical rods, labeled 'C' at the bottom (no text or symbols on the diagram itself)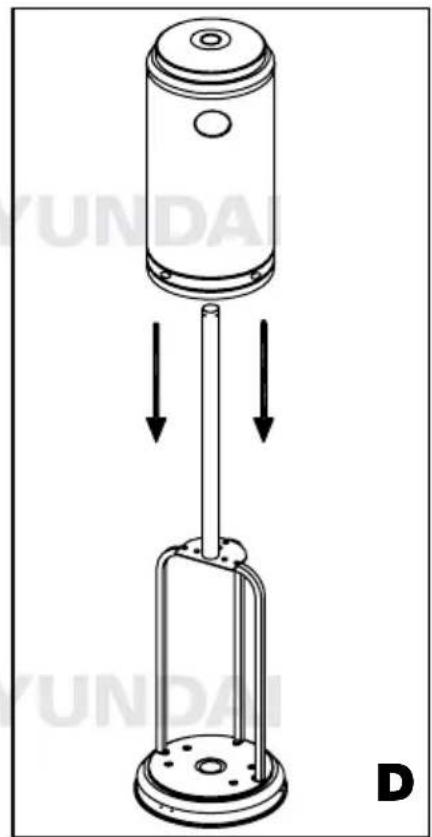
natural_image
Technical diagram of a piston-cylinder assembly with downward force arrows, no text or symbols present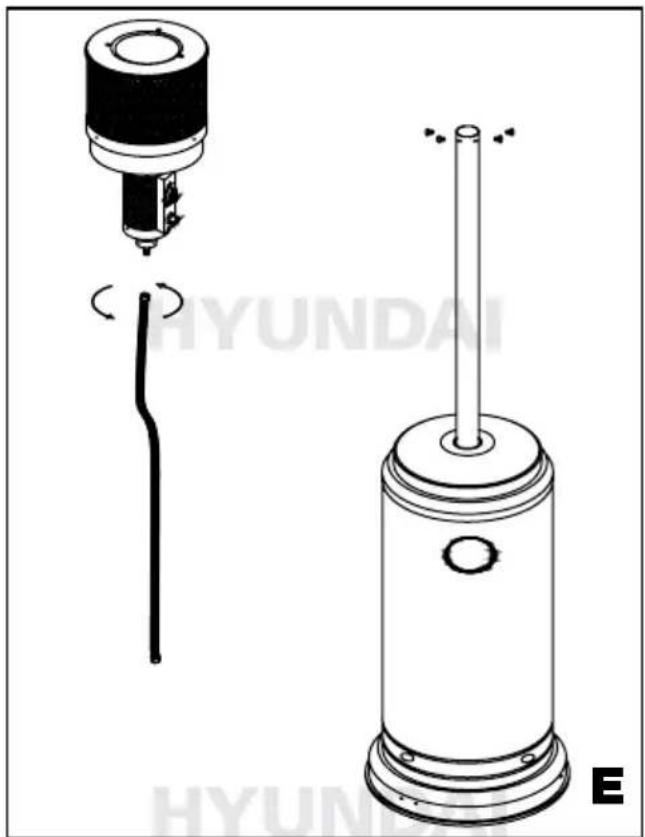
natural_image
Technical line drawing of a mechanical device with two views: top shows a cylindrical component, bottom shows a cylindrical device with a rod and mounting base (no text or symbols)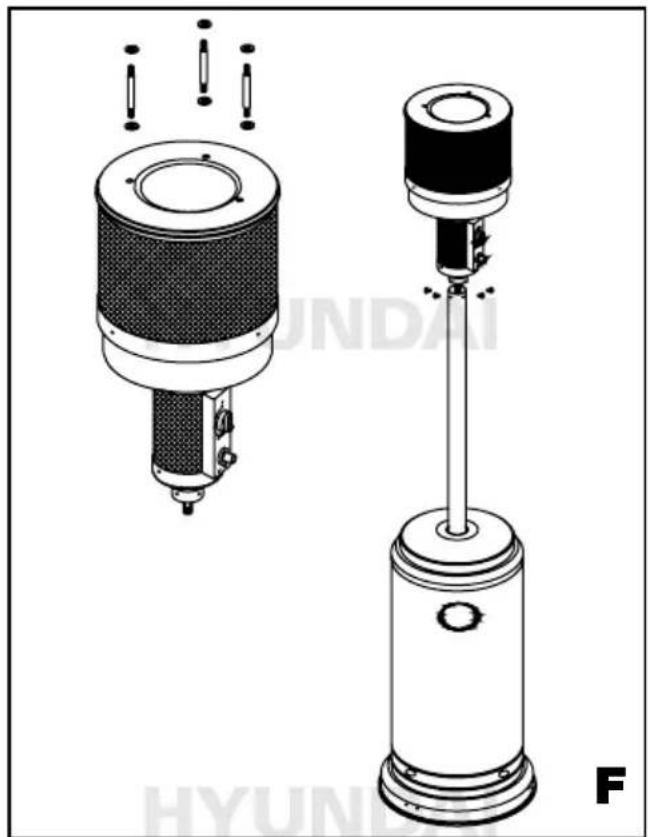
natural_image
Technical illustration of a mechanical device with two views: top shows internal components, bottom shows a vertical support structure (no text or symbols)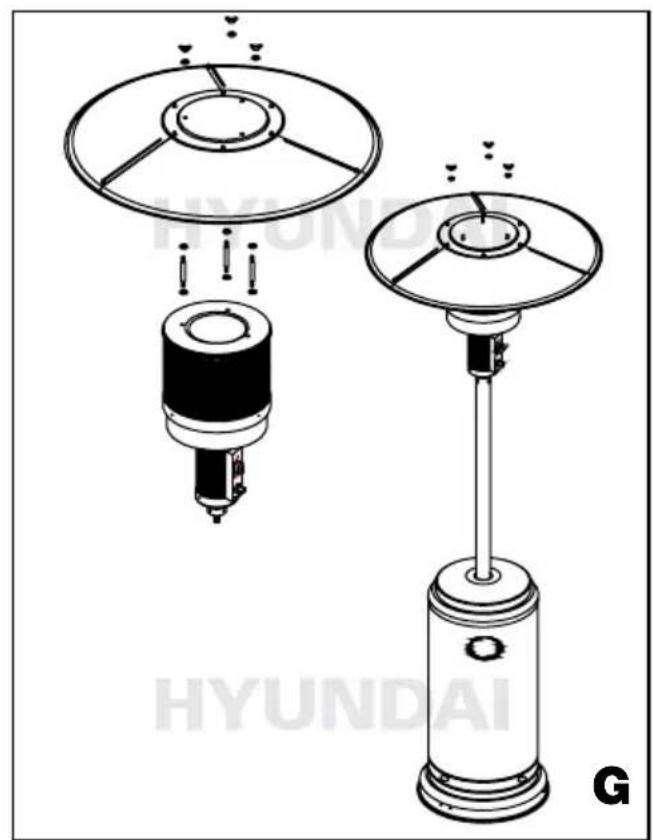
natural_image
Technical illustration of a mechanical device with two views: top shows a cylindrical component, bottom shows a vertical support structure (no text or symbols)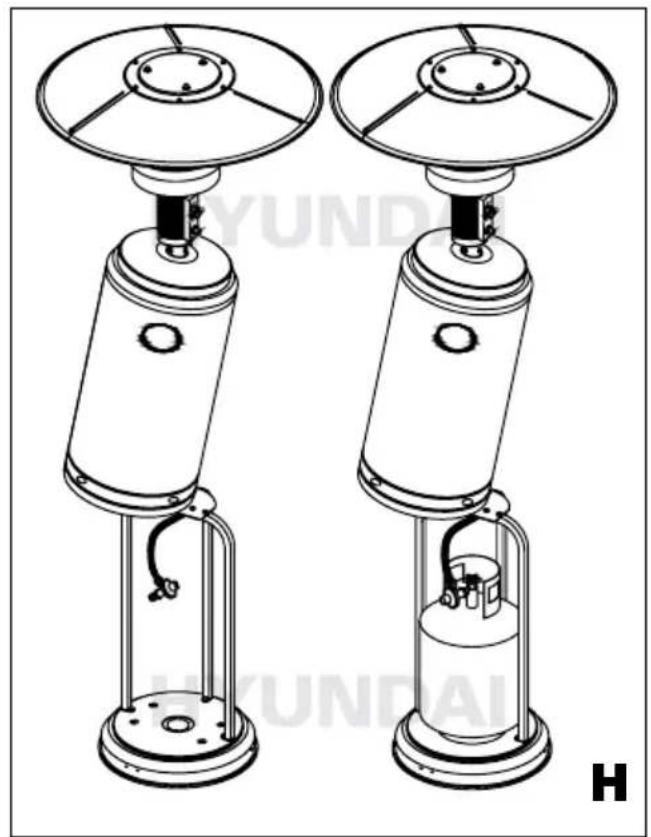
natural_image
Technical line drawing of two industrial air purifiers with cooling fans and a base mount (no text or symbols)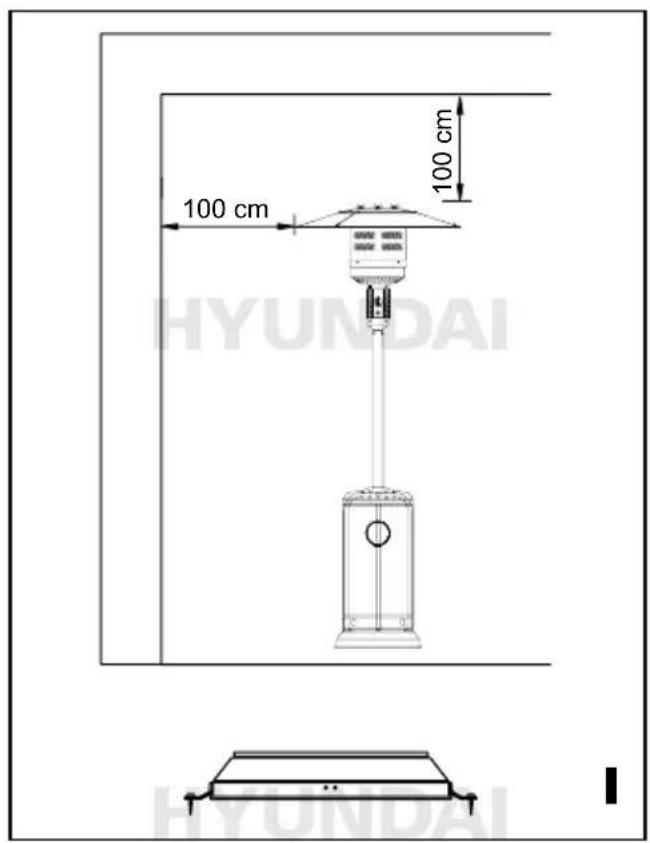
text_image
100 cm 100 cm HYUNDAI HYUNDAI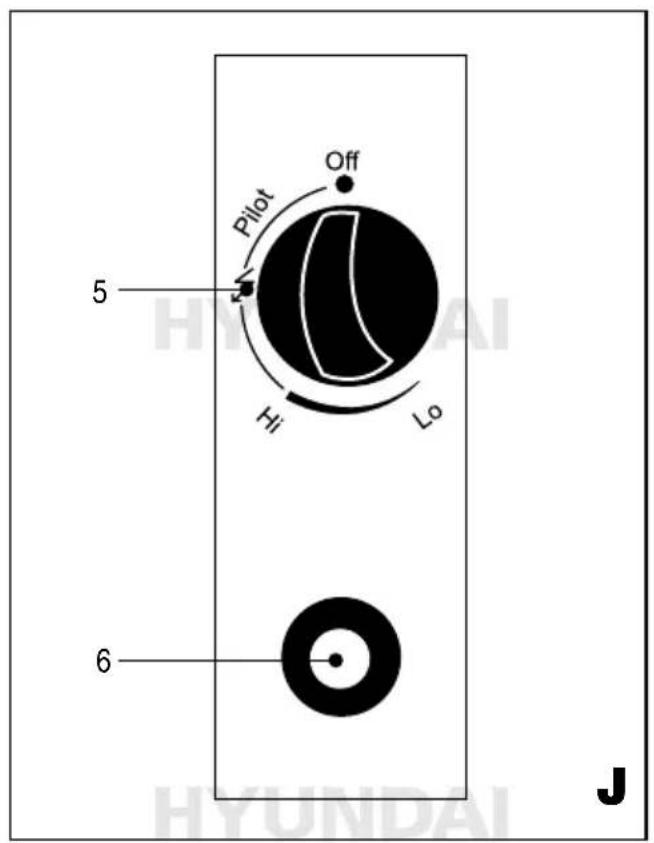
text_image
Pilot Off 5 Hi Lo 6 J
text_image
HYUNDAI HYUNDAI HYUNDAI HYUNDAI HYUNDAI HYUNDAI HYUNDAI HYUNDAITERRASVERWARMER OP GAS 68801
WAARSCHUWING

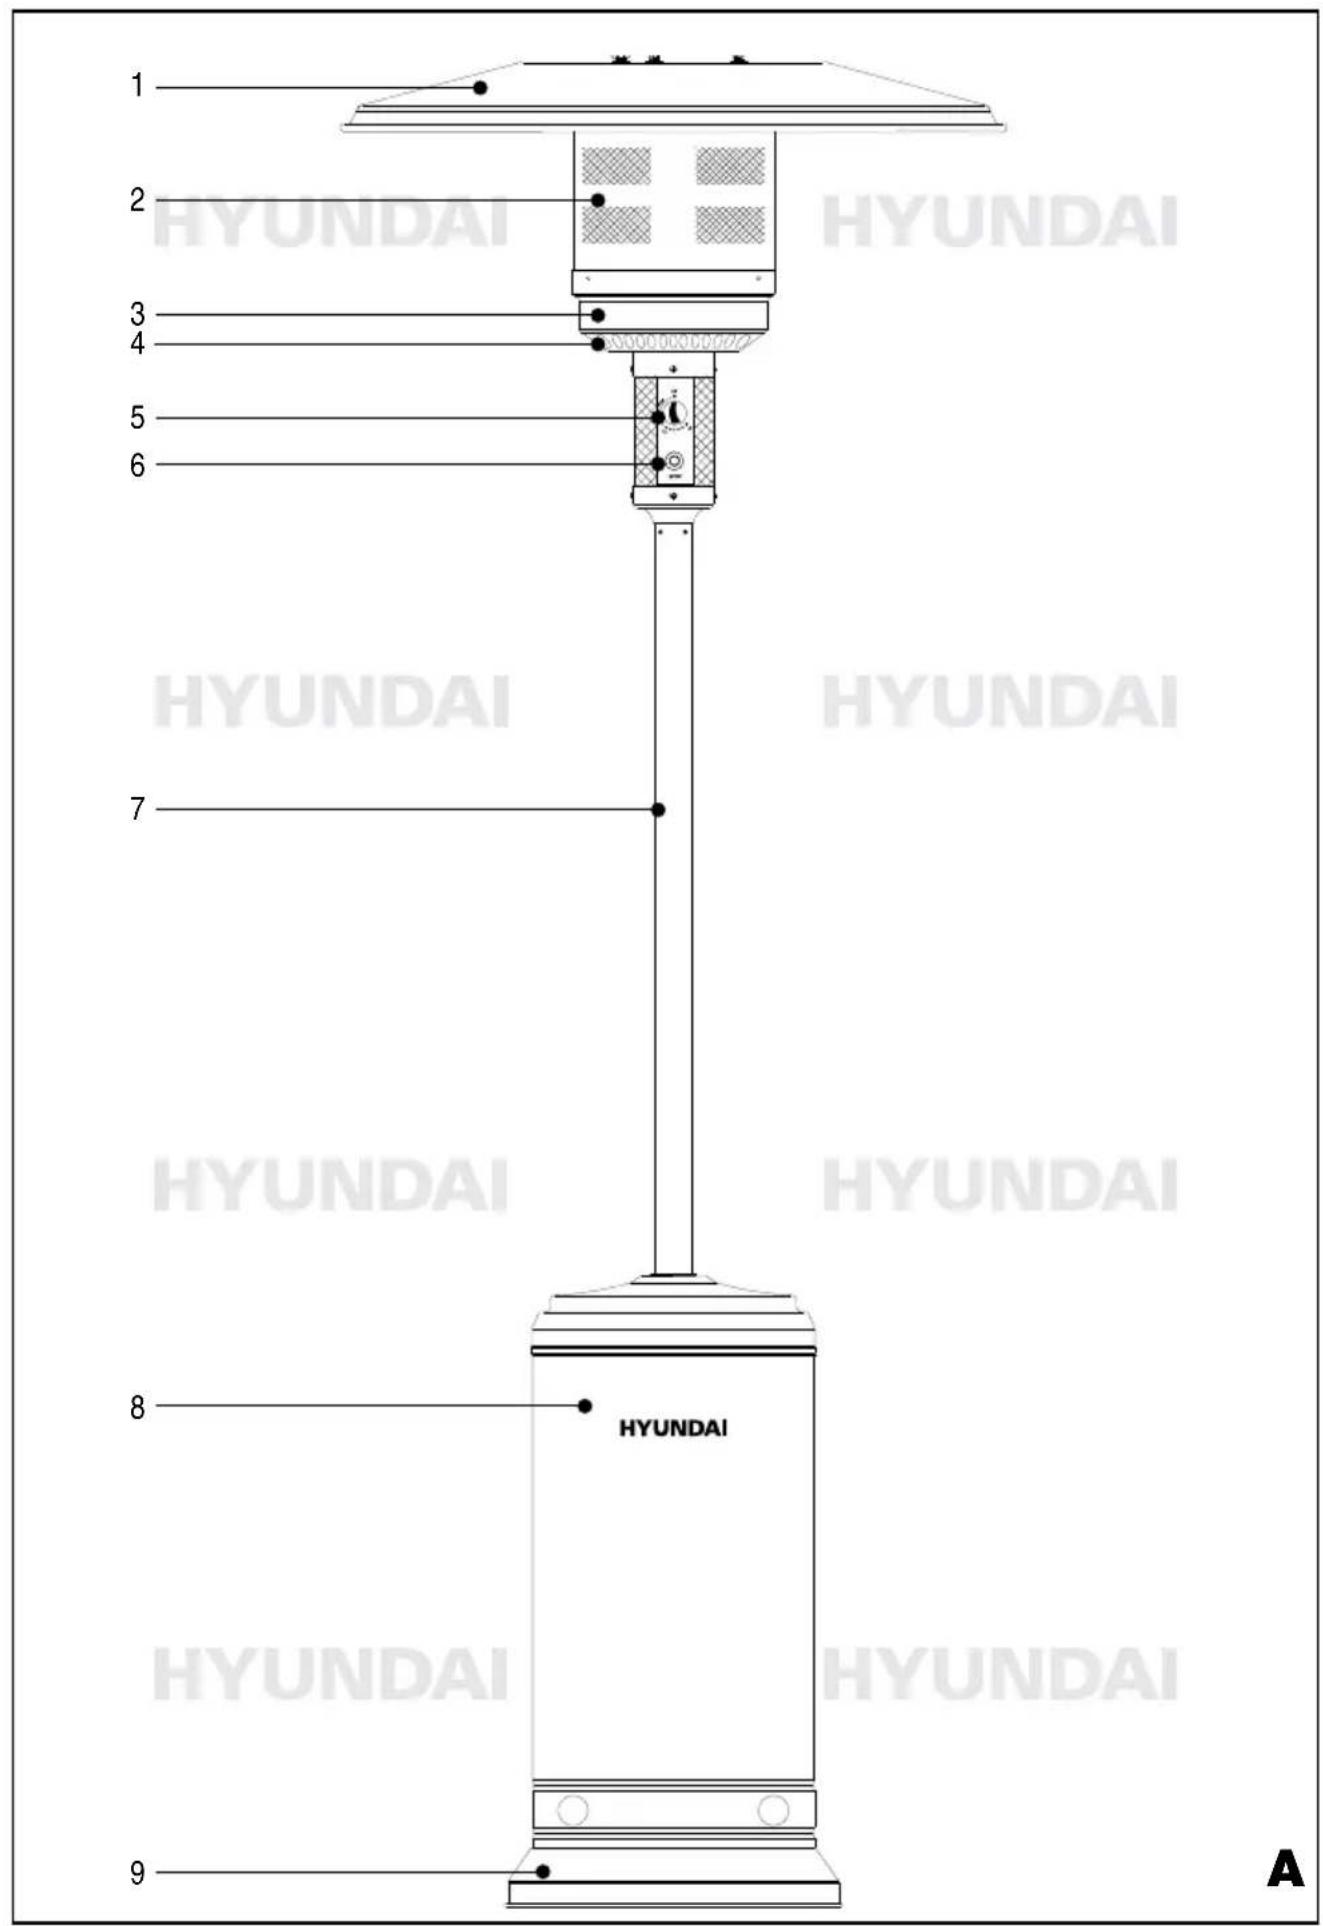
BESCHRIJVING (FIG. A)

Improper installation, adjustment, modification, service, or maintenance can cause fire, serious injury, or carbon monoxide poisoning. Read the installation, operating and maintenance instructions thoroughly before installing or servicing the device.
Keep this manual for future reference. When selling the device, pass these instructions on to the purchaser.
The following symbols are used throughout this manual:

Denotes risk of personal injury or damage to the machine.

Important information about the use of the machine.
IMPORTANT
You will find the following symbols on the device and/or in this manual:

Danger of personal injury or material damage.

Read the operating instructions before installing and using the device.

For use outdoors or in well-ventilated areas.

Have repairs carried out by an authorized service centre and only follow the manufacturer's instructions.
FOR YOUR SAFETY

If you smell gas
- Turn off the gas to the device.
- Extinguish open flames.
- If you continue to smell gas, call the fire department immediately.
- Do not store or use gasoline or other flammable vapours and liquids in the vicinity of this or any other device.
- A gas cylinder that is not connected for use should not be stored in the vicinity of this or any other device.
- The use of this device in an enclosed space can be dangerous and is therefore prohibited.
- For outdoor use only and in well-ventilated areas. A well-ventilated area should be open to at least 25% of the surface. The area of the walls is the sum of the total area.
SAFETY REGULATIONS

For use with butane or propane gas only.
- This device must be installed and the gas cylinder stored in accordance with local regulations.
- Keep the gas cylinder housing vents free from dust and dirt.
- Do not move the device during use. Wait for the device to cool down completely before moving it.
- Close the tap on the gas cylinder before moving the device.
- The hose should be checked regularly and replaced 3-4 years after production. The year of production is indicated on the hose. Always replace the hose with a hose that complies with local laws and regulations.
- Only use the type of gas and the type of gas cylinder as specified by the manufacturer.
- In strong winds, special attention must be paid to tilting the device.
- The device is not intended for installation on recreational vehicles and/or boats.
- The device may not be used for heating habitable spaces in residential buildings. Never use the
device in living, sleeping or working areas.
- Never use the device to dry laundry or other damp objects.
- Do not use the device until it has been assembled according to the instructions and all connections have been checked for gas leaks. Leakage tests should be performed with a soap solution. Never use an open flame to check for leaks.
- Do not use the device near flammable materials (wood chips, crumbs, paper, waste and other flammable materials).
- Do not use aerosol products near a working device. This can cause an explosion.
- Only use the supplied gas hose and regulator. When replacing, check that the outlet pressure of the gas regulator matches the pressure indicated on the type label.
- Keep children, disabled persons and pets away from the device to avoid burns and fire damage.
- Do not allow the device to be used by persons (incl. children) with a physical, mental or sensory disability, or lack of knowledge and experience. Do not let children play with the device.
- Do not use the device if you are taking medications that can affect reaction time, or are using alcohol or drugs.
- Always close the tap of the gas cylinder tightly after use and turn the control knob to OFF. Disconnect the gas hose if it will not be used again within a few hours.
• Always replace a gas cylinder outdoors. - Only use a CE-approved gas cylinder.
- Pay close attention and use common sense at all times.

Carbon monoxide
Lack of oxygen or poor combustion can cause carbon monoxide poisoning. Carbon monoxide is deadly.
Initial symptoms of carbon monoxide poisoning are: headache, dizziness, nausea, vomiting and blurred vision. These symptoms resemble those of other conditions such as the flu or food poisoning and are easily overlooked. People with heart or lung problems or anaemia, the elderly, pregnant women and people under the influence of alcohol are at increased risk.
If you detect these symptoms, there is insufficient ventilation or the device is not working properly. Provide fresh air immediately. Have the device checked.
DESCRIPTION (FIG. A)

This terrace heater is designed to be able to sit outside for a long time on colder and wintery days. Not suitable for commercial use.
- Reflector
- Flame screen
- Burner
- Air inlet
- Control knob
- Ignition button
- Standard
- Gas cylinder holder
- Base
Package contents
- Terrace heater (partially disassembled)
• Pressure regulator and gas hose - Fasteners
• 3 ground anchors with bolts, washers and nuts - Instruction manual
• Warranty and service conditions
Gas requirements
- Only use butane or propane gas.
- The maximum inlet pressure of the gas regulator must not exceed 10 bar.
- The minimum supply pressure must be at least 28 mbar.
- The pressure regulator and gas hose to be used
must comply with legal guidelines.
- The hose must be a maximum of 130 cm long, suitable for butane/propane, comply with national regulations and be fitted with a screw coupling.
- The installation must be carried out in accordance with the prescribed guidelines for the use and storage of liquid petroleum gases.
- A rusted, dented or damaged gas cylinder can be dangerous and must be checked by the gas supplier. Never use a gas cylinder with a damaged tap.
- Never connect a non-compliant gas cylinder to the terrace heater! The pressure regulator and hose to be used must comply with local regulations.

Gas
Because gas is odourless, an odorant is added to quickly detect a gas leak. Gas is heavier than air; so, try to detect the scent just above the ground!
If you smell gas, take immediate action!
- Immediately shut off the gas supply.
- Do not do anything that could create a spark or fire to prevent ignition of the gas. Do not switch electricity on or off, do not light a match, lighter or the like and do not use your phone.
- Move everyone away from the gas source and allow plenty of time for the gas to blow off. Stay away during that process! If you continue to smell gas or if you do not trust the situation, alert the fire brigade.
- Have a gas leak repaired by qualified persons!
ASSEMBLY (FIG. A-H)
Tools required
- Open-end wrench 10 and 13 mm
- Screw spanner 20 cm
- Pipe wrench
• Phillips screwdriver medium - Soap solution for leakage test
Step 1 (fig. B)
- Attach the three bent tubes to the base with 3 bolts (M8x15).
Step 2 (fig. C)
- Place the stand with mounting plate on the frame.
- Attach the stand to the frame with 6 long bolts (M6x35) and flange nuts
Step 3 (fig. D)
- Place the gas cylinder holder on the frame.
Step 4 (fig. E)
- Remove the 4 bolts from the bottom of the burner.
- Attach the gas hose to the burner.
- Insert the gas hose into the stand.
- Attach the burner to the stand with the 4 bolts.
Step 5 (fig. F)
- Check if the burner is mounted on the stand according to the instructions and all bolts and nuts are properly tightened.
- Screw 3 spacers with a washer between them onto the burner.
- Place a washer on each spacer.
Step 6 (fig. G)
- Remove the protective film from the 3 parts of the reflector.
- Attach the reflector parts to the mounting ring with bolts, washers and cap nuts.
- Place the reflector on the spacers.
- Fix the reflector with 3 washers and 3 wing nuts.
Step 7 (fig. H)
- Attach the wheels (if desired) to the base with bolts, washers and nuts.
- Attach (for permanent installation) the ground anchors to the base with bolts, washers and nuts.
- Lift the gas cylinder holder and rest it on the frame.
- Connect the pressure regulator to the gas cylinder and tighten with a spanner.
- Screw the gas hose to the pressure regulator.
- Place the gas cylinder in the frame.
- Lower the gas cylinder holder over the frame.
[info] The terrace heater is now ready for use.

The terrace heater is now ready for use.
Leakage test

Before using for the first time, perform an extensive leakage test.
- Carry out the check with a full gas cylinder.
- Set the control knob to the OFF position.
- Make a soap solution from one part liquid soap and one part water.
- Apply the soap solution to the entire gas path, especially to the joints, with a spray cylinder, cloth or brush.
- Turn on the gas supply. If there is a leak, soap bubbles will form.
- In the event of a leak, turn off the gas supply. Check the leaking part and tighten the nuts.
- Turn the gas supply back on and check again. If the leak is not resolved, contact your supplier.

Make sure there are no flames or sparks nearby when performing the leakage test and do not smoke!.
The terrace heater can only be put into use when it is 100% sure that no gas is leaking anywhere.
Location (fig. I)
- This device is primarily intended for outdoor use only.
• Always ensure adequate ventilation and fresh air supply - Always keep a sufficient distance from combustible materials, i.e., top 100 cm and sides at least 100 cm.
- The device must be placed on a flat, solid surface.
- Never use the device in an explosive environment such as in rooms where petrol or other flammable liquids or vapours are stored.
- To protect the device from strong winds, ground anchors can be attached to the base and anchored to the bottom with screws or tent pegs (not supplied).
USE
Switching on (fig. J)
- Open the tap on the gas cylinder fully.
- Push in the control knob (5) and turn the knob to the pilot position. Hold down the button for at
least 30 seconds (at least 90 seconds after reconnecting a new gas cylinder).
-
While holding the control knob in, press the igniter button (6) several times until the pilot ignites.
-
Release the control button.

If the flame will not ignite, turn the control knob to OFF wait 5 minutes and repeat step 3
-
Now turn the control knob to the HI position and let the terrace heater burn in this position for five minutes. Then turn the control knob to the desired power. High = maximum.
-
The pilot can be checked through the viewing hole with the slider, located on the side of the flame screen.
7.
Switch off
- Turn the control knob to the pilot position.
- Push the control knob in and turn it to the OFF position.
- Close the tap on the gas cylinder completely.
Replacing a gas cylinder
Disconnect the empty gas cylinder
- Switch off the device with the control knob and close the gas cylinder tap clockwise by hand.
- Let the device cool down for at least 15 minutes. After 15 minutes, check that there are no hot parts anywhere.
- Loosen the pressure regulator of the empty gas cylinder by hand, (preferably) do not use any tools.
Connect new gas cylinder
- Check the gas cylinder for damage and the pressure regulator for a perfect seal. When in doubt, exchange the gas cylinder with the gas supplier.
- Check whether the tap on the empty and new gas cylinder is turned off. Check that the valve seal on the new gas cylinder is in good condition. Do not use additional seals.
- Check that there are no kinks in the hose.
- Keep all possible ignition sources away. Think of sparks, cigarettes, hot surfaces, open flames, electrical devices, etc.
- Check that the sealing rubber is present in the
union nut of the pressure regulator and that it is in good condition.
- Connect the pressure regulator to the gas cylinder. Tighten the swivel nut firmly, anticlockwise, by hand, to obtain a gas-tight connection.
- Open the tap on the gas cylinder anti-clockwise.
- As soon as a hiss is audible, turn off the tap immediately. The connection is then not properly closed. Tighten the swivel nut of the pressure regulator.
- Do a leak test with soapy water.
- If no leakage is found, the device can be switched on.
CLEANING AND MAINTENANCE
Cleaning
- Clean the smooth surfaces with a soft damp cloth. Do not use highly flammable, aggressive or abrasive cleaning agents!
- Remove debris from the burner and flame screen to keep it clean and safe for use.
Maintenance
The device does not require any special maintenance.
STORAGE
- Clean the device.
- Check whether the valve on the gas cylinder is closed properly.
- Remove the pressure regulator and hose from the gas cylinder.
- Check the gas cylinder for damage and the pressure regulator for a good seal. If in doubt, exchange the gas cylinder with your gas supplier.
- Always keep a gas cylinder in a well-ventilated area.
- Store the device, without a gas cylinder, in a dry, dust-free and safe area. If necessary, the reflector and burner can be disassembled.
PROBLEMS AND POSSIBLE SOLUTIONS
| Problem Cause Solution | ||
| Pilot flame does not ligh Gas cylinder | der tap closedGas cylinder emptyGas nozzle cloggedAir in the systemLoose connection | DOpen tab on gas cylinderPlace a full gas cylinderCleanPress and hold control knob for 90 secondsCheck and close |
| Pilot flame goes out Dirt around pilot | flameLoose connectionGas leak in pipeLow gas pressure cylinder almost empty | CleanCheck and closeCheck and replacePlace a full gas cylinder |
| Burner does not light Low gas pressure | cylinder almost emptyGas nozzle cloggedControl knob to OFFPilot nozzle not installed correctlyTerrace heater is not level | Place a full gas cylinderCleanSwitch onHave it repairedPlace on a flat surface |
TECHNICAL DATA
Device category A
Gas category I3B/P (30)
Max. capacity W 13,000
Min. capacity W 5,000
Type of gas butane or propane
Gas consumption g/h 450-870
Supply pressure mbar 29
Burner injector size mm 1.9
Pilot injector size mm 0.18
Weight (without container) kg 15.5

GUARANTEE
Refer to the enclosed guarantee conditions for the terms and conditions of guarantee.
ENVIRONMENT
Your product, accessories and packaging should be sorted for environmental-friendly recycling.
Subject to change; specifications can be changed without further notice.
CE
VERKLARING VAN OVEREENSTEMMING DECLARATION OF CONFORMITY
CERTIFICAT DE CONFORMITÉ KONFORMITÄTSERKLÄRUNG
ART. NR. HYUNDAI 68801
TYPE NR. D018-14.4V2120
Dvize bv declares under its sole responsibility that this product is in conformity with the following standards or standardization documents: