
WB100MA - Scale TANITA - Free user manual and instructions
Find the device manual for free WB100MA TANITA in PDF.
User questions about WB100MA TANITA
0 question about this device. Answer the ones you know or ask your own.
Ask a new question about this device
Download the instructions for your Scale in PDF format for free! Find your manual WB100MA - TANITA and take your electronic device back in hand. On this page are published all the documents necessary for the use of your device. WB100MA by TANITA.
USER MANUAL WB100MA TANITA
text_image
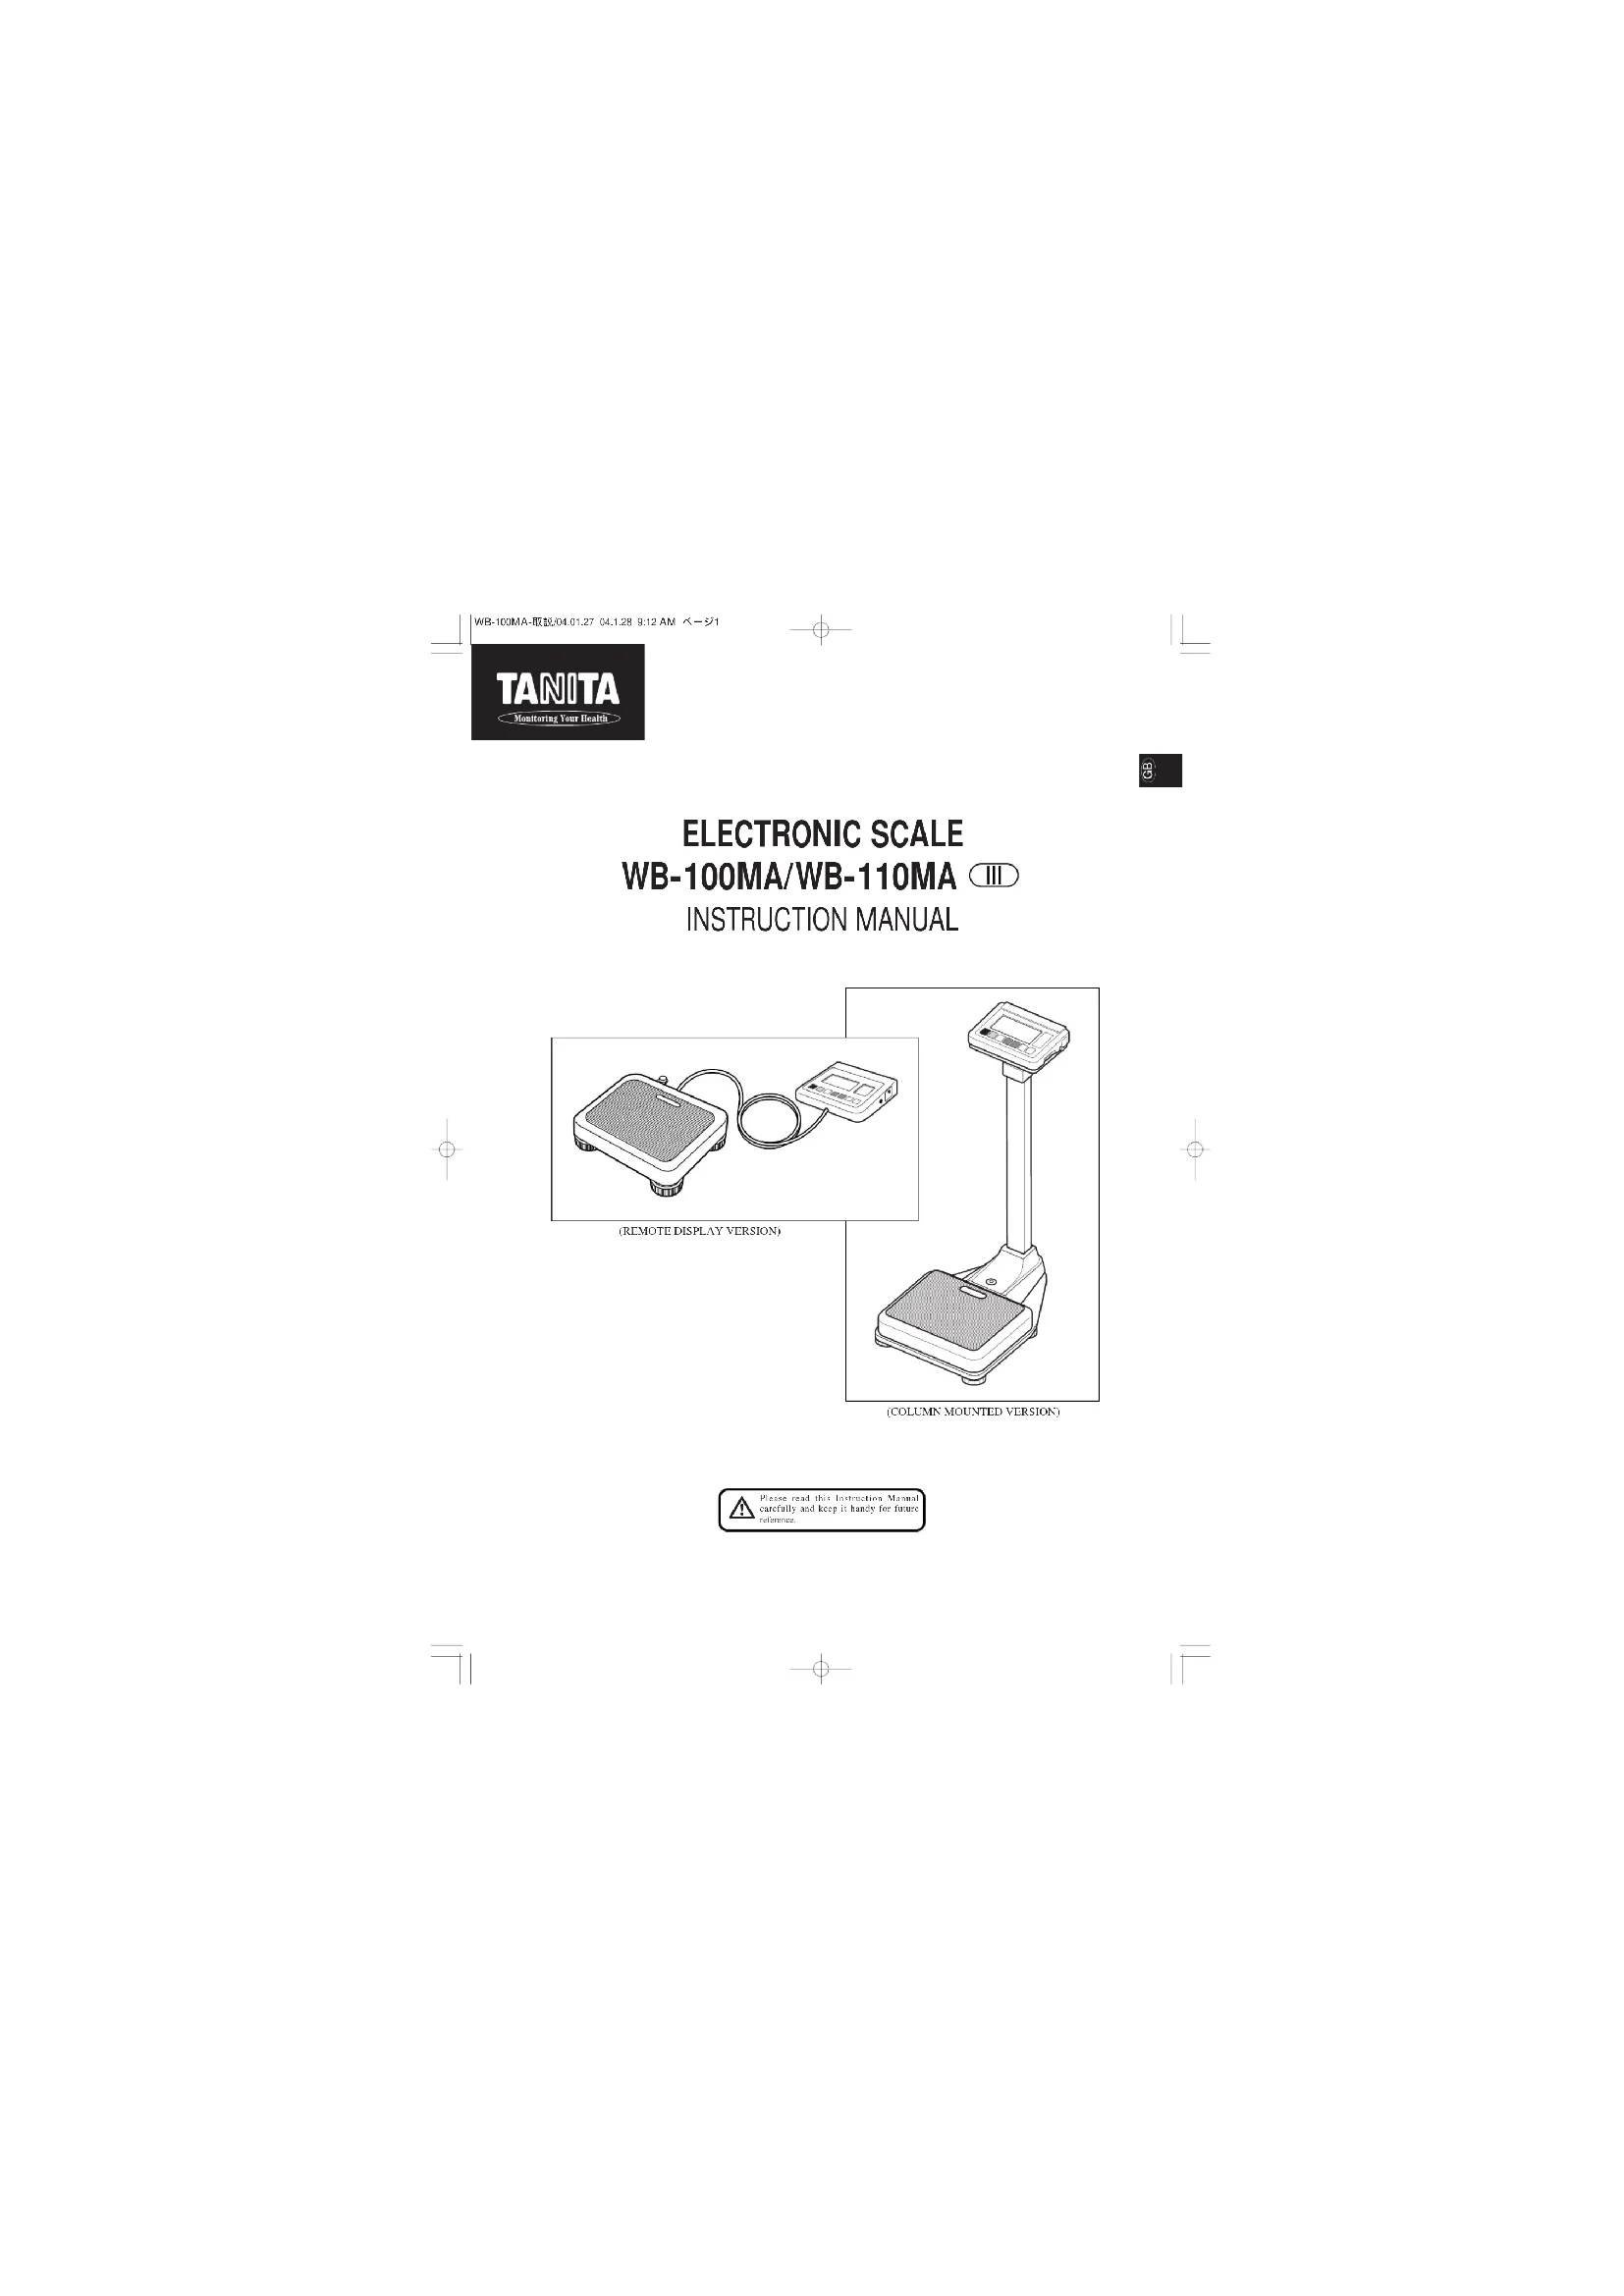
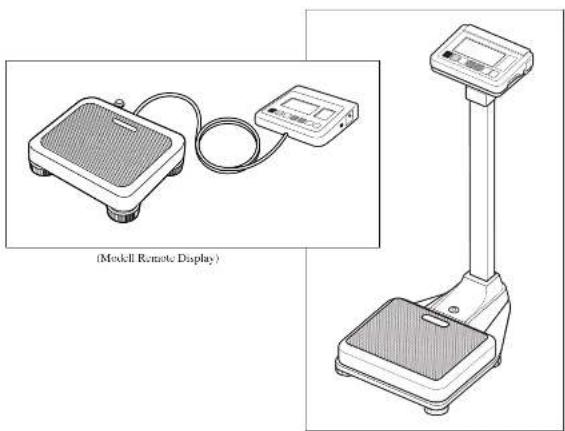
(REMOTE DISPLAY VERSION)(COLUMN MOUNTED VERSION)
Please read this instruction Manual carefully and keep it hardly for future reference.
WB-100MA-取説04 01.27 04 1.28 5:12 AM ページ2
C
2
Table of Contents
□ Table of Contents 3
Applications 4
□ Safety Notes 4
Caution Symbols 4
Caution
△[Maintenance] 5
△[Instructions for Measurement] 5
Storage Conditions
- Product Assembly and Components 6
■ Product Components....6
(Remote Display Version)
(Column Mounted Version)
■ Control Panel 7
■ Symbols and their Meanings 7
- Preparation for Use B
■ Level Adjustment....5
(Remote Display Version)
(Column Mounted Version)
■ Installation of the Equipment 8
(Remote Display Version)
■ Prepare Power Source 9
- Operating Instructions....10
Standard Weighing Procedures 10
- Tare Weighing 10
3.Cancellation of Tare Weighing Function 10
4.BMI Calculation: 11
- RS-232C Communication Specifications 12
■ Specifications 12
■ Names and connection methods for signal lines ……12
■ Weighing Mode 12
■ EMI Mode 12
5.Troubleshooting 13
■ Possible Problems 13
□Specifications Back cover
GB

3
Applications
- This equipment has been calibrated as a precision weighing instrument and can be used to certify weights and/or business transactions.
- It can be used to obtain reference data during medical examinations, such as periodic checkups, and can help the prevention of obesity.
Safety Notes
Caution Symbols
In this Instruction Manual and the descriptions on the equipment, there are various caution symbols that will enable you to use this equipment safely and correctly so that harm to you and other people and loss of your property will be prevented.
The symbols and their meanings are as follows. Please understand them well before proceeding with the Instruction Manual.

This symbol indicates the risk of death or serious injury if the safety instructions are ignored and the equipment is misused.

This symbol indicates the risk of physical injury and/or damage to the equipment if the safety instructions are ignored and the equipment is misused.

This symbol indicates general precautions that should be taken when using this equipment.
Warning
To prevent electric shocks,
Do not insert or remove the power plug with wet hands.
To prevent fire hazards,
Always use a correctly wired 230V AC not multiple extension cords.
Caution
• To prevent the spread of infections,
Always clean the Weighing platform after use. Sterilize the platform with an appropriate alcohol-based cleaning fluid before each use.
• Installation of the Weighing Platform
Ensure the weighing platform is placed on a level and stable surface. If the equipment is used when the Platform is unstable, for example because not all the feet are on a level surface, there is a risk that it will topple over and it will be impossible to obtain an accurate measurement.
To avoid the risk of injury and damage to the equipment, never jump on the platform.
• How to handle the equipment when moving it
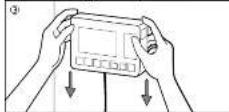
Since the Platform is heavy, please lift it by holding the Platform firmly with both hands so that you do not drop
- AC Adapter
Ensure that the adapter supplied (model A30930G) is always used with this equipment. Other adapters may cause malfunctions.
- Battery
When changing batteries, ensure that the new batteries are inserted with the correct polarity ⊕. ⊗ the polarity is incorrect, then the batteries may leak and damage the equipment.
• The circuit board incorporates a fuse (100mA, 125V) for electronic equipment. If devices other than the original AC adapter are used or a large electrical current is applied, the fuse will be blown for safety purposes. If the fuse is blown, the unit must be inspected and repaired. As the fuse forms a fixed part of the unit and cannot be easily disassembled by the customer, please consult your nearest Tanita sales office or agent when the fuse needs to be replaced.
⚠️ [Maintenance]
This is a precision manufactured and accurately calibrated product. Please observe the following instructions.
- Never disassemble or adjust the equipment, as this may cause malfunctions. The equipment should only be inspected in accordance with the regulations in each country.
- When not in use for a long time, unplug the AC Adapter from the wall socket.
- When not in use for a long time, remove the batteries before storing the equipment.
- Do not wipe the equipment with corrosive chemicals (benzine, cleaner, etc.). Please use a neutral detergent to clean the equipment
- Avoid subjecting the equipment to excessive shocks or vibrations.
- When disposing of this unit, please do so in accordance with the prevailing regulations in each country.
- If an unauthorised person attempts to disassemble or repair any of the part, the warranty will become invalid. When the unit malfunctions, please consult your nearest Tanita sales office or agent.
⚠ [Instructions for Measurement]
- Measurement may not be possible on a surface that is strongly vibrating. In such cases transfer the equipment to a stable surface with little or no vibration.
- When the equipment has been transferred to another location with a temperature difference of more than 20°C, leave at least two hours before using.
- While taking measurements, please keep any persons using transmitters, such as a mobile phone, away from the unit to avoid causing margin errors.
Temperature Range for Use : 0°C / +35°C
Relative Humidity: 30% / 80% (without condensation)
Temperature Range of Environment : -10°C / +50°C
Range of Relative Humidity : 10% / 90% (without condensation)
To avoid malfunctions, do not store the equipment in direct sunlight, significant temperature changes, the risk of dampness, a large amount of dust, in the vicinity of fires or where there is a risk of receiving vibrations or shocks.
| Value Range | |
| Voltage Range | 230VAC |
| Frequency Range | 50Hz |
| Electric Current Range | 65mA |
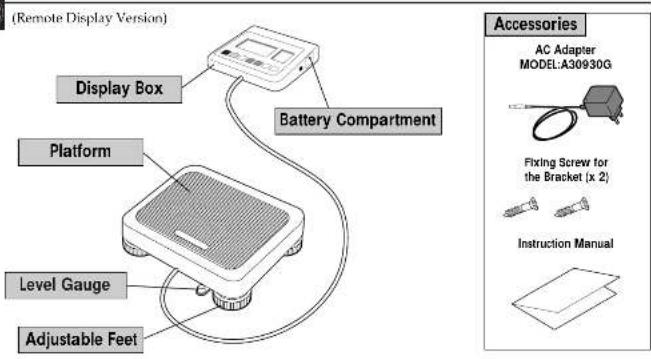
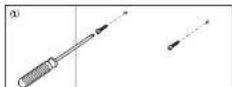
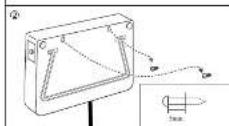
1.Product Assembly and Components
■ Product Components Please verify that the following components are in the package.
(Remote Display Version)
text_image
(Remote Display Version) Display Box Battery Compartment Platform Level Gauge Adjustable Feet Accessories AC Adapter MODEL:A30930G Fixing Screw for the Bracket (x 2) Instruction Manual(Column Mounted Version)
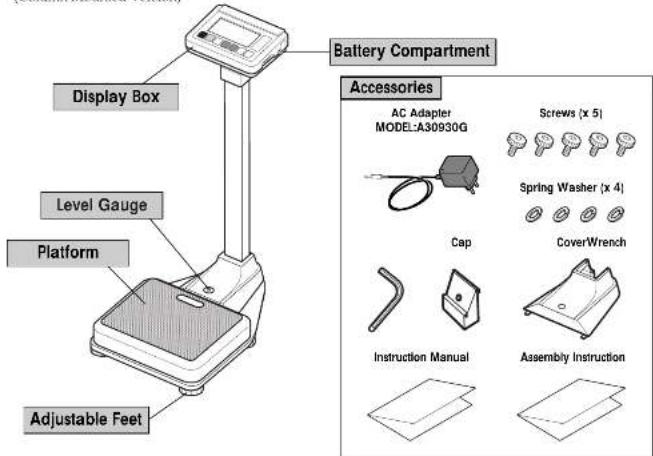
text_image
Display Box Level Gauge Platform Adjustable Feet Battery Compartment Accessories AC Adapter MODEL:A30930G Screws (x 5) Spring Washer (x 4) Cap CoverWrench Instruction Manual Assembly Instruction6
Control Panel
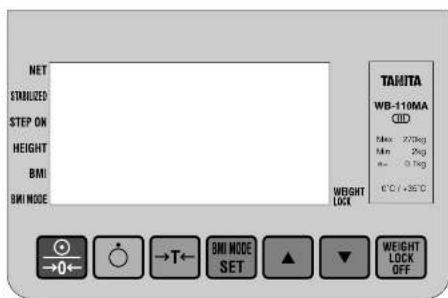
text_image
NET STANULZED STEP ON HEIGHT BMI BMI MODE TAMITA WB-110MA CID Max: 270deg Min: 2kg Max: 0.1kg °C / +36°C WRIGHT LOCK →0← →T← BMI MODE SET ▲ ▼ WEIGHT LOCK OFF
Power on and/or reset the display to zero.

Power off.

Tare weighing function.

8VII mode, and/or height setting.

Mode selection or increase numerical values.

Mode selection, or decrease numerical values.

Weight Lock Release
NET mark:
An arrow appears next to this icon when the tare weighing function is on.
STABILIZED mark:
Indicates that the displayed figure has stabilized.
STEP ON mark (Ready mark):
Indicates that the scale is ready to begin measurements.
HEIGHT mark (Unit of height):
Indicates the height is set
BMI mark:
Indicates that BMI calculation.
BML MODE mark:
Indicates when BMI mode is on.
WEIGHT LOCK mark:
indicate when the measurement is stabilized.
It appears only when the weight Lock Switch is on.
■ Symbols and their Meanings
| : Display Unit On. | : Display Unit Off. | --- | : Direct current |
| : Class II Equipment | : Type B applied part | →0← | : Zero reset |
| →T← | : Caution. Refer to the attached notes. | CEon | : Conformity with Medical Device Directive 93/42/EEC |
7
2.Preparation for Use
Level Adjustment
C
(Remote Display Version)
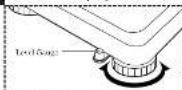
*Adjust the level by rotating the adjustable feet.
(Column Mounted Version)
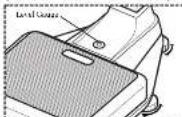
*Adjust the level by rotating the adjustable net.
For accurate measurement, place the unit on as flat a surface as possible and adjust the level with the adjustable feet so the bubble in the level gauge is in the center of the frame.
Caution
Place the equipment on a level surface. If the equipment is not stable, for example because not all the feet are on a level surface, there is a risk that it will topple over and it will be impossible to obtain an accurate measurement.
■ Installation of the Equipment (Remote Display Version)
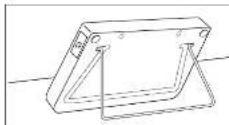
When using the stand
Please pull out the stand at the back at the display box.
When pulling away the display box, please insert the stand in the slot on the back of the display box.
When installing the display box on the wall
① Screw the wall-hanging screws into the wall I leave the screws procuding from the wall by 5 mm
② Insert the screw heads in the holes on the back of the display box. ③ Pull down the display box securely into place.
- If the Display Box is not fixed sufficiently, there is a danger that it may fall down. - Avoid installing the Display Box in a place where users may step an or get caught by the cable. - Do not save the Display Box by the cable.
- Do not swing the Display Box by the cable.
8
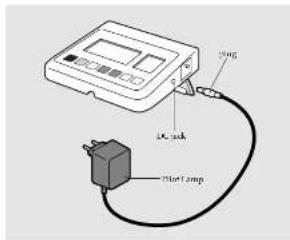
■ Prepare Power Source
① When using the AC Adapter
text_image
100 μA 500 μA 100μA lamp⑦ When using dry cell batteries
text_image
Fixing Sensors for the Battery Compartment Dry Cell Switches Battery Compartment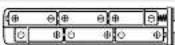
Insert the cable plug for the AC Adapter into the DC jack on the side of the Display Box, and insert the AC Adapter plug into a 25IV AC mains DC jack.
Then confirm the Pilot Lamp on the AC Adapter lights up.
Warning
- To avoid electric shocks, do not insert and remove the plug with wet hands.
Caution
- Use only the AC adapter (MODEL: A30930G) specified. Using an AC Adapter other than that specified may cause malfunctions.
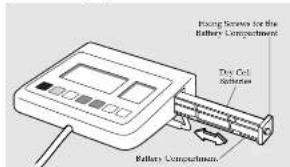
Uncrew the Fixing Screws for the Battery Compartment on the right side of the Display Box and pull out the Battery Compartment. Place dry cell batteries LR6 (AA) in the correct positions as instructed inside the Battery Compartment and fix the Battery Compartment with the Fixing Screws.
It is displayed on the Display, please replace all the six
batteries LR6 (AA) with new ones.
appares when the battery voltage is lower than 6.5 V =10%.
- Please change the batteries LR6 (AA) carefully to avoid dropping them on your feet.
- Ensure that the batteries are inserted with the correct polarity Ⓤ. The polarity is incorrect, then the batteries may leak and damage the equipment.
- When not to use for a long time, remove the batteries before storing the equipment.
- When the equipment has been transferred to another location with a temperature difference of more than 20°C, leave at least two hours before using.
③ Auto Power off Interval Setting
When the Scale power off,Press key and held.

Release the holding key
The display turns to "Auto Power Off Interval Setting Mode"
showing "20" as 20 minutes power off setting as default.
Press ▲ (up arrow) or ▼ (down arrow) key and set 10 for 10 minutes and/or CONT for continuous setting if required.
Press key to complete
9
3. Operating Instructions
- Standard Weighing Procedures
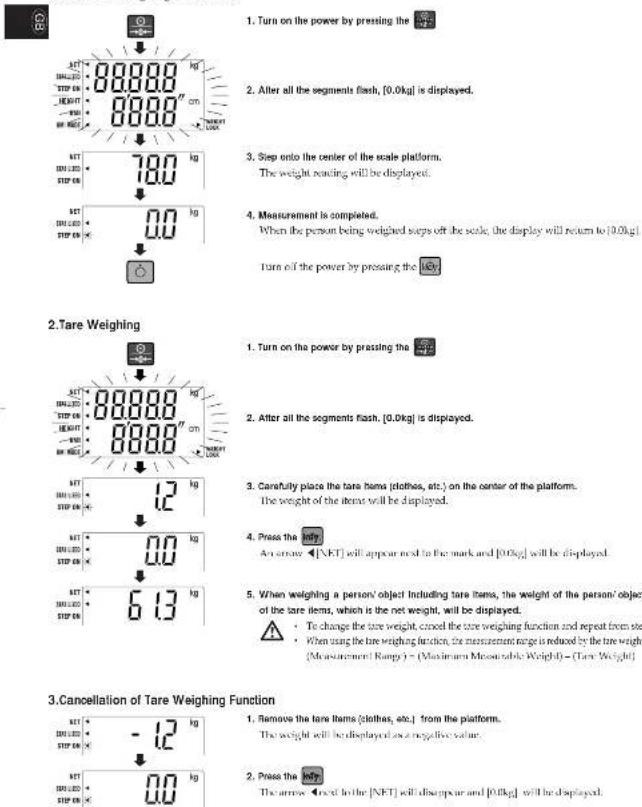
text_image
1. Turn on the power by pressing the 2. After all the segments flash, [0.0kg] is displayed. 3. Step onto the center of the scale platform. The weight reading will be displayed. 4. Measurement is completed. When the person being weighed steps off the scale, the display will return to [0.0kg] Turn off the power by pressing the 2. Tare Weighing 1. Turn on the power by pressing the 2. After all the segments flash, [0.0kg] is displayed. 3. Carefully place the tare items (clothes, etc.) on the center of the platform. The weight of the tare will be displayed. 4. Press the tare An arrow [NFT] will appear next to the mark and [0.0kg] will be displayed. 5. When weighing a person' object including tare items, the weight of the person' object of the tare items, which is the net weight, will be displayed. To change the tare weight, cancel the tare weighing function and repeat from step When using the tare weighing function, the measurement range is reduced by the tree weight [Measurement Range] = (Maximum Measurable Weight) - (Tare Weight) 3. Cancellation of Tare Weighing Function 1. Remove the tare items (clothes, etc.) from the platform. The weight will be displayed as a negative value. 2. Press the tare The arrow need to be in the [NFT] will disappear and [0.0kg] will be displayed.4.BMI Calculation:
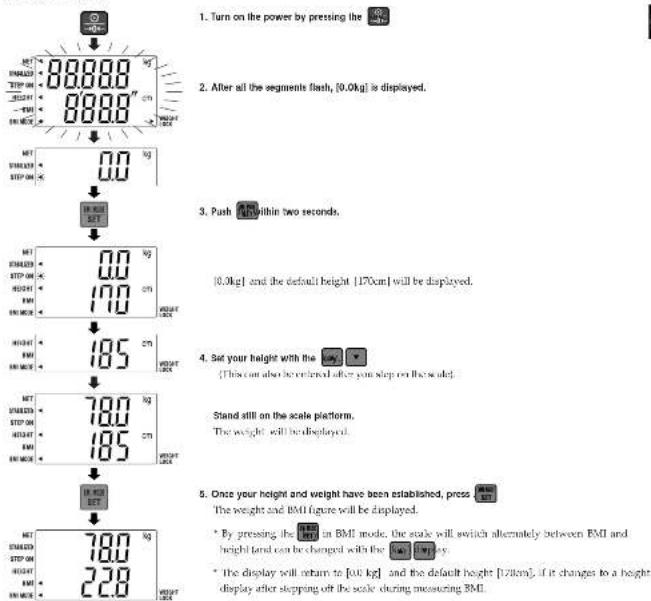
text_image
1. Turn on the power by pressing the 2. After all the segments flash, [0.0kg] is displayed. 3. Push 450000000000000000000000000000000000000000000000000000000000000000000000000000000000000000000 4. Set your height with the [This can also be ordered after your sleep on the scale] 5. Stand still on the scale platform. The weight will be displayed. 6. Once your height and weight have been established, press 450000000000000000 The weight and BMI figure will be displayed. * By pressing the BMI in BMI mode, the scale will switch alternately between BMI and height range can be changed with the BMI rowry. * The display will return to [45 kg] and the default height [128cm], if it changes to a height display after stepping off the scale during measuring BMI.Guidelines based on NIH/ WHO BMI
| Under Weight | BMI < 18.5 | |
| Normal Range | 18.5 ≤ BMI < 25 | |
| Pre-obese | 25 ≤ BMI < 30 | |
| Obese | CLASS I | 30 ≤ BMI < 35 |
| Obese | CLASS II | 35 ≤ BMI < 40 |
| Obese | CLASS III | BMI ≥ 40 |
4. RS-232C Communication Specifications
■ Specifications

| Communication standard | FIA RS-232C |
| Communication method / frequency method | |
| Signal speed 2,400 bit | |
| Data bit length 7 bit | |
| Parity EVEN | |
| Stop bit 1 bit | |
■ Names and connection methods for signal lines
| terminal no. Signal name | |
| 1 | |
| 2 TXD | |
| 3 RXD | |
| 4 | |
| 5 GND | |
| 6 | |
| 7 | |
| 8 | |
| 9 | |
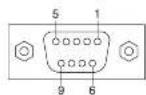

- An RS-232C connector ID sub 9 pin female is attached to the side of the display box.
- When connecting the display box with a personal computer, etc., please use an IS-232C straight cable.
• Use the RS212C cable shorter than 3m long.
■ Weighing Mode
When receiving 4 bytes of data as indicated in 1-1 while using the scale in weighing mode, weight data will be output in 14 bytes, as indicated in 1-2.
1.1 Reception data

1-2 Transmission data

Details of Weiching Mode Transmission Data
| Byte nos. 1-2 | Header | 2 bytes fixed | 5D: Unstable 5 : Sluble St. Overhead, et. |
| Byte nos. 3-4 | Separator | 2 bytes fixed | 2 squares |
| Byte nos. >10 | Weight data | 6 bytes fixed | Right-aligned |
| Byte nos. 11-12 | Maximaterials | 2 bytes fixed | Kg/kg |
| Byte nos. 13-14 | Terminator | 2 bytes fixed | CR-LF |
BMI Mode
While the scale is used in BMI risks, the output data will very depending on the form of the received data.
⑤ When receiving 4 bytes of data, as indicated in 1-3, the scale will calculate your IBM using the currently input height figure, and 26 bytes
of data will be output, as indicated in 2.1 or 2.2, depending on the measurement unit.
② When receiving 11 bytes of data, including measurement units and height figures, in the form indicated in 12 or 13, the scale will
calculate your BMI using these figures, and 26 bytes of data will be output, as indicated in 2-1 or 2-2, depending on the measurement
1-1 Reception data

1-2 Reception data (height data when using ke)
2-1 Transmission data (kg/cm)
Details of BMI mode transmission data
| Byte nos. 1-2 | Marker | 2 bytes fixed | 5D: Unstable 5; Unstable St. Overhead, etc. |
| Byte nos. 2-4 | Separator | 2 bytes fixed | 2 spaces |
| Byte nos. 3-10 | Weight data | 6 bytes fixed | Right aligned |
| Byte nos. 11-12 | Maximetrums | 2 bytes fixed | Kg/kg |
| Byte nos. 13 | Separator | 1 byte fixed | 1 corrma |
| Byte nos. 14-18 | Height data | 5 bytes fixed | Right-aligned |
| Byte nos. 19 | Separator | 1 byte fixed | 1 corrma |
| Byte nos. 20-24 | BMI data | 5 bytes fixed | Right aligned |
| Byte nos. 25-26 | Terminator | 2 bytes fixed | CR+LF |

5.Troubleshooting
■ Possible Problems
If problems occur, please refer to the following instructions. If the problem persists contact your nearest Tanita sales or repair center.

| Problem | Solution |
| The unit does not turn on when the key is pressed. | •When Using with the AC Adapter Ensure that the AC Adapter cable is properly connected with the Display Unit. Ensure that the AC Adapter is correctly inserted in the main DC jack.•Using dry cell batteries The batteries may have run out. Continue that the equipment is working by using the AC Adapter or new batteries. |
| Measurement is not correct. | •Please confirm that all the adjustable feet are resting on a level surface. |
| Measurement does not become stable. Display turns on and off. | •Measurement may be impossible in the case of excessive vibration. Use the equipment in another place. |
| ----|is displayed. | •It is possible that the maximum weight capacity has been exceeded. Please stop measuring. |
| xxxx|is displayed. | •Do not stand on or put objects on the Platform before starting measurement. Start measurement after confounding there is nothing on the Platform. |
WB-100MA-取説:04 01.27 04 1.28 5:12 AM ページ14
Specifications
| TYPE WR-TRIMA WR-TRIMA | ||||
| Power Source | AC adaptive Centre miniMODEL A209/00CLASS 2Input Voltage: 230VAC50Hz5mAOutput Voltage: 9VDC10.45VDCRated Current: 300mANo Load Input Voltage: 12VDC40.6VDCLR6 (AA Alkaline battery) x 8, (Not included) | |||
| Power Consumption 0.3W max | ||||
| Weight Measurement | Measurement System | Strain Gauge Load Cell | ||
| Maximum Capacity/Million Graduation | 260kg/0.1kg | 320kg/0.1kg | ||
| Accuracy at test calibration | ±0.1kg | |||
| Input Items | Height | 90 - 240cm/1cm increments | ||
| Output Items Display | Weight | 270kg/0.1kg incrementx200kg/ | ||
| Height | 50 - 380cm/1cm increments | |||
| BMI | 0.1 increments | |||
| Size(Ratio Parle Version) | Display | 150x209x56mm | ||
| Platform | 320x336x80mm | |||
| Cable Length | 5m | |||
| Size (Columns Mounted Version) | 336x600x1070mm | |||
| Display | Upper Digital and Lower 4Digital LCDHeight of numerals 25mm | |||
| Output Data Interface | RS 222C (D-sub 9xns Female Connector) | |||
| Temperature Range of usage | 0°C/33°C | |||
| Relative Humidity | 20%~80% (without concentration) | |||
| Weight or Equipment (Remove Display Version) | 5.1kg (except battery) | |||
| Rated Power | 10.8kg (except battery)/Weight of Equipment ColumnDC9V 300mA (LR6 (AA Alkaline battery) X6 not included)approximately 100 hours of continuous use when using LR6 (AA Alkaline battery) | |||
| Battery Life | ||||
TANITA
Monitoring Your Health
ELEKTRONISCHE WAAGE
WB-100MA/WB-110MA Ⅲ
BEDIENUNGSANLEITUNG
This product meets the following requirements:
- Medical Taxis Directive (95/42, FFC)
Safety Standard: EN6301-1:1990, AM Na.1:1953, AM Na.2:1995
IEC eblel-1:968,AM No.1:1991,AM No.2:1995
LMC Standard: LN6061 12:300
- Non-Automatic weighing Instruments (50/384/FFC)
TANITA UK LTD.
The Barn, Polketa Close, Yvesley,
Wid closer.
Dr. 769, Canadian Kingdom Tel.: +44-1895-458527
http://www.tanita.co.uk
TANITA
TANITA Corporation
14.2.1 chora Nano cho Iabama-ko
Tokyo Japan
Tel:03/3968-2121 / 03/1568-7048 Fax:03/3967-3766
TANITA Corporation of America, inc.
2625 South Clarkbrook Drs
Arlington Heights, Illinois 60205 U.S.A.
28 Hbc (800) 526-4829
Fax: 847-640-5261
trip: double beta
TANITA Health Equipment H.K.LTD.
Unit 301 10G S/F Wing On Plaza.
62 Mrdy Road, Taimshatsui East
Kowloon, Hang Kong
Tel: 4052-2693-7111 Fax: +852-2693-8667
注:4022-2035 101
TANITA Europe GmbH
Ergoster Strasse 25
D-71065 Stredfings
Germany
Tel: 07021-61896 Fax: 07031-818971
http://www.tanta.de
TANITA FINANCE S.A.
Win Labizuste
68 Boulevard 50
92200 Equity-Sur-Sure,
Phone: 51-68-24-20-39
Fax: 01-55-24 38-68
B.2014年5月
text_image
(Modell Remote Display)(Modell Remote Display)
(Modell Remote Display)
(Modell Remote Display)
(Modell Remote Display)
D

text_image
AT 100.00 STEP ON 400.00 200.00 OFF 88.00 88.00" 78.00 18.00 50.00 0.00 STOP ON STOP ON STOP ON STOP ON STOP ON STOP ON STOP ON STOP ON STOP ON STOP ON STOP ON STOP ON STOP ON STOP ON STOP ON STOP ON STOP ON STOP ON STOP ON STOP ON STOP ON STOP ON STOP ON STOP ON STOP ON STOP ON STOP ON STOP ON STOP ON STOP ON STOP ON STOP ON STOP ON STOP ON- Medical Practice Directive (95/42/FWG)
Saherhauteore : FNS080-):1990, AM Nr. 1:1993, AM Nr. 2:1995
IEC 6001-1:988, AM Nr 1:1951, AM Nr 2:1955
EMC Norm: LN6091 12:30/1
2.Nichotomotive Wilm weight 09/784 (THC)
2.NiRBCAMONIA S. K. (PRESISTRE, 1970/384) EWS
TANITA UK LTD.
The Barn, Polketa Close, Yvesley,
Wardlose.
UBP 783, United Kingdom
Tel: +44-1895-438577 Fax: +44-1896-438511
http://www.108.com.cn
TANITA
TANITA Corporation
14-2.1-chorus Namo cho Iaburu-ko
Tokyo: Japan
Tel:10518968-2121/10517568-7048 Fax:10518967-1256
TANITA Corporation of America, inc.
2435 South Claytmok Dras
Jiangzhou Hainbin, Hong Kong 60205 U.S.A.
Toll Free (B00) 826-4828
d: M7-610-6241
Fax: 847-640-5261
http://www.isola.com
TANITA Health Equipment H.K.LTD.
Unit 301-108 SF Wino Co Pizza
62 Mrdy Road, Trimsbatsui East
Комиран, Ната Кара
Tel: +852-2838-7111
Fax: +352-2838-8667
President, Stress 25
D-71065 Skredolfroan
Cognizzi
Tel: 07031-61896
Fax: 07031-818971
http://www.tanita.de
TANITA, FRANCE S.A.
Win / shipments
- Всюльник
92700 Roche-Sun-Sure
France
Tel: 01-65-24-99-99
Fax: 11-55-24 38-68
1952003月8日
TANITA
Monitoring Your Health
BALANCE ELECTRONIQUE WB-100MA/WB-110MA III
MODE D'EMPLOI
text_image
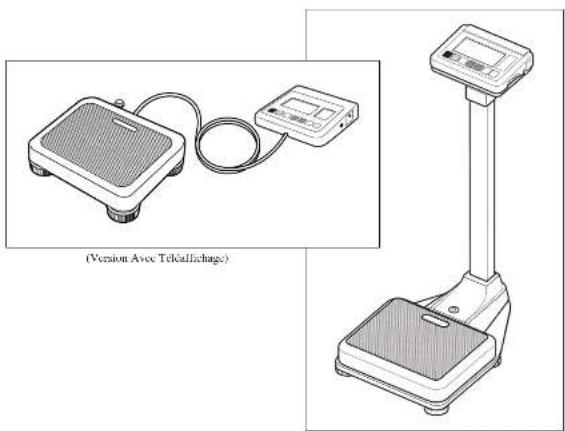
(Version Avec Tekäffischage)Please read this instruction Manual carefully and keep it hardly for future reference.
WB-100MA-取説04 01.27 04 1.28 9:12 AM ページ30
Table des matières
■ Pashou or control 43
text_image
Technical diagram showing three-step installation of a screwdriver, a device with internal components, and a handheld device with control buttons.IEC eblel-1:968,AM No.1:1991,AM No.2:1995
Nocme LMC : EN60501 1 2201
The Barn, Projecta Close, Yewashay,
Msd close.
GBP 7185, United Kingdom
Tel: +44-1895-438577 Fax: +44-1896-438511
http://www.tanfa.co.uk
TANITA
TANITA Corporation
14.2.1 chora Namo cho Iaburn-ko
Tokyo Long
Tel: (08)3968-2121 / (08)3568-7048 Fax: (08)3967-1256
TANITA Corporation of America, inc.
2435 South Claytmok Dras
Jinotro Hainita, Illinois 60205 U.S.A.
Toll Free: (800) 826-4828
14:247-640-8241
Fax: 847-640-5261
trip: www.tsd.com
TANITA Health Equipment H.K.LTD.
Unit 301-108 SIE Wino Co Plaza
62 Mrdy Road, Trimsbatsui East
Комиран, Ната Кара
Tel: +852-2838-7111
Fax: +352-2838-8667
92700 North-Sun-Sara
France
Tel: 01-65-24-99-99
Fax: 01-55-24-38-68
2016年5月
TANITA
Monitoring Your Health
BILANCIA ELETTRONICA
WB-100MA/WB-110MA III
text_image
ACT MINI:0.00 STEP ON HEIGHT: -500 OFF: 120 88.000 88.00" mm TIME: 300 TIME: 300 STEP ON NAT MINI:0.00 STEP ON 78.0 kg NAT MINI:0.00 STEP ON 0.0 kg2-1 Transmissione dati (Kg/cm)
$$ \begin{array}{c c c c c c c c c c c c c c c c c c c c c c c c} 1 & 2 & 3 & 4 & 5 & 6 & 7 & 8 & 9 & 1 0 & 1 1 & 1 2 & 1 3 & 1 4 & 1 5 & 1 6 & 1 7 & 1 8 & 1 9 & 2 0 & 2 1 & 2 2 & 2 3 & 2 4 & 2 5 & 2 6 \ \hline S & D & & \gamma & 5 & . & \phi & k & g & & & & & & 1 & 8 & 0 & , & & 2 & 3 & . & & 1 & C R L F \end{array} $$
Monitoring Your Health
BÁSCULA ELECTRÓNICA
WB-100MA/WB-110MA Ⅲ
IEC8041-1:1951, AM N.2:1991, AM N.2:1995
Ch: 763, Canadian Kingshire Tel: +44-1895-438527.
http://www.tanita.co.uk
TANITA
TANITA Corporation
14-2.1-chorus Nano cho Iaburu-Ju
Tokyo Japan
Tel:03/8968-2121 / 03/1568-7048 Fax:03/8967-3766
TANITA Corporation of America, inc.
2625 South Clarkbrook Drive
Arlington Heights, Illinois 60205 U.S.A.
20 Hize (800) 826-4829
Fax: 847-640-5261
http://www.boc.cn
TANITA Health Equipment H.K.LTD.
Unit 301 10G S/F Wing On Plaza.
62 Mody Road, Taimshatsui East
Kowshan, Hang Kong
Tel: 4052-2693-7111 Fax: +852-2693-8667
注:4022.27.09 151
TANITA Europe GmbH
Ergoster Strasse 25
D-71065 Stredlings
Germany
Tel: 07031-61896 Fax: 07031-618971
http://www.tanta.de
TANITA FRANCE S.A.
Win Lshizuge
68 Boulevard
92200 Equity-Sur-Sure,
Phone: 71-48-24-26-50
Fax: 11-55-24 38 68
http://www.bndla.h

natural_image
Illustration of a digital pressure meter connected to a control unit (no text or symbols visible)natural_image
Line drawing of a digital balance scale with a top and base plate (no text or symbols)text_image
Technical diagram showing three-step installation of a screwdriver, a device with internal components, and a handheld device with control buttons.The Bars, Phigots Close, Yesterday
Middlesex
CB7 2HY, Unitat Kingston
Tel: +44-1895-438577 Fax: +22-1895-438511
http://www.banta.co.uk
TANITA
TANITA Corporation
14-2.1-chrome Nama-sha Babistki
Taiwan Jaya
Tel:0312958-2123 / 10312968-7048 Fax:0312957-2766
TANITA Corporation of America, inc.
5625 South Clarkbrook Drby
(4) proton heights. Limp 6205 J.S.A
Tel Free: (800) 826-4828
-1:847-540-924
Fax:847-640-926
http://www.tanfa.com
TANITA Health Equipment H.K.LTD.
87 Modu Road, Immaterial East
Koalap, Hara Kea
[1]:+152-2818-711
Fax: +152-2838-8667
2、本次发行股份购买资产的定价依据
TANITA Europe GmbH
https://www.fzq.com/
B.2023年1月