
Appia Life - Coffee machine NUOVA SIMONELLI - Free user manual and instructions
Find the device manual for free Appia Life NUOVA SIMONELLI in PDF.
| Product type | Professional espresso coffee machine |
| Brand | Nuova Simonelli |
| Model | Appia Life |
| Category | Coffee machine |
| Intended use | Coffee, steam and hot water dispensing by professionals |
| Boiler capacity | 4.4 liters |
| Boiler material | DHP copper 99.9% |
| Boiler service pressure | 1.0 - 1.4 bar (adjustable) |
| Pump pressure | 9 bar (adjustable) |
| Power supply | See rating plate (e.g., 230V, 50/60Hz) |
| Power | See rating plate |
| Water mains pressure | 2 - 6 bar (cold water) |
| Minimum water flow rate | 200 l/h |
| Recommended water hardness | 50 - 60 ppm (French TH 3/5°) |
| Operating temperature | +5 °C to +30 °C |
| Noise level | Less than 70 dB(A) |
| Main functions | Coffee dispensing (volumetric), manual steam or Easycream (optional), hot water, dose programming, automatic cleaning cycle |
| Routine maintenance | Daily cleaning of groups with blind filter, weekly cleaning of shower screens, regular regeneration of water softener |
| Safety | Mandatory grounding, main switch, overheating protection, backflow prevention device |
| Spare parts and repairability | Original spare parts available, intervention reserved for qualified technician |
| General information | User manual provided, CE declaration of conformity, warranty voided if non-compliant use |
Frequently Asked Questions - Appia Life NUOVA SIMONELLI
User questions about Appia Life NUOVA SIMONELLI
0 question about this device. Answer the ones you know or ask your own.
Ask a new question about this device
Download the instructions for your Coffee machine in PDF format for free! Find your manual Appia Life - NUOVA SIMONELLI and take your electronic device back in hand. On this page are published all the documents necessary for the use of your device. Appia Life by NUOVA SIMONELLI.
USER MANUAL Appia Life NUOVA SIMONELLI
IT LIBRETTO ISTRUZIONI (Istruzioni Originali)
EN USER HANDBOOK (Translation of the Original Instructions)
FR MANUEL D'INSTRUCTIONS (Traduction des Instructions Originales)
APPIA life.
PROGRAMMAZIONE / PROGRAMMING / PROGRAMMATION
(versioni SeV) (S and V versions) (versions S et V)
PULIZIA / CLEANING / NETTOYAGE
MANUTENZIONE / MAINTENANCE / ENTRETIEN
MESSAGE FUNZIONI MACCHINA APPIA LIFE V / APPIA LIFE V MACHINE
FUNCTION MESSAGES / MESSAGES FUNCTIONS MACHINE APPIA LIFE V
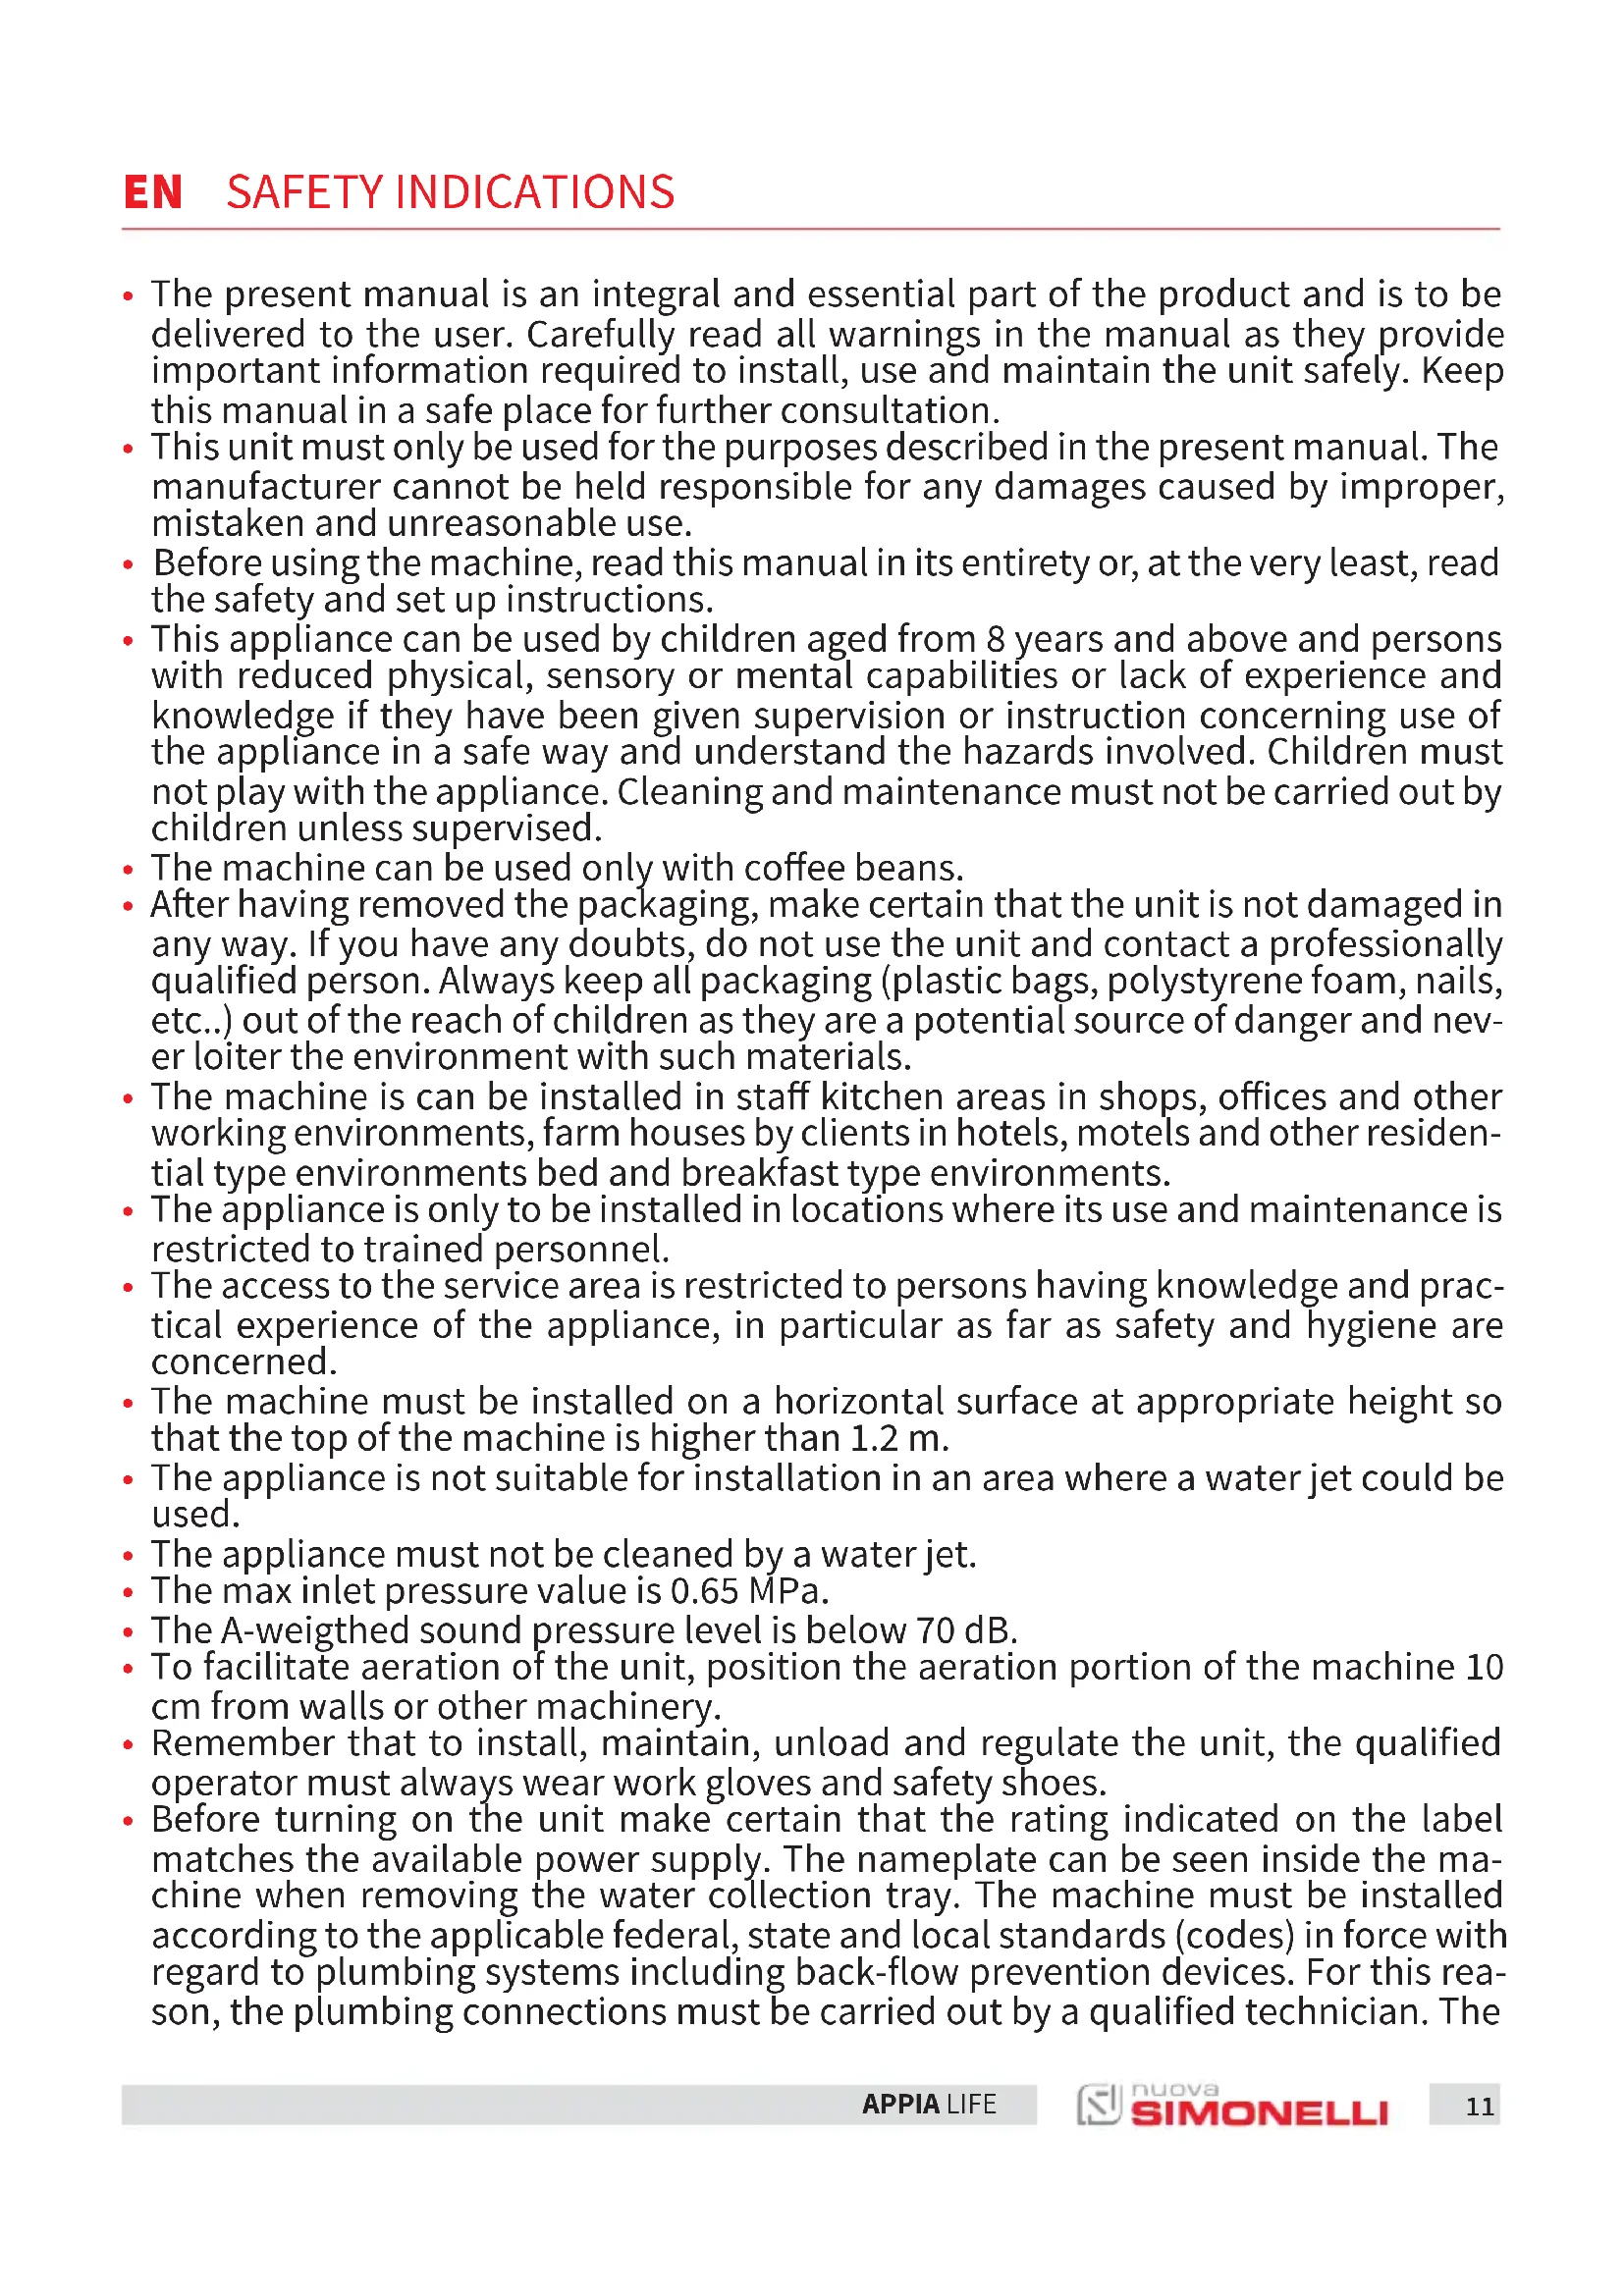
- The present manual is an integral and essential part of the product and is to be delivered to the user. Carefully read all warnings in the manual as they provide important information required to install, use and maintain the unit safely. Keep this manual in a safe place for further consultation.
- This unit must only be used for the purposes described in the present manual. The manufacturer cannot be held responsible for any damages caused by improper, mistaken and unreasonable use.
- Before using the machine, read this manual in its entirety or, at the very least, read the safety and set up instructions.
- This appliance can be used by children aged from 8 years and above and persons with reduced physical, sensory or mental capabilities or lack of experience and knowledge if they have been given supervision or instruction concerning use of the appliance in a safe way and understand the hazards involved. Children must not play with the appliance. Cleaning and maintenance must not be carried out by children unless supervised.
- The machine can be used only with coffee beans.
- After having removed the packaging, make certain that the unit is not damaged in any way. If you have any doubts, do not use the unit and contact a professionally qualified person. Always keep all packaging (plastic bags, polystyrene foam, nails, etc.) out of the reach of children as they are a potential source of danger and never loiter the environment with such materials.
- The machine is can be installed in staff kitchen areas in shops, offices and other working environments, farm houses by clients in hotels, motels and other residential type environments bed and breakfast type environments.
- The appliance is only to be installed in locations where its use and maintenance is restricted to trained personnel.
- The access to the service area is restricted to persons having knowledge and practical experience of the appliance, in particular as far as safety and hygiene are concerned.
- The machine must be installed on a horizontal surface at appropriate height so that the top of the machine is higher than 1.2m .
- The appliance is not suitable for installation in an area where a water jet could be used.
- The appliance must not be cleaned by a water jet.
The max inlet pressure value is 0.65MPa
The A-weighted sound pressure level is below 70 dB. - To facilitate aeration of the unit, position the aeration portion of the machine 10 cm from walls or other machinery.
- Remember that to install, maintain, unload and regulate the unit, the qualified operator must always wear work gloves and safety shoes.
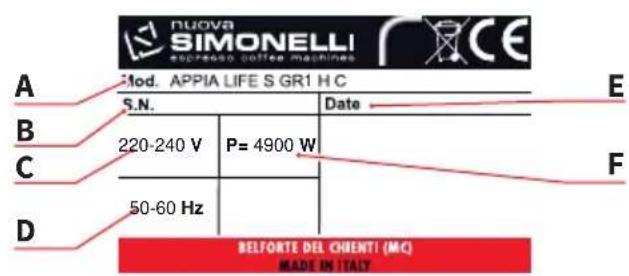
- Before turning on the unit make certain that the rating indicated on the label matches the available power supply. The nameplate can be seen inside the machine when removing the water collection tray. The machine must be installed according to the applicable federal, state and local standards (codes) in force with regard to plumbing systems including back-flow prevention devices. For this reason, the plumbing connections must be carried out by a qualified technician. The
warranty expires if the characteristics of the power supply do not correspond to the nameplate data.
- When installing the device, it is necessary to use the parts and materials supplied with the device itself. Should it be necessary to use other parts, the installation engineer needs to check their suitability for use in contact with water for human consumption. The installer must Make the hydraulic connections respecting the rules of hygiene and water safety to environmental protection in force in the place of installation. So for the hydraulic plant contact an authorized technician. Always utilise the new hose supplied for connection to the water supply. Old hoses must not be utilised.
- A means for disconnection, having a contact separation in all poles that provide full disconnection under overvoltage category III, is incorporated in the fixed wiring in accordance with the wiring rules.
- For Australian and New Zealand markets the disconnection is incorporated in the fixed wiring is in accordance with AS/NZS 3000.
- In case of installation in kitchens, connect the equipotential conductor to the terminal on the machine indicated by the symbol .

- The symbol of grounding is present inside the rear of the coffee machine.
-
The manufacturer cannot be held responsible for any damages incurred if the system is not grounded. For electrical safety, this machine requires a ground system. Contact a technically certified electrician who must check that the line electrical capacity is adequate for the maximum capacity indicated on the unit label.
-
There are some basic rules for the use of any electrical appliance. In particular:
-
Never touch the unit with wet hands or feet;
- Never use the unit with bare feet;
- Never use extension cords in areas equipped with baths or showers;
- Never pull on the power supply cord to unplug the unit;
- Never leave the unit exposed to atmospheric agents (rain, direct sunlight, etc.);
-
Never let children, unauthorized personnel or anyone who has not read this manual operate the unit.
-
The qualified electrician must also check that the section of the installation's cables is large enough for the absorbed power of the appliance.
- Never use adapters, multiple jacks or extension cords. When such items prove absolutely necessary, call in a qualified electrician.
- To prevent dangerous overheating, it is advisable to fully extend the power supply cord. Never block the intake and/or heat dissipation grills, in particular those for the cup warmer.
- The user must never replace the unit's power supply cord. If this cord is damaged, turn off the unit and have it replaced by a professionally qualified technician.
- Should it be necessary to replace the power cord, this replacement operation must only be performed by an authorized service centre or by the manufacturer.
- The device needs to be supplied with water that is suitable for human consumption and compliant with the regulations in force in the place of installation. The installa
tion engineer needs confirmation from the owner/manager of the system that the water complies with the requirements and standards stated above.
- For machines connected to the mains water supply, the minimum pressure must be 2 bar and the maximum pressure for correct machine operation must not exceed 4 bar.
- The operating temperature must be within the range of [+5, +30]^ .
- At the end of installation, the device is switched on and taken to rated operating conditions, leaving it in a state in which it is "ready for operation".
-
After reaching the "ready for operation" condition, the following dispensing operations are carried out:
-
100% of the coffee circuit through the coffee dispenser (for more than one dispenser, this is divided equally);
- 100% of the hot water circuit through the water dispenser (for several dispensers it is divided equally).
- Open the steam outlet for 1 minute.
At the end of installation, it is good practice to draw up a report of the operations.
- It is forbidden to leave the machine switched on without the presence and surveillance of a qualified operator. Simonelli Group is not responsible for damages caused by failure to comply with this prohibition.
- When adding the coffee, the operator must never put his hands into the container.
- Be extremely careful when using the steam nozzle. Never place your hands under the nozzle and never touch it right after use.
- Before cleaning the unit follow the instructions given in this manual carefully.
- Once started the washing machine, do not interrupt, the detergent residue may remain inside the delivery unit.
- In case of breakdown or poor function, turn off the unit. Never tamper with the unit. Contact only professionally qualified personnel. Only the manufacturer or an authorized service center can make repairs and only using original spare parts. Non compliance with the above can compromise machine safety.
- In case of fire, disconnect power to the machine by turning off the main switch. Its absolutely avoid to extinguish the fire with water while power to the machine is on.
- Before performing any sort of maintenance, the authorized technician must turn off the unit and unplug it from the mains.
- When the machine is left unattended for a long period, close the water inlet tap.
- New hose set supplied with the appliance is to be used and that old set should not be reused.
-
Should you decide to stop using this type of unit, we suggest you render it inoperable by unplugging it and cutting the power supply cord.
-
Never dispose of the machine in the environment: to dispose of the machine, contact an authorized center or contact the manufacturer for pertinent indications.
INFORMATION TO THE USERS
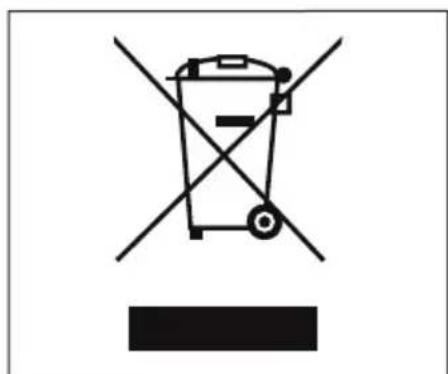
Under the senses of the Directives/ Guidelines 2011/65/EU concerning the reduction of the use of dangerous substances in electric and electronic equipment, as well as the disposal of wastes".
The symbol of the crossed large rubbish container that is present on the machine points out that the product at the end of its life cycle must be collected separately from the other wastes. The user for this reason will have to give the equipment that got to its life cycle to
the suitable separate waste collection centres of electronic and electro-technical wastes, or to give it back to the seller or dealer when buying a new equipment of equivalent type, in terms of one to one.
The suitable separate waste collection for the following sending of the disused equipment to recycling, the dealing or handling and compatible environment disposal contributes to avoid possible negative effects on the environment and on the people's health and helps the recycling of the materials the machine is composed of. The user's illegal disposal of the product implies the application of administrative fines as stated in Law Decree n.22/1997" (article 50 and followings of the Law Decree n.22/1997).
PREPARATION BY THE PURCHASER
- Preparation of the installation site.
The purchaser must prepare the surface on which the machine will stand suitable to support the machine weight (see the installation chapter).
- Electrical requirements.
The mains power installation must comply with the safely regulations and standards in force in the country of installation and must include an efficient earth system. An omnipolar cut-off device must be installed on the power line upstream of the machine.

The power wires must be sized according to the maximum current required by the machine to ensure a total voltage loss under full load of less than 2% .
- Plumbing requirements.
Prepare a suitable drain and a mains that supply water a maximum hardness of 3/5 French degrees (60/85 ppm).
SYMBOLS

A
B
C

D

E
A General hazard
B Electrical shock hazard
C Burns hazard
D Hazard of damage to the machine
E Operation reserved for the qualified technician, in compliance with current standards
RESIDUAL RISKS
Although the manufacturer has provided mechanical and electrical safety systems, dangerous areas persist during the use of the machine:
- Coffee dispensing groups.
- Steam wand.
Hot water wand.
Cup warmer.
MACHINE RECEIVING
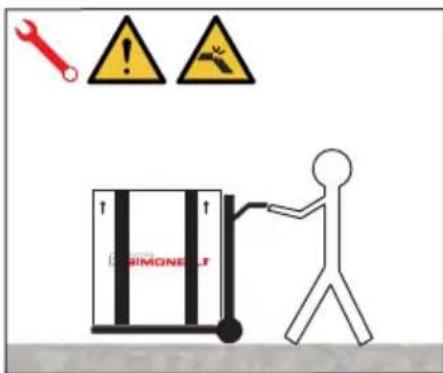
TRANSPORT
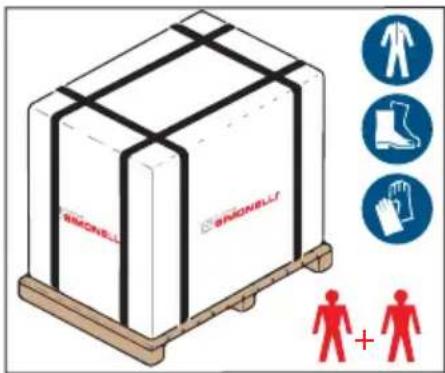
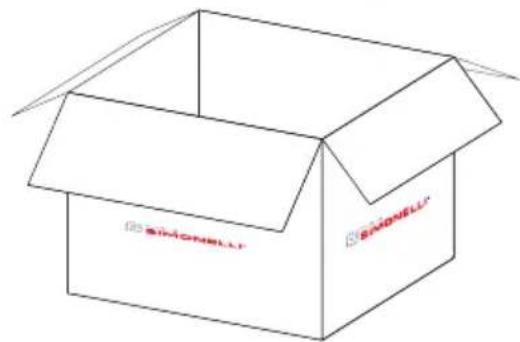
The machine is transported on pallets containing several machines inside cartons strapped to the pallet.
Operators performing any shipping or handling operations must wear gloves, safety shoes and overalls with elasticized cuffs.
The machine must be moved by 2 or more operators.

Failure to respect current safety regulations and standards on lifting and handling materials absolves the Manufacturer from all liability for possible damage to person or things.
MOVEMENTS
-
Slowly lift the pallet about 30~cm from the ground and reach the loading area.
-
After checking that there are no obstacles, things or people, proceed with the loading.
-
Once you arrive at your destination, always with a suitable lifting device (e.g. forklift), after making sure that there are no things or people in the unloading area, take the pallet to the ground and move it about 30cm from the ground, until to the storage area.
STORED
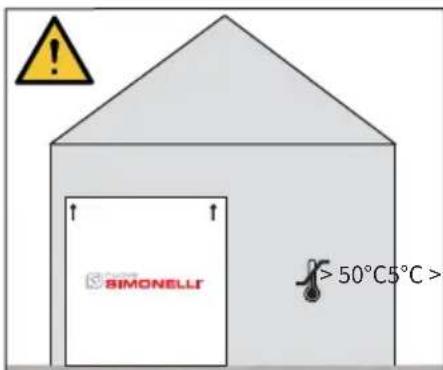
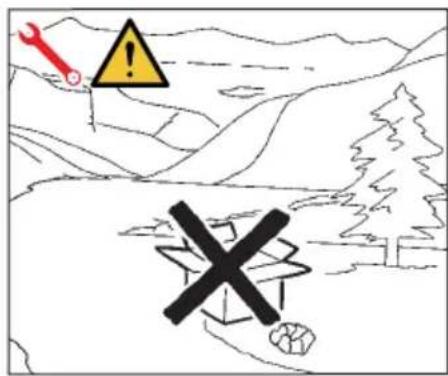
The package containing the machine must be stored away from atmospheric agents.
Before performing the following operations, make certain that the load is in stable and will not fall when the straps are cut.
Wearing gloves and safety shoes, the operator must cut the straps and store the product. During this operation, see the product technical features for the weight of the machine being stored and proceed as necessary.
UNPACKING
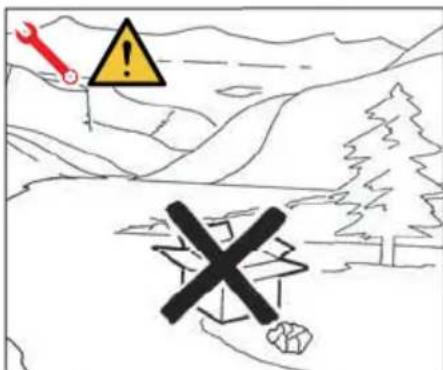
Once the machine has been released from the pallet or container, do not pollute the environment with these items.
CONTENTS CHECK
Upon receipt of the box, check that the packaging is intact and visually undamaged. Inside the packaging must be the instruction manual and the relative kit. In case of damage or faults, contact your local dealer.
For any communication, always communicate the serial number.
The communication must be carried out within 8 days from the receipt of the machine.
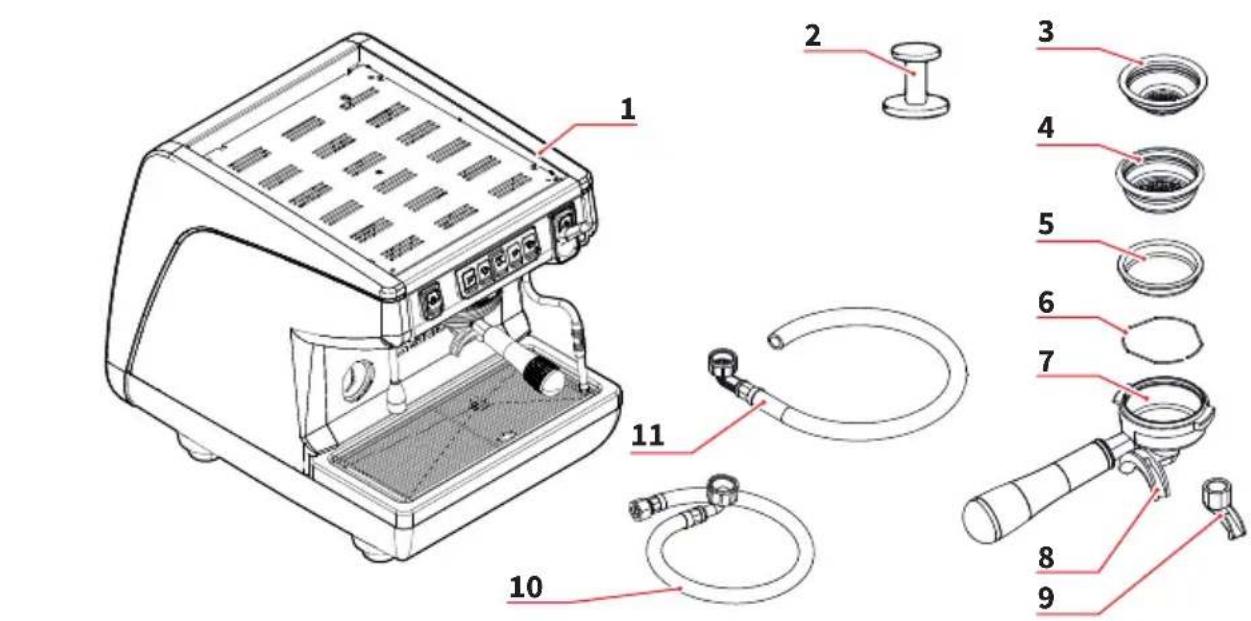
1 Machine (example image)
2 Coffee tamper (1 unit)
3 Single filter (1 unit)
4 Double filter (1 for each group)
5 Blind filter (1 for each group)
6 Spring (group number + 1)
7 Filter-holder (group number + 1)
8 Double delivery spout (1 for each group)
9 Single delivery spout (1 for each group)
10 Filling tube 3/8" (1 unit)
11 Draining pipe 025 (1 unit)
A Model and version
B Serial number
C Power supply
D Frequency
E Production date
F Power
G Optional
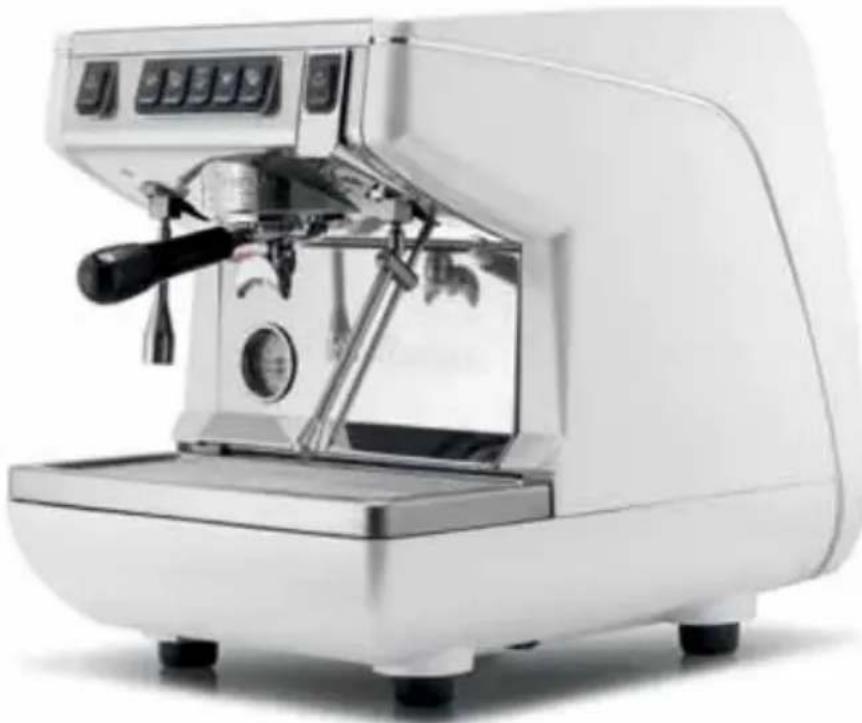
1 Dispensing buttons
2 Steam knob
3 Steam wand /Easycream
4 Delivery spout
5 Filter holder
6 Main switch
7 Hot water nozzle
8 Adjustable foot
9 Pressure gauge
10 Economiser regulator (optional)
P1 Hot water
P2 1 short coffee
P3 2 short coffees
P4 Continuously coffee
P5 1 long coffee
P6 2 long coffees
FR
Machine designed and built respecting what is expressed in the declaration of conformity.
- It must be used by professionals in the sector for the supply of coffee, water and steam.
3.1
USAGE PRÉVU
This chapter lists a number of reasonably foreseeable improper uses. The machine must, however, always be used in respect of the instructions given in this manual.
- Use by non-professional operators.
- Introduction of liquids other than softened drinking water with a maximum hardness of 3/5 French degrees (60/85 ppm).
- Touching the delivery areas with the hands.
- Introduction, into the filter holder, ground different than coffee.
- Heating drinks or other non-food substances.
- Obstructing the vents with cloths or other items.
Using the machine if wet.
To lift the machine are necessary 2 or more operators.
FR
Before installing the machine, make sure the area where it will be installed is compatible for the size and weight of the machine.
- Position the machine on a horizontal plane at least 900 mm high from the ground.
- Keep at least 100mm around the machine for proper ventilation.
- Adjust the machine by acting on the feet.
4.1
POSITIONNEMENT
Avoid throttling in the connecting tubes. Assess that
the drain pipe is able to eliminate waste. It is forbidden to use connecting pipes already used in the past. Filter maintenance is the responsibility of the purchaser.
1 Mesh filter
2 Softener
3 Drain 50~mm
Failing to maintain water into the correct levels will void the warranty.
WATER SPECIFICATIONS
Total hardness 50-60 ppm (parts per million).
Water line pressure between 2-6 bar and water to be cold.
Min flow rate: 200 l/hr.
- Filtration level below 1.0 micron.
- tds (total dissolved solids) level between 50 - 250 ppm.
- Alkalinity level between 10 - 150 ppm.
- Chlorine level less than 0.50 mg/l.
ph level between 6.5 and 8.5.
FR
4.2
BRANCHEMENT A L'ARRIVÉE D'EAU

Prior to connecting the machine to the electrical mains, assess that the voltage shown on the machine's data plate corresponds with that of the mains.
FR
4.3
BRANCHEMENTÉLECTRIQUE
At the end of installation, the device is switched on and taken to rated operating conditions, leaving it in a state in which it is "ready for operation".
After reaching the "ready for operation" condition, the following dispensing operations are carried out:
- 100% of the coffee circuit through the coffee dispenser (for more than one dispenser, this is divided equally);
- Open the steam outlet for 1 minute;
- Complete emptying of the steam boiler. Repeat this operation at least 3 times.
At the end of installation, it is good practice to draw up a report of the operations.
FR
4.4 OPÉRATIONS PRELIMINAIRES
The operations described below must
be carried out only by specialized technicians.
The Manufacturer is not responsible for any damage to things or persons deriving from a failure to comply with the above.
FR

Operation carried out whit the machine turned on.

Act with a screwdriver on the screw located at the top of the machine:
- Turn the adjustment screw CLOCKWISE to INCREASE the temperature of the hot water.
- Turn the adjustment screw ANTICLOCKWISE to DECREASE the temperature of the hot water.
All models APPIA LIFE are equipped with a level gauge to keep the water level inside the boiler constant.
At the first start, the machine automatically loads water for 90 seconds, at the end of which it stops if it has reached the level. If the machine still requires water, the continuous/stop buttons flash. Simply restart the machine to complete filling.
At the end of the installation, the qualified technician must provide the total replacement of the water contained in the boiler for at least three times before using effectively the machine.
FR
5.2 REMPLISSAGE AUTOMATIQUE DE LA CHAUDIÈRE
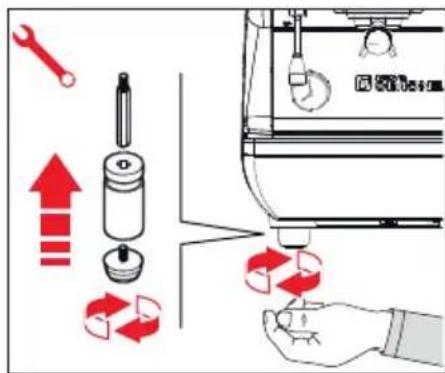
To adjust the service pressure of the boiler, thus regulating the water temperature, according to the various functions and needs of the coffee desired, proceed as follows:
- Remove the worktop grid cover:
- Remove the protective metal sheet by unscrewing the two side screws as shown in the illustration;
- Remove the upper panel and turn the pressure switch adjustment screw to INCREASE (clockwise) or DECREASE (counterclockwise) the pressure.
Advisable pressure: 1 - 1,4 bar (according to the kind of coffee).
- Turn the pump registration screw, turning it clockwise to INCREASE and counter clock wise to DECREASE the pressure.
Advisable pressure: 9 bar.
FR
5.3 RéGLAGE PRESSOSTAT/POMPE
The set pump pressure is shown during a delivery, on the lower part of the gauge.
Once the adjustment operation has been completed, screw the protective metal sheet back into its setting and replace the worktop grid cover.
FR
For correct functioning of the machine, personalising each button panel card at time of replacement is necessary; proceed as follows on the selectors placed on the card (on the key side).
FR
5.4 REMPLACEMENT DES CLAVIERS
ACCENSION / SPEGNIMENTO DELLA MACCHINA

Before starting to use the appliance, the operator must be sure to have read and understood the safety prescriptions contained in this booklet.
6.1
SWITCHING THE MACHINE ON/OFF

Press the ON/OFF key (6) to turn the machine ON or OFF.

For electronic card maintenance, turn the machine off by means of the dual main switch or disconnection plug.
FR
After commissioning the machine:
- Insert the desired filter (single or double inside the filter holder).
- Fill the filter with coffee appropriately ground.
- Press the coffee in the filter uniformly using the appropriate presser.
Clean the edge of the filter of coffee residues and insert the filter holder into the dispensing unit. - Before insert the filter holder, the group must be purged for at least 2 seconds to refresh the water present in the circuit, turning on and off the supply.
- Insert the filter holder inside the dispensing group.
- Position the cup/s under the spout/s and press the desired coffee button.
At the end of each coffee dispensing leave the filter-holder inserted in the unit so that it will keep warm.
FR
6.2
DISTRIBUTION CAFÉ
While using the steam nozzle, you must pay attention to not place your hands beneath it or touch just after it has been used.
Before use the steam wand, cleaning out of the condensation for at least 2 seconds.
To use steam just pull or push the provided lever.
By pulling it completely the lever will hold a position of maximum delivery; by pushing it, the lever will automatically give way.
The two steam nozzles are articulated to guarantee their easy use.
6.3 DISTRIBUTION VAPEUR
Immerse the nozzle all the way into a container 1/3 full of milk.
Aprire il vapore.
Before the milk has reached the desired temperature, pull the nozzle slightly up and lightly move it vertically across the surface of the milk.
When you have completed the procedure, clean the nozzle carefully with a soft cloth.
FR
6.4
PREPARATION
DU CAPPUCCINO
HOT WATER DISPENSING
While using the hot water nozzle, pay careful attention not to place your hands beneath it or touch it just after it has been used.
The use of the hot water wand must always be preceded by the purge of the hydraulic circuit for at least 2 seconds.
- Place a suitable container under the hot water nozzle.
- Press button (P1) once, the indicator light will illuminate. The hot water wand will deliver water for the amount of time equivalent to the set value or press the button again to stop pouring.
Hot water can be delivered at the same time as coffee.
FR
6.5
DISTRIBUTION EAU CHAUBE
As an optional extra, the machine can be equipped with an Easycream steam nozzle in place of the steam nozzle. On this version, the hot water nozzle is fitted in place of the manual steam nozzle.
The automatic steam nozzle can be used to deliver steam to foam milk or heat other liquids.
Place a suitable container with milk or another beverage inside it beneath the automatic steam nozzle.
Press the key and make sure that the key lights up. The automatic steam nozzle will dispense steam until the liquid reaches the pre-set temperature (see chapter 5.4 for programming details).
7.1 DOSES PROGRAMMING
To access the programming units, proceed as follows:
The procedure can be carried out with the machine on.
To enter the programming function for each group, it is necessary to hold down the continued delivery key (P4) for 5 seconds.
The delivery keys will begin to flash.
- Accessing the programming mode for the first group also enables the setting mode for the machine's operating parameters.
FR
7.1 PROGRAMMATION DOSES
7.2 PROGRAMMING COFFEE DOSES
To programme the amount of water for each of the delivery keys, proceed as follows:
- Fill the filter holder with the right amount of coffee.
- Place the filter holder in the group.
- Press one of the delivery keys (P2, P3, P5, P6).
The machine will begin to dispense and once the required quantity has been delivered, press the continued key (P4). - Delivery will cease and the selected dose key will switch off (the other keys will continue to flash).
- Press the continued key (P4) to exit the programming function or to continue programming other dose keys.
This procedure can be used for all groups on the machine, although it must be performed on one group at a time; the other groups will continue to operate as normal.
FR
7.2 PROGRAMMATION CAFÉ DOSES
7.3 PROGRAMMING HOT WATER
Use the relevant procedure to enter the programming function.
- Press the hot water selection key (P1).
- Hot water delivery will begin.
- Decide the required amount of hot water and then press the (P1) key again
- Press the continued key (P4) to exit the programming function or to continue programming other selection keys.
FR
7.3 PROGRAMMATION EAU CHAUBE
PROGRAMMING STANDARD DOSES
It is possible to enter pre-set values for the 4 group doses and water (steam).
To do this, it is necessary to press the key (P4) and hold it down for at least 10 seconds until the flashing keys remain fixed.
The doses are:
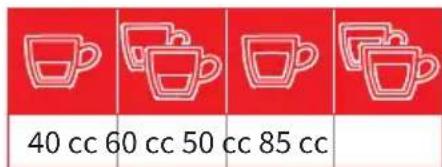
Water
9 seconds
A time setting of 0 seconds for steam and water means this function will work continually.
FR
7.4
PROGRAMMATION
DOSES STANDARDS
PROGRAMMING (OPTIONAL)
Access programming by holding the continuous key (P4) for 5 seconds.
The keys will start to flash.
To program the Easycream wand:
Press the steam selection key
- Steam delivery starts.
- Define the required steam delivery duration and press the

- To exit programming, press the key (P4), or proceed with programming of other selection keys.
FR
7.5
PROGRAMMATION
EASYCREAM (EN OPTION)
The operations described below must
be carried out only by specialized technicians.
The Manufacturer is not responsible for any damage to things or persons deriving from a failure to comply with the above.
FR

Press and hold down the key (P4) to enter dose programming; the keys will begin to flash.
Press and hold down the key (P4) to access the machine operating parameters.
1 Enabling the pump if the level is enabled.
2 Enabling the software block to enter the dose programming function.
3 Adjusting keypad brightness.
4 Enabling the hot water pump (on machines fitted with economiser).
5 Restoring default settings.
7.6
PROGRAMMATION DE PARAMÉTRES DE FONCTIONNEMENT
Use the espressor key (P2) to set pump enabling during levelling.
If the key (P2) is lit, the pump is enabled together with the level; if it is switched off, the pump is not enabled with the level function.
Use the long coffee key (P5) to enable a software block to programme doses (key lit) or to de-activate the block (key off).
The 2 long coffees key (P6) is used to choose the key brightness setting from 5 pre-set levels.
Use the (P6) key, which will flash, to change the level, lowering it to minimum or returning it to maximum.
Use the hot water key (P1) to set the pump to switch on while hot water is being delivered. If the (P1) key is lit, the pump will switch on while hot water is being delivered; if it is switched off, the pump will not switch on.
7.6.5 RESTORING DEFAULT SETTINGS
It is possible to restore default settings, i.e. pump level, water with pump and maximum brightness.
7.6.5 REINITIALISATION DES PARAMÉTRES PAR DÉFAUT
To reset these parameters, with the machine switched on, simply press the continuous coffee brewing button (P4) for more than 5 seconds. When the button is released, the default parameters will be restored.
Press and hold the hot water key (P1) for 3 seconds to access the automatic cleaning function (the continuous key (P4) start flashing).
Press the continuous key (P4) to carry out the cleaning cycle.
At the end of the cleaning cycle, the continuous keys (P4) start flashing to allow the rinsing cycle.
After 20 seconds from the access, if no key is pressed, the machine goes back to the normal operation.
To exit the cleaning function manually and go back to the normal operation, during flashing of the continuous key (P4), press and hold the hot water key (P1) for 3 seconds.
When the automatic cleaning cycle is started, it cannot be stopped before its programmed end.
If the machine is stopped before the cycle has finished, when it is switched back on, it restarts the rinsing cycle automatically.
7.7 CYCLE AUTOMATIQUE DE NETTOYAGE DES GROUPE
The machine must be set to "0" power before any cleaning operations are performed.
- Avoid to clean the machine using water jets or standing it in water.
- Do not use solvents, chlorine-based products or abrasives.
8.1
BODY MACHINE
CLEANING
Work area cleaning
- Remove the worktop, lifting it up from the front and sliding it out.
- Remove the water collection dish underneath.
- Clean everything with hot water and cleansers.
External plates cleaning
To clean all the chromium-plated areas, use a soft, damp cloth.
FR

Cleaning the coffee-holder once a week:
- Turn the screw placed in the centre of the coffee-holder.
- Slide the coffee-holder out and check that its holes are not obstructed but clean. If obstructed, clean as described.
FR
8.2
NETTOYAGE
DOUCHES
CLEANING WITH THE BLIND FILTER
The machine is pre-set for cleaning the delivery unit with a specific washing powder. Carrying out a washing cycle at least once a day with special cleansers.
Once the filter-holder has been removed, repeat delivery operations a few times to eliminate any cleanser residues.
To carry out the washing procedure, proceed as follows:
1 Substitute the filter with the delivery unit blind filter.
2 Fill it with two spoonfuls of special cleanser powder and insert it into the unit filter-holder.
3 Press one of the coffee keys and halt it after 10 seconds.
4 Repeat the procedure several times.
5 Remove the filter-holder and carry our a few deliveries.
8.4
CLEANING FILTERS AND FILTER-HOLDERS
- Place two spoonfuls of special cleanser in half a litre of hot water.
- Immerse filter and filter-holder (without its handle) in it leaving them to soak for at least half an hour.
- Rinse abundantly with running water.
8.3
NETTOYAGE GROUPE AVEC FILTRE AVEUGLE
To avoid scaling deposits in the boiler and in the heating exchangers, the softener must always be kept efficient. Therefore, the ionic resins must be regularly regenerated.
Regeneration times are established according to the quantity of coffee delivered daily and the hardness of the water utilised.
As an indication, regeneration times can be calculated on the basis diagram illustrated in figure.
FR
8.5
Regeneration procedures are as follows:
1 Turn the machine off and place a container large enough to contain at least 5 litres under tube E.
2 Turn levers C (in) and D (out) from left to right.
3 Take the cap off by unscrewing knob G.
4 Fill with 1 Kg normal kitchen salt.
5 Put the cap back on and reposition lever C moving it towards the left and allowing tube F to discharge the salty water until it has been eliminated and the water becomes fresh again (about half and hour).
6 Reposition lever D towards the left.
FR
During maintenance / repairs, the parts used must be able to guarantee compliance with the safety and hygiene requirements envisaged for the device. Original replacement parts can offer this guarantee.
After the repair or replacement of any components of parts that come into contact with food or water, it is necessary to carry out the washing procedure as described in this manual or according to the manufacturer's instructions.
FR
APPIA LIFE V MACHINE FUNCTION MESSAGES
MESSAGEFONCTIONS MACHINEAPPIALIFEV
| Indicazioni display e tasti Display and key indications Indications affichage et touches | Causa Cause Causes | Effetto Effect Effet | Soluizione Solution Solution |
| Disegno tastingo continuo (P4) lampeggiante e tastingo erogazione (P2) fisso. Drawing of continued key (P4) flashing and delivery key (P2) lit. Dessin touche continu (P4) cli- gnotante et touche distribution (P2) fixe. | Se entro i primi tre secondi dall'inizio dell'erogazione il dosa-tore non invia impulsi. If the doser doesn't send out its set commands within the first three seconds from delivery onset. Si le doseur n'envoie pas d'impulsions dans les trois premières secondes de distribution. | Se l'erogazione non è interrotta manualmen-te si arrivava al blocco di tempo limite (120 secondi). If the delivery isn't manually halted, the maximum time limit (120 seconds) will be blocked. Si la distribution n'est pas interrompue manuelle-ment, on obtient le blo-cage de temps limite (120 secondes). | Interrompere l'erogazione. Interrupt delivery. Interrompree la distribu- bution. |
| Disegno tastingo continuo (P4) lampeggiante. Drawing of continued key (P4) flashing. Dessin touche continu (P4) clignotante. | Se dopo 90 secondi dall'inizio, con pompà insertita durante altoli- vello, a 180 secondi se è disabilitata, il livello non è stata ripristinato. If within 90 seconds from onset, with pump insert- ed during the levelling, at 180 sec., if the level has not been re-establishé. Si 90 secondes après le début, avec pompà insérée pendant que le niveau est elevé, 180 sec. si elle la pompà est désactivée, le niveau n'a pas été réinitialisé. | Viene disattivata la pompà, la resistenza e tutte le funzioni sono inibite. The pump, the resistor and all the functions will be halted. La pompè est désactivée, la résistance et toutes les fonctions sont inhibées. | Spagnere la macchina per almeno 5 secondi e riaccenderla. Turn the machine off for at least 5 seconds and then switch it on again. Éteindre la machine au moins 5 secondes puis la rallumer. |
11
SCHEMI
DIAGRAM
SCHEMAS
IT
EN
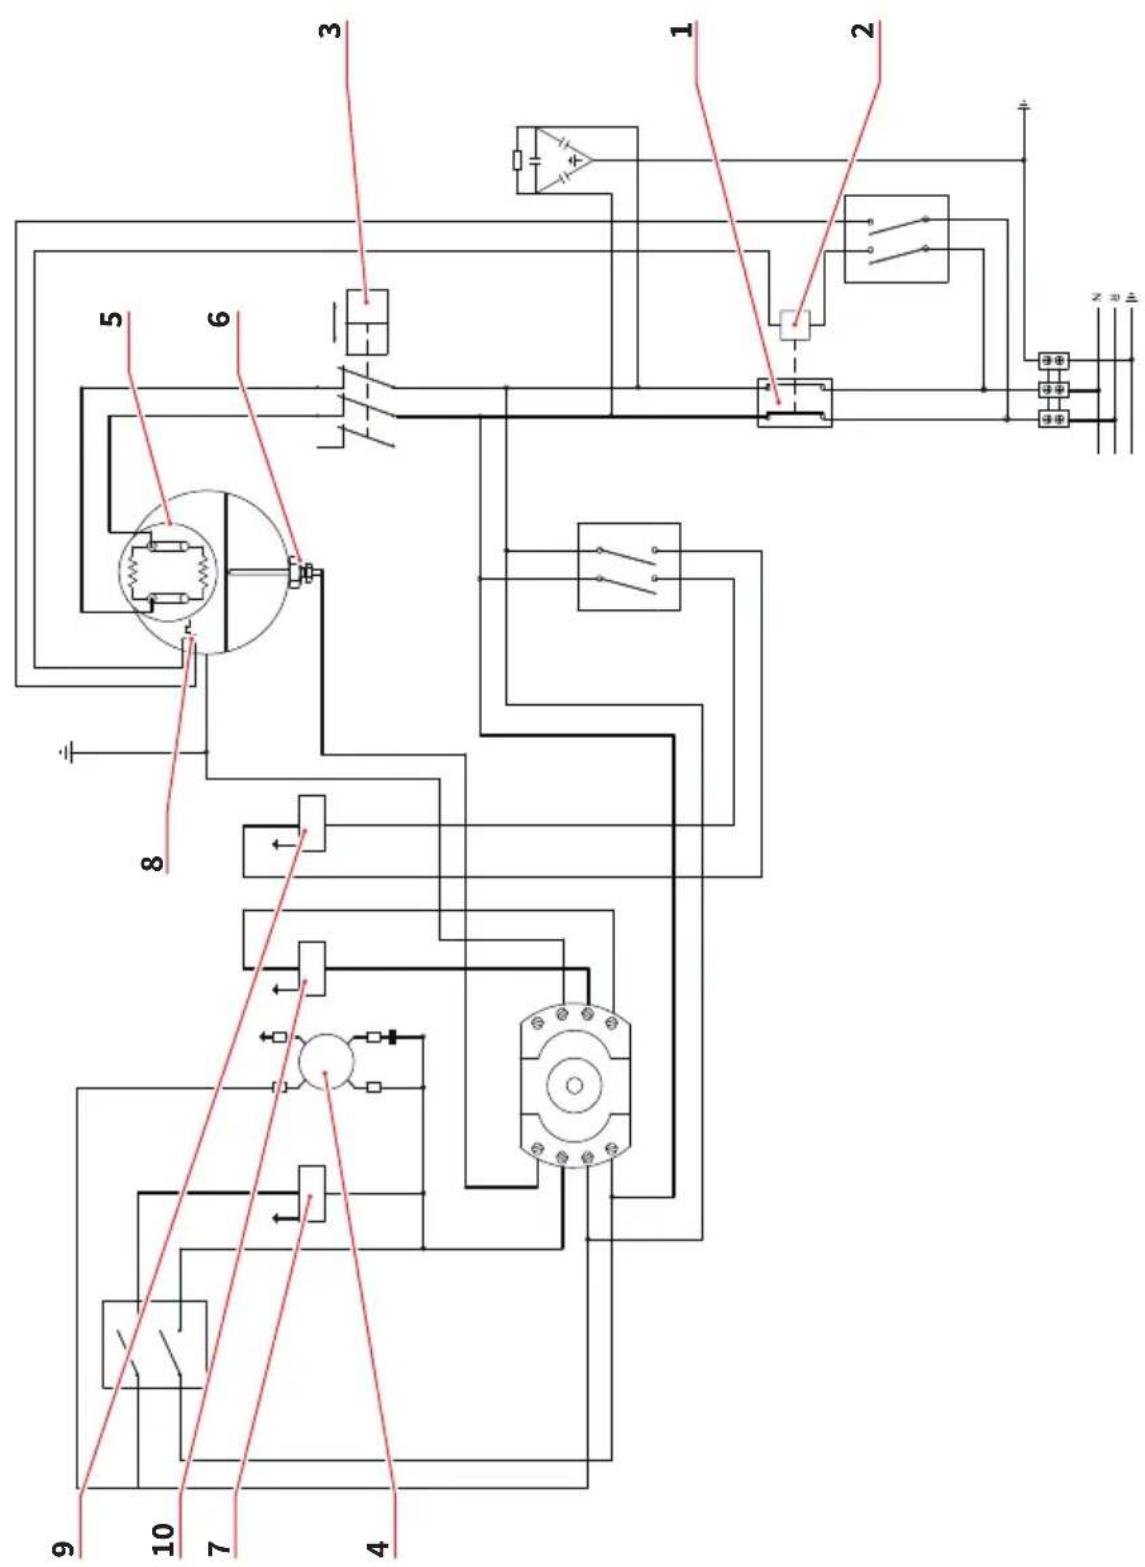
11.1
SCHEMA ELETTRICO
S1GR.
11.1
ELECTRICAL DIAGRAM
S1GR.
FR
11.1
SCHEMA ELECTRIQUE
S1GR.
1 MS Switch
2 R Relay
3 P Pressostat
4 MP Pump motor
5 HE Boiler heating element
6 LP Level probe
7 EV1 Electrovalve group 1
8 TE Thermostat
9 EVHW Mixer electrovalve
10 EVL Water level electrovalve
1 MS Switch
2 R Relay
3 P Pressostat
4 MP Pump motor
5 HE Boiler heating element
6 LP Level probe
7 EV1 Electrovalve group 1
8 TE Thermostat
9 EVHW Mixer electrovalve
10 EVL Water level electrovalve
1 General tap
2 Pump
3 Retaining valve
4 Expansion valve
5 Refill electrovalve
6 Flowmeter
7 Heater exchange
8 Delivery electrovalve
9 Safety valve
10 Hot water electrovalve
11 Steam tap
12 Pressostat
13 Boiler
14 Heating element
FR
The technical file has been deposited at the company headquarters, at the address on the back. The person in charge of collating and managing the technical file is Mr. Lauro Fioretti.
Model and production: See label on machine
Caldaia Boiler Chaudiere:
| Lt. | 0.6* | 1,7 | 2,0 | 3,8 | 4,2 | 4,8 | 5,4 | 7,0 | 9,3 | 11,1 | 11,3 | 14,7 | 17,0 | 20,3 | 23,1 |
| MPa max. | 0,18 | 0,18 | 0,18 | 0,18 | 0,18 | 0,18 | 0,18 | 0,18 | 0,18 | 0,18 | 0,18 | 0,18 | 0,18 | 0,18 | 0,18 |
| T max (C°) | 130,5 | 130,5 | 130,5 | 130,5 | 130,5 | 130,5 | 130,5 | 130,5 | 130,5 | 130,5 | 130,5 | 130,5 | 130,5 | 130,5 | 130,5 |
| Kg/h | 0,8 | 2,3 | 1,0 | 1,3 | 1,3 | 1,3 | 2,3 | 2,3 | 2,6 | 3,6 | 3,6 | 4,0 | 4,0 | 4,0 | 4,0 |
| P (W) | 1000 | 2600 | 1200 | 1800 | 1800 | 1800 | 2600 | 2700 | 3000 | 4500 | 4500 | 5000 | 5000 | 5000 | 5000 |
- Boiler in zona di applicazione articolo 3, comma 3 97/23/CE
- Boiler in application area, article 3, section 3 97/23/EC
- Chauffe-eau en zone d'application article 3, alinéa 3 97/23/CE
Applied regulations: Collections M,S, VSR editions '78 and '95 and available in the registered office.
Drawing No.: (See the end of the Instruction Booklet)
ATTENTION: This declaration is to be kept with the equipment at all times and must always go together with the equipment. Any use of the equipment than for the purposes for which it was designed is prohibited. The integrity and efficiency of the equipment of the safety devices are the responsibility of the user. The declaration is null and void if the machine is modified without the express authorization of the manufacturer or if improperly installed and used in such a way that does not comply with indications in the user's manual and the instructions.
Nuova Distribution France
Hexapole - Actipole - Bat 5
Rue Maurice Herzog
73420 Viviers Du Lac
T+33(0)967894852
F+33(0)479544852
info@nuovadistribution.fr