
Air Force TY8463 - Vacuum Cleaner TEFAL - Free user manual and instructions
Find the device manual for free Air Force TY8463 TEFAL in PDF.
| Brand | Tefal |
| Model | Air Force TY8463 |
| Type | Cordless stick vacuum |
| Power supply | Rechargeable 12V NiMH battery |
| Battery voltage | 12 V |
| Runtime (Min speed) | Up to 25 minutes |
| Runtime (Max speed) | Up to 15 minutes |
| Charging time | Approximately 12 hours |
| Charger | 12V, models RS-RH5155 / RS-RH5203 / RS-RH5380 |
| Charge indicator | Indicator light (turns off at end of charge) |
| Speed levels | 2 (Min / Max) |
| Brush type | Motorized rotating brush with LED |
| Motor filter | Protective foam filter, washable |
| Dust bin | Empty via flap (push button), washable with lukewarm water |
| Filter maintenance | Recommended cleaning at least once a month |
| Thermal safety | Automatic shutdown in case of overheating |
| Usage | Hard floors and carpets (avoid long-pile rugs) |
| Storage | Vertical parking position |
| Included accessories | Delta head with motorized brush, charger, cleaning tool |
Frequently Asked Questions - Air Force TY8463 TEFAL
User questions about Air Force TY8463 TEFAL
0 question about this device. Answer the ones you know or ask your own.
Ask a new question about this device
Download the instructions for your Vacuum Cleaner in PDF format for free! Find your manual Air Force TY8463 - TEFAL and take your electronic device back in hand. On this page are published all the documents necessary for the use of your device. Air Force TY8463 by TEFAL.
USER MANUAL Air Force TY8463 TEFAL
- Precautions before use 2
- Electric power source 3
- Repairs 3
DESCRIPTION 3
BEFORE FIRST USE 3
- How to assemble the appliance 3
- Charging the battery 4
- Turning on the appliance 4
- Storage 5
CLEANING AND MAINTENANCE 5
- Cleaning the dust tray.. 5
- Cleaning the foam rubber motor protection filter 5
- Vacuum cleaner care and maintenance 6
BATTERIES 6
- Battery replacement 6
- Throwing away the appliance 6
ENVIRONMENT 6
REPAIRS 7
GUARANTEE 7
SECURITY ADVICE
For your safety, this appliance complies with applicable rules and regulations (Low Tension Guidelines, Electromagnetic Compatibility, Environmental Regulations...).
- This appliance is not intended to be used by persons (including children) with reduced physical, sensory or mental capacities or lack of experience and knowledge, unless they are supervised or have been given instructions beforehand concerning use of the appliance by a person responsible for their safety.
Children should be supervised to ensure they do not play with the appliance.
- This appliance can be used by children aged from 8 years and above and persons with reduced physical, sensory or mental capabilities or lack of experience and knowledge if they have been given supervision or instruction concerning use of the appliance in a safe way and understand the hazards involved. Children shall not play with the appliance. Cleaning and user maintenance shall not be made by children without supervision. Keep the device and its cord away from children.
- Do not use the appliance if: the cord is damaged. In order to avoid all danger, the cord winding system and the cord itself of your vacuum cleaner must necessarily be replaced by a Tefal Authorized Service Centre only.
1. Precautions before use
- Your vacuum cleaner is an electric appliance: it must always be used under normal conditions. Use and store the appliance away from children's reach. Never leave the appliance on and unattended. Never hold the end of the vacuum tube near your eyes or ears.
- Never vacuum wet surfaces or liquids, no matter what their nature; hot substances; ultra-fine substances such as plaster, cement or ashes; large cutting waste materials such as glass; toxic products such as solvents or paint strippers; aggressive products such as acids or strong cleaners; or gasoline or alcohol-based flammable or explosive materials.
- Never submerge the product or charge it under water or under any other liquid. Never spray water on the appliance or on the charger.
- Do not store the appliance outdoors and keep it in a cool, dry place at all times.
- Do not place the appliance near a heat source (ovens, electric heaters or hot radiators).
- Do not expose the batteries to room temperature above 104^ (40^) .
- Do not take the vacuum cleaner apart while it is on.
- Never use your vacuum cleaner without the dust tray and the foam rubber motor protection filter.
- Do not use the appliance:
- If it fell and shows visible signs of deterioration or functional anomalies.
- If the charger or the charger cable are damaged.
In any of these cases, do not try to take the appliance apart. Rather, take it to the authorized Tefal Service Center nearest to your home, because special tools will be needed in order to safely carry out any repairs.
- Repairs must only be carried out by specialists using original replacement parts.
- To attempt the repair of an electronic appliance at home may be hazardous to the user.
- Only use original, guaranteed Tefal replacement parts (filters, batteries...).
- This appliance is intended for domestic use only. In case it is used inappropriately, not following the given instructions, Tefal will not be subject to any liabilities whatsoever.
- The vacuuming tube located at the height of the vacuum head must be checked regularly. If it is damaged, the appliance should not be used.
2. Electric power source
- Make sure that the voltage indicated on the rating plate of the charger corresponds to that of your power source.
- Never unplug the charger by pulling the electric cord.
- If the charger cord is damaged or if the charger itself does not function properly, do not use any other charger, different from the model provided by the manufacturer, and contact the Tefal Consumer Service or go to the authorized Service Center nearest to your home.
3. Repairs
Repairs must only be carried out by specialists using original replacement parts. To attempt the repair of an electronic appliance at home may be hazardous to the user, and will invalidate the guarantee.
DESCRIPTION
- Ergonomic handle
- Stop/Start button
2.a Stop position
2.b "Min" position
2.c"Max"position
- Light "MAX" speed signal
- Light charge signals
5.Neck
- Main body
- Locking screw
- Air outlet grill
- Dust tray
9.a Dust receiver
9.b Dust separator
9.c Foam rubber motor protection filter
9.d Lid
- Connection tube
- Delta vacuum head with integrated electro-brush
11.a Electro-brush
11.bLED*
11.c Latches
11.d Trap
12.Wheels
13. Charger
- 12V: ref. RS-RH5155*
- 12V / Korea : ref RS-RH5203*
-
12V/H-K:ref RS-RH5380*
-
Batteries
- 12V: ref. RS-RH5157*
- Tool
BEFORE FIRST USE
1. How to assemble the Appliance
Unpack your appliance and throw away any tags attached. Make sure to keep your guarantee and read the instructions carefully before using the appliance for the first time.
- Remove the screw from the neck and leave the nut in its place.
Fix the neck by carefully inserting it in the upper portion of the main body (fig.1). - Insert the locking screw (7) into the neck and screw it tightly using the tool provided with the appliance (fig.2).
Fix the Delta vacuum head (11) by locking it into place in the lower portion of the main body (fig.3).
Fix the dust tray on the main body of the appliance (fig 19).
Please note : In order to detach the Delta vacuum head, press the ejection button located at the back of the main body (fig.4) and pull to remove.
2. Charging the battery
IMPORTANT: Use only the original charger provided with the appliance (see DESCRIPTION chapter). Do not charge the appliance at temperatures lower than 32^ (0^) or higher than 104^ (40^) . Using a universal charger will automatically invalidate the guarantee.
Before you use your vacuum cleaner for the first time, you must charge the battery completely (for 12 hours maximum).
While the battery is being charged, the Stop/Start button must be in the Stop position (2.a)
- Place the vacuum cleaner near an electric power point.
- Plug the charger in and connect it to the vacuum cleaner using the socket located at the back of the neck (fig.5).
- The charge signal (4) located at the front of the main body will light. Leave the vacuum cleaner to charge. Once the charge cycle is completed (after about 12 hours), the light charge signal will turn off automatically.
The vacuum cleaner can stay connected to the charger permanently, without any hazard. Keep in mind, however, that if you decide to keep the charger connected it might become slightly hot. This would be a completely normal phenomenon.
It is advisable to charge the vacuum cleaner immediately after each use in order to always have it available with a fully charged battery. Thus, you will gain the maximum benefit from its cleaning and autonomous performance functions. However, in case you plan to be absent for a long period of time (on vacation, for example), it is advisable to unplug the charger for, in this case, the autonomous performance function could be diminished due to automatic power loss.
3. Turning on the appliance
Unplug the charger cord from the vacuum cleaner. Hold the vacuum cleaner by the handle and slide the Stop/Start button downwards, towards one of the two following speeds (fig.6):
- « Min »: Used to vacuum clean thick or delicate rugs and carpets (2.b), as well as fragile surfaces.
Please note : always make sure that the wheels located at the back of the base are clean. - « Max »: Used for optimum vacuum performance on all floor types, and in case of strong dirt marks (2.c).
The electro-brush is a rotating, motorized brush that guarantees maximum cleaning effectiveness by allowing the appliance to suck up dirt and clean in depth. The bristles, located all along the brush, remove threads, hair and fur that might be caught on the surface of rugs and carpets.
Please note: If the vacuum head adheres too closely to the surface you are cleaning, change the speed to « Min »
ATTENTION: Do not vacuum large fragments of broken objects, as they could block and damage the brush. Do not use the electro-brush on long hair carpets, on animal fur, or on fringes.
REMOVING AND CLEANING THE ELECTRO-BRUSH
ATTENTION: Always turn off the appliance and unplug it before storing or cleaning.
Using the tool provided with the appliance (15), press in the two latches located on each side of the lower side of the Delta head (fig.7). Lift the trap located on top of the electro-brush (fig.8). Remove the electro-brush and its lateral bearing in order to clean them (fig.9). Carefully remove any threads, hair, fur, etc. from the electro-brush. Once clean, replace the electro-brush and its lateral bearing (fig.11), then replace the trap over it (fig.12). Finally, using the tool provided with the appliance, close both latches (fig.13).
FOR YOUR SAFETY
- Do not touch any rotating parts before you turn off and unplug the vacuum cleaner.
- Do not use the appliance on wet surfaces.
- Do not immerse the appliance in water.
ELECTRO-BRUSH MALFUNCTION
The electro-brush does not function properly or makes an unusual sound
- Either the rotating brush or the axis is blocked: turn off the appliance and clean them.
- The brush is worn out: visit an authorized Service Center in order to have the brush changed.
- The belt is worn out: if the belt makes noise, it means that it is slipping because it's worn out. Visit an authorized Service Center in order to have the belt changed.
The electro-brush stops while you are vacuuming
- The thermal security feature has been activated: Turn off the vacuum cleaner by moving the Stop/Start button to the Stop position (2.a) and unplug it. Check to see if any solid object is blocking the rotation of the brush. If this is the case, remove the object and clean the electro-brush (fig.10), then you may keep using the vacuum cleaner.
The electro-brush moves with difficulty
If you find that your vacuum cleaner slides with difficulty along surfaces, progressively reduce the speed until you reach the « Min » position (2.b). If the problem persists, take your appliance to the authorized Tefal Service Center nearest to your home.
See the list of authorized Tefal Service Centers or contact the Tefal Consumer Service department.
4. Storage
After use, turn off your vacuum cleaner by moving the Stop/Start button to the Stop position (2a). Now you may store your appliance vertically wherever you like, thanks to the parking position.
To place the vacuum cleaner in the parking position: Place the neck vertically in order to block the appliance.
To continue using the vacuum cleaner: Take it by the handle and make it swing backwards in order to unblock it and leave the parking position.
CLEANING AND MAINTENANCE
IMPORTANT: Always turn off the appliance and unplug it before storing or cleaning.
1. Cleaning the dust tray (9)
1.a Fast emptying
Whenever the dust tray is full, empty it as follows: remove the tray by sliding it downwards (fig.14), place it over a bin and press the "Push" button in order to open the trap and empty the tray's contents (fig.15). Close the trap (fig.16) and replace the dust tray on the main body of your appliance (fig.19).
1.b Complete cleaning procedure
It is advisable to clean the dust tray regularly.
- Remove the dust tray (fig.14), then separate each of its components (9).
- Remove the foam rubber motor protection filter (9c).
- Place the dust receiver (9a), the dust filter (9b) and the lid (9d) under warm water (fig.20); then let them stand to dry or dry them with a dry cloth.
- Wash the foam rubber motor protection filter (see paragraph 2).
- Once the components of the dust tray are all dry, reassemble them; do the same with the extra foam rubber motor protection filter (9c) provided as a supplement with your appliance.
- Close the dust tray and reposition it on the main body of your appliance (fig.19).
2. Cleaning the foam rubber motor protection filter (9c)
ATTENTION: Never use your vacuum cleaner without the foam rubber motor protection filter.
In order to maintain the high performance level of your appliance, do not vacuum ultra-fine substances such as plaster, cement or ashes, and clean the foam rubber motor protection filter at least once a month. If you perceive that your vacuum cleaner is performing under regular average level, we recommend that you clean the foam rubber motor protection filter more frequently.
- Remove the dust tray lid (9d) and then remove the foam rubber motor protection filter (9c) (fig.21).
- Clean the foam rubber motor protection filter (9c) with warm, soapy water.
Rinse and let dry for at least 12 hours before replacing the filter on the appliance (fig.22).
IMPORTANT: In order to assure optimal motor protection, make sure that the foam rubber filter is completely dry before replacing it on the appliance. You will need to let it dry for at least 12 hours before reinserting it into the dust tray. An extra foam rubber motor protection filter is provided with your vacuum cleaner so that you may use the appliance while the first filter is still drying.
ATTENTION: Never place the dust tray components or the foam rubber motor protection filter in an automatic dishwasher.
3. Vacuum cleaner care and maintenance
Wipe the main body of the appliance with a soft, damp cloth; then dry it with a dry cloth (fig.23).
IMPORTANT: Do not use detergents, or aggressive or abrasive products. The transparent color of the dust tray and/or of the separator lid may change with time; however, this will not modify the performance of the appliance.
BATTERIES
1. Battery replacement
This appliance contains nickel-metal hydride (NiMh) accumulators which are, for safety reasons, only accessible to professional engineers. When the battery is no longer capable of retaining its charge, the NiMh block must be removed. In order to replace the accumulators, please visit the authorized Service Center nearest to your home.
2. Throwing away the appliance
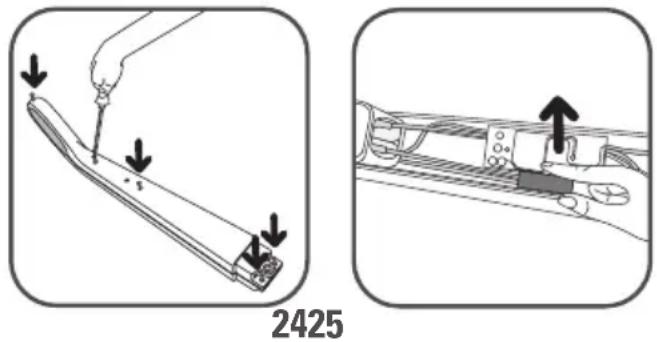
It is important that you remove the batteries before throwing away your appliance. In order to do this, visit an authorized Service Center or proceed as follows: disconnect the appliance from the electricity network, dismount the neck from the main body removing the central screw, and then remove the five (5) assembly screws located at the back of the neck (fig.24). Carefully lift the upper cover of the neck and unscrew the two electric circuit screws, then unplug the battery block by pulling the plug (fig.25). Do not throw the battery bloc into the waste bin; take it to the authorized Tefal Service Center nearest to your home or to a place specially designated to process such type of waste.
ENVIRONMENT
- According to current regulation, any appliance that is out of service must be taken to an authorized Service Center, where it will be safely disposed of.
Warning
Do not place a block of rechargeable batteries with non-rechargeable batteries. If you wish to change the batteries, visit an authorized Service Center.
The batteries are designed to be used indoors only. Do not immerse them in water. Handle the batteries with care. Do not place the batteries in your mouth. Do not let the batteries come in contact with other metal objects such as rings, nails or screws. Be careful not to provoke internal short-circuits in the batteries by inserting metal objects through their extremities. If a short-circuit does occur, the temperature of the batteries could rise dangerously, causing serious burns or even catching fire. If the batteries start leaking, do not rub your eyes or mucous membranes. Wash your hands and rinse your eyes with clean water. If irritation persists, consult your physician.

Let's help protect the environment!
① Your appliance contains numerous useful or recyclable materials.
Take the appliance to a collection spot so that it can be disposed of properly.
REPAIRS
IMPORTANT: If you notice that your vacuum cleaner is not functioning properly, before any revision, turn it off by placing the Stop/Start button in the Stop position.
Repairs should only be carried out by specialists using original replacement parts. To attempt the repair of an electronic appliance at home may be hazardous to the user.
If your vacuum cleaner does not start
Make sure that the charger is completely unplugged from the appliance. If it is, it means that the appliance is not charged, so proceed to charge it.
If your appliance does not vacuum
The electro-brush is dirty: clean it.
- The separator is clogged up: remove the dust tray and clean the separator.
If your vacuum cleaner seems less efficient, makes noise or whistles
- The tube or the hose are partially clogged up: unclog them.
- The dust receiver is full: empty and clean it.
- The dust tray is not well positioned: place it correctly.
- The Delta vacuum head is dirty: demount the electro-brush and clean it.
- The foam rubber motor protection filter is saturated: clean it.
If the separator gets filled with dust
- The separator sometimes accumulates dust. Make sure that nothing is blocking the duct between the separator and the dust tray.
- The dust tray opening is blocked: Remove the dust tray, empty it and clean the opening.
The vacuum head moves with difficulty
Lower the vacuum speed by moving the appropriate switch button.
If the problem persists, take your vacuum cleaner to the authorized Tefal Service Center nearest to your home. See the list of authorized Tefal Service Centers or contact the Tefal Consumer Service department.
GUARANTEE
This appliance is intended for domestic use only. In case it is used inappropriately, not following the given instructions, Tefal will not be subject to any liabilities whatsoever and the guarantee will be invalidated.
Read the instructions before using the appliance for the first time: using the appliance in any way different from the one indicated here would free Tefal of all liabilities.
卡
I|J
a
- 9
- 10
- 译文
10
10
- ydo6ha pyka
- KhoNka BkJIIOUHTb/BbIKJIIOUHTb
2.aI03nBbIKJ.
2.bПОЗИЦЯ«MNH>
2.cПоицьг«Мakc
- CBeTOBoi HnDnKaTOp «Max»
- CBeTOBOI cInHaJI 3apJa aAkkymyIaTopa
- Ⅲeɪka
- OCHOBHOI KOpNyc
- CTonOpHbI BnHT
8.Bo3dyxOBbInyckHnapeWetka - KoHTeHep nIy nbIIN
9.aHaKoNHTenb nbln (0,5n)
9.b PacnpedeJnteB nbnn
9.cIoponoHObBiΦnIbTp DnIaunTbIMOTopa
9.d KpbiIka
-
CoeinnHtBnaT py6a
11.ДeльТовидя Habадka nbInecoca c nHTerpnpOBaHHo3NeKtpoUeTKoH
11.a 3neKtpoueTka
11.b CBeToIONoI*
11.c3auejka
11.d 3aedepeXnBaIOUoiN ΦIbTp -
Koneca
13.3apraHoeyctpoiCTBO
- 12B:cm.RS-RH5155*
- 12V/Koper:cm.RS-RH5203*
-12V/ToHkoHr:cm.RS-RH5380*
14.AkkymyIaTOpbl
-12B:cm.RS-RH5157*
15. VHCTpymeHT
IPEEDIIEPBbIMNCIOJIb3OBAHHEM
1. KaK co6npaTb yCTpoiCTBO
Pacnyte yctpoCTBO n Bbl6pocbTe BCE 6npKn. CoxpaHnte rapaHTnIO n BHNMaTeNbHO npOHTne IHCTpyKcNIO, npexJeemBnepBbIe NcNOJb3OBaTb yCTpoCTBO.
- BbITAHNTe BHTNt N3 WeyKn, YTO6bi raiKa 3aHJa CBOE MeCTO.
- Pπρικρεπητe ΜεώΚγ, αΚκύραΤΟ BCTestανβε ΕενΒερχΗΙΟ Καςθό Αςθό Βοχόθους Κρόηγα (fig.1).
BCTaBbTe cTOnOpHbI BnHT (7) B weiKy n IIOTHo 3akpeHnTE erO C NOMOuIIO IHCTpyMeHtA, NOCTaBnREMO r npu6opom (fig.2). - 3aФИКСИРУТЕДIELТOBИДНУЮHAcAДКУ nbIeLecOca (11)ЗakpenINB eeВнЖнЧаCTN OCHOBHorO KOpnyCa (fig.3).
- 3aKpEnIte KOHTeHep IJIy PbJIN K OCHOBOMy Kopnycy yCTpoiCTBa (fig.19).
IoxaJyNCTa, 6paTne BHMMaHHe: IJI TORO, UTO6bI OTOeHNHTb DeJIbTOBnHyIO TOnOBy NblcOca, HaxMnte Ha KhoNky Bbl6pOca B 3aJHeu cAChn OCHOBHOKOpnyCa (fig.4) u n3BLeKeNTe ee.
3NeKtpoueTka He pa6oTaETdoJXHbIM 06pa3OM IIN N3daeCTpaHHbIe 3ByKn
Bpaaioaiae 3eTka nnn oc b3a6noknpoBaHbI: BblKlOuHTe nbInecoc n npoucntte ux.
- UeTka n3HOweHa: NocTeNTe ABTopn3OBaHHbI cepBucHbI cEHTp, YTO6bl 3aMeHHTb IeTKy.
- PemeHb n3HOweH: ecn pemeHb n3daet 3ByKn, TO 3TO 3HaunT, yTO OH cKOJIb3NT, NOTOMy yTO n3HOweH. Nocetnte aBTopu3OBaHHb CEpBnCHbI cHTp, yTO6bl 3aMeHHTb peMeHb.
3NeKtpoouetKa ocTaHaBnBaeTc, KOrda Bbl nIbIeocuTe
-Функця Термально 6e3oNaCHOCTN 6bIa aKTHBnPoBaHa: BbIKIOHTe nbIEcOC, nepemeCTNB KHOKNy BKNIOHTb/BbIKIOHTb Do ynpa Ha no3uIIO BbIKIOHTb (2.a) n OTKIOHTe erO ot nITAHNA. IpoBepbTe, HET Nk KaKOrO-lN60 TBepDoro npedMeta, 6NoKpyUoTe BpaSeHne uTeKn. Ecn 3To TaK, To ydaJIte o6BeKT n OChTNe 3JNEKTPoUeTKy (fig.10). Pocne 3Toro, Bbl MoKeTe npodOnJHtB nbIEcOCntb.
3neKtpo-ueTka DnHexTcA Ctpydom
EcnBbO6HApxKnn, YTO BaW nbIeNcOC c TpyDom nepemeaetc BdoNb nobepxHocTn, NOCTeNEHNO CHN3bTe HHTeHCNBHOCTb DO N03uCIN «MunHMaJIbHaJ» (2.b). Ecn npo6nema He yctpaHeHa, OTHeCtne nbIeCoc B 6bnkaWN ABTOPIN3OBaHHb CepBNCbY ueHrTp Tefal.
Cm. cnncok abTopn3OBaHHbIX cepBnchbIX ueHtpob Tefal nn o6paNTecb B OTdcl 6cbxuBaHHK kIneHTOB Tefal.
4. XpaHeneHne
Iocne nCnoB3OBaHnB, BbIKNoHTe nbIeOC, nepemecTb KHOKNy BkIOuHTb/BbIKIOuHTb do ynpoa (2a).Teepb Bbl moKeTe rDe yroJHo xpaHtB npi6Op c NOMoU bEeTKKaIbHOrO napKOBOUHO NOLOXHeH.NTO6bl noCTaBtB nbIEcOC BnapKOBOUHO NOLOXHe: IocTaBBte weKy BePTKAlbHO, YTO6bl 3a6NOKpOBaTB yCTPOINCTBO. YTO6bl npoJOLxHtB nCNOB3OBaHne nbIeOCa: BO3BMITE erO 3a pyUky i Kaunite erO ha3ad, YTO6bl pa36NOKpOBaTB n BblTN3 napKOBOUHO NOLOXHeH.
YIUCTKA I TEXHINUECKOE OBCJYKINBAHINE
BHIMAHNE: Bcerda BbIKIouaTe n OTKIOUaTe yCTpoCTBO OT nITAHnpeD xpaHeHem nN OuMtKoN.
1. OuNTka KOHTeHepa IyIbn (9)
1.a 5bictpoe onopoxkHeHne KOHTeHepa
BcAkn pa3, KOrda KOHTeHep dIy PbIIN CTaHOBITcI ONHbIM, OIOPoXHnTe 3TO CNeIyIOUmO6pa3OM: CHMITE KOHTeHep, cDbHbV bero Bn3 (fig.14), nOmeCTte erO HAd MycOpHbIM aIuKOM I HaXmTE Ha KhoNky "Push", 4To6bl OTkpbl 3aIepXbIAUuI NlTp I BbIbPoCnTB coDePXMoe KOHTeHepa (fig.15). 3aKpOIne NlTp (fig.16) n NOMeCTte KOHTeHep Ha MeCTO B OCHOBHOJ qAcTn PbJIneCoca (fig.19).
1.bPpoceDypa noHno ouNCTKu
Pekomehdyetcpeyraepno uCTnB KOHTeHep dIa c6opa nbIn.
- BbITaHNTe KOHTeHep dIy nbIyn (fig.14), notom pa36epnte ero Ha actn (9).
- BbTiAHnTe nOpOHOHbI Φnlt3aunTbI MOTopa (9c).
- Iorpy3nte HakoNtTeB nbIIN (9a), pacnpeJenTcB nbIIN (9b) n KpbIshky B TeNnyo Body (fig.20); daIte IM BbICOXHyTB nII N BbITpIte IN cyXOn TkaHbIO;
-
PpOMoIte nopoJHObBI ΦnIbTp 3aunIbI dBurTaTeNa (CM. pa3dIe 2).
-
KaK TOnbKO DeTaN KOHTeHepa DnA C6opa NbIN BbICoxHyT, C6ePnte INx; CdelaIte To Xe Camoe C DOONHInTeNbHbIM NOpONoHOBbIM ΦNtPOM 3aunTb I DBuRaTeJ (9c), KOTOpBI NOCTabJIeTCB KauEcTBe DOONHeHnK BaWemy PbIecoccy.
- 3akpoTe KOHTeHep dIa c6opa nbIIIN NOCTaBbTe eRo Ha MeTo B OCHOBHOKOpnyc nbJInecOca (fig.19).
2. Ouinctka nopolohoBoro fIbtpa Ira 3aunTbI Dnuratae (9c)
BHIMAHNE: Hnkorda He nCnoIb3yIe nbIinec6 6e3 nopoloHOBOrO fNlbTpa Ira 3aunTbI DBuratela.
ДяТOrO,TO6bI NODEpKINBaTb BbICOKn yPOBeHb IPOUN3BOUInTeNbHOCTN nbIEcOca, He nbIEncocbTe yNbTpatoHKne BeueCtBa,TakNe KaK rInc, cEmeHT nnn 30na, n npOBOnTe OuNCtky NopONHOBOrO fNtpaDn3aunTb DBnTaTeNa, no KpaHne Mepe, pa3 B MeCa. EcnB Bbl CUnTaTe, YTO BaW nbIEncoc pa6oTaET HnKe HopMaJbHorO cpeHero yPOBnA, mbI peKOMeHnyem Bam uNCTnTB nopONHObBIOf nnBtpd3aunTb DnBnAteYaAae.
- CHIMITE KpbIiKy KOHTeHepa IJIy IIbII (9d), a 3aTeM BbITAHTE NOpOJHOBBI ΦNtBp 3aUNTbI DnIRaTeJIa (9c) (fig.21).
OuHCTnTe NopoJHObBiy HJIbTp DnIa3aunTbI DVBraTeNa (9c) C TeNIOyMbInbHO BDOi.
Прорноцит e n Дайт e Всохнут b B TeueHne, no KpaHne Mpe, 12 cacob npexd e cem nomeaTb fHbTp Ha Mecto (fig.22).
BAJHO:Дя toro yto6bl obecneuHb onTumalbHyO 3aunTy dBnraTeIa, y6eNTecb, yTO npolnoHbIy IINbTp nONHO BbICox, npexke yem cTaBnTp erO Ha MeCTo. DaIte emy BBicOXHyTb B TeueHne, no KpaHne Mpe, 12 YacOB, 3aTeM BcTaBbTe erO B KOHTeHep dJa c6opa nbIn. C Baunm nbIEcOCOM NOCTaBnaETCa DONONHtEnbHbI NopOLHObBI NOpOLHObBI NOpHBTp 3aunTbI dBnraTeIa, no 3ToMy Bbl MoKeTe WcNoJIb30BaTb nbInecoc, B TO BpeMa KaK nepBbI FInbTp no-npexHemy cyuNTcra.
BHIMAHHE: Hukorda He cTabbTe deTann KOHTeHepa dIa c6opa nIIIN IIN NopoJIOHOBBI 0JIbTp dIa3aunTbI Dnuratela B NOcydOMoeHyO MaunHy.
3.Чистka И Тхницекoe обслжьанne
He yctaHaBnBaIte 6IOK 3apaXaembIX aKKyMylTOpOB C He 3apJkaeMbIMn aKKymyIaTOpAMN.
EcnBbXOTnTe 3aMeHnTb 6aTapeKn, nocetnte aBTOpN3OBaHHbI cepBnCHbI ueHTp.
BaTape n npedHa3NaeHbToIbKO dIy IcNoIb3OBAHnB N omeuHn. He norpykaTe nx B Bovy. O6paaate C aKKymyIaTOpAMn OCTOpoxHo. He 6epnte 6atapeKn B pot. He no3BOJnTe, YTO6bl aKKymyIaTOpBl BCTynlln B KOHTAKT C DpyrIMn MeTALNueCKMn PpeDMTaMn, TaKIMn KaK KOlbUa, rBO3Dn IIN Ns Uppynbl. BybTe octOpOXHbl, YTO6bl He cnpoBOUcapOBaTB BHyTpEnHee KOPOTKe 3aMbIkaHne B aKKymyIaTOpAX, BCTabJIa MTAALLNuCeckne PpeDMtbl CheE3 IN KHeuHocTN. Ecn KOPOTKe 3aMbIkaHne IMeET MeCTo, TempePaTypa 6tapeu MoKet Bo3pactn Do OnaCHO rPOBnB, Bbl3bBaA cepBe3HbIe OXOrn IIN DaXe BO3rOpaHne. Ecn aKKymyIaTOpBl HaunHaOT TeYb, He TpNTe rIa3a IIN CN3NCTbIe OboLoyKn. BbIMOnTe pyKn I npOMoITe rla3a YInCToB BDOJ. Ecn pa3dpaxKeHne He npoxOHT, 6paTntecb K Bpauy.

DaBaIte nOMOXeM 3aunTb OKpykaIoUy cpey!
① Baue yctpoiCTBO coepxnt MHOxecTBO NOJIe3HbIX IINI nepepaTaBbAembix MaTePnaIOB.
OTHeCnTe yCTpOcTBo B nyHKT npneMa IJyYTuIN3aUIN.
PEMOHT
BAxHO: EcnBbI 3aMeTnH, yTo Baw nbilecoc He pa6oTaet OJXhbIM o6pa3om, nepei IIO60 npOBepKoB, BbIKIOuHTe erO, noCTaBvB KONky BkIOUHTb/BbIKIOUHTb B nIoXeHne BbIKIOUHTb.
Pemont MoryT denaTb TOnbKO CneuaNCTbl, NcNoIb3yIOUne OpunHaNbHbIe 3aNactn. IOnbItka OTpeMOHTnpoBaTb 3JIeKtpueeCKoe yCtpoJCTBO B DOMaUnHX YcNOBIAx MOKeT 6bITb ONaCHOI nIPOIb3OBAteIra.
Ecn nIbIeCoc He BkIIOaTcA
y6eHNTecb, yTO 3apAHHoe yCTpoIcTBO NONHOCTbIO OTOeDINHeO OT nbInecoca. Ecnn OTKNIouHeO, 3HaHT, aKKymyIaTOp pa3pJxKeH. 3apAInTe aKKymyIaTOp.
Ecnn nbinecoc He nbinecocnt
3JneKtpooueTka 3acopunlaeb: npoucnite ee.
- PacnpedeJnteB 3a6nt: BbITAHTE KOHTeHep dIa c6opa nbINn OoNCTne pacnpedeJInteB.
Ecnn nbinecoc pa6oTaet nnoxo, Bbidae CBnCTnnn wym
Tpy6kn nn IaHn qactuHNo 3acopeHbI: npouHCTnTe nX.
- HaKoNITeIbNbIIIN 3aONJIHeH: ONOpOxHInTe i OUYCTnTe erO.
- KoHTeHep dIa c6opa nbIIN IIOXO yCTaHOBHeN: NOMeCTuTe erO npaBnIbHO.
-ДелбTOBинаг HaCaIka nbIeCoca 3arpyHeHa: demoHTnpuTe 3neKtpouTeKu n OUnCTte ee.
-Поролоновьй ФильтбдцпгелдвогаTeязагрзнлс:очиспе ero.
Ecn npacnpedentel 3arpa3nncra
PacnpedeHnteB HnOrDa HaKaanNbae TnbIb. Y6eHNTecb, UTO HnUTo He 6NoKpyeT KaHaJ MExd y pacnpedeHnTeMeM n KOnTeHepom dnn c6opa nbIi.
3a6IokpObaHO OTKpbITne KOHTeHepa IyIbIIN: BbITAHnTe KOHTeHep, ONOpOXHnTe nOuCTnte erO.
TolOBKa nbIeCocA DnKxTeC TpydOm
Y6aBbTe INHTeHCBHOCTb NbJIeCOCA C NOMOJbIO COOTBeTCTBYIOJIe KNOHKn.
Ecn npo6jema He 6ydt yctpaHeHa,OTheCnTe nbIeoc Tefal B 6nnkAunn aBTOp3OBaHHb CEpbHt.
Cm. cnncok abTOPn3OBaHHbIX cepBnCHbIX ueHTPOB Tefal nn o6paNTecb B OTdcl 6cbnykBaHnKJneHToB Tefal.
TAPAHTR
UcpoCTBO npedHa3HaeHO TOBKO IINCNOB3OBAHnB DOMaunx ycNoBnx. KomnaHn Tefal He Hecet OTBeTCTBeHHOCTH 3a yctpoCTBO B Cnyae HnPaBnBHoro NCNOB3OBAHn, KOtOpoe IpOTnBopeuT daHHoH INCHPTyKUnn.
IpouHTe HNCTpyKUIO nepei nepBbIM NcNoJIb3OBAHnEM nbJIeCoca: NcNoJIb3OBAHnE yCTPOJCTBa B JIO6bIX dpyrnx 1eJx, KpOME KaK yKa3aHHbIX 3dEcB, OCBO60KJaET KOMNaHnIO Tefal OT KaKoJ-NI6O OTBETCTBEHHOCtN.
3MICT
CTopiHka
IOPAIN3BE3NEKIN 37
- 3anobixkhi 3axoNi nepeB BnKOpncTaHHaM 37
2.Джерениелекtrpoeheprii 38
3.PemOHr. 38
OINIC 38
IePeI IEPiIM BnKOpNCTAHHrM 38
- 38
- 3apka akymyTopa 39
- BBimKHeHHn npncTroo.. 39
- 36epirannn 40
OuHJIeHHI TEXHIyHE OBCJyROBvBAHHI 40
- Ouichienn KOnTeHepa Iy 40
- OunueHHn npoOnHOBOrO fIbTpA nla 3axncty DnryHa.. 41
3.Доглд i texhiue he obcnyrobybanna nopoxotra 41
AKUMYJIATOPN 41
- 3amHa akymyITopa 41
- Ytni3aizipnscptpo 41
OXOPOHA IOBkIIJIa 41
PEMOHT 42
TAPAHTIA 42
IOPAДN 3БE3ПЕКИ
Дя Baшой 6e3nekn, ue npictpiB iDnOBiJaE diOuHm npaBnIam Ta noLoXeHHaM (IhCTpyKci 3 Hn3bKOi Ha npyRn, EneKtpomarHiHOi cymicHocTi, PnpoDOoxOpOHHomy 3aKoHODaCTBy...).
- Zei npictri3a6opohetbcBnKOpncTOByBaTn Oco6am (BKNIOUHO 3 DiTbMn) 3 06mexKeHIMN fI3nHIMN, yTTeBIMN nn PO3yMOBIMN 3DIO6HOCTaMn, a TAKoX OCO6AMn, kI He MaIOTB BiINOBIDHO DOCBIy uN 3HaHb, OKPIM BnPaADkIB, KOJI BOHN 3NaXODaTbCnPiJ HArJaDMO OCO6n, BiIOBIdaIbHOi 3a iXHIO 6e3neKy, a6O J OTpImaII nIHCTpyKcii CTOCOBHO BnKOpNCtAHNr Iprntpoio.
BydJIaCKa, cIiKyuTe, 06 dITn He 6abuINsc3 npicTPOeM.
- Zei npictpi 3abopohetbca BnKOpncTOBvBaTn dITam, kIM He BnIOBnIOc8 pOKiB, a taKoX Oco6aM, kI He MaOTb BiIDNOBIDHO IOCBiDy Ta 3HaHb, a taKoX nn i3uHni, yTTeBi qN POzymoBi 3di6HOCTi e 06mexKeHMn, OKPIM BnPaADKiB, KOJI BOHn OTPMaII INCTpykci CTOCOBHO BnKOpncTaHHa PnCtpoU, a TaKoX 3HaOTb IPO BCI NoteHNI HBe3neKn. DiTAM 3abopohetbcra 6aBNTscra 3 npictpoem. OunSeHHa Ta 06cLyroBvBaHNA KOpncTyBaUem He NobHHi 3diChHOBatncr DITbMn 6e3 HaJMy. 36epiraTe npictpi Ta shHyp JKNBHeHHa B HeNoctynHomy dIa DIteMiczi.
3a6bopohraetbcra BnKOpncTOBvBaTn npilaad: kso nookdojKeHO eIektpnueHn shyp. 3aJra 6e3neKn, 3amHa 3MOTyBaIbHoro npncrpoTo Ta shhupa nllococa nobHHa 3di'CHIOBATNCb TIlbKn B akpeiHTOBaHOMy cepBicHomy ceHTpi Tefal.
1. 3anobixhi 3axoynpeed BnKOpncTaanHЯm
Ybaxho npouTaTe iHctpykuio 36epexitb II B 6e3neuHomy Micui.
Baw npoxotar - eektpnHn npctpi: noro Heo6xHNO 36epiraTb HopMaIbHnx yMOaX. BnkOpncToByte i 36epiraTe npctpiB HeooctynHomy dJe tne MiCi. HikoN He 3aIIuAaTe npctpi BBIMKHeHm 6e3 HarJy. He niohcTe KHeCt py6n npoxotara do ouen uN Byx.
Hikon He npoxotte BONORY iINORY uPiHN, He 3aJexHO BID ixHbOro noxodKeHHraPuy peoBnH; HADToHki peoBnH, TaKi rinc, cemeHT u30la; MacNBHI BIXOu, RaHapnKnaCkno; TOKcuHi peoBnH, TaKi RPO3uHHNt Ta PO3uHn DnBuaHHe pAp6u; arpeCBHPeoBnH, TaKi RA KNCOTn CunbHi MIOUc 3ac06u; naIIBO, 3aIMnCTi Ta BN6yXone63neuHi peoBnH Ha OCHOBi cnnpTy.
-
Hikon He 3aHypouTe i He 3apJkaTe npucptpii niD BOIOU Ch iHsMMPiINHAMn. He po3npckyute BDOy Ha nopoxotar nn 3apJdHn npucptpii.
-
He 36epiraTe npicptiHa BIDKpntomy NOBtpi, a 3aBxDn TpMaTe NOro B pOxoJIoHOMy, cyXOMy Micu.
-
He 3aIIuAaIe npicptpi 6iI dxpejia Te nla (dyxOBok, eJeKtpnHnx o6irpibauiv paiaTopiB).
-
He 36epiraTe akymnyaTOp npn kimHaTHiI TemnepaTypi Bnue 104^ F (40^)
-
He po36npaIte npoxotar, KOJIu BIn BBIMKHeHn.
-
He BnKOpncToBnyTe npoxoTg 6e3 KOHTeHepa dIy nIy nu npOIoHOBOrO fInbTp aIy 3axNcTy MoTopa.
-
He BnKOpncToBnyTe npncTpi:
-
RAKUO BIH Bnab i E HAABHI BUNIMI O3HaKN yuKoJKeHb a6o fHKUioHaJIbHI aHOMaII.
Socill jUolowly baiy
pLabyly lalal o aaiy caii
.(9) Loojoe JU (14 JUJI)
.(9c)
g (9d) 1b2g (9b) JjJ (20 kJ) aJg J (9a) JjJ
a 1
.(20 1jbl jbl jzaiyll jzbl jld
(9c) y
.
.(19J)
(9c) 1234567890
blblj jaiyly jajl dla 1jg jg jgs jgs jwslj y:
a 1 a 1 1 1 1 1 1 1 1 1 1 1 1 1 1 1 1 1 1 1 1 1 1 1 1 1 1
a 1
.1J 1
.(21 J5JI) (9c) jIbI bI yiaieWyI yabI aIooEjol .(9d) JbI IaI 8e jol
.1JlIg 9c) bblb l iy jol
.(22J)
1 1
a 11 1 1 1 1 1 1 1 1 1 1 1 1 1 1 1 1 1 1 1 1 1 1
- 1.2.3.4.5.6.7.8.9.10.11.12.13.14.15.16.17.18.19
j 1 j 1 j 1 j 1 j 1 j 1 j 1 j 1 j 1 j 1 j 1 j 1 j 1 j 1 j 1 j 1 j 1 j 1 j 1 j 1 j 1 j 1 j 1 j 1 j 1 j 1 j 1 j 1 j 1 j 1 j 1 j 1 j 1 j 1 j
1guluog auiyul 3
J (2a) (Stop/Start) J (Jb) J (Jc)
"Laagill" ggo Jaa, yj j kso 1 3 ydoosgocgdo
y ggsggsggsggsggsggs
gag ggo aaiisbl jgl glgll ploal llaa 1
aIg
.àIiIgIäIbIäIaIooIyIyIyIyIyIyIyIyIyIyIyIyIyIyIyIyIy
(9)
1a
14 15 16 17
.(19)S.
Igilo 1olal jjgl a561 gno yjll
.(1J)gui b 10 no gglal jajl d alayd uoldy auiu sb iis
.(2J)gaoaaboljlllajxwlypkolbyaldeIgawisblgic(7)
.(3J)
.19J5) gssjll qibl puee de jles s
1 4 J5 (4 J5) Delta J5
aJbJ 2
aai yj g j aaiy 51 aaii jai .("gui b i jai (ag) o jai jai) gi h jao gai lai jai lai lai lai lai lai lai lai gai jai jai jai jai jai jai jai jai jai jai jai jai jai jai jai jai jai jai jai jai jai jai jai jai jai jai jai jai jai jai jai jai jai jai jai jai jai jai jai jai jai jai jai jai jai jai jai jai jai jai
1 1
.(aclw 12 jc Jdd)Jolk kcbt bIbIyIaIyIaIyIaIyIaIyIaIyIaIy
.(Stop" (2a" 一 _ 一 ^ 一 (Stop/Start) 1 (Sto)
. 1
(5J) 1
gw.(aLw 12 (j) jzai l o g r sui i j. jzai J aoi kbl jj. jii biao aodao ggb(4) jzai r zg
Lg jai 1
j 1 1 1 1 1 1 1 1 1 1 1 1 1 1 1 1 1 1 1 1 1 1
gss aeeab1 css s d jn g .jnnnll alaoa aayr lalb yag jnnaa Jyaa Wd n no Ll I aai Sbl ooley g
.
auiy 13
aJ (Stop/Start) JzIJI (Stop/Start) JzIJI (Stop/Start) JzIJI (Stop/Start) JzIJI (Stop/Start) JzIJI (Stop/Start) JzIJI (Stop/Start) JzIJI (Stop/Start) JzIJI (Stop/Start) JzIJI (Stop/Start) JzIJI (Stop/Start) JzIJI (Stop/Start) JzIJI
.:Min"
aLol ool aol l 1
.(2c) :"Max"
| 2\( از \) "Max" | 1\( از \) "Min" | |
| \( از \) 15\( از \) 25\( از \) 12 |
aLgJdLgJL
aLg 1 g a 1 1 1 1 1 1 1 1 1 1 1 1 1 1 1 1 1 1 1 1 1 1 1 1 1 1 1 1 1 1 1
Min"ae wJgol 1s Jzssb s b a 13:abxu
jlllglgog.
aalgll lgl aol 1l alu uag Tefal daae aoe y e g g y
L
.
JgUdUds JjibI 3uabjjglao jdo
.(...)yjb,yj)Lg jnJ 1
Tefal jgSj 102bbl lLw y j 1 100
.
aui 2
J 1
.ogjll llll 1 1 1 1 1 1 1 1 1 1 1 1 1 1 1 1 1 1
- DESCRIPTION 3
- BEFORE FIRST USE 3
- CLEANING AND MAINTENANCE 5
- BATTERIES 6
- ENVIRONMENT 6
- REPAIRS 7
- GUARANTEE 7
- SECURITY ADVICE
- Precautions before use
- Electric power source
- Repairs
- DESCRIPTION
- BEFORE FIRST USE
- How to assemble the Appliance
- Charging the battery
- Turning on the appliance
- REMOVING AND CLEANING THE ELECTRO-BRUSH
- FOR YOUR SAFETY
- ELECTRO-BRUSH MALFUNCTION
- The electro-brush does not function properly or makes an unusual sound
- The electro-brush stops while you are vacuuming
- The electro-brush moves with difficulty
- Storage
- CLEANING AND MAINTENANCE
- Cleaning the dust tray (9)
- 1.a Fast emptying
- 1.b Complete cleaning procedure
- Cleaning the foam rubber motor protection filter (9c)
- Vacuum cleaner care and maintenance
- BATTERIES
- Battery replacement
- Throwing away the appliance
- ENVIRONMENT
- Warning
- Let's help protect the environment!
- REPAIRS
- IMPORTANT: If you notice that your vacuum cleaner is not functioning properly, before any revision, turn it off by placing the Stop/Start button in the Stop position.
- If your vacuum cleaner does not start
- If your appliance does not vacuum
- If your vacuum cleaner seems less efficient, makes noise or whistles
- If the separator gets filled with dust
- The vacuum head moves with difficulty
- GUARANTEE
- 卡
- a
- 10
- IPEEDIIEPBbIMNCIOJIb3OBAHHEM
- KaK co6npaTb yCTpoiCTBO
- 3NeKtpoueTka He pa6oTaETdoJXHbIM 06pa3OM IIN N3daeCTpaHHbIe 3ByKn
- 3NeKtpoouetKa ocTaHaBnBaeTc, KOrda Bbl nIbIeocuTe
- 3neKtpo-ueTka DnHexTcA Ctpydom
- XpaHeneHne
- YIUCTKA I TEXHINUECKOE OBCJYKINBAHINE
- BHIMAHNE: Bcerda BbIKIouaTe n OTKIOUaTe yCTpoCTBO OT nITAHnpeD xpaHeHem nN OuMtKoN.
- OuNTka KOHTeHepa IyIbn (9)
- 1.a 5bictpoe onopoxkHeHne KOHTeHepa
- 1.bPpoceDypa noHno ouNCTKu
- Ouinctka nopolohoBoro fIbtpa Ira 3aunTbI Dnuratae (9c)
- 3.Чистka И Тхницекoe обслжьанne
- DaBaIte nOMOXeM 3aunTb OKpykaIoUy cpey!
- PEMOHT
- BAxHO: EcnBbI 3aMeTnH, yTo Baw nbilecoc He pa6oTaet OJXhbIM o6pa3om, nepei IIO60 npOBepKoB, BbIKIOuHTe erO, noCTaBvB KONky BkIOUHTb/BbIKIOUHTb B nIoXeHne BbIKIOUHTb.
- Ecn nIbIeCoc He BkIIOaTcA
- Ecnn nbinecoc He nbinecocnt
- Ecnn nbinecoc pa6oTaet nnoxo, Bbidae CBnCTnnn wym
- Ecn npacnpedentel 3arpa3nncra
- TolOBKa nbIeCocA DnKxTeC TpydOm
- TAPAHTR
- 3MICT
- IOPAIN3BE3NEKIN 37
- OINIC 38
- IePeI IEPiIM BnKOpNCTAHHrM 38
- OuHJIeHHI TEXHIyHE OBCJyROBvBAHHI 40
- AKUMYJIATOPN 41
- OXOPOHA IOBkIIJIa 41
- PEMOHT 42
- TAPAHTIA 42
- IOPAДN 3БE3ПЕКИ
- 3anobixhi 3axoynpeed BnKOpncTaanHЯm
- Ybaxho npouTaTe iHctpykuio 36epexitb II B 6e3neuHomy Micui.
Brand : TEFAL
Model : Air Force TY8463
Category : Vacuum Cleaner