
APC Key 25 mk2 - Controller AKAI - Free user manual and instructions
Find the device manual for free APC Key 25 mk2 AKAI in PDF.

| Product type | MIDI controller for Ableton Live |
| Brand | AKAI Professional |
| Model | APC Key 25 mk2 |
| Number of keys | 25 second-generation dynamic keys |
| Clip grid | 8 x 5 RGB backlit keys |
| Rotary knobs | 8 assignable knobs (Volume, Pan, Send, Device) |
| Control buttons | Play/Pause, Rec, Stop All Clips, Shift, Octave +/-, Sustain, Scene Launch (5), Clip Stop (8) |
| Connectivity | USB (power and MIDI data) |
| Power supply | Via USB port (bus power) |
| Dimensions (approx.) | 300 x 200 x 40 mm |
| Weight (approx.) | 1 kg |
| Compatibility | Ableton Live (Live Lite included) |
| Box contents | APC Key 25 mk2, USB cable, user guide, software download cards (Ableton Live Lite) |
| Security | Integrated Kensington lock |
| Maintenance | Clean with a soft, dry cloth; avoid liquids |
| MIDI device | Control of volume, pan, sends, and device parameters in Ableton Live |
| Octave range | 10 octaves with Oct- and Oct+ buttons |
| Warranty | Visit akaipro.com for details |
Frequently Asked Questions - APC Key 25 mk2 AKAI
User questions about APC Key 25 mk2 AKAI
0 question about this device. Answer the ones you know or ask your own.
Ask a new question about this device
Download the instructions for your Controller in PDF format for free! Find your manual APC Key 25 mk2 - AKAI and take your electronic device back in hand. On this page are published all the documents necessary for the use of your device. APC Key 25 mk2 by AKAI.
USER MANUAL APC Key 25 mk2 AKAI
User Guide (English)
Introduction
Thank you for purchasing the APC Key 25 mk2. At Akai Professional, we know how serious music is to you. That's why we design our equipment with only one thing in mind—to make your performance the best it can be.
Box Contents
APC Key 25 mk2
Ableton Live Lite (download)
Software Download Cards
USB Cable
User Guide
Safety & Warranty Manual
Support
For the latest information about this product (documentation, technical specifications, system requirements, compatibility information, etc.) and product registration, visit akaipro.com.
For additional product support, visit akaipro.com/support.
Setup
- On your computer, open Ableton Live.
- Use the included USB cable to connect APC Key 25 mk2's USB port to an available USB port on your computer (powered on).
-
In Ableton Live, open the Preferences:
-
Windows: Options > Preferences
MacOS:Live > Preferences -
Click the Link/MIDI tab.
- Click an available Control Surface drop-down menu and select APC Key 25 mk2 (Port 2).
- Click an available Input drop-down menu and select APC Key 25 mk2 (Port 2).
- Click an available Output drop-down menu and select APC Key 25 mk2 (Port 2).
- Make sure that the Track option under MIDI Input is enabled for APC Key 25 mk2.
- Close the Preferences window.
You can now use APC Key 25 mk2 with Ableton Live.
Basic Operation
Refer to this section to learn how to do basic tasks in Ableton Live using APC Key 25 mk2. Important: Before doing any of the following, set up APC Key 25 mk2 as a controller in Ableton Live (described in the Setup section above).
To launch a clip, press one of the Clip Buttons (in the 8x5 matrix) that is dimly lit, which means there is a clip loaded to that slot but is not playing. The Clip Button will be brightly lit when it is playing.
To stop a clip:
- Press and hold Shift and press the first Scene Launch Button (Clip Stop). This puts the Clip Stop Buttons at the bottom of the 8x5 matrix of Clip Buttons in Clip Stop Mode.
- Press the Clip Stop Button in the same track (column) as the clip you want to stop.
To launch a scene, press one of the five Scene Launch Buttons to the right of the 8x5 matrix of Clip Buttons.
To move around the matrix of clips, press and hold Shift and press one of the left four Clip Stop Buttons (, , , ) to shift the viewable 8x5 matrix. In the software, this is represented by a red rectangle around the clips.
To solo a track:
- Press and hold Shift and press the second Scene Launch Button (Solo). This puts the Clip Stop Buttons at the bottom of the 8x5 matrix of Clip Buttons in Solo Mode.
- Press the Clip Stop Button in the same column as the track you want to solo.
To mute a track:
- Press and hold Shift and press the third Scene Launch Button (Mute). This puts the Clip Stop Buttons at the bottom of the 8x5 matrix of Clip Buttons in Mute Mode.
- Press the Clip Stop Button in the same column as the track you want to mute.
To record-arm a track:
- Press and hold Shift and press the fourth Scene Launch Button (Rec Arm). This puts the Clip Stop Buttons at the bottom of the 8x5 matrix of Clip Buttons in Record-Arm Mode.
- Press the Clip Stop Button in the same column as the track you want to record-arm.
To select a track:
- Press and hold Shift and press the fifth Scene Launch Button (Select). This puts the Clip Stop Buttons at the bottom of the 8x5 matrix of Clip Buttons in Select Mode.
- Press the Clip Stop Button in the same column as the track you want to select.
To stop all clips, press the Stop All Clips button.
To adjust volumes, press and hold Shift and press the fifth Clip Stop Button (Knob Ctrl - Volume) to put APC Key 25 mk2's Knobs in Volume Mode. The eight Knobs will control the volume levels of the first eight tracks in Ableton Live.
To adjust panning, press and hold Shift and press the sixth Clip Stop Button (Knob Ctrl - Pan) to put APC Key 25 mk2's Knobs in Pan Mode. The eight Knobs will control the panning positions of the first eight tracks in Ableton Live.
To adjust send levels, press and hold Shift and press the seventh Clip Stop Button (Knob Ctrl - Send) to put APC Key 25 mk2's Knobs in Send Mode. The eight Knobs will control the levels of Send A for the first eight tracks in Ableton Live.
Tip: Repeat this action to set the knobs to control the levels of subsequent sends (e.g., Send B, Send C, etc.).
To adjust devices, press and hold Shift and press the eighth (last) Clip Stop Button (Knob Ctrl - Device) to put APC Key 25 mk2's Knobs in Device Mode. The eight Knobs will control the eight Macro Controls of the current device in Ableton Live.
Features
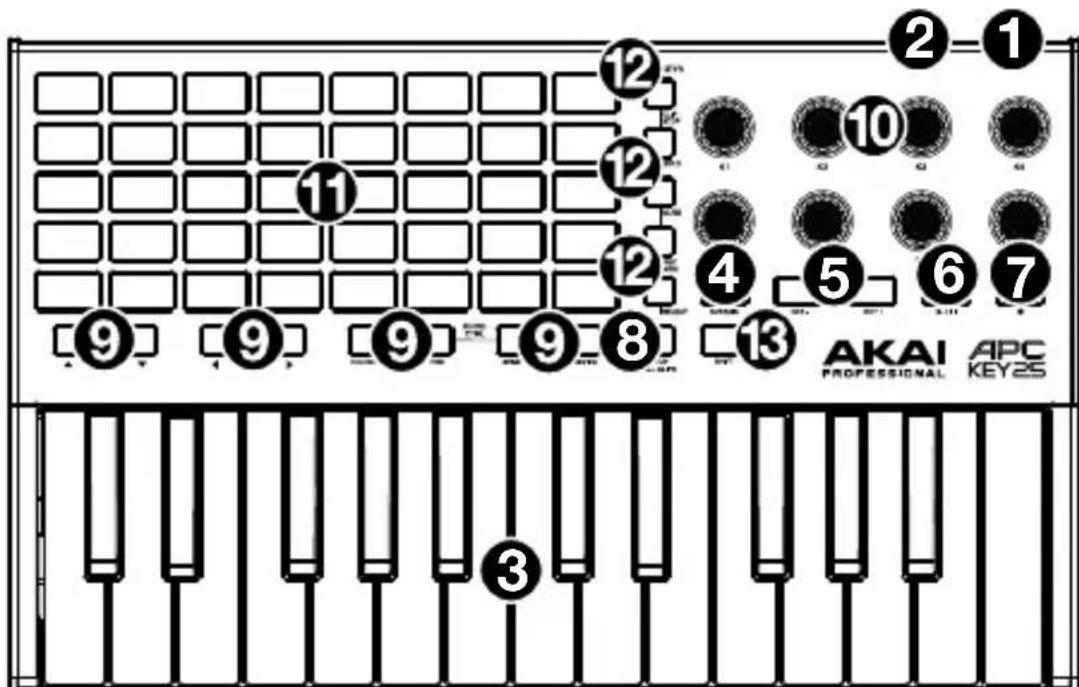
- USB Port: Use a standard USB cable to connect this port to a USB port on your computer. The computer's USB port provides power to APC Key 25 mk2. This connection is also used to send and receive MIDI data to and from your computer.
- Kensington Lock Slot: You may use this Kensington lock slot to secure the APC Key 25 mk2 to a table or other surface.
- Keyboard: This Gen 2 dynamic 25-note keyboard is velocity-sensitive and, in conjunction with the Oct Up and Oct Down buttons, can control a ten-octave range.
-
Sustain: Press and hold this button to sustain all currently held notes (similar to the sustain pedal on a piano). This button is a momentary button, sustaining only when the button is pressed and held.
-
Oct Down / Oct Up: Use these buttons to shift the keyboard's range up or down. Press both buttons simultaneously to reset the octave shift to "zero."
- Play/Pause: Press this to start/resume or pause playback in Ableton Live.
- Rec: Press this to start recording in Ableton Live.
- Stop All Clips: Press this button to stop all clips when they reach the end.
-
Clip Stop Buttons: Normally, you can press one of these buttons to stop the clip in the corresponding track—represented by the column of five Clip Buttons just above it. You can change their functions by pressing and holding Shift and then pressing one of the Scene Launch buttons labeled Soft Keys: Clip Stop, Solo, Mute, Rec Arm, or Select. Each button puts the Knob CTRL Clip Stop Buttons in a different mode:
-
Clip Stop Mode: The Clip Stop Buttons will stop their corresponding tracks (the default mode).
- Solo Mode: The Clip Stop Buttons will solo their corresponding tracks.
- Mute Mode: The Clip Stop Buttons will mute their corresponding tracks.
- Record-Arm Mode: The Clip Stop Buttons will record-arm their corresponding tracks.
- Select Mode: The Clip Stop Buttons will select their corresponding tracks.
Press and hold Shift and press one of the left four Clip Stop Buttons (▲, ▼, ▲, ▶) to shift the viewable 8x5 matrix of clips. In Ableton Live's Session View, this is indicated by a red rectangle around the clips.
- Knobs: Normally, you can use these knobs to control various parameters in Ableton Live.
Press and hold Shift and press one of the right four Clip Stop Buttons labeled Knob CTRL (Volume, Pan, Send, Device) to put APC Key 25 mk2's Knobs in the corresponding mode:
- Volume Mode: The eight knobs will control the volume levels of the first eight tracks in Ableton Live.
-
Pan Mode: The eight knobs will control the panning positions of the first eight tracks in Ableton Live.
-
Send Mode: The eight knobs will control the levels of Send A for the first eight tracks in Ableton Live. Repeat this action to set the knobs to control the levels of subsequent sends (e.g., Send B, Send C, etc.).
Device Mode: The eight knobs will control the eight Macro Controls of the current device in Ableton Live. -
Clip Buttons: While in Ableton Live's Session View, use these buttons in this 8x5 matrix to launch clips. Each Clip Button represents a single clip slot. The eight columns represent eight tracks while the five rows represent five scenes. In Clip Launch Mode, the buttons' colors will match the clip colors in Ableton Live. If there is nothing loaded to a clip slot in Ableton Live, the matching button will remain unlit.
You can launch the entire scene by pressing the Scene Launch buttons to the right of the row of clips.
- Scene Launch Buttons: Normally, you can press one of these buttons to launch the corresponding scene—represented by the row of eight Clip Buttons to its left.
Press and hold Shift and then press one of these buttons to change the function of the Clip Stop Buttons, which can then stop, solo, mute, record-arm, or select their corresponding tracks (see #9. Clip Stop Buttons above).
- Shift: Press and hold this button and then press a Scene Launch button to change the function of the Clip Stop Buttons (see #9. Clip Stop Buttons above).
Press and hold this button and then press one of the left four Clip Stop Buttons (▲,▼, ▲, ▶) to shift the viewable 8x5 matrix of clips. In Ableton Live's Session View, this is indicated by a red rectangle around the clips.
Press and hold Shift and press one of the right four Clip Stop Buttons labeled Knob CTRL (Volume, Pan, Send, Device) to put APC Key 25 mk2's Knobs in the corresponding mode (see #10. Knobs above).
Ableton Live Lite (download)
Ableton Live Lite (Download)
Technical Specifications
| Note Keys | 25 velocity-sensitive keys; 10-octave range with octave up/down buttons |
| Clip Buttons | 40 RGB backlit clip-launch buttons in 8x5 matrix |
| Knobs | 8 360° knobs with 4 modes |
| Inputs / Outputs | 1 USB port |
| Power | USB-bus-powered |
| Dimensions (width x depth x height) | 12.4" x 7.6" x 1.9" 315 x 193 x 47 mm |
| Weight | 2.1 lbs. 0.9 kg |
Specifications are subject to change without notice.
Trademarks & Licenses
Akai Professional is a trademark of inMusic Brands, Inc., registered in the U.S. and other countries. Ableton is a trademark of Ableton AG. MacOS is a trademark of Apple Inc., registered in the U.S. and other countries. Windows is a registered trademark of Microsoft Corporation in the United States and other countries. Kensington and the K & Lock logo are registered trademarks of ACCO Brands. All other product or company names are trademarks or registered trademarks of their respective owners.
AKAI
PROFESSIONAL
akaipro.com
Manual Version 1.2

Brand : AKAI
Model : APC Key 25 mk2
Category : Controller