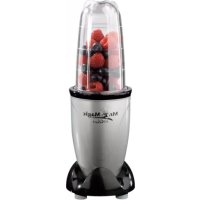
05611 - Blender Gourmetmaxx - Free user manual and instructions
Find the device manual for free 05611 Gourmetmaxx in PDF.
| Brand | Gourmetmaxx |
| Model | 05611 (emerald/black) |
| Product type | Blender mixer |
| Power supply | 230 V~, 50 Hz, 400 W |
| Protection class | II |
| Blender bowl capacity | 750 ml (up to 350 g of solids) |
| Large beaker capacity | 500 ml |
| Small beaker capacity | 350 ml |
| Dimensions (L x W x H) | 18 x 15 x 25 cm (estimated) |
| Weight | 1.2 kg (estimated) |
| Cable length | 0.8 m (estimated) |
| Blade material | Stainless steel |
| Included accessories | Blender bowl, 2 beakers, 2 attachments (flat and cross blades), sieve, pusher, sprinkling lid, 2 storage lids |
| Functions | Blend, mix, chop, grind, purée, whip cream |
| Max. continuous use | 1 minute, then cool down for 2 minutes |
| Maximum food temperature | 50 °C |
| Cleaning | Dishwasher-safe accessories; motor unit wiped with a damp cloth |
| Safety | Start lock if bowl not engaged; sharp blades; do not immerse |
| After-sales service | DS Produkte GmbH, Am Heisterbusch 1, 19258 Gallin, Germany, Tel.: +49 38851 314650 |
| Repairability | Do not repair yourself; contact after-sales service |
Frequently Asked Questions - 05611 Gourmetmaxx
User questions about 05611 Gourmetmaxx
0 question about this device. Answer the ones you know or ask your own.
Ask a new question about this device
Download the instructions for your Blender in PDF format for free! Find your manual 05611 - Gourmetmaxx and take your electronic device back in hand. On this page are published all the documents necessary for the use of your device. 05611 by Gourmetmaxx.
USER MANUAL 05611 Gourmetmaxx
www.service-shopping.de
Items supplied and device overview 18
Accessories 18
Before initial use 20
Use 20
Recipe ideas 22
Cleaning and storage 24
Troubleshooting 24
Technical data 25
Disposal 25
Explanation of symbols

Safety instructions:
Please read these carefully and comply with them in order to prevent personal injury and damage to property.

Supplementary information

Suitable for use with food.

Protection class II
Dear customer,
We are delighted that you have decided on this blender.
Before using the device for the first time, please carefully read through the instructions and store them for future reference. These instructions are to accompany the device when passed on to others.
The manufacturer and importer assume no liability in the event the data in these instructions have not been observed!
If you have questions about the device or spare parts/accessories, contact customer service via our website:
www.service-shopping.de
Please keep in mind: The images in this instruction manual may vary slightly from the actual device.
Proper use
- The device is intended for blending, stirring, grinding, puréeing and chopping food such as fruit, vegetables, hard cheese, nuts or herbs. The device is also suitable for whipping cream.
- The device is not suitable for crushing ice cubes.
- The device is intended for domestic, not commercial use.
- The device is not intended to be operated with an external timer or a separate telecontrol system.
- Only use the device as described in this instruction manual. Any other use is deemed improper.
- Defects arising due to improper handling, damage or attempts at repair are excluded from the warranty. This also applies to normal wear and tear.
Safety notes
This device may be used by persons with impaired physical, sensory or mental abilities or who lack experience and/or knowledge if they are supervised or have been instructed on how to use the device safely and have understood risks arising from using the device. Children may not play with the device.
Children and animals must be kept away from the device and the connection line! Store the device so that it is not accessible to children or animals!
If the device is not supervised, before assembling, disassembling and cleaning the device, it must always be disconnected from the mains.
If the device, the connecting cable or the plug of the device is damaged, it must be replaced by the manufacturer or customer service department or a similarly qualified person (e.g. specialist workshop) in order to avoid any hazards.

Risks of injury
■ Risk of suffocation! Keep children and animals away from the packaging material.
■ Risk of injury associated with sharp blades! The blades are sharp! Handle the cross-blade adapter with care in order to prevent cut injuries.
- Never reach into the mixing container when the device is switched on and keep hair and clothing away from it! Use the enclosed plunger to feed in ingredients.
- Burn hazard! Never fill the device with hot food or liquids! The content must not be warmer than 50^ .
Ensure that your work area is well lit when you use the unit.
Ensure that it is not possible for others to trip over the connected mains cable. Do not allow the cable to hang over the edge of tables or kitchen counters. Others may become caught and pull the device down.

Risk of electric shock and fire
Only use the device in enclosed areas.
Always place the device on a dry, level and solid base.
- Keep a sufficient distance from other heat sources, e.g. hobs or ovens.
Never cover the device with cloths or the like. Danger of overheating!
The device should never be set up when highly flammable materials are nearby (curtains, textiles, etc.).
- Do not place any flammable materials such as paper, cardboard or plastic in or on the device.
- Never submerge the motor unit in water or other liquids! Make sure that the motor unit, the cord or the plug can not fall in water or get wet.
If the motor unit falls in water, immediately disconnect the power supply.
Never touch the motor unit, the cord or the plug with wet hands.
- Only connect the device to a socket, which has been properly installed and complies with the device's technical data (see chapter "Technical data").
- Lay the cord such that it is not crushed or creased and such that it does not come into contact with hot surfaces.
Pull the mains plug out of the socket if you do not use the device, if a defect occurs while in use or before a storm.
If you want to remove the mains plug from the socket, never pull on the cable, but always on the plug.
Avoiding damage to materials, property and the device
Check the device for damages prior to each use. The device must not be used if the motor unit, the accessories, the mains cord or plug exhibit visible damages. Do not attempt to repair the device or replace the cable and/or plug yourself. In the event of damage, promptly contact the customer service department.
Each time before using the device, check whether the device is clean and dry and whether it has been correctly assembled and closed.
The device should only be used when it is fully assembled, undamaged, and operational!
Always place the device on a dry, even, and firm base.
- Do not use any additional accessories. Only use the enclosed accessories from the manufacturer.
Do not let the motor run if the device is empty.
Always keep hold of the motor unit with one hand while preparing food.
- Do not use the device for longer than 1 minute without interruption. A cooling-down period of 2 minutes must then be maintained.
- Do not overfill the mixing beakers or the mixing container. Only fill the large mixing beaker and the mixing container up to the MAX mark. Only fill the small beaker up to three quarters with food.
Always keep the lid of the mixing container closed while preparing food. To add ingredients, the insert in the middle of the lid can be removed.
Do not force ingredients into the mixing container.
The device must not be transported when switched on. Always pull the mains plug out of the socket and allow the motor to come to a full stop prior to moving the device.
Do not allow the device to fall and do not subject it to strong percussions.
- Do not subject the device to extreme temperatures, severe changes in temperature, direct sunlight or moisture.
Hygienic notes
There may be some production residue stuck to the device. To avoid health risks, clean it thoroughly before first use (see chapter "Cleaning and storage").
Clean the accessories thoroughly with warm water and a small amount of mild detergent immediately after each use to prevent the build-up of germs. Do not allow any residual food to dry onto it.
- Be absolutely sure to store prepared meals in the fridge. Do not consume any spoiled food and only use ingredients whose best before date has not expired yet.
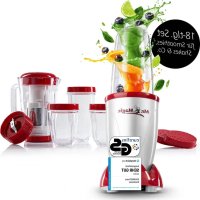
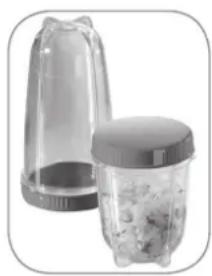
Items supplied and device overview
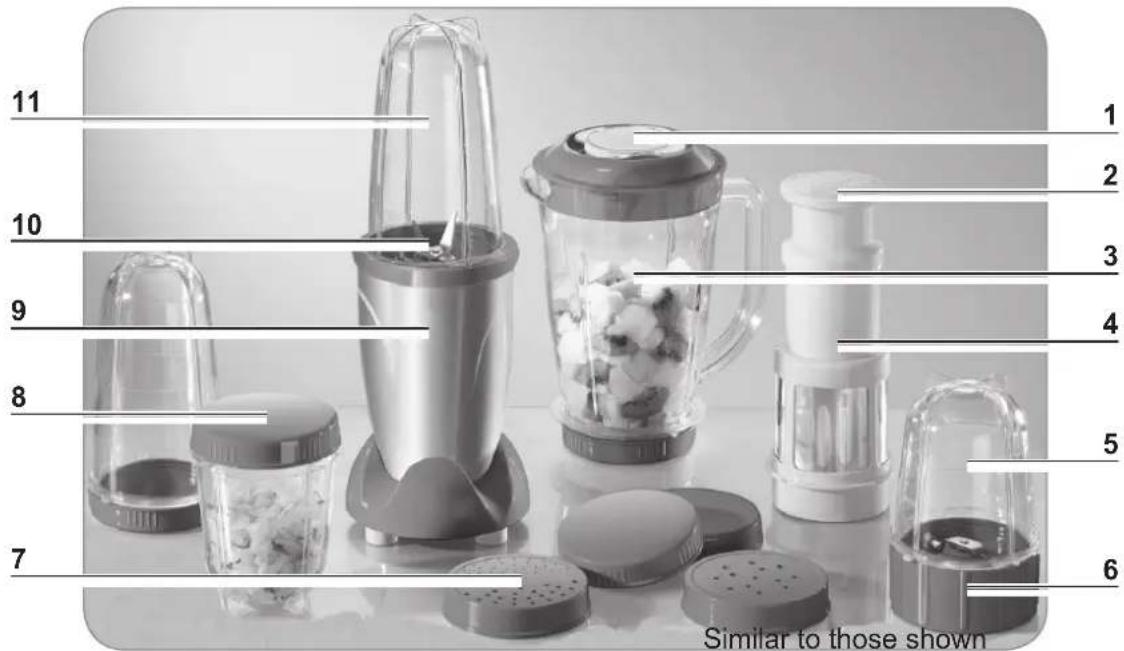
1 Lid of the mixing container (2-part)
2 Plunger
3 Mixing container, 750~ml
4 Sieve insert (for juicing)
5 Small mixing beaker, 350ml
6 Flat-blade attachment
7 Sprinkle lids
8 Keep-fresh lid
9 Motor unit
10 Cross-blade attachment
11 Large mixing beaker, 500ml
Accessories
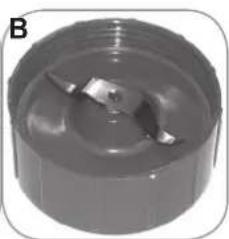
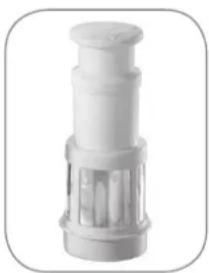
Cross-blade and fl at-blade attachment

PLEASE NOTE!
The blades are sharp! Be careful when handling the cross-blade and flat-blade attachment in order to prevent any cut injuries.
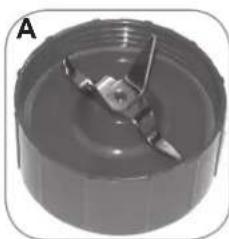
The cross-blade attachment (A) is suitable for mincing and chopping up foodstuffs such as apples, nuts, onions, herbs and for stirring and mixing drinks such as milkshakes.
The flat-blade attachment (B) is suitable for whipping and stirring cream or moussees and for grinding hard foodstuffs such as Parmesan cheese or coffee beans.

- The blade attachments are dishwasher-safe.
- A sealing ring is located in the attachments. This ring ensures that the beaker or mixing container does not leak during preparation. After each cleaning operation and prior to every use, check whether the sealing ring is still in the correct position.
Beakers and keep-fresh lids

PLEASE NOTE!
It is essential that you store the prepared food in the fridge. Do not eat any food that has gone off and only use fresh ingredients that have not yet passed the best-before date.
The beakers are suitable for smaller portions (small beaker: 350 ml; large beaker: 500 ml). For storage purposes, you can seal the beaker shut with a keep-fresh lid after you have finished preparation.

- The beakers and keep-fresh lids are dishwasher-safe.
- A sealing ring is located in the keep-fresh lids. This ring ensures that a beaker can be sealed airtight and does not leak. After each cleaning operation and prior to every use, check whether the sealing ring is still in the correct position.
Sprinkle lids

The sprinkle lids are suitable for sprinkling ground ingredients such as Parmesan cheese, nutmeg, cinnamon or nuts.

The sprinkle lids are dishwasher-safe.
Mixing container

PLEASE NOTE!
With solid foods, the maximum filling weight of the mixing container is 350g
- Never reach into the mixing container when the device is switched on and keep hair and clothing away from it! Use the enclosed plunger to feed in ingredients.
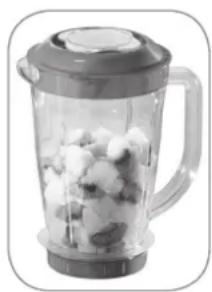
The mixing container is suitable for large portions (up to 750~ml ). You can use it for example to prepare milkshakes, fruit juices and vegetable juices or iced coffee.

- The lid has two parts. To add ingredients, the insert in the middle of the lid can be removed.
- The lid has two pour openings in different sizes. Place the pour opening you want on the right next to the pouring spout and turn the lid clockwise to tighten it.
- The bottom of the mixing container can be unscrewed (this bottom cap can also be used as a keep-fresh lid if necessary). A sealing ring is located in the bottom cap. This ring ensures that the mixing container does not leak. After each cleaning operation, check whether the sealing ring is still in the correct position.
Sieve insert and plunger

PLEASE NOTE!
Do not force ingredients into the mixing container.
The sieve insert and plunger turn the mixing container into a juicer: The sieve insert filters out all solid elements such as pips and stems from the juice. You can use the plunger to feed in more ingredients during preparation.
Before initial use

PLEASE NOTE!
- Keep children and animals away from the packaging material. There is a danger of suffocation!
- Unpack all parts and check the items supplied for completeness (see the "Items supplied and device overview" chapter) and transport damage. If you find any damage to the components, do not use them (!), but contact the customer service department.
- Clean the device and the accessories (see the "Cleaning and storage" chapter).
Use

PLEASE NOTE!
The blades are sharp! Be careful when handling the cross-blade and flat-blade attachment in order to prevent any cut injuries.
- Never reach into the mixing container when the device is switched on and keep hair and clothing away from it! Use the enclosed plunger to feed in ingredients.
Always keep hold of the motor unit with one hand while preparing food.
Always pull the mains plug out of the plug socket and allow the blades to come to a complete standstill before you remove and / or replace the beaker or mixing container.
The device may not be moved or transported while it is switched on.
- Do not use the device for longer than 1 minute without interruption. A cooling-down period of 2 minutes must then be maintained.
- Never fill the device with boiling-hot food or liquids! The contents must not be hotter than 50^ .
- With solid foods, the maximum filling weight of the mixing container is 350 g .
- Do not overfill the mixing beakers or the mixing container. Only fill the large mixing beaker and the mixing container up to the MAX mark. Only fill the small beaker up to three quarters with food.
Always keep the lid of the mixing container closed while preparing food. To add ingredients, the insert in the middle of the lid can be removed.
Do not force ingredients into the mixing container.
- Always place the motor unit on a dry, even, and firm base. You may wish to place a non-slip mat underneath the motor unit so that the surface is not damaged.
- Decide whether you want to use a beaker or the mixing container (see the "Accessories" chapter, "Beakers and keep-fresh lids" and "Mixing container" sections).
If you want to use a beaker:
-Pour the ingredients you want into the beaker of your choice.
- Depending on your requirements, screw the cross-blade or flat-blade attachment onto the beaker (see the "Accessories" chapter, "Cross-blade and flat-blade attachment" section).
If you want to use the mixing container:
- Unscrew the bottom cap of the mixing container and, depending on your requirements, screw the cross-blade or flat-blade attachment onto the mixing container (see the "Accessories" chapter, "Cross-blade and flat-blade attachment" section).
- Turn the lid of the mixing container anticlockwise and remove the lid.
- Pour the ingredients you want into the container and then close the lid again. Make sure that the lid sits on the container so that the pouring spout is completely closed shut!

- If you want to use the sieve insert, first place the insert into the (empty!) mixing container. Make sure that the little bars inside the container sit correctly in the notches in the sieve insert.
- For juicing, you should only feed the pieces of fruit or vegetables into the mixing container after the device has been switched on (see step 5).
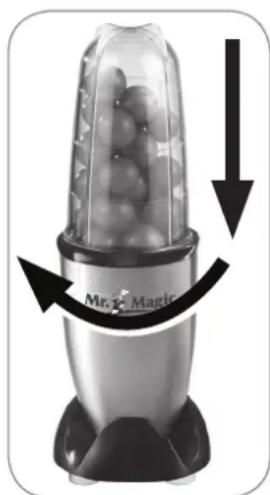

- Now place the filled container into the motor unit (the blade attachment is "sunk" into the motor unit; see illustration). Make sure that the locking lugs on the beaker or mixing container rest correctly in the recesses of the motor unit.
- Insert the mains plug into a properly installed mains socket that is easily accessible.
- To switch on the device, press the container down slightly and at the same time turn it clockwise until it engages. Always keep hold of the motor unit with one hand while preparing food.
If you are using the mixing container, remove the insert in the middle of the lid to add ingredients. You can use the longer to continuously feed in more ingredients.
- To switch off the device, turn the container anticlockwise again until you feel some resistance. Always wait until the blades have come to a complete standstill before you remove the container.
Recipe ideas
Banana f lip
In this recipe, the well-known "banana milk" is spiced up with egg yolk and ice to make the "flip".
Ingredients (for one drink)
1 egg
1 small banana (soft)
18 cl cold milk
1 scoop of cream or vanilla ice cream
2 tsp. honey
To garnish: Banana slices, pineapple chunks and 1-2 cocktail cherries
Preparation
- Separate the egg. Pour the egg yolk into the mixing container with the other ingredients.
- Mix everything together for a short time and pour into a glass.
- Place the banana slices, pineapple chunks and cocktail cherries on a cocktail stick and use this to decorate the drink.
Mai Tai
Tastes devilishly good, but is not as innocent as it seems.
Ingredients (for one drink)
1 lemon
6 ice cubes (already chopped up with the cross blade)
2 cl rum (70%)
6 cl white or brown rum
4 cl lime juice
3 ice cubes
To garnish: Mint leaves
Preparation
- Fill a glass with the ice which has (already) been chopped up and place it in the fridge.
- Extract the juice from the lemon.
- Mix together the rum, lime juice and lemon juice in a beaker for a short time and then add the ice cubes to the beaker.
- Take the glass from the fridge and pour the contents of the beaker into the glass through a sprinkle lid.
- Garnish the drink with mint leaves.
Full-fl avoured coffee, served ice-cold.
Ingredients (for 2 drinks)
600 ml freshly brewed, strong coffee
(Tip: Use twice the amount of coffee powder to brew the coffee.)
2 sticks of cinnamon
4 cloves
4 grains of allspice
150 g cream
6 ice cubes
Sugar to taste
To garnish: Chocolate shavings
Preparation
- Pour the hot coffee into a 1-litre jug and allow it to cool for a short while.
- Add the cinnamon sticks, cloves and grains of allspice and place the jug in the fridge for at least 1 hour.
- Place the glasses in the freezer compartment half an hour before serving.
- Take the jug from the fridge and pour the contents of the jug through a sieve into the mixing container.
- Add the cream, ice cubes and sugar and mix everything together until the mixture is frothy and smooth.
- Remove the glasses from the freezer compartment and pour the contents of the mixing container into the glasses.
- Decorate the drinks with chocolate shavings.
Cleaning and storage

PLEASE NOTE!
Remove the plug from the mains socket before cleaning the device.
- Never immerse the device in water or other liquids! Ensure that the device, cable or mains plug do not fall into water or become wet.
After every use, thoroughly clean the accessories immediately with warm water and a little mild detergent to prevent the formation of germs. Do not allow any food residues to dry on.
All accessories, apart from the motor unit(!), can be cleaned in the dishwasher.
- Do not use corrosive or abrasive cleaning agents to clean the device. These could damage the surface.
- Clean the accessories which have been used with clear, warm water and some mild detergent. The accessories can also be cleaned in the dishwasher.
- Only wipe the motor unit with a slightly damp cloth and then dry it thoroughly.
- Allow all parts to dry completely before assembling the device again and / or putting it away for storage. Store the device in a dry, clean place that is not accessible to children.
NOTE: The plastic parts may discolour with time. However, this is of no concern with respect to health or the functioning of the device parts.
Troubleshooting
If the device is not working properly, please check whether you are able to rectify the problem yourself first.

Do not attempt to repair a defective device yourself!
If you are unable to switch the device on, check the following:
- Is the mains plug properly connected with the socket?
- Is the socket defective? Try another socket.
- Was the fuse for your mains connection triggered?
- Has the blade adapter been correctly screwed onto the blending container?
- Is the blending container correctly fitted in the motor unit? The device can only be activated if the blending container has been properly fitted in the motor unit and has locked in place.
Technical data
Product numbers:
-03806 (silver/red)
-03191 (white/limegreen)
-03196 (Royal stainless steel / black)
-04911 (Gold edition)
-05611 (emerald/black)
Model: 3186-1
Voltage supply: 230V 50 Hz
Output: 400
Customer service / importer:
DS Produkte GmbH
Am Heisterbusch 1
19258 Gallin
Germany
Tel.: +49 38851 314650
(Calls (subject to a charge. Costs vary depending on the provider.)
Safety class: II

Disposal

The packaging material is recyclable. Dispose of the packaging in an environmentally-friendly manner and make it available to the collection service for recyclable materials.
Dispose of the device in an environmentally-friendly manner. It does not belong in the household garbage. Dispose of it at a recycling centre for old electrical and electronic equipment.
For more information, please contact the administration in your community.
Sommaire
Utilisation adequate 26
Chere cliente, cher client,
www.service-shopping.de
www.service-shopping.de