
VCC 61605 AF - Vacuum Cleaner BEKO - Free user manual and instructions
Find the device manual for free VCC 61605 AF BEKO in PDF.
| Product type | Canister vacuum cleaner |
| Brand | Beko |
| Model | VCC 61605 AF |
| Nominal power | 800 W |
| Noise level | 70 dBA |
| Net weight | 5.1 kg |
| Power supply voltage | 220-240 V~, 50-60 Hz |
| Dust container volume | 3.5 L |
| Operating range | 9 m |
| Filter type | HEPA 13 |
| Telescopic tube | Yes, adjustable |
| Multi-surface brush | Yes, with hardwood/carpet adjustment |
| Turbo nozzle | Yes, for pet hair |
| Hard floor brush | Yes, with special fibers |
| Electronic power control | Yes, touch on the appliance and slider on the handle |
| Bag filling indicator | Yes, icon flashing |
| Automatic cord rewind | Yes |
| Usage | Household |
| Protection class | II (double insulation) |
| Environmental compliance | WEEE, RoHS |
Frequently Asked Questions - VCC 61605 AF BEKO
User questions about VCC 61605 AF BEKO
0 question about this device. Answer the ones you know or ask your own.
Ask a new question about this device
Download the instructions for your Vacuum Cleaner in PDF format for free! Find your manual VCC 61605 AF - BEKO and take your electronic device back in hand. On this page are published all the documents necessary for the use of your device. VCC 61605 AF by BEKO.
USER MANUAL VCC 61605 AF BEKO
natural_image
Exterior view of a beige vacuum cleaner with coiled black hose and control buttons (no visible text or symbols)VCC 61605 AF
EN FR RO SL SV CS BG
HU PL DE IT ES SR
01M-8838043200-2919-05
beko
Please read this manual first!
Dear Valued Customer,
Thank you for preferring this Beko appliance. We hope that you get the best results from your appliance which has been manufactured with high quality and state-of-the-art technology. For this reason, please read this user manual and all other provided documents carefully before using the appliance and keep it as a reference for future use. If you hand over the appliance to someone else, give the user manual as well. Follow the instructions by paying attention to all the information and warnings in the user manual.
Meanings of the Symbols
Following symbols are used in various sections of this manual:

Important information and useful hints about usage.

WARNING: Warnings against dangerous situations concerning the security of life and property.

Protection class for electric shock.

This product has been produced in environmentally friendly, modern facilities.
CONTENTS
| ENGLISH | 4-11 |
| FRANÇAIS | 12-21 |
| ROMANIAN | 22-32 |
| SLOVENŠČINA | 33-41 |
| SVENSKA | 42-50 |
| ČESKY | 51-59 |
| BULGARIAN | 60-69 |
| MAGYAR | 70-79 |
| POLSKI | 80-90 |
| DEUTSCH | 91-101 |
| ITALIANO | 102-112 |
| ESPAŇOL | 113-124 |
| СРПСКИ 125-134 | |
1 Important safety and environmental instructions
This section contains safety instructions that will help protect from risk of personal injury or property damage.
Failure to follow these instructions invalidates the granted warranty.
1.1 General safety
- This appliance complies with the international security standards.
- This appliance can be used children aged from 8 years and above and persons with reduced physical, sensory or mental capabilities or lack of experience and knowledge if they have been given supervision or instruction concerning use of the appliance in a safe way and understand the hazards involved. Children shall not play with the appliance. Cleaning and user maintenance shall not be made by children without supervision.
- Do not use it if the power cable or humidity and heat sources, the appliance itself is damaged. Contact an authorized service.
- Your mains power supply should comply with the information supplied on the rating plate of the appliance.
- The mains supply of the appliance must be secured with a minimum 16 A fuse.
- Do not use the appliance with an extension cord.
In order to prevent the power cable from getting damaged, make sure that it doesn't get bystuck, twisted or rub against sharp surfaces.
- Do not touch the appliance or its plug when it is plugged if your hands are damp or wet.
- Do not pull the power cable when unplugging the appliance.
- Do not vacuum flammable materials and when vacuuming cigarette ashes make sure that it got cold.
- Do not vacuum water or other liquid materials.
- Protect the appliance from rain,
1 important safety and environmental instructions
- Never use the appliance • If your store the package in or near to combustible material, keep it out of the or inflammable places and reach of children. materials. 1.3 Compliance with the IEEE
- Unplug the appliance before cleaning and maintenance. 1.2 Compliance with the WEEE Directive and Disposing of the Waste Product
- Do not dip the appliance or its cable in water to clean it. This product complies with EU WEEE Directive (2012/19/EU). This product bears a classification symbol, for waste, electrical, and electronic
- Check the hose of the appliance regularly. Do not use if it is damaged and contact an authorized service. This symbol indicates that this product shall not be disposed with other household wastes at the end of its service life. Used device must be returned to official collection point for
- Do not attempt to dismantle the appliance.
- Returned to official collection point for recycling of electrical and electronic devices. To find these collection systems please contact to your local authorities or retailer, where the
- Only use the original parts or parts recommended by the manufacturer.
- If heavily used for cleaning dust such as cement or grout the dust indicator will lit earlier then expected, in such case replace the dust bag even it is empty. 1.3 Compliance with RoHS Directive The product you have purchased complies with EU RoHS Directive (2011/65/EU). It does not contain harmful and prohibited materials specified in the Directive.
- Do not use the appliance without filters; otherwise it can get damaged. 1.4 Package information Packaging materials of the product are manufactured from recyclable
- When vacuuming the stairs, materials in accordance with our National Environment Regulations. Do not dispose of the packaging materials together with the domestic or other wastes. Take them to the packaging material collection points
This product complies with EU WEEE Directive (2012/19/EU). This product bears a classification symbol for waste electrical and electronic equipment (WEEE).
This symbol indicates that this product shall not be disposed with other household wastes at the end of its service life. Used device must be returned to official collection point for
Recycling of electrical and electronic devices. To find these collection systems please contact to your local authorities or retailer where the product was purchased. Each household performs important role in recovering and recycling of old appliance. Appropriate disposal of used appliance helps prevent potential negative consequences for the environment and human health.
The product you have purchased complies with EU RoHS Directive (2011/65/EU). It does not contain harmful and prohibited materials specified in the Directive.
Packaging materials of the product are manufactured from recyclable materials in accordance with our National Environment Regulations. Do
1.2 Compliance with the WEEE Directive and Disposing of the Waste Product
1.3 Compliance with RoHS Directive
1.4 Package information
not dispose of the packaging materials together with the domestic or other wastes. Take them to the packaging material collection points designated by the local authorities.
2 Your vacuum cleaner
2.1 Overview
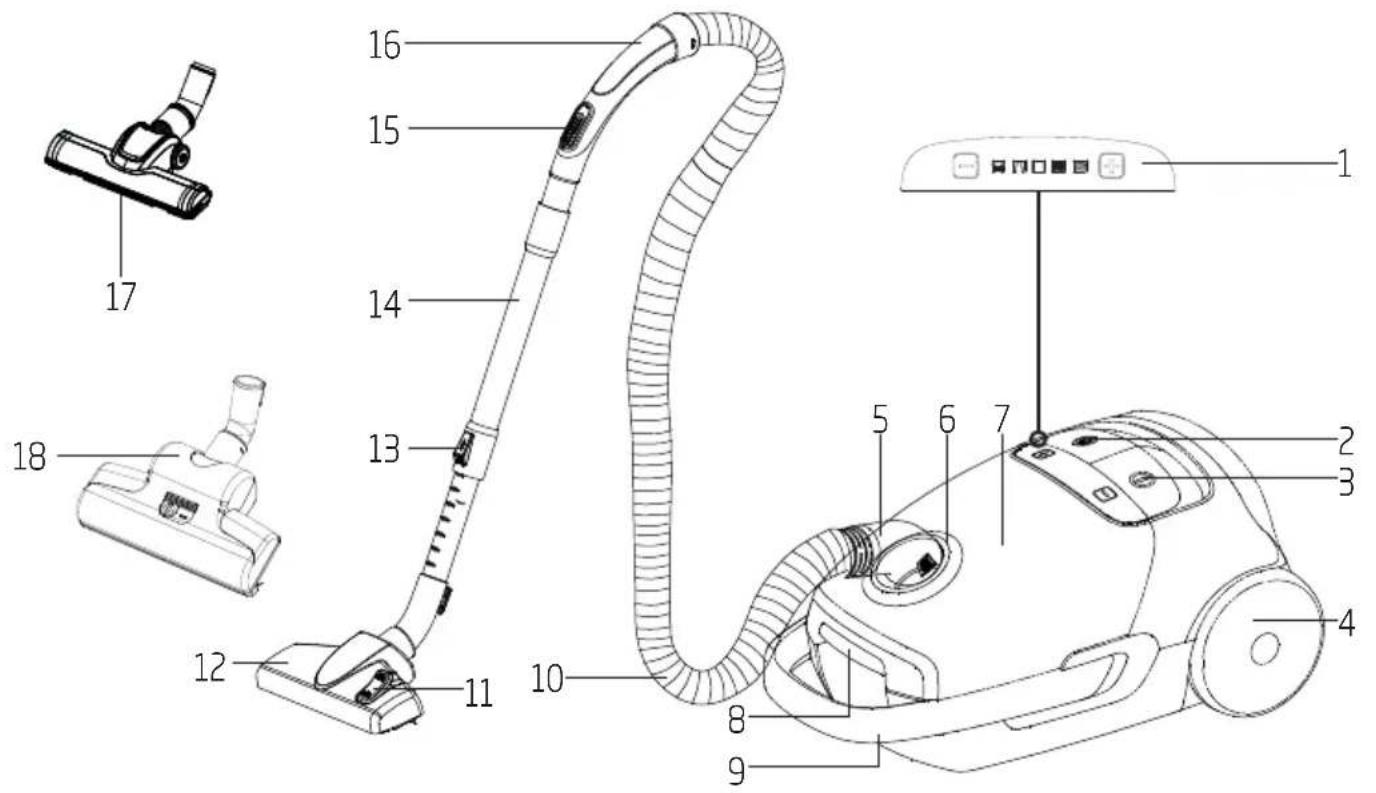
- Display and touch control panel
- Cable winding button
- On/Off button
- Wheel
- Hose cap
- Suction nozzle
- Upper cover
- Button for opening the dust container
- Carriage handle
- Hose
- Parquet/carpet brush adjustment latch
- Parquet/carpet brush
- Telescopic tube adjustment latch
- Telescopic tube
- Vacuum control
- Handle
- Hard floor brush
- Turbo brush
2.2 Technical data
| Power | : 800 W |
| Sound level : | 70 dBA |
| Net weight : | 5,1 kg |
| Supply voltage : | 220-240 V~, 50-60 Hz |
| Dust volume : | 3,5 L |
| Operating radius : | 9 m |
| Filter | : HEPA13 |
Technical and design modifications are reserved.
The values which are declared in the markings affixed on your appliance or other printed documents supplied with it represent the values which were obtained in the laboratories pursuant to the pertinent standards. These values may vary according to the usage of the appliance and ambient conditions.
3 Operation
3.1 Intended use
The appliance was designed for household use and is not suitable for industrial use.
3.2 Inserting/removing the hose
- Push the hose nozzle (10) in the arrow direction into to the hose inlet (5).

natural_image
Line drawing of a vacuum cleaner with attached pipe fitting (no text or symbols)- The fasteners on the hose nozzle (5) should click into position.
- Press the fasteners on the hose nozzle (10) in order to remove the hose (5).
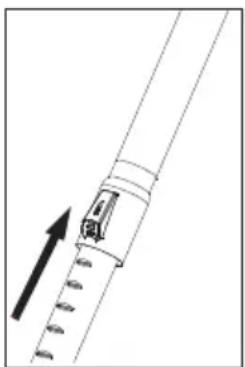
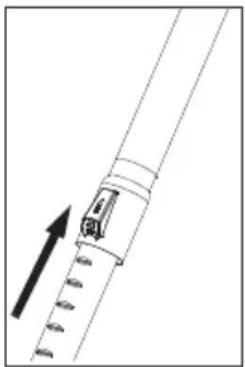
3.3 Inserting/removing the telescopic tube
- Insert the telescopic tube (14) into the end of the handle (16).
- Pull the telescopic tube (14) from the handle (16) to remove it.
- Push the height setting switch (14) in the arrow direction and pull from its end in order to adjust the length of the telescopic tube (13).
natural_image
Diagram of a medical or laboratory instrument with an arrow indicating direction (no text or symbols present)3.4 Attaching/removing the parquet/carpet brush
- Attach the telescopic tube (14) to the parquet/ carpet brush (12).
- Pull the telescopic tube (14) from the parquet/ carpet brush (12) to remove it.
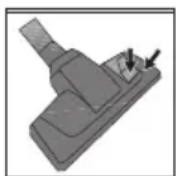
3.5 Adjusting the parquet/ carpet brush
Shift the latch (11) on the parquet/carpet brush (12) or;
• to position for hard floors and parquet.
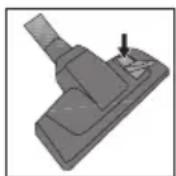
- to "position for carpets and rugs.
3.6 Operation
- Pull the plug behind the appliance and plug it in the socket.
- Press the ON/OFF button (3) to start or stop the appliance.
3 Operation
3.6.1 Adjusting the suction power
You can adjust the suction power using the + / - keys of the touch control panel (1) found on the vacuum cleaner.
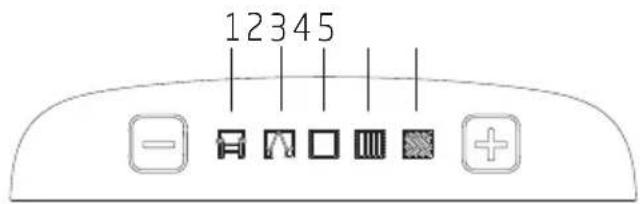
- Use your appliance at level to clean sofas.
- Use your appliance at level to clean curtains and table cloths.
- Use your appliance at level to clean carpets.
- Use your appliance at level clean rugs.
- Use your appliance at level to clean hard surfaces.
3.6.2 Suction power adjustment control
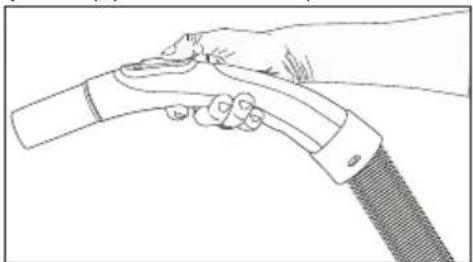
You can lower the suction power of the parquet/ carpet brush at a certain level by pulling backward the suction power adjustment control (15) located on the handle (16) without the need to use the control panel (1) found on the product.
natural_image
Line drawing of a hand holding a handheld device (no text or symbols)3.6.3 Dust indicator
When your dust bag is full, all icons on the display and on the touch control panel (1) will start to flash simultaneously. Replace the dust bag.
3.7 Accessories
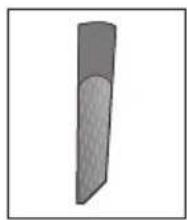
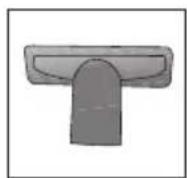
Crevice tool
natural_image
Simple 3D illustration of a cylindrical object with a textured surface (no text or symbols)Suitable for cleaning "hard-to-reach" areas including spaces between chairs and furniture.
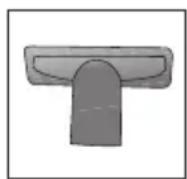
Upholstery tool

Suitable for floors, cleaning stairways, automobiles, sofas and chairs etc.

WARNING: Do not use it by holding the outer end of the handle (16).
3.8 Hard floor brush
The hard floor brush (17) was developed for use on hard floors such as tile, ceramic, parquet, wooden floors etc.
It prevents potential scratches while cleaning hard floors thanks to its specially-developed soft hair.
3.9 Turbo brush
The turbo brush (18) allows you to clear the hair on carpets in a faster and more efficient way. Thus you can even remove the hair -which is hard to remove such as dog hair or cat hair- easily.
On surfaces where you have difficulty moving the turbo brush (18), push the slid found on the brush in the arrow direction.
3 Operation
3.10 Turning off the vacuum cleaner and parking
- Turn off the device by pressing the ON/OFF button (3) and plug it out.
- Wind the power cable by pressing the power cable winding button (2).
Vertical parking
Attach the hook of the parquet/carpet brush to the parking slot under the appliance.
Horizontal parking
Attach the hook of the parquet/carpet brush to the parking slot behind the appliance.
4 Cleaning and care
Before cleaning your appliance, turn off and unplug.

WARNING: Never use gasoline, solvent, corrosives, metal objects or hard brushes for cleaning your appliance.
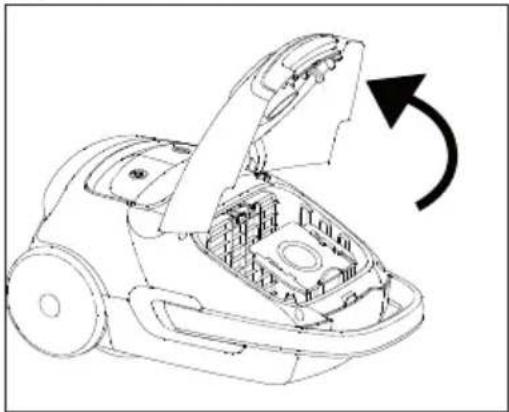
4.1 Replacing the dust bag
When your dust bag is full, all icons on the display and on the touch control panel (1) will start to flash simultaneously. Replace the dust bag.
- Open the upper cover (8) by pressing the button for opening the dust container (7).
- Remove the dust bag from the bag holder by pulling it from its tray.
natural_image
Technical line drawing of a robotic vacuum cleaner with internal components and an arrow indicating rotational motion (no text or symbols)- Dispose the full dust bag.
- Holding its tray, push the new dust bag into the bag holder. Ensure that it is fully seated.
- Close the upper cover (7) of the appliance.

WARNING: Do not force the upper cover (7) to close it, otherwise the plastic parts can be damaged.

WARNING: Dust bags not purchased from authorized dealers or services are not original. Such dust bags have a lesser quality and they become torn in a shorter period and render your appliance inoperable. Faults caused by using unauthentic dust bags are not covered by the scope of the warranty.

WARNING: Do not wash a dust bag.
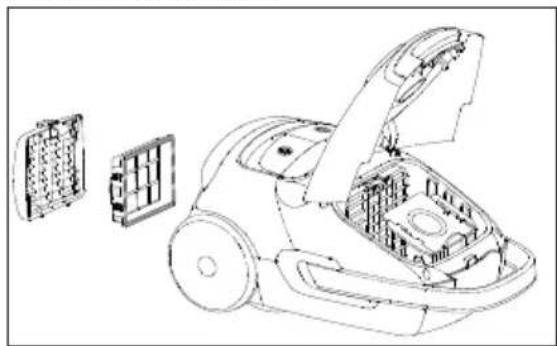
4.2 Cleaning the filters
After 5 dust bag replacements (this number varies depending on the usage frequency and area), clean the filters.
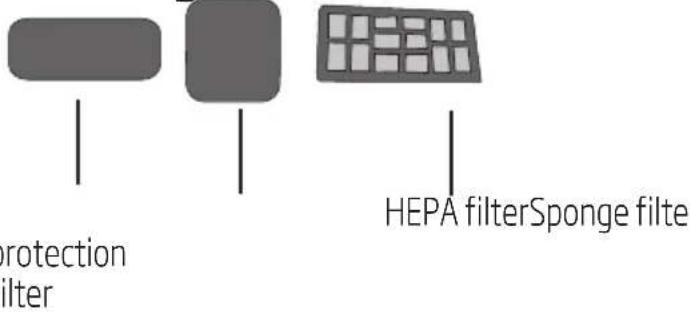
While you empty the dust accumulated in the dust container to clean the container, you need to clean the motor protection filter, the foam filter and HEPA filter as well.

WARNING: For drying filters, do not use appliances such as hairdryers, stoves or other sources of hot air.

WARNING: Do not mount back the filters before they are dried properly; otherwise a smell of humidity may disseminate on the air, water may splash from the rear part or filters may get damaged.

WARNING: Put the filters back to their original place when they are dry.
4 Cleaning and care
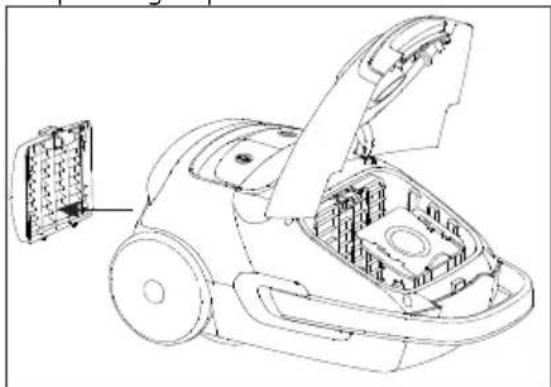
4.2.1 Motor protection filter
-
Open the upper cover (8) by pressing the button for opening the dust container (7).
-
Push the filter cover latches towards the arrow direction shown to open up the filter lid.
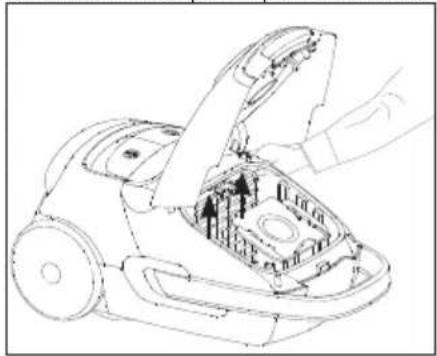
natural_image
Line drawing of a car's internal components, showing open lid and internal parts (no text or symbols)-
Remove the sponge from its caging.
-
Shake off and rinse it with water. After rinsing, gently squeeze the sponge..
4.2.2 Sponge filter
-
Push down the rear cover opening latch to open the cover.
-
Remove the sponge placed on the back of the lid to rinse it.
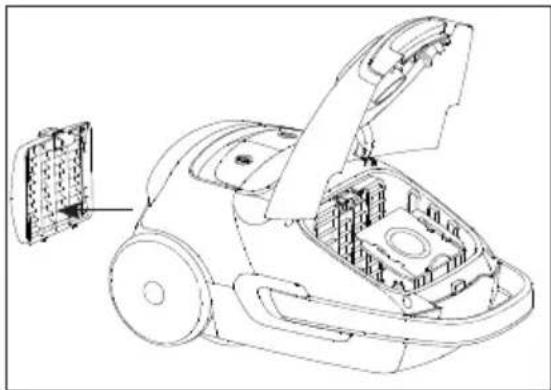
natural_image
Technical line drawing of a robotic vacuum cleaner with internal components and housing (no text or symbols)- After rinsing, gently squeeze the sponge.
4.2.3 HEPA filter
- Press the rear lid button to open and remove the HEPA filter.
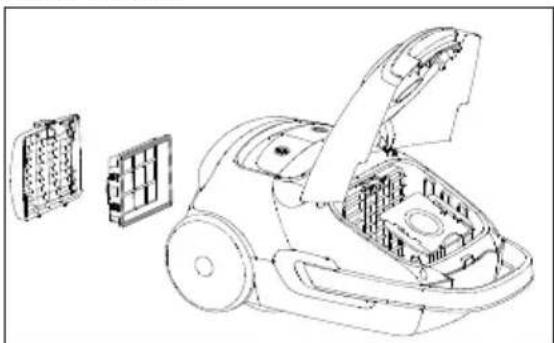
natural_image
Technical line drawing of a robotic car interior showing internal compartments and housing (no text or symbols)-
Shake off and rinse it with water.
-
Leave the HEPA filter for drying after rinsing.
4.3 Storage
- Store the appliance carefully when you do no want to use it for a long time.
- Plug out the appliance.
- Keep it away from children.
natural_image
Line drawing of a vacuum cleaner with attached pipe fitting (no text or symbols)natural_image
Diagram of a mechanical device with an arrow indicating direction (no text or symbols present)natural_image
Line drawing of a hand holding a handheld device (no text or symbols)natural_image
Simple 3D illustration of a cylindrical object with a shaded cross-section (no text or symbols)Suitable for cleaning "hard-to-reach" areas including spaces between chairs and furniture.
Brosse à meubles
natural_image
Technical line drawing of a robotic car interior showing open lid and internal compartments (no text or symbols)natural_image
Line drawing of a robotic vacuum cleaner with internal components and a hand adjusting the part (no text or symbols)natural_image
Technical line drawing of a robotic device with internal components and housing (no text or symbols)natural_image
Technical line drawing of a robotic vacuum cleaner with internal compartments and housing (no text or symbols)natural_image
Line drawing of a vacuum cleaner with attached pipe fitting (no text or symbols)natural_image
Diagram of a medical or laboratory instrument with an arrow indicating direction (no text or symbols present)natural_image
Line drawing of a hand holding a handheld device (no text or symbols)3.6.3 Indicator de praf
natural_image
Simple 3D illustration of a cylindrical object with a shaded cross-section (no text or symbols)natural_image
Technical line drawing of a robotic vacuum cleaner with open lid and internal components, showing rotational motion (no text or symbols)natural_image
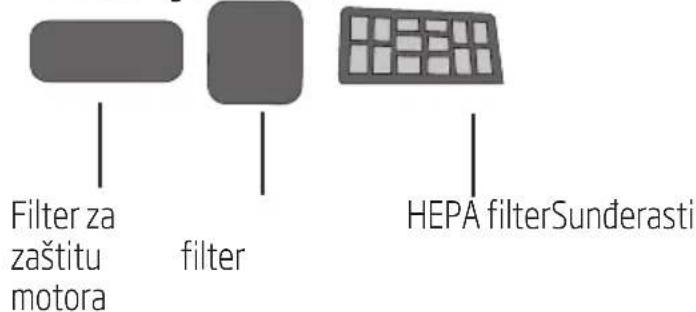
Three gray rectangular shapes with vertical lines beneath them, no text or symbols presentFiltru HEPAFiltru buretef
protectie motor
natural_image
Line drawing of a robotic vacuum cleaner with open lid and internal components (no text or symbols)natural_image
Technical line drawing of a robotic vacuum cleaner with internal components and housing (no text or symbols)natural_image
Technical line drawing of a robotic vacuum cleaner with internal components and housing (no text or symbols)natural_image
Line drawing of a vacuum cleaner with attached pipe fitting (no text or symbols)- Zapirala na šobi cevi (5) naj se zaskočijo v položaj.
- Pritisnite zapirala na šobi cevi (10) in odstranite cev (5).
natural_image
Diagram of a medical or surgical instrument with an arrow indicating direction (no text or symbols present)natural_image
Line drawing of a hand holding a handheld device (no text or symbols)3.6.3 Indikator prahu
natural_image
Simple 3D illustration of a cylindrical object with a shaded top surface (no text or symbols)Primerno za težko dostopne površine, vključno s površinami med stoli in pohištvom.
Nastavek za oblazinjeno pohištvo
natural_image
Technical line drawing of a robotic car interior showing open lid and internal components (no text or symbols)- Polno vrečko za prah vrzite v smeti.
- Držite pladenj nove vrečke za prah in jo vstavite v nosilec. Prepričajte se, da je popolnoma pritrijena na mestu.
- Zaprite zgornji pokrov (7) naprave.

natural_image
Three abstract geometric shapes: a rounded rectangle, a rounded rectangle with grid pattern, and a flat grid on a pole (no text or symbols)Filter HEPAPenasti filter
zaščito motorja
natural_image
Line drawing of a robotic vacuum cleaner with open lid and internal components (no text or symbols)- Peno odstranite iz mrežice.
- Stresite peno in jo sperite z vodo. Ko peno sperete, jo nežno stisnite.
4.2.2 Penasti filter
natural_image
Technical line drawing of a robotic vacuum cleaner with internal components and housing (no text or symbols)- Ko peno sperete, jo nežno stisnite.
4.2.3 Filter HEPA
- Pritisnite gumb za zadnji pokrov in odprite ter odstranite filter HEPA.
natural_image
Technical line drawing of a robotic vacuum cleaner with internal compartments and housing (no text or symbols)- Stresite peno in jo sperite z vodo.
- Ko filter HEPA sperete, ga pustite, da se posuši.
4.3 Shranjevanje
- Če naprave ne želite uporabljati dlje časa, jo skrbno shranite.
- Izvlecite vtič naprave.
• Hranite izven dosega otrok.
natural_image
Line drawing of a vacuum cleaner with attached pipe fitting (no text or symbols)natural_image
Diagram of a mechanical device with an arrow indicating direction (no text or symbols)natural_image
Line drawing of a hand holding a handheld device (no text or symbols)3.6.3 Dammindikator
natural_image
Simple 3D illustration of a cylindrical object with a textured surface (no text or symbols)natural_image
Technical line drawing of a robotic car interior showing open lid and internal compartments (no text or symbols)natural_image
Line drawing of a robotic vacuum cleaner with open lid and internal components (no text or symbols)natural_image
Technical line drawing of a robotic vacuum cleaner with internal components and housing (no text or symbols)natural_image
Technical line drawing of a robotic vacuum cleaner with internal components and housing (no text or symbols)natural_image
Line drawing of a vacuum cleaner with attached pipe fitting (no text or symbols)natural_image
Diagram of a medical or laboratory instrument with an arrow indicating direction (no text or symbols present)natural_image
Line drawing of a hand holding an electric vehicle plug (no text or symbols)natural_image
Simple 3D illustration of a cylindrical object with a shaded cross-section (no text or symbols)natural_image
Line drawing of a robotic vacuum cleaner with open lid and internal components, showing rotational arrow (no text or symbols)natural_image
Line drawing of a robotic vacuum cleaner with open lid and internal components (no text or symbols)natural_image
Technical line drawing of a robotic car interior showing housing, wheels, and components (no text or symbols)natural_image
Technical line drawing of a robotic vacuum cleaner with internal components and housing (no text or symbols)natural_image
Line drawing of a vacuum cleaner with attached pipe fitting (no text or symbols)natural_image
Diagram of a medical or surgical instrument with an arrow indicating direction (no text or symbols present)natural_image
Line drawing of a hand holding a handheld device (no text or symbols)natural_image
Simple 3D illustration of a vertical cylindrical object with a textured surface (no text or symbols)natural_image
Technical line drawing of a robotic vacuum cleaner with open lid and internal components, showing rotational motion (no text or symbols)natural_image
Line drawing of a robotic vacuum cleaner with open lid and internal components (no text or symbols)natural_image
Technical line drawing of a robotic vacuum cleaner with internal components and housing (no text or symbols)natural_image
Technical line drawing of a robotic vacuum cleaner with internal components and housing (no text or symbols)natural_image
Line drawing of a vacuum cleaner with attached pipe fitting (no text or symbols)natural_image
Diagram of a medical or surgical instrument with an arrow indicating direction (no text or symbols present)natural_image
Line drawing of a hand holding a handheld device (no text or symbols)natural_image
Simple 3D illustration of a cylindrical object with a shaded cross-section (no text or symbols)natural_image
Technical line drawing of a robotic car interior showing open lid and internal components (no text or symbols)natural_image
Line drawing of a robotic vacuum cleaner with open lid and internal components (no text or symbols)natural_image
Technical line drawing of a robotic vacuum cleaner with internal components and housing (no text or symbols)natural_image
Technical line drawing of a robotic vacuum cleaner with internal compartments and housing (no text or symbols)WARNING: Warnings against dangerous situations concerning the security of life and property.

natural_image
Line drawing of a vacuum cleaner with attached pipe fitting (no text or symbols)natural_image
Diagram of a medical or laboratory instrument with an arrow indicating direction (no text or symbols present)natural_image
Line drawing of a hand holding a handheld device (no text or symbols)natural_image
Technical line drawing of a robotic vacuum cleaner with internal components and an arrow indicating rotational motion (no text or symbols)natural_image
Technical line drawing of a robotic vacuum cleaner with internal components and a hand adjusting the part (no text or symbols)natural_image
Technical line drawing of a robotic vacuum cleaner with internal components and housing (no text or symbols)natural_image
Technical line drawing of a robotic vacuum cleaner with internal components and housing (no text or symbols)natural_image
Line drawing of a vacuum cleaner with attached pipe fitting (no text or symbols)natural_image
Diagram of a medical or laboratory instrument with an arrow indicating direction (no text or symbols present)natural_image
Line drawing of a hand holding a handheld device (no text or symbols)3.6.3 Staubanzeige
natural_image
Simple 3D illustration of a vertical cylindrical object with a shaded base (no text or symbols)natural_image
Technical line drawing of a robotic car interior showing open lid and internal components (no text or symbols)natural_image
Technical line drawing of a robotic vacuum cleaner with open lid and internal components (no text or symbols)natural_image
Technical line drawing of a robotic device with internal components and housing (no text or symbols)natural_image
Technical line drawing of a robotic vacuum cleaner with internal components and housing (no text or symbols)natural_image
Line drawing of a vacuum cleaner with attached pipe fitting (no text or symbols)natural_image
Diagram of a medical or laboratory instrument with an arrow indicating direction (no text or symbols present)natural_image
Line drawing of a hand holding a handheld device (no text or symbols)natural_image
Simple 3D illustration of a cylindrical object with a shaded cross-section (no text or symbols)natural_image
Technical line drawing of a robotic car interior showing open lid and internal components, with rotation arrow indicating clockwise motion (no text or symbols)natural_image
Three abstract geometric shapes: a rounded rectangle, a rounded square, and a grid-like structure with grid pattern (no text or symbols)natural_image
Line drawing of a robotic vacuum cleaner with open lid and internal components (no text or symbols)natural_image
Technical line drawing of a robotic vacuum cleaner with internal components and housing (no text or symbols)natural_image
Technical line drawing of a robotic vacuum cleaner with internal components and housing (no text or symbols)natural_image
Line drawing of a vacuum cleaner with attached pipe fitting (no text or symbols)natural_image
Diagram of a medical or laboratory instrument with an arrow indicating direction (no text or symbols present)natural_image
Line drawing of a hand holding a handheld device (no text or symbols)natural_image
Simple 3D illustration of a cylindrical object with a shaded cross-section (no text or symbols)natural_image
Line drawing of a robotic car interior showing open hood and internal compartments, with rotation arrow indicating clockwise motion (no text or symbols)natural_image
Line drawing of a robotic vacuum cleaner with open lid and internal components (no text or symbols)natural_image
Technical line drawing of a robotic vacuum cleaner with internal components and housing (no text or symbols)natural_image
Technical line drawing of a robotic vacuum cleaner with internal components and housing (no text or symbols)- Ekran i kontrolna tabla osetljiva na dodir
- Dugme za namotavanje kabla
- Dugme za uključivanje/isključivanje
- Točak
- Poklopac za crevo
- Cev za usisavanje
- Gornji poklopac
- Dugme za otvaranje posude za prašinu
- Drška za nošenje
- Crevo
- Bravica za podešavanje četke za parket/tepih
- Četka za parket/tepih
- Bravica za podešavanje teleskopske cevi
- Teleskopska cev
- Kontrola usisavanja
- Drška
- Tvrda četka za pod
- Tubro četka
2.2 Tehnički podaci
Snaga : 800 W
Nivo buke : 70 dbA
Neto težina : 5,1 kg
Napon :
50-60 Hz
Kapacitet prikupljanja
prašine : 3,5 L
Domašaj pokretanja : 9 m
Filter :
natural_image
Line drawing of a vacuum cleaner with attached pipe fitting (no text or symbols)- Pričvršćivači na cevi creva (5) treba da nalegne u položaj uz zvuk „klika”.
- Pritisnite pričvršćivače na cevi creva (10) da biste uklonili crevo (5).
3.3 Postavljanje/uklanjanje teleskopske cevi
- Ubacite teleskopsku cev (14) u kraj drške (16).
- Povucite teleskopsku cev (14) sa drške (16) da biste je uklonili.
- Pritisnite prekidač za podešavanje visine (14) u smeru strelice i povucite cev držeći je za kraj da biste podesili dužinu teleskopske cevi (13).
natural_image
Diagram of a medical or laboratory instrument with an arrow indicating direction (no text or symbols present)3.4 Postavljanje/uklanjanje četke za parket/tepih
- Povežite teleskopsku cev (14) sa četkom za parket/tepih (12).
- Povucite teleskopsku cev (14) sa četke za parket/tepih (12) da biste je uklonili.
natural_image
Line drawing of a hand holding an electric vehicle plug (no text or symbols)3.6.3 Indikator prašine
Kada je vaša kesa za prašinu puna, sve ikonice na ekranu i na kontrolnoj tabli osetljivoj na dodir (1) počinju istovremeno da trepere. Zamenite kesu za prašinu.
3.7 Dodaci
natural_image
Simple 3D illustration of a cylindrical object with a shaded cross-section (no text or symbols)natural_image
Line drawing of a robotic car interior showing open lid and internal compartments with rotation arrow (no text or symbols)- Odložite napunjenu kesu za prašinu.
- Držeći za uložak, gurnite novu kesu za prašinu u držač za kesu. Proverite da li je u potpunosti nalegla.
- Zatvorite gornji poklopac (7) uređaja.

UPOZORENJE: Nemojte da zatvarate gornji poklopac (7) na silu jer se plastični delovi mogu oštetiti.

UPOZORENJE: Kese za prašinu koje se ne kupuju kod ovlašćenih prodavaca ili servisa nisu originalne. Takve kese za prašinu su nižeg kvaliteta i mogu se pocepati za kraći period čime što dovodi do toga da vaš uređaj bude van funkcije. Kvarovi izazvani korišćenjem neoriginalnih kesa za prašinu nisu pokriveni garancijom.

UPOZORENJE: Nemojte da perete kesu za prašinu.
4.2 Čišćenje filtera
Nakon svakih 5 zamena kese za prašinu (ovaj broj varira u zavisnosti od učestalosti korišćenja i oblasti upotrebe), očistite filtere.
Dok uklanjate prašinu koja se nakupila u posudi za prašinu da biste očistili posudu, potrebno je da očistite filter za zaštitu motora, penasti filter, kao i HEPA filter.

UPOZORENJE: Pri sušenju filtera nemojte da koristite uređaje kao što su fen za kosu, peći ili drugi izvori toplote.

UPOZORENJE: Nemojte da ponovo postavljate filtere pre nego što se pravilno osuše; u suprotnom, u vazduhu se može proširiti miris vlage, voda može da prska sa zadnje strane ili se filteri mogu oštetiti.
natural_image
Line drawing of a robotic vacuum cleaner with open lid and internal components (no text or symbols)-
Uklonite sunder iz kućišta.
-
Istresite ga i isperite vodom. Nakon ispiranja nežno iscedite suđer..
4.2.2 Sunderasti filter
- Gurnite nadole bravu za otvaranje zadnjeg poklopca da biste otvorili poklopac.
- Uklonite sunder koji se nalazi na zadnjoj strani poklopca da ga isperete.
natural_image
Technical line drawing of a robotic vacuum cleaner with internal components and housing (no text or symbols)- Nakon ispiranja nežno iscedite sunder.
4.2.3 HEPA filter
- Pritisnite dugme zadnjeg poklopca da biste otvorili i uklonili HEPA filter.

natural_image
Technical line drawing of a robotic car interior showing internal compartments and housing (no text or symbols)-
Istresite ga i isperite vodom.
-
Ostavite HEPA filter da se osuši nakon ispiranja.
4.3 Skladištenje
- Pažljivo skladištite uređaj kada ne želite da ga koristite duže vreme.
- Izvucite utikač uređaja iz utičnice.
• Držite ga van domašaja dece.

natural_image
Abstract geometric design with blue triangular shapes and gradient shading (no text or symbols)- Please read this manual first!
- Meanings of the Symbols
- CONTENTS
- Important safety and environmental instructions
- General safety
- Compliance with the WEEE Directive and Disposing of the Waste Product
- Compliance with RoHS Directive
- Package information
- Your vacuum cleaner
- Operation
- Intended use
- Inserting/removing the hose
- Inserting/removing the telescopic tube
- Attaching/removing the parquet/carpet brush
- Adjusting the parquet/ carpet brush
- Operation
- Adjusting the suction power
- Suction power adjustment control
- Dust indicator
- Accessories
- Crevice tool
- Upholstery tool
- Hard floor brush
- Turbo brush
- Turning off the vacuum cleaner and parking
- Vertical parking
- Horizontal parking
- Cleaning and care
- Replacing the dust bag
- Cleaning the filters
- Motor protection filter
- Sponge filter
- HEPA filter
- Storage
- Brosse à meubles
- Indicator de praf
- Indikator prahu
- Nastavek za oblazinjeno pohištvo
- Penasti filter
- Filter HEPA
- Shranjevanje
- Dammindikator
- Staubanzeige
- Tehnički podaci
- Postavljanje/uklanjanje teleskopske cevi
- Postavljanje/uklanjanje četke za parket/tepih
- Indikator prašine
- Dodaci
- Čišćenje filtera
- Sunderasti filter
- Skladištenje
Brand : BEKO
Model : VCC 61605 AF
Category : Vacuum Cleaner