HF128376.1 - Humidifier Emerio - Free user manual and instructions
Find the device manual for free HF128376.1 Emerio in PDF.
| Product type | Evaporative humidifier |
| Brand | Emerio |
| Model | HF128376.1 |
| Power supply | 220-240 V~, 50/60 Hz, 28 W |
| Operating modes | AUTO, low speed, high speed, night mode |
| Humidity setting | 20% to 65% RH, in 1% steps (default 50%) |
| Digital display | Yes (current and set humidity) |
| Automatic shut-off | Yes, when tank is empty (water level sensor) |
| Filter type | Removable and washable filter |
| Filter cleaning | Baking soda and citric acid solution, soak 3 hours, rinse |
| Tank maintenance | Drain and rinse every 3 days |
| Warranty | 2 years |
| Usage | Indoor only, on flat and stable surface |
| Recommended water temperature | Below 40 °C |
| Recommended ambient temperature | Below 20 °C (manual) |
| Recommended relative humidity | 45% to 65% |
| Safety | Do not add essential oils, do not touch water while operating, unplug before maintenance |
Frequently Asked Questions - HF128376.1 Emerio
User questions about HF128376.1 Emerio
0 question about this device. Answer the ones you know or ask your own.
Ask a new question about this device
Download the instructions for your Humidifier in PDF format for free! Find your manual HF128376.1 - Emerio and take your electronic device back in hand. On this page are published all the documents necessary for the use of your device. HF128376.1 by Emerio.
USER MANUAL HF128376.1 Emerio
natural_image
White portable water heater with black lid and white base, no visible text or symbols on bodyEvaporative Humidifier (EN)
Instruction manual – English ...... - 2 -
Before use make sure to read all of the below instructions in order to avoid injury or damage, and to get the best results from the appliance. Make sure to keep this manual in a safe place. If you give or transfer this appliance to someone else make sure to also include this manual.
In case of damage caused by user failing to follow the instructions in this manual the warranty will be void. The manufacturer/importer accepts no liability for damages caused by failure to follow the manual, a negligent use or use not in accordance with the requirements of this manual.
-
Read and save these instructions. Attention: pictures in the IM are for reference only.
-
This appliance can be used by children aged from 8 years and above and persons with reduced physical, sensory or mental capabilities or lack of experience and knowledge if they have been given supervision or instruction concerning use of the appliance in a safe way and understand the hazards involved.
-
Children shall not play with the appliance.
-
Cleaning and user maintenance shall not be made by children without supervision.
-
This appliance is intended to be used in household and similar applications.
-
Unplug the appliance during filling and cleaning.
-
Regarding maintenance, filling, cleaning and descaling of the appliance, please refer to the related paragraphs of the manual.
-
Before inserting the plug into the mains socket, please check that the voltage and frequency comply with the specifications on the rating label.
-
Disconnect the mains plug from the socket when the appliance is not in use and before cleaning.
-
Ensure that the mains cable is not hung over sharp edges and keep it away from hot objects and open flames.
- Do not plug or unplug the appliance from the electrical outlet with a wet hand.
- Never attempt to open the housing of the appliance, or to repair the appliance yourself. This could cause electric shock.
- Do not add detergents, chemical solutions in the appliance.
- Keep detergents and chemical solutions away from children.
- If there is any abnormal smell during normal operation, please switch off and disconnect power supply and ask qualified technician for repairing.
- Do not touch water in the water tank & components in the water when the unit is working.
- Do not switch on the appliance without water in the water tank.
- Do not scrape transducer at will.
- Do not clean transducer with detergents and chemical solutions.
- Indoor and domestic use only.
- When moving the appliance, lift it by the base unit; not by the water tank.
- Do not put items like clothing or towels on top of the appliance. If the nozzle is obstructed, this may cause the malfunction.
- Never use this appliance in a room where aerosol products (sprays) are used or in a room or where oxygen is being administered.
- Turn off the appliance and unplug it before removing the water tank and moving the unit.
- Excessive humidity in a room can cause water condensation on windows and some furniture. If this happens, turn off the appliance.
-
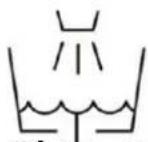
Never place housing under water flow or immerse in liquids.
-
Always place the humidifier on a hard, flat and level surface. Avoid exposure to direct sunlight and always keep it away from walls and heat sources such as stoves, radiators, etc. Warning: The humidifier may not work correctly if it is not placed on a level surface.
- Fill the water tank with fresh, distilled or demineralized water. Do not drop any other liquid into water tank or water basin.
- Do not shake the humidifier as this might cause the water spill over into the base of humidifier.
- Do not pour hot water into the tank, i.e. at a temperature in excess of 40^ C.
- The ideal relative humidity level for human comfort is in fact between 45% and 65% . Excess humidity shows up in the form of condensation on cold surfaces or cold walls in the room. To measure the room's humidity correctly, use a hygrometer available in most specialist shops and hypermarkets.
- Be aware that high humidity levels may encourage the growth of biological organisms in the environment.
- Do not permit the area around the humidifier to become damp or wet. If dampness occurs, turn the output of the humidifier down. If the humidifier output volume cannot be turned down, use the humidifier intermittently. Do not allow absorbent materials, such as carpeting, curtains, drapes, or tablecloths, to become damp.
- Never leave water in the reservoir when the appliance is not in use.
- Empty and clean the humidifier before storage. Clean the humidifier before next use.
Warning: Micro-organisms that may be present in the water or in the environment where the appliance is used or stored, can grow in the water reservoir and be blown in the air causing very serious health risks when the water is not renewed and the tank is not cleaned properly every 3 days.
-
Clean the water tank every three days.
-
Empty the tank and refill every third day. Before refilling, clean it with fresh tap water or cleaning agents if required by the manufacturer. Remove any scale, deposits, or film that has formed on the sides of the tank or on interior surfaces, and wipe all surfaces dry.
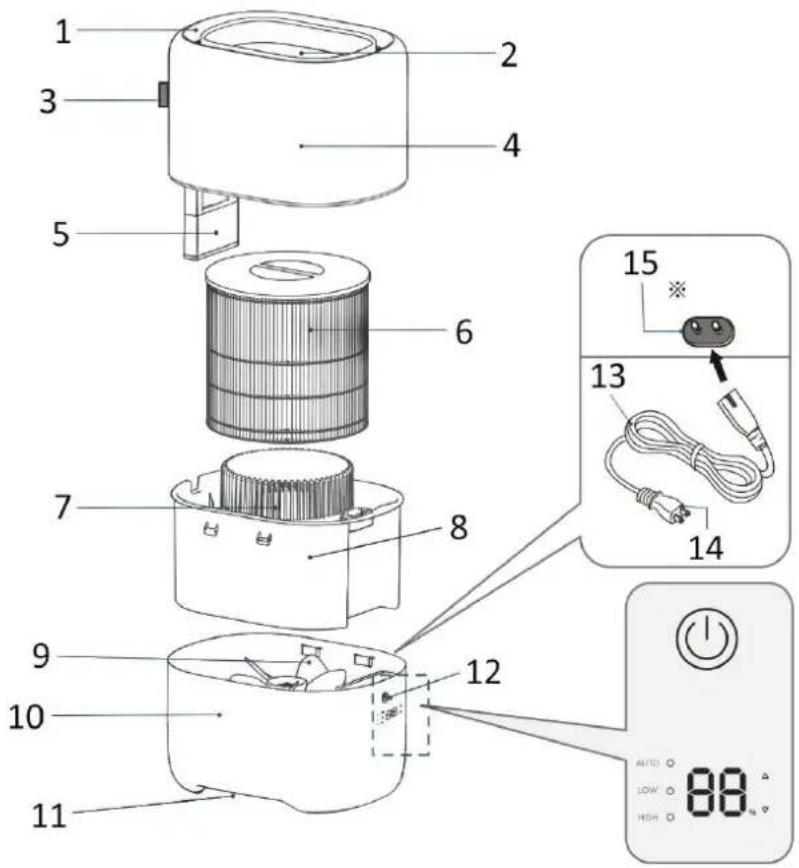
PARTS
-
Spray port
-
Water supply port
-
Water level gauge
-
Cover
-
Water level sensor
-
Filter
-
Air outlet
-
Water tank
-
Fan
-
Main unit
-
Air inlet
-
Control panel
-
Power cord
-
Power plug
-
Power port (Main unit side)
Caution: Do not touch the fan when the appliance is running.
text_image
1 2 3 4 5 6 7 8 9 10 11 12 13 14 15 AUTO LOW HIGH 88°Control panel
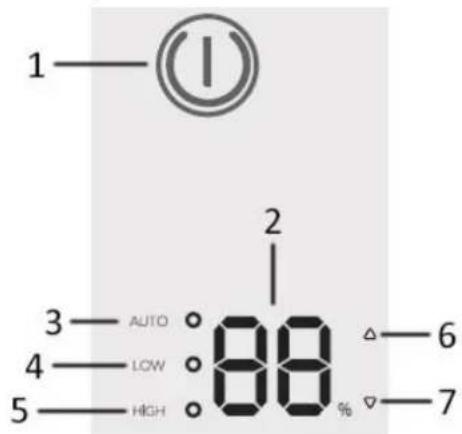
-
Switch (with indicator light)
-
Humidity digital display
-
Indicator light for AUTO mode
-
Indicator light for low speed mode
-
Indicator light for high speed mode
-
Humidity adjustment button (increasing)
-
Humidity adjustment button (decreasing)
Before operating, put unit at room temperature for half of an hour before running.
It is recommended to use the unit below temperature of 20^ C and relative humidity less than 80%RH.
Use water below 40°C
Clean the water tank before using.

text_image
Diagram illustrating the step-by-step procedure of a hairdryer, showing color change, color transfer, and electrical connection.-
Put the appliance on a stable flat surface.
-
Fill the water from the top water supply port slowly. Note that if the water level gauge reaches the top Max line, stop adding water, otherwise the water will overflow from the main unit.
-
Plug the power cord to the port on the main unit, and then connect the power plug to the appropriate power supply.
-
After the appliance is powered on, all indicator lights light up for about 2 seconds, and then turn off. The appliance enters the standby state. The switch indicator light turns red, and other indicator lights are off.
-
Press the switch once, the appliance runs in AUTO mode and the appliance displays the current relative humidity. The switch indicator light turns green.
-
Press the humidity adjustment buttons to set the desired relative humidity in a range from 20% to 65%. (The default is 50%. Each press of the humidity adjustment button leads to a change of 1%.) After setting, the display turns back to the current relative humidity.
-
When the appliance is in AUTO mode, press the switch button once, the appliance will run in low speed mode (the fan works in low speed), and if you press the switch button once more, the appliance will run in high speed mode (the fan works in high speed).
-
When the appliance is in high speed mode, press the switch button once, the appliance will get back to Auto mode. The three modes are switched in a cycle. However, only in the Auto mode, the desired relative humidity can be adjusted.
9. Night mode:
- Press the two humidity adjustment buttons ("△" + "▽") at the same time for about 1 second, the night mode is activated. All lights turn off but the appliance keeps running.
-
When the night mode is on, press any button to cancel the night mode, and indicator lights turn back on.
-
To stop the appliance manually, long press the switch button for about 2 seconds. The appliance enters standby mode and the switch indicator light turns red.
NOTES
• This is not an aroma humidifier. Do not put essential oils or chemicals in the water.
- When there is not enough water in the water tank, the appliance will automatically stop working and the switch indicator light will turn red. Add more water if you need to use the appliance.
- If the water tank is taken out when the appliance is working, the appliance will stop working immediately and the switch indicator light will flash in red.
CLEANING AND MAINTENANCE
- Take out the plug from the power outlet.
-
Remove the cover and use a sponge or soft cloth to wash the cover with tap water.
-
Remove the filter from the water tank and wash the filter with tap water. If there is obvious dirt, refer to the section "How to clean and maintain the filter".
- Take out the water tank and wash the inside of the water tank with tap water.
- Wipe the inside and outside of the main unit with a dry cloth.
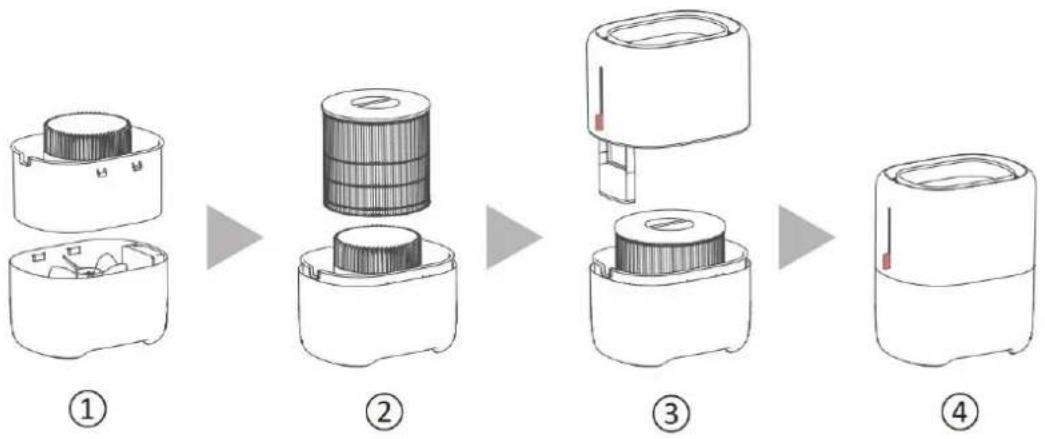
- After cleaning and drying, re-assembly the appliance following the illustration shown below. Pay attention to the front and back direction of the cover. If the cover is not aligned, there is a danger of water leakage.
CAUTION: The main unit must never be washed with water for there are electronic parts inside. Do not allow any water to enter the motor.
flowchart
graph LR
    A["Step ①: Initial component with internal structure"] --> B["Step ②: Stabilized cylindrical component"]
    B --> C["Step ③: Final assembled cylindrical component"]
    C --> D["Step ④: Final assembled cylindrical component"]
How to clean and maintain the filter
- Prepare 4L tap water, 120g baking soda, 30g citric acid, and mix them to make a cleaning solution.
- Place the filter in the cleaning solution for about 3 hours.
- Rinse the filter in tap water.
- Dry the filter in a well-ventilated shade place. Avoid direct sunlight.
Notes:
- When cleaning the filter, do not press the filter with a cloth or fingers. Otherwise, the filter may be deformed or ruptured, and then the humidification performance will be affected.
- If dirt or odor remains after cleaning, or the humidification effect is weakened, please replace the filter with a new one.
TECHNICAL DATA
Power supply: 220-240V \~ 50-60Hz
Power: 28W
GUARANTEE AND CUSTOMER SERVICE
Before delivery our devices are subjected to rigorous quality control. If, despite all care, damage has occurred during production or transportation, please return the device to your dealer. In addition to statutory legal rights, the purchaser has an option to claim under the terms of the following guarantee:
For the purchased device we provide 2 years guarantee, commencing from the day of sale. If you have a defective product, you can directly go back to the point of purchase.
Defects which arise due to improper handling of the device and malfunctions due to interventions and repairs by third parties or the fitting of non-original parts are not covered by this guarantee. Always keep your receipt, without the receipt you can't claim any form of warranty. Damage caused by not following the instruction manual, will lead to a void of warranty, if this results in consequential damages then we will not be liable.
Neither can we hold responsible for material damage or personal injury caused by improper use if the instruction manual is not properly executed. Damage to accessories does not mean free replacement of the whole appliance. In such case please contact our service department. Broken glass or breakage of plastic parts is always subject to a charge. Defects to consumables or parts subjected to wearing, as well as cleaning,
maintenance, replacement of said parts or shipping and transportation costs to and from any place of repair are not covered by the warranty and are to be paid.
ENVIRONMENT FRIENDLY DISPOSAL

Recycling – European Directive 2012/19/EU
This marking indicates that this product should not be disposed with other household wastes. To prevent possible harm to the environment or human health from uncontrolled waste disposal, recycle it responsibly to promote the sustainable reuse of material resources. To return your used device, please use the return and collection systems or contact the retailer where the product was
purchased. They can take this product for environmentally safe recycling.
text_image
Diagram illustrating the step-by-step procedure of a hairdryer, showing color change, color transfer, and electrical connection.flowchart
graph LR
    A["Step ①: Initial component with internal structure"] --> B["Step ②: Stabilized cylindrical component"]
    B --> C["Step ③: Stabilized cylindrical component"]
    C --> D["Step ④: Final assembled cylindrical component"]