SneakACup CM1110 - Coffee machine BLACK & DECKER - Free user manual and instructions
Find the device manual for free SneakACup CM1110 BLACK & DECKER in PDF.
Document temporarily unavailable
The manual is currently being transferred to our new server. It will be accessible again in a few hours. Thank you for your patience.
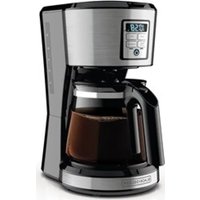
| Product Type | Drip Coffee Maker |
| Brand | Black & Decker |
| Model | CM1110 (SneakACup) |
| Capacity | 12 cups (approx. 1.5 L) |
| Power Supply | 120 V, 60 Hz |
| Filter Type | Paper basket filter |
| Functions | Programmable, delay brew, bold (Strong) mode, Sneak-A-Cup pause, 2-hour auto warm |
| Clock | Digital with programming (HOUR/MIN) |
| Cleaning System | Auto Clean with alert after 60 cycles |
| Showerhead | Whirlpool showerhead |
| Water Level Indicator | Graduations on the water reservoir |
| Brew Basket | Removable (part CM1110-01) |
| Carafe | Glass with lid (part CM1110-02) |
| Warming Plate | Non-stick warming plate |
| Automatic Shut-off | After 2 hours |
| Safety | Polarized plug, automatic shut-off, do not immerse |
| Maintenance | Removable parts dishwasher safe (top rack) |
| Descaling | Via Auto Clean cycle with white vinegar (6 cups vinegar + 4 cups water) |
| Use | For household use only |
| Warranty | 2-year limited |
Frequently Asked Questions - SneakACup CM1110 BLACK & DECKER
User questions about SneakACup CM1110 BLACK & DECKER
0 question about this device. Answer the ones you know or ask your own.
Ask a new question about this device
Download the instructions for your Coffee machine in PDF format for free! Find your manual SneakACup CM1110 - BLACK & DECKER and take your electronic device back in hand. On this page are published all the documents necessary for the use of your device. SneakACup CM1110 by BLACK & DECKER.