
OpenStation 76382 - Can opener HAMILTON BEACH - Free user manual and instructions
Find the device manual for free OpenStation 76382 HAMILTON BEACH in PDF.

| Product Type | Electric can opener with integrated tools |
| Brand | Hamilton Beach |
| Model | OpenStation 76382 |
| Power Supply | 120 V ~ 60 Hz |
| Plug | Polarized (one wide prong) |
| Main Functions | Opening cans, jars (large and small), glass bottles, plastic bottles, pull-tab cans, plastic packaging (blade included) |
| Automatic Shut-off | Yes – motor stops once can is opened |
| Magnetic Lid Holder | Yes – holds lid after opening (except aluminum) |
| Cord Storage | Integrated into base |
| Large Container Opening | Yes – tool for large jars |
| Small Container Opening | Yes – tool for small jars |
| Removable Multi-Tool | Yes (Multi-Tool) – includes bottle opener, pull-tab can opener, blade |
| Lid Material | Steel or aluminum (magnet does not hold aluminum) |
| Care and Cleaning | Lever assembly and tools washable in warm soapy water; base wiped with a damp cloth – do not immerse |
| Lubrication | Motor permanently lubricated – no oiling required |
| Safety | Use under supervision near children; do not use with damaged cord; unplug before cleaning |
| Replacement Parts | Available at hamiltonbeach.ca/parts |
| Warranty (Canada) | 5 years against defects in materials and workmanship |
| Warranty (USA) | 1 year against defects in materials and workmanship |
| Customer Service (USA) | hamiltonbeach.com/customer-service |
| Customer Service (Canada) | hamiltonbeach.ca/customer-service |
Frequently Asked Questions - OpenStation 76382 HAMILTON BEACH
User questions about OpenStation 76382 HAMILTON BEACH
0 question about this device. Answer the ones you know or ask your own.
Ask a new question about this device
Download the instructions for your Can opener in PDF format for free! Find your manual OpenStation 76382 - HAMILTON BEACH and take your electronic device back in hand. On this page are published all the documents necessary for the use of your device. OpenStation 76382 by HAMILTON BEACH.
USER MANUAL OpenStation 76382 HAMILTON BEACH
For recipes, tips and product information.
hamiltonbeach.ca
Open to US customers only • Ce concours
natural_image
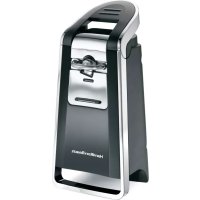
Exterior view of a modern stainless steel coffee maker with black lid and white handle (no visible text or symbols)Can Opener with Tools
When using electrical appliances, basic safety precautions should always be followed to reduce the risk of fire, electric shock, and/or injury to persons, including the following:
- Read all instructions.
- This appliance is not intended for use by persons with reduced physical, sensory, or mental capabilities, or lack of experience and knowledge, unless they are closely supervised and instructed concerning use of the appliance by a person responsible for their safety.
- This appliance shall not be used by children. Keep the appliance and its cord out of reach of children.
- Close supervision is necessary when any appliance is used near children. Children should be supervised to ensure that they do not play with the appliance.
- To protect against risk of electrical shock, do not put cord, plug, base, or motor in water or other liquid.
- Release the piercing lever assembly handle; then unplug from the outlet when not in use, before assembling or disassembling parts, and before cleaning. To unplug, grasp the plug and pull from the outlet. Never pull from the power cord.
- Avoid contact with moving parts.
- Do not operate any appliance with a damaged supply cord or plug, or after the appliance malfunctions or has been dropped or
damaged in any manner. Supply cord replacement and repairs must be conducted by the manufacturer, its service agent, or similarly qualified persons in order to avoid a hazard. Contact Customer Service for information on examination, repair, or adjustment as set forth in the Limited Warranty.
-
The use of attachments not recommended or sold by the appliance manufacturer may cause fire, electric shock, or personal injury.
-
Do not use outdoors.
-
Do not let cord hang over edge of table or counter or touch hot surfaces, including stove.
-
Do not place on or near a hot gas or electric burner, or in a heated oven.
-
Release the piercing lever before plugging cord into wall outlet. To disconnect, release the piercing lever; then remove plug from wall outlet. To unplug, grasp the plug and pull from the outlet. Never pull from the power cord.
-
Do not open pressurized (aerosol-type) cans.
-
Do not open cans of flammable liquids such as lighter fluids.
-
Do not use appliance for other than intended purpose.
SAVE THESE INSTRUCTIONS
Other Consumer Safety Information
This appliance is intended for household use only.
To avoid an electrical circuit overload, do not use another high-wattage appliance on the same circuit with this appliance.
⚠ WARNING Electrical Shock Hazard: This product is provided with a polarized plug (one wide blade) to reduce the risk of electric shock. The plug fits only one way into a polarized outlet. Do not defeat the safety purpose of the plug by modifying the plug in any way or by using an adapter. If the plug does not fit fully into the outlet, reverse the plug. If it still does not fit, have an electrician replace the outlet.
The length of the cord used on this appliance was selected to reduce the hazards of becoming tangled in or tripping over a longer cord. If a longer cord is necessary, an approved extension cord may be used. The electrical rating of the extension cord must be equal to or greater than the rating of the appliance. Care must be taken to arrange the extension cord so that it will not drape over the countertop or tabletop where it can be pulled on by children or accidentally tripped over.
To avoid an electrical circuit overload, do not use another high-wattage appliance on the same circuit with this appliance.
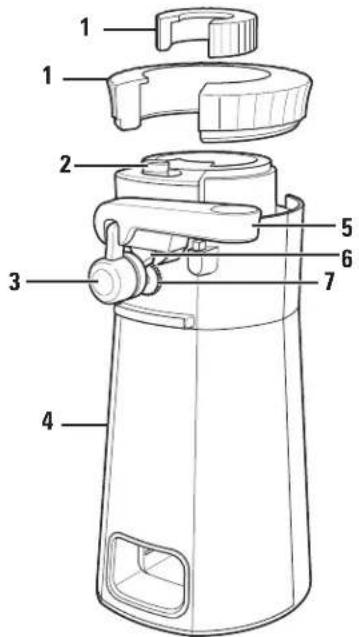
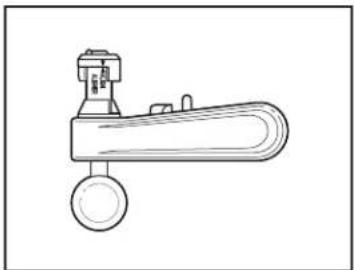
Parts and Features
To order parts, visit : hamiltonbeach.com/parts
| 1 Small and Large Jar Openers | |
| 2 | Cutting Assembly Release/Insert Button |
| 3 | Magnetic Lid Holder |
| 4 | Base |
| 5 | Piercing Lever Assembly with Handle |
| 6 | Cutting Blade |
| 7 | Geared Wheel |
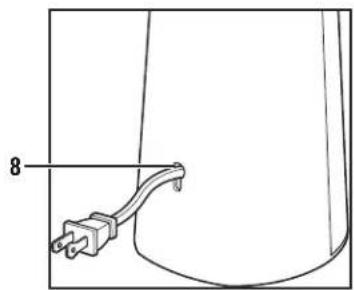
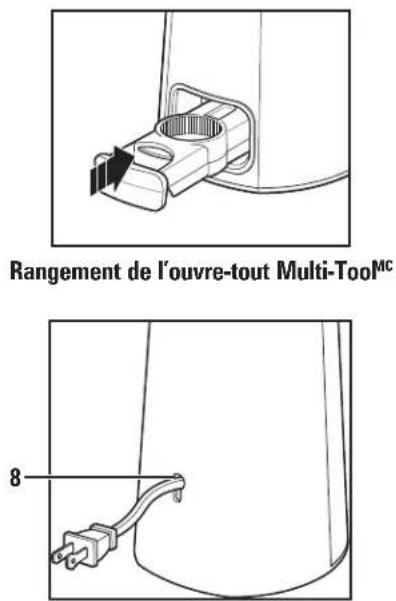
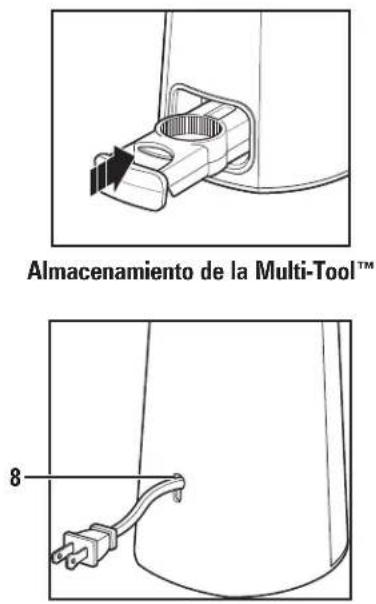
| 8 | Cord Storage |
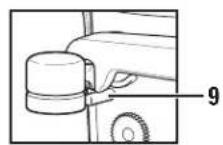
| 9 | Can Guide |
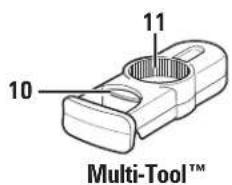
| 10 | Glass Bottle Opener |
| 11 | Plastic Bottle Opener |
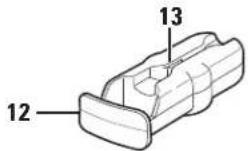
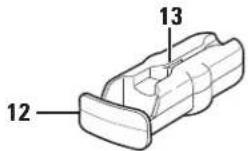
| 12 | Pop Top Can Opener |
| 13 | Cutting Blade (for plastic packaging) |

natural_image
Simple line drawing of a cable with a plug, no text or symbols present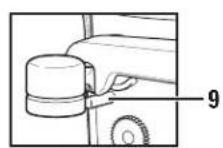

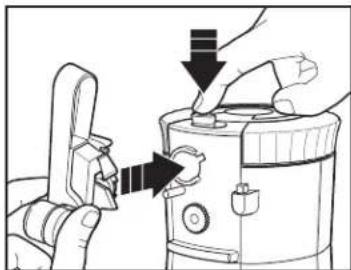
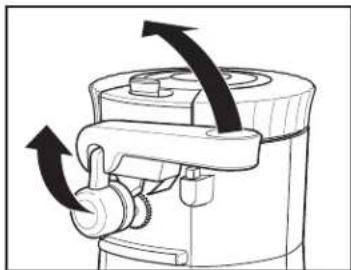
How to Install Piercing Lever Assembly
natural_image
Line drawing of a mechanical lever or lever device with a circular base and lever handle (no text or symbols)- To insert Piercing Lever Assembly, match Alignment Arrows.
natural_image
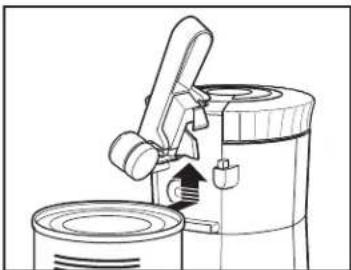
Illustration of hands using a pliers to adjust or install a device (no text or symbols visible)- Push and hold Release Button and insert Piercing Lever Assembly with Handle straight up into Piercing Lever Assembly opening.
natural_image
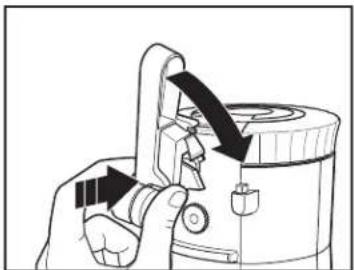
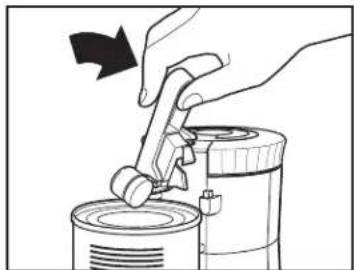
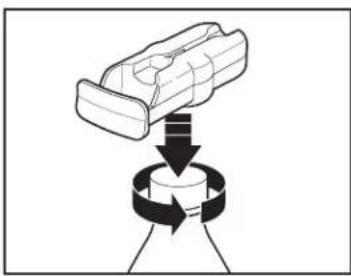
Illustration of a hand using a handheld device to adjust or install a device (no text or symbols visible)- Once fully inserted, release lever. Turn right until Piercing Lever Assembly is in place.
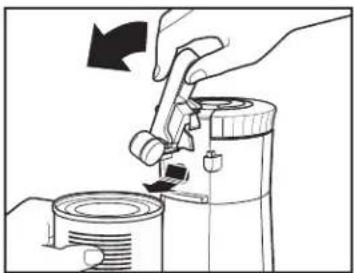
NOTE: If Can Opener does not operate properly, the arrows on the Piercing Lever Assembly were not aligned before inserting. Remove Piercing Lever Assembly and repeat steps 1-3.
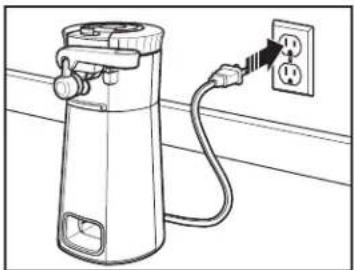
How to Use
natural_image
Line drawing of a gas cylinder connected to an electrical outlet with a power plug (no text or symbols)- Place Can Opener on level surface. Plug into outlet.
natural_image
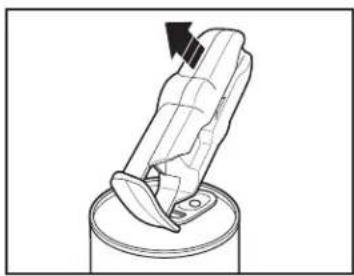
Diagram of a mechanical device with directional arrows indicating motion or force (no text or symbols)- Raise Piercing Lever Assembly Handle up.
natural_image
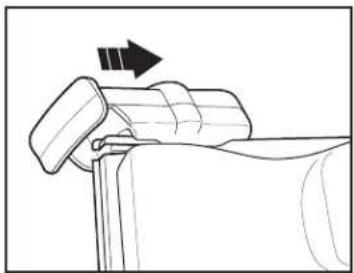
Line drawing of a mechanical device with a lever and base, showing internal components (no text or symbols)- Place rim of can firmly under Can Guide and against Geared Wheel. Tilt top of can in, to position Cutting Blade inside rim of can.
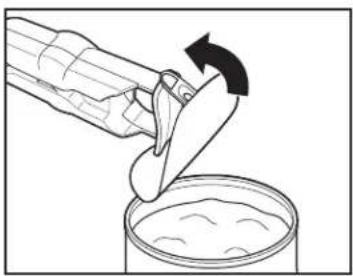
natural_image
Illustration of a hand using a tool to lift a cylindrical container (no text or symbols visible)- Press Piercing Lever Assembly Handle all the way down. Motor will begin turning can and cutting lid. It is not necessary to hold Piercing Lever Assembly Handle down, or to hold can during cutting action when opening smaller cans. When opening a larger can, user may need to stabilize Can Opener with one hand.
natural_image
Illustration of a hand using a tool to lift a cylindrical container, with no text or symbols present.- Motor will automatically stop when can is open. Lift Piercing Lever Assembly Handle and remove can.
NOTES:
- If there is a bump, dent, or heavy seam in the rim of the can, open other end of can or start Cutting Blade just beyond it.
- The motor of the Can Opener is permanently lubricated and will require no oiling.
- Can Opener will easily open all standard size cans.
• Cans made with aluminum lids will not adhere to magnet.
How to Use Jar Openers and Multi-Tool™
CAUTION
Multipurpose opening tool contains a sharp blade. Use care when holding or handling opening tool.

natural_image
Diagram showing a mechanical component being lifted by a downward arrow into a jar (no text or symbols)Large Jar Opener (fits multiple jar sizes)
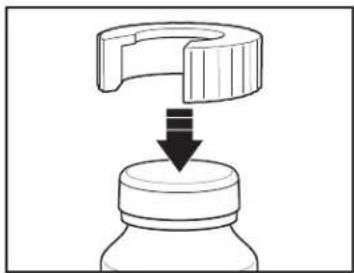
natural_image
Diagram showing a mechanical component being lifted by a downward arrow into a jar (no text or symbols)Small Jar Opener (fits multiple jar sizes)
natural_image
Diagram of a robotic hand gripping a joint, with an arrow indicating force direction (no text or symbols)Multi-Tool™ Glass Bottle Opener
natural_image
Diagram of a mechanical component with an arrow indicating direction (no text or symbols present)Multi-Tool™ Cutting Blade (for plastic packaging)
natural_image
Diagram showing a mechanical component being lifted by a rotating ring, with no visible text or symbols.Multi-Tool™ Plastic Bottle Opener
natural_image
Diagram of a person pressing down on a cylindrical container with an arrow indicating motion (no text or symbols)Multi-Tool™ Pop Top Can Opener
natural_image
Illustration of a hand pouring liquid from a container into a container with an arrow indicating rotation (no text or symbols)Care and Cleaning
-
Unplug.
-
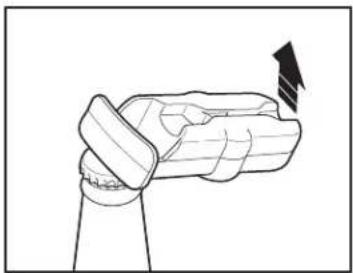
To remove Piercing Lever Assembly: Push and hold Release/Insert Button. Grasp Magnetic Lid Holder and pull Assembly out.
-
Wash Piercing Lever Assembly, Small and Large Jar Openers, and Multi-Tool™ in hot, soapy water. Rinse and dry thoroughly.

natural_image
Illustration of hands operating a device with arrows indicating action (no text or symbols)⚠ WARNING Electrical Shock Hazard. Do not immerse the can opener body or cord in water or other liquid.
-
Wipe Base of Can Opener with a damp cloth. Never immerse Can Opener in water. Do not use abrasive cleaners or pads to wipe the base of the Can Opener.
-
To insert Piercing Lever Assembly (see page 5): With one hand, push and hold Release Button; with the other hand, slide Piercing Lever Assembly with Handle straight up into Piercing Lever Assembly opening. Release Button and push Assembly into Piercing Lever Assembly opening. Turn right until it is in place.
-
Ensure Lever is fully inserted into Can Opener.
Limited Warranty
This warranty applies to products purchased and used in the U.S. and Canada. This is the only express warranty for this product and is in lieu of any other warranty or condition.
This product is warranted to be free from defects in material and workmanship for a period of five (5) years from the date of original purchase in Canada and one (1) year from the date of original purchase in the U.S. During this period, your exclusive remedy is replacement of this product or any component found to be defective, at our option; however, you are responsible for all costs associated with our returning a product or component under this warranty to you. If the product or component is unavailable, we will replace with a similar one of equal or greater value.
This warranty does not cover glass, filters, wear from normal use, use not in conformity with the printed directions, or damage to the product resulting from accident, alteration, abuse, or misuse. This warranty extends only to the original consumer purchaser or gift recipient. Keep the original sales receipt, as proof of purchase is required to make a warranty claim. This warranty is void if the product is used for other than single-family household use or subjected to any voltage and waveform other than as specified on the rating label (e.g., 120 V \~ 60 Hz).
We exclude all claims for special, incidental, and consequential damages caused by breach of express or implied warranty. All liability is limited to the amount of the purchase price. Every implied warranty, including any statutory warranty or condition of merchantability or fitness for a particular purpose, is disclaimed except to the extent prohibited by law, in which case such warranty or condition is limited to the duration of this written warranty. This warranty gives you specific legal rights. You may have other legal rights that vary depending on where you live. Some states or provinces do not allow limitations on implied warranties or special, incidental, or consequential damages, so the foregoing limitations may not apply to you.
To make warranty claim, do not return this appliance to the store. Please write Hamilton Beach Brands, Inc., Customer Service Department, 4421 Waterfront Dr., Glen Allen, VA 23060, or visit hamiltonbeach.com/customer-service in the U.S. or hamiltonbeach.ca/ customer-service in Canada. For faster service, locate the model, type, and series numbers on your appliance.
PRÉCAUTIONS IMPORTANTES
natural_image
Line drawing of a mechanical lever or lever device with a circular base and central hub (no text or symbols)natural_image
Illustration of a hand using a device to adjust a button, with arrows indicating action (no text or symbols present)natural_image
Illustration of a hand using a handheld device to adjust or install a device (no text or symbols visible)natural_image
Line drawing of a gas cylinder connected to an electrical outlet (no text or symbols)natural_image
Diagram of a mechanical device with directional arrows indicating motion or force (no text or symbols)natural_image
Line drawing of a mechanical device with a lever and base, showing internal components (no text or symbols)natural_image
Illustration of a hand using a tool to lift a cylindrical container (no text or symbols visible)natural_image
Illustration of a hand using a manual tool to lift or lift a cylindrical container (no text or symbols present)natural_image
Diagram showing a mechanical component being lifted from a jar (no text or symbols)natural_image
Diagram showing a mechanical component being lifted by a downward arrow into a jar (no text or symbols)natural_image
Diagram of a hand gripping a piece of material, with an arrow indicating force direction (no text or symbols present)natural_image
Diagram of a mechanical component with an arrow indicating direction (no text or symbols present)natural_image
Diagram showing a mechanical component being lifted by a rotating ring (no text or symbols)natural_image
Illustration of a mechanical device pressing down on a cylindrical container (no text or symbols)natural_image
Illustration of a hand pouring liquid into a container with an arrow indicating rotation (no text or symbols)natural_image
Illustration of hands operating a mechanical device with arrows indicating motion (no text or symbols)AVERTISSEMENT

natural_image
Line drawing of a mechanical lever or lever device with a circular base and central hub (no text or symbols)natural_image
Illustration of a hand using a device to adjust a button, with arrows indicating action (no text or symbols present)natural_image
Illustration of a hand using a handheld device to adjust or install a device (no text or symbols visible)natural_image
Line drawing of a gas cylinder connected to an electrical outlet with a power plug (no text or symbols)natural_image
Diagram of a mechanical device with directional arrows indicating motion or force (no text or symbols)natural_image
Line drawing of a mechanical device with a lever and base, showing internal components (no text or symbols)natural_image
Illustration of a hand using a tool to lift a cylindrical container (no text or symbols visible)natural_image
Illustration of a hand using a manual tool to lift a cylindrical container (no text or symbols present)natural_image
Diagram showing a mechanical component being lowered into a jar (no text or symbols)natural_image
Diagram showing a mechanical component with a downward arrow indicating compression or disassembly (no text or symbols present)natural_image
Diagram of a robotic hand gripping a joint, with an arrow indicating motion direction (no text or symbols)natural_image
Diagram of a mechanical component with an arrow indicating direction (no text or symbols present)natural_image
Diagram showing a mechanical component being lifted by a rotating ring, with no visible text or symbols.natural_image
Diagram of a mechanical device pressing down on a cylindrical container (no text or symbols)natural_image
Illustration of a hand pouring liquid into a container with an arrow indicating rotation (no text or symbols)Cuidado y limpieza
natural_image
Illustration of hands operating a portable device with a scroll wheel (no text or symbols visible)


- SAVE THESE INSTRUCTIONS
- Other Consumer Safety Information
- This appliance is intended for household use only.
- Parts and Features
- How to Install Piercing Lever Assembly
- How to Use
- NOTES:
- How to Use Jar Openers and Multi-Tool™
- CAUTION
- Care and Cleaning
- Limited Warranty
- PRÉCAUTIONS IMPORTANTES
- AVERTISSEMENT
- Cuidado y limpieza
Brand : HAMILTON BEACH
Model : OpenStation 76382
Category : Can opener