
iMETEO X6 - Weather Station TECHNISAT - Free user manual and instructions
Find the device manual for free iMETEO X6 TECHNISAT in PDF.

| Product type | Weather station with outdoor sensor |
| Brand | TechniSat |
| Model | iMETEO X6 |
| Base station power supply | DC 5V/1.2A (mains adapter included); backup batteries: 2 x AA (LR06) not included |
| Outdoor sensor power supply | 3 x AA (LR06) not included; built-in solar panel |
| Main functions | Indoor/outdoor temperature, humidity, barometric pressure, wind speed and direction, rainfall, weather forecast, alarms, backlight |
| Indoor temperature range | 0 °C to 50 °C |
| Outdoor temperature range | -40 °C to 70 °C |
| Humidity range | 20 % RH to 95 % RH |
| Pressure range | 600 to 1100 hPa |
| Rainfall range | 0 to 9999 mm |
| Wind speed range | 0 to 180 km/h |
| Transmission frequency | 433.92 MHz RF, power 10 dBm |
| Transmission range | Up to 100 m in open field |
| Number of connectable sensors | 1 multi-sensor (included) + up to 3 additional sensors (optional) |
| Display | Color LCD screen with adjustable backlight |
| USB port | USB 5V/1A for charging external devices |
| Radio-controlled clock | DCF77 (Europe), adjustable ON/OFF, adjustable time zone |
| Alarm function | Dual alarm with adjustable snooze, weekday/weekend repetition |
| Weather forecast | 12 hours, icons: sunny, cloudy, rainy, stormy, snowy, windy |
| Maintenance and cleaning | Clean with a soft dry cloth; rain funnel to be cleaned regularly (1-3 months) |
| Safety | Do not open, do not expose to water, use suitable power adapter, keep out of reach of children |
| Warranty | 24 months statutory, from date of purchase |
| Supported languages | English, German, Italian, French, Spanish, Dutch, Danish |
Frequently Asked Questions - iMETEO X6 TECHNISAT
User questions about iMETEO X6 TECHNISAT
0 question about this device. Answer the ones you know or ask your own.
Ask a new question about this device
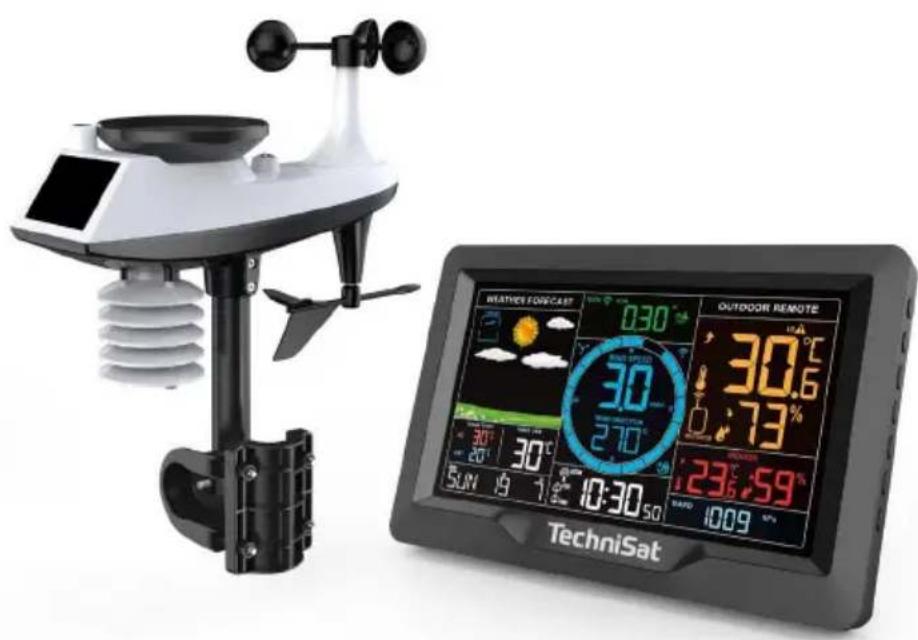
Download the instructions for your Weather Station in PDF format for free! Find your manual iMETEO X6 - TECHNISAT and take your electronic device back in hand. On this page are published all the documents necessary for the use of your device. iMETEO X6 by TECHNISAT.
USER MANUAL iMETEO X6 TECHNISAT
Weather station with temperature, pressure and weather trend function, equipped with wind sensor, rainfall measurement and color screen.
TechniSat
Notes on recycling
This device has been designed and manufactured with high-quality materials and components that are recyclable. The symbol of the crossed-out wheeled waste container indicates that the product is subject to separate collection in accordance with the Directive
European Parliament and the Council 2012/19/EU and in accordance with the
Directive of the European Parliament and the Council 2006/66/EC and informs that electrical and electronic equipment and batteries and accumulators after the period of use, must not be discarded together with
With other household waste. The user is obliged to return it to a collector of waste electrical and electronic equipment and batteries and accumulators forming a system for the collection of such waste, including a suitable store, local collection point or municipal unit. Waste equipment can have a harmful effect on the environment
and human health due to the potential content of hazardous substances, mixtures and components. The household plays an important role in contributing to the reuse and recovery, including recycling, of waste equipment. At this stage, attitudes are formed that influence the behavior of the
The common good, which is a clean environment. Households are also one of the largest users of small equipment, and rational management of this equipment affects the recovery of recyclable materials. In case of improper disposal of this product, penalties may be imposed in accordance with national legislation.
The packaging of your device consists only of recyclable materials.


Important note on disposal of batteries/accumulators: Batteries/accumulators may contain toxic substances that are harmful to the environment. Therefore, it is necessary to dispose of batteries/accumulators in accordance with applicable laws. Never dispose of batteries/batteries in regular household waste. Dispose of used batteries/accumulators free of charge at a specialized dealer or at special disposal facilities. (Batteries are not included).
1 Introduction
Security
- Please read carefully before using the device user manual.
- Please follow the instructions.
- Please do not use the device if it has fallen into water.
- Please use only a dry cloth for cleaning.
- All repairs should be carried out by an authorized service center.
- The device is not a toy. Children do not recognize the dangers of using electrical appliances. Keep the device out of the reach of children and pets.
- Do not crush, throw or shake the device.
- Do not use any heat sources near the station and sensors, which can also heat them up

NOTE
- Please do not remove the housing on your own.
- Do not lubricate / grease the device.
- Do not place the device on top of other electrical appliances.
- The base station is designed for indoor use.
- Operate the device only with the recommended mains voltage. Never attempt to operate the device at any other voltage.
- If the device shows signs of damage, do not run it.
- Do not run the device near bathtubs, showers, swimming pools or running/splashing water. There is a risk of electric shock and/or damage to the device.
- Foreign objects, such as nails, coins, etc., must not fall inside the device. Do not touch the connection contacts with metal objects or fingers. This can lead to short circuits.
- This device is not intended for use by persons (including children) with limited physical, sensory or mental or lacking experience and/or knowledge, unless they are supervised or instructed by a person responsible for their safety in the use of the device.
- Modifications to the device are prohibited.
Before connecting, make sure that the operating voltage of the AC adapter is compatible with the mains voltage.
- When the device is not in use (and connected using the power supply), remove the plug from the socket. Pull the plug, not the cord. Remove the plug before the storm begins. If the device will not be used for a long period of time, such as before going on a long trip,
Remove the plug from the outlet. The heat generated during operation must be dissipated by proper air circulation. Therefore
The device must not be covered or installed in a closed enclosure. A free space of at least 10 cm must be provided around the device.
- Regularly check the power cord for damage and do not use it if it is damaged.
- When unplugging the power supply from an electrical outlet, pull the plug, not the cord.
- The device can only be operated in temperate climates.
- For pluggable devices, the connection socket should be mounted close to the device and should be easily accessible.

WARNING
Do not touch the mains plug of the power supply with wet hands; danger!

WARNING
The power supply cable should be routed in such a way that no one can trip over it.

WARNING
Electrical voltage!
There is a possibility of electric shock.
Never open the device or AC adapter!
In the following cases, unplug the device from the mains and ask a specialist for help:
- The power cord or power plug is damaged,
- The device has been exposed to moisture or liquid has entered it,
- In case of major accidents,
- In case of serious external damage.

Danger of suffocation! Packaging and its parts should not be left with children. Risk of suffocation due to foil and other packaging materials.
2 Features of the device
- USB connector (5V/1A)
- 12 or 24 hour time format
- Calendar to 2099
- Display of the days of the week in 7 languages: English, German, Italian, French, Spanish, Dutch and Danish.
- Alarm and snooze function (off, 5-60 min)
- Low battery indicator
- Weather forecast function
- 3 backlighting modes available
- Relative humidity: indoor and outdoor indication range: 20%RH \~ 95%RH
- Record max/min: temperature, humidity, wind speed and rainfall
- Alert temperature, humidity, wind speed, rainfall
- Display of sensible temperature, wind chill temperature, heat index, dew point temperature
Temperature:
- The range of indicated internal temperature measurement:
-0°C (32°F) \~ 50°C (122°F) - The range of the indicated measurement of the outdoor temperature:
- 40^ C (-40°F)\~ 70^ C (158°F)
- choice of temperature unit °C or °F
- Memory of maximum/minimum temperature and humidity Pressure:
- Measurement range: 600 to 1100
hPa Precipitation:
- measuring range: 0 to 9999mm
Wind:
- wind speed measurement range: 0 to 180 km/h
- wind direction: 0 to 359 degrees
Wireless outdoor sensor:
- transmission frequency: 433.92MHz RF, 10dBm power
- Transmission range in open space: up to 100 meters
Power supply:
- Weather station:
Power supply: DC 5V/1.2A, batteries: 2 x AA (LR06) (*not)
- External sensor:
Battery: 3 x AA (LR06) (*not).
3 View of the device
Base station
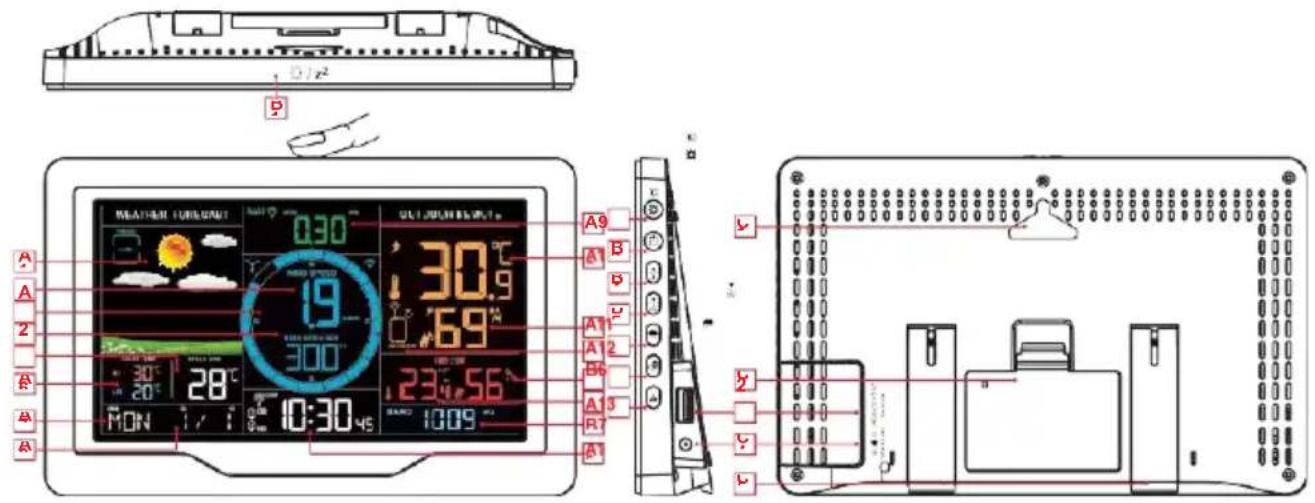
LCD screen
A1: Weather forecast
A3: Wind direction
A5: Perceived temperature
A7: Day of the week
A9: Rainfall
A11: External humidity
A13: Internal humidity
Pressure A16: Time
A2: Wind speed
A4: Wind direction and max wind speed from the last 1h.
A6: Today's record highest i lowest temperature
A8: Calendar
A10: Outdoor temperature
A12: External sensor channel
A14: Internal temperature A15:

RCC signal icon
DST Daylight saving time icon
① Alarm icon 1
② Alarm icon 2
M-F Monday-Friday repeat alarm icon
S-S Saturday-Sunday repeat alarm icon
z^z Snooze
Wireless connection icon
Wireless channel loop icon
Low battery indicator
HI▲ High temperature alarm icon
LOA Low temperature alarm icon
HI DAY 24-hour rainfall alarm icon
HI▲ Intensity warning icon RATE precipitation
HI TOP Wind speed alarm icon
Wind icon
Temperature| Humidity arrow trend upward
Temperature| Humidity arrow downward trend
Buttons
B1:"/z" touch button
B3: "💡" button
B5: " ≡" button
B7: "CH" button
B9: Battery cover
B11: Power connector
Housing of the device
C1: Open to hang
C3: USB port
C5: Brackets
B2: " ⚙ | ⟢ "
B4: " ▲" button
B6: " 🔵 " button
B8: "⚠" button
B10: USB connector
B12: Supporting legs
C2: Battery cover
C4: Power connector
Wireless multi sensor
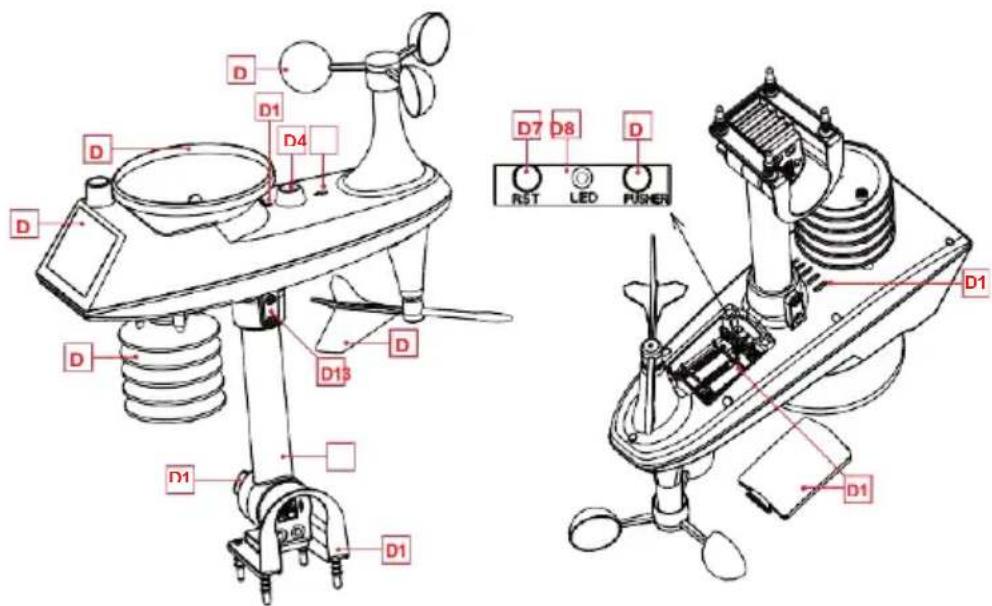
D1: Solar panel
D3: Wind vanes
D5: Inductive measuring box
humidity wind direction aileron
D8: LED indicator
D10: Battery cover
D12: Fixed base
D14: Drain holes for rain sensor D15: North direction indicator
D16: Rain funnel rotation mark
D2: Rain funnel
D4: Level
D6: Temperature and
D7: Reset button
D9: Manual transmiion button
D11: Carrying rod
D13: Ball head screws
D17: Large nut for attaching the rod bearing and base
4.1 Preparing the station for operation
Items needed to set up the station and set up the station (not included):
- Phillips screwdriver and hex screwdriver for assembly.
- Batteries: three AA alkaline or lithium batteries (LR06) for the multifunction (external) sensor. Optionally, two AA (LR06) batteries to keep the station running in case of power failure.
i Tip:
- Remove the weather station and sensor from the package and place them together on a table within easy reach.
- Prepare batteries and a screwdriver
- Hold the sensor (multi-sensor) and weather station 0.15-0.3 meters apart for at least 5 minutes after installing the batteries and connecting the power supply so that the sensor and station can reconnect.
4.2 Quick setup
- Insert 3 AA batteries into the wireless multi outdoor sensor.
- Then connect the power cord to the weather station.
- Configure basic settings. Set the time, date, unit, etc.
- Insert 2 AA batteries into the weather station (if the power supply is unexpectedly turned off, the settings will not be lost).
- After 5 minutes, move the remote sensor outside or to another target location
- Move the weather station to a suitable location, keeping a minimum distance of 2.5 meters from all sources of interference, such as a TV or computer monitor, radio reception is weaker in rooms with concrete walls (e.g.: in basements) and in offices. In such extreme conditions, place the weather station close to a window.
i Tip
The weather station has a clock time calibration function. When the power is turned on, searching for an external wireless sensor, the weather station will automatically enter the radio-controlled clock time calibration mode (at this point, the screen will dim). If you need to set the time and unit manually, you must press and hold the " " (B4) button to exit the automatic time setting mode, and then continue to the next step.
4.3 Setting the time and units
- Press and hold the "⚙" button for 3 seconds to enter the configuration mode.
- Press and release the "▲" or "▼" button to adjust the value. Hold down the "▲" or "▼" button to quickly adjust the value
-
Press and release the "⚙" button to confirm and move to the next item. The order of settings is as follows:
-
BEEP ON/OFF
-
Temperature unit selection: °C | °F
-
Selecting the unit of pressure pressure: hPa| inHg| mmHg
-
Wind speed unit: KM/H |MPH
-
Selection of wind degree (angle) or direction (letter)
-
Rainfall unit: MM| inch
-
Radio controlled clock function: ON |OFF
-
Time zone: -1 to 2 hours.
-
Hourly format: 24Hr| 12Hr
-
Hour
-
minutes
-
Calendar display format: Month/Date| Date/Month
-
Year
-
Month
-
Date
-
Language of the week display: a total of seven countries
-
Initialize weather settings
i Tip
- If no operation is performed within 20 seconds during setup or the "☀️/z ^2 button is pressed, the device will automatically exit setup mode and return to normal operation.
- If the distance from the German signal tower (Mainflingen town) is 1500 km or more, the signal received by the radio clock is very weak. It is recommended to set the RCC (DCF) to the OFF position.
4.4 Radio controlled clock
After the weather station searches for an external wireless sensor after power on, (up to 3 minutes) it will automatically enter RCC timing mode. The weather station will automatically search for the RCC signal for 7 minutes, the RCC signal icon will flash and the backlight will automatically turn off.
i Tip
- Since the RCC signal search requires the unit to be in a static operating state if possible, the backlight is automatically turned off to prevent signal interference. Try not to control the weather station within seven minutes. If you want to exit the mode
RCC signal search, press and hold the "→" button for 3 seconds to exit the RCC signal search mode. - The weather station will automatically perform an RCC signal search at 1:00 / 2:00 / 3:00 each day to correct any deviation from the exact time. If this synchronization attempt fails (the radio mast icon disappears from the display), the system will automatically make another synchronization attempt for the next full hour. This process is automatically repeated up to 5 times a day.
- If it is necessary to search for RCC signals manually, press and hold the "A" button for 3 seconds to activate the search mode. Again, the search time is 7 minutes.
- A flashing radio mast icon indicates that an RCC signal search is in progress. A continuous display of the radio mast icon indicates that successful timing of the RCC signal has been completed and the calibration time has succeeded. The "DST" icon indicates that the calibration time corresponds to daylight saving time.
4.5 Alarm function
- Press the "☐" button to display alarm time 1, press the "button again to display alarm time 2, and then press the "button a third time to exit the alarm viewing mode.
- In the alarm 1 or alarm 2 time viewing mode, press and release the "⚙" button to enable or disable the alarm function.
- When alarm 1 or alarm 2 is activated, the symbol "1" or "2" is displayed. At the same time, the repeat symbol of the corresponding alarm "M-F" is S-S-played.
- After 20 seconds without pressing any button or by touching the "/z ^2 " button, you can exit the viewing mode.
4.5.1 Set alarm and snooze
- Press and hold the "button for 3 seconds to activate the alarm and snooze setting mode
- Press and release the "▲" or "▼" button to adjust the value. Hold down the "▲" or "▼" button to make a quick adjustment.
- Press and release the "button to confirm and move to the next item.
i Tip
After 20 seconds without pressing any button or by touching the "/z" button, you can exit the setting mode.
The order of settings is as follows:
- Alarm 1 hour
- 1 minute alarm
- Alarm 1 repeat: M-F| S-S| M-S
- Alarm 1 snooze time (SNOOZE): 5 to 60 minutes| OFF
- Alarm 2 hour
- Alert 2 minutes
- Alarm 2 repeat: M-F| S-S| M-S
- Alarm 2 snooze time (SNOOZE): 5 to 60 minutes | OFF.
i Tip
- When the alarm repeat is set to M-F, the alarm function will be active from Monday to Friday, Saturday and Sunday will be invalid. When the alarm repeat is set to S-S, the alarm function will be active on Saturday and Sunday, and Monday through Friday will be invalid. If the alarm repeat is set to display both M-F and S-S, the alarm function will be active throughout the week.
- Snooze time setting range: 5 \~ 60MIN, OFF, setting to OFF means no snooze function. The unit of snooze time is minutes.
- The alarm will sound for 2 minutes if it is not turned off by pressing any button. In this case, the alarm will be automatically repeated after 24 hours.
- The rising alarm sound (duration: 2 minutes) changes in volume 4 times.
4.5.2 Disabling the alarm signal
- When the alarm is triggered, press any button except the touch button "/z ^2 " or press and hold the button "/z ^2 " for more than 3 seconds to turn off the alarm signal.
4.5.2 Snooze function
- While the alarm is in progress, touch and release the touch button " ", then alarm signal will be turned off and go into snooze mode. After the
snooze time the alarm will ring again (you can repeat the snooze).
- In snooze time mode, press any button except the touch button "☀/z2" or hold the touch button "☀/z7" for more than 3 seconds to exit the snooze mode.
4.6 Temperature| Humidity readings| History| Trends
- Press and release the " 8 " button to display the high and low temperature and humidity, as well as the sensible temperature, dew point temperature (DEW POINT), heat index (HEAT IND) and wind chill index (CHILL IND).
- In High | Low temperature or humidity viewing mode, press and release the "CH" button to switch to viewing records from other channels.
- In the temperature and humidity history viewing mode, press and hold the "⚙" button for 3 seconds to delete all indoor and outdoor temperature and humidity history.
- Remote indoor and outdoor temperature and humidity will have indications of a change in trend.
Temperature and humidity
increase ↘ Temperature and
humidity decrease
No arrow display: temperature/humidity remains unchanged.
i Tip
- Sensations such as temperature, dew point temperature, heat index and wind chill index are related to the values detected by the wireless remote sensor (multi sensor).
- Remote internal temperature reading|external| humidity will be reset to the current value.
- After 20 seconds without pressing any button or by touching the "/z ^2 " button, you can exit the review mode.
4.7 Wind readings| History
- During normal operation, press and hold the "button for 3 seconds to change the display to wind direction or maximum wind speed of the last hour.
WIND SPEED (Wind Speed): average speed in the last 30 seconds TOP SPEED
1HR (Speed max 1h): highest speed in the last hour WIND DIRECTION: in letters or degrees.
History display: Press "▼" button several times to display maximum wind history values: 1 Hour (default) | 24 Hours | 7 Days | Month | Year.

Tip
- 1 HOUR (one hour): the past 60-minute period (default maximum speed record, already shown).
- 24 hours : the past 24-hour period, since the last record
- 7 days (7) : the past period of 7, since the last record
- Month: Specified by a calendar month, e.g., January 1 - January 31.
- Year: Defined by the calendar year, i.e., January 1 - December 31.
Resetting indications
In wind speed history viewing mode, press and hold the "button for 3 seconds to clear all wind speed history.
- The wind speed reading will be reset to the current wind speed.
4.8 Precipitation readings| History
- During normal operation, press and hold the "button for 3 seconds to change the display to cumulative rainfall value (NOW) or rainfall intensity (RATE).
- Press and release the " 🔊 " button to display the rain history.
i Tip
- Precipitation: current to past (1 hour | 24 hours | day | 7 days | month | year | total) total cumulative precipitation. Rainfall intensity: average rainfall over the past 12 hours per hour.
- NOW: The cumulative value in the last 30 minutes.
1 HOUR (1 hour): cumulative value over the last 60 minutes
24 HOURS: The cumulative value of the last 24 hours.
DAY: A 24-hour period from 0:00 to 23:59 (12:00 to 23:59). Cumulative value with today
7 DAYS (7 days): In the last 7 days, the cumulative value of the last record
MONTH: A cumulative value defined by a calendar month (e.g., January 1 - January 31).
YEAR: The cumulative value is determined according to the calendar year, from January 1 to December 31
TOTAL : The cumulative value of the total operating time (without time stamp) since the weather station was started.
Resetting indications
In the rain history viewing mode, press and hold the "⚙️" button for 3 seconds to clear all rain history.

Tip
- The rainfall reading value will be reset to 0 mm.
4.9 Connection to wireless multi-sensor
- Up to 1 wireless multi sensor (included) and 3 different channels of wireless temperature | humidity sensor (not included, optionally available) can be connected to the weather station,
- The weather station automatically searches for all wireless sensors within 3 minutes of power-up and records their IDs. Each sensor generates a random ID upon power-up to distinguish between sensors.
- In the main display interface, press and release the "CH" button to enter the channel viewing mode and display the wireless sensor values on different channels.

Tip
- Temperature and humidity values are displayed in the OUTDOOR REMOTE column. At the same time, the channel icon (displaying item A15) displays the number of channels: OUTDOOR (representing multi outdoor sensor) | 1 or 2 or 3 (representing 3 channels of wireless temperature | humidity sensor)).
- When the weather station loses sensor signals or a sensor is not connected to a channel, the channel value is displayed as "--".
Adding a new sensor or replacing a sensor
If you need to add a new sensor or replace a sensor. In channel browsing mode, press and hold the "⚙️" button for more than 3 seconds, the weather station will start searching for a sensor. This process takes up to 3 minutes.

Tip
- When adding a new sensor or replacing a sensor (replacing the battery in the old sensor), first turn on the power to the sensor, then follow the steps above to control the weather station.
- When the low battery icon "√" appears on the channel icon (position on the A15 display). , it means that the battery is about to be discharged. Replace the battery according to the above instructions.
Loop mode for additional sensors
In the normal time display interface, press and hold the "Button" for 3 seconds, the wireless channel in the OUTDOOR REMOTE column will go into the
Loop mode, the channel will be changed every 5 seconds (OUTDOOR|CH1|CH2|CH3), every 5 seconds data from a different sensor will be displayed.
4.10 Display and set weather alerts
- Press and release the "Button to display the weather alert mode. Continue to press and release the "Button to confirm and move to the next item.
i Tip
- After 20 seconds without pressing any button or by touching the "/z ^2 " button, you can exit the review mode.
- Display outdoor temperature | humidity alarm, press and release "CButton to switch to other channels. (Total 4 channels: external multi sensor |, optional sensors CH1 | CH2 | CH3).
- In each position of the weather alert view, press the "button to enable (ON) or disable (OFF) the alert.
Changing the value of alerts
- Press and hold the "⚠️" button for 3 seconds to enter the weather alert setting mode.
- Press and release the "▲" or "▼" button to adjust the value. Hold down the "▲" or "▼" button to quickly adjust the value.
- Press and release the "⚠️" button to confirm and move to the next item.
Order of viewing and settings
- Outdoor| remote high temperature (high temperature alarm, outdoor)
- Outdoor I remote low temperature (low temperature alarm, external)
- Outdoor | remote high humidity (high humidity alarm, outdoor)
- Outdoor| remote low humidity (low humidity alarm, outdoor)
- Indoor| remote high temperature (high temperature alarm, indoor)
- Indoor I remote low temperature (low temperature alarm, indoor)
- Indoor| remote high humidity (high humidity alarm, indoor)
- Indoor| remote low humidity (low humidity alarm, indoor)
- High wind speed (high wind speed alarm)
- High 24-hours rainfall (rainfall sum alert for the last 24 hours)
- High rainfall rate (high rainfall alarm)
4.11 Triggering a weather alert
When the station reaches the armed alarm value, it will emit 5 beeps every minute. The flashing alarm icon will indicate whether the alarm is (LOW) LOW or (HIGH) HIGH.
i Tip
- If you want to permanently cancel the alarm, enter the alarm viewing mode, go to the item you want to cancel, press and release the "⚙️" button to set the OFF mode.
4.12 Weather forecast function
The weather station calculates the weather forecast for about 12 hours based on the barometric pressure trend. Of course, this forecast cannot compare with the forecasts of professional weather services supported by satellites and high-performance computers. It only provides a rough indication of the current development of the weather situation in a small local area. You should consider the weather forecast from your local weather service, as well as the forecast from your own weather station. If there are discrepancies between the information from the device and the information from the local weather service, use the latter's guidance as authoritative.
The weather station displays the following weather icon:
| Sunny | Light cloudiness | Cloudy | Rainy | Stormily |
 |  |  |  | 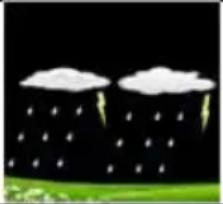 |
| Snow | Windy | Windy | Storm | Snowbird |
 |  |  | 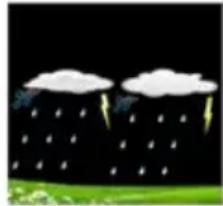 | 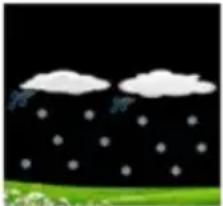 |
After 7-10 days of air pressure calibration by the weather station, the weather forecast will be stable with an accuracy of 70%-75%.
The weather station can display the barometric pressure trend. The following messages can be displayed:
Pressure is rising

Pressure remains unnamed

Pressure decreases
i Tip
- The Snow icon will appear only when the outdoor temperature (refers to the temperature detected by multiple connected sensors) is lower than -4°C (+25°F), and the forecast will be rainy or thundery.
- The Windy icon will only appear if the wind speed exceeds 50KM/H and the forecast is sunny or mostly cloudy or overcast.
- The Thunderstorm icon will only appear if the wind speed is greater than 50KM/H and the forecast is rainy or thunderous.
- The Snowstorm icon will be displayed only when the outdoor temperature (refers to the temperature detected by the outdoor multi sensor) is below -4°C (+25°F) and the wind speed exceeds 50 KM/H and the forecast predicts rain or rain with lightning.
4.13 Screen backlighting
- If the product is powered by batteries, touch the location button "☀️/z ^2 ". The backlight illuminates for 15 seconds.
- When the station is connected to the AC adapter, the batteries are automatically disconnected and the backlight will always be on. Press the "to adjust the backlight brightness, you can adjust 4 states: 3 different levels of backlight brightness and backlight off. When the backlight brightness is not set to maximum brightness, press the "button. The backlight is set to maximum brightness for 10 seconds.
i Tip
- When receiving the RCC (time) signal, the backlight will be automatically turned off to prevent interference and correct reception of the DCF77 signal.
4.14 Station battery level
- If the "Indoor" column on the station's LCD screen displays the battery icon ", replace the battery in the weather station as soon as possible.
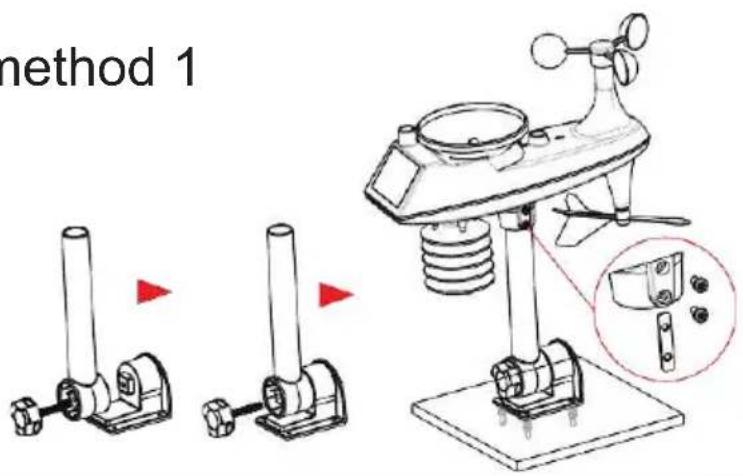
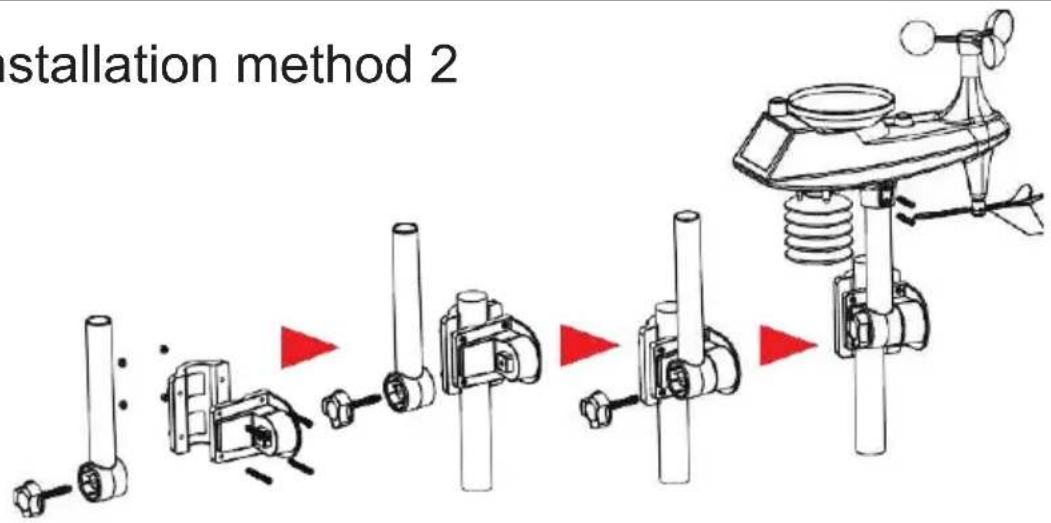
5 Multi-sensor outdoor
- The sensor should be mounted in an open area. Ensure a distance of 15 meters in all directions.
- The sensor should be mounted on a stable platform or bracket mounted at a minimum height of 1.5 m above the ground.
- The sensor base is bolted to the platform and support frame. Tighten the large nut that attaches the support rod to the base.
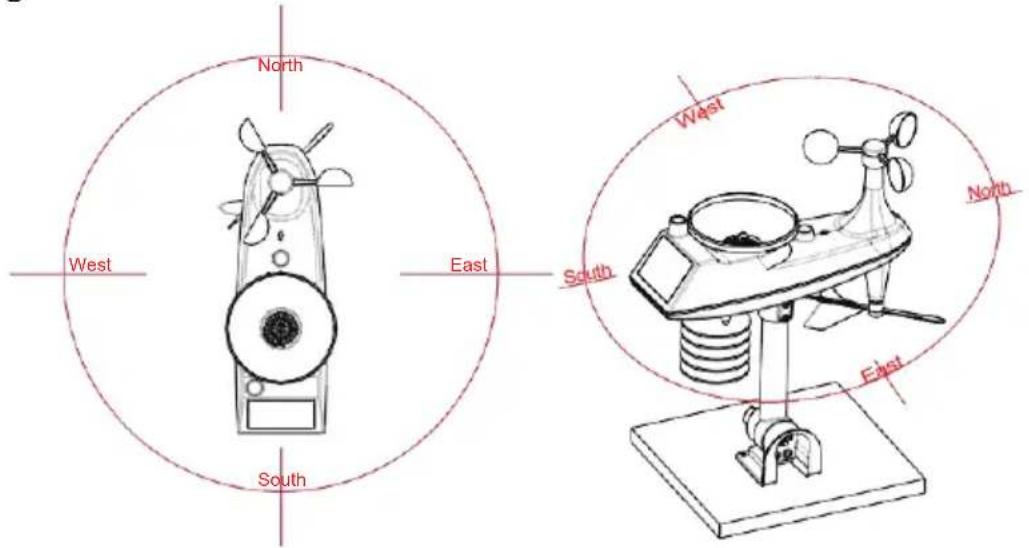
- When installing, position the sensor body so that the solar panel faces south, otherwise the wind direction will be
incorrect. Note the embossed "N" north mark on the top of the sensor (you need a compass to check, and the "N" north embossing mark is identical to the "N" of the compass).
- When installing the sensor, use a top level (mounted to the multi-sensor housing) to ensure the sensor is level, otherwise it will affect the accuracy of the precipitation reading.
- After the above two steps, lock the two hexagon socket screws located on the side of the sensor body.
- The rain funnel structure of the sensor should be cleaned regularly (recommended cycle 1-3 months, depending on the frequency of rainfall).
Installation diagrams
Installation method 1
Installation method 2
flowchart
graph TD
    A["Initial installation"] --> B["Assembly of mechanical parts"]
    B --> C["Assembly of air condition sensor"]
    C --> D["Assembly of air condition sensor with sensor"]
    D --> E["Final installation"]
Positioning of the multi-sensor relative to the north direction
Cleaning the rain funnel
- Remove the rain hopper (rotate the rain hopper according to the direction of rotation shown).
- Gently remove dirt or insects from the rain sensor.
- Remove debris from the rainwater funnel itself, especially debris from the funnel drain.
- Remove debris from the drain.
- Reinstall the rainwater funnel.
- Note: Do not apply oil to the rain sensor.

i Tip
Make sure the wireless sensor is installed within 100 meters of the weather station (empty, no obstructions). Depending on the thickness of the obstacle between the wireless sensor
and the weather station, the distance should be as short as possible (the distance after the wireless signal penetrates the obstacle will be shortened), otherwise the data transmission may be disrupted .
6 USB port - wired charging of external devices
- Use the original charging cable (USB) of the external device and connect the USB plug to the USB socket (C3) on the side of the IMETEO X6.
- The external device can be charged with a maximum current of 1 A at 5 V.
7 Manufacturer
TechniSat Digital Sp. z o.o.
Poznańska 2 St.
55-120 Oborniki Śląskie
Poland
8 Service tips and warranty
This product is quality tested and has a statutory warranty period of 24 months from the date of purchase. Please keep the invoice as proof of purchase. For warranty claims, please contact the product seller or manufacturer.
In case of questions and information, or if you have a problem with this device, our technical hotline is available: Monday. - to Friday, from 8:00 am to 4:00 pm at +71 310 41 48.
The guarantor, within the scope of the guarantee, undertakes to remove at its own expense any defects in the product. Removal of defects will be carried out by replacing the defective product with a new, defect-free one or repairing it.
In order to exercise the warranty, the purchaser must report the defective product to the point of sale where the product was purchased and deliver the defective product there. The product should be delivered complete.
The warranty does not cover product defects caused by the purchaser or resulting from:
- Using or installing the product in a manner inconsistent with the instructions for,
- Improper storage or maintenance of the device,
- repairs or alterations of the product performed by unauthorized persons,
- ingress of liquids or foreign bodies,
- lightning and power line surges.
The provisions of the warranty do not exclude, limit or suspend the rights of purchasers (consumers) under generally applicable laws.
Obtaining detailed information about the product, including the rules and procedures of the warranty procedure, assigning an RMA number, is possible by phone 71 310 41 48 or by emailserwis@technisat.com, on working days, from 8 am to 4 pm.
9 Legal information
TechniSat hereby declares that the IMETEO X6 radio device complies with Directive 2014/53/EU and RoHS. The full text of the EU declaration of conformity is available at http://konf.tsat.de/?ID=23994

10 Technical data
10.1 Technical data of the weather station
- Temperature range for internal sensor: 0^ C\~ 50^ C
- Temp. range for outdoor sensor: - 40°C\~ 70°C
- USB: 5V/1A (5W)
- Humidity measurement range: 20%RH\~ 95%RH
-
Wireless multi outdoor sensor:
-
3 variable channels
- transmission frequency: 433.92MHz RF, 10dBm power
- transmission range in open space: up to 100 meters
- possibility to connect up to three external sensors
- Barometer range: 600\~1100 hPa/mB
Wireless outdoor sensor:
- transmission frequency: 433.92MHz RF, 10dBm power
- Transmission range in open space: up to 100 meters
Power supply:
- Weather Station:
Power supply: DC 5V/1.2A, batteries: 2 x AA (LR06) (*not)
- External sensor:
Battery: 3 x AA (LR06) (*not).
Solar panel: in the presence of sunlight, solar panels provide direct power. In the absence of sunlight, there is an automatic switch to battery power.
- The wireless remote sensor can operate at a temperature of -40^ to +70^ . Please select a suitable battery according to the limit temperature of the wireless sensor:
- The alkaline zinc-manganese battery can operate at temperatures from -20°C to +60°C.
- The lithium-ion polymer battery can operate at temperatures ranging from -40^ to +70^ .
- Supported languages: English, German, Italian, French, Spanish, Dutch and Danish.
10.2 Technical specifications of the power supply
Manufacturer:HUAXU ELECTRONICS
Model: HX075-0501200-AG-001
Input voltage: 100-240V, 0.3A max Input
frequency: 50/60Hz Output voltage: 5V
Output current: 1.2A
Output power: 6W
Average efficiency during operation: 77.63% Power
consumption at zero load:0.1W
10.3 Cleaning the device
- Do not clean the device with a wet cloth or under running water.
- Before cleaning, pull out the USB plug and turn off the device!
- Do not use sponges, cleaning powders or solvents such as alcohol or gasoline.
- Do not use any of the following: salt water, insecticides, spirits, chlorinated or acidic solvents (ammonium chloride).
- The housing should be cleaned with a soft cloth.
- If necessary, use a cotton cloth with small amounts of a water-based or alcohol-based, non-alkaline soap solution.
Rub the surface gently with a cotton cloth. - Cleaning the rain funnel is described in Section 5 (Multi sensor external).
D1: Zonnepaneel
D3: Windvaan