Superdrive SD80 - Guitar amp Budda - Free user manual and instructions
Find the device manual for free Superdrive SD80 Budda in PDF.

| Product type | Tube guitar amplifier (head) |
| Model | Budda Superdrive SD80 |
| Power | 80 watts (estimated) |
| Preamp tubes | 3 x 12AX7 |
| Power tubes | 4 x 6L6GC |
| Channels | Rhythm and Drive (switchable via footswitch or Master button) |
| Equalization | Bass, Mid (with Pull Modern feature), Treble |
| Drive | Distortion control (blues, crunch, solo) |
| Rhythm | Gain control for clean channel |
| Master Volume | Overall volume with Push/Pull for channel selection |
| Effects loop | Passive series loop (Send/Return) |
| Slave output | 100 ohm buffered signal with level control |
| Impedance selector | 4, 8 or 16 ohms |
| Speaker outputs | Two parallel jacks |
| Input | Standard 1/4" guitar input |
| Footswitch | Input for single-button footswitch (channel switching) |
| Power supply | 110-120 VAC, 50/60 Hz, fuse T 3.15AL/250V |
| Consumption | 2 A |
| Chassis | Aluminum heat sink |
| Standby function | Go/Rest switch with recommended 30-second warm-up |
| Pull Bright function | Adds sparkle to Rhythm channel |
| Pull Modern function (Mid) | Reduces mids, boosts bass and treble |
| Country of manufacture | United States |
Frequently Asked Questions - Superdrive SD80 Budda
User questions about Superdrive SD80 Budda
0 question about this device. Answer the ones you know or ask your own.
Ask a new question about this device
Download the instructions for your Guitar amp in PDF format for free! Find your manual Superdrive SD80 - Budda and take your electronic device back in hand. On this page are published all the documents necessary for the use of your device. Superdrive SD80 by Budda.
USER MANUAL Superdrive SD80 Budda
Intended to alert the user to the presence of uninsulated "dangerous voltage" within the product's enclosure that may be of sufficient magnitude to constitute a risk of electric shock to persons.
Intended to alert the user of the presence of important operating and maintenance (servicing) instructions in the literature accompanying the product.

CAUTION: Risk of electrical shock — DO NOT OPEN!
CAUTION: To reduce the risk of electric shock, do not remove cover. No user serviceable parts inside. Refer servicing to qualified service personnel.
WARNING: To prevent electrical shock or fire hazard, this apparatus should not be exposed to rain or moisture, and objects filled with liquids, such as vases, should not be placed on this apparatus. Before using this apparatus, read the operating guide for further warnings.

FCC Compliancy Statement
This device complies with Part 15 of the FCC rules. Operation is subject to the following two conditions: (1) this device may not cause harmful interference, and (2) this device must accept any interference received, that may cause undesired operation.
Warning: Changes or modifications to the equipment not approved by Peavey Electronics Corp. can void the user's authority to use the equipment.
Note - This equipment has been tested and found to comply with the limits for a Class B digital device, pursuant to Part 15 of the FCC Rules. These limits are designed to provide reasonable protection against harmful interference in a residential installation. This equipment generates, uses and can radiate radio frequency energy and, if not installed and used in accordance with the instructions, may cause harmful interference to radio communications. However, there is no guarantee that interference will not occur in a particular installation. If this equipment does cause harmful interference to radio or television reception, which can be determined by turning the equipment off and on, the user is encouraged to try and correct the interference by one or more of the following measures.
- Reorient or relocate the receiving antenna.
- Increase the separation between the equipment and receiver.
- Connect the equipment into an outlet on a circuit different from that to which the receiver is connected.
- Consult the dealer or an experienced radio/TV technician for help.
Responsible Party:
Peavey Electronics Corporation • 5022 Hartley Peavey Drive • Meridian, MS • 39305
(601) 483-5365 • FAX (601) 486-1278 • www.peavey.com • 80305780 • ©2011

IMPORTANT SAFETY INSTRUCTIONS
WARNING: When using electrical products, basic cautions should always be followed, including the following:
-
Read these instructions.
-
Keep these instructions.
-
Heed all warnings.
-
Follow all instructions.
-
Do not use this apparatus near water.
-
Clean only with a dry cloth.
-
Do not block any of the ventilation openings. Install in accordance with manufacturer's instructions.
-
Do not install near any heat sources such as radiators, heat registers, stoves or other apparatus (including amplifiers) that produce heat.
-
Do not defeat the safety purpose of the polarized or grounding-type plug. A polarized plug has two blades with one wider than the other. A grounding type plug has two blades and a third grounding plug. The wide blade or third prong is provided for your safety. If the provided plug does not fit into your outlet, consult an electrician for replacement of the obsolete outlet.
-
Protect the power cord from being walked on or pinched, particularly at plugs, convenience receptacles, and the point they exit from the apparatus.
-
Only use attachments/accessories provided by the manufacturer.
-
Use only with a cart, stand, tripod, bracket, or table specified by the manufacturer, or sold with the apparatus. When a cart is used, use caution when moving the cart/apparatus combination to avoid injury from tip-over.
-
Unplug this apparatus during lightning storms or when unused for long periods of time.
-
Refer all servicing to qualified service personnel. Servicing is required when the apparatus has been damaged in any way, such as power-supply cord or plug is damaged, liquid has been spilled or objects have fallen into the apparatus, the apparatus has been exposed to rain or moisture, does not operate normally, or has been dropped.
-
Never break off the ground pin. Write for our free booklet "Shock Hazard and Grounding." Connect only to a power supply of the type marked on the unit adjacent to the power supply cord.
-
If this product is to be mounted in an equipment rack, rear support should be provided.
-
Note for UK only: If the colors of the wires in the mains lead of this unit do not correspond with the terminals in your plug, proceed as follows: a) The wire that is colored green and yellow must be connected to the terminal that is marked by the letter E, the earth symbol, colored green or colored green and yellow. b) The wire that is colored blue must be connected to the terminal that is marked with the letter N or the color black. c) The wire that is colored brown must be connected to the terminal that is marked with the letter L or the color red.
-
This electrical apparatus should not be exposed to dripping or splashing and care should be taken not to place objects containing liquids, such as vases, upon the apparatus.
-
The on/off switch in this unit does not break both sides of the primary mains. Hazardous energy can be present inside the chassis when the on/off switch is in the off position. The mains plug or appliance coupler is used as the disconnect device, the disconnect device shall remain readily operable.
-
Exposure to extremely high noise levels may cause a permanent hearing loss. Individuals vary considerably in susceptibility to noise-induced hearing loss, but nearly everyone will lose some hearing if exposed to sufficiently intense noise for a sufficient time. The U.S. Government's Occupational Safety and Health Administration (OSHA) has specified the following permissible noise level exposures:
Duration Per Day In Hours Sound Level dBA, Slow Response
| 8 90 | |
| 6 92 | |
| 4 95 | |
| 3 97 | |
| 2 100 | |
| 1 1/2 102 | |
| 1 105 | |
| 1/2 | 110 |
| 1/4 or less | |
According to OSHA, any exposure in excess of the above permissible limits could result in some hearing loss. Earplugs or protectors to the ear canals or over the ears must be worn when operating this amplification system in order to prevent a permanent hearing loss, if exposure is in excess of the limits as set forth above. To ensure against potentially dangerous exposure to high sound pressure levels, it is recommended that all persons exposed to equipment capable of producing high sound pressure levels such as this amplification system be protected by hearing protectors while this unit is in operation.
SAVE THESE INSTRUCTIONS!
a) The wire that is colored green and yellow must be connected to the terminal that is marked by the letter E, the earth symbol, colored green or colored green and yellow.
b) The wire that is colored blue must be connected to the terminal that is marked with the letter N or the color black.
c) The wire that is colored brown must be connected to the terminal that is marked with the letter L or the color red.
WARNING: Changes or modifications to this unit not expressly approved by the party responsible for compliance could void the user's authority to operate the equipment.
This device complies with part 15 of the FCC Rules. Operation is subject to the following two conditions:
(1) This device may not cause harmful interference, and
(2) this device must accept any interference received, including interference that may cause undesired operation.

text_image
BUDDA®Superdrive™ Series
SD18 SD30 SD45 SD80
112 COMBO 212 COMBO HEAD

natural_image
Row of black BUDDA audio amplifiers with white buttons, arranged in a pyramid (no text or symbols on the devices themselves)Budda® Superdrive™ Series Guitar Amplifiers
Thank you for purchasing the finest tube amplifier in the business. We appreciate your support and look forward to providing you with years of trouble-free service.
Before we get into the features of your amplifier, we would like to note that tube amplifiers require a little bit of care and maintenance to ensure many years of service. We would like to share the most important tips with you right here:
When you first turn on your amplifier, remember to leave it on Rest for at least 30 seconds before turning it to Go. This will give the tubes time to warm up and will extend tube life.

text_image
SUPER BUDDA® DRIVE 45 SERIES II ON GO OFF REST PULL / CHANNEL MASTER BASSFront Panel Functions: What they do and how to use them
On/Off: Power On and Off switch. Make sure the black Go/Rest switch is set on Rest before you turn the power to On.
Go/Rest: Standby control. Always remember to leave it on Rest for at least 30 seconds before turning it to Go when you turn the amp On. Always switch the amplifier to Rest before plugging or unplugging any devices or cables.
Master: The Master controls the overall Volume of your amplifier. It also has a push/pull feature that allows you to select between the Rhythm (push) and Drive (pull) channels. The higher the setting, the louder the output and greater the tube saturation. Note: pulling this control will disable the footswitch function.
Bass: Use this control to dial your bass frequencies. Adjustments to this control usually depend upon your pickup configuration; single coils will require more bass and humbuckers less.
Mid: Use this push/pull control to dial in your midrange frequencies. Mids are the most active part of the EQ circuit. Cutting scoops your tone, sort of like creating a "V" in a graphic equalizer. Boosting them will add more fundamental guitar frequencies.
Pull "Modern": This radically changes the EQ of your amplifier. Pulling this control will slightly reduce the mids while raising the bass and treble frequencies. It works best in the Drive mode with the Mid control at a minimum setting.
Check to make sure that the Impedance switch on the rear panel is set to the correct impedance (4, 8 or 16 ohms) for your cabinet. Improper loading may cause excess tube and transformer wear and eventual failure. Use high-quality speaker cables to ensure maximum performance. For tube-related problems, please see the troubleshooting section on page 10 of this manual.
All Superdrive chassis are fabricated from aluminum, which helps to reduce weight along with our custom pine cabinets. Low weight is a significant benefit for all players who gig, as well as their happy road crew & techs. Aluminum is also a great conductor of heat. It may feel warmer to the touch than a traditional steel chassis, but there's no need to worry.
text_image
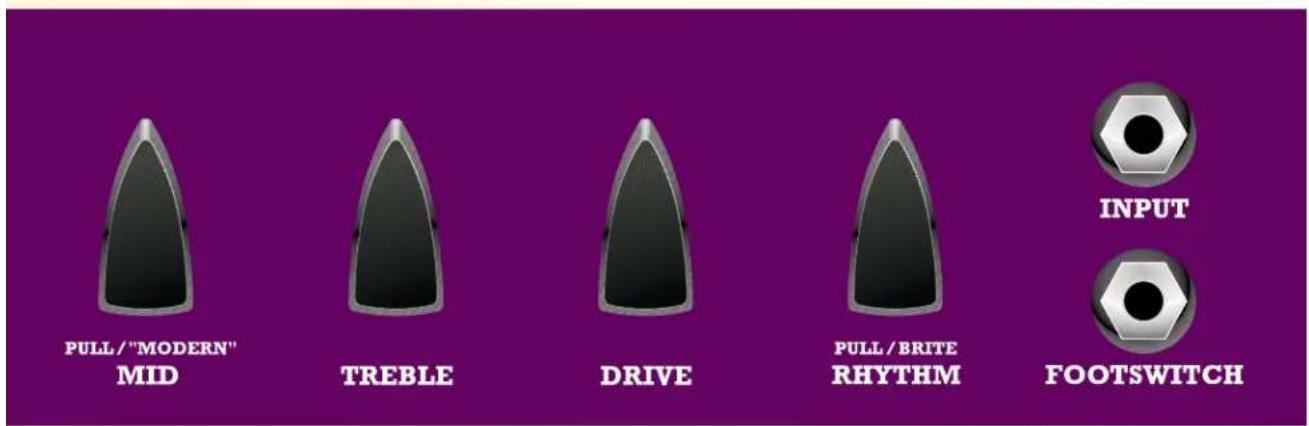
PULL / "MODERN" MID TREBLE DRIVE PULL / BRITE RHYTHM INPUT FOOTSWITCHTreble: Use this control to dial your treble frequencies. Typically, guitars that use single coils will require less treble and humbuckers more.
Drive: This controls the overall distortion of your amplifier. Lower settings will offer a blues type of gain Mid settings are good for crunch Higher settings are great for solo work
Rhythm: Use the Rhythm Control to adjust the gain of your Rhythm Channel
"Pull Brite": This control adds brilliance to the Rhythm channel. Use this to create shimmery clean tones and also to give your treble a boost when using guitars with humbuckers and darker-sounding woods.
Input: This is where you plug in your guitar cable.
Footswitch: Plug your Budda single-button footswitch cable here to switch between the Rhythm and Drive channels of your amp. If you forget your switch at the gig, you can pull the Master control to access the Drive channel.

text_image
EFFECTS LOOP SEND RETURN SUPER BUDDA® DRIVE 45 SERIES II DESIGNED AND MADE IN U.S.A. SLAVE SLAVE LEVELRear Panel Functions: What they do and how to use them
Effects Loop: Superdrive amps have passive series loops. This is where you plug in your effects devices.
Send: Use this jack to send your signal to an external effect unit input, or to another amplifier's effects return input. This signal comes from the preamp and includes the EQ section and Master Volume control of your amplifier.
Return: Use this jack to receive the output of your effects device or another amplifier's send or direct output. This path sends the signal to the power amp and is post EQ and Master Volume. At this point you are accessing only the power (output) section of the amplifier.
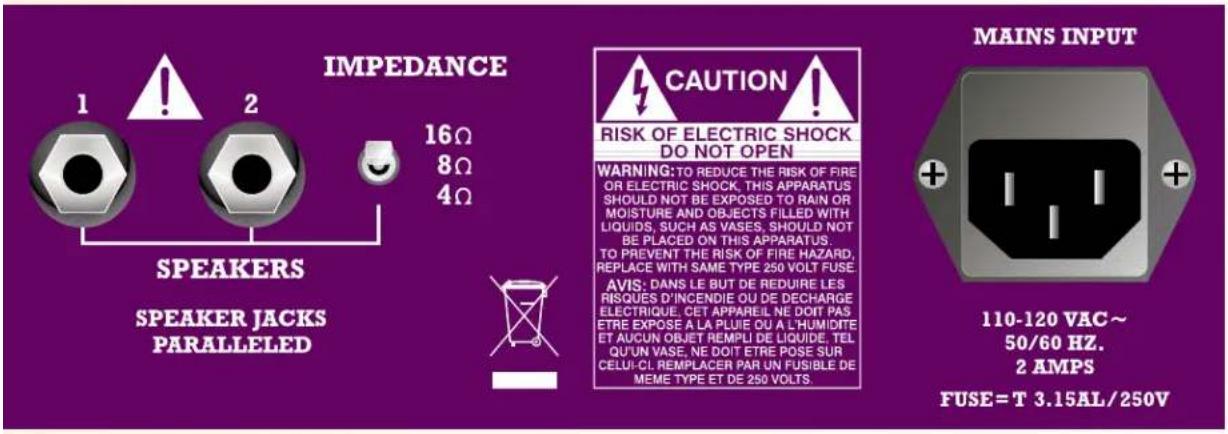
Slave: The Slave out is a 100-ohm compensated signal that is in parallel with the speaker output. It contains the full complement of preamp and power amp characteristics of your amp. Use this output to send your signal to a power amplifier connected to additional speaker cabinets for a louder version of your amp.
Slave Level: This controls the level of the output from your Slave out. If slaving to an effects unit in a stereo amp rig, use the unit's input sensitivity LED lights as a gauge to set the slave level. Use this control to avoid overloading the input of your slave amp or effects unit.
Speakers: This is where you plug in your speaker cabinets.
text_image
IMPEDANCE 16Ω 8Ω 4Ω SPEAKERS SPEAKER JACKS PARALLELED CAUTION! RISK OF ELECTRIC SHOCK DO NOT OPEN WARNING: TO REDUCE THE RISK OF FIRE OR ELECTRIC SHOCK, THIS APPARATUS SHOULD NOT BE EXPOSED TO RAIN OR MOISTURE AND OBJECTS FILLED WITH LIQUIDS, SUCH AS VASES, SHOULD NOT BE PLACED ON THIS APPARATUS. TO PREVENT THE RISK OF FIRE HAZARD, REPLACE WITH SAME TYPE 250 VOLT FUSE. AVIS: DANS LE BUT DE REDUIRE LES RISQUES D'INCENDIE OU DE DECHARGE ELECTRIQUE, CET APPAREIL NE DOIT PAS ETRE EXPOSE A LA PLUIE OU A L'HUMIDITE ET AUCUN OBJET REMPLI DE LIQUIDE. TEL QU'UN VASE, NE DOIT ETRE POSE SUR CELU-CL. REMPLACER PAR UN FUSIBLE DE MEME TYPE ET DE 250 VOLTS. MAINS INPUT 110-120 VAC~ 50/60 HZ. 2 AMPS FUSE=T 3.15AL/250VImpedance: Select the proper impedance to match your speaker load. Our combos and cabinets are normally wired for 8 ohms unless otherwise stated.
AC POWER INLET:
This is the receptacle for an IEC line cord, which provides AC power to the unit. Connect the line cord to this connector to provide power to the unit. Damage to the equipment may result if improper line voltage is used. (See line voltage marking on unit).
Never break off the ground pin on any equipment. It is provided for your safety. If the outlet used does not have a ground pin, a suitable grounding adapter should be used and the third wire should be grounded properly.
To prevent the risk of shock or fire hazard, always make sure that the amplifier and
all associated equipment is properly grounded.
As the colors of the wires in the mains lead of this apparatus may not correspond with the colored markings identifying the terminals in your plug, proceed as follows:
(1) The wire which is colored green and yellow must be connected to the terminal which is marked by the letter E, or by the Earth symbol, or colored green or green and yellow. (2) The wire which is colored blue must be connected to the terminal
which is marked with the letter N, or the color black. (3) The wire which is colored brown must be connected to the terminal which is marked with the letter L, or the color red.
Getting Started:
Initial Setup:
Start with the Drive channel, then set up the Rhythm channel.
Drive Channel
Select the Drive channel by pulling the Master control out. Set the Master Volume at approximately 9 o'clock.
Next, use the Drive control. We recommend starting at around 10 o'clock.
As you rotate the knob clockwise, listen to your signal until it begins to distort. The higher the setting, the more distortion you will add to your signal.
Dial the right amount of distortion until you are satisfied with your overdrive.
Go back and turn up the Master Volume to add girth to the overall tone. Notice how the amp sustains a note longer when the master is turned up.
Find your sweet spot using the Drive and Master controls. This will be a good reference for your Drive channel.
Rhythm Channel
Select the Rhythm channel by pushing the Master control in.
Next, use the Rhythm control
Rotate clockwise until the volume of the Rhythm channel is at a good level relative to the volume of the Drive channel.
Try pulling the Rhythm/Brite control to add treble, shimmer and brightness (see Pull "Brite").
Trouble Shooting Tips:
Preamp and power tubes may become microphonic and lose power over time. A few of the common symptoms are:
A high-pitched squealing sound when you turn on your amp.
A static sound when your guitar volume is turned down.
A loss of output or a muddy signal.
One simple test to determine whether your amp is experiencing preamp or power tube problems can be performed by plugging your guitar into the effects return of your amp:
If the static or squealing noise continues, then the problem is related to the power tubes or driver tube (third from left) and they should be replaced.
If the static noise goes away, then the first or second preamp tube is the culprit and should be changed. Start by replacing the first position tube, farthest to the left looking at the rear of your amp.
We suggest changing power tubes every 6 months for those who play their amp more than an hour per day 3 to 5 times a week. You can get a copy of our tube layout chart online at www.budda.com (click on Resources).
If you experience any problems other than those already mentioned above, please contact us for a consultation to determine the problem. We offer customer support between the hours of 10 a.m. and 5 p.m. Pacific Standard Time. You can reach us toll free at (877) 612-8332, or e-mail us at support@budda.com.
We are excited to be an important part of your sound. Enjoy the tones, and from all of us at Budda, "play it like it's on 11!"
Superdrive Series Rear Panels and Tube Compliment
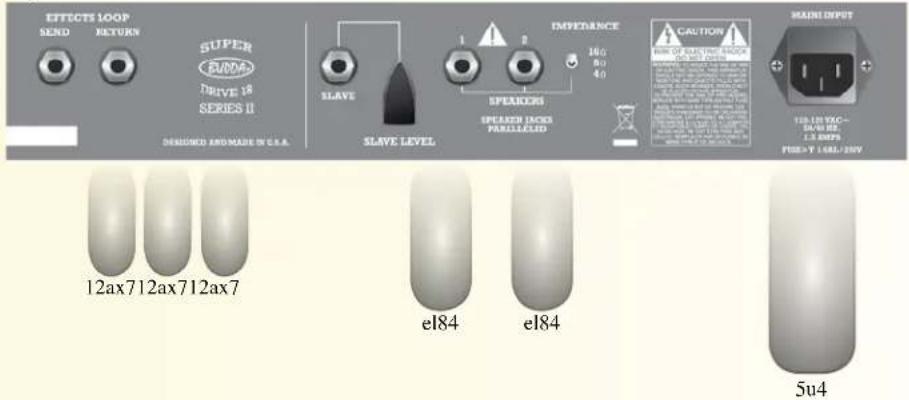
Superdrive 18 Rear Panel
text_image
EFFECTS LOOP SEND RETURN SUPER DRIVE 18 SERIES II DESIGNED ENOMADE IN U.S.A. SLAVE SLAVE LEVEL EMERIORI SPEAKER JACKS PREDUCED IMPERIENCE 160 80 40 CAUTION RUN OF ELECTRIC BLOCK ON VOLT ON 12ax712ax712ax7 el84 el84 MAIN OUTPUT USB:1.5VAC- 5.5VAC- 1.5 Mbps FIRE:Y 1.5xL/20V 5u4Superdrive 30 Rear Panel
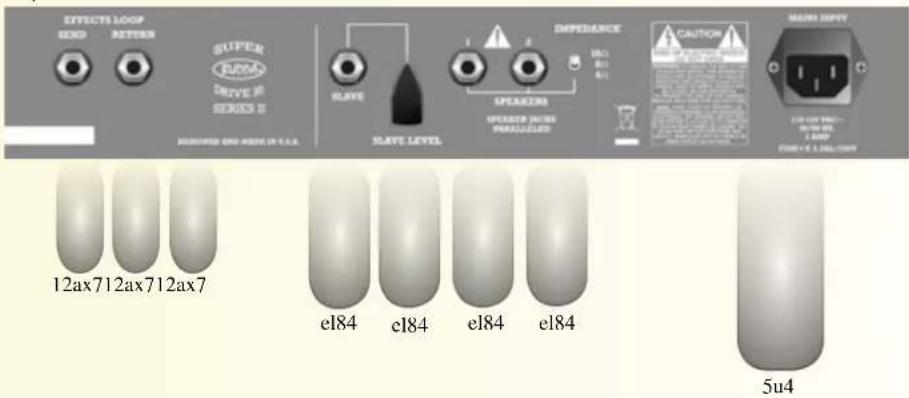
text_image
EFFECTS LOOP SEND RETURN SUPER DRUM DRIVE 30 SERIES II SHAVE LEVEL IMPEDANCE SEVEREER SPREADER INCH MANUALIDAD CAUTION MAIN SWITCH 12ax712ax712ax7 el84 el84 el84 el84 5u4Superdrive 45 Rear Panel
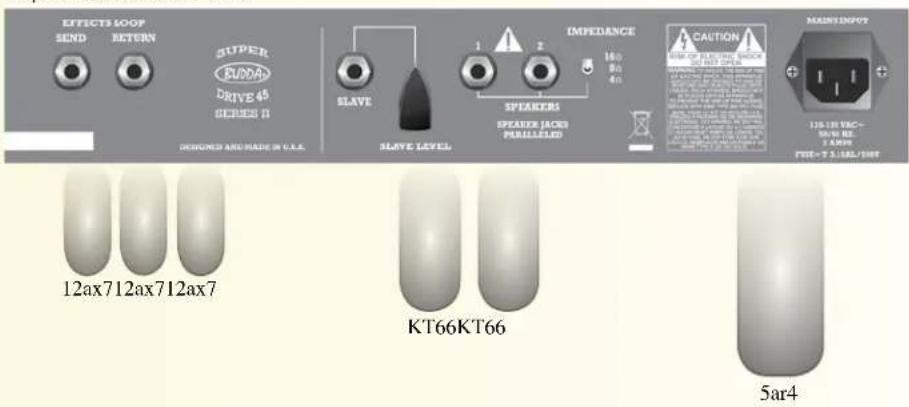
text_image
EFFECTS LOOP SEND RETURN SUPER FLUDDA DRIVE 45 SERIES II DESIGNED AND MADE IN O.A.S. SLAVE IMPEDANCE 1 2 180 8x 40 SPEAKERS SPEAKER JACKS PARALLELID CAUTION 12x18 VAC~ BOW RE T LAMP FUE= T S:LAL/SHP 12ax712ax712ax7 KT66KT66 5ar4Superdrive 80 Rear Panel
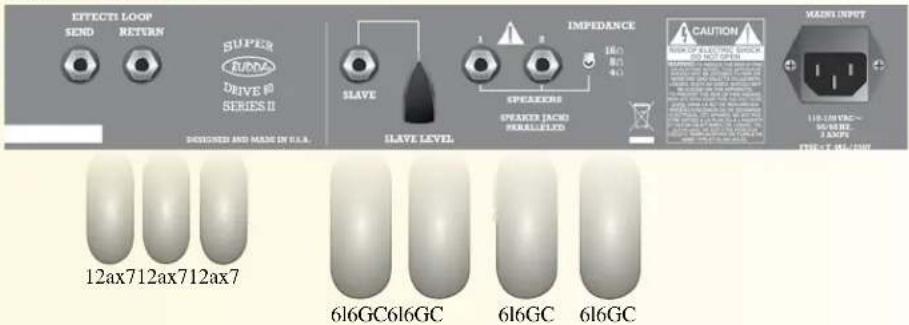
text_image
EFFECTS LOOP SEND RETURN SUPER DRIVE ID SERIES II DESIGNED AND MADE IN SLLA. IMPEDANCE 18Ω 8Ω 4Ω CAUTION MAIN INPUT 110-UNICAC~ SAVERE 2.5V TYPE OF 100-100V SLAVE SLAVE LEVEL SPEAKERS SPAKER (ACID) PARALLEL 12ax712ax712ax7 616GC616GC 616GC 616GC
text_image
BUDDA® BUDDA.COMBUDDA®
Serie Superdrive™
SD18 SD30 SD45 SD80
112 COMBO 212 COMBO HEAD
natural_image
Row of black BUDDA audio amplifiers with white buttons, arranged in a triangular pattern (no text or symbols on the devices themselves)natural_image
Row of black BUDDA audio amplifiers with white buttons, arranged in a triangular pattern (no text or symbols on the devices themselves)natural_image
Row of black BUDDA audio amplifiers with white buttons, arranged in a triangular formation (no text or symbols on the devices themselves)Budda® Superdrive™ Series - Gitarrenverstärker
natural_image
Row of black BUDDA audio amplifiers with white buttons, arranged in a triangular pattern (no text or symbols on the devices themselves)natural_image
Row of black BUDDA audio amplifiers with white buttons, arranged in a triangular pattern (no text or symbols on the devices themselves)Budda® Superdrive™ Series Amplificadores de Guitarra
natural_image
Row of black BUDDA audio amplifiers with purple buttons, arranged in a pyramid (no text or symbols on the devices themselves)Budda® Superdrive™ Series吉他放大器
natural_image
Row of black BUDDA audio amplifiers with white buttons, arranged in a pyramid (no text or symbols on the devices themselves)What This Warranty Covers
Your Budda Warranty covers defects in material and workmanship in Budda products purchased and serviced in the U.S.A. and Canada.
What This Warranty Does Not Cover
The Warranty does not cover: (1) damage caused by accident, misuse, abuse, improper installation or operation, rental, product modification or neglect; (2) damage occurring during shipment; (3) damage caused by repair or service performed by persons not authorized by Budda; (4) products on which the serial number has been altered, defaced or removed; (5) products not purchased from an Authorized Budda Dealer.
Who This Warranty Protects
This Warranty protects only the original retail purchaser of the product.
How Long This Warranty Lasts
The Warranty begins on the date of purchase by the original retail purchaser. The duration of the Warranty is as follows:
PRODUCT CATEGORY DURATION
AMPLIFIERS, OTHER THAN TUBES AND SPEAKER COMPONENTS 1 YEAR
TUBES 90 DAYS
SPEAKER COMPONENTS (INCL. SPEAKERS, BASKETS, DRIVERS, DIAPHRAGM REPLACEMENT KITS AND PASSIVE CROSSOVERS) 90 DAYS
What Budda Will Do
We will repair or replace (at Budda's discretion) products covered by warranty at no charge for labor or materials. If the product or component must be shipped to Budda for warranty service, the consumer must pay initial shipping charges. If the repairs are covered by warranty, Budda will pay the return shipping charges.
How To Get Warranty Service
(1) Take the defective item and your sales receipt or other proof of date of purchase to your Authorized Budda Dealer or Authorized Budda Service Center.
(2) Call Budda Service at (877) 612-8332 and obtain clearance to mail your amplifier to Budda.
Limitation of Implied Warranties
ANY IMPLIED WARRANTIES, INCLUDING WARRANTIES OR MERCHANTABILITY AND FITNESS FOR A PARTICULAR PURPOSE, ARE LIMITED IN DURATION TO THE LENGTH OF THIS WARRANTY.
If you live in a state that does not allow limitations on how long an implied warranty lasts, the above limitation may not apply to you.
Exclusion of Damages
BUDDA'S LIABILITY FOR ANY DEFECTIVE PRODUCT IS LIMITED TO THE REPAIR OR REPLACEMENT OF THE PRODUCT, AT BUDDA'S OPTION. IF WE ELECT TO REPLACE THE PRODUCT, THE REPLACEMENT MAY BE A RECONDITIONED UNIT. BUDDA SHALL NOT BE LIABLE FOR DAMAGES BASED ON INCONVENIENCE, LOSS OF USE, LOST PROFITS, LOST SAVINGS, DAMAGE TO ANY OTHER EQUIPMENT OR OTHER ITEMS AT THE SITE OF USE, OR ANY OTHER DAMAGES WHETHER INCIDENTAL, CONSEQUENTIAL OR OTHERWISE, EVEN IF BUDDA HAS BEEN ADVISED OF THE POSSIBILITY OF SUCH DAMAGES.
If you live in a state that does not allow the exclusion or limitation of incidental or consequential damages, the above exclusion or limitation may not apply to you.
If you have any questions about this warranty or service received or if you need assistance in locating an Authorized Service Center, contact the Budda International Service Center at (877) 612-8332.
Warranty conditions subject to change without notice.

Logo referenced in Directive 2002/96/EC Annex IV (OJ(L)37/38,13.02.03 and defined in EN 50419: 2005
The bar is the symbol for marking of new waste and is applied only to equipment manufactured after 13 August 2005

BUDDA.COM
Features and specifications are subject to change without notice
Printed in the U.S.A. • 80302603
Budda Amplification Warranty Card
Give us some information and put your warranty into effect!
Please take a few minuets to fill out this warranty card to help us get to know and serve you better.
To save time, submit your warranty registration online at budda.com click on resources / product registration
Name: Phone: ____ ____
Street Address: ____
City: State: Zip: ____ ____ ____
Email Address: ____
Product Purchased: ____
Date of Purchase:
Serial Number: ____
Purchased From:
Quality of service where purchased: ____
How did you become aware of Budda? Store □ Friend □ Mailer □
Ad
Web Site

Friend

Mailer


Improvements or suggestions of Budda products: ____
For customer service please call: Toll Free (877) 612-8332.
M-F, 8-5 p.m. Central time or email us at:
sales@budda.com

text_image
BUDDA®Thank you for taking the time to fill out our survey! Don't forget to fold and tape (with Budda address facing out), affix postage stamp and drop in the mail!

Logo referenced in Directive 2002/96/EC Annex IV (OJ(L)37/38,13.02.03 and defined in EN 50419: 2005
The bar is the symbol for marking of new waste and
is applied only to equipment manufactured after
13 August 2005
Meridian, MS 39301
412 HWY. 11/80 East
Budda Amplification

Place Postage Here