
78450 - Food Dehydrator PROCTOR SILEX - Free user manual and instructions
Find the device manual for free 78450 PROCTOR SILEX in PDF.
| Brand | Proctor Silex |
| Model | 78450 |
| Product Type | Commercial Food Dehydrator |
| Power Supply | 120 V AC, 60 Hz (standard estimate) |
| Adjustable Temperature | Yes, from 35°C to 68°C (95°F to 155°F) |
| Timer | Up to 15 hours |
| Number of Trays | 5 removable trays |
| Temperature Guide | Meat/jerky: 68°C, Fruits: 57°C, Vegetables: 52°C, Herbs: 35-52°C |
| Thermal Overload Protection | Yes, automatic shutdown in case of overheating |
| Protection Fuse | Yes, located at the back |
| Care and Cleaning | Trays washable in soapy water; interior/exterior with damp sponge; do not immerse |
| Sanitization | Removable parts sanitizable per NSF/ANSI standards |
| Dimensions | Approximately 45 x 35 x 30 cm (estimate for a commercial model) |
| Weight | Approximately 6 kg (estimate) |
| Usage | Indoor only, on stable surface, at least 30 cm from wall |
| Power Cord | Removable, with 3-prong grounding plug |
| Replacement Parts Available | Trays, tray supports, fuse |
| Customer Service | Phone: 1-866-285-1087, Email: commercial.support@hamiltonbeach.com |
Frequently Asked Questions - 78450 PROCTOR SILEX
User questions about 78450 PROCTOR SILEX
0 question about this device. Answer the ones you know or ask your own.
Ask a new question about this device
Download the instructions for your Food Dehydrator in PDF format for free! Find your manual 78450 - PROCTOR SILEX and take your electronic device back in hand. On this page are published all the documents necessary for the use of your device. 78450 by PROCTOR SILEX.
USER MANUAL 78450 PROCTOR SILEX
natural_image
Line drawing of a rectangular electronic device with ventilation slots and a door (no text or symbols)840294400
12/17
IMPORTANT: This operation manual should be reviewed with all equipment operators as part of your operator training program.
IMPORTANT SAFEGUARDS
WARNING – When using electrical appliances, basic safety precautions should always be followed to reduce the risk of fire, electric shock, and/or injury to persons, including the following:
- Read all instructions.
- This appliance is not intended for use by children or by persons with reduced physical, sensory, or mental capabilities, or lack of experience and knowledge, unless they are closely supervised and instructed concerning use of the appliance by a person responsible for their safety.
- Close supervision is necessary when any appliance is near children. Children should be supervised to ensure that they do not play with the appliance.
- Do not touch hot surfaces. Use handles or knobs. Use pot holders when removing hot racks.
- To protect against a risk of electrical shock, do not immerse cord, plug, or base in water or other liquid.
- Unplug from outlet when not in use. Unplug before putting on or taking off parts, and before servicing or cleaning. Allow to cool before cleaning.
- Do not operate any appliance with a damaged supply cord or plug, or after the appliance malfunctions or has been dropped or damaged in any manner. Supply cord replacement and repairs must be conducted by the manufacturer, its service agent, or similarly qualified
persons in order to avoid a hazard. Call the provided customer service number for information on examination, repair, or adjustment.
-
The use of accessories or accessory attachments not recommended by the appliance manufacturer may cause injuries.
-
Do not use outdoors.
-
Do not let cord hang over edge of table or counter, or touch hot surfaces.
-
Do not place on or near a hot gas or electric burner, or in a heated oven.
-
Extreme caution must be used when moving an appliance containing hot food, or hot liquids.
-
To disconnect, turn appliance OFF (☐; then remove plug from wall outlet.
-
Do not use appliance for other than intended use.
-
Make sure the detachable power cord is securely attached to the unit during operation.
-
The dehydrator must be placed with all four feet supported by a level stable surface.
-
Do not block the air vents at the rear of the appliance. Keep the dehydrator at least 12" (31.5 cm) away from any wall.
-
Do not operate the dehydrator on or near flammable materials.
SAVE THESE INSTRUCTIONS
⚠ WARNING Electrical Shock Hazard: This appliance is provided with a grounded (3-prong) plug to reduce the risk of electric shock. The plug fits only one way into a grounded outlet. Do not defeat the safety purpose of the plug by modifying the plug in any way or by using an adapter. If the plug does not fit into the outlet, have an electrician replace the outlet.
The length of the cord used on this appliance was selected to reduce the hazards of becoming tangled in or tripping over a longer cord. If a longer cord is necessary, an approved extension cord may be used. The electrical rating of the extension cord must be equal to or greater than the rating of the appliance. The extension cord must be a grounding-type, 3-wire cord. Care must be taken to arrange the extension cord so that it will not drape over the countertop or tabletop where it can be pulled on by children or accidentally tripped over.
To avoid an electrical circuit overload, do not use another high-wattage appliance on the same circuit with this appliance.
Technical Services
For assistance or replacement parts, call or e-mail
Technical Services:
866-285-1087 or
910-693-4277
commercial.support@hamiltonbeach.com
www.hamiltonbeachcommercial.com
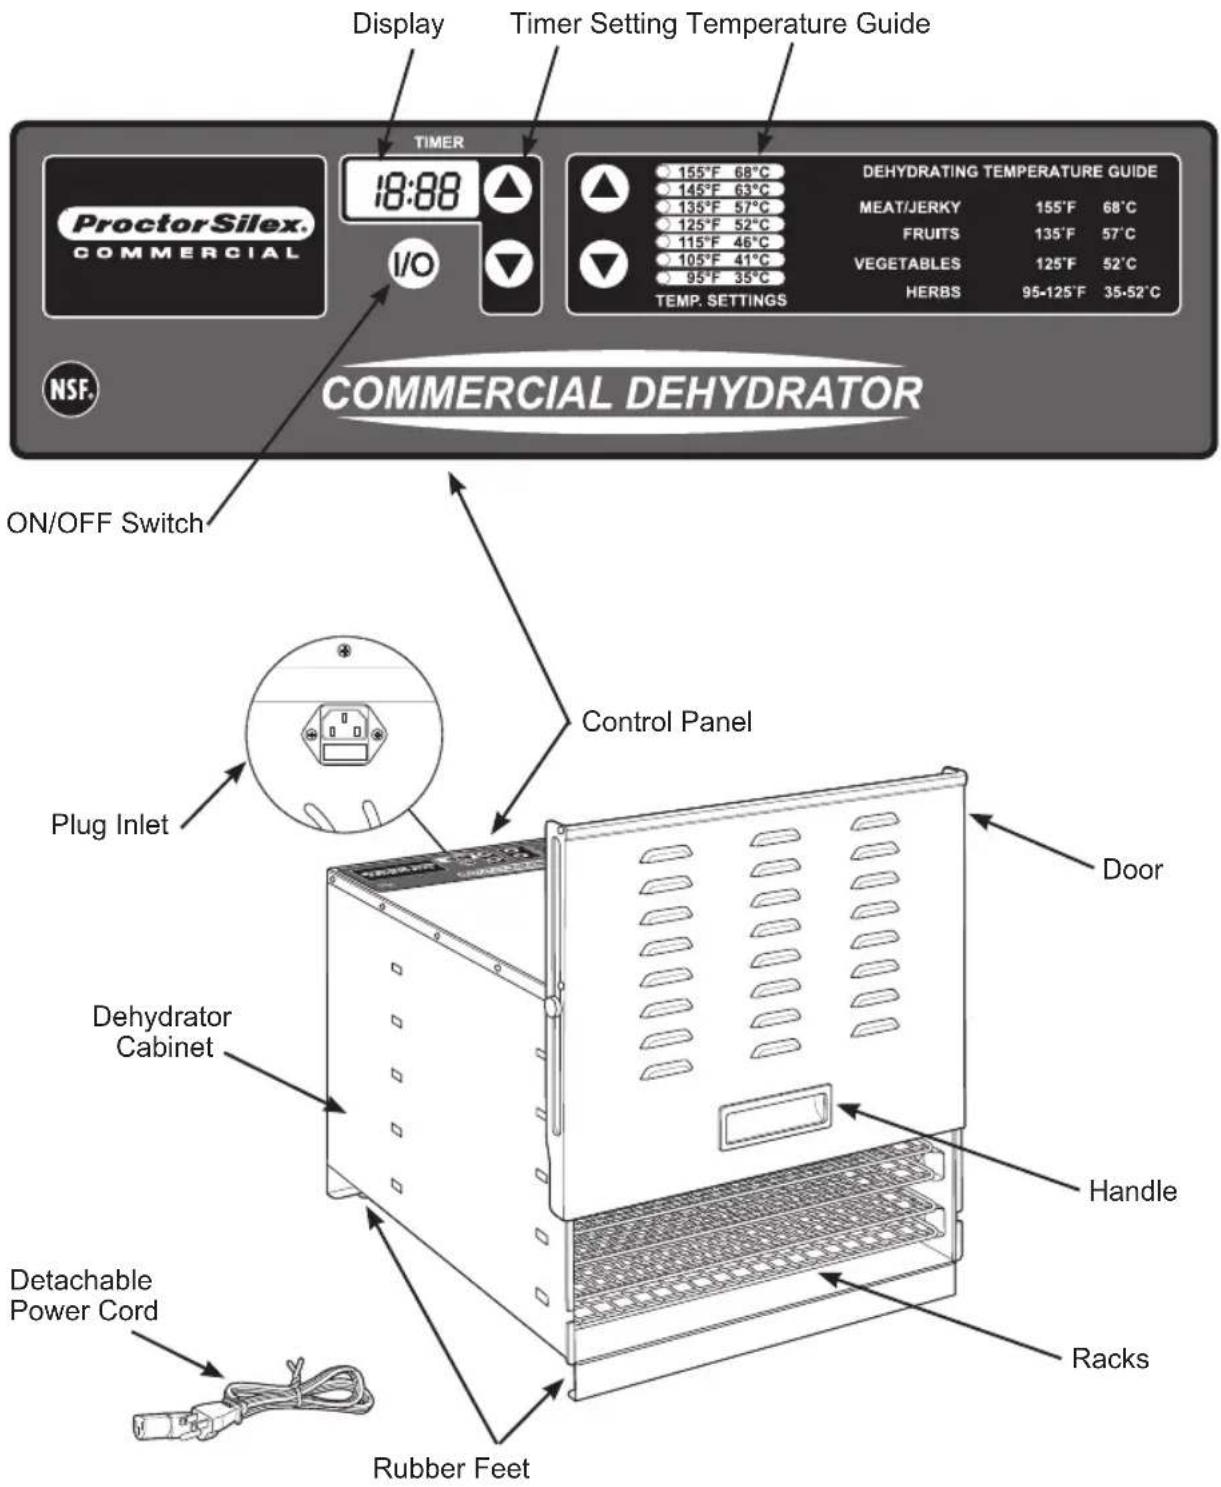
PARTS AND FEATURES
ASSEMBLY
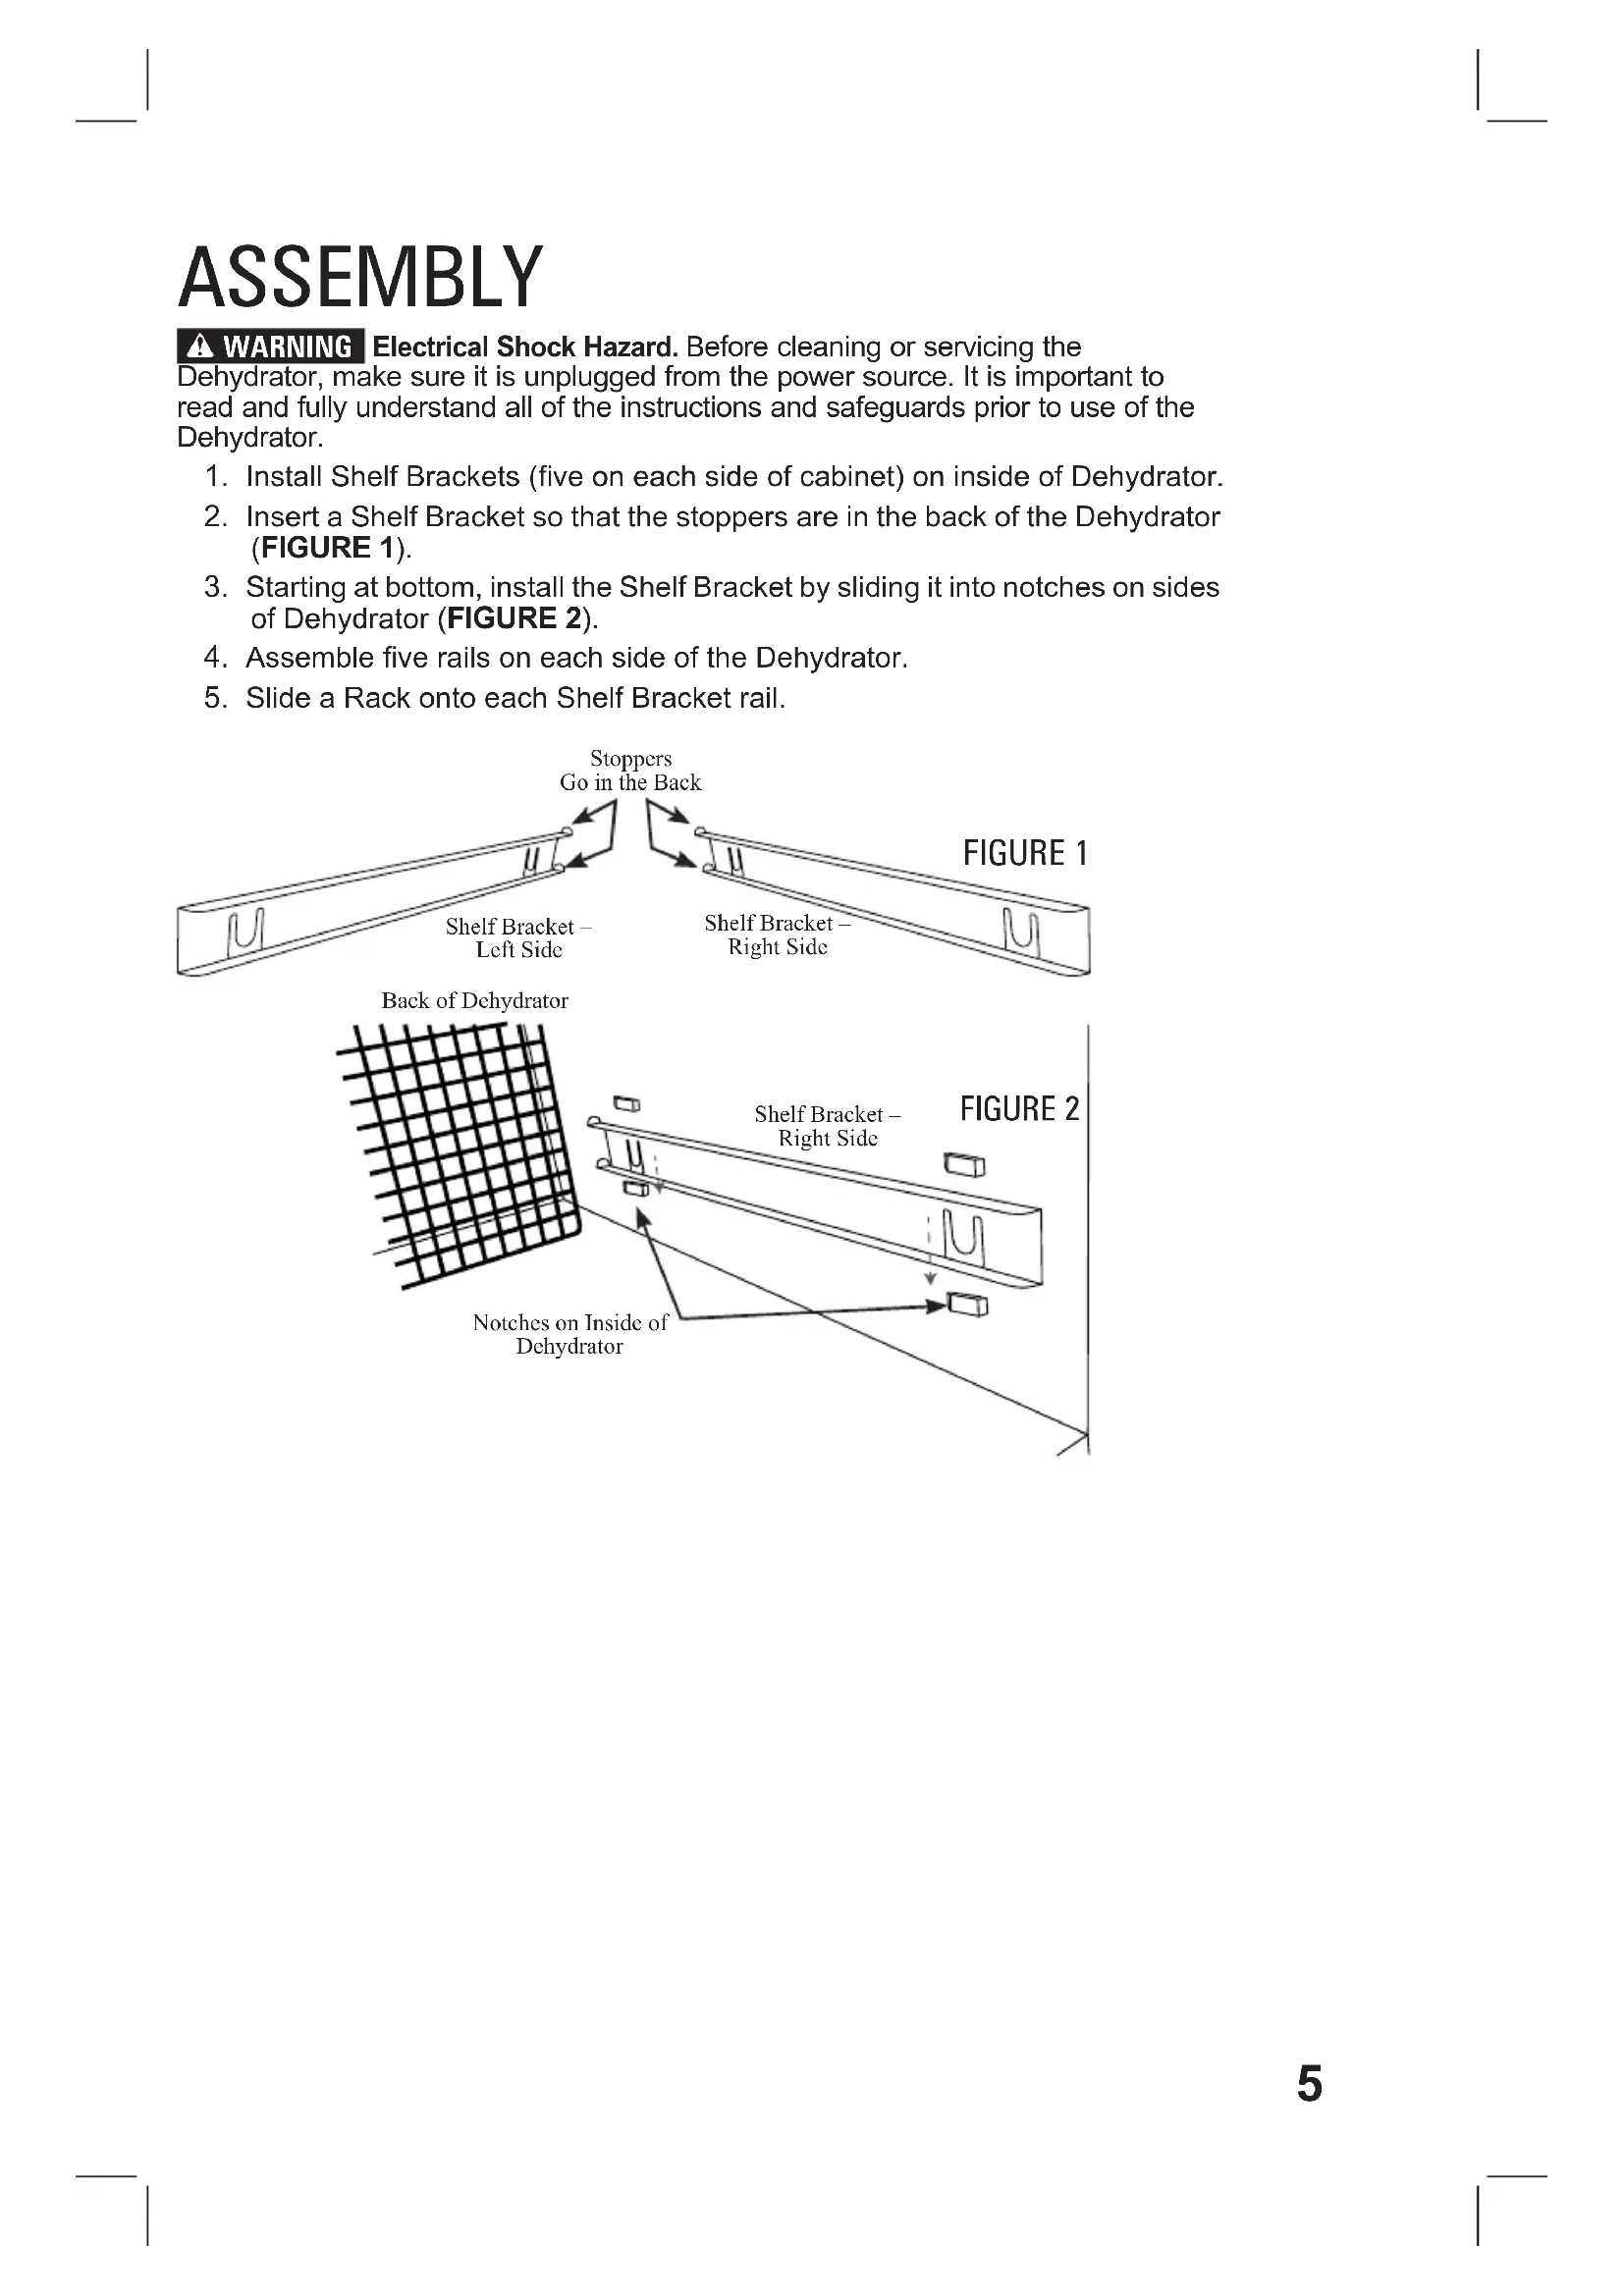
WARNING Electrical Shock Hazard. Before cleaning or servicing the Dehydrator, make sure it is unplugged from the power source. It is important to read and fully understand all of the instructions and safeguards prior to use of the Dehydrator.
- Install Shelf Brackets (five on each side of cabinet) on inside of Dehydrator.
- Insert a Shelf Bracket so that the stoppers are in the back of the Dehydrator (FIGURE 1).
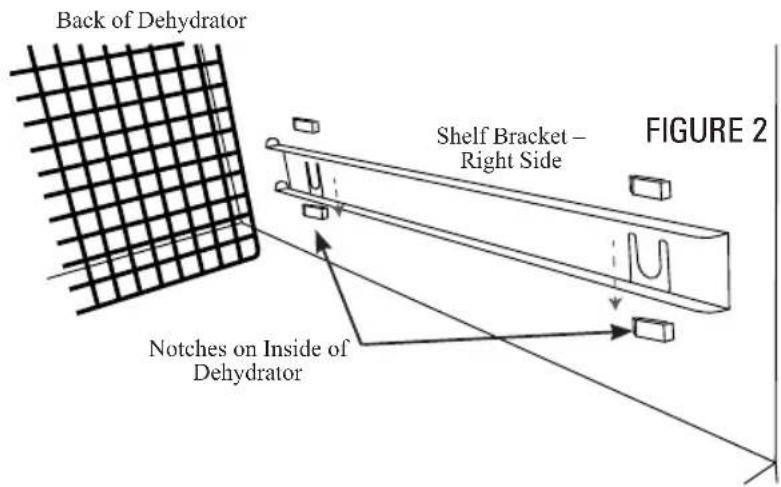
- Starting at bottom, install the Shelf Bracket by sliding it into notches on sides of Dehydrator (FIGURE 2).
- Assemble five rails on each side of the Dehydrator.
- Slide a Rack onto each Shelf Bracket rail.

OPERATING INSTRUCTIONS
Before First Use: Clean racks and inside cabinet before using dehydrator for the first time.
- Insert the connector end of the Power Cord into the Plug Inlet on the back side of the unit.
- Position the Dehydrator as to NOT block the air vents at the rear of the Dehydrator. Keep the Dehydrator at least 12" (30.5 cm) away from any wall, any combustible materials, and/or surfaces to allow for proper air circulation. DO NOT operate the Dehydrator on or near flammable surfaces such as carpeting.
- Install the Shelf Brackets. The right-side Shelf Brackets mount on the interior wall on the right side of the Cabinet. The left-side Shelf Brackets mount on the interior wall on the left side of the Cabinet. Insert the tabs on each Shelf into the corresponding slots in the interior walls. Press down on each Shelf Bracket during installation to make sure they fully seat in the slots.
To Program:
- Plug into outlet.
- Press I/ once to turn Dehydrator ON.
- Use the Temperature Guide arrows to select desired temperature setting. Light will illuminate beside selected target temperature.
- Use the Timer arrows to select desired dehydrating time. Time is displayed in hours and minutes. Dehydrator will begin to run program after any selection is made to change time. Maximum run time is 15 hours.
- NOTE: Dehydrator will begin heating after selecting
a dehydrating time. If no temperature is selected, the Dehydrator will default to the previous temperature setting.
- Remove any excess water from food (this can be done by patting food with a paper towel or napkin). Excess moisture may cause Dehydrator temperature to drop.
- Load the Racks with items to be dried. Position pieces so that they do not touch each other. Do not overlap or allow the product to touch. Allow ample space between the products for proper air circulation. Unused Racks do not need to be installed.
- Water droplets may form on the surface of some products while dehydrating. Periodically blot the product with a clean paper towel. NOTE: Drying times may vary based on many circumstances, including but not limited to the relative humidity of the room, the temperature of the food at the beginning of the drying process, the amount of food in the Dehydrator, and the leanness of the meat.
- Make sure the sides of the Door are securely closed against the front of the Cabinet. Be careful when opening the Door during operation. The Dehydrator may become hot depending on the temperature setting.
- Check foods to make sure they are completely dry before removing. Open or cut through the middle of a few samples to check internal dryness. If the food is still moist, dehydrate longer.

FIGURE 3
THERMAL OVERLOAD PROTECTOR
This unit features a thermal overload protector. If unit overheats, it will shut off automatically. Contact Technical Services for service.
FUSE
This unit includes a fuse on the back side of the unit to protect electric components from damage and overheating. In the event that the dehydrator stops functioning or will not maintain its temperature consistently, you make need to check the fuse.
- Turn the ON/OFF Switch OFF (☐ Unplug power cord.
- Allow the Dehydrator to completely cool before attempting to move the Dehydrator to access the back of the unit.
- Unscrew the fuse and inspect the fuse to check for signs of burning or damage.
- If you suspect the fuse is damaged, please call Customer Service for a replacement fuse.
CLEANING INSTRUCTIONS
WARNING Electrical Shock Hazard. Before cleaning or servicing the
Dehydrator, make sure it is unplugged from the power source. It is important to read and fully understand all of the instructions and safeguards prior to use of the Dehydrator.
- Clean Racks and inside Cabinet before using Dehydrator for the first time and after each use.
- Turn ON/OFF Switch OFF (☐ Unplug.
- Allow Dehydrator to completely cool before cleaning.
- Remove Racks from Cabinet.
- Wipe the Cabinet clean, inside and out, with damp sponge or soft cloth. Be careful not to splash water onto heating element (located behind the screening and fan in the back of the Cabinet) while cleaning inside of Cabinet. Water could damage the heating element and increases the risk of electric shock. DO NOT immerse the Dehydrator in water.
- Clean Racks with warm, soapy water. Rinse with clear water and dry immediately.
SANITIZING
- Sanitize removable dehydrator parts daily.
- Sanitize parts in accordance to NSF/ANSI standards.
- After unplugging unit, wipe exterior with soft cloth, wet with water and a mild detergent. Repeat with a clean, soft, damp cloth and dry.
“Y” y/o “MX” y/o “MXY” y/o “Z”.
ProctorSilex®
COMMERCIAL
4421 Waterfront Drive
Glen Allen, VA 23060
www.hamiltonbeachcommercial.com
840294400
12/17


Brand : PROCTOR SILEX
Model : 78450
Category : Food Dehydrator