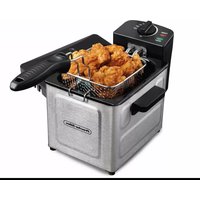
35041 - Deep fryer PROCTOR SILEX - Free user manual and instructions
Find the device manual for free 35041 PROCTOR SILEX in PDF.


| Product Type | Deep Fryer |
| Brand | Proctor Silex |
| Model | 35041 |
| Capacity | 2 liters (approximately 8 cups) |
| Power | 1500 watts |
| Temperature Range | 175°C to 190°C (350°F to 375°F) |
| Adjustable Thermostat | Yes |
| Frying Basket | Removable, with handle |
| Lid | Yes, with viewing window |
| Indicator Lights | Power and ready lights |
| Cool-Touch Handles | Yes |
| Non-Stick Interior | Yes |
| Filter | Permanent, washable |
| Cord Storage | Yes, under base |
| Dimensions (L x W x H) | 10.5 x 9.5 x 8.5 inches (approximately 26.7 x 24.1 x 21.6 cm) |
| Weight | 4.5 pounds (approximately 2 kg) |
| Power Cord Length | 30 inches (approximately 76 cm) |
| Dishwasher-Safe Parts | Basket and lid are dishwasher safe |
| Cleaning | Wipe exterior with damp cloth; interior wipe with paper towel |
| Safety Features | Automatic shutoff, cool-touch handles, non-slip feet |
| Replacement Parts Available | Basket, lid, filter |
| Warranty | 1 year limited |
| Manual Languages | English, Spanish, French |
| UPC | Not specified |
Frequently Asked Questions - 35041 PROCTOR SILEX
User questions about 35041 PROCTOR SILEX
0 question about this device. Answer the ones you know or ask your own.
Ask a new question about this device
Download the instructions for your Deep fryer in PDF format for free! Find your manual 35041 - PROCTOR SILEX and take your electronic device back in hand. On this page are published all the documents necessary for the use of your device. 35041 by PROCTOR SILEX.
USER MANUAL 35041 PROCTOR SILEX
When using electrical appliances, basic safety precautions should always be followed to reduce the risk of fire, electric shock, and/or injury to persons, including the following:
- Read all instructions.
- This appliance is not intended for use by persons (including children) with reduced physical, sensory, or mental capabilities, or lack of experience and knowledge, unless they are closely supervised and instructed concerning use of the appliance by a person responsible for their safety.
- Close supervision is necessary when any appliance is used by or near children. Children should be supervised to ensure that they do not play with the appliance.
- Do not touch hot surfaces. Use handles or knobs.
- To protect against risk of electric shock, do not immerse cord, plugs, or heating element assembly in water or other liquid.
- Be sure handle is properly assembled to basket and locked into place. See detailed assembly instructions.
- Unplug from outlet when not in use and before cleaning. Allow to cool before putting on or taking off parts and before cleaning the appliance.
- Do not operate any appliance with a damaged cord or plug, or after the appliance malfunctions or has been damaged in any manner. Call our toll-free customer service number for information on examination, repair, or adjustment.
- The use of accessory attachments not recommended or sold by the appliance manufacturer for use with this model may cause injuries.
- Do not use outdoors.
- Do not let cord hang over edge of table or counter or touch hot surfaces.
- Do not place on or near a hot gas or electric burner, or in a heated oven.
-
Never move deep fryer containing hot oil.
-
Always attach plug to appliance first; then plug cord in the wall outlet. To disconnect, turn any control to OFF (O) and remove plug from wall outlet.
- Do not use appliance for other than intended purpose.
- To reduce the risk of injury, NEVER fill oil above MAX fill mark.
- Always ensure removable pot is filled to at least MIN level when using oil.
- Never leave appliance unattended while in use.
- Always dry foods and remove ice before frying.
- Always dry deep fryer components thoroughly after cleaning and before frying.
- Always fry with lid in place.
- Do not use refrigerated oil.
- Never block vent on lid. Be aware of steam emitting from vent.
- Escaping steam may cause burns to hands or fingers. Open the lid carefully.
- Always raise frying basket, rest on basket drain bracket, and allow food to drain before removing the frying basket from the removable oil pot.
SAVE THESE INSTRUCTIONS!
Other Consumer Safety Information
This product is intended for household use only.
This product is only intended for the preparation, cooking, and serving of foods. This product is not intended for use with any nonfood materials or products.
WARNING
Electrical Shock Hazard: This product is
provided with a polarized plug (one wide blade) to reduce the risk of electric shock. The plug fits only one way into a polarized outlet. Do not defeat the safety purpose of the plug by modifying the plug in any way or by using an adapter. If the plug does not fit fully into the outlet, reverse the plug. If it still does not fit, have an electrician replace the outlet.
WARNING
Burn Hazards:
- Hot liquid will splash if you miss the drain bracket and accidentally drop the frying basket into the hot liquid. Do not lean over the deep fryer when the lid is off.
- Serious hot-oil burns may result from a deep-fat fryer being pulled off a countertop. Do not allow the cord to hang over the edge of the counter where it may be grabbed by children or become entangled with the user. Do not use with an extension cord.
Parts and Features
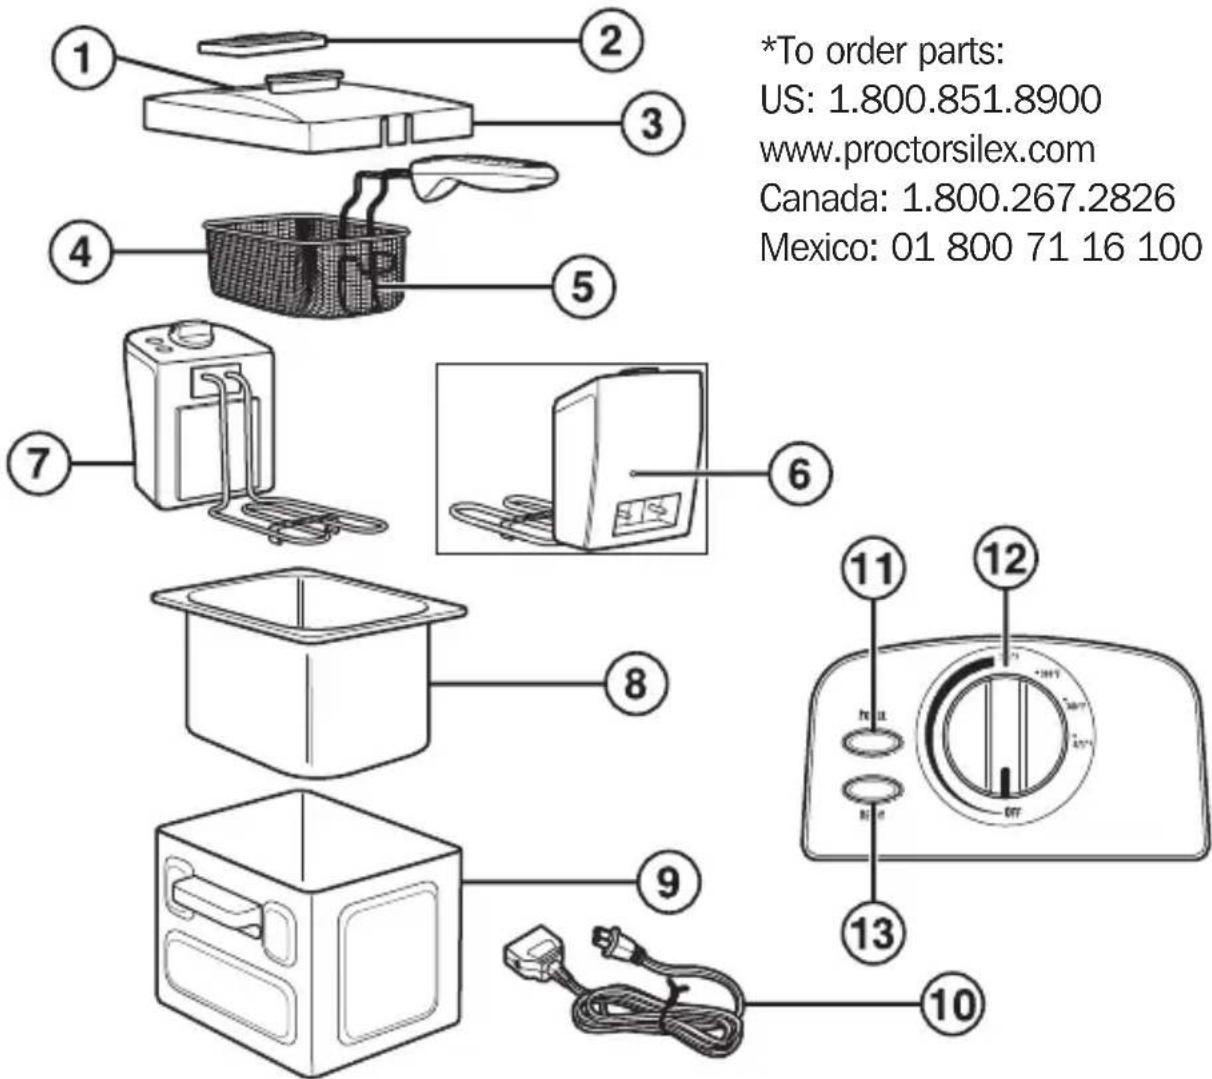
- Steam Vent
- Removable Vent Cover*
- Removable Lid*
- Frying Basket With Removable Handle*
- Basket Drain Bracket
-
Reset Button
-
Heating Element Assembly
- Removable Oil Pot*
- Base*
- Magnetic Cord Assembly*
- Power ON Light
- Adjustable Thermostat
- Ready-to-Cook Light
How to Assemble the Fryer
- Place base on a stable, flat surface.
- Insert oil pot into base.
- Align grooves of heating element assembly with grooves on base. Push down on heating element assembly to connect it to base.
NOTE: Heater cannot be turned on unless correctly installed on base.
-
To assemble handle, squeeze tines of handle together.
-
Align tines with round holes on metal bracket of basket.
-
Release tines to allow them to spread and then pull handle back to lock into metal bracket.
For storage: Push handle into basket and squeeze tines together to remove handle.
- Align removable vent cover with metal grease screen and snap into place.

natural_image
Diagram of a kitchen appliance with a downward arrow indicating a process or operation (no text or symbols present)
natural_image
Illustration of a hand pouring liquid into a basket with arrows indicating flow direction (no text or symbols)
natural_image
Illustration of a hand pouring liquid into a basket with arrows indicating flow direction (no text or symbols)
natural_image
Line drawing of a washing machine with a downward arrow indicating a drop or action (no text or symbols present)Frying
WARNING Burn Hazard.
- Never fill oil above MAX fill mark.
- Never move fryer when it is in operation or when fryer contains hot oil.
- Never leave fryer unattended while in use.
- Remove as much moisture from food as possible. Do not add water or ice to oil.
- Escaping steam may cause burns to hands or fingers. Open lid carefully.
- Failure to follow these instructions may result in serious burns since hot oil may spill from fryer.
BEFORE FIRST USE: Thoroughly clean and dry fryer. See "Cleaning Your Fryer" on page 11.
- Place assembled fryer on stable, level, heat-resistant surface out of reach of children.
- Lift lid to open.
- Remove basket from fryer.
- Fill fryer with a minimum of 4 cups (946 ml) to a maximum of 6 cups (1.4 L) of oil to top indicator mark on removable oil pot.
NOTE: Never operate unit without oil in pot or unit will exceed temperature limit and will require resetting.
Frying (cont.)
- Make sure fryer is turned to OFF (O). Attach magnetic end of cord assembly to fryer socket. Magnetic end of cord will only go in one way. Be careful not to disturb magnetic connection when plugging cord into electrical outlet.

natural_image
Diagram showing a computer interface with an inserted port and cable (no text or symbols)NOTE: The low magnetic force allows the cord to “break away” which prevents unit from accidentally being pulled off a countertop.
- Close lid. Plug in unit. Set Thermostat to desired setting. Preheat fryer until Ready-to-Cook Light comes on (6 to 10 minutes). For more information on temperature selection, check food package or Frying Chart on page 10.
Ready-to-Cook Light will come on when oil has reached preset temperature.
- To fry unbattered food, place food in basket and proceed with Step 8.
To fry battered foods (such as tempura batter), lower basket into oil and then carefully place food directly into oil. Replace lid. Proceed to Step 9.
NOTE: For best results and to ensure that food is properly cooked, fry in a single layer. See Frying Chart on page 10.
Frying (cont.)
- Carefully place basket in fryer. Close lid.
NOTE: Never operate unit without oil in pot or unit will exceed temperature limit and will require resetting by pushing the red reset button.
- When frying is done, remove lid, raise basket, and hook over removable oil pot to drain.

natural_image
Illustration of a hand using a griddle to clean food from a microwave oven using a pan (no text or symbols)NOTE: Do not allow condensation to drain into oil pot while removing lid or while unit is off.
-
Carefully empty food from basket and place in a bowl or colander lined with paper towel. Fill and repeat as needed.
-
Turn adjustable thermostat to OFF (O) and unplug appliance after use. Place lid on the removable oil pot and allow to cool.
FRYING TIP: Ready-to-Cook Light may go out after frying a batch of food. When oil has reached selected temperature, Ready-to-Cook Light will come back on. Unit is now ready to fry next batch of food.
Frying Chart
| FOOD | FRYING TEMPERATURE COOKING TIMES | INTERNAL TEMP/ DONENESS |
| Frozen French Fries 375°F (191°C) 2 to 3 minutes Brown and crisp | ||
| Fresh-Cut French Fries 375°F (191°C) 7 to 8 minutes Brown and crisp | ||
| Frozen Onion Rings 375°F (191°C) 2 to 3 minutes Brown and crisp | ||
| Frozen Fish Sticks 350°F (177°C) 2 to 3 minutes 145°F (63°C) | ||
| Frozen Butterflied Shrimp 350°F (177°C) 3 to 4 minutes 145°F (63°C) | ||
| Frozen Precooked Chicken Tenders | 375°F (191°C) 3 to 5 minutes 165°F (74°C) | |
| Frozen Precooked Chicken Wing Pieces | 375°F (191°C) 8 to 10 minutes 165°F (74°C) | |
| Fresh Chicken Wing Pieces | 375°F (191°C) | 7 to 9 minutes 165°F (74°C) |
NOTES:
- Length of cooking time and temperature may vary based on batch size and weight.
- For best results, fry a single layer of food for each batch.
- Frozen, uncooked chicken should be thawed, excess water removed, and patted dry with paper towel prior to cooking.
- See “Frying Tips” on page 12 for more information to obtain best results.
• Always follow package directions. - When cooking meat, poultry, or fish, use cooking thermometer to determine internal temperatures.
- Visit foodsafety.gov for more information on safe internal cooking temperatures.
Cleaning Your Fryer
⚠ WARNING Burn Hazard. To avoid eruptions and/or splatter of hot oil, dry all fryer components thoroughly before using.
- Unplug from wall outlet.
- Wait until oil has cooled. This can take several hours.
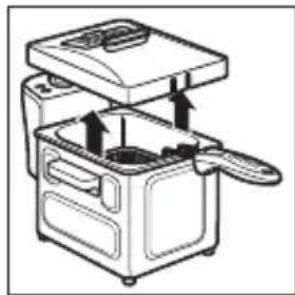
- Remove lid; then remove basket from fryer.
- Remove heating element assembly from base and hook onto oil pot to drain.
- Do not immerse heating element assembly in water.
NOTE: To avoid damaging fryer, use care when cleaning heating element assembly.
natural_image
Diagram of a food processor with open lid and handle, showing internal components (no text or symbols)Gently wipe with soft cloth dampened with hot, soapy water.
-
Lift oil pot from base and pour out oil. Wipe all excess oil or oil film from oil pot.
-
Clean base and oil pot with hot, soapy water. Oil pot, basket, and lid assembly may be washed in a dishwasher.
-
Remove vent cover and wash it in hot, soapy water. Dry thoroughly.
-
Clean lid and basket in hot, soapy water. Position lid vertically to drain and allow to dry thoroughly.

natural_image
Simple line drawing of a folded paper or sheet with a handle, no text or symbols presentFrying Tips
Selecting and Changing the Frying Oil
- Use a good quality vegetable or peanut oil.
- Frying foods in butter, margarine, olive oil, or animal fat is NOT recommended because of low-temperature smoke point.
• DO NOT mix two types of oil. - Change oil regularly to maintain optimum frying and flavor quality.
- Oil used for french fries can be used 10 to 12 times before changing if oil is filtered after each use. Oil used for food that is high in protein (such as meat or fish) should be changed more often.
- To filter oil, allow oil to completely cool. Cheesecloth or paper towel may be used as a filter to strain oil.
• Always follow food package directions. - DO NOT add fresh oil to used oil.
- Always change the oil if it starts to foam when heated, when it has a strong smell or taste, or when it turns dark and/or syrupy.
Before Frying
- Excess water or ice particles can cause hot oil to splatter or foam. Remove any excess water from fresh food by blotting with a paper towel. Remove any ice chunks or buildup from frozen foods.
Frying Tips (cont.)
General Tips
- DO NOT use plastic utensils in hot oil.
- Season food AFTER frying.
- If food is not as crisp as desired, reduce batch size.
Disposing of Oil
- Pour cool oil into its original (resealable) empty plastic bottle.
Basket Usage With Freshly Battered Foods
- Freshly battered foods should be carefully placed directly into oil. First, lower basket completely and then carefully place each piece of battered food into hot oil. Use basket to remove fried battered foods.
Storage
- Basket handle can be disassembled from the basket. Place oil pot in base and then place basket, basket handle, and power cord in oil pot.
- It is best to store all oils in a cool, dark, dry place for up to six months.
IF YOU LIVE IN A HIGH-ALTITUDE AREA:
The Extension service will have detailed information about cooking for your area. To locate the Cooperative Extension service in your county, please visit: http://www.csrees.usda.gov/Extension.
Troubleshooting Tips
PROBLEM THINGS TO CHECK
| Fried food does not have a golden-brown color and/or is not crispy. | Selected temperature is too low or food has not been fried long enough. Check food package or Frying Chart on page 10 for correct temperature or preparation time.There is too much food in basket. Never fry too much food at one time. See food package or recipe for correct frying amount. Food pieces may be too thick to fry adequately.Volume of oil is too low. |
| Fryer gives off a strong, unpleasant odor. | Oil isn’t fresh. Change oil. Filter oil regularly to keep it fresh longer.When frying food with a high moisture content (such as chicken or fries), change oil frequently.Type of oil is not suitable for deep-frying food. Use good quality frying oil. Do not mix two different types of oil or fat. |
| Unit does not heat. | Ensure magnetic cord assembly is properly attached to fryer socket.Ensure electrical cord assembly is plugged into electrical outlet.Heating element assembly not correctly assembled. Make sure heating element assembly is properly installed on base. See “How to Assemble the Fryer” on page 6.Press Reset button on heating element assembly. Make sure fryer has recommended amount of oil in oil pot. |
Troubleshooting Tips (cont.)
PROBLEM THINGS TO CHECK
| During frying, the oil spills over the edge of the fryer. | There is too much oil in fryer. Make sure that oil does not exceed maximum level mark.Basket/food immersed too quickly. Carefully raise basket out of oil.Food contains too much liquid or coated with ice crystals. Dry food thoroughly before placing it in fryer. Follow instructions in “Frying” section on page 7.When frying food with a high moisture content (such as chicken or fries), change oil frequently.There is too much food in frying basket. |
| Oil foams too much during frying. | Food contains too much liquid or coated with ice crystals. Dry food thoroughly before placing it in fryer.When frying food with a high moisture content (such as chicken or fries), change oil frequently.Type of oil is not suitable for deep-frying food. Use good quality frying oil. Do not mix two different types of oil or fat.Basket/food immersed too quickly. Carefully raise basket out of oil.The use of refrigerated oil may cause excessive splattering. Use room-temperature oil.Oil pot has not been cleaned properly. See instructions in the “Cleaning Your Fryer” section on page 11. |
| Oil film buildup on oil pot. | Use plastic scouring pad to clean.To clean oil residue from oil pot, use a household degreaser. |
LIMITED WARRANTY
This warranty applies to products purchased and used in the U.S. and Canada. This is the only express warranty for this product and is in lieu of any other warranty or condition.
This product is warranted to be free from defects in material and workmanship for a period of one (1) year from the date of original purchase. During this period, your exclusive remedy is repair or replacement of this product or any component found to be defective, at our option; however, you are responsible for all costs associated with returning the product to us and our returning a product or component under this warranty to you. If the product or component is no longer available, we will replace with a similar one of equal or greater value.
This warranty does not cover glass, filters, wear from normal use, use not in conformity with the printed directions, or damage to the product resulting from accident, alteration, abuse, or misuse. This warranty extends only to the original consumer purchaser or gift recipient. Keep the original sales receipt, as proof of purchase is required to make a warranty claim. This warranty is void if the product is used for other than single-family household use or subjected to any voltage and waveform other than as specified on the rating label (e.g., 120V \~ 60 Hz).
We exclude all claims for special, incidental, and consequential damages caused by breach of express or implied warranty. All liability is limited to the amount of the purchase price. Every implied warranty, including any statutory warranty or condition of merchantability or fitness for a particular purpose, is disclaimed except to the extent prohibited by law, in which case such warranty or condition is limited to the duration of this written warranty. This warranty gives you specific legal rights. You may have other legal rights that vary depending on where you live. Some states or provinces do not allow limitations on implied warranties or special, incidental, or consequential damages, so the foregoing limitations may not apply to you.
To make a warranty claim, do not return this appliance to the store. Please call 1.800.851.8900 in the U.S. or 1.800.267.2826 in Canada or visit proctorsilex.com in the U.S. or proctorsilex.ca in Canada. For faster service, locate the model, type, and series numbers on your appliance.
PRÉCAUTIONS IMPORTANTES
natural_image
Diagram of a kitchen appliance with a downward arrow indicating a component (no text or symbols present)
natural_image
Illustration of a hand pouring liquid into a basket with arrows indicating flow direction (no text or symbols)
natural_image
Illustration of a hand pouring liquid into a woven basket with arrows indicating flow direction (no text or symbols)
natural_image
Line drawing of a device with a handle and arrow indicating downward motion (no text or symbols)Friture
⚠ AVERTISSEMENT Risque de brûlure.
natural_image
Diagram showing a computer interface with an inserted port and cable (no text or symbols)natural_image
Illustration of a hand using a griddle to clean food from a microwave oven using a pan (no text or symbols)natural_image
Diagram of a food processing machine with arrows indicating internal components (no text or symbols)natural_image
Simple line drawing of a 3D geometric shape with a curved cutout (no text or symbols)natural_image
Line drawing of a kitchen appliance with a downward arrow indicating a component (no text or symbols)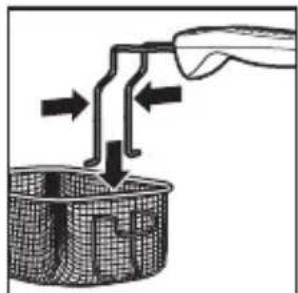
natural_image
Illustration of a hand pouring liquid into a basket with arrows indicating flow direction (no text or symbols)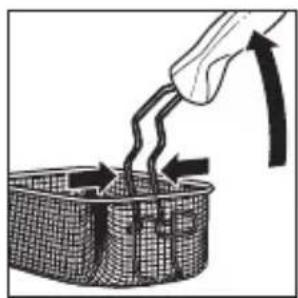
natural_image
Illustration of a hand pouring liquid into a woven basket with arrows indicating flow direction (no text or symbols)
natural_image
Line drawing of a food processor with a downward arrow indicating a drop or action (no text or symbols present)Cómo Freír
ADVERTENCIA
natural_image
Diagram showing a computer interface with an inserted port and cable (no text or symbols)natural_image
Illustration of a hand pouring liquid into a square griddle on a kitchen appliance (no text or symbols)natural_image
Illustration of a food processor with internal components and directional arrows indicating flow (no text or symbols)natural_image
Simple line drawing of a 3D geometric shape with a curved surface and a diagonal line, no text or symbols present.Mixcoac MEXICO 03910 D.F.
Tel: 01 55 5563 8723
Fax: 01 55 5615 1856
Jalisco

- SAVE THESE INSTRUCTIONS!
- Other Consumer Safety Information
- WARNING
- Electrical Shock Hazard: This product is
- Burn Hazards:
- Parts and Features
- How to Assemble the Fryer
- Frying
- WARNING Burn Hazard.
- Frying (cont.)
- NOTES:
- Cleaning Your Fryer
- Frying Tips
- Selecting and Changing the Frying Oil
- Before Frying
- Frying Tips (cont.)
- General Tips
- Disposing of Oil
- Basket Usage With Freshly Battered Foods
- Storage
- IF YOU LIVE IN A HIGH-ALTITUDE AREA:
- Troubleshooting Tips
- PROBLEM THINGS TO CHECK
- Troubleshooting Tips (cont.)
- LIMITED WARRANTY
- PRÉCAUTIONS IMPORTANTES
- Friture
- ⚠ AVERTISSEMENT Risque de brûlure.
- Cómo Freír
- ADVERTENCIA
- Jalisco
Brand : PROCTOR SILEX
Model : 35041
Category : Deep fryer