
VSTV2B2 - TV Stand SANUS - Free user manual and instructions
Find the device manual for free VSTV2B2 SANUS in PDF.

| Product Type | TV Stand |
| Brand | Sanus |
| Model | VSTV2B2 |
| Screen Compatibility | 40'' to 86'' (102 - 218 cm) |
| Maximum Supported Weight (TV + accessories) | 56.6 kg (125 lb) |
| Height Adjustment | Yes, adjustable vertical support |
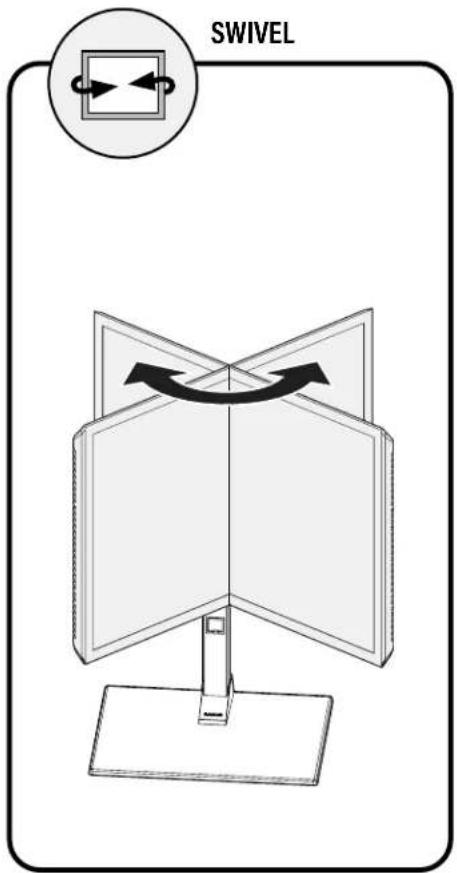
| Orientation | Swivel (swiveling head) |
| Cable Management | Integrated (cable routing) |
| Main Material | Steel |
| Dimensions (approx.) | Adjustable height, wide base for stability |
| Stand Weight | Not specified (estimated ~15 kg) |
| Installation | Requires assembly, tools not included |
| Maintenance | Clean with a soft, dry cloth |
| Safety | Do not exceed maximum weight; secure firmly; keep out of reach of children |
| Spare Parts | Not available (product not user-serviceable) |
| Warranty | Contact SANUS customer service |
Frequently Asked Questions - VSTV2B2 SANUS
User questions about VSTV2B2 SANUS
0 question about this device. Answer the ones you know or ask your own.
Ask a new question about this device
Download the instructions for your TV Stand in PDF format for free! Find your manual VSTV2B2 - SANUS and take your electronic device back in hand. On this page are published all the documents necessary for the use of your device. VSTV2B2 by SANUS.
USER MANUAL VSTV2B2 SANUS
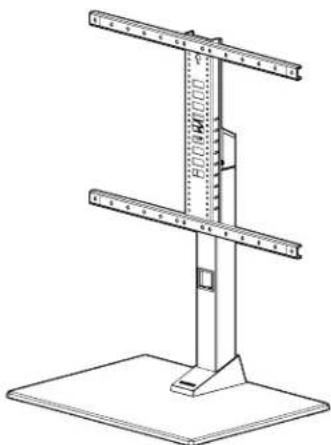
VSTV2-B2 Swivel TV Base INSTRUCTION MANUAL
WE'RE HERE TO HELP
Want to watch a video that shows how easy this DIY project will be?
Watch it now at: SANUS.com/3093

Our install experts are standing by to help.
Call us at:
US: +1 (800) 359-5520
EMEA: +31 (0) 495 580 852
UK: +44 (0) 800 056 2853
IMPORTANT SAFETY INSTRUCTIONS
- PLEASE READ MANUAL PRIOR TO USE - SAVE THESE INSTRUCTIONS
AUTION: Avoid potential personal injuries and property damage!
CAUTION: Manufacturer is not responsible for damage or injury caused by incorrect assembly or use.
WARNING: Exceeding the weight capacity can result in serious personal injury or damage to equipment! It is the installer's responsibility to make sure the weight of the display (including accessories) does not exceed 125 lbs (56.6 kg). Use with heavier televisions may result in instability causing tip over resulting in death or serious injury!
WARNING: Use this mounting system only for its intended use as described in these instructions. Do not use attachments not recommended by the manufacturer.
WARNING: Death or serious injury may occur when children climb on audio and/or video equipment furniture. A remote control or toys placed on the furnishing may encourage a child to climb on the furnishing and as a result the furnishing may tip over onto the child.
WARNING: Relocating audio and/or video equipment to furniture not specifically designed to support audio and/or video equipment may result in death or serious injury due to the furnishing collapsing or overturning onto a child.
NOTE: This product supports TVs from 40 in. to 86 in. (diagonal).
NOTE: This product has no user serviceable parts.
Please read through these instructions completely to be sure you're comfortable with this easy install process. Also check your TV owner's manual to see if there are any special requirements for mounting your TV.
If you do not understand these instructions or have doubts about the safety of the installation, assembly or use of this product, contact Customer Service.
TV Weight Limit
(including accessories)
DO NOT EXCEED
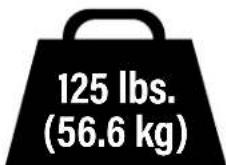
If your TV (plus accessories) weighs MORE, this mount is NOT compatible.
Visit SANUS.com or call customer service to find a compatible mount.
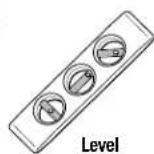
Tools Needed

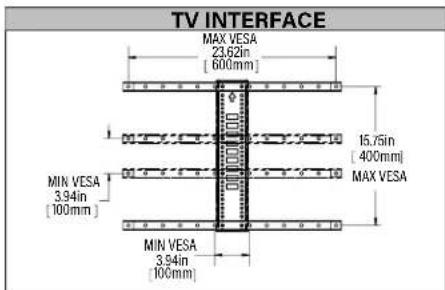
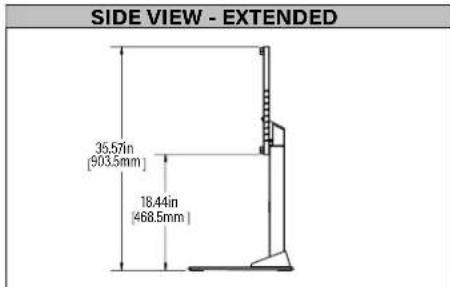
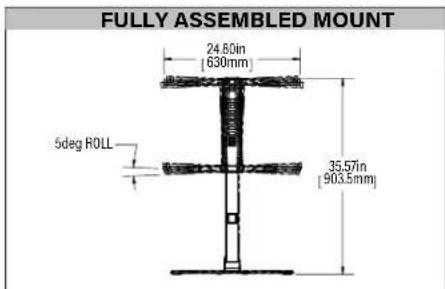
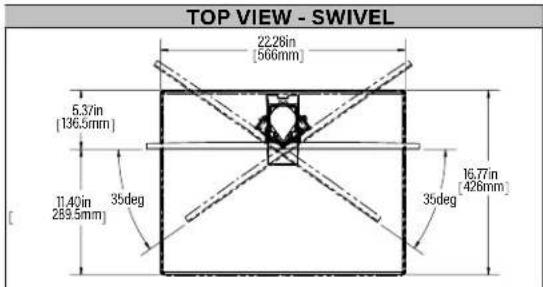
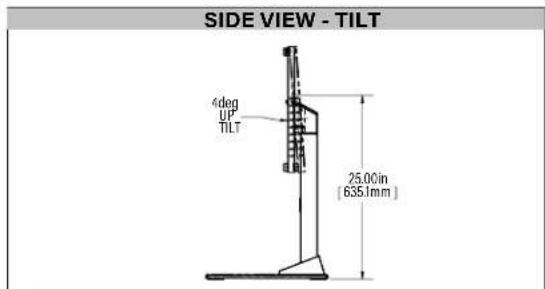
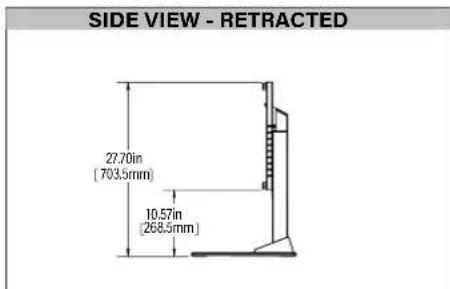
Dimensions
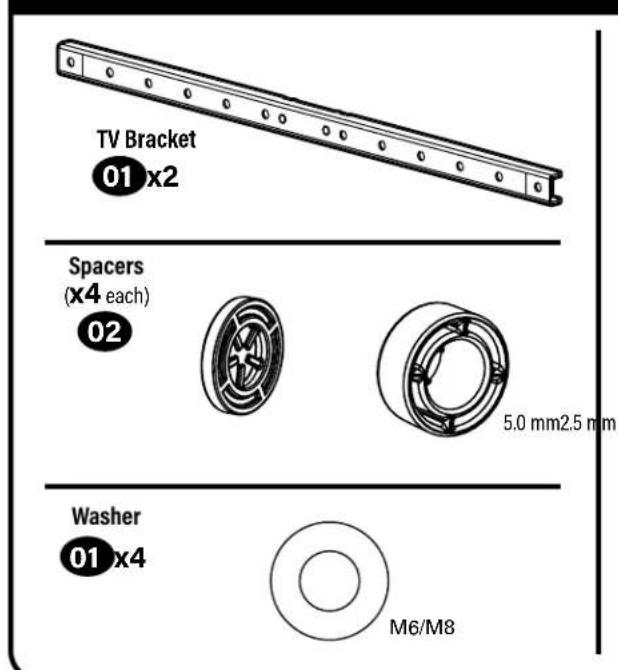
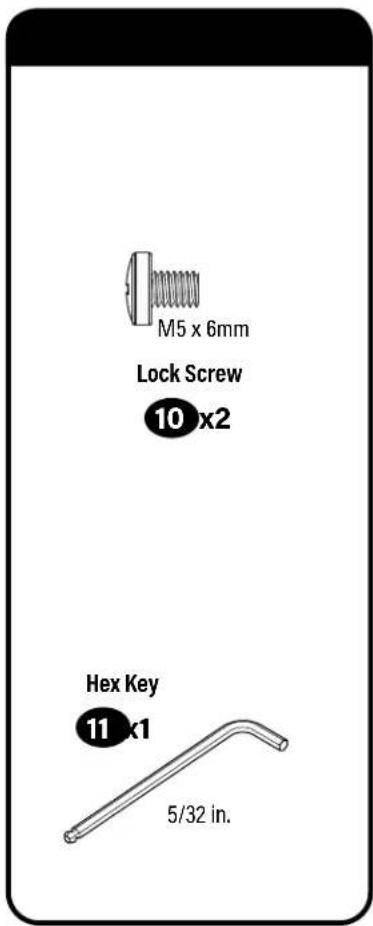
Supplied Parts and Hardware
WARNING: This product contains small items that could be a choking hazard if swallowed.
Before starting assembly, verify all parts are included and undamaged. If any parts are missing or damaged, do not return the damaged item to your dealer; contact Customer Service. Never use damaged parts!
NOTE: Not all hardware included will be used.
STEP1
STEP1STEP2 STEPS2 and 3
STEP1 Attach TV Brackets to TV
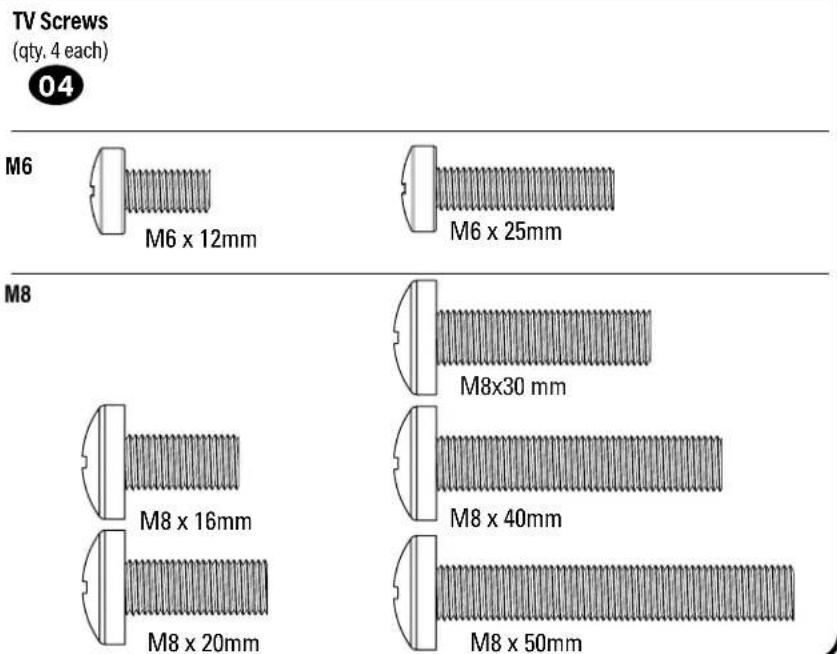
1.1 Select TV Screw Diameter
Test the three TV screw diameters (M6, or M8) in the threaded inserts on the back of your TV to determine which screw diameter fits your TV.

1.2 Select TV Screw Length
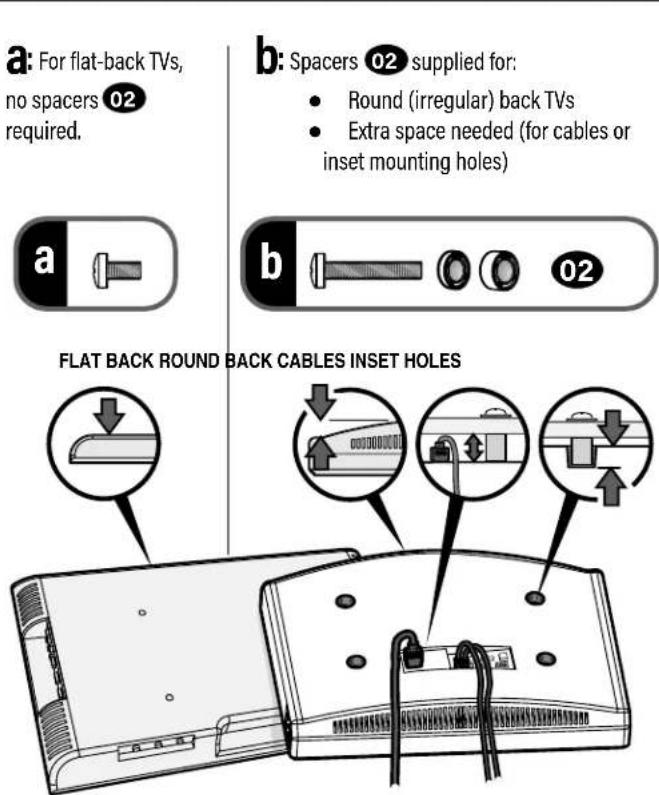
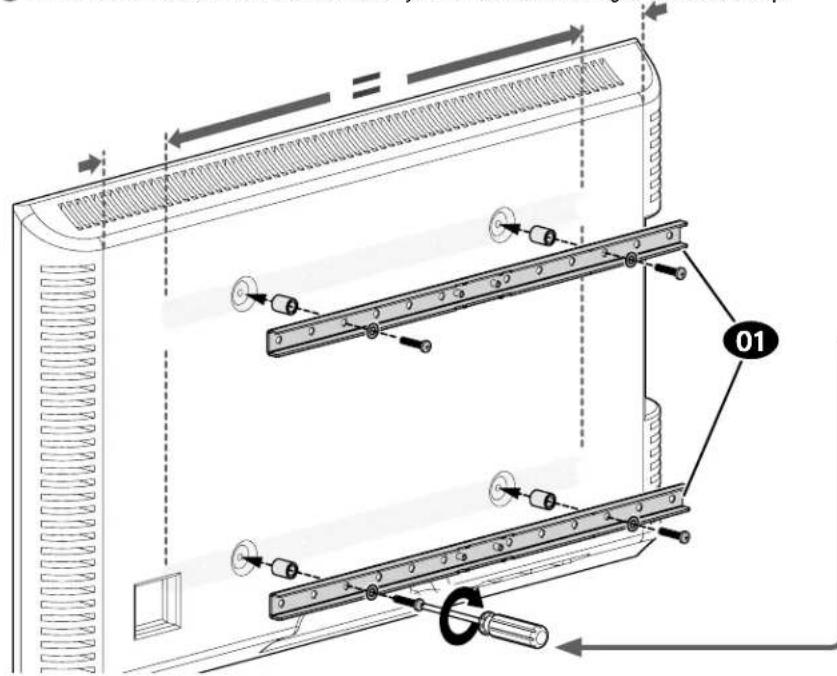
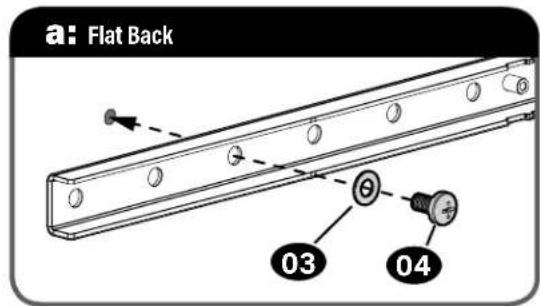
1.3 Attach Horizontal Brackets
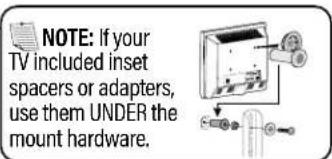
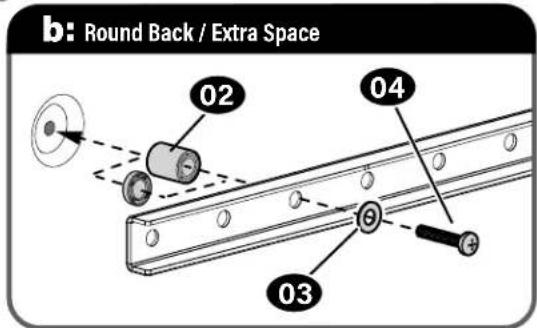
Position your TV brackets 01 over your TV hole pattern - making sure the brackets are centered. Secure TV brackets 01 using your selection for screw/washer (a: Flat Back) or screw/washer/spacer (b: Round Back / Extra Space).
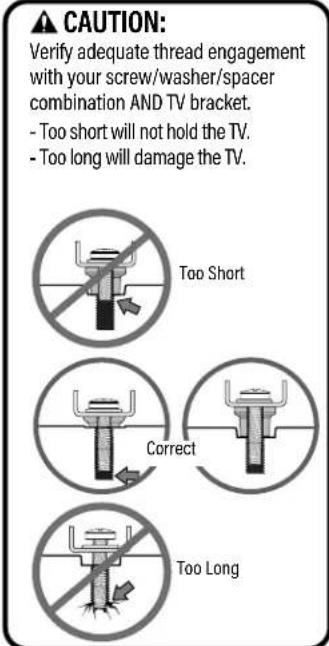
CAUTION: Avoid potential personal injuries and property damage! DO NOT use power tools for this step. Tighten the screws only enough to secure the TV bracket to the TV. DO NOT overtighten the screws.
IMPORTANT: Ensure TV brackets are securely fastened before moving on to the next step.
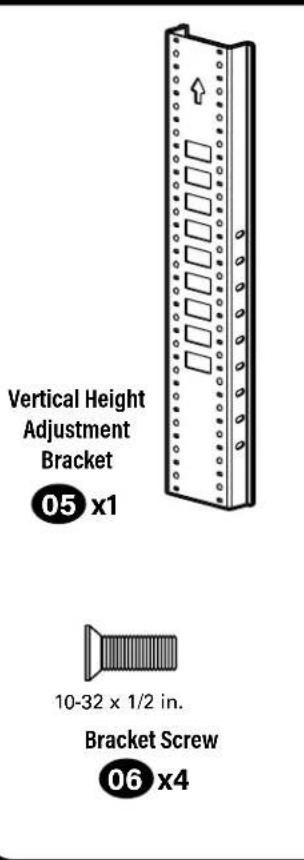
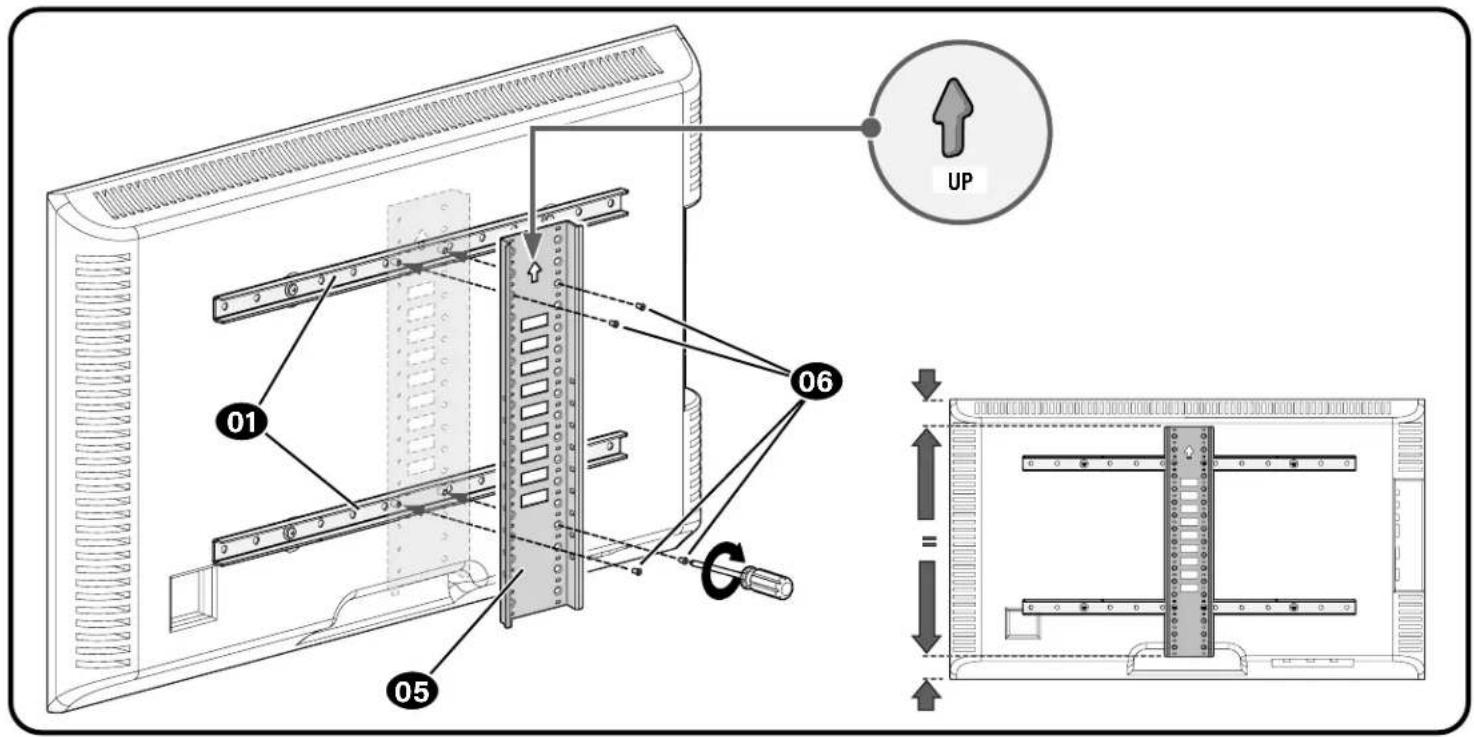
1.4 Attach Vertical Bracket
Make sure the vertical height adjustment bracket 05 is CENTERED on the TV and secure using interface screwsv.
IMPORTANT: Ensure all brackets are securely fastened before moving on to the next step.
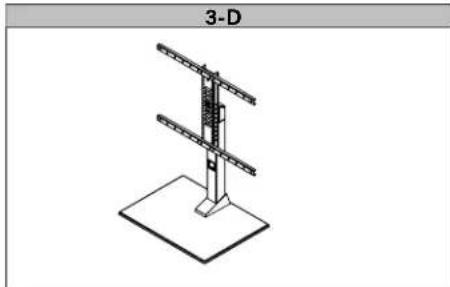
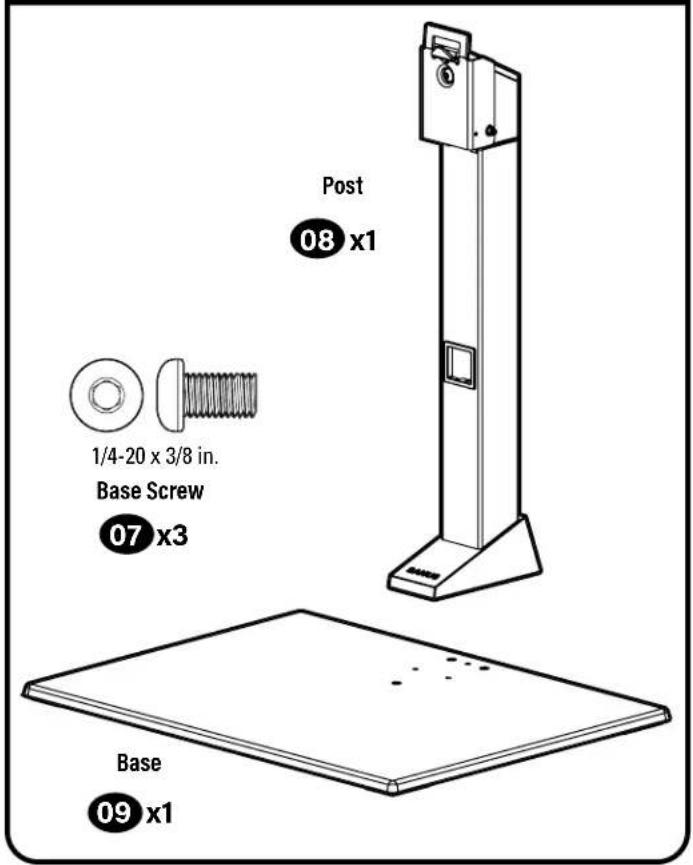
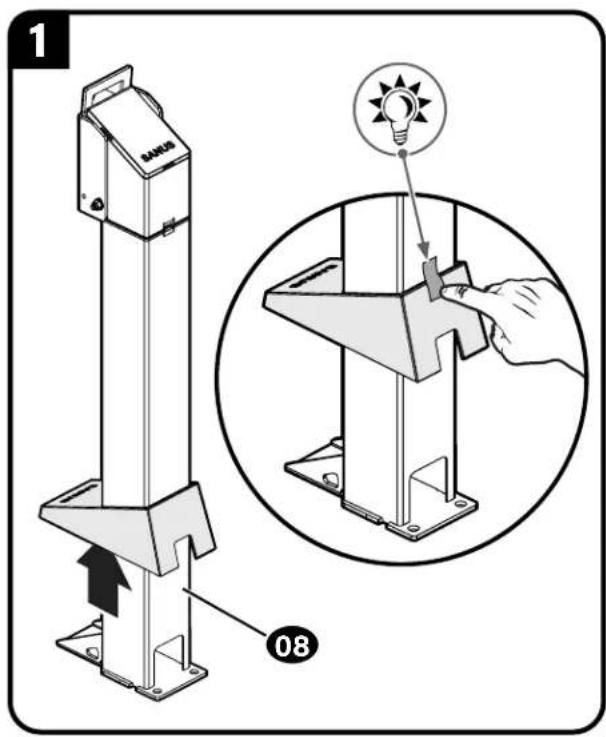
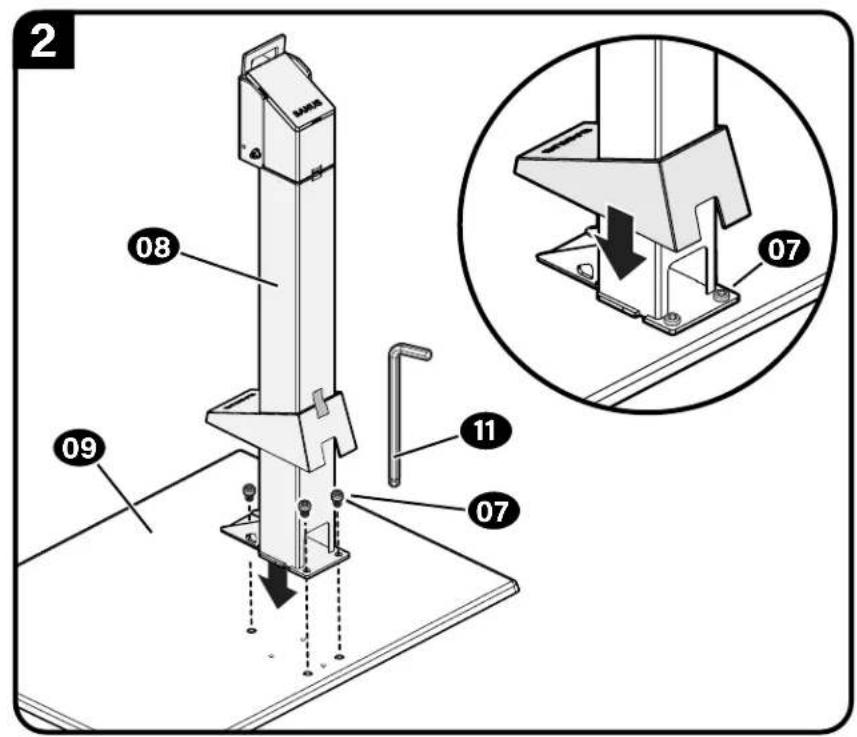
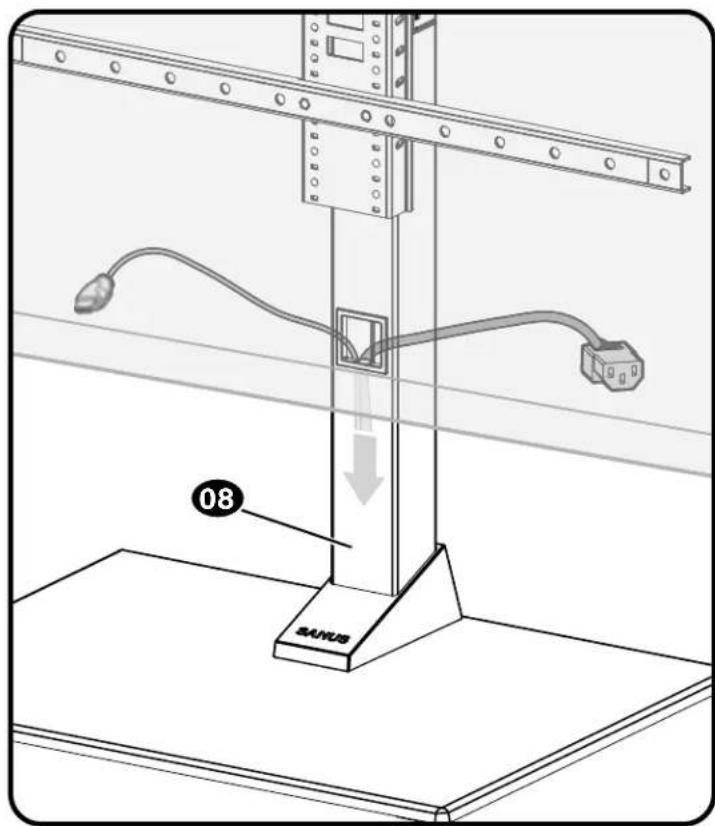
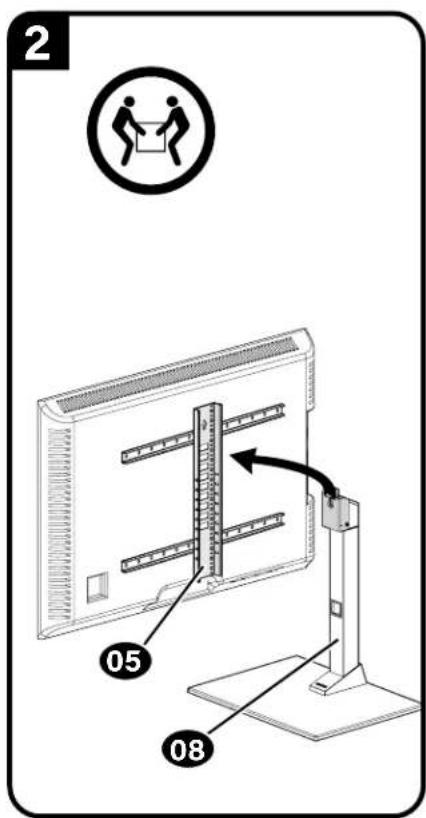
STEP2 Attach Post to Base
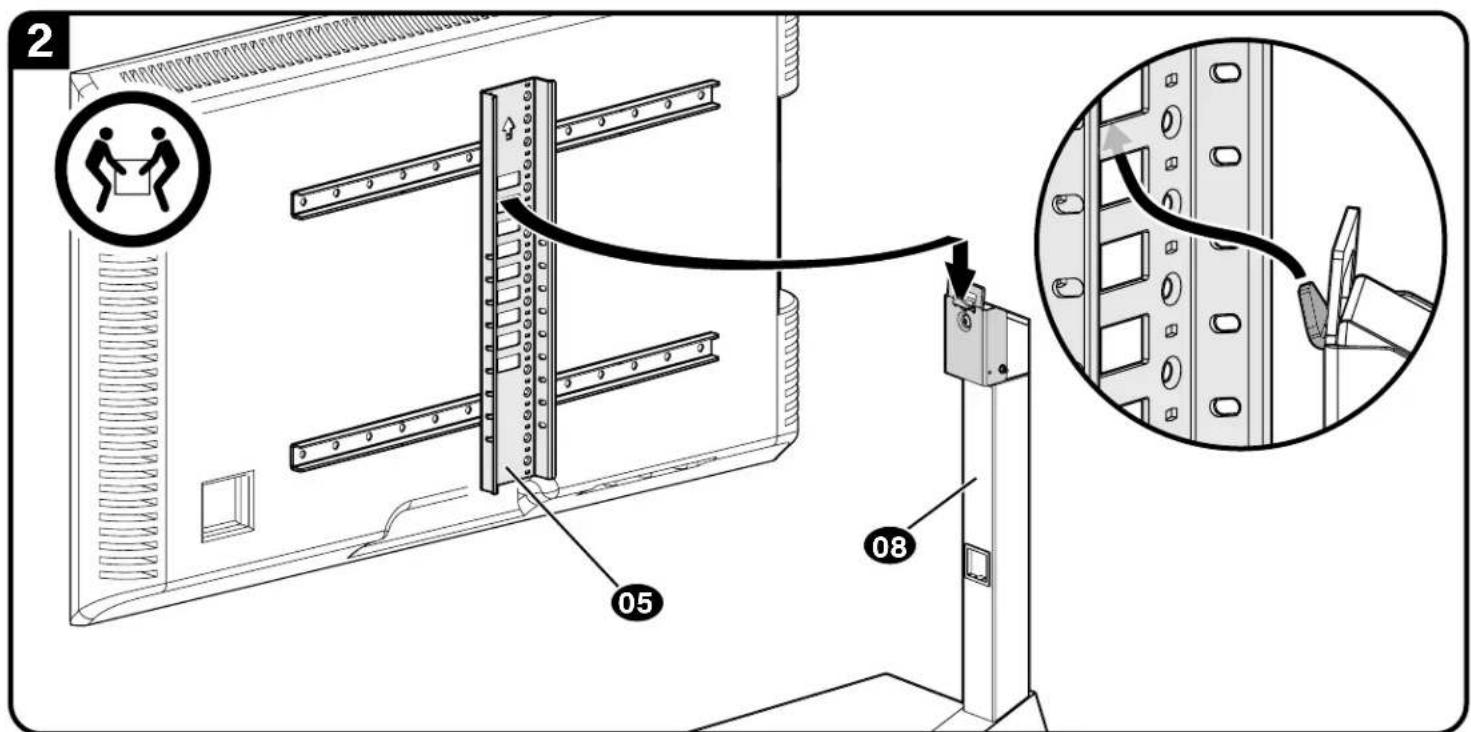
STEP 3 Attach TV to Post
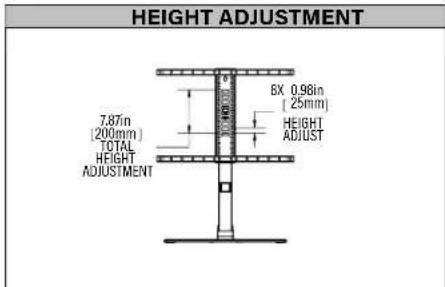
Determine the height from the base 08 that you would like your TV to hang.
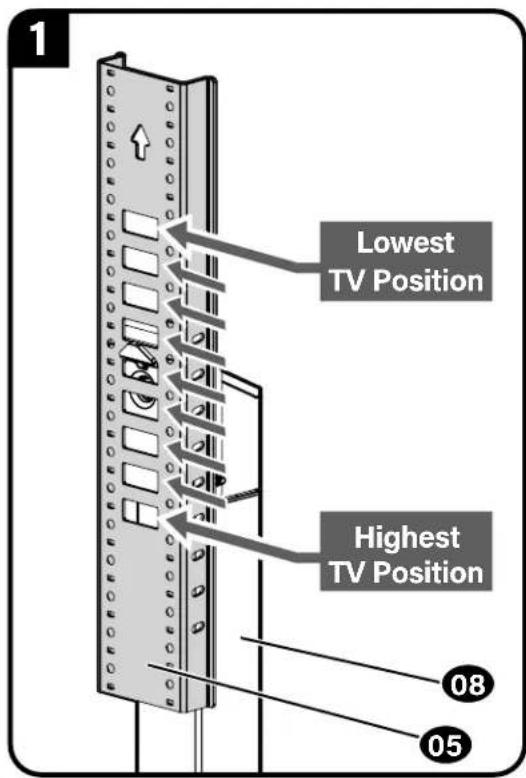
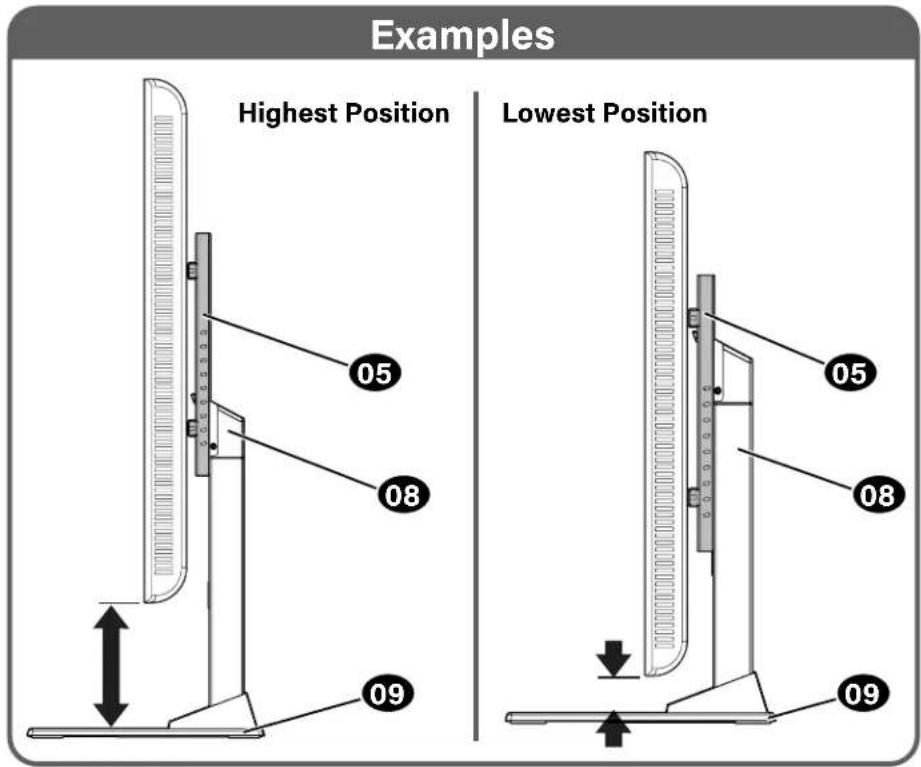
Hang the TV/bracket assembly (at your desired height) onto the post 08

NOTE: Leave enough space under your TV, for any accessories that you may want to place on the shelf.
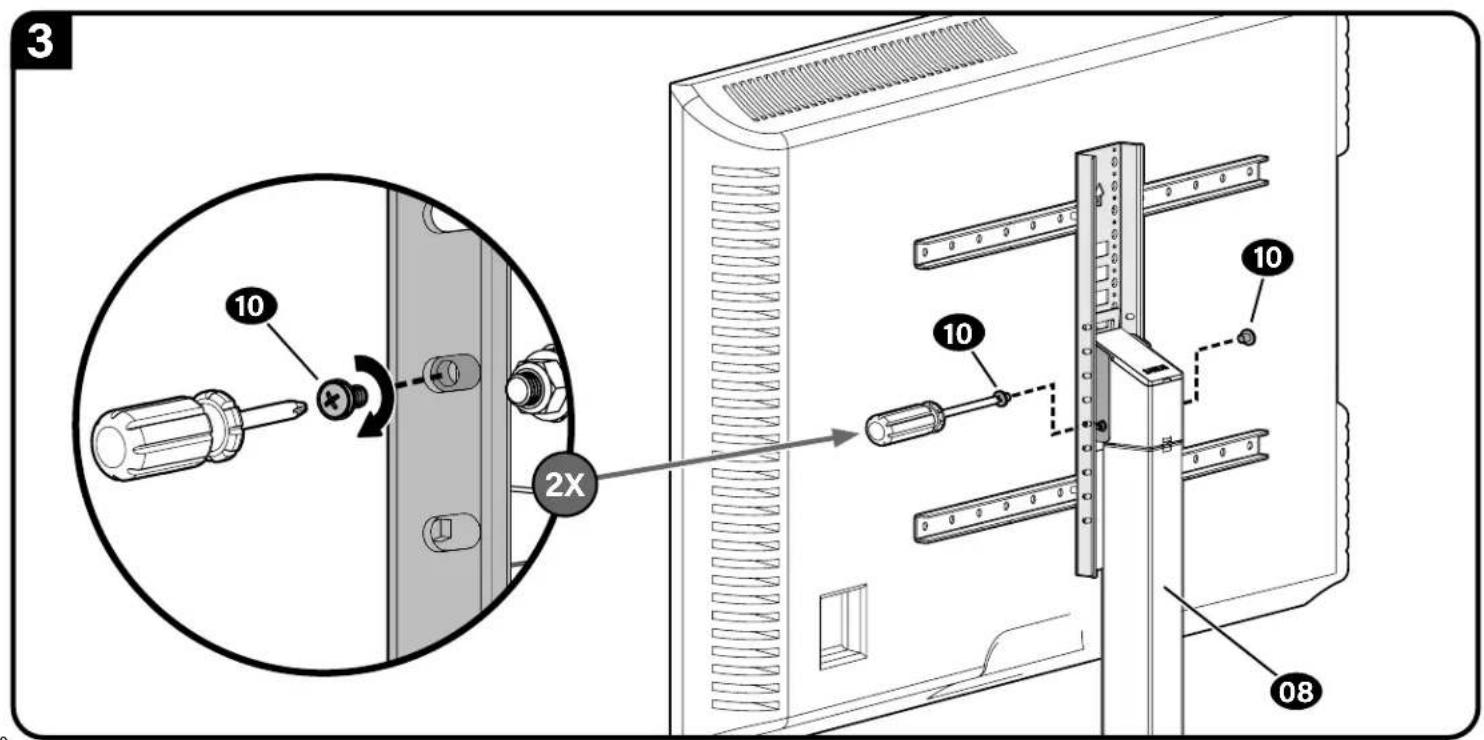
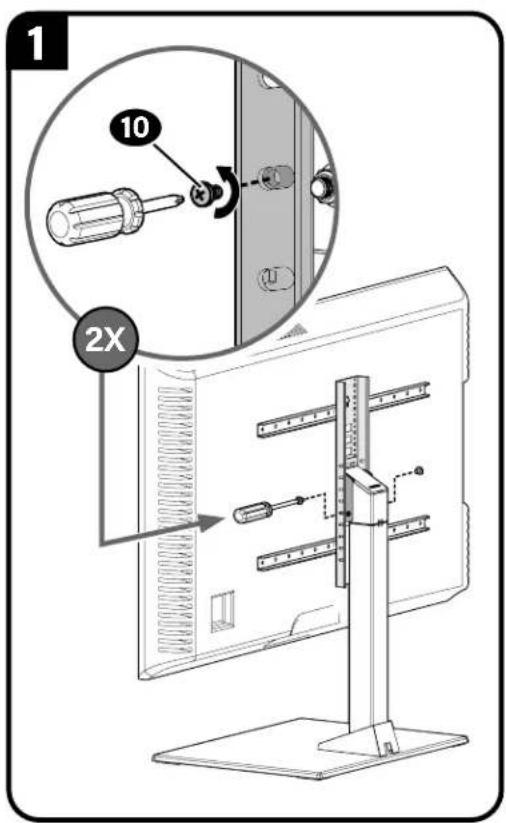
Secure the TV/bracket assembly to post 08 with two lock screws 10
IMPORTANT: Keep the base clear while installing TV.
1 important: Ensure TV/bracket assembly is securely fastened to post 08 before moving on to the next step.
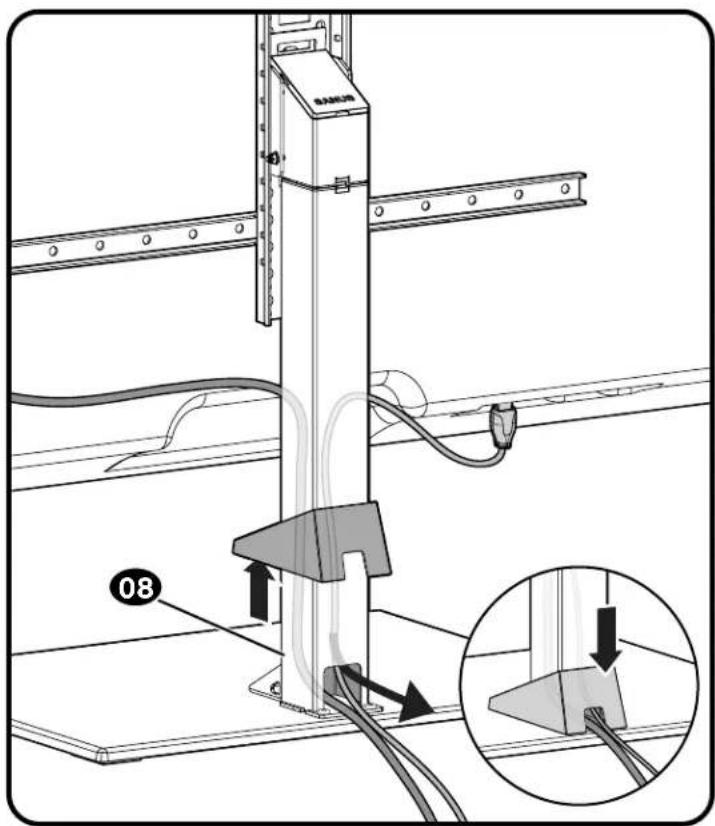
Cable Management
Adjustments

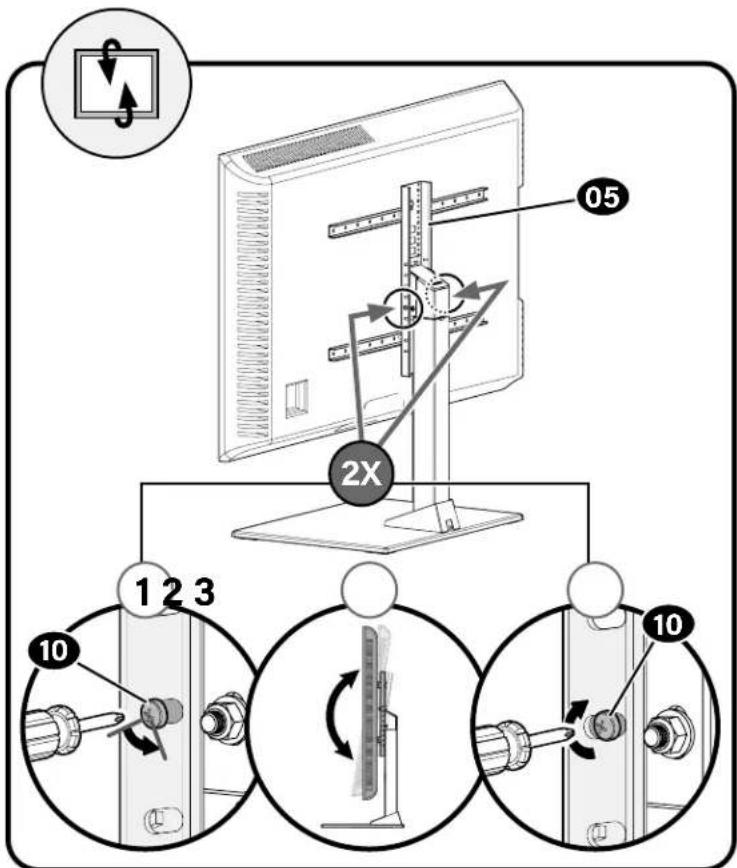
To Remove Your TVAdjustments
ESPANOL
PASO 3 Fjar el poste al television
- Determine la posicion del soporte vertical de ajuste de alta
- Determine a qu' altitude de la base desea colgar su televator.
Heo6xOaMbIe HNCTpyMeHTbl

YpOBeHb
OTBeptKa
Pa3mepbl Kpenexhbl nHTeppeic TeneBn0pa
ctp.3
Noctablaemble KOMPnKekTkyoUe N KpEnExhNbIe 3IeMeHTbl
ctp.4
PYCCKN
I PEPYIPEXJEHNE! B coCTAB H3dennK ectb MeNkHeTAM, KOtOpbIe MOrTy Bb3BaTb ydyuIbe npn pnorNaTbHaMM.
Pepen6cbpoky6bEmtce, 0to Bce Detanm HMeKOTcB HnunHn He NobpeckdeHb. Ecnk KaKaJ-No6 Oetanb oCytCTByET Nm NobpeckdeHa, He Bo3BaauTte KdEne DInepy; o6paTtceb B cHTp 6cbnymbaHna KIneHToB. He knohbyTe NOpeckdeHbte Detann!
PnPMeAHNE. PnMnHOaKe HcNOb3yIOCTHe BCCBKNIOUeHHbE B KOMNIeKt NOCTABKHN KpENeKHbE 3JEMeHTbl.
UAT 1 KpennneHne KpOnuTeHnOB Ha TeNeBn3Op
CTP.6
1.1 Bb6op DnAmetpa BnHTOB DnTeLeBn3opa
Nonpo6yTe BBepyTb BHTb BycTaHOBOUHbIe OTBepTnCpe3b60Ha 3aDne NaHEn TeneBnOpa IOnpeDeneHn COOTBETCTByIOUero DmAmEtpa BHTa (M6 HIN M8).
1.2 Bb6op dHbBHTOB TnTeNeBn3opa
a: EcnB BAI TENEB30P HMEET NNOCKYIO 3ADHIO CTENK, N BbXoTNE TcAHOHTB TENEB30P 6JIMKE K WAPHMPOI RONOBKE KPNENHEM, HCNIOyE 6Ooe KOPOKBE BHNTB.
b:BtynKc6oJee DHHbIMB HHTAMN npedHa3aHcyHebl yctaHOBKn:
TeBn3OpCBbnyKnHnHepOBHO3aHHeNCTeKo
TeneBn3POB C yrrnybHnMn Dn MOHTaXhBix OTBePCTm
Korda nra kabeene tpebyetc donoJHHTenbHOe npoctpaHCTBO
1.3 KpeIeHne rOpHToHTaIbHbIX KPOHtTeHOB
BAXHO!IpeedHauJiompaobTbCHMNHTe BCE pnpcoeDHeHHbte CToKn dTeNeBtOpa!
HaONKHe KPOHTeHbI dNn KPNENHn TeneBnOpa 01 NoBepx CxMb MoHTaXhBx OTBepCTn y6eNTbc, YTO KPOHtEHHbOuTEHTPpOBaHbNo BepTkAaN NblpOBHeH.3aKpenITeKPOHtEHHbI dNn KPNENHn TeneBnOpa 01 c nmoIb bblpaHbX bHnTb HsH6 (nnocKa 3aHnCTeHka) Hn BTyNO, BnHToN Hsa6 (Bblnyla 3aHnCTeHka Hn Tpe6yTc DononHntebnHO poctpaHcTO).
BAXHO!IpeK TEm KAK nepeHn K CNEyUOeMy sary, y6eHtEcb, YTO TEeBnMOHbIe KPOHwTeHbI HaekHo 3AkpeHbI.
1.4 PnKpEnIte BepTknabHbKn KpoHTeHH
Y6eHTTeCb, YTO BePTKakbHbH KPOHHTeH DnIpeyHmPobKn BblcToBt 05 OuETHpPBOaH OHOCHTeBHO TeneBn3Opa.
3aKpenHTe BepTKaIbHbKn KpOHTeHn DnpeYIpOBKn Bbcotb05 CnOMouBcOeIHINTEbHbIX BMHTOB 06
BAXHO! Npeep TcK KnepeuT K cNeyuOeMy uay, ybeNTecb, YTO BCE KPOHHTeHb HAdEeXHO 3aKpEnnHeB.
WAT 2 KpennneHne cTOnKu KocHOBaHMo
ctp.9
IAT3KpeHHeHTeNEBn3OpaKCTOKe
ctp.10
- OnpeJeHne noJooKHe He BepTKaNbHOro KPOuHTeHa dI pyrynpOBKn BbcotB
- QnpeJenHtte BbICOTy HAD OCHOBAHmE, HA KOtOpYIO BbXoTne NOBecuTb TeneBn3Op.
PIMMEYAHNE. OCTaBte DOCTaTOHIO MecTa DnI pINHADNEXHOCTei, KOtOpBe HxKHO NOMeCTNb HA NOKy.
- 3aKpenTe TeneBnOp C KPOHHTeHOM B c6ope Ha WaHnPHoR rONOBKe 08 DByMa PmKcPpyouMMN BInHTAMM 10
BAXKHO! Bo Bpemy yctahOBKn TeleBn3Opa OCHOBaHne DoJNHO 6bIb OTKpbTo.
BHNMAHNE!Y6eIHTcB,TOTeTneBn3Op C KPOHHTeHOM B Cbope HAdexKHO pNkPENHeB K WapHnPHoI rONoBKe 08, N nepeIaTe K cIeDyUeMy aary.
Ipoknaka ka6eien
crp.13
PerynnpovKnTeIeBn3opa
crp.14
Chartne TeJebn3opa
ctp.15

Thank you for choosing Sanus! Please take a moment to let us know how we did:
Legrand AV Inc.
6436 City West Parkway
Eden Prairie, MN 55344 USA
US: +1 (800) 359-5520
SANUS.com
Legrand AV Netherlands B.V.
Franklinstraße 14
6003 DK Weert Netherlands
EMEA: +31 (0) 495 580 852
UK: +44 (0) 800 056 2853
SANUS.com
Authorized Representative for the UK
Starline Holding Technology Ltd.
Unit C Island Road
Reading RG2 ORP UK
Legrand AV Inc. and its affiliated corporations and subsidiaries (collectively, "Legrand"), intend to make this manual accurate and complete. However, Legrand makes no claim that the information contained herein covers all details, conditions, or variations. Nor does it provide for every possible contingency in connection with the installation or use of this product. The information contained in this document is subject to change without notice or obligation of any kind. Legrand makes no representation of warranty, expressed or implied, regarding the information contained herein. Legrand assumes no responsibility for accuracy, completeness or sufficiency of the information contained in this document.
©2022 Legrand AV Inc. All rights reserved. Sanus is a brand of Legrand. SANUS and the SANUS logo are registered trademarks of Legrand.