
Realikids Instant Cam - Camera AGFAPHOTO - Free user manual and instructions
Find the device manual for free Realikids Instant Cam AGFAPHOTO in PDF.
| Product type | Instant camera |
| Brand | AgfaPhoto |
| Model | Realikids Instant Cam |
| Sensor | CMOS 5.0 megapixels |
| Screen | HD LCD 2.4 inches |
| Storage | micro SD card up to 32 GB (not included) |
| Printing | Instant, black and white |
| Modes | Photo, video, playback |
| Video resolution | HD / Full HD (up to 1920×1080) |
| Frames and filters | Built-in, multiple choices |
| Flash | Built-in LED |
| Selfie mirror | Yes |
| Power | Rechargeable lithium battery, charges via USB (cable included) |
| Battery life | Approximately 1 hour (depending on usage) |
| Consumables | Thermal paper roll (not included) |
| Print format | Approximately 5 × 7.6 cm (2×3 inches) |
| Interface languages | French, English, German, Italian, Spanish, etc. |
| Safety | Not suitable for children under 36 months (choking and strangulation hazards) |
| Maintenance | Clean with a soft, dry cloth. Do not expose to moisture. |
| Repairability | Spare parts not specified. Contact customer service. |
Frequently Asked Questions - Realikids Instant Cam AGFAPHOTO
User questions about Realikids Instant Cam AGFAPHOTO
0 question about this device. Answer the ones you know or ask your own.
Ask a new question about this device
Download the instructions for your Camera in PDF format for free! Find your manual Realikids Instant Cam - AGFAPHOTO and take your electronic device back in hand. On this page are published all the documents necessary for the use of your device. Realikids Instant Cam by AGFAPHOTO.
USER MANUAL Realikids Instant Cam AGFAPHOTO
Instant Print Camera
Realikids Instant Cam
natural_image
White and blue digital camera with a black-and-white photo of a young girl inside (no text or symbols visible)
natural_image
Illustration of a young girl in a pink frame with cartoon sheep and a red background (no text or symbols)User manual
PRODUCT KEY FEATURES

- Instant black and white photo printing
- Photo frames
• 5.0 MP CMOS sensor - 2.4" HD screen
- Support up to 32 GB micro SD card (not included)
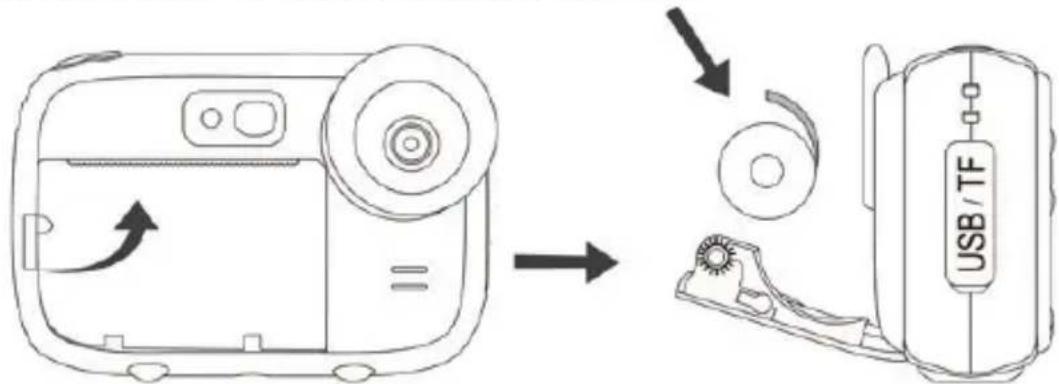
PAPER ROLL INSTALLATION
text_image
Diagram showing device assembly process with labeled USB/TF component and directional arrows indicating motion- Pull the small lever to the left of the paper slot upwards to open the lid.
- Place the paper roll inside respecting the position shown on the diagram above.
- Close the lid and press it firmly until it locks in place.
- While closing the lid, make sure 5 cm of paper comes out of the printing slot.
Note: the first prints may be more or less sharp because the instant camera requires a short warm-up time.
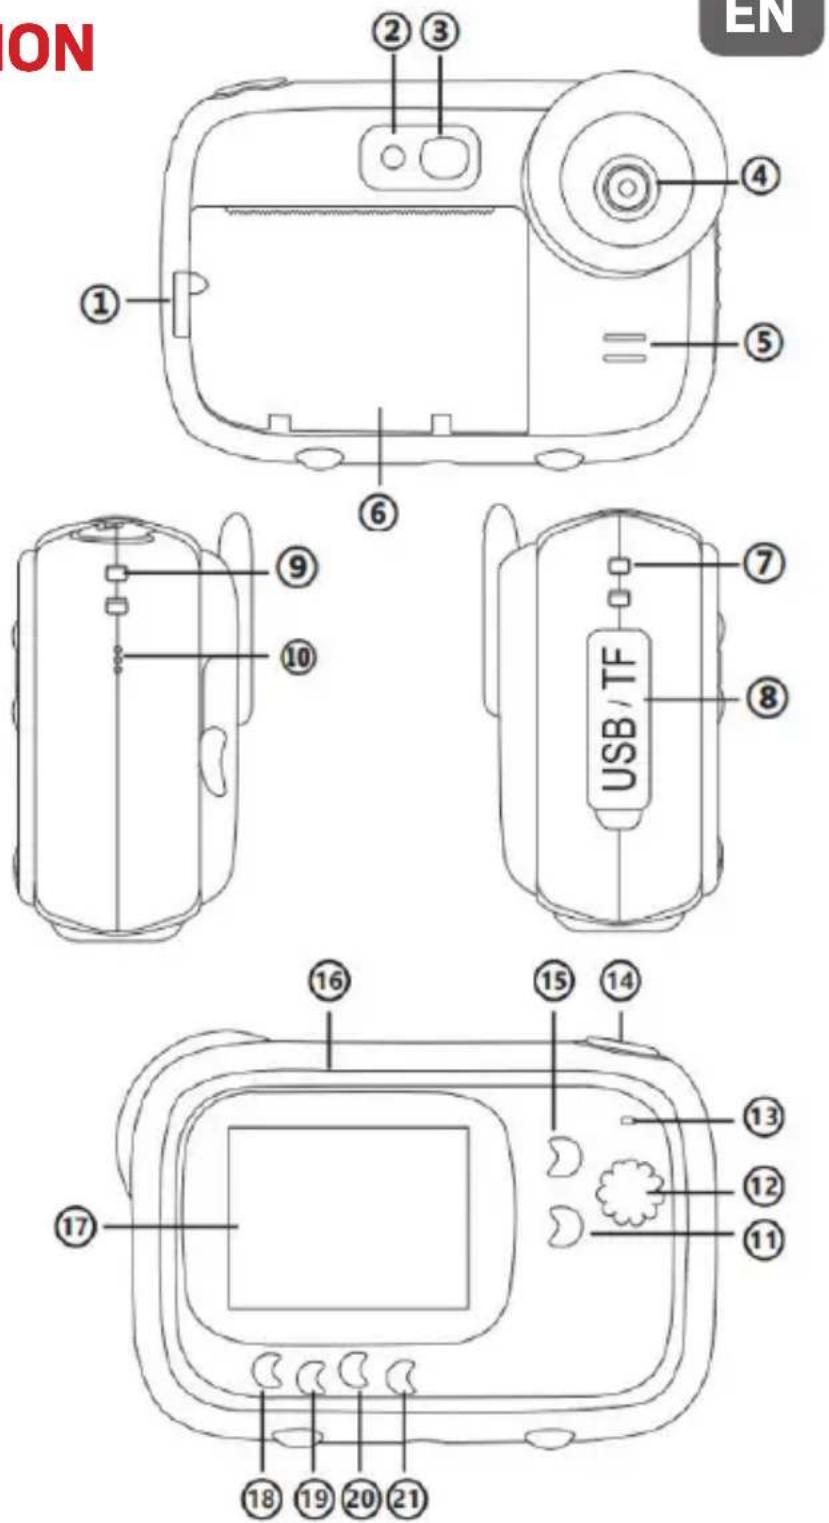
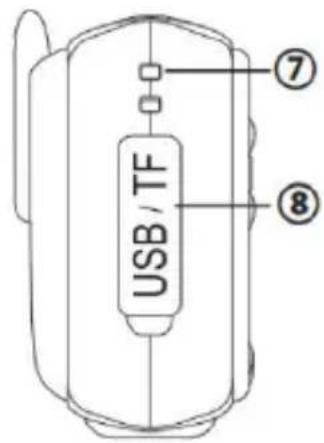
BUTTONS DESCRIPTION
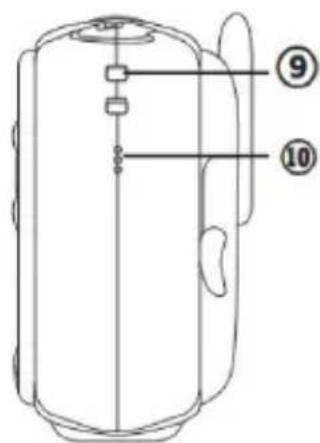
- Lever of the paper roll slot
- LED flash
- Selfie mirror
- Lens
- Speaker
- Paper roll slot
- Lanyard hole
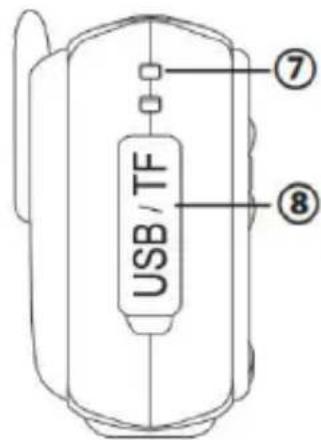
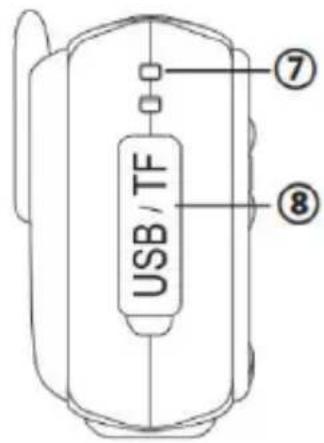
- USB/TF slot
- Lanyard hole
- Microphone
- Down button
- Mode/OK button
- Indicator light
- Shutter button
- Up button
- Reset hole
- Screen
- Settings menu button
- Frame button
- Printing button
- Power button
text_image
ON ① ② ③ ④ ⑤ ⑥ ⑦ ⑧ ⑨ ⑩ USB / TF ⑯ ⑮ ⑯ ⑰ ⑱ ⑲ ⑳ ⑰ ⑱ ⑲ ⑳ ⑰ ⑱ ⑲ ⑳ ⑰ ⑱ ⑲ ⑳EN
text_image
Technical diagram of a cylindrical device with labeled parts ⑨ and ⑩, showing internal components and structural lines.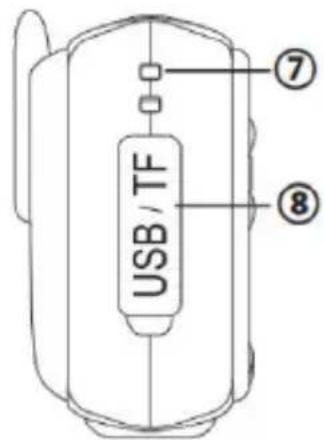
text_image
USB / TF ⑦ ⑧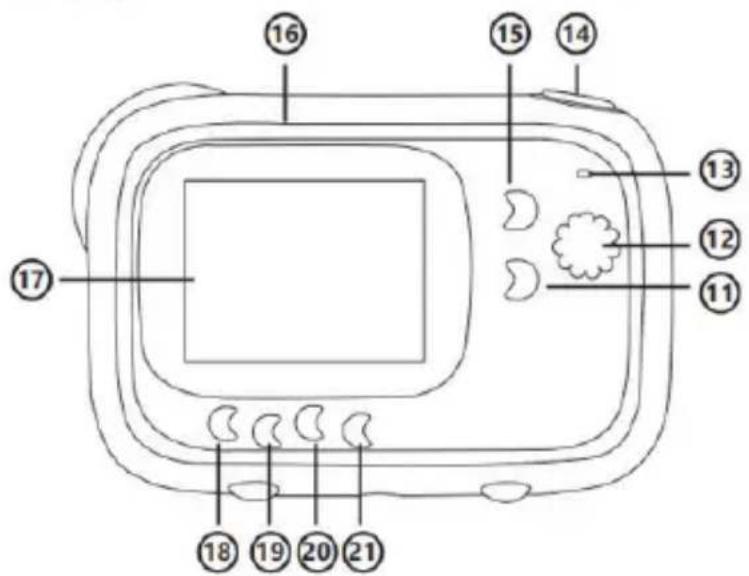
text_image
Diagram of a device with numbered components for identification and labelingOPERATION GUIDE
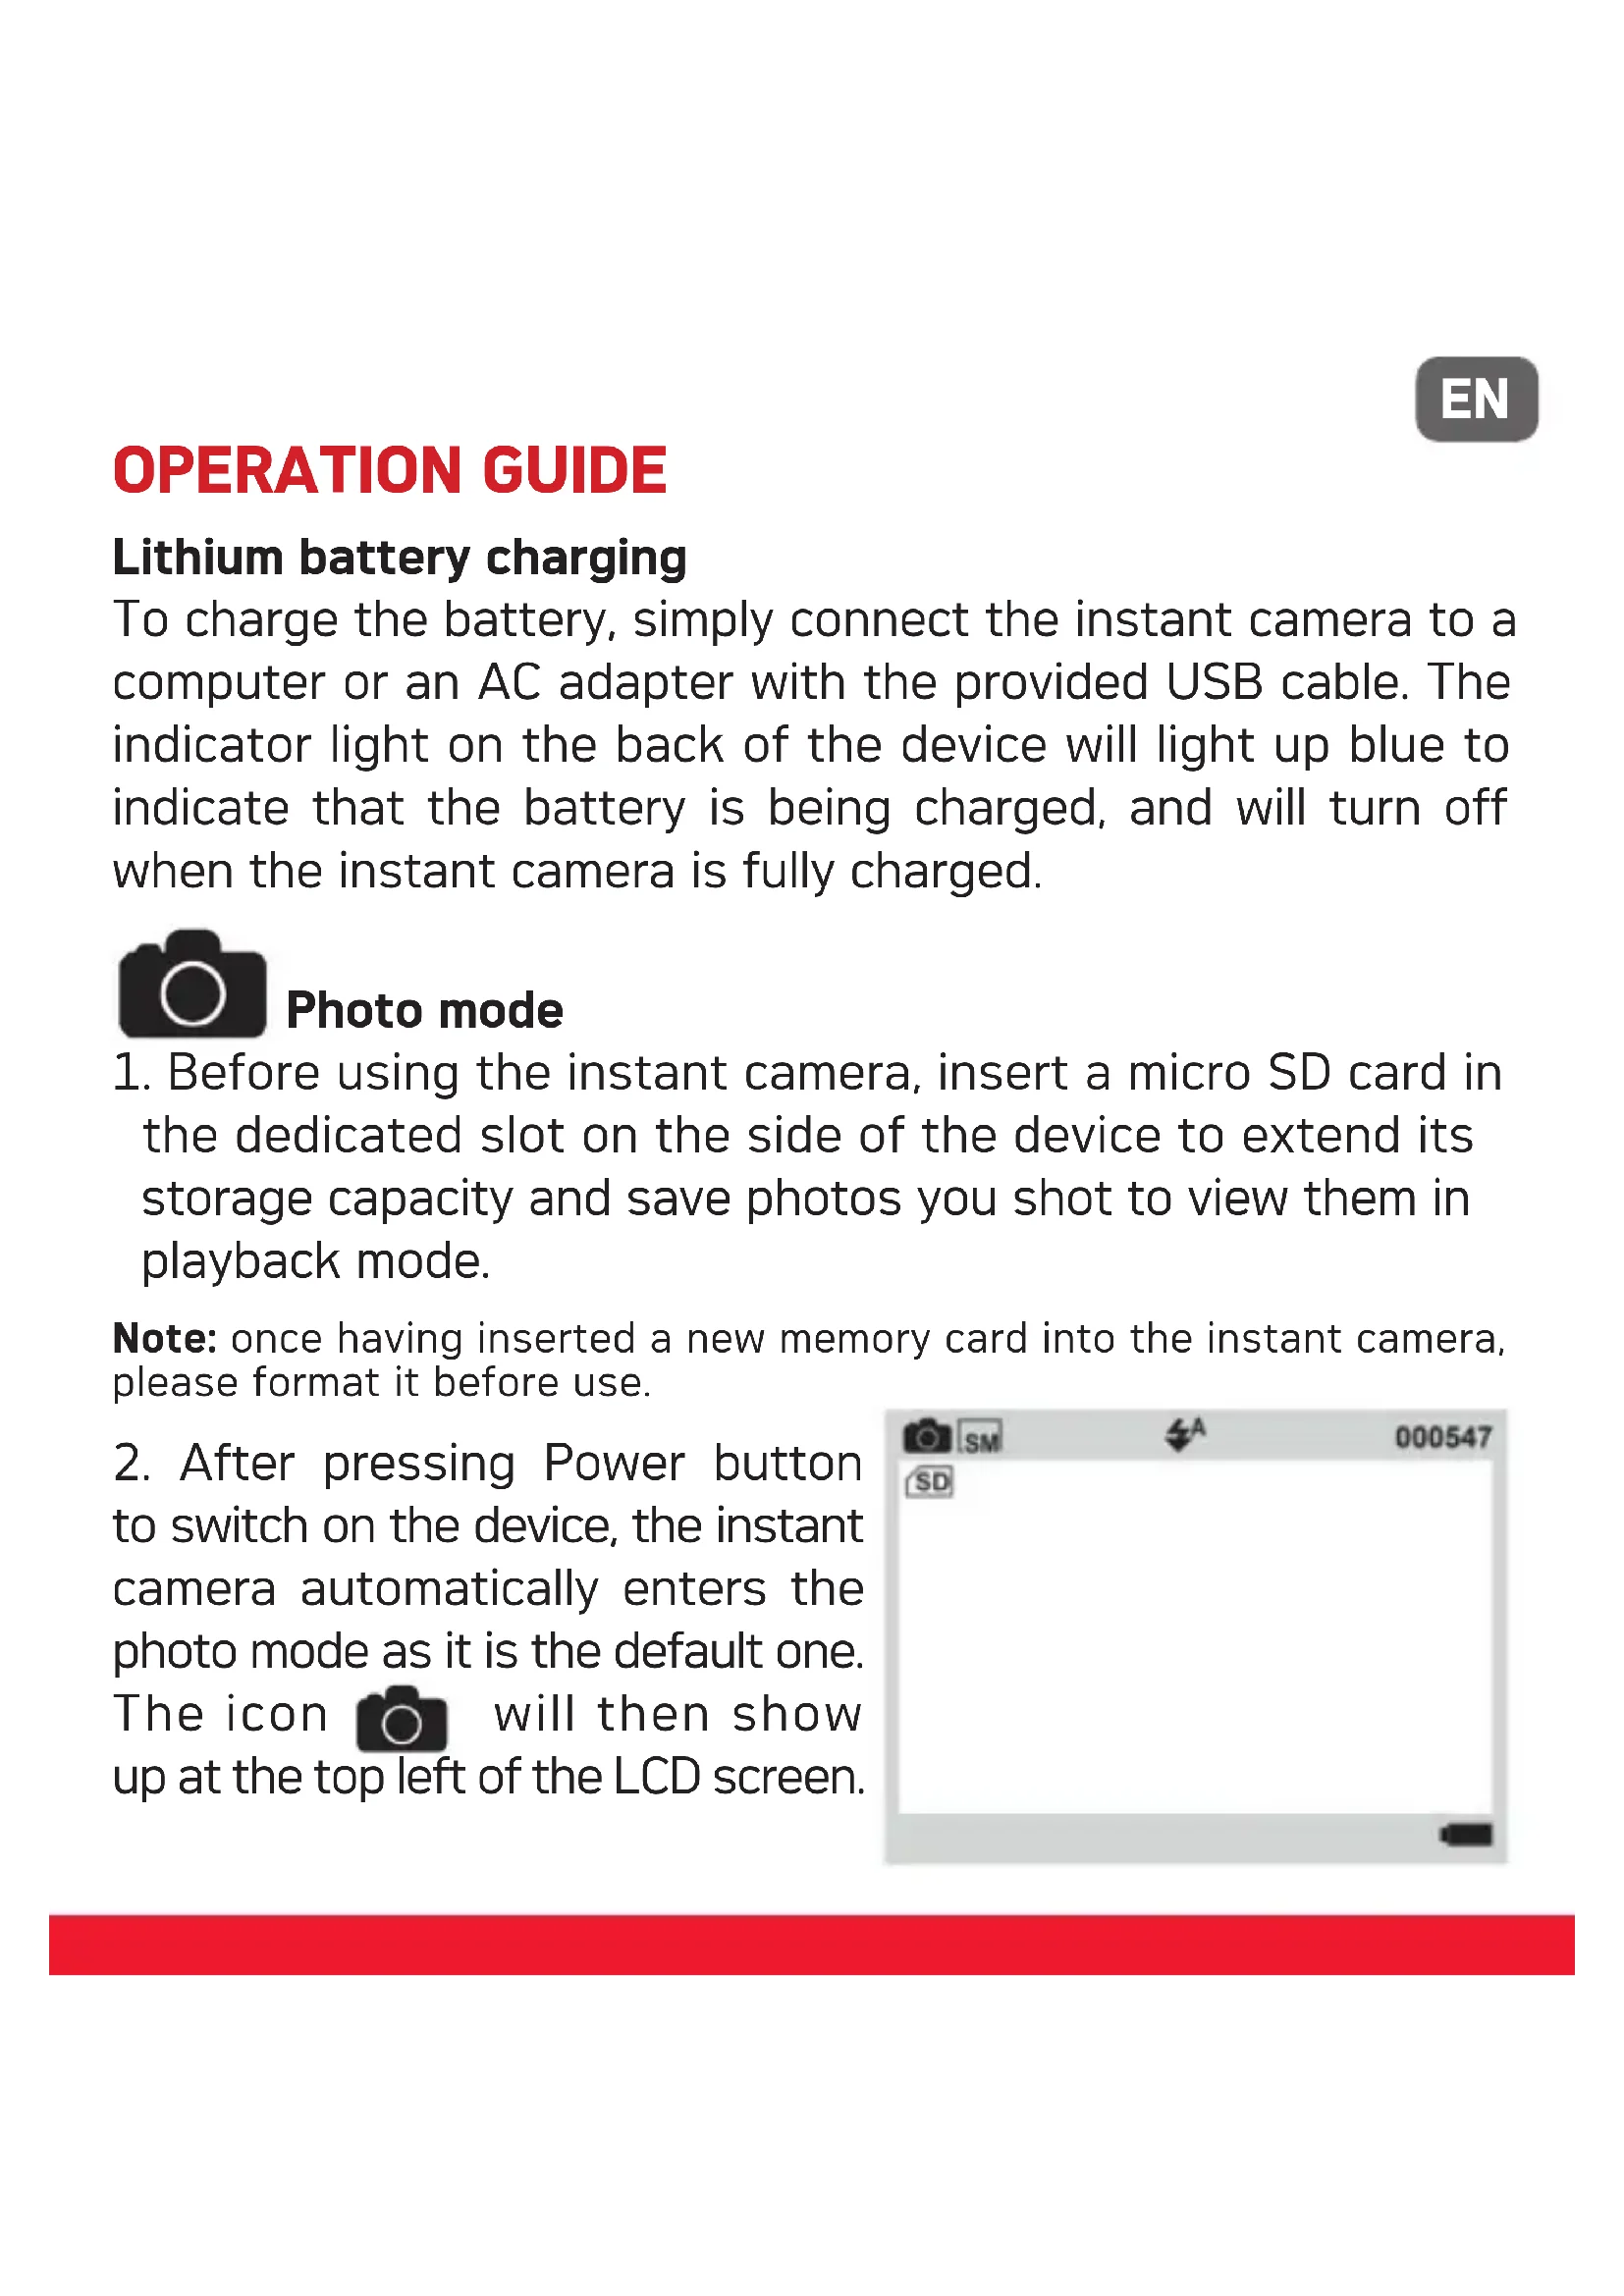
Lithium battery charging
To charge the battery, simply connect the instant camera to a computer or an AC adapter with the provided USB cable. The indicator light on the back of the device will light up blue to indicate that the battery is being charged, and will turn off when the instant camera is fully charged.

Photo mode
- Before using the instant camera, insert a micro SD card in the dedicated slot on the side of the device to extend its storage capacity and save photos you shot to view them in playback mode.
Note: once having inserted a new memory card into the instant camera, please format it before use.
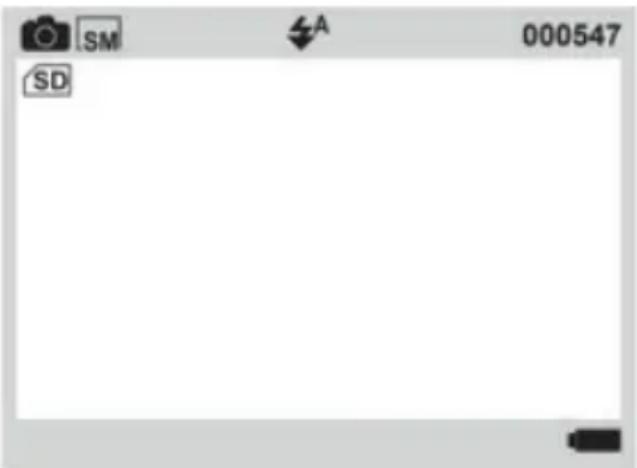
- After pressing Power button to switch on the device, the instant camera automatically enters the photo mode as it is the default one. The icon 📷 will then show up at the top left of the LCD screen.
text_image
SM A 000547 SDEN
- Before taking photos, you can add a frame or filter by first pressing Frame button and then Up / Down buttons to scroll through the choices. To exit the frame mode, press Frame button again.
- Press Shutter button to take a picture.
- The printing function being on by default, the instant camera will then automatically print the photo you just shot.

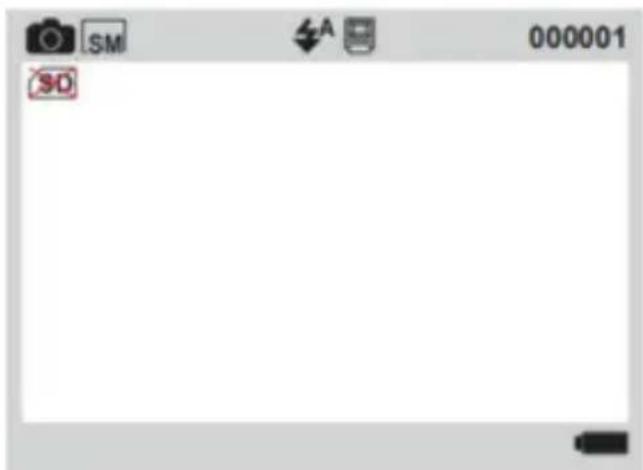
Printing function
- When you switch on the instant camera, the printing function is automatically activated in
photo mode, as the icon shows at the top of the screen.
text_image
SM A 000001 SDNote: this function can work without a micro SD card has been inserted into the instant camera.
- Possibly add a frame or a filter by first pressing Frame button and then Up / Down buttons to scroll through the choices.
- Press Shutter button to take picture.
- The instant camera will instantly print it.
EN
- If you do not want to print the photo you have just taken, press Printing button before pressing Shutter but ton to only take a picture. The icon 📁 no longer shows up at the top of the LCD screen.

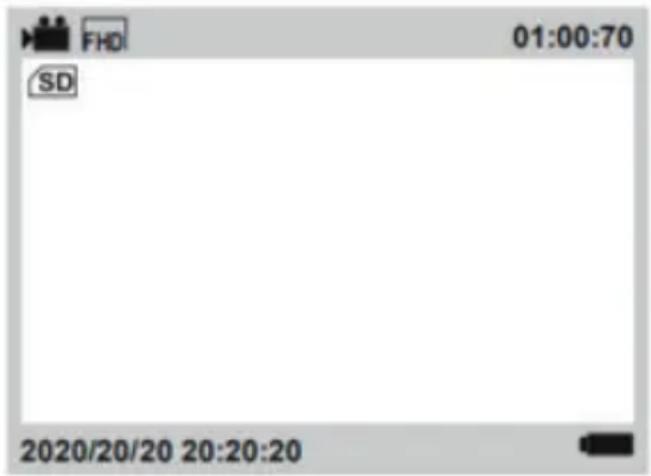
Video recording mode
- After pressing Power button to switch on the device, the instant camera automatically enters the photo mode as it is the default one.
- Press Mode button until moving to video recording mode. The icon will then show up at the top left of the LCD screen.
text_image
FHD 01:00:70 SD 2020/20/20 20:20:20- Press Shutter button to start video recording.
Note: in video mode, photo printing function is disabled.

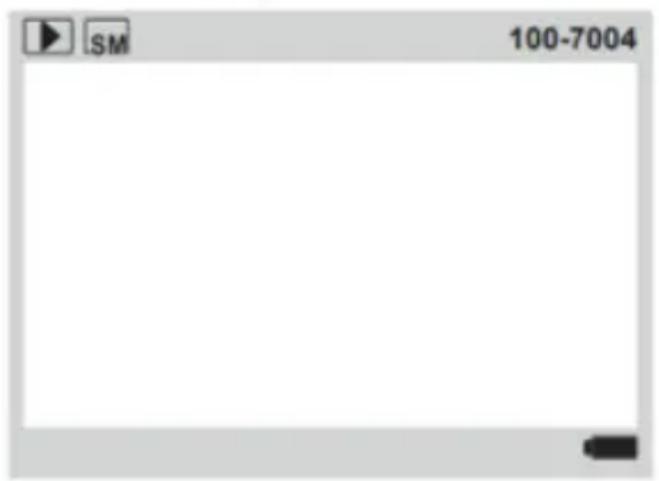
Playback mode
- After pressing Power button to switch on the device, the instant camera automatically enters the photo mode as it is the default one.
EN
- Press Mode button until moving to playback mode. The icon ▶ will then show up at the top left of the LCD screen.
text_image
100-7004 SM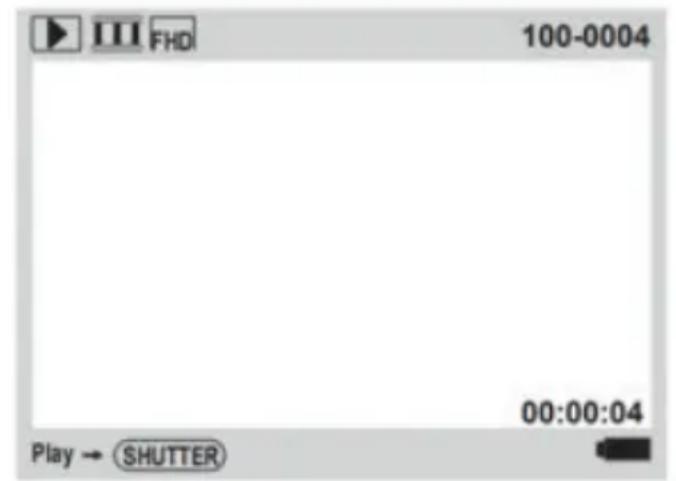
text_image
100-0004 00:00:04 Play → SHUTTER- Press Up / Down buttons to choose the file you want to view.
- If you selected a photo, you press Print button to print it.
- If you selected a video, press Shutter button to play it back.
Note: to delete a file, press Menu button in playback mode. The «Delete this file?» question will then show up on the LCD screen with OK / Cancel options. Press Up / Down buttons to make a choice and Mode button to confirm.
Settings menu in the photo / video mode
If you want to adjust some settings of the instant camera, Settings menu button to enter the settings menu.
- Settings menu button in photo or video mode.
- Press Up / Down buttons to choose the setting you want to adjust.
-
Press Mode button to enter the submenu.
-
The settings menu looks as follow:
| Video Size | HD/FHD |
| Resolution | 1M/2M/3M/5M/8M/10M |
| Print Density | Density 6/5/4/3/2/1 |
| Fill light | Off/On/Auto |
| Date Tag | On/Off |
| Sound | On/Off |
| Time Setting | Year/Month/Day/Hour/Minute/Second |
| Language Setting | English/Simplified Chinese/Traditional Chinese/Japanese/Korean/Russian/French/German/Italian/Spanish/Czech/Portuguese/Polish/Turkish/Dutch/Hungarian |
| Flicker | 50Hz/60Hz |
| Format | OK/Cancel |
| Reset System | OK/Cancel |
| Version | P01_V1.0.0 |
- Press Up / Down buttons to select a setting option and then Mode button to confirm.
- Settings menu button to exit the settings menu.
CARACTÉRISTIQUES PRINCIPALES DU PRODUIT
text_image
Diagram showing device assembly process with labeled components: projector, USB/TF, and directional arrows indicating motion.text_image
Technical diagram of a cylindrical device with labeled parts ⑨ and ⑩, showing internal components and structural lines.⑥
text_image
USB/TF ⑦ ⑧
text_image
Diagram of a device with numbered components for identification and labelingFR
GUIDE OPÉRATIONNEL
text_image
FHD 01:00:70 SD 2020/20/20 20:20:20text_image
Diagram showing the process of a device with an arrow indicating rotation and a USB/TF device labeled in the bottom right.text_image
FHD 01:00:70 SD 2020/20/20 20:20:20text_image
Technical diagram of a cylindrical device with numbered annotations pointing to internal components.⑥
text_image
USB / TF ⑦ ⑧
text_image
Diagram of a device with numbered components for identification and labelingES
GUÍA OPERACIONAL
text_image
FHD 01:00:70 SD 2020/20/20 20:20:20text_image
Diagram showing device operation steps: adding a camera to a USB/TF device via pulley and scroll.text_image
FHD 01:00:70 SD 2020/20/20 20:20:20text_image
Diagram showing device assembly process with labeled components: projector, USB/TF, and fan mechanismtext_image
Technical diagram of a cylindrical device with numbered annotations pointing to internal components.⑥

text_image
USB / TF ⑦ ⑧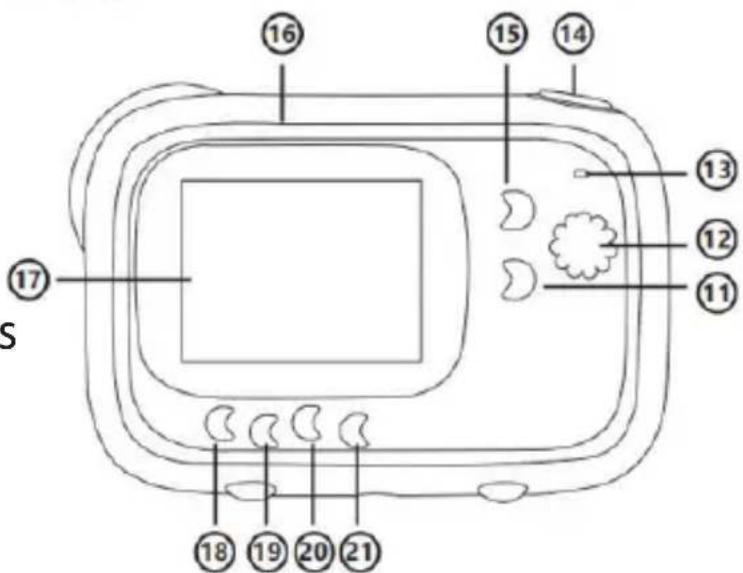
text_image
16 15 14 13 12 11 17 S 18 19 20 21PT
GUIA OPERACIONAL
text_image
FHD 01:00:70 SD 2020/20/20 20:20:20text_image
Diagram showing the process of a device's internal components, including a camera, a USB/TF device, and a mechanical device with directional arrows.BESCHRIJVING VAN KNOPEN
text_image
Diagram showing device assembly process with labeled components: projector, USB/TF device, and directional arrows indicating motion.text_image
FHD 01:00:70 SD 2020/20/20 20:20:20text_image
Diagram showing device operation steps: adding a camera to a USB/TF device via a rotary switch.text_image
Technical diagram of a cylindrical device with labeled parts ⑨ and ⑩, showing internal components and connections.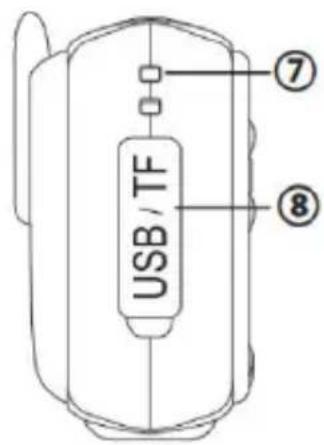
text_image
USB / TF ⑦ ⑧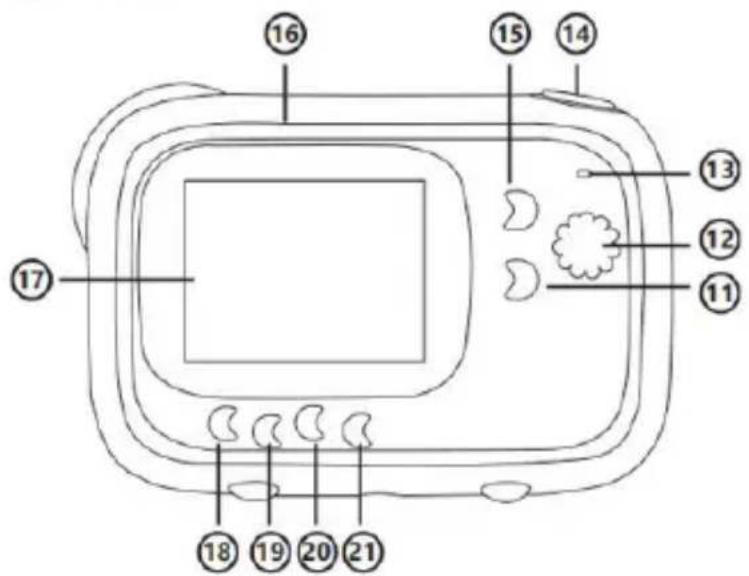
text_image
Diagram of a device with numbered components for labeling and assembly reference.HASZNÁLATI ÚTMUTATÓ
text_image
FHD 01:00:70 SD 2020/20/20 20:20:20text_image
Diagram showing the process of a projector device with an arrow indicating rotation and a USB/TF device labeled in Chinese.text_image
Diagram of a device rear panel with numbered labels pointing to key components
text_image
Technical diagram of a cylindrical device with labeled parts ⑨ and ⑩, showing internal components and structural details.⑥
text_image
USB / TF ⑦ ⑧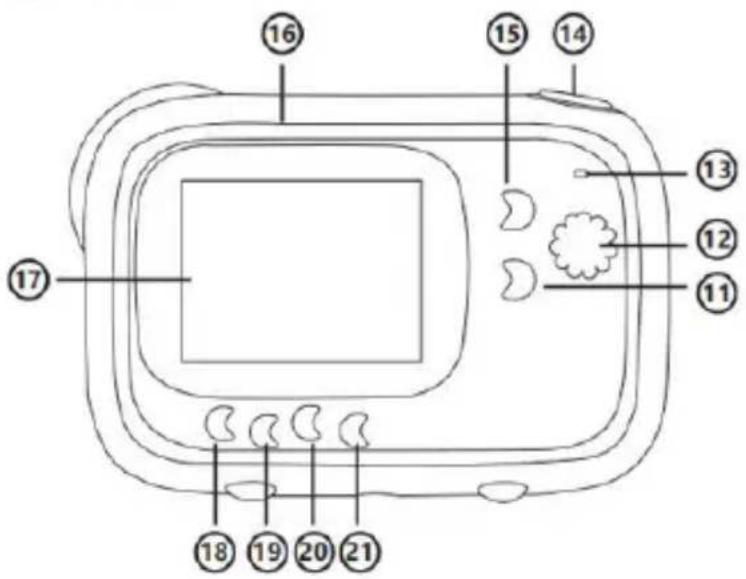
text_image
Diagram of a device with numbered components for labeling and assembly reference.CZ
PROVOZNÍ PŘÍRUČKA
text_image
FHD 01:00:70 SD 2020/20/20 20:20:20WARNING! Not suitable for children under 36 months. Small parts and long neck strap. Choking and strangulation hazards.
Notice of compliance for the European Union:
products bearing the CE mark comply with the applicable European directives and associated harmonised European standards.

natural_image
Symbol of a trash bin crossed with two crossed lines, no text or numbers presentDisposal of waste equipment by users in the European Union:
this symbol means that according to local laws and regulations, it is prohibited to dispose of this product with household waste. Instead, it is your responsibility to protect the environment and human health by handing over your used device to a designated collection point for the recycling of waste electrical and electronic equipment. For more information about where you can drop off your waste equipment for recycling, please contact your local city office, your household waste disposal service or the shop where you purchased the product.
After sales service / service après vente / Kundendienst / servicio postventa / serviço pós venda / servizio post vendita / serviço pós venda / serwis posprzedażowy / poprodejní servis / értékesítés utáni szolgáltatás / dienst na verkoop / послепродажное обслуживание:
@ : aftersaleservice@gtcompany.fr
Product manufactured for and distributed by:
GT COMPANY - 5 rue de la Galmy - 77700 Chessy - France
+33 (0) 1.61.10.09.25 - www.gtcompany.fr
AgfaPhoto is used under license of Agfa-Gevaert NV. For this product a sublicense has been granted by AgfaPhoto Holding GmbH (www.agfaphoto.com). Neither Agfa-Gevaert NV nor AgfaPhoto Holding GmbH manufacture this product or provide any product warranty or support. For service, support and warranty information, contact the distributor or manufacturer.
Thermal paper compatible / Compatible avec le papier thermique Thermopapier kompatibel / Compatible con papel térmico Compatibile con carta termica / Compatível com papel térmico / Compatibel met thermisch papier / Kompatybilny z papierem termicznym / Termikus papír kompatibilis / Kompatibilní s termálním papírem /Термобумага совместима:
ATP3WH
(3 rolls of 57x30mm white thermal paper)
(3 rouleaux de papier thermique blanc 57x30mm)
[3 Rollen weißes Thermopapier 57 x 30 mm]
(3 rollos de papel térmico blanco de 57x30 mm)
(3 rotoli di carta termica bianca 57x30mm)
(3 rolos de papel térmico branco 57x30mm)
(3 rollen wit thermisch papier 57x30mm)
[3 rolki białego papieru termicznego 57x30mm]
(3 tekercs 57x30mm fehér hőpapír)
(3 role bílého termálního papíru 57x30 mm)
(3 рулона белой термобумаги 57x30 мм)