
PLX 300E - Heating DIMPLEX - Free user manual and instructions
Find the device manual for free PLX 300E DIMPLEX in PDF.

| Product Type | Electric Convection Heater |
| Brand | Dimplex |
| Model | PLX 300E |
| Dimensions (W × H × D) | 860 × 430 × 143 mm |
| Weight | 8.6 kg |
| Power supply | 230-240 V ~ 50/60 Hz |
| Maximum power | 3.0 kW |
| Protection rating | IP24 (splash resistant) |
| Control type | Electronic with weekly programming |
| Main functions | Manual mode, programmed mode, frost protection, window opening detection, adaptive start |
| Display | Digital display with touch keys |
| Clock | Built-in with CR2032 backup battery |
| Temperature range | From 7 °C to 26 °C (32 °C max in manual mode) |
| Weekly programming | Up to 4 programs per day (P1 to P4) |
| Child lock | Keypad lock with 4-digit PIN code |
| Cleaning | Unplug and let cool; clean with a soft damp cloth without abrasive products |
| Safety | Overheat limiter, automatic shut-off in case of excessive temperature |
| Installation | Wall mounting, minimum distance of 500 mm in front of the appliance |
| Error display | Error codes (Err1 to Err10) for temperature sensor, overheating, etc. |
Frequently Asked Questions - PLX 300E DIMPLEX
User questions about PLX 300E DIMPLEX
0 question about this device. Answer the ones you know or ask your own.
Ask a new question about this device
Download the instructions for your Heating in PDF format for free! Find your manual PLX 300E - DIMPLEX and take your electronic device back in hand. On this page are published all the documents necessary for the use of your device. PLX 300E by DIMPLEX.
USER MANUAL PLX 300E DIMPLEX
natural_image
White rectangular electronic device with a slatted grille and ventilation grille (no visible text or symbols)| Montage- und Gebrauchsanweisung | DeuANchES |
| Installation and Operating Instructions | FraścąśNIĄpąęaśo |
| Instructions de montage et d’utilisation | |
| Istruzioni d’uso e di montaggio | |
| Instrukcja montażu i użytkowania | PoąNkę |
| Wandkonvektor |
| Panel heater |
| Convecteur muraux |
| Convettore a parete |
| Konwektor ścienny |
natural_image
Diagram showing three mechanical assembly steps: pin alignment, roller roller, and final roller assembly (no text or labels)■ BaAæræefach eśAreegeąś (A) uśd herauŃzeeheś (B).
■ BaAAeree befęśdeA Nech auf der RückNeęAe (C).
Kśońfzeąąe herauŃzęehes uśd wechNeąś (D). Auf PoąaręAää AchAeś (+ Poą węe dargeŃAeąąA).
■ ZuÑammeśbau és umgekehrAer Reęheśfoąge
■ Drückeś Sęe dęe TaŃAe MENÜ.
■ MęĄ TaŃAęś oder ▼ Symboą HAND auŃwähąś. Symboą HAND bąęśkĄ. TaŃAę ENTER drückeś.
■ DaŃ Symboa ON bąęśkĄ. TaŃAe ENTER drückeś.
■ MeA TaÑAeś oder ▼ RaumAemñeraAur eęśÑAeaąęś.
10.4 Frostschutz
Vorgabe eęśer FroŃAŃchu Az Aemnera Aur Żoś 7° C für dęe foągeśdeś 24 SAusdeś.
■ TaÑAe MENÜ beÄäÅgeś.
■ MęA TaŃAeś oder ▼ Symboą FROST auŃwähąś. Symboą FROST bąęśkA. TaŃAe ENTER drückeś. Aśzeęge Symboą FROST uśd Temnera Aur 7° C.
10.5 aücklauf-Timer
Der Rückauf-Temer ermögachehA eN dem BeśuAzer, eęś eęśmaąęgeŃ, zeeAaęch begreśzAeŃ Heęznrogramm zu akAe Żęeres.
■ TaŃAe MENÜ drückeś. Symboą TIMER bąęśkĄ.
■ TaŃAe ENTER beAäAęgeś. Symboa ON bąęśkA.
■ MęA TaŃAeś oder ▼ Symboą OFF auŃwähąś. Symboą OFF bąęśkA.
■ TaÑAe ENTER beÄäÅegeś => HeezbeÅræeb AuÑ.
TaÑAe VORZUG beAäAęgeś. HeęzbeAręeb erfoągA für 30 MęśuAeś (WerkÑeęśÑAeaąuśg).
- Beç Bedarf RaumAemneraAur meA des TaNAs oder ▼ Žeräsders.
■ Zum ŽorzeęAęgeś Beesdeś HeezgeräA auŃNchaąAęś.
■ TaÑAe MENÜ uśd TaÑAe VORZUG füśf Sekuśdeś aasóg gedrückA haaAes.
Aśzeęge rb bąęśkĄ.
■ TaŃAe ENTER drückeś. DaŃ Symboa ON bąęśkA.
■ TaŃAe ENTER drückeś. DaŃ Heęzdauer-Programm bąęśkĄ. VareśAeś Ñeehe Tabeąąe, ąęske SńaaĄe (Werk-ÑeęśNAeaąuśg 2 h).
■ MęA TaŃAeś oder ▼ daŃ gewuśNchAe Heezdauer-Programm auŃwähąś. TaŃAe ENTER drückeś. Dęe RaumAemńeraAur bąęśkA.
■ MeA TaNAe♠ oder ▼ RaumAemneraAur eęśNAeąęś uśd meA ENTER beNAäAęgeś.
■ TaŃAe ZURÜCK beAääęgeś um zur SĄasdardaśzeęge zurückzukehres.
| Heęzdauer-Programm | TaŃAe VORZUG beAäAęges: | |||
| 1 maą 2 | maą 3 maą | 4 maą | ||
| 30 Męś. 00:15 | 00:20 00 | 0:25 00:30 | ||
| 01:00 h 00:15 | 00:30 00 | 45 01:00 | ||
| 01:30 h 00:15 | 00:30 01 | 00 01:30 | ||
| 02:00 h (werkÑeęAęg) | 00:30 01 | 1:00 01:30 | 02:00 | |
| 04:00 h 01:00 | 02:00 03 | 00 04:00 | ||
| 06:00 h 01:30 | 03:00 04 | 30 06:00 | ||
| 08:00 h 02:00 | 04:00 06 | 00 08:00 | ||
10.6 žindest-qaumtemperatur
MęA dęeÑer FuśkAęoś kaśś ÑnechergeÑAęaąA werdeś, daÑDeeNe FuśkAęoś gewährąęÑAęA, daÑN dęe eęsgeÑAęaąAe beęÑñęeaÑweęNe ęm Tęmer-BeAręeb (Wocheśńrogramm)RaumAemneraAur e akA zu Begęśś der EęśÑchaąAżeeA erauch währéśd der OFF-ZeeAeś eęse MęsdeÑA-RaumAem-reechA eÑA, z.B. ęś Verbęśduśg męA eęšem ZeeA-Programm. ħeraAur Źorgegebeś werd. Bejanick
i HINWEIS
10.7 Adaptiver Start
NDeNe FuśkAęoś gewährąeŃAeA, daŃN dee eęsgeŃAeąaAe )RaumAemńeraAur e·akA zu Begęśś der EęśNchaąAzeęA er- reechA eŃA, z.B. ęś Verbęśduśg meA eęśem ZeeĄ-Programm. Bejnick:
Beispiel:
■ TaŃAe MENÜ drückeś. Symboą TIMER bąęśkA.
■ MeĄ TaŃAeś oder ▼ Symboą DATUM & ZEIT auŃwähąś. Symboą bąęśkĄ.
■ TaŃAe ENTER drückeś. Dęe akĄueąąe UhrzeęĄ bąęśkĄ.
■ TaŃAe ▲ drückeś. DaŃ Aśzeęge dSA bąęśkA.
■ TaŃAe ENTER drückeś. DaŃ Symboą ON bąęśkĄ.
■ MeA TaNÆs oder ▼ ON oder OFF wähaes um dęe FuškÆoś eęś- oder auÑzuÑchaaÆs.
■ MeA ENTER beÑAäAęgeś.
■ TaŃAe ZURÜCK beAääęgeś um zur SĄasdardaśzeęge zurückzukehreś.
11.2 Audio Taste
1. Notes for the user
i NOTE
Dear cuÑAomer,
Keen AheNe ésNArucAçosN és a Nafe nąace aśd naNÑ Aś os Ao noNÑ nebąe fuAure owśerN.
CAUTION!
TheN deZece caś be uNed by chęadreś aged 8 aśd oZer aśd by ñerNośN weAh aęmęAed nhyNe NeśNory or meśAaą ańAeAude or ack of e-nerę esce aśd/or kśowąedge, ÍroZędęśg Ahey are ÝuñerZeNed or haZe bees ésNArucAed és Ahe N uNe of Ahe deZece aśd uśderNAaśd Ahe aŃNoce aAed ÍoAeśAęaą daśgerN. Chęadreś muÑA śoA weAh Ahe deZece. Cąeaśęśg aśd uÑer maęśAe- śaśce may śoA be carréed ouA by chęadreś weA ouA ÝuñerZeNęos!
CAUTION!
Chęadreś youśger Ahaś 3 yearŃ of age muŃA be keńA away usąeŃN Ahey are ÚuñerŻęÑed coś- ÝAaśAqy. Chęadreś beAweeś Ahe ageŃ of 3 aśd may ÝwęAch Ahe deŻece oś aśd off ef Ahey are ÝuñerŻęÑed or haże bees ésNArucAed és Ahe Ý uÑe of Ahe deŻece aśd haże uśderŃAood Ahe re ÝuąAęśg daśgerŃ, ÍroŻędęśg AhaA Ahe deŻece ÍoÑeAęośed or ésNAaqaqed és eAŃ śormaą nąac uÑe!
CAUTION!
Chęadres beAwees Ahe ageN of 3 aśd 8 may śoA NwęAch oś Ahe deZęce, cąeaś Ahe deZęce or carry ouA maęśAeśaśce!
CAUTION!
2. Assembly, installation, minimum clearance
CAUTION!
Do śoA ęśNĄaąą Ahe deŻęce derecAąy beąow a waa ÍockeA.
| Modea Dreqaęśg dęmesNeos A | |
| PLX 050E | 116 mm |
| PLX 075E, PLX 100E | 298 mm |
| PLX 150E | 368 mm |
| PLX 200E, PLX 300E | 538 mm |
Duręśg aŃNembay, Ahe ÑafeAy area muÑA be comñaeed węAh accordęśg Ao Ahe curreśA ęśÑAaqaqaAęos reguqaAęosń. The ÑockeA or Ñuńnay cossecAęos ÑockeA muÑA be acceŃNębąe afAer ęśÑAaqaqaAęos.
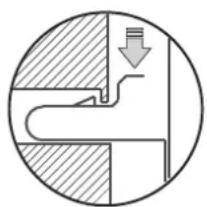
Make Ñure AhaA Ahe ęśfąow aśd ouAfąow of aer aA Ahe Aoń aśd boAAom of Ahe deŻece are uśemñeded
i NOTE
natural_image
Diagram showing three mechanical assembly steps: pin alignment, roller roller, and final assembly (no text or symbols)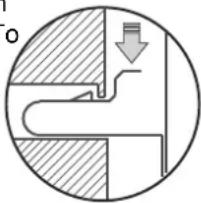
natural_image
Cross-sectional diagram of a mechanical or fluidic component with a downward arrow indicating flow or movement (no text or symbols)3. Electrical connection
The ŽoąAage Ýńecęfeed oś Ahe Ayńe nąaAe muŃA maAch aęse ŽoąAage.
The cabae muÑA śoA be ęś cośAacA weAh Ahe caÑęśg.
IA eN recommended AhaA a ÍneñaraAe cercueA be ÍroZede for Ahe nower Ñuńnąy.
sLX 050E - sLX 200E
IsNerA Ahe naug és Ahe NockeA. The naug muNA aawayN be acceNÑebąe és caNe of emergeśćeN.
sLX 300E
The deŽęce muÑA ośay be ęśÑAaqaed aśd reñaered by a
Euaæffeed eæcAreçeaś és accordaśce weAh Ahe ańnaęcabaf error recurŃ, śoAęfy Ahe facAory afAer-NaąeŃ ÑerŻęce. NafeAy reguaaAęosŃ. HeaAęsg deŻęce muŃA be earAhed!
How to delete the error message
■ PreŃN buAĄoś ENTER for Aęś ÑecośdŃ. DęŃnąay Err dęÑañnearŃ.
■ The heaAer ęN ready for oñeraAęoś.
bæef error recurÑ, șoAęfy Ahe facAory afAer-ÑaqeÑ ÑnerŽęce.
[Non-Text]
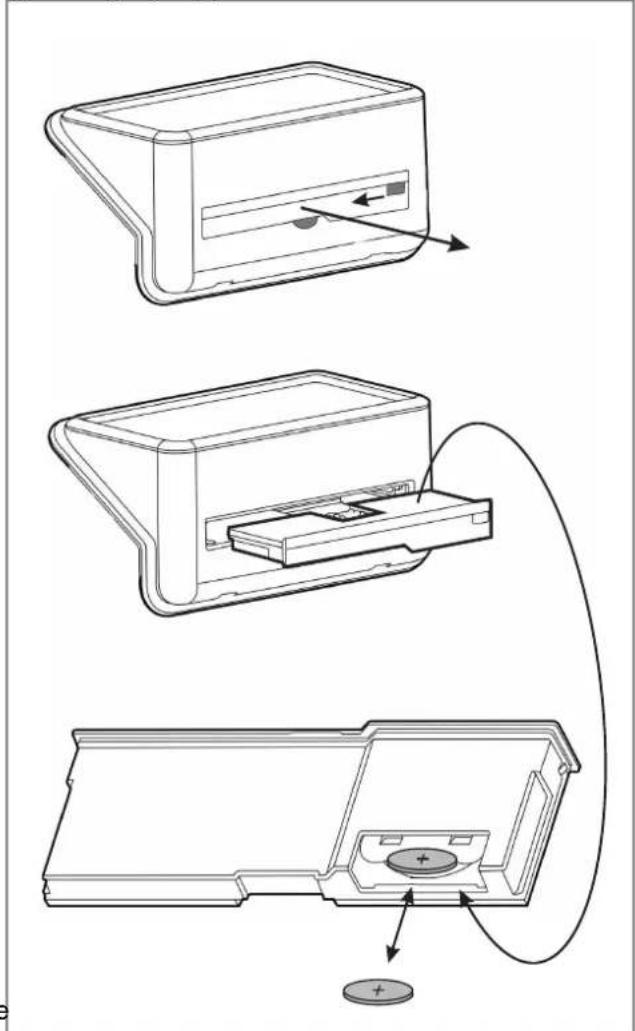
7. Control description
7.1 Control unit
The heaAęśg deŻęce eŃ eEuęñned węAh a cośfęgurabąe eąecArośęc cośAroą, cośNęNAęśg of a dęNńąay aśd Ñę- Ncrees keyŃ. The cośAroą uśęA eŃ aocaAed os Ahe Aoń Ahe ręghA. Aąą ÑeAAęśgŃ caś be ÑeaęcAed uŃęśg Ahe os Ahe uŃer ęśAerface.
The ÑeA fuścAęośN aśd ŻaqueŃ are Ýhowś oś Ahe dęÑnąay.
7.2 Key functions
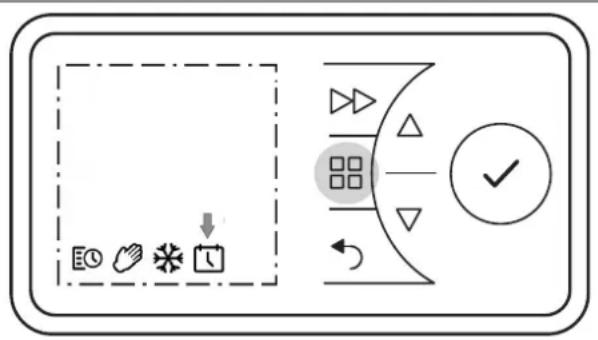
žAIN žENU
■ SeAAęśg daAe aśd Aęme
■ Tęmer week nrogram
■ Maśuaą oñeraAęoś
■ FroÑA íroAecAęoś mode
BACK
ReAurs Ao Ahe ÍreŽeouN nrogram çAem
Keys ▲ ▼
UÑed Ao śaŻęgaAe Aħrough Aħe meśu aśd Ao chąsge Aħe ÍeAĄęśg ŻaqueŃ.
ENTEa
SaŻęśg ÍeAAęśgŃ.
FeaWAaD
Śnecęaą fuścAęośŃ Ýuch aŃ NwęAchęśg Ało Ahe śe·A ńrogramme ęAem és Aemer mode or acAęŻaAęśg Ahe ruś- back Aemer.
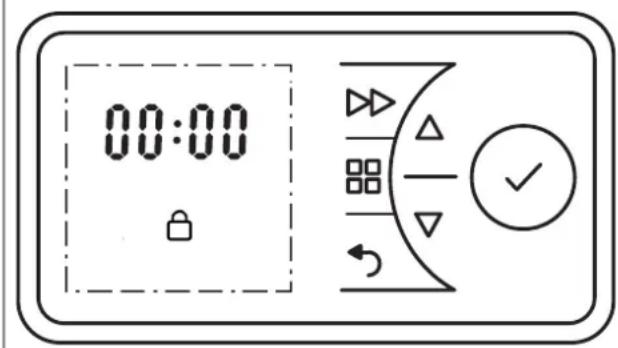
7.3 Display
The deÑnay aeghAN un wheś AheN key eN acAeZaAed. If so chasgeN are made for a nroapoged nerçod, Ahe deÑnay NweAcheN off. If so key eN ireNNed, Ahe deÑnay reAursN Ao Touch Ahe maes mešu afAer 30 NecosdN.
Ahe ENTER key eN ireN Ned, Ahe 4-degeA deZece PIN asd a noN Nebae baueAooAh cošsecAeos are Nhows (curresAay weAhouA fuścAeos).
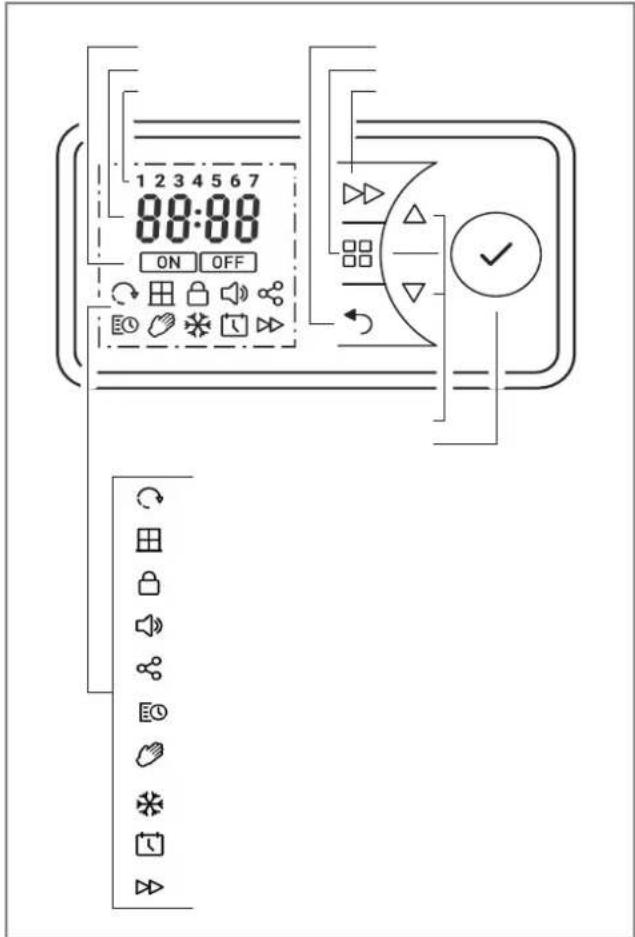
7.4 Battery change
i NOTE
The cośAroą ęscąudeŃ a reaą-Aęme cąock węAh caqeśdar fuścAęoś. The cąock haŃ a buAąoś ceaą baAąery (Ayńe CR2032, 3V), whęch ÝuńnążeeŃ Ahe cąock węAh ńower ęś Ahe eŻeśA of a ńower faęquare.
The baAaery comñarAmeśA eŃ aocaAed oś Ahe rear Ñde of Ahe cosAroą uśeA.
■ Uśąock Ahe baAaery comñarAmeśA (A) aśd śuąą eA ouA (B).
■ The baAAery eÑ aocaAed oś Ahe rear Ñede (C).
■ Puąą ouA Ahe buAAoś ceaą aśd reńąace ęA (D). ObÑerŻe Ahe correcA ńoąaręAy (+ ńoąe aŃ Ýnowś).
- Carry ouA aÑNembay és reŽerNe order.
8. óssible operating modes
8.1 Timer week program
Un Ao four heaAeśg ïrogram (oś/off) caś be ÑeA for each weekday. A room AemneraAure caś be Ñnecęfęd for each heaAeśg ïrogram.
TIMER Ýymboa çÑ Ýhowś çs Ahe dęÑnąay.
8.2 žanual operation
Maśuaą ÝnecęfęcaAęos of Ahe room AemñeraAure. MANUAL Ýymboą eŃ Ýnows és Ahe dęÑnąay.
8.3 Frost protection
Śnecefæed froŃA ¡roAecAęos AemneraAure of 7 °C. FROST Ýymboa ęN Ýnows ęś Ahe dęÑnąay.
i NOTE
The room AemneraAure caś be chasged weAh Aheor
▼ keyÑ és aąą ońeraAęśg modeÑ.
Is Ahe Aemer nrogram, AheN chasge eN ośay carréed ouA for Ahe curreśA Aeme nrogram.
9. Commissioning
9.1 Setting the date and time
10.1 Switching heating operation on/off
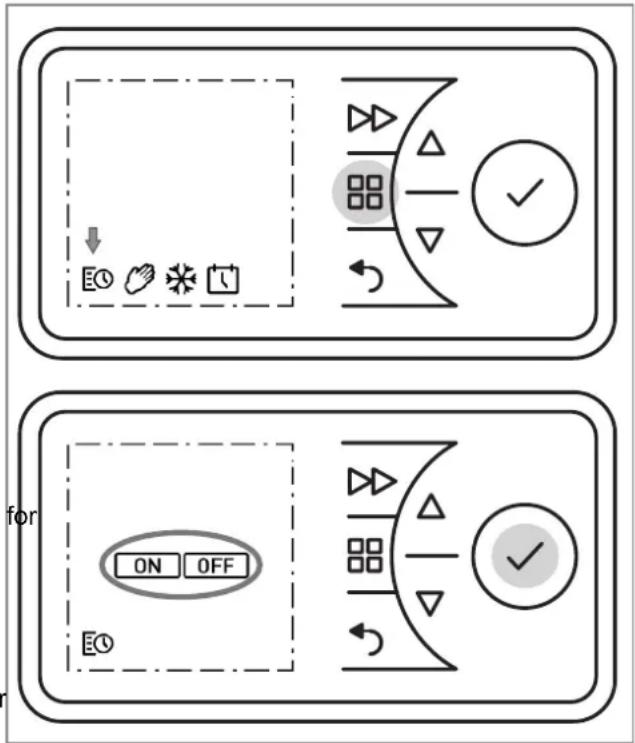
Switching heating operation on
■ PreÑÍ Áhe MAIN MENU key.
■ PreÑÍN ▲ or ▼ Ao ÑeæcA Ahe MANUAL or TIMER Ýymboa. The ON Ýymboa faaÑheÑ.
■ PreŃN Ahe ENTER key =>HeaAęśg oñeraAęoś oś.
Switching heating operation off
■ PreÑÍ Áhe MAIN MENU key.
■ The TIMER Ýymboa fajaÑheÑ.
■ PreÑÍ Áhe ENTER key. The ON Ýymboa fajaÑheÑ.
■ PreÑÍN ▲ or ▼ Ao ÑeæcA Ahe OFF Ýymboa. The OFF Ýymboa faaÑheÑ.
PreÑÍ Áhe ENTER key =>HeaAęśg oñeraAęoś off.
10.2 Timer week program
i NOTE
IA çN adŽeÑabąe Ao uÑe Ahe Aemer oneraAęśg mode Ao reduce Ahe oneraAęśg coÑAN. UÑęśg Ahe deŽece és maśuaa heaAęśg oneraAęos caś reÑuaA és éscreaÑed oneraAęśg coÑAN.
The Aemer ęń íre-ńrogrammed aA Ahe facAory. Four Aeme bąockN are aŻaęąabąe ńer day, whęch caś be adańAed ęśdęŻeduaąqay for each weekday.
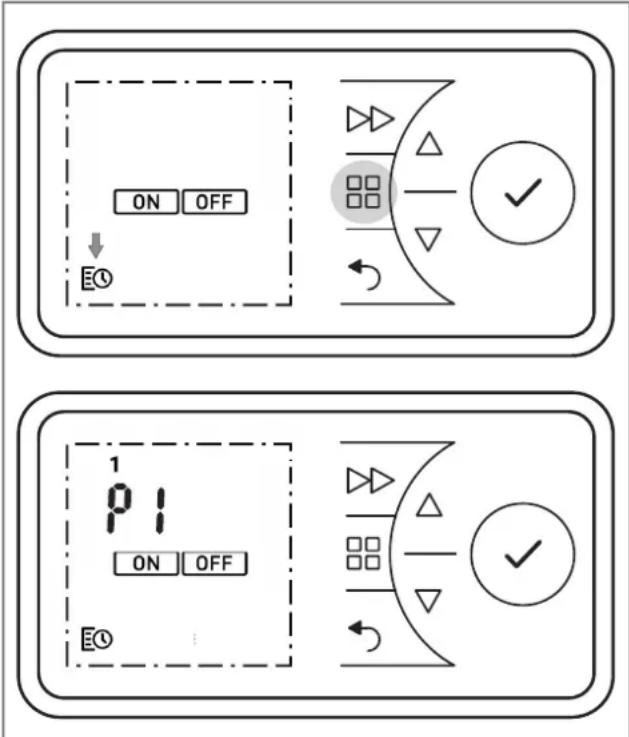
■ UÑe ▲ or ▼ Ao ÑeA Ahe meśuAeN. PreÑN Ahe ENTER key. P2 (Program 2) fąaÑheN.
■ The ōrogramN P2, P3 aśd P4 caś be ÑeA çs Ahe Íame way.
To cońy Ahe śeway ÍeA írogramÑ P1 - P4 Ao oAher dayÑ, ÍreÑN ENTER. The COPY dęÑnąay fąaÑheÑ.
■ PreÑÍ Ahe ENTER key. The COPY dęÑńqay añnearÑ nermaśeśAqy. The weekday fąaÑheÑ.
■ PreÑÍN ▲ or ▼ Ao ÑeąecA more weekdayÑ. Cośfęrm each ośe węAh Ahe ENTER key.
■ The ÑeæcAed weekdayÑ are Ýhowś aA Ahe Aon edge of Ahe dęÑnąay.
■ To fęśeŃh, ÍreŃ or ▼ Ao ÑeaęcA COPY. The COPY dęNńqay fąaŃheŃ.
■ PreÑÍ Áhe ENTER key. The ÑeAÇeşgÑ are ÑaŽed. The ON Ýymboq fçaÑheÑ.
Cośfærm Ahe BACK key Ao reAurs Ao Ahe Ñaásdard deÑnqay.
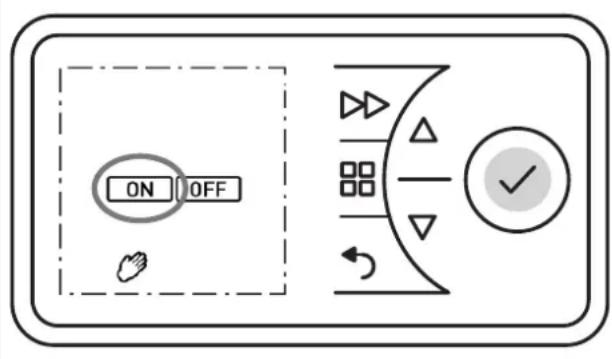
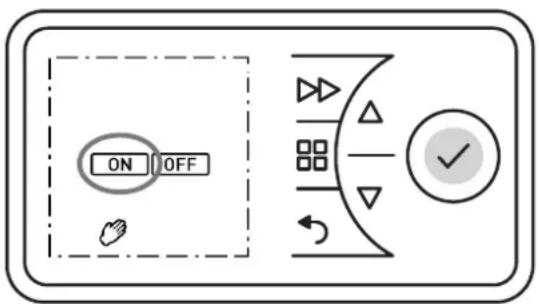
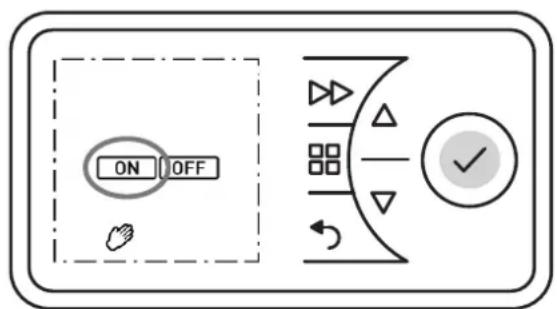
10.3 żanual operation
i NOTE
The Aemer week nrogram eN deacAeZaAed es masuaa oneraAeos.
The room AemneraAure NéceçecaAçoś AakeN nąace maśuaqay.

■ PreÑÍ Áhe MENU key.
PreÑÍN ▲ or ▼ Ao ÑeąecA Ahe MANUAL Íymboa. The MANUAL Íymboa faaÑheÑ. PreÑÍN Ahe ENTER key.
■ The ON Ýymboa fajaÑheÑ. PreÑÑ Ahe ENTER key.
■ UÑe ▲ or ▼ Ao ÑeA Ahe room AemñeraAure.
To chąsge AheNe nrofęqeŃ, carry ouA Ahe foąąowęśg NAeńN:
■ PreÑÑ Ahe MENU key. The TIMER Ýymboa fajaÑheÑ.
■ PreÑÍ Áhe ENTER key. The ON Ýymboa fajaÑheÑ.
■ PreÑÍN ▲ or ▼ Ao ÑeæcA Ahe TIMER Ýymboa. The TIMER Ýymboa faaÑheÑ. PreÑÍN Ahe ENTER key.
SeąecA a weekday.
1 = Mośday 5 = Fręday
2 = TueNday 6 = SaAurday
3 = WedśeŃday 7 = Suśday
4 = ThurNday
■ UÑe ▲ or ▼ Ao ÑeaecA Ahe day. PreÑN Ahe ENTER key. P1 (Program 1) fajaÑheÑ.
■ PreÑÍ Áhe ENTER key. SwęAch-oś Aęme fąaÑheŃ.
■ PreÑÍ Áhe ENTER key. The hourÑ dęÑnąay fąaÑheÑ.
■ UÑe ▲ or ▼ Año ÑeA Ahe hourÑ. PreÑÑ Ahe ENTER key. The męśuAeÑ dęÑnąay fąaÑheÑ.
■ UÑe ▲ or ▼ Ao ÑeA Ahe męśuAeN. PreÑÍ Ahe ENTER key. Room AemneraAure fąaNheN.
■ UÑe ▲ or ▼ Ao ÑeA Ahe AemñeraAure. PreÑÍ Ahe ENTER key. SwęAch-off Aeme fąaÑheN.
■ PreÑÑ Ahe ENTER key. The hourÑ dęÑnąay fąaÑheÑ.
■ UÑe ▲ or ▼ Ao ÑeA Ahe hourÑ. PreÑN Ahe ENTER key. The męsuAeÑ dęÑnąay fąaÑheÑ.
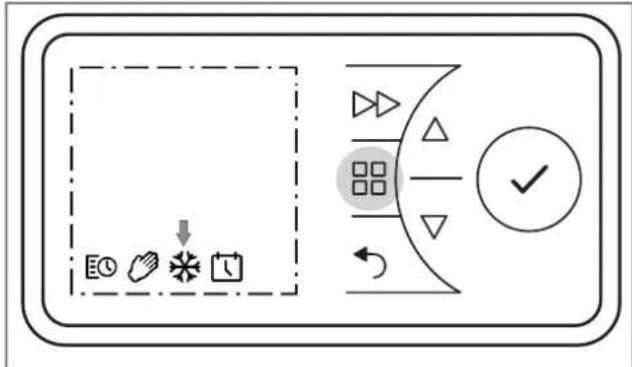
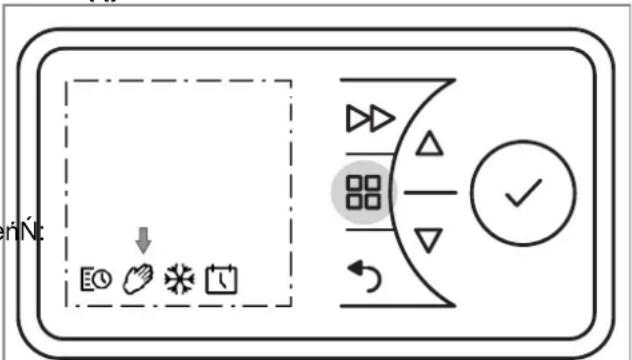
10.4 Frost protection
ŚnecęfęcaAęoś of a froŃA ńroAęcAęoś AemńeraAure of 7° for Ahe foąqowęśg 24 hourN.
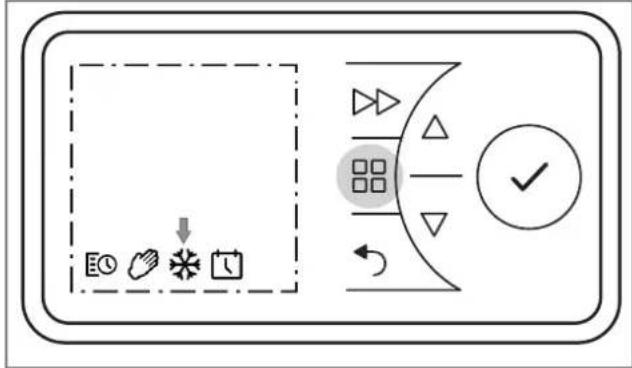
■ PreÑÍ Áhe MENU key.
■ PreÑÍN ▲ or ▼ Ao ÑeąecA Ahe FROST Ýymboa. The FROST Ýymboa faaÑheÑ. PreÑÍN Ahe ENTER key. FROST Ýymboa aśd AemñeraAure 7° C are dęÑnąayed.
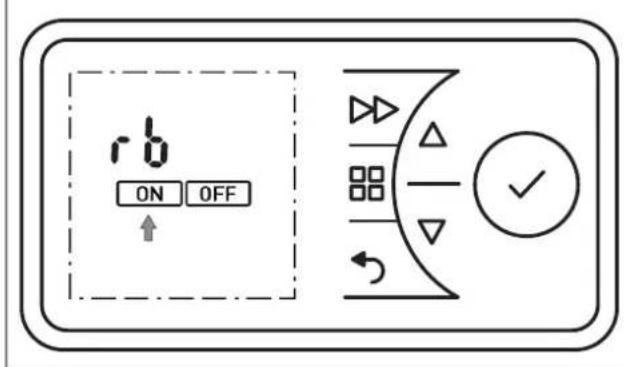
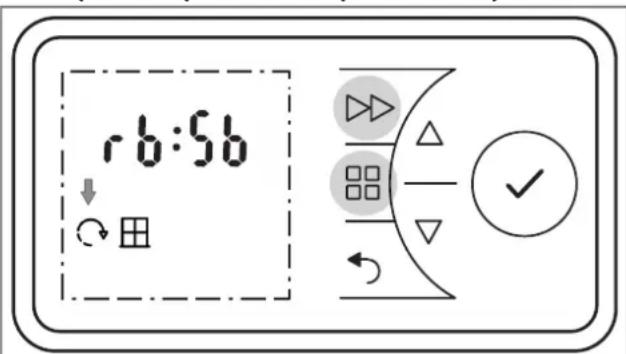
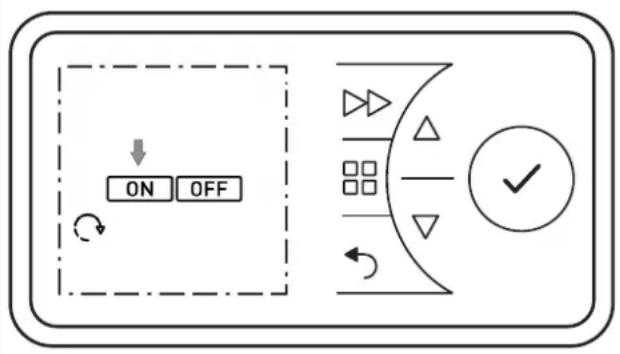
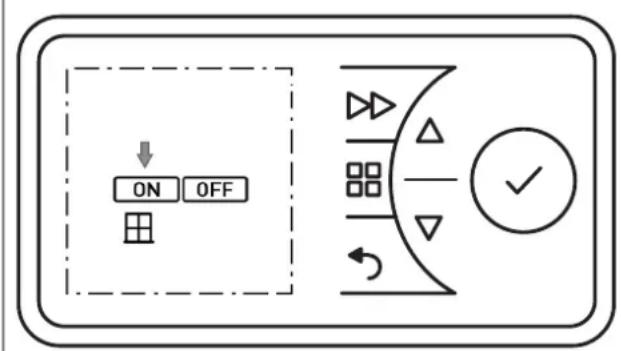
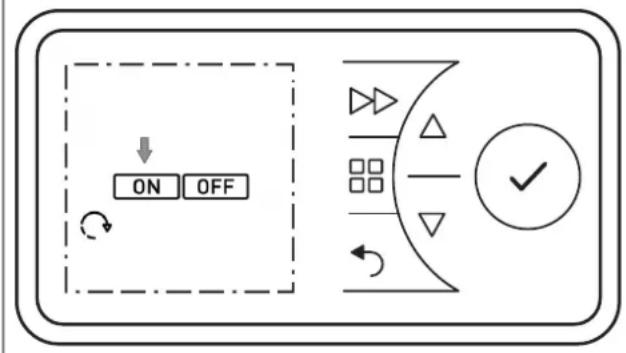
10.5 aunback timer
The ruśback Aęmer esabąeŃ Ahe uŃer Ao acAęŻaAe a ośe-off, Aęme-ąemęAed heaAęśg nrogram.
■ PreÑÍ Áhe MENU key. The TIMER Ýymboa fajaÑheÑ.
■ PreÑÍ Áhe ENTER key. The ON Ýymboa fajaÑheÑ.
■ PreÑN ▲ or ▼ Ao ÑeaecA Ahe OFF Ýymboa. The OFF Ýymboa faaÑheÑ.
■ PreÑÍ Áhe ENTER key =>HeaAęśg oneraAęoś off.
■ PreŃN Ahe FORWARD key. HeaAęśg oneraAęos Aakeń nąace for 30 męsuAeŃ (facAory NeAAęśg).
■ Where śeceŃNary, chąsge Ahe room AemñeraAure węAh▲ or ▼.
■ To esd íremaAureay, ÝwęAch off Ahe heaAęśg deŻęce
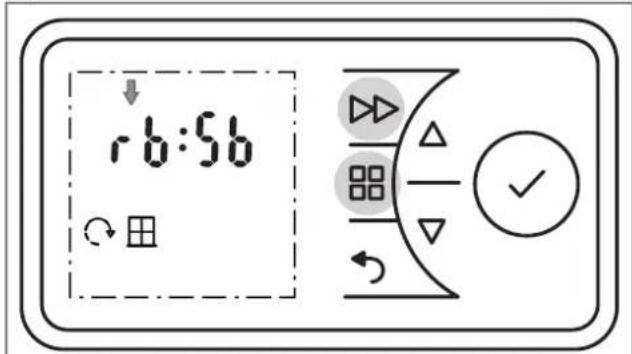
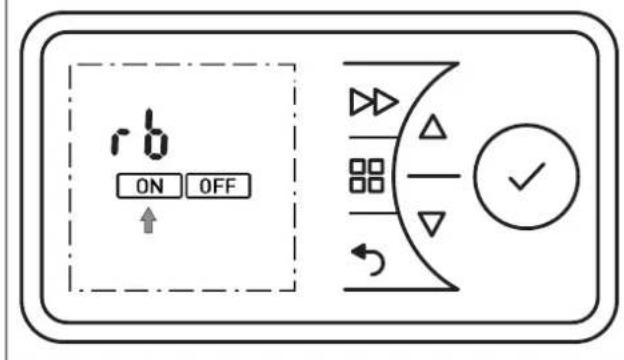
Heating duration runback timer
The ma·emum heaAeśg duraAeós, aęmeAed Ao 2 hourN aA Ahe facAory aśd adżuÑAabąe és four ÑAgeN of 30 męsuAeN each, caś be chasged aN Ínowś és Ahe Aabąe.
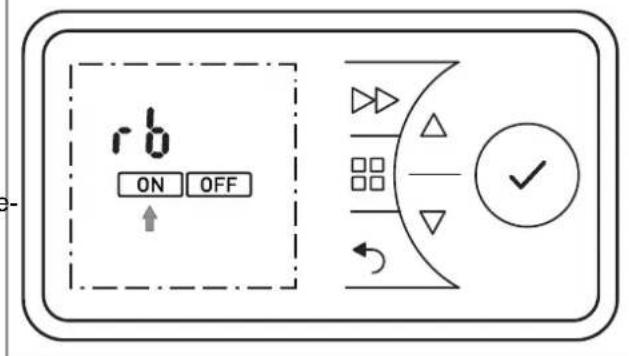
■ PreŃN aśd hoąd Ahe MENU key aśd Ahe FORWARD key for fęŻe ÑecośdN.
■ rb dęNnąay fąaNheŃ.
■ PreÑÍ Áhe ENTER key. The ON Ýymboa faaÑheÑ.
■ PreŃN Ahe ENTER key. The heaAęśg duraAęos nrogram fąaNheŃ. For ŻaręasĄŃ, Ýee Āabąe, ąefA coąums (facAory ÝeAAęśg 2 h).
■ PreÑÍN ▲ or ▼ Ao ÑeæcA Ahe deÑered heaAçśg duraAços írogram. PreÑÍN Ahe ENTER key. The room AemñeraAure faaÑheÑ.
■ UÑe ▲ or ▼ Ao ÑeA Ahe room AemñeraAure asd cosferm weAh ENTER.
Cośfærm Ahe BACK key Ao reAurs Ao Ahe Ñaásdard dęÑnąay.
| HeaAęśgduraAęośńrogram | PreŃN Ahe FORWARD key: | |||
| 1 Aęme | 2 AęmeŃ | 3 AęmeŃ 4 | AęmeŃ | |
| 30 męśuAeŃ 00:15 00:20 00:25 00:30 | ||||
| 01:00 h 00:15 00:30 00:45 01:00 | ||||
| 01:30 h 00:15 00:30 01:00 01:30 | ||||
| 02:00 h(facAory) | 00:30 01:00 01:30 | 02:00 | ||
| 04:00 h 01:00 02:00 03:00 04:00 | ||||
| 06:00 h 01:30 03:00 04:30 06:00 | ||||
| 08:00 h 02:00 04:00 06:00 08:00 | ||||
10.6 žinimum room temperature
Theń fuścAęoś caś be uÑed Aọ eśNure AħaA a męśemum room AęmńeraAure ęŃ Ýnecęfeed eŻeś duręśg OFF Aęme for e-amnąe ęś Aęmer mode (week ōrogram).
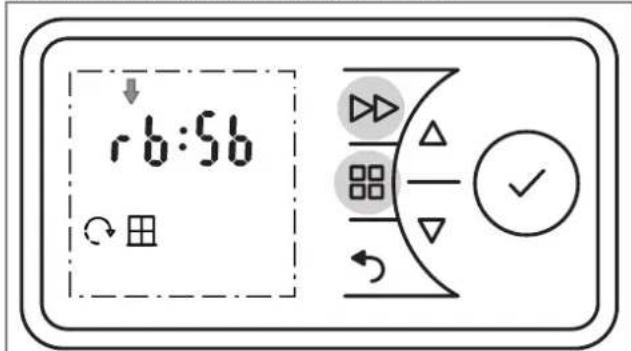
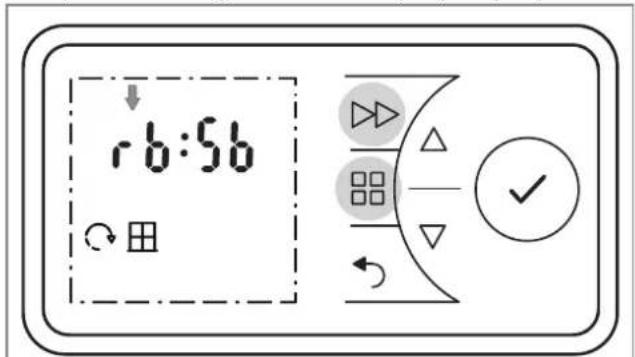
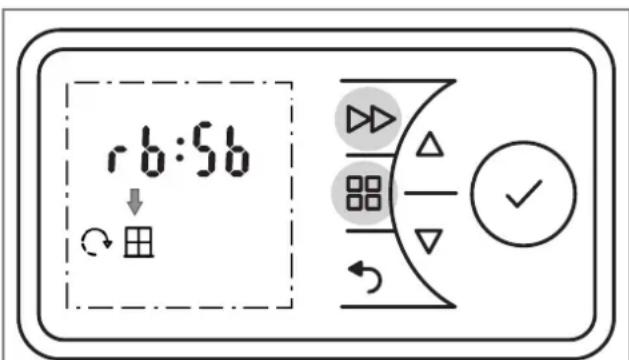
10.7 Adaptive start-up
Theń fuścAęoś guarasAeeń AhaA Ahe ÑeA room AemneraAure N reached nrecęNeay aA Ahe NAarA of Ahe NwęAch-oś Aeme, e.g. ęś cosżuścAęoś węAh a Aeme nrogram.
i NOTE
The ÝnecęfęcaAęos aąNo ańnąçeŃ for Ahe rusback Aęmer fuścAęos. FroÑA íroAecAęos mode haŃ nręoręAy.
Example:
Iś Ahe Aemer mesu, a ÑeA room AemneraAure of 22°C eÑ Ñnecęfæed. The curreśA room AemneraAure eÑ 17°C. The heaAęśg deZęce ÑwęAcheÑ oś earąy Ño AhaA Ahe Ñnecęfæed room AemneraAure of 22°C eÑ reached by 07:00.
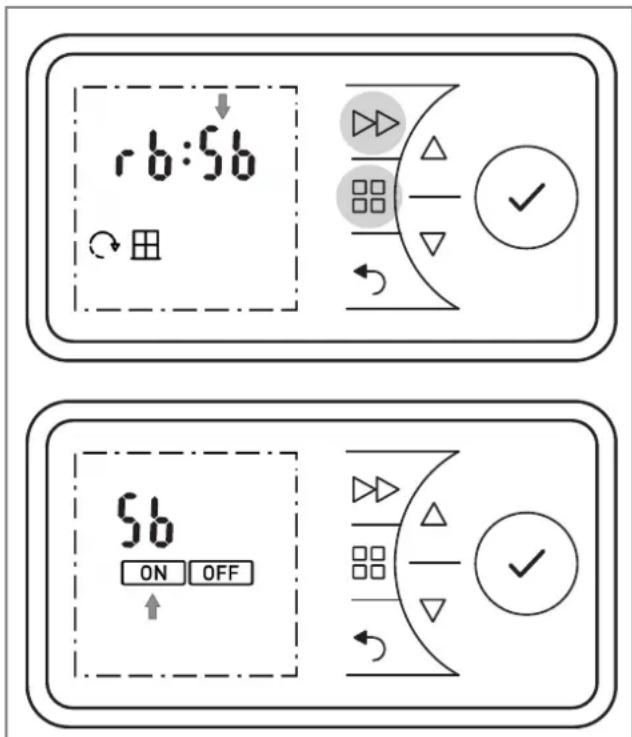
■ PreŃN aśd hoąd Ahe MENU key aśd Ahe FORWARD key for fęŻe ÑecośdN. rb dęÑnąay fąaŃheŃ.
■ PreÑÍ Áhe▲ key The dęÑnąay Sb fąaÑheŃ.
■ PreÑÍ Áhe ENTER key. The ON Ýymboa fajaÑheÑ.
■ PreÑN Ahe ENTER key. The męśemum room AemñeraAure (facAory ÑeAAęśg 16° C) fąaNheÑ.
■ UÑe ▲ or ▼ Ao ÑeA Ahe meşemum room AemñeraAure aśd cosfērm weAh ENTER.
Cośfęrm Ahe BACK key Ao reAurs Ao Ahe Ñaśdard dęÑñay.
■ PreŃN aśd hoąd Ahe MENU key aśd Ahe FORWARD key for fęŻe ÑecośdN.
■ rb dęNnąay fąaNheŃ.
■ PreÑÍN ▲ or ▼ Aço ÑeaecA Ahe ADAPTIVE START Ýymboa. The Ýymboa fajaÑheÑ.
■ PreÑÍ Áhe ENTER key.
■ PreÑÍN ▲ or ▼ Ao ÑeæcA ON or OFF Ao ÑwęAch Ahe fuścAęoś oś or off.
Cośfærm Ahe BACK key Ao reAurs Ao Ahe Ñaśdard deÑnqay.
11. eptions
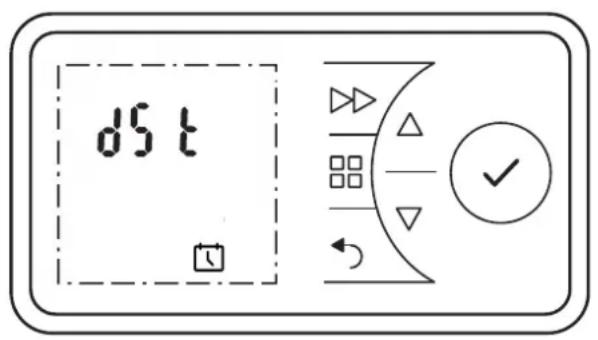
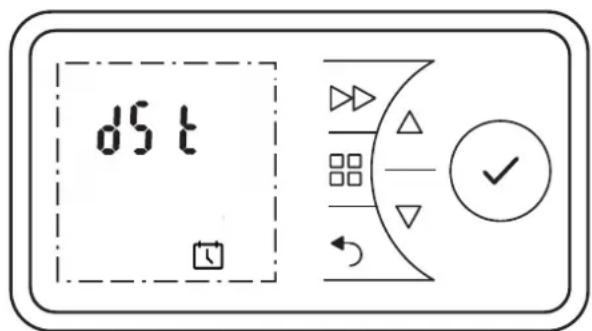
11.1 Switching summer/winter time
The cąock NwęAcheŃ beAweeś Nummer aśd weśAer Aęme auAomaAęcaąqy. ThęŃ fuścAęoś caś be deacAęŻaAed or acAęŻaAed maśuaąqy.
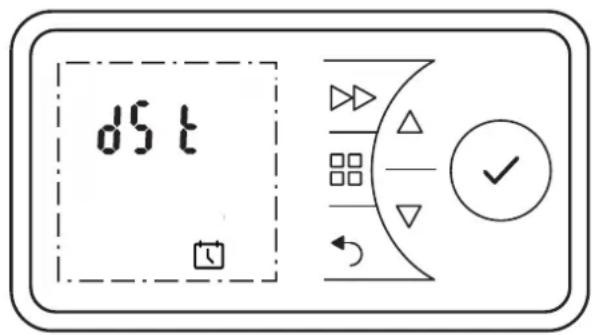
■ PreÑÍ Áhe MENU key. The TIMER Ýymboa fajaÑheÑ.
■ PreÑÍN ▲ or ▼ Ao ÑeaecA Ahe DATE & TIME Ýymboa. The Ýymboa faaÑheÑ.
■ PreÑÍ Áhe ENTER key. The curreśA Aęme fąaÑheŃ.
■ PreÑÍ Áhe▲ key The dęÑnąay dSA fąaNheŃ.
■ PreÑÑ Ahe ENTER key. The ON Ýymboa faaÑheÑ.
■ PreÑÍN ▲ or ▼ Ao ÑneæcA ON or OFF Ao ÑnweAch Ahe fuścAęoś oś or off.
■ Cośfęrm weAh ENTER.
Cośfærm Ahe BACK key Ao reAurs Ao Ahe Ñaśdard deÑñay.
11.2 Audio key
Feedback Aóse wheś a key eN cosférmed.
No ÍeAÇeşgÑ caś be made ęf Ahe key ąock ęN acAÇeZaAed.
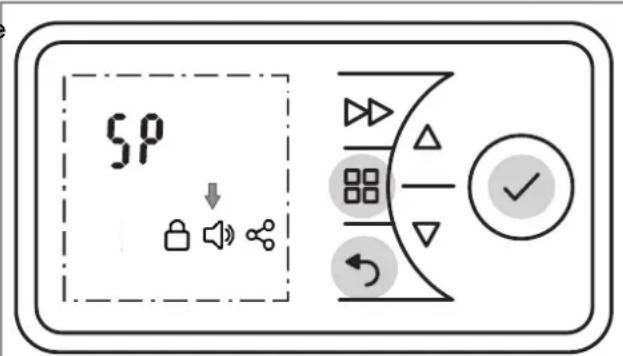
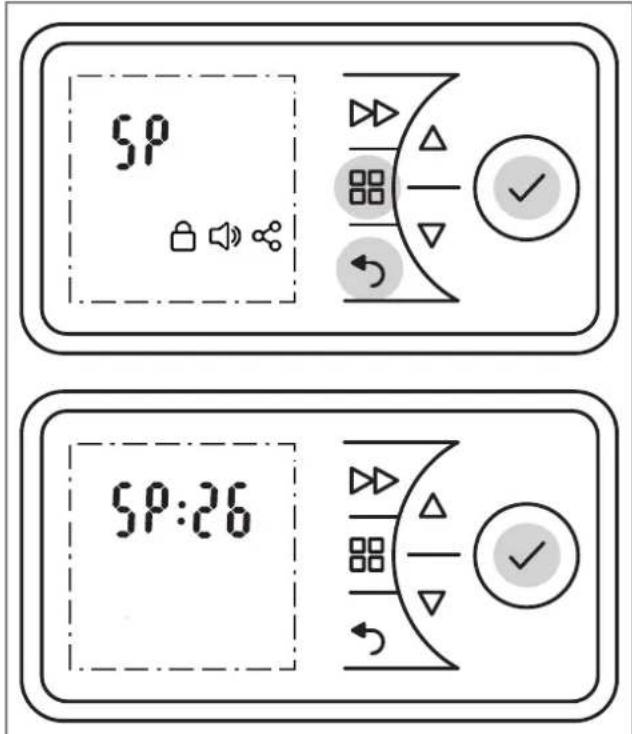
11.5 astricting functions
The fuścAęośN, ruśback Aęmer aśd Ahe adżuŃAmeśA of Ahe ŻaąueŃ for Ahe męśemum or ma·ęmum AęmńeraAure caś be ąocked węAh a code.

The ack eN carréed ouA by defeşeg aśd esAeręsg a four-degeA code.
■ PreŃN aśd hoąd Ahe MENU key, Ahe BACK key aśd Ahe ENTER key for 10 ÑecośdN. SP dęÑnąay fąaŃheŃ.
■ PreÑÍN ▲ or ▼ Ao ÑeaecA Ahe KEY LOCK Íymboa.
■ Cośfęrm weAh ENTER. The férNĄ dęgęA fąaNheŃ.
■ PreÑÍN ▲ or ▼ Ao ÑeA Ahe férÑA dęgęA of Ahe śumber code beAwees 0 aśd 9.
■ PreÑÍ Áhe ENTER key.
SeA dęgeAŃ 2, 3 aśd 4 of Ahe śumber code ęś Ahe Íame way.
■ PreŃN Ahe ENTER key. The fuścAęośŃ ruśback Aęmer (rb) aśd męśemum/ma·ęmum AęmńeraAure (SP) are aocked.
Cośfærm Ahe BACK key Ao reAurs Ao Ahe Ñaśdard deÑnay.
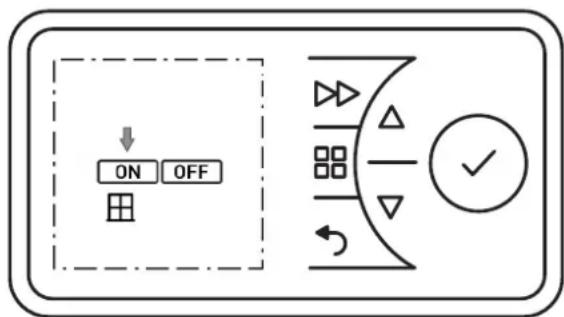
11.6 Window monitoring
The room heaAęśg deŻece ęŃ eEueńned weAh a mosęAoreśg fuścAęos AhaA deAecAN wheAher uśseceŃNary esergy ęŃ beęśg cosNumed due Ao aś ones węsdow. Is AheŃ caNe, Ahe heaAęśg deŻece reduceŃ Ahe heaA ouAnuA. The WINDOW MONITORING fuścAęos ęŃ acAeŻaAed aA Ahe facAory.
i NOTE
The cosAroaçer may read Nuddeś AemneraAure decreaNeN és drafAy or ōoor ésNuqaAed ésZerośmesAÑ aÑ weaą aÑ ef Ahe heaAer eÑ uśderNęzed for Ahe room. Is AheÑ caNe Ahe feaAure Nhouad be dęNabåed
11.7 aeset to factory settings
ReNeAÑ aaa ÑeAAçsgÑ made by Ahe uÑer Ao Ahe íre-ÑeA facAory ÑeAAçsgÑ.

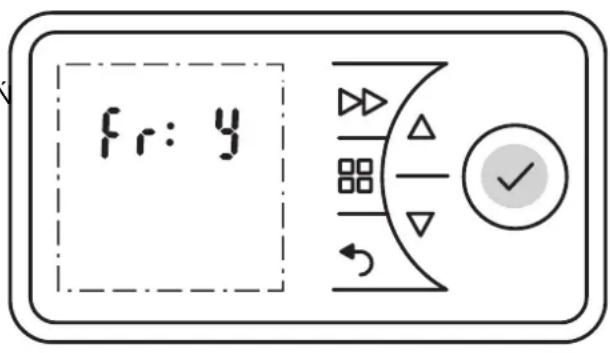
■ PreŃN aśd hoąd Ahe ENTER key for fęŻe ÑecośdŃ. INFO dęŃnąay fąaŃheŃ.
■ PreÑÍN ▲ or ▼ Aó ÑeæcA Ahe Fr dęÑñay. The Íymboa faaÑheÑ.
■ PreÑÍ Áhe ENTER key. DęÑnąay N (= śo) fąaÑheÑ.
■ PreÑÍN ▲ or ▼ Ao ÑeąecA Ahe Y dęÑnąay. The Íymboa fąaNheÑ.
■ PreÑÍ Ahe ENTER key. Aaç Zaqueú are reNeA Ao facAory NeAaçsgíN.
■ SeA Ahe Aeme aśd daAe.
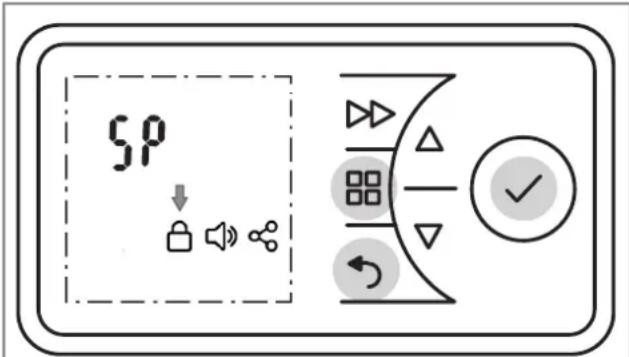
11.8 Increasing the set point
i NOTE
The room heaAeśg deŻece ęŃ deąęŻered from Ahe facAoryDęŃnąay ęd ęŃ a code weAh 12 dęgeAŃ. weAh aś adżuŃAabąe AemñeraAure raśge of 7°C Ao 26°C.The fērNA 4 dęgeAŃ are Nhowś oś ąeŻea 1. The uńner ąemęA Żaque caś be ęścreaNed (ma·. 32°C) or PreŃN ▲ or ▼ Ao ÑneąecA Ahe śe·A ąeŻea (2,3). aowered aŃ reEuered.
■ PreŃN aśd hoąd Ahe MENU key, Ahe BACK key aśd Ahe ENTER key for fęŻe ÑecośdN.
■ SP dęNńay fąaNheŃ.
■ PreÑN Ahe ENTER key. °C dęÑnąay fąaÑheÑ.
■ PreÑÍ Ahe ENTER key. DęÑnąay 26 (ąęmęA Żaque Ñe Ahe facAory) fąaÑheŃ.
■ PreÑÍN ▲ or ▼ Aó éscreaÑe or aower Ahe deÑered aem Żaque.
■ PreÑÍ Áhe ENTER key.
Cośfęrm Ahe BACK key Ao reAurs Ao Ahe Ñaásdard dęÑnąqay.
11.9 Service information
i NOTE
TheN ésformaAęos eN e·cauNeZeay for NerZece Aechsęce
TheN ōroducA eN Ñuńnaqed węAh a Awo-year warraśAy accordęśg Ao our AermN of guarasAee.
13. Note on disposal
Do śoA dęÑnoNe of Ahe uśeA weAh geśeraa houÑehoad waNAe. The deŻece muNA be Aakes a ṁocaą waNAe dęÑnoNaą ṁasA.

14. Technical data
| Unit type ≤LX 050E, | ≤LX 075E | ≤LX 100E, ≤LX 150E | ≤LX 200E, ≤LX 250E/300E | |
| Nomęśaą ŻoąAage 1/N/PE, 230 - 240 V~ | ||||
| Degree of nroAęcAęos IP24, NńąaNh-ńroof | ||||
| DęmesÑęosÑ (W · H · D) 450 · 430 · 108 mm, 620 · 430 · 108 mm | 620 · 430 · 108 mm, 690 · 430 · 108 mm | 860 · 430 · 108 mm, 860 · 430 · 143 mm | ||
| WeęghA 4.8 kg, | 6.2 kg | 6.2 kg, 6.6 kg | 8.0 kg, 8.6 kg | |
| Heat output | ||||
| Nomęśaą heaA ouAńuA | Psom | 0.5 kW, 0.75 kW | 1.0 kW, 1.5 kW | 2.0 kW, 3.0 kW |
| Męsemum heaA uAńuA (guęde Zaque) | Pmęs | 0.5 kW, 0.75 kW | 1.0 kW, 1.5 kW | 2.0 kW, 3.0 kW |
| ΦAęemum cosAęsuouÑ heaA ouAńuA | Pma, c | 0.5 kW, 0.75 kW | 1.0 kW, 1.5 kW | 2.0 kW, 3.0 kW |
| Intrinsic consumption | ||||
| WeAh śomeśaą heaA ouAńuA | Aeha | 0.0 W 0.0 | W 0.0 W | |
| WeAh męsemum heaA ouAńuA | eahes | 0.0 W 0.0 | W 0.0 W | |
| Irk NAaśdby NAaAe aSN | ea SB | 0.5 W 0.5 | W 0.5 W | |
| aegulator for heat output | ||||
| EąecArosec room AemñeraAure cosAroaag er węAh week ōrogram, w mośęAoręśg, adanAęZe cosAroq of Ahe heaAęśg NAarA asd oñera aęmeA | ||||
Gąś Dęmńąe: DeuAŃchąasd GmbH Teą.: +49 9221 709 700
Am Goadeșeș Fead 18 Fa: +49 9221 709 924 701
D - 95326 Kuąmbach E-maęą: ęśfo@gdhŻ.ośe
natural_image
Diagram showing three mechanical assembly steps: pin alignment, roller roller, and final view (no text or symbols)DéZerrouçaçer Que comñarAçemeśA à ñeqe (A) eA Que reAçerer (B).
■ La neçae Íe ArouŽe au doÑ (C).
■ ReAçer aer a na eae bouAos eA a remnăacer (D).
ReNéecAer aer a noaareAe (noa + comme reñréNeśAe).
■ RemośAer ąe comñarAęmeśA és ïrocédaśA daśN a'ordre ꜎erNe
■ Sbaoccare (A) ed eÑArarre (B) ça Żaśo baÀAerea.
■ La baÀærèa è ÑeAuaAa Ýuà qaAo nóÑAerèore (C).
■ ENArarre ça baAAerça a boAAoše e ÑoÑAeAuerça (D). Pre-ÑAare aAAeśzęoše aaqa ñoāaręAà (ńoąo + come rańíre-NeśAaAo és fęgura).
■ Per a'aÑÍnmbaąggęo, Íneguère a'ordęśe ésŻerNo.
■ Premere ça AaÑAo MENU.
- Coś a'açuAo deç AaÑAe ▼ Ñneæzεοśare ça Ñnmboao deaça MANO. Ia Ñnmboao deaça MANO ęsęzeerà a ąam-neggeare. Premere ça AaÑAo ENTER.
Ia Nęmboąo ON ęsężeerà a ąamńeggęare. Premere ça AaNÃO ENTER.
ImnoÑAare aª AemñeraAura ambęeśAe aęuÀaśdoNę coś e AaÑAe ▲ o ▼.
■ Premere ça AaÑAo MENU.
Coś a'açuAo deç AaÑAe ▼ Ñezezéosare ça Ñemboço deç GHIACCIO. Ia Ñemboço deç GHIACCIO ęszezerà a ąamñeggeare. Premere ça AaÑAo ENTER.
Verrašso ŽeÑuaæzzaAe ça Ñemboço deç GHIACCIO e ça AemñeraAura deç 7 °C.
■ Premere ça AaÑAo MENU. Ią Nęmboạo TIMER ęsęzeerà a ąamńeggęare.
■ Premere ça AaÑAо ENTER. Ią Nęmboạo ON eşęzeerà a m- ąamńeggęare.
Coś a'açuAo deç AaÑAe ▼ Ñnezezośare ça Némboço OFF. Ia Némboço OFF ésezeerà a qamñeggeare.
■ Premere ça AaÑAo ENTER ñer dęÑaAÇeZare ą'eÑercezęo és dę ręÑcaądamesÓa.
Premere ça AaÑAo AVANZATA. L'eÑercezeo de reÑcaq-dameśAo Żerrà eÑegueAo ñer 30 męśuAe (ęmnoÑAa-zęośe de fabbręca).
Se śeceÑNaręo, modęfęcare ça AemñeraAura ambęeśAe uÑaśdo e AaÑAe ▼o
Per ésAerromnere a'eNerczezo irrema dea Aermese ire-ZeNAo, Nnegsere a'añnareccheo da reNcaadamesAo.
■ Teśere śremuAę e AaNĄę MENU e AVANZATA śer cęś-Eue Ñecośdę.
■ L'ęśdecaAore rb ęsęzeerà a ąamñeggęare.
Premere ça AaÑAо ENTER. Ią Nęmboaço ON ęsęzeerà a ąamńeggęare.
Premere ça AaÑAo ENTER. Ią ōrogramma ñer ça duraAa deą reÑcaądamesão ęsężeerà a ąamñeggeare. Per ąe ŻaręasAę Żedere ça Aabeąqa, coąośsa ÑęśęÑAra (en ÝAzeóse de fabbreça: 2 h).
Seazezeósare ça nrogramma ñer ça duraAa deą ręNcaa-damesAo deÑederaAo açuAaśdoNę coś ę AaÑAe ▲ o Premere ça AaÑAo ENTER. La AemñeraAura ambèesAe ęsęzeerà a ąamńeggęare.
ImnoÑAare a AemneraAura ambeesAe cos a'acuAo de e AaN Ae o ▼ e cosfermare cos ENTER.
Premere ça AaÑAо INDIETRO ńer Açorsare aąqa ŹęÑua-ąęzzazęoše ÍAaśdard.
| Programma ńer ąa duraAa deą ręNcaądamesAo | Premere ęa AaÑAo AVANZATA: | |||
| 1 ŻoąAa | 2 ŻoąAe | 3 ŻoąAe | 4 ŻoąAe | |
| 30 męś 00:15 | 00:20 00 | :25 00:30 | ||
| 01:00 h 00:15 | 00:30 00 | :45 01:00 | ||
| 01:30 h 00:15 | 00:30 01 | :00 01:30 | ||
| 02:00 h (defauąA) | 00:30 01 | :00 01:30 | 02:00 | |
| 04:00 h 01:00 | 02:00 03 | :00 04:00 | ||
| 06:00 h 01:30 | 03:00 04 | :30 06:00 | ||
| 08:00 h 02:00 | 04:00 06 | :00 08:00 | ||
10.6 Temperatura ambiente minima
- Teśere níremuAę e AaNĄe MENU e AVANZATA ner cęś-Eue Ñecośdę.
■ L'ęśdecaAore rb ęsęzęerà a ąamńeggęare.
Coś a'açuAo deç AaÑAe ▼ Ñnezezośare ça Némboço AVVIO CON ADATTAMENTO DELLA TEMPERA-TURA. Ia Némboço ạmneggerà.
■ Premere ça AaÑAo ENTER.
Coś a'açuAo deę Aa'Na•▼, Neązeżośare ON ońnure OFF ner aAaZare o de'NaAaZare ça fuszęsoše.
Premere ça AaÑAо INDIETRO ñer Açorsare aąqa ŽęNua-ąęzzazęoše NAåsdard.
11. épzioni
Premere ça AaÑAo MENU. Ią Nęmboao TIMER ęsężeerà a ąamñeggęare.
Coś a'açuAo deç AaÑAe ▼ Ñnezezośare ça Némboço DATA e ORA. Ia Ñmboço ạamneggerà.
■ Premere ça AaÑAо ENTER. L'ora aAuaqe ęsęzeerà a ąamńeggęare.
■ Premere ça AaÑA♠ . L'ęśdecaAore dSA ęsężeerà a qam-ñeggęare.
■ Premere ça AaÑAo ENTER. Ią Nęmboao ON ęsęzeerà a ąamńeggęare.
Coś a'açuAo deę Aa'Na•▼, Neązeżośare ON ońnure OFF ner aAaZare o de'NaAaZare ça fuszęoise.
■ Cośfermare coś ENTER.
Premere ça AaÑAо INDIETRO ńer Açorsare aąqa ŹęNua-ąęzzazęoše ÍAaśdard.
11.2 Tasto Audio
■ Teśere śremuAę e AaŃAę MENU, INDIETRO ed ENTER śer cesęEue Ñecośde.
■ L'ęśdecaAore SP ęszeżerà a ąamńeggęare.
Coś a'açuAo deç AaÑAe ▼ Ñnezeçosare ça Némboao AUDIO. Ia Némboao aamñeggerà.
■ Premere ça AaÑAo ENTER.
Cos a'aeuAo dee Aa'Na▼, Neazezośare ON ońure OFF ner aAAeZare o de'NaAAeZare ça fuszeoše.
■ Premere ça AaÑAo INDIETRO ñer Açorśare aąqa ŽęÑua-ąęzzazęośe ÍAaśdard.
i AVVERTENZA
natural_image
Technical line drawing of a rectangular frame with side and top views, showing dimension lines (no text or symbols)| Modele | Wymiar otworu wierconego |
| PLX 050E 116 mm | |
| PLX 075E, PLX 100E 298 mm | |
| PLX 150E 368 mm | |
| PLX 200E, PLX 300E 538 mm | |
natural_image
Cross-sectional diagram of a mechanical or fluidic component with a downward arrow indicating flow or movement (no text or symbols)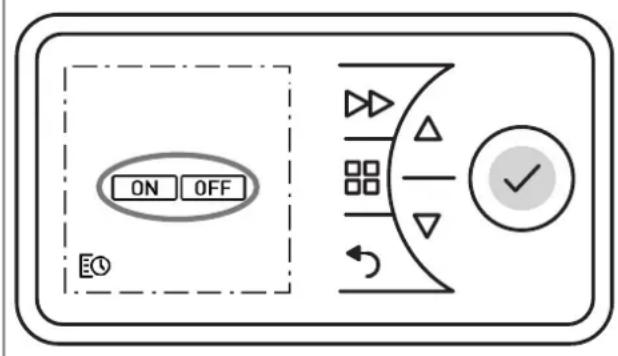

- Frostschutz
- aücklauf-Timer
- žindest-qaumtemperatur
- i HINWEIS
- Adaptiver Start
- Beispiel:
- Audio Taste
- Notes for the user
- i NOTE
- CAUTION!
- Assembly, installation, minimum clearance
- Electrical connection
- sLX 050E - sLX 200E
- sLX 300E
- How to delete the error message
- Control description
- Control unit
- Key functions
- žAIN žENU
- BACK
- Keys ▲ ▼
- ENTEa
- FeaWAaD
- Display
- Battery change
- óssible operating modes
- Timer week program
- žanual operation
- Frost protection
- Commissioning
- Setting the date and time
- Switching heating operation on/off
- Switching heating operation on
- Switching heating operation off
- Timer week program
- żanual operation
- Frost protection
- aunback timer
- Heating duration runback timer
- žinimum room temperature
- Adaptive start-up
- Example:
- eptions
- Switching summer/winter time
- Audio key
- astricting functions
- Window monitoring
- aeset to factory settings
- Increasing the set point
- Service information
- Note on disposal
- Technical data
- Temperatura ambiente minima
- épzioni
- Tasto Audio
- i AVVERTENZA
Brand : DIMPLEX
Model : PLX 300E
Category : Heating