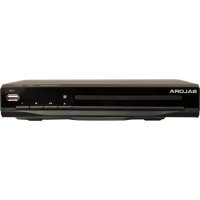
DVD330 - DVD player SALORA - Free user manual and instructions
Find the device manual for free DVD330 SALORA in PDF.


| Product Type | DVD Player |
| Brand | Salora |
| Model | DVD330 |
| Compatible disc formats | DVD, DVD-R, SVCD, HDCD, VCD, CD, CD-RW, MP3, JPEG |
| Audio digital-to-analog converter | 192 kHz / 24 bits |
| Digital video converter | 10-bit, resolution >500 lines |
| Video outputs | HDMI, composite video, S-video, component |
| Audio outputs | RCA stereo (2.0V±0.0V/1.0V), HDMI audio |
| Power supply | AC 110-240 V, 50/60 Hz |
| Dimensions (W x D x H) | 255 x 215 x 48 mm |
| Weight | 500 g |
| Included accessories | Remote control, RCA audio cable, HDMI cable, user manual, 2 batteries |
| Main functions | DVD/VCD/CD/MP3/JPEG playback, A-B repeat, zoom (2x-4x), CD/MP3 to USB copy, programmed playback, OSD functions |
| Audio and subtitle languages | 8 audio languages, 32 subtitle languages |
| Parental control | Yes, with default password 8888 |
| Laser protection | Laser head overcurrent protection system |
| Maintenance and cleaning | Clean with a soft, dry cloth. Avoid exposure to heat, moisture, and dust. Do not use solvents. |
| Safety | Do not expose to rain or moisture. Do not open the casing. Unplug if not in use for extended periods. |
| Repairability | Have it serviced by qualified personnel. No specific spare parts indicated. |
| General information | User manual available in multiple languages. Online support via notice-facile.com. |
Frequently Asked Questions - DVD330 SALORA
User questions about DVD330 SALORA
0 question about this device. Answer the ones you know or ask your own.
Ask a new question about this device
Download the instructions for your DVD player in PDF format for free! Find your manual DVD330 - SALORA and take your electronic device back in hand. On this page are published all the documents necessary for the use of your device. DVD330 by SALORA.
USER MANUAL DVD330 SALORA
INSTRUCTIEHANDLEIDING
DVD-SPELER
Modelnr.: DVD330

natural_image
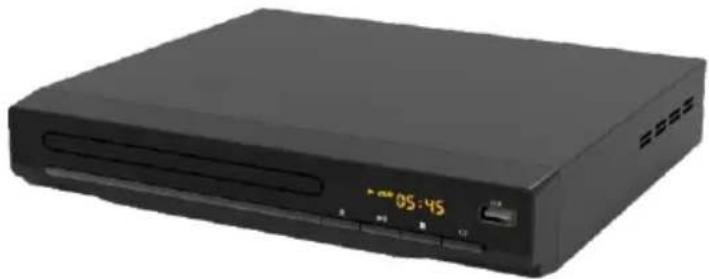
Black electronic device with digital display showing time 05:45 (no visible text or symbols on body)
natural_image
Black triangular warning symbol with a lightning bolt inside, indicating electrical hazard (no text)

natural_image
Black triangular warning symbol with exclamation mark (no text or numbers)LET OP: OPEN NOOIT DE BEHUIZING OF ACHTERKANT VAN DIT APPARAAT, WANT DAN IS ER KANS OP EEN ELEKTRISCHE SCHOK.
DIT APPARAAT BEVAT GEEN ONDERDELEN DIE DOOR DE GEBRUIKER KUNNEN WORDEN GEREPAREERD. LAAT REPARATIE OVER AAN DAARVOOR GEKWALIFICEERD PERSONEEL.
natural_image
Symbol of a triangular warning sign with a central sunburst (no text or numbers present)Invisible laser radiation when open and interlock failed or defeated. Avoid direct exposure to laser beam
LASER SAFETY
This unit employs an optical laser beam system in the CD mechanism, designed with built-in safeguards. Do not attempt to disassemble, refer to qualified service personnel. Exposure to this invisible laser light beam may be harmful to the human eye. THIS IS A CLASS-1 LASER PRODUCT USE OF CONTROLS, OR ADJUSTMENTS OR PROCEDURES OTHER THAN THOSE SPECIFIED HEREIN,MAY RESULT IN HAZARDOUS LASER LIGHT BEAM EXPOSURE.
LET OP:

- POWER
- STOP
- PLAY/PAUSE
- EJECT
- DVD DOOR
- USB PORT 7.
-
DISPLAY
-
REMOTE SENSOR AC INPUT
- AC POWER
- HDMI OUTPUT
- AUDIO R OUTPUT
- AUDIO L OUTPUT
- VIDEO OUT

- POWER
- DVD/USB
- HOEK (ANGLE)
- NUMMERTOETSEN
- REV
- FWD
- L/R
- SETUP
- UP
- LEFT
- MENU
- DOWN
- MUTE
- AUDIO
- OSD
- VOLUME (+/-)
- ZOOMEN
- EJECT (OPEN/CLOSE)
- V-MODUS
- ONDERTITEL (SUBTITLE)
- GO TO
- VOLGENDE (NEXT)
- VORIGE (PREV)
- STOP
- AFSPELEN/PAUZE (PLAY/PAUSE)
- TITEL (TITLE)
- RIGHT
- ENTER
- PBC
- RESETTEN
- HERHALEN
- A-B
- P/N
- PROG.
- SLOW
VOORBEREIDING
1. Accessoires
PIJLTOETSEN ( ◀ ▶ ▼▲)
natural_image
Symbol of a trash bin crossed with a diagonal line, no text or numbers presentThis symbol on the product or in the instructions means that your electrical and electronic equipment should be disposed at the end of its life separately from your household waste. There are separate collection systems for recycling in the EU. For more information, please contact the local authority or your retailer where you purchased the product.
INSTRUCTION MANUAL
DVD PLAYER
Model No.: DVD330

natural_image
Black electronic device with digital display and control buttons (no visible text or symbols)
natural_image
Black triangular warning symbol with a lightning bolt inside, indicating electrical hazard (no text)

natural_image
Black triangular warning symbol with exclamation mark (no text or numbers)CAUTION: TO REDUCE THE RISK OF ELECTRIC SHOCK, DO NOT REMOVE COVER OR BACK.
NO USER SERVICEABLE PARTS INSIDE, REFER SERVICING TO QUALIFIED SERVICE PERSONNEL.
The meanings of the graphic symbols on the back cover are as follows:
The lightning flash with arrow symbol within an equilateral triangle is intended to alert the user to the presence of uninsulated "dangerous voltage" within the product's enclosure, that may be of sufficient magnitude to constitute a risk of electric shock to persons.
The exclamation point within an equilateral triangle indicates maintenance (servicing) instructions in the literature accompanying the appliance.

WARNING: TO REDUCE THE RISK OF FIRE OR ELECTRIC SHOCK, DO NOT EXPOSE THIS APPLIANCE TO RAIN OR MOISTURE.
WARNING
* Store the product in its original packaging, if it will not be used for a long period of time.
* Store the product in a well ventilated and cool place.
* The top and rear panels of the DVD player may become warm when used for a long period of time. This is not a malfunction.
* Do not remove the disc while it is being played, in order to avoid damage to the lens and disc.
* Do not push the disc tray, press the open/close key on the front panel or remote control to open or close the disc tray.

natural_image
Symbol of a triangular warning sign with a central sunburst (no text or numbers present)Invisible laser radiation when open and interlock failed or defeated. Avoid direct exposure to laser beam
LASER SAFETY
This unit employs an optical laser beam system in the CD mechanism, designed with built-in safeguards. Do not attempt to disassemble, refer to qualified service personnel. Exposure to this invisible laser light beam may be harmful to the human eye. THIS IS A CLASS-1 LASER PRODUCT USE OF CONTROLS, OR ADJUSTMENTS OR PROCEDURES OTHER THAN THOSE SPECIFIED HEREIN,MAY RESULT IN HAZARDOUS LASER LIGHT BEAM EXPOSURE.
CAUTION:
To reduce the risk of electric shock, do not remove cover. Refer servicing to qualified service personnel.
Please read the manual carefully before operation.
Keep the manual in a safe place for future reference.
USAGE NOTES OF DVD PLAYER
Do not place the player on the following locations.
Near sunshine or appliances that radiate heat, such as heaters, stoves or other appliances that produce heat.
On top of other heat radiating devices.
Dusty locations or locations with poor ventilation or high humidity, locations that are unstable or where the appliance is subject to vibration or exposed to rain or water.
Nearby the high power speaker or on the same stand with speaker. Avoid shocks to protect its normal function.
Do not play discs that are scratched or bent, to prevent the unit from getting damaged.
USAGE NOTES OF POWER SUPPLY
The power supply required is AC 110-240V 50/60Hz.
When not planning to use this unit for a long period of time, disconnect the AC power plug from the outlet. To prolong service life, the period between
DVD PLAYER
- Fully compatible with DVD, SVCD, VCD, MP3, CD-R and CD-RW with high error correction ability.
- Able to read picture CDs for displaying digital pictures.
- 10 bit digital video converter, the resolution is more than 500 lines.
-
24 bit/96KHz digital audio converter, high quality sound effects, professional Hi-Fi level.
-
Video component signal output S-video output, composite video output.
- 8 languages, 32 caption models, multiple angle selection.
- Various TV display screen selections, and ability to select preferred story section for viewing.
- Full function intelligent upgrade.
- Plays and converts MP3+G
192KHz/24 Digital/analog
(D/A) converter
This latest conversion technology matches 96KHz sampling frequency software (twice as high as CD ^2 and 24-bit data, giving you perfect sound quality without distortion.
Component video output
Component video output enables you to enjoy the real DVD effect.
Laser head overcurrent protection system.
The laser head is the most important and critical part of the whole appliance, its performance is directly linked to the service life and error correction function of the whole system. When a common player reads a scratched disc or a non-standard disc, the laser intensity will be 2-4 times or even 20 times the normal level, thus dramatically reducing its service life. This appliance is provided with a unique laser head overcurrent protection system, ensuring constant laser current and thus greatly extending the service life of the laser head.
FRONT & BACK PANEL FUNCTIONS AND VIEW

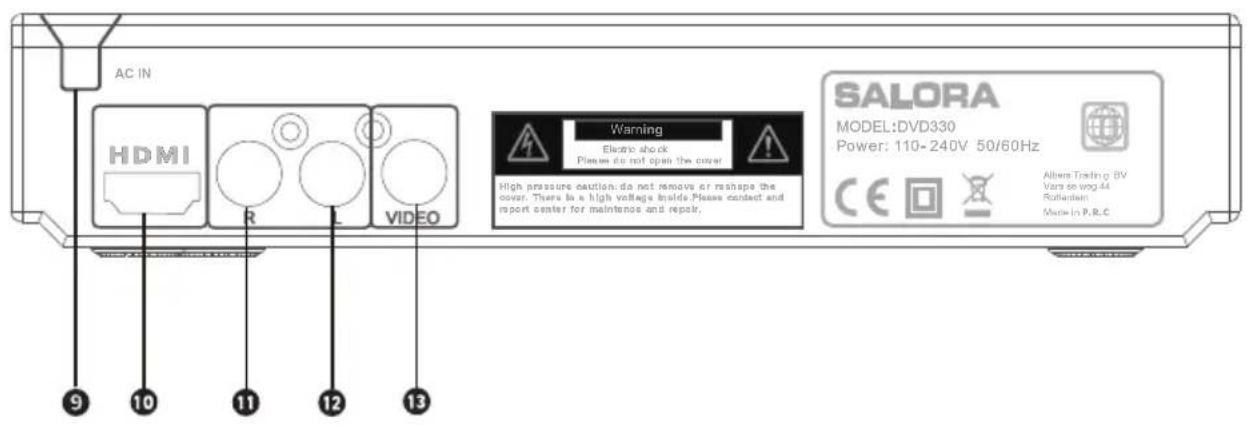
- POWER
- STOP
- PLAY/PAUSE
- EJECT
- DVD DOOR
-
USB PORT
-
DISPLAY
- REMOTE SENSOR AC INPUT
- AC POWER
- HDMI OUTPUT
- AUDIO R OUTPUT
- AUDIO L OUTPUT
- VIDEO OUT
REMOTE CONTROL VIEW

-
POWER
-
DVD/USB
-
ANGLE
-
NUMBER KEYS
-
REV
-
FWD
-
L/R
-
SETUP
-
UP
-
LEFT
-
MENU
-
DOWN
-
MUTE
-
AUDIO
-
OSD
-
VOLUME(+/-)
-
ZOOM
-
EJECT (OPEN/CLOSE)
-
V-MODE
-
SUBTITLE
-
GO TO
-
NEXT
-
PREV
-
STOP
-
PLAY/PAUSE
-
TITLE
-
RIGHT
-
ENTER
-
PBC
-
RESET
-
REPEAT
-
A-B
-
P/N
-
PROG.
-
SLOW
PREPARATIONS
1. Accessories
1x remote control, 1x RCA audio cable, 1x HDMI cable, 1x user manual, 2x remote control battery
(please check if all accessories are present when opening the box).
2. Installation of remote control battery
Place two batteries in the battery compartment. Make sure that the polarities are correct.
There should be no large obstacles between the remote control and the main unit.
SYSTEM CONNECTION
When connecting this appliance to other components, make sure that all the appliances are powered off. Audio/video cables must be connected according to the different color identifications and should be fitted firmly.
* Yellow to video terminal
* White to audio terminal
* Red to audio terminal
PLAY MODE SETTING
If you find that the picture does not cover the entire screen or if there is no color, please select PAL, NTSC or auto by pressing N/P.
DVD disc is able to support a picture with different proportions, in TV mode. It is possible to comply with the proportions of your discs. Select
Normal/Full, wide screen under the system setup. Proceed as below: Press
Finally press
BASIC OPERATION
Once all the connections of the system have been made, this appliance will be ready for use.
Prior to playing, make sure to complete the following
- Switch on TV and select AV mode. If it concerns an S-Video connection, select S-Video mode.
- Switch on amplifier if connected, select AC-3 or DVD mode.
- Switch on DVD player.
If there is no disc, NO DISC is shown on the screen.
Step 1: Press EJECT (OPEN/CLOSE), the tray slides out automatically.
Step 2: Place disc on the tray, press EJECT (OPEN/CLOSE) again to close the tray. The disc will be shown on the top left corner of the screen as well as displayed on screen.
PLAY DISC
Once the disc has been read, this appliance starts playing automatically.
*If it is a DVD, the appliance will show the DVD menu or title menu.
*If it is a CD, the appliance will start playing the tracks in sequence.
Press PLAY/PAUSE to pause, then press it again to resume play.
Press PREV to choose previous item or chapter.
Press NEXT to choose next item or chapter.
Press F. FWD. to select 2X, 4X, 8X, 20X normal play fast forward function of DVD disc playing.
Press F. FWD. to select 2X, 4X, 8X, 20X normal play fast forward function of other type of disc playing.
Press F. REV. to select 2X, 4X, 8X, 20X normal play fast reverse function of DVD disc playing.
Press F. REV. to select 2X, 4X, 8X, 20X normal play fast reverse function of other type of disc playing.
Press STOP to stop the playing disc and remember the location and press PLAY to start playing again from the remembered position. Press STOP once more to stop playing.
SCREEN DISPLAY
When playing a DVD disc, press OSD on the remote control:
Pressing OSD for the first time.
Pressing OSD for the second time:
Pressing OSD for the third time.
Pressing OSD for the fourth time.
P/N
Press P/N each time to select NTSC, PAL, auto display on the screen. (Do this when playing has stopped.)
SUBTITLE
This function enables you to select different subtitle languages (as many as 32 languages, only for discs encoded with multiple subtitles). Press SUBTITLE to select the desired language. For example, select language 2 English from 8 options.
ANGLE
During sports matches, concerts or theatrical programs, hold ANGLE on remote control to select different viewing angles for the same image (this function only works for discs encoded with multiple angles).
AUDIO
There are 8 languages that can be selected (4 languages for CD).
Press LANGUAGE to select language (this function only works for discs encoded with multiple languages).
For example, selecting language 1 from 2 language options, sound field effect AC-3, 2 channels, English.
TITLE
Press TITLE to select the title menu.
(This function only works for discs encoded with multiple titles.)
MENU
Press MENU to return to the main menu for playing DVD discs.
ARROW KEYS ( ◀ ▶ ▼▲ )
When playing discs, the four arrow keys enable you to select different title, menu or setup options.
NUMBER KEYS
Press the relevant number key to play favorite pictures according to the numbers in the menu.
AB REPEAT
Press A-B for the first time to set initial point (A).
Press A-B for the second time to set end point (B).
After setting, the program starts to repeat section A to B.
Press A-B for the third time to cancel repeat.
CHANGE DVD/USB
Press DVD/USB to select monitoring signals operating instructions in DVD/USB combined with the desired option.
REPEAT
In DVD mode, press REPEAT to select the following displays Chapter repeat on---Title repeat on-- Repeat off.
ZOOM
The picture can be enlarged by up to 4 times to allow you to enjoy a particular action or still picture. Press this key 3 times, the zoom scales are 2X, 3X, 4X respectively.
Pressing the key once more will return you to the normal play mode.
VOLUME AND MUTE
Press volume (VOL+) to increase volume.
Press volume (VOL-) to reduce volume until there is no volume output.
Press Mute to select mute, press it once more to cancel mute mode.
PROGRAM
When playing a disc, press PROG on the remote control to enter program mode: Enter the desired track numbers (2,4,6 and 8, for example) and then press PLAY to start.
To exit the programmed play mode, simply press PROG to cancel. Or press PLAY twice to exit.
SETTING THE SYSTEM (DVD menu setting)
Press SETUP on the remote control, the SETUP MENU (main) will be displayed. The player will ask you to enter the password. Simply enter 8888, this is the manufacturer's preset password.
-
After accessing the SETUP Menu, press the arrow keys for moving up and down and select the required item, then press PLAY to confirm your entry and move to the sub-menu. Use the left and right arrow keys to move the pointer, and the up and down arrow keys to select the required option. Also, press PLAY to confirm your selection. Now, setup of this current function is completed.
-
To end the setup, press SETUP once more. In the SETUP MENU, you may choose any of the following options as required.
GENERAL SETUP
This option is used to set TV screen format, video functions and DVD functions, with the options TV SYSTEM/SCREEN SAVER/HD OUTPUT/VIDEO/TV TYPE/PASSWORD/RATING/DEFAULT.
TV SYSTEM
Follow the operating instructions stated in DVD MENU SETUP combined with the following desired option.
This product supports various output systems, including AUTO, PAL, PAL60, NTSC.
-
If your TV set only has the NTSC or PAL system, the screen will blink and become colorless when an incorrect system is selected. In this case, press N/P on the remote control to return to normal screen. Always remember to select the correct system.
-
For more information about output formats, refer to the instructions for your TV set.
SCREEN SAVER
Go to the General Setup menu to select the SCREEN SAVER screen protection setting.
V-MODE (VIDEO)
The operating instructions stated in DVD MENU SETUP combined with the desired VIDEO option.
RESOLUTION
The operating instructions stated in DVD MENU SETUP combined with the desired RESOLUTION option.
TV TYPE
The operating instructions stated in DVD MENU SETUP combined with the desired TV TYPE option.
NOTE:
- Irrespective of the screen format you have selected, if your screen displays in 4:3 format, the picture will be shown in that format anyway.
- For DVDs, the screen format is convertible.
- If your screen display is 4:3 format, the picture will be flattened when a DVD with 16:9 display format is used.
- The DVD must be stopped when setting the system.
PASSWORD
The default password is 8888. The user is able to change the password using this option.
The operating instructions stated in DVD MENU SETUP combined with the desired PASSWORD option.
RATING
The operating instructions stated in DVD MENU SETUP combined with the desired RATING option.
For a film to be restricted for children, the film class can be set according to the label on the disc. This function does not work when the password setup mode is active.
DEFAULT
This option is used to restore the original settings of this appliance.
The operating instructions stated in DVD MENU SETUP combined with the desired DEFAULT option.
POWER RESUME (LAST MEMORY SETTING)
Last memory function: if you take the disc out of the DVD player after stopping playback, the last play position is stored in the memory.
If the next disc you load is the same one, the display shows RESUME and playback will resume.
PREFERENCE SETUP
PREFERENCE SETUP menu which includes OSD LANGUAGE, AUDIO LANG, SUBTITLE LANG,
MENU LANG
The operating instructions stated in DVD MENU SETUP combined with the desired OSD LANGUAGE, AUDIO LANG, SUBTITLE LANG option.
OSD LANGUAGE
The operating instructions stated in DVD MENU SETUP combined with the desired language option.
AUDIO LANG
The operating instructions stated in DVD MENU SETUP combined with the desired AUDIO LANG. option.
SUBTITLE LANG
The operating instructions stated in DVD MENU SETUP combined with the desired SUBTITLE LANG option.
MENU LANG
The user can use this item to set the language of the setup menu and screen display to English.
The operating instructions stated in DVD MENU SETUP combined with the desired MENU LANG option.
AUDIO OUT
Audio out can be output via the rear panel.
The operating instructions stated in DVD MENU SETUP combined with the desired AUDIO OUT option.
HDMI AUDIO
The operating instructions stated in DVD MENU SETUP combined with the desired HDMI AUDIO option.
QUALITY
Quality includes: BRIGHTNESS, CONTRAST, HUE, SATURATION and SHARPNESS.
BRIGHTNESS
The operating instructions stated in DVD MENU SETUP combined with the desired BRIGHTNESS option.
CONTRAST
The operating instructions stated in DVD MENU SETUP combined with the desired CONTRAST option.
HUE
The operating instructions stated in DVD MENU SETUP combined with the desired HUE option.
SATURATION
The operating instructions stated in DVD MENU SETUP combined with the desired SATURATION option.
SHARPNESS
The operating instructions stated in DVD MENU SETUP combined with the
OPERATION OF FUNCTIONS
With a compact disc (in CD/MP3 format) in the disc tray, connect a USB device and press SUBTITLE on the remote control to start copying. Just before the copying process, the appliance will search for the "MP3" folder. An "MP3" folder will be created if it does not yet exist in the USB device..
During the copying process, the copied content will be copied and numbered consecutively in the “MP3” folder. Each copied content is named with the track number on the disc as shown in the figure. If the same track number is used once more, the track number will be followed by a letter. For example, if “track 5” on one disc is copied, the copied content will be named “Track 5”. If another track 5 is copied from another disc, the copied content will be named “TRACK5A”. The next copied track 5 from yet another disc will be named “TRACK5B”.
*When copying is completed, press SUBTITLE on the remote control to enter the display as shown in screen. Select USB and press Enter on the remote control to enter the playback mode.
* In playback mode, use the arrow keys (◀ ▶ ▼▲) on the remote control to select the "MP3" folder and press Enter to open the "MP3" folder as shown on the screen. Go to the
desired recorded song to start playback. (the order of the copied songs in the "MP3" folder is
based on the times at which the songs were copied.)
Note: this copying function does not support any DVD disc.
OPERATION OF RIPPING FUNCTION (FROM CD TO USB)
* With a CD in the disc tray, connect a USB device and press SUBTITLE on the remote
control to enter the downloading mode, the TV/monitor display is shown on the screen.
* Use the arrow keys ( ◀▶▼▲) to go to “TRACKS” and press Enter on the remote control to open the display as shown on the screen. After selecting the desired track number shown on the screen, move the cursor to START and press Enter to start download as shown on the screen. Just before the downloading process, the appliance will search for the “UNKNOWN ALB” folder. An “UNKNOWN ALB” folder will be created if it does not exist in the USB device. The song on the CD will be converted to MP3.
Once MP3 downloading is completed, press SUBTITLE on the remote control to enter the display as shown on the screen. Select USB and press ENTER on the remote control to enter the playback mode. In playback mode, use the arrow keys ( ◀▶▼▲) to select the “UNKNOWN ALB”
folder and press ENTER to open the “UNKNOWN ALB” folder as shown on the screen. Go to the desired song to start playback. (The order of downloaded songs in the “UNKNOWN ALB” folder is based on the times at which the songs were downloaded.)
Note: this downloading function is only supported for CD and MP3 discs.
OPERATION OF RIPPING FUNCTION FROM MP3 TO USB
* With an MP3 disc in the disc tray, connect a USB device and press SUBTITLE on the remote control to start copying. During the copying process, the percentage (0-100%) of the copied portion of the file will be displayed on the TV or monitor screen. Just before the copying process, the appliance will search for the “CDROM” folder. A “CDROM” folder will be created if it does not exist in the USB device. The file on the MP3 disc will be copied to the “CDROM” folder.
Once MP3 copying is completed, press DVD/USB on the remote control to enter the display as shown on the screen. Select USB and press ENTER on the remote control to enter the playback mode. In playback mode, use the arrow keys (◀▶▼▲) to select the “CDROM” folder and press ENTER to open the “CDROM” folder as shown on the screen. Go to the desired file to start playback. (The order of the copied files in the “CDROM” folder is based on the times at which the files were copied.)
NOTE: This copying function only supports MP3 discs.
Place a CD disc into the tray, and the player will automatically search the directories saved on the CD file. After searching, it will automatically go to the saved CD file and play the first song on the disc (01: is highlighted). On the screen it is displayed as Track 01/xxx.
MP3 is an auto compression mode using level 3 of the international standard MPEG, whereby sound signal is compressed at a rate of 12:1. An MP3 disc can record more than 600 minutes of music for playback or record over 170 songs, rivaling CDs in sound quality.
To play an mp3 disc, go to the MP3 file menu. When playing an MP3 disc, 2 file menus can be selected by pressing PROG: File list, Folder.
-
File list: the files to be played can be selected by pressing the UP and DOWN arrow keys combined with ENTER, or selected directly by using number keys and ENTER. If the entered number is higher than the available numbers, CURRENT TRACK NUMBER will display on screen.
-
Folder: Display menu first and then press UP/DOWN LEFT/RIGHT arrow keys and ENTER to select subdirectory and music.
JPEG makes use of the most efficient compression technology and is widely used as a compressed storage format.
Even if pictures are compressed 15-20 times, they still have a good effect. This format is supported by most picture processing software, is suitable for picture storage, is small in size and is easy to use. This appliance is able to read JPEG format picture CDs. Press the relevant number key to select the picture to be displayed.
- Insert disc correctly, the appliance starts to search for disc information.
- Press number key to select the picture.
- It is only efficient in current picture when pressing number key.
TROUBLESHOOTING GUIDE
For your convenience, we have listed some points to help solve problems you might encounter while using the DVD player.
No sound: Ensure a good connection between the player and other appliances, such as power amplifier or TV, and make sure the TV and power amplifier are working correctly.
No picture: Ensure a good connection between the player and other appliances, such as power amplifier or TV, and make sure that the TV is working properly.
Disc does not play: Ensure the disc is inserted correctly (label facing upwards on the disc tray) and make sure the disc is not dirty.
Remote control does not work: Remove the obstacle between the player and the remote control. Point the remote control towards the remote control sensor and check the battery.
Split screen: Ensure the disc is not dirty and that it is not scratched. The player is controlled by a micro-computer. When encountering problems, switch off the power first, and switch on again after a few seconds. It is possible that the player is working properly again.
TECHNICAL SPECIFICATIONS
| Type DVD Player | |
| Model DVD330 | |
| Play mode | NTSC/PAL/AUTO |
| Disc mode | DVD/DVD-R/SVCD/HD CD/VCD/CD/CD-RW |
| Video characteristic | MPEG4 for DVD, MPEG 1 for VCD |
| Audio characteristic | DVD/DVD-R/SVCD/HDCD/VCD/CD/CD-RW |
| Frequency response | 20Hz-20KHz:+/-1dB |
| Audio S/N ratio | ≥slant 89dB |
| Dynamic range | ≥slant 80dB |
| D/A converter | 192 KHz/24bit |
| Output characteristic | HDMI/VIDEO |
| Video output | 1 Vp-p(75Ω) |
| S-Video output 1 Vp-p(75Ω) | C:0.3 Vp-p(75Ω) |
| Audio output | 2.0V± 0.0V/1.0V |
| Power voltage | AC 110-240V 50/60Hz |
| Product Size | 255(W)x215(D)x48(H)mm |
| Product Weight | 500g |
Specifications are subject to change without notice.

natural_image
Symbol of a trash bin crossed with a diagonal line, indicating no waste or discharge (no text or numbers present)This symbol on the product or in the instructions means that your electrical and electronic equipment should be disposed at the end of its life separately from your household waste.
There are separate collection systems for recycling in the EU. For more information, please contact the local authority or your retailer where you purchased the product.
MODE D'EMPLOI
LECTEUR DE DVD
natural_image
Black electronic device with control panel and display screen (no visible text or symbols)
natural_image
Black triangular warning symbol with a lightning bolt inside, no text or numbers present

natural_image
Black triangular warning symbol with exclamation mark (no text or numbers)ATTENTION : POUR RÉDUIRE LE RISQUE DE CHOC ÉLECTRIQUE, NE PAS ENLEVER LE COUVERCLE OU LA PARTIE ARRIÈRE.
PAS DE PIÈCES RÉPARABLES PAR L'UTILISATEUR À L'INTÉRIEUR, RÉFÉREZ L'ENTRETIEN À UN PERSONNEL QUALIFIÉ.
natural_image
Symbol of a triangular warning sign with a central sunburst (no text or numbers present)Invisible laser radiation when open and interlock failed or defeated. Avoid direct exposure to laser beam
LASER SAFETY
This unit employs an optical laser beam system in the CD mechanism, designed with built-in safeguards. Do not attempt to disassemble, refer to qualified service personnel. Exposure to this invisible laser light beam may be harmful to the human eye. THIS IS A CLASS-1 LASER PRODUCT USE OF CONTROLS, OR ADJUSTMENTS OR PROCEDURES OTHER THAN THOSE SPECIFIED HEREIN,MAY RESULT IN HAZARDOUS LASER LIGHT BEAM EXPOSURE.
ATTENTION :

- POWER
- STOP
- PLAY/PAUSE
- EJECT
- DVD DOOR
-
USB PORT
-
DISPLAY
- REMOTE SENSOR AC INPUT
- AC POWER
- HDMI OUTPUT
- AUDIO R OUTPUT
- AUDIO L OUTPUT
- VIDEO OUT

- POWER
- DVD/USB
- ANGLE
- TOUCHES NUMÉROTÉES
- REV
- FWD
- L/R
- SETUP
- UP
- LEFT
- MENU
- DOWN
- MUTE
- AUDIO
- OSD
- VOLUME(+/-)
- ZOOM
18.EJECT (OPEN/CLOSE) - V-MODE
- SUBTITLE
- GO TO
- NEXT
- PREV
- STOP
- PLAY/PAUSE
- TITLE
- RIGHT
- ENTER
- PBC
- RESET
- REPEAT
- A-B
- P/N
- PROG.
35.SLOW
PRÉPARATIONS
1. Accessoires
Chapter repeat on---Title repeat on-- Repeat off.
ZOOM
natural_image
Symbol of a crossed-out trash bin with no text or numbers presentThis symbol on the product or in the instructions means that your electrical and electronic equipment should be disposed at the end of its life separately from your household waste.
There are separate collection systems for recycling in the EU. For more information, please contact the local authority or your retailer where you purchased the product.
BEDIENUNGSHANDBUCH
DVD-SPIELER
Modellnr.: DVD330
natural_image
Black electronic device with digital display and control buttons (no visible text or symbols)
natural_image
Black triangular warning symbol with a lightning bolt and downward arrow (no text)

natural_image
Black triangular warning symbol with exclamation mark (no text or numbers)natural_image
Symbol of a triangular warning sign with a central sunburst (no text or numbers present)Invisible laser radiation when open and interlock failed or defeated. Avoid direct exposure to laser beam
LASER SAFETY
This unit employs an optical laser beam system in the CD mechanism, designed with built-in safeguards. Do not attempt to disassemble, refer to qualified service personnel. Exposure to this invisible laser light beam may be harmful to the human eye. THIS IS A CLASS-1 LASER PRODUCT USE OF CONTROLS, OR ADJUSTMENTS OR PROCEDURES OTHER THAN THOSE SPECIFIED HEREIN,MAY RESULT IN HAZARDOUS LASER LIGHT BEAM EXPOSURE.
ACHTUNG:

- POWER
- STOP
- PLAY/PAUSE
- EJECT
- DVD DOOR
-
USB PORT
-
DISPLAY
- REMOTE SENSOR AC INPUT
- AC POWER
- HDMI OUTPUT
- AUDIO R OUTPUT
- AUDIO L OUTPUT
- VIDEO OUT

- POWER
- DVD/USB
- ANGLE
- ZIFFERNTASTEN
- REV
- FWD
- L/R
- SETUP
- UP
- LEFT
- MENU
- DOWN
- MUTE
- AUDIO
- OSD
- VOLUME(+/-)
- ZOOM
18.EJECT (OPEN/CLOSE) - V-MODE
- SUBTITLE
- GO TO
- NEXT
- PREV
- STOP
- PLAY/PAUSE
- TITLE
- RIGHT
- ENTER
- PBC
- RESET
- REPEAT
- A-B
- P/N
- PROG.
35.SLOW
VORBEREITUNG
1. Zubehör
natural_image
Symbol of a trash bin crossed out by a diagonal line, with no text or numbers present.This symbol on the product or in the instructions means that your electrical and electronic equipment should be disposed at the end of its life separately from your household waste.
There are separate collection systems for recycling in the EU. For more information, please contact the local authority or your retailer where you purchased the product.





- INSTRUCTIEHANDLEIDING
- LASER SAFETY
- LET OP:
- VOORBEREIDING
- Accessoires
- PIJLTOETSEN ( ◀ ▶ ▼▲)
- INSTRUCTION MANUAL
- WARNING
- CAUTION:
- USAGE NOTES OF DVD PLAYER
- USAGE NOTES OF POWER SUPPLY
- DVD PLAYER
- Component video output
- Laser head overcurrent protection system.
- FRONT & BACK PANEL FUNCTIONS AND VIEW
- REMOTE CONTROL VIEW
- PREPARATIONS
- Accessories
- Installation of remote control battery
- SYSTEM CONNECTION
- PLAY MODE SETTING
- BASIC OPERATION
- PLAY DISC
- SCREEN DISPLAY
- P/N
- SUBTITLE
- ANGLE
- AUDIO
- TITLE
- MENU
- ARROW KEYS ( ◀ ▶ ▼▲ )
- NUMBER KEYS
- AB REPEAT
- CHANGE DVD/USB
- REPEAT
- ZOOM
- VOLUME AND MUTE
- PROGRAM
- SETTING THE SYSTEM (DVD menu setting)
- GENERAL SETUP
- TV SYSTEM
- SCREEN SAVER
- V-MODE (VIDEO)
- RESOLUTION
- TV TYPE
- NOTE:
- PASSWORD
- RATING
- DEFAULT
- POWER RESUME (LAST MEMORY SETTING)
- PREFERENCE SETUP
- MENU LANG
- OSD LANGUAGE
- AUDIO LANG
- SUBTITLE LANG
- AUDIO OUT
- HDMI AUDIO
- QUALITY
- BRIGHTNESS
- CONTRAST
- HUE
- SATURATION
- SHARPNESS
- OPERATION OF FUNCTIONS
- OPERATION OF RIPPING FUNCTION (FROM CD TO USB)
- OPERATION OF RIPPING FUNCTION FROM MP3 TO USB
- TROUBLESHOOTING GUIDE
- TECHNICAL SPECIFICATIONS
- Specifications are subject to change without notice.
- MODE D'EMPLOI
- ATTENTION :
- PRÉPARATIONS
- BEDIENUNGSHANDBUCH
- ACHTUNG:
- VORBEREITUNG
- Zubehör
Brand : SALORA
Model : DVD330
Category : DVD player