
imagePROGRAF TX4100 - Printer CANON - Free user manual and instructions
Find the device manual for free imagePROGRAF TX4100 CANON in PDF.
Download the instructions for your Printer in PDF format for free! Find your manual imagePROGRAF TX4100 - CANON and take your electronic device back in hand. On this page are published all the documents necessary for the use of your device. imagePROGRAF TX4100 by CANON.
USER MANUAL imagePROGRAF TX4100 CANON
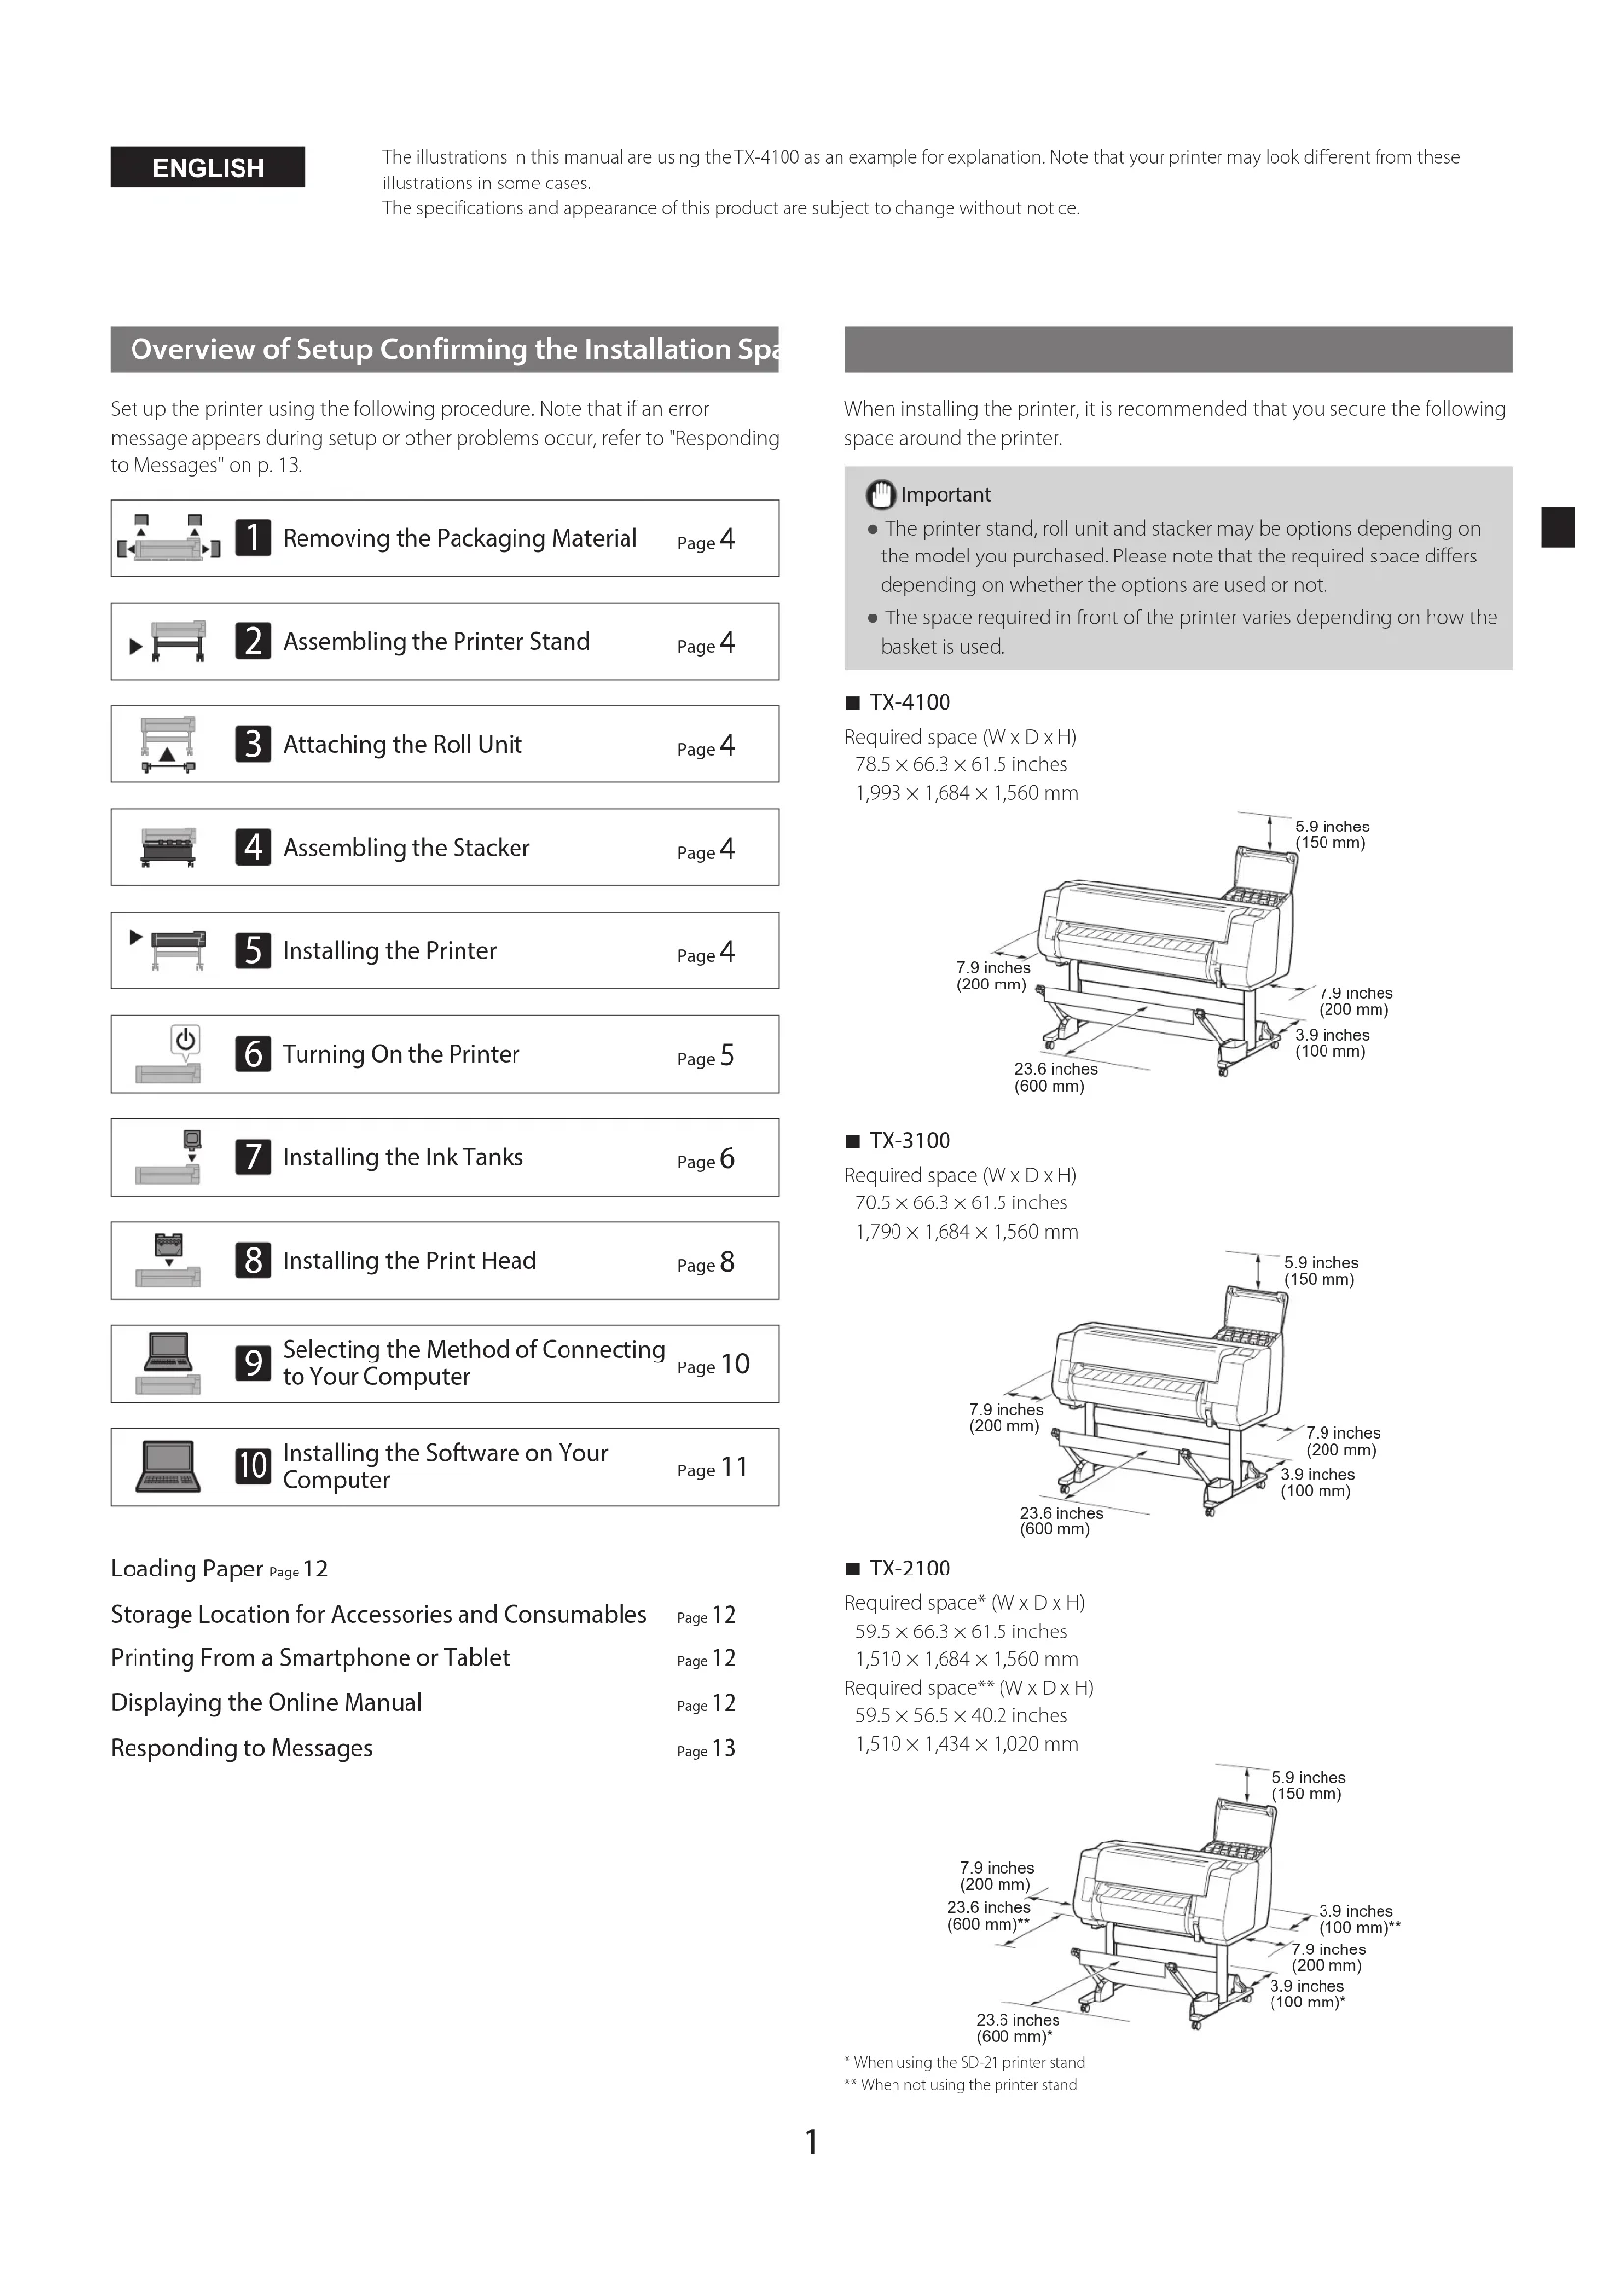
- When using the SD-21 printer stand ** When not using the printer stand ENGLISH2 Package Contents Check that the following included accessories are contained in the package. Note that a cable to connect the printer to a computer is not provided with the printer. Note ●Although the included accessories also contain items that are not explained in this manual, you should store them without losing any since they will be required when using various functions. ●For instructions on the included items not described in this manual, refer to the Online Manual by following the instructions in “Displaying the Online Manual” on p. 12.
Basket locking support (2 pieces) *
3-inch paper core attachment (2 pieces) Printer stand mounting bracket set *
Holder stopper * *1 Only included with models where the printer stand is included as standard. Note that it may be packaged in a separate box depending on the region where you purchased the printer. The items included with the printer stand are described in the Printer Stand Setup Guide.*2 These items might not be included depending on your region.*3 This is used when loading roll paper. For details, refer to the Online Manual. Manuals Included with This Product Setup Guide (this manual) Describes how to setup the printer. Printer Stand Setup Guide Describes how to assemble the stand. This item might not be included depending on your model. Quick Guide Contains information related to warnings for using this product safely and information related to replacing paper, ink tanks, and the print head. Online Manual (Electronic Manuals) This manual describes advanced usage of the printer such as paper saving tips, how to print a poster and banner with the supplied software and print quality adjusting method, in addition to the basic instructions for printing on roll paper or cut sheet. To view the Online Manual, refer to "Displaying the Online Manual" (p. 12). ■Roll Unit ■Stacker Provided as an optional accessory. Refer to the included setup guides for the respective accessories.3 Handling Cautions Moving the Printer ●Have the following number of people grasp the carrying grips on each side in the base of the printer. The weight may cause pain such as back pain. TX-4100 (Approx. 211 lb (96 kg)) 6 people or more TX-3100 (Approx. 191 lb (87 kg)) 6 people or more TX-2100 (Approx. 163 lb (74 kg)) 6 people or more For the TX-4100 Standing Up the Printer ●When standing the printer up, place cardboard or other material underneath to prevent damage and scratching, and make sure the side with the operation panel is up. Furthermore, make sure that the weight of the printer is taken by the corner of the printer. If the weight is taken by any other part of the printer, the printer may become damaged. ●When carrying the printer, firmly grasp the carrying grips on each side in the base (the area shown shaded in the diagram). Holding the printer at other positions is dangerous and may cause injury or damage to the printer if the printer is dropped. ●Do not hold any position other than the carrying grips. In particular, do not hold the plastic parts of the printer rear surface (the area shown shaded in the diagram). Other ●Do not put the printer down or carry the printer with only the center of the printer supported. This may cause damage to the printer. ●When setting the printer down temporarily, make sure to put the printer on a flat, stable surface.4
Installing the Printer If you are not using the stand, install the printer in a location like the following.
Assembling the Printer Stand Assemble the stand by referring to the Printer Stand Setup Guide (separate manual). If you are not using the stand, proceed to " Installing the Printer".
Attaching the Roll Unit If you purchased the optional roll unit, attach the roll unit by referring to the Roll Unit Setup Guide (separate manual). If you are not using the roll unit, proceed to " Turning On the Printer".
Assembling the Stacker If you purchased the optional stacker, attach the stacker by referring to the Stacker Setup Guide (separate manual). If you are not using the stacker, proceed to " Turning On the Printer".
Removing the Packaging Material
Lift up the printer. ●For details on how to carry and the number of people, refer to "Handling Cautions" (p. 3).
Place the printer on a stable flat location.
Remove the packaging material.
Remove all of the tape and other packaging material. Remove the tape affixed to the roll holder.5
Pull up and remove the belt stopper. ●Keep the belt stopper for future use. You will need it in case you move the printer to another location.
Remove the tape and protective material. ●Peel off the tape affixed to the carriage, and then pull the protective material (the area shown shaded in the diagram) towards you and remove it. Remove the protective sheet if there is one attached.
Close the top cover.
Connect the power cord to the printer. ●Insert the power cord into the power connector on the rear of the printer.For the TX-2100 / TX-3100 For the TX-4100
Plug the power cord into the outlet, and then turn on the printer.
When the language selection screen appears on the touch screen, select and tap a language (lightly with your finger, and then move your finger away). Then, if the screen for selecting a time zone appears, select and tap your region.
When a message prompting you to start the setup appears on the touch screen, tap OK.6
Installing the Ink Tanks Instructions on ink tank installation are shown on the touch screen. Install the ink tanks as instructed. If the ink tank is cold, allow it to adjust to room temperature before attaching it to the printer.
Open the ink tank cover.
Release the ink tank lock lever of the color you are installing. ●While pressing the button at the position (B), lift up the handle part (A) towards you.
With it in this state, pull the ink tank lock lever up.
Continue pulling until the entire ink tank lock lever is tilted towards you. ●Make sure the ink tank lever stays in this position.
Shake each ink tank gently 7 or 8 times before opening its pouch. Important●Failure to shake the ink tanks may result in reduced print quality because ink ingredients have settled on the bottom of the tank.
Open the pouch and remove the ink tank. Important●Never touch the ink holes or metal contacts (the area shown shaded in the diagram). Touching these parts may cause stains, damage the ink tank, and affect print quality.●Avoid dropping the ink tank after removing it from the pouch. Otherwise, ink may leak and cause stains.●Do not remove ink tanks to shake them after they have been mounted. Doing so may cause ink to spill.
Check that the color of the ink tank is the same as the color displayed on the label in the printer, and insert the ink tank into the holder in the orientation shown in the diagram. ●Insert with the ink tank label facing up and ensuring that the text on the label is not upside-down. Match the color of the ink tank label to the color of the label in the printer7
Lift up the ink tank lock lever once and then push it down.
Firmly push down the handle part of the ink tank lock lever all the way in.
Make sure the ink lamp lights red. Important ●If the ink lamp does not light, repeat steps 2 to 4 and 8 to 9.
Repeat steps 2 to 10 to install each of the ink tanks.
Close the ink tank cover.8
Installing the Print Head Instructions are now shown on the touch screen regarding print head installation. Install the print head by following the instructions.
Open the top cover. Important ●Do not move the carriage (the area enclosed by a circle in the diagram). If you accidentally move it, temporarily close the top cover and it will return to its original position.
Tilt the print head lock lever towards you.
Open the print head locking cover by following the instructions on the screen and tap OK. Do not touch the electrical contacts of the carriage. Do not touch here
Grasp the print head as shown in the diagram and remove it from the bag. Hold here
Remove the orange protective caps in the order shown in the diagram. Hold here to remove Important ●Do not touch the part that was being protected by the protective cap (part shown shaded in the diagram) under any circumstances. Touching it may cause damage to the print head or printing problems. ●The print head is filled with ink. Be careful to avoid getting your clothes and surrounding items dirty when removing the protective caps. It is recommended that you remove the protective caps above the bag that contained the print head. ●Do not reattach the protective caps after removing them. Furthermore, dispose of them according to local regulations.9
Install the print head. ●Align the print head so that the area enclosed by a circle in the diagram is facing you, and carefully push the print head firmly into the printer, ensuring that the part covered by the protective caps does not touch the carriage.
Pull the print head locking cover down toward you to lock the print head in place.
Push the print head lock lever all the way to the end.
Check that the triangle mark on the angle adjustment lever is aligned with the red ■. If they are not aligned, move the angle adjustment lever up or down to align it with the ■. Triangle mark Red ■
Close the top cover. Note ●If the roll unit is installed, the roll unit calibration starts automatically after the print head is attached. If the roll holder is mounted on the roll unit at this time, calibration cannot be executed. Do not mount the roll holder on the roll unit until the setup has finished.10
Selecting the Method of Connecting to Your Computer When something like the following is displayed on the touch screen, select the connection method.Connect the printer to the network using a LAN cable.Connect the printer to the network wirelessly without using a LAN cable.Connect the printer to a computer using a USB cable.Select this such as when connecting using a fixed IP address. The connection settings and software installation will need to be performed separately. Start the settings from the touch screen of the printer. Wired LAN connection
Select Wired LAN connection. Check the message about the connection method and select Yes if there are no problems. ●A message prompting you to connect the LAN cable appears.
Use the LAN cable to connect the wired LAN connector on the rear of the printer to the hub port.
Select OK and proceed to "Installing the Software on Your Computer" (p. 11). Wi-Fi connection
Select Wi-Fi connection. Check the message about the connection method and select Ye s if there are no problems. ●A message prompting you to set up Wi-Fi connection appears.
Select Yes and proceed to "Installing the Software on Your Computer" (p. 11). ●To configure the settings from the printer, select No and proceed to "Configuring Wi-Fi Settings on the Printer Touch Screen" (column below). USB connection
Select USB connection. Check the message about the connection method and select Ye s if there are no problems. ●Do not connect the USB cable yet.
Select OK and proceed to "Installing the Software on Your Computer" (p. 11). The printer starts charging the ink for the first time* and adjusting the print head. This takes around 25 minutes. Do not open the covers of the printer or turn the power off during this time.
- Charges ink between the ink tank and print head and performs cleaning to keep the printer in optimal condition. This may cause the remaining ink indicator and maintenance cartridge capacity indicator to drop some amount. Since the included starter ink tanks are for initial installation, it is recommended that you purchase replacement ink tanks quickly. Configuring Wi-Fi Settings on the Printer Touch Screen For Wi-Fi connection
Check that the following screen appears and select Ye s . Note●If any of Checking the nozzle, Preparing the ink system, or Cleaning... is displayed, the printer initial settings are not finished. Wait until the above screen appears.
Check that the following screen appears and select Ye s .
Configure the settings by following the instructions on the screen. ●When the home screen appears and (network) appears, the Wi-Fi settings are complete.
Proceed to "Installing the Software on Your Computer" (p. 11).11
Installing the Software on Your Computer The printer connection settings and software installation are performed using a computer. You can download the setup file from our website. If you are using a Windows PC, you can also run the file from the CD-ROM. Downloading from the website (Windows/macOS) Go to the Canon website on your computer.https://ij.start.canon/TX-4100This is the example input for the TX-4100.Input the model number of the printer you are using. Click Download to download the setup file and then run the file.●If a warning screen about downloading appears, select Do not block, Allow, etc. and then proceed to the next step. Booting up from the included CD-ROM (Windows) ■ If you are using Windows 10 or Windows 8.1
Insert the setup CD-ROM into the computer. Click the popup message for the disk drive and click Run Msetup4.exe on the screen that is displayed. NoteIf the message does not appear (or has disappeared) Click or File Explorer on the taskbar. Click This PC on the left side of the window that opens. Double-click the CD-ROM icon on the right side of the window. If the contents of the CD-ROM appear, double-click Msetup4.exe. If the User Account Control dialog box appears, click Yes and proceed to the next step. ■ If you are using Windows 7
Insert the setup CD-ROM into the computer. When the AutoPlay screen appears, click Run Msetup4.exe. NoteIf the AutoPlay screen does not appear Click Computer from the start menu. Double-click the CD-ROM icon in the right side of the window that opens. If the contents of the CD-ROM appear, double-click Msetup4.exe. If the User Account Control dialog box appears, click Yes and proceed to the next step. Click Start Setup. Configure the settings by following the instructions on the screen. Note ●A screen for selecting the printer connection method may be displayed in the middle of configuring the settings. If this happens, select the method you selected on p. 10 and then click Next and continue with the rest of the settings. ●Connect the USB cable to the proper location by following the instructions on the screen.12 Loading Paper
2. Select the paper.
3. Perform the operations by following the instructions
on the screen. Storage Location for Accessories and Consumables When you open the top cover, a cleaning brush (for cleaning the interior) is stored on the right side. The accessory pocket can be used to store accessories such as the 3-inch paper core attachment.You can store spare ink tanks in the spare ink box. Important●Do not place a used ink tank. Printing From a Smartphone or Tablet With the "Canon PRINT Inkjet/SELPHY" application software, you can easily, wirelessly print photos stored on your smartphone or tablet (running iOS or Android). iOS Search for "Canon Print" in the App Store.Android Search for "Canon Print" in Google Play. Note●You can also download the app by accessing the Canon website from the QR code on the right. Displaying the Online Manual The Online Manual describes how to use the printer. It can be accessed from the Canon website as shown below.
Access the Canon website by any of the following methods. ●Enter the URLhttps://ij.start.canonSelect the model number of the printer you are using.●Scan the QR code