
Soup & Co BL9001 - Blender TEFAL - Free user manual and instructions
Find the device manual for free Soup & Co BL9001 TEFAL in PDF.

| Brand | Tefal |
| Model | Soup & Co BL9001 |
| Product type | Cooking blender |
| Power | 1100 W |
| Bowl capacity | 1.8 L max (including mini mark) |
| Maximum temperature | 100 °C |
| Programmable timer | Up to 59 minutes |
| Automatic programs | 4 programs: Creamy soup (P1), Chunky soup (P2), Steam cooking (P3), Autoclean (P3 or P4 depending on model) |
| Manual mode | Yes, with temperature and duration settings |
| Blender mode | Yes, 5 speeds |
| Crushed ice function | Yes, 30-second duration |
| Keep warm | Up to 40 minutes after cooking |
| Safety | Lid and bowl locking, overload detection, burn protection |
| Bowl material | Stainless steel (inner wall) |
| Seal ring | Removable, replaceable |
| Included accessories | Steaming basket (depending on model), measuring cap, seal holder |
| Automatic cleaning | Integrated Autoclean program |
| Maintenance | Bowl washable with soapy water, motor base cleaned with a damp cloth |
| Power supply | AC, grounded outlet |
| Repairability | Spare parts available through authorized service |
Frequently Asked Questions - Soup & Co BL9001 TEFAL
User questions about Soup & Co BL9001 TEFAL
0 question about this device. Answer the ones you know or ask your own.
Ask a new question about this device
Download the instructions for your Blender in PDF format for free! Find your manual Soup & Co BL9001 - TEFAL and take your electronic device back in hand. On this page are published all the documents necessary for the use of your device. Soup & Co BL9001 by TEFAL.
USER MANUAL Soup & Co BL9001 TEFAL
natural_image
Line drawing of a blender with control panel and digital display (no text or symbols)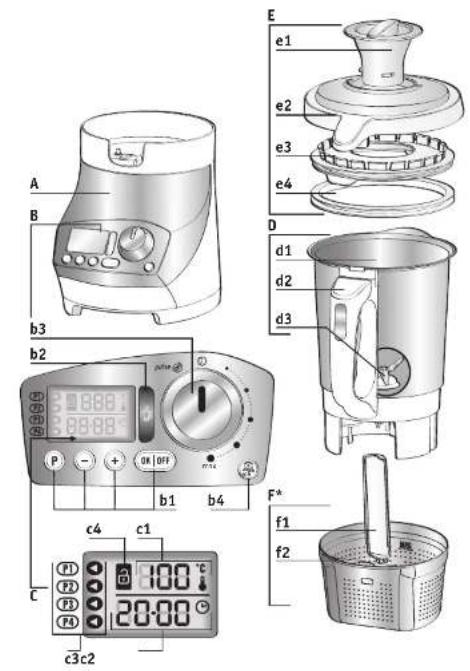


DESCRIPTION DE L'APPAREIL
A Bloc moteur
D Ensemble Bol blender
d1 Bol inox (repère Max = 1.8 litre)
d2 Gâchette poignée
d3 Lames inox
E Ensemble couvercle
e1 Bouchon doseur
e2 Couvercle
e3 Porte-joint
By reading this guide, you will find some user instructions that will help you discover the full potential of your appliance: make creamy or thick soups, chunky soups, sauces and fruit purées, smoothies, cocktails and steam based recipes and much more.
APPLIANCE DESCRIPTION
A Motor unit
B Control panel
b1 Selection buttons
- P - Automatic programs
P1 : Creamy soup/P2: Thick soup/
Steam cooking: P3 (depending on model*)
Autoclean: P3 or P4 (depending on model*)
--/+ - Decrease/Increase cooking time or
temperature
- OK/OFF - Validation of program choice,
cooking time or temperature/Stop appliance
b2 Heat indicator light (if >50°C inside
the jug)
b3 Speed selector button
b4 Ice crush button (for crushing ice-cubes)
C Display screen
c1 Temperature adjustment display from
60 to 100°C
c2 Timer display (time adjustable from
0 to 59 mins)
c3 Programme display (P1, P2, P3 and P4
depending on model*)
c4 Safety indicator display ①
D Blender jug unit
d1 Stainless steel jug (Max limit = 1.8 litre)
d2 Handle with trigger
d3 Stainless steel blades
E Lid unit
e1 Measuring cap
c2 Lid
e3 Carrier seal
e4 Waterproof seal
F Cooking basket (depending on model*)
f1 handle
f2 basket
Technical data on appliance:
Maximum temperature: 100°C
Power: 1100W
Maximum programming time: 59 minutes.
SAFETY INSTRUCTIONS
▶ On personal safety
- Read the instructions carefully before using your appliance for the first time and retain them for future use: the manufacturer cannot accept any liability for non compliant appliance use.
- Do not allow children to use the appliance without supervision.
• This appliance shall not be used by children.
Keep the appliance and its cord out of the reach of children.
- This appliance is not intended to be used by persons (including children) with reduced physical, sensory or mental capabilities or lack of experience and knowledge, unless they are supervised or have been given instructions beforehand concerning use of the appliance by a person responsible for their safety.
• Children should be supervised to ensure they do not play with the appliance.

- Keep the appliance out of the reach of children.
- WARNING: When using the appliance, some parts reach high temperatures (stainless steel side of jug, transparent parts of the lid and cap, metallic sections under the jug, basket) and are subject to residual heat after use. They can cause burns. Handle the appliance by the cold plastic parts (handles, motor unit) during heating and until complete cool down. The red heat indicator light comes on if there is a risk of burning.
- Do not use your appliance if it is not working correctly, if it has been damaged or if the power cord or plug have been damaged. To avoid any danger have the cord replaced by an approved service centre (see list in the service booklet).
- The appliance is designed for domestic use only and at an altitude below 2000 m. The manufacturer shall not accept any liability and reserves the right to cancel the guarantee in the event of commercial or inappropriate use or failure to follow the instructions.
- This appliance is not intended to be used in the following applications, and the guarantee will
not apply for:
- staff kitchen areas in shops, offices and other working environment;
- farm houses;
- by clients in hotels, motels and other residential type environments;
- bed and breakfast type environments.
▶ European markets only:
- Keep the appliance and its cord out of reach of children under 8 years of age.
• Children shall not play with the appliance. - This appliance may be used by persons with reduced physical, sensory or mental capabilities, or by persons with little or no knowledge of the appliance, as long as they are under proper supervision and have received instructions as to the safe use of the appliance, and as long as they understand the implicit risks.
- This appliance may be used by children as long as they are at least 8 years old, they are properly supervised and have received instructions as to the safe use of the appliance, and as long as they understand the
implicit risks. Cleaning and maintenance of the appliance should not be carried out by children without supervision, unless they are over 8 years of age and are being supervised by an adult.

- WARNING: Your appliance releases steam which can cause burns.
Handle the lid and measuring cap with care (use an oven glove or pot holder if necessary). Hold the measuring cap by the central section.
- Be careful if hot liquid is poured into the food processor or blender as it can be ejected out of the appliance due to a sudden steaming.
- Do not start up the appliance if the measuring cap is not placed in the hole in the lid, if the seal is not positioned on the support seal or if the carrier seal is not fixed in the lid.
- WARNING: Be aware of the risk of injury in the event of incorrect use of the appliance.
• The blades are very sharp: handle them with care so as not to injure yourself whilst emptying the jug or during cleaning.
- WARNING: Be careful to avoid any spillage on the connector during cleaning, filling or pouring.
- Please check the instruction manual on how to adjust the speed settings and operational time of each programme.
- Please check the instruction manual on how to assemble and attach the accessories to the appliance.
- Please check the instruction manual on how to clean and maintain your appliance.
-
When cleaning the appliance, always follow the instructions.
-
Unplug the appliance.
- Do not clean when hot.
- Clean with a damp cloth or sponge.
- Do not put the appliance in water or under a running tap.
▶ On connection to power supply
- The appliance must be plugged into a socket with an earth connection.
- The appliance is designed to work with alternating current only. Check that the voltage on your appliance's data plate
corresponds to your domestic power supply.
- Given the diverse standards in effect, if the appliance is used in a country other than that in which it is purchased, have it checked by an Approved Service Centre.
• Always unplug the appliance from the power supply if you leave it unattended and before assembling, dismantling and cleaning it. - Any error in connection will invalidate the guarantee.
- Never pull on the power cord when unplugging the appliance.
- Do not immerse the appliance, cord or plug in liquid.
- Do not immerse this appliance in water or any other liquid.
- The power cord must be kept out of the reach of children and must not be placed near or come into contact with the hot parts of the appliance, sources of heat or sharp edges.
▶ On incorrect use
- Never turn on the blender jug without ingredients or with dry products only.
• Always add solid ingredients before pouring in any liquid ingredients, without exceeding
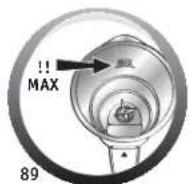
the limit marker of 1.8 L MAX engraved inside the jug. (Cf. Fig. 8). If the blender is too full, boiling water may spurt out. Make sure there is enough liquid to cover the min limit marker (Cf. Fig. 7).
- Some recipes may cause sudden overflowing, due to the formation of bubbles, particularly when using frozen vegetables. In this case, it is up to you to reduce the quantities accordingly.
- Do not place your fingers or any other object in the jug while the appliance is in operation.
- Do not use the jug as a container for freezing or sterilisation purposes.
- Place the appliance on a stable, heat-resistant, clean, and dry surface.
- Do not place the appliance next to a wall or a cupboard: the steam may damage them.
- Do not let your hair, a scarf or a tie amongst other things hang over the jug whilst the appliance is in operation.
- Do not put any of the accessories in the microwave.
-
Do not use the appliance outdoors.
-
Never exceed the maximum quantity indicated in the instructions.
- Put the appliance away once it has cooled down.
- For your safety, do not use accessories or spare parts other than those provided by the approved after-sales service centres.
- Any intervention other than normal cleaning and maintenance by the customer must be performed by an Approved Service Centre."
BEFORE FIRST USE
Your appliance has 3 operating modes:
- Automatic program mode: temperature, cooking and mixing times are pre-programmed to make soups and to carry out automatic steam cooking.
- Manual Mode: personalised adjustments in temperature and cooking time for one use can be made according to your preferences.
- Blender Mode: select the motor speed without using the cooking function to make some tasty smoothies or cocktails.
Positioning of the jug and the lid unit
- Before using for the first time, wash all the accessories (D, E and F) in hot soapy water except for the motor unit (A).
- Make sure that all packaging is removed before operating the appliance.
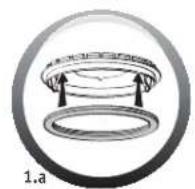
- Put the seal on the carrier seal (Cf. Fig. 1.a) and clip the unit onto the lid (Cf. Fig. 1.b).
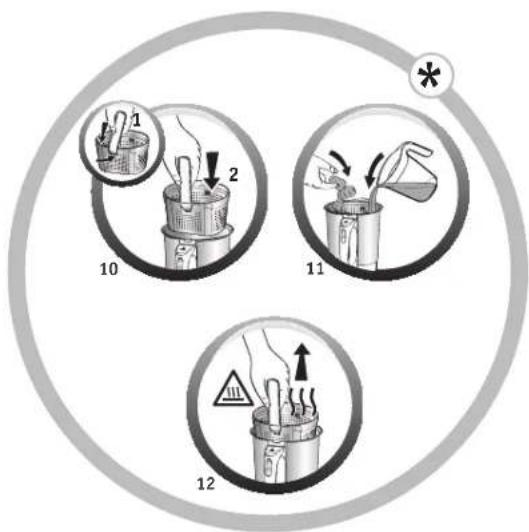
• To steam cook, put the basket with the sliced vegetables in position and fill up the jug with 0.5 litres of cold water without exceeding the bottom of the basket (cf. Fig. 10 and 11).
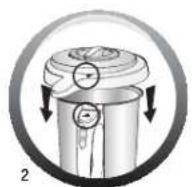
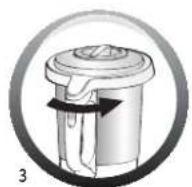
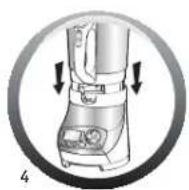
- Position the lid (E) on the jug (D) lining up the two triangles (Cf. Fig. 2), lock the lid without pressing by turning it in the direction of the arrow (Cf. Fig. 3). Position the blender jug (D) on the motor unit (A) until you hear it click (Cf. Fig. 4)
- The appliance only starts up once the jug and lid are correctly in place and are locked onto the motor unit.
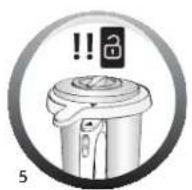
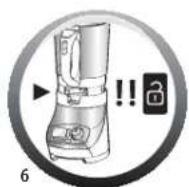
In the event of incorrect positioning or locking of one or the other (Cf. Fig. 5 and 6), the lock sign starts to flash when you activate a function.
USING THE APPLIANCE
PROGRAM MODE
Once the water and the ingredients are placed into the jug or into the steam basket, lock the lid and position the jug onto the motor unit (see before first use).
Select one of the automatic programs suggested below (P button) and validate (OK button). The red indicator light illuminates and a 'beep' will sound to inform you that the cooking has started.
| Introducing the suggested automatic programs | |||
| Temperature (Max) | Adjustable times Mixing | ||
| P1 - Creamy soup (thin texture) | 100°C | 25 min. (+ or -10 min) | Max speed 1 min |
| P2 - Chunky Soup (texture dense) | 100°C | 35 min. (+ or -10 min) | Min speed 13 secs |
| P3 - (only for model with cooking basket) – Steam cooking with cooking basket and 50 cI water (depending on model') | 100°C | 30 min. (+ or -20 min) | No |
| P3 - (or P4 for model with cooking basket) - Autoclean automatic cleaning programme | 100°C | 30 s. (adjustable up to 1 min) | Max speed |
When the program is finished, the appliance gives out 3 beeps.
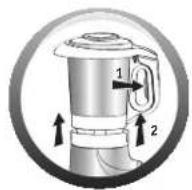
Unlock the jug by pressing the trigger (d2) located on the inside of the handle (cf. Fig. 9) and serve immediately or leave the jug in place to keep warm (up to 40 minutes).
PRACTICAL GUIDANCE
- Make sure you have enough liquid to cover the Min limit marker (Cf. Fig. 7). and take care not to exceed the 1.8 L MAX limit marker engraved inside the jug (Cf. Fig. 8).
- Some recipes may cause sudden overflowing, due to the formation of bubbles, particularly when using frozen vegetables. In this case, it is up to you to reduce the quantities accordingly.
- Time and temperature information is flashing: you can modify this information. Adjust the time as required with the aid of the + (increase) and - (decrease) buttons, depending on the ingredients used and the amount to be made (see table of the cooking times for soups in the recipe booklet).
- With the cooking basket (depending on model*) you can steam cook (use P3 with 0.5 litres of water), or for chunky soup recipes and cooking whole ingredients such as meat, fish, vegetables at the same time as your soup (use P1 or P2).
- At the end of the programs, the appliance automatically keeps the recipe warm for 40 minutes so it remains ready to be consumed. To stop warming, simply press the OFF button.
- If you open the lid, press the trigger or remove the jug, the warming process will automatically stop. - When the program has started, you can stop the appliance at any time by pressing the P button (2 beeps will sound). The program is then in pause mode and you can restart it by pressing the P button again or by pressing the OK button (a beep signal will be emitted).
- If you choose the wrong program by mistake and you wish to cancel it, press the OFF button for 2 seconds and that will allow you to restart the times and the temperatures.
MANUAL MODE
- Adjust the cooking time with the aid of the + (Increase) and - (decrease) buttons, depending on the ingredients used and the amount to be made (see table of the cooking times for soups in the recipe booklet).
- You have to then validate the time chosen by pressing the OK button.
- The temperature information is flashing, you can change this information. Adjust the cooking temperature with the aid of the + (increase) and -
(decrease) buttons.
- You then have to validate the temperature chosen by pressing the
- OK button.
- The red indicator light illuminates and a 'beep' will sound to inform you that the cooking has started.
- At any point you can adjust the motor onto either: - slow speed (position 1) to mix liquid ingredients (e.g. to make sauces).
- quick speed (position 2 onwards) to mix solid ingredients.
BLENDER MODE (without cooking)

- Select a speed by turning the speed selector to the right. The mixing starts and the time appears on the screen.
In blender mode, you can select up to 5 speeds with different mixing types.
The pulse speed can be found to the left of position 0.
- Turn the speed selector to position 0 to stop the appliance.
- Press on the trigger (d2) then remove the blender jug (D). If you wish to program an operation time which stops automatically:
- Adjust the operation time with the aid of the + (increase) and - (decrease) buttons.
- Select a speed by turning the speed selector. The count time appears on the screen.
• The motor stops automatically at the end of the count time.
Ice crushing button: The "Ice" button starts the ice crushing operation; this takes 30 seconds. You can stop the appliance as required by pressing the "OFF" button. You can crush a maximum of 6 to 8 ice cubes.
CLEANING THE APPLIANCE
- Do not immerse the appliance in water. Never put the motor unit (A) under hot running water.
- Clean the jug immediately after use.
- Fill up the jug with 1 litre of hot water along with 2 or 3 drops of washing up liquid. Only use the recommended amount of water and washing up liquid. An excess of washing up liquid creates more foam and consequently can lead to overflowing.
- Use the automatic Autoclean programme: P3 or P4 (depending on model*) to carry out a prewash of the bowl.
- Once the program has stopped, unplug the appliance.
- Press on the trigger (d2) then remove the blender jug (D).
- Place the jug on a flat surface.
- Unlock the lid by turning it a quarter turn clockwise. Remove the lid with care.
-
When the parts have cooled down, unclip the lid's carrier seal with the aid of the gripping system.
-
Finish cleaning the jug with the aid of a sponge.
- Rinse the inside of the jug and the lid under running water.
- In the event of the heated part of the jug getting extremely dirty, leave to soak for a few hours in a mix of water and washing up liquid to help get it clean.

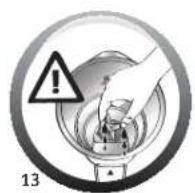
• Take care when cleaning the blades (d3) in the blender jug and when you empty the bowl as they are sharp.
- Use a damp cloth to clean the motor unit (A). Dry it carefully.
- The detachable parts (lid, carrier seal, seal, measuring cap, cooking basket) can be cleaned with a sponge and hot soapy water.
WHAT TO DO IF YOUR APPLIANCE DOES NOT WORK
| PROBLEMS | CAUSES | SOLUTIONS |
| The appliance does not work. | It is not plugged h. | Plug your appliance into the mains powersupply. |
| The jugand the lid are not in the correct place or arenot locked correctly. | Check that the jug and the lid are corectlyp as itioned an dloided following thediagrams inthe instructions | |
| Excessive vibrations. | The appliance isn ot placed on a flat surface, the appli ame is not stable | Place the appli anceon a flat stable surface. |
| Volume of ingredient sis too high. | Reduce the quantity of ingredents proess ed. | |
| Leak through lid. | Volume of ingredient sis too high. | Reduce the quantity of ingredents proess sed. |
| The lid is not positionedor locked correctly | Lox theli difrmily onto the jug | |
| The waterproof seal isnot present | Position thew ate proofseal on the carrier sed and dci p the unit onto the lid | |
| The waterproof seal has been cut through or dam aged | Change the seal orc contact an approved service entre | |
| The blades do not rotate easily | Peces off ood too big or too hard | Reduce the size or quantity of the ingredients processed.Add some liquid |
| Displays "SECU" | Motor overload caused by too large an amount of ingredients or pieces of food that are too hard or too large | Let the motor cool down and reduce theamount of ingredients in the jug. |
| Displays "SECU" + redindicator light is flashing | Empty jug, nearly empty or not enough liquid in recipe | Add liquid up to the jug's minimum levelmarker (Cf. Fig. 7) |
| Displays "Err" + red indicator lights flashing | The heating element does not work | Contact the Customer Relations Helpline - see contact list |
| Displays « ntc » + redindicator light is flashing | The temperature sensor is no longer working | Contact the Customer Relations Helpline- see contact list |
| Motor stops during use, without any fault being displayed. | If the jug an did are not correctly assembled and fastened the safety motor overload will be triggered | Leave it to cooldown for 30 minutes andredu ce the quantity of ingredients to process. |
Your appliance still doesn't work?
Contact the Customer Relations Helpline - see contact list.
RECYCLING
- Disposal of packaging materials and the appliance.
The packaging is made of exclusively environmentally safe materials that can be disposed of according to current recycling regulations.
To dispose of your appliance, consult the appropriate department of your local authority.
• Expired electronic or electrical products:

Think of the environment!
① Your appliance contains valuable materials which can be recovered or recycled.
Please take it to a local waste collection point where it will be disposed

BESCHRIJVING VAN HET APPARAAT
A Motorblok
B Bedieningspaneel
b1 Selectieknoppen
- P - Automatische programma's
HET APPARAAT SCHOONMAKEN
UW APPARAAT WERKT NIET. WAT NU?

- DESCRIPTION DE L'APPAREIL
- APPLIANCE DESCRIPTION
- SAFETY INSTRUCTIONS
- ▶ On personal safety
- ▶ On incorrect use
- BEFORE FIRST USE
- USING THE APPLIANCE
- PROGRAM MODE
- PRACTICAL GUIDANCE
- MANUAL MODE
- BLENDER MODE (without cooking)
- CLEANING THE APPLIANCE
- RECYCLING
- Think of the environment!
- BESCHRIJVING VAN HET APPARAAT
- A Motorblok
- HET APPARAAT SCHOONMAKEN
Brand : TEFAL
Model : Soup & Co BL9001
Category : Blender