
Master Valet IS6300 - Steam cleaner TEFAL - Free user manual and instructions
Find the device manual for free Master Valet IS6300 TEFAL in PDF.
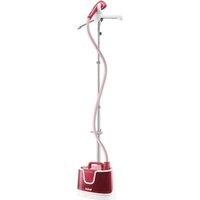
| Product Type | Vertical Garment Steamer |
| Brand | Tefal |
| Model | Master Valet IS6300 |
| Power Supply | 220-240 V ~ 50-60 Hz |
| Power | 1600 W (estimated) |
| Water Tank Capacity | 1.2 L (estimated) |
| Heat-up Time | Approximately 60 seconds |
| Power Cord Length | 2 m (estimated) |
| Steam Hose Length | 1.5 m (estimated) |
| Weight | 5.5 kg (estimated) |
| Dimensions (L x W x H) | 40 x 30 x 170 cm (estimated) |
| Main Functions | Vertical steaming, Roll & Press system, continuous steam |
| Included Accessories | Fabric brush, lint brush, delicate textile cover, integrated hanger, rotating clips |
| Maintenance and Cleaning | Regular descaling recommended (every 50 h or 1 year), clean with damp cloth |
| Safety | Automatic shut-off not specified, overheat protection, grounded outlet required |
| Spare Parts and Repairability | Removable tank, telescopic pole, interchangeable accessories; repair at authorized center |
| Recommended Use | Household, indoor only, hanging garments |
| Water Type | Tap water, or mix 50% distilled water if hard |
| Warranty | 2 years (standard, subject to conditions) |
Frequently Asked Questions - Master Valet IS6300 TEFAL
User questions about Master Valet IS6300 TEFAL
0 question about this device. Answer the ones you know or ask your own.
Ask a new question about this device
Download the instructions for your Steam cleaner in PDF format for free! Find your manual Master Valet IS6300 - TEFAL and take your electronic device back in hand. On this page are published all the documents necessary for the use of your device. Master Valet IS6300 by TEFAL.
USER MANUAL Master Valet IS6300 TEFAL
natural_image
Illustration of two Tefal vacuum cleaner units with attached cable and control knobs (no text or symbols)FR
EN
PT
EL
AR
IR
TH
ZH
MS
TR
natural_image
Diagram of a mechanical device with a cylindrical component and a curved base, showing rotational motion (no text or symbols)fig. 1
natural_image
Mechanical component diagram showing a lever mechanism with rotational motion indicated by an arrow (no text or symbols)fig. 2
natural_image
Diagram of a laboratory apparatus with a conical base and vertical tube, showing internal components and directional arrows (no text or labels)fig. 3
natural_image
Diagram of a mechanical component with a rotating knob and dashed centerline, no text or symbols presentfig. 4
natural_image
Diagram showing two mechanical components with upward arrows indicating motion or force (no text or symbols)fig. 5
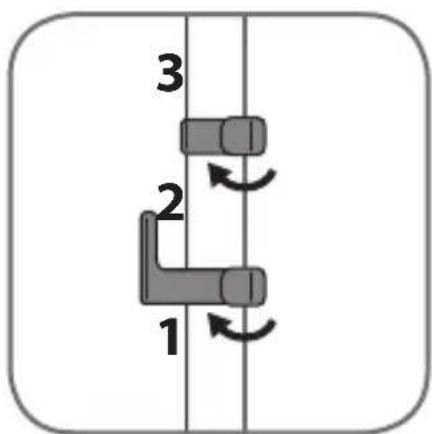
fig. 6
natural_image
Top-down view of a mechanical component with a handle and mounting bracket (no text or symbols visible)fig. 7
natural_image
Mechanical component diagram showing a housing and internal structure with no visible text or symbolsfig. 8
natural_image
Top-down view of a mechanical component with a central shaft and mounting bracket (no text or symbols visible)fig. 9
natural_image
Illustration of a hand using a vacuum cleaner to lift a small container with an upward arrow (no text or symbols)fig. 10
natural_image
Illustration of a hand cleaning a kitchen sink with a faucet and a tool (no text or symbols)fig. 11
natural_image
Illustration of a hand using a vacuum cleaner to press or install a small object, with a downward arrow indicating motion (no text or symbols present)fig. 12
natural_image
Illustration of a hand holding a wall-mounted electrical outlet connected to a computer monitor (no text or symbols present)fig. 13
natural_image
Mechanical device with a black arrow pointing to a component, no visible text or symbolsfig. 14
natural_image
Illustration of a hand using a tool to press or adjust a mechanical component, with no visible text or symbols.fig. 15
natural_image
Illustration of a hand using a tool to press down a mechanical component (no text or symbols visible)fig. 16
natural_image
Illustration of a person holding a hairdryer over a collared shirt, with no text or symbols present.fig. 17 fig. 18
natural_image
Line drawing of a person holding a hairdryer over a collared shirt (no text or symbols)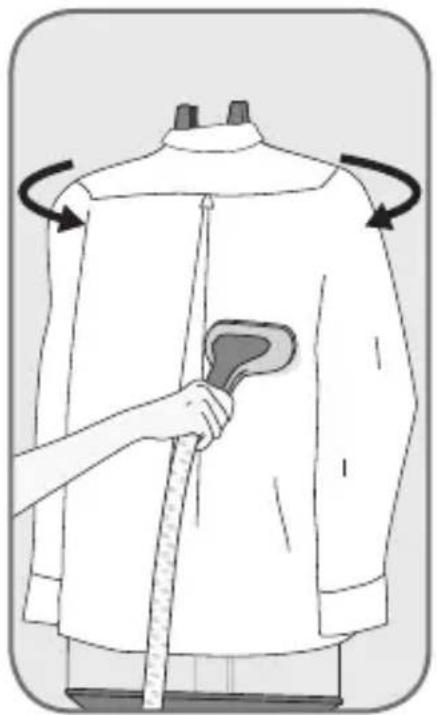
natural_image
Illustration of a person adjusting a sleeveless shirt with a cane, shown in a garment outline (no text or symbols)fig. 19 fig. 20
natural_image
Illustration of a hand using a tool to lift a jacket, showing rope routing (no text or symbols)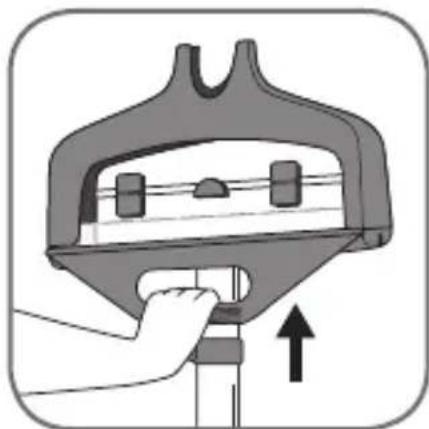
natural_image
Illustration of a hand holding a device with an upward arrow, no text or symbols presentfig. 21
natural_image
Illustration of hands washing a sink with a pipe, no text or symbols present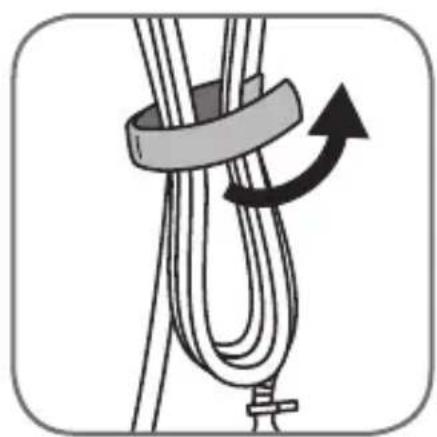
natural_image
Diagram of a rope knot with a black arrow indicating clockwise motion (no text or symbols)
natural_image
Diagram of a rope knot with a hook and clamping mechanism, no text or symbols presentfig. 24fig. 23fig.:
FR
natural_image
Diagram showing a capsule being inserted into a bone (no text or labels)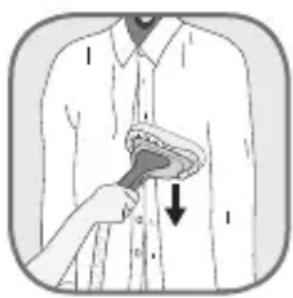
natural_image
Illustration of a person applying a cotton swab to another shirt (no text or symbols)Important safety instructions
When using your appliance, basic precautions should always be followed, including the following:
- Read all instructions before using this product.
- This product has been designed for indoor, domestic use only. Any commercial use, inappropriate use or failure to comply with the instructions, the manufacturer accepts no responsibility and the guarantee will not apply.
• Always plug your appliance:
- into a mains circuit with voltage between 220 V and 240 V.
- into an earthed electrical socket.
Connecting to the wrong voltage may cause irreparable damage to the appliance and will invalidate your guarantee.
If using a mains extension lead, ensure that it is correctly rated (16A) with an earth, and is fully extended.
- Completely unwind the power cord before plugging into an earthed socket.
- Use appliance for its intended use only.
- To reduce the risk of contact with hot water emitting from steam vents, check appliance before each use by holding it away from body and operating steam button.
- This appliance can be used by children aged from 8 years and above and persons with reduced physical, sensory or mental capabilities or lack of experience and knowledge if they have been given supervision or instruction concerning use of the appliance in a safe way
and understand the hazards involved. Children shall not play with the appliance. Cleaning and user maintenance shall not be made by children without supervision.
- Never pull on the cord to disconnect the appliance from electrical outlet; instead, grasp plug and pull to disconnect on the plug to disconnect the appliance.
- Do not allow cord to touch hot surfaces or come into contact with rough or sharp edges. Let the appliance cool completely down before putting away. Loop cord loosely around appliance when storing.
- Always disconnect appliance from the electrical supply when filling with water or emptying when cleaning, when removing or refitting accessories and when not in use.
- Care should be taken when using the appliance due to the emission of steam.
- Do not operate appliance with a damaged cord or if appliance has been dropped or damaged. To avoid the risk of electric shock, do not disassemble or attempt to repair the appliance. Take it to the nearest approved service centre for examination and repair. Incorrect reassembly or repair could cause a risk of fire, electrical shock or injury to persons when the appliance is used.
- Close supervision is necessary for any appliance being used by or near children.
- Do not leave the appliance unattended while plugged in or while it is still hot.
- Burns could occur from touching hot metal or plastic parts, hot water or steam. Use care when you empty a steam appliance. There may be hot water in the reservoir.
- If an extension cord is absolutely necessary, a cord with a 16A ampere rating shall be used. A cord rated for less amperage can result in a risk of fire or electric shock due to overheating. Care shall be taken to arrange the cord so that it cannot be pulled or be tripped over.
- To protect against a risk of electric shock, do not immerse the appliance in water or other liquids.
- Do not direct steam at people, animals or clothes while they are being worn.
- This appliance is not intended for use by persons (including children) with reduced physical, sensory or mental capabilities, or lack of experience and knowledge, unless they have been given supervision or instruction concerning use of the appliance by a person responsible for their safety. Children should be supervised to ensure that they do not play with the appliance.
- The use of accessory attachments other than those provided by the manufacturer is not recommended and may result in fire, electric shock or personal injury.
- The appliance must be rested on a stable surface. When placing the appliance on its base, ensure that the surface on which the base is placed is stable.
- The appliance must not be used if it has been dropped, if there are visible signs of damage or if it is leaking.
- Check the electrical power cord for sign and wear or damage prior to use. If the electrical power cord is damaged, it must be replaced at an approved service centre to avoid any danger.
- Do not use other descaling products than the one cited in the IFU.
Before first use
- When you first use the appliance, some smoke or a harmless odour may be produced or there may be a small discharge of particles. This will not affect the use of the appliance and will disappear quickly.
What water to use?
- Your appliance has been designed to use tap water.
If your water is very hard, mix 50% tap water and 50% bottled demineralised water.
Never use water containing additives (starch, perfume, aromatic substances, softeners, etc.), or condensation water (for example water from tumble dryers, water from refrigerators, water from air conditioning units, rainwater). This water contains organic waste materials or minerals that concentrate under the effect of heat and cause spitting, brown colouring or premature ageing of your appliance.
SAVE THESE INSTRUCTIONS
Environmental protection first!
① Your appliance contains valuable materials which can be recovered or recycled.
When disposing of it, take it to a local civic waste collection point.
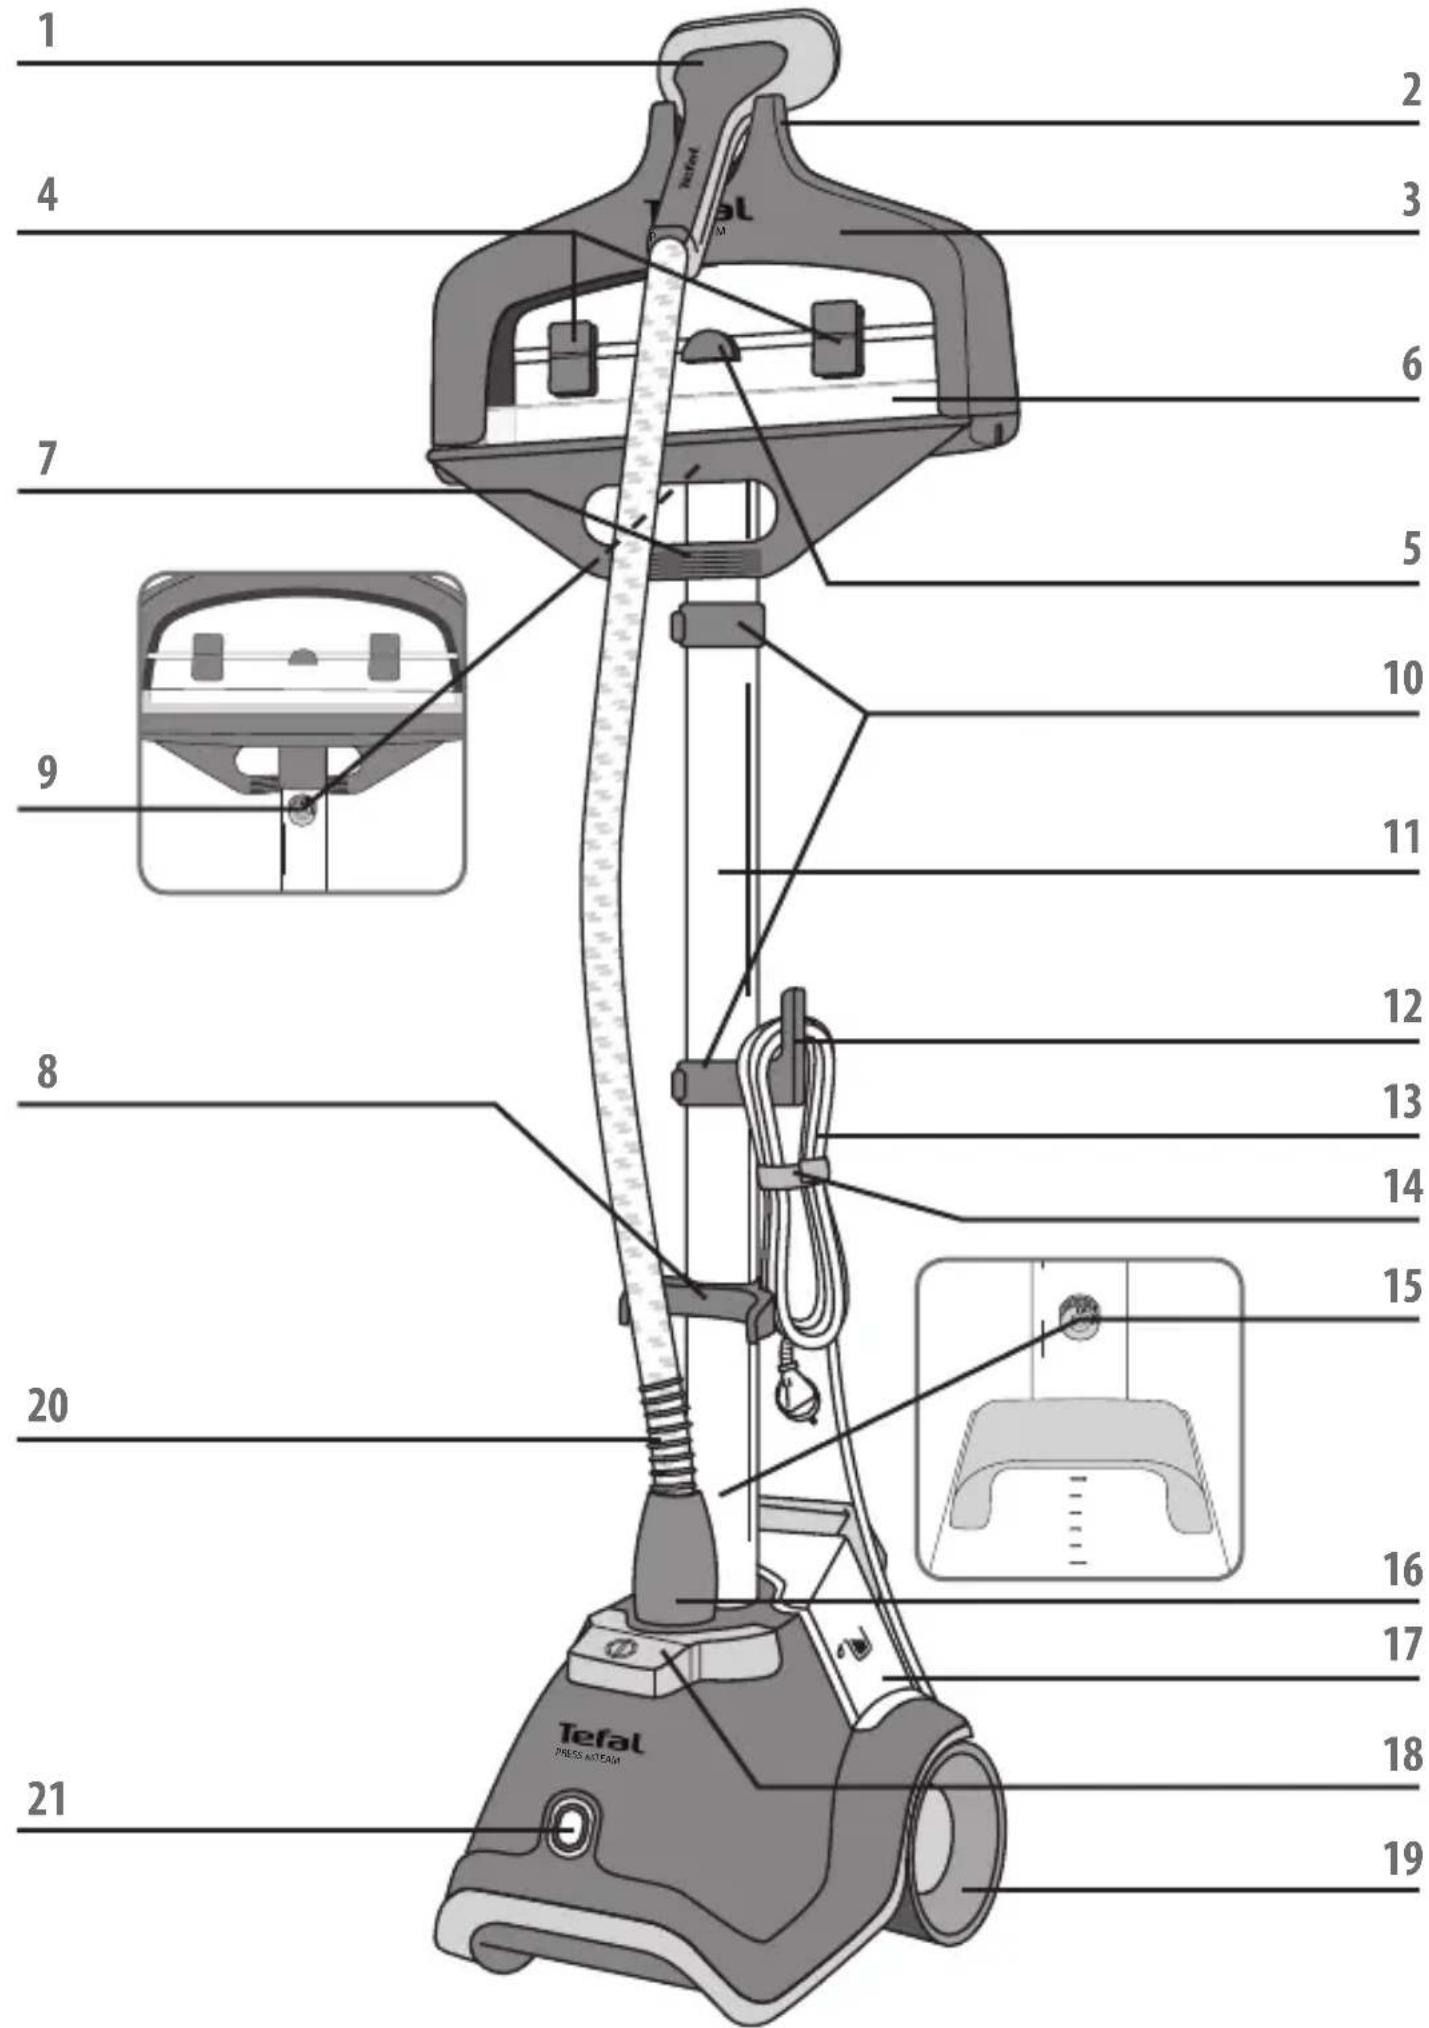
DESCRIPTION
- Steam head
- Steam head hook
- Built in hanger
- Rotary trouser/dress clips
- Hanger holder
- Roll & press system: vertical support panel
- Roll & press system: rolling and locking handle
- Roll & press system: locking hook
- Hanger fastening screw
- Pole locking clips
- Telescopic pole
- Electric cord holder
BEFORE USE
1 • Garment steamer assembly
Pole assembly
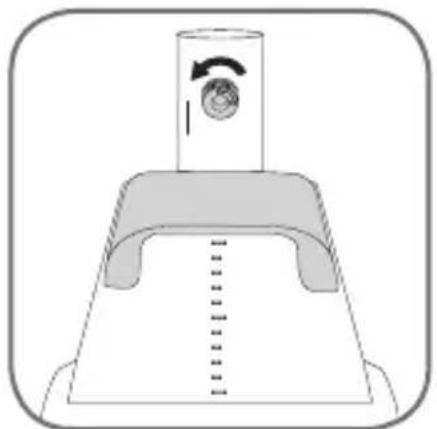
- Unscrew the fastening screw on the base of the pole (fig. 1).
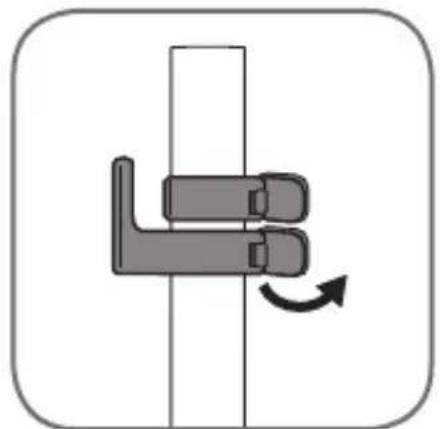
- Hold the pole such that the cord holder is on the left. Check that the 2 pole clips are unlocked (fig. 2).
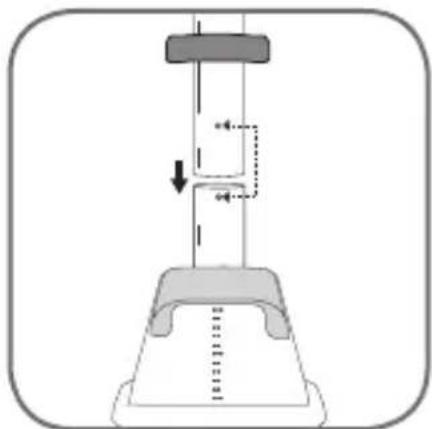
- Insert the pole into the base by pressing downwards until the holes of the pole and base are at the same level, so that you can put the screw back. If the holes are not aligned, check that the clips of the pole are well and truly unlocked (fig. 3).
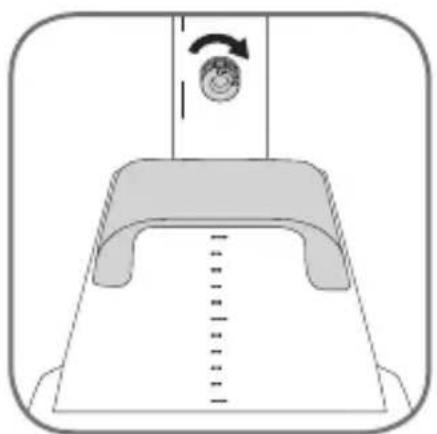
- Screw the pole fastening screw back in as far as it will go so that the pole is firmly fixed to the base (fig. 4).
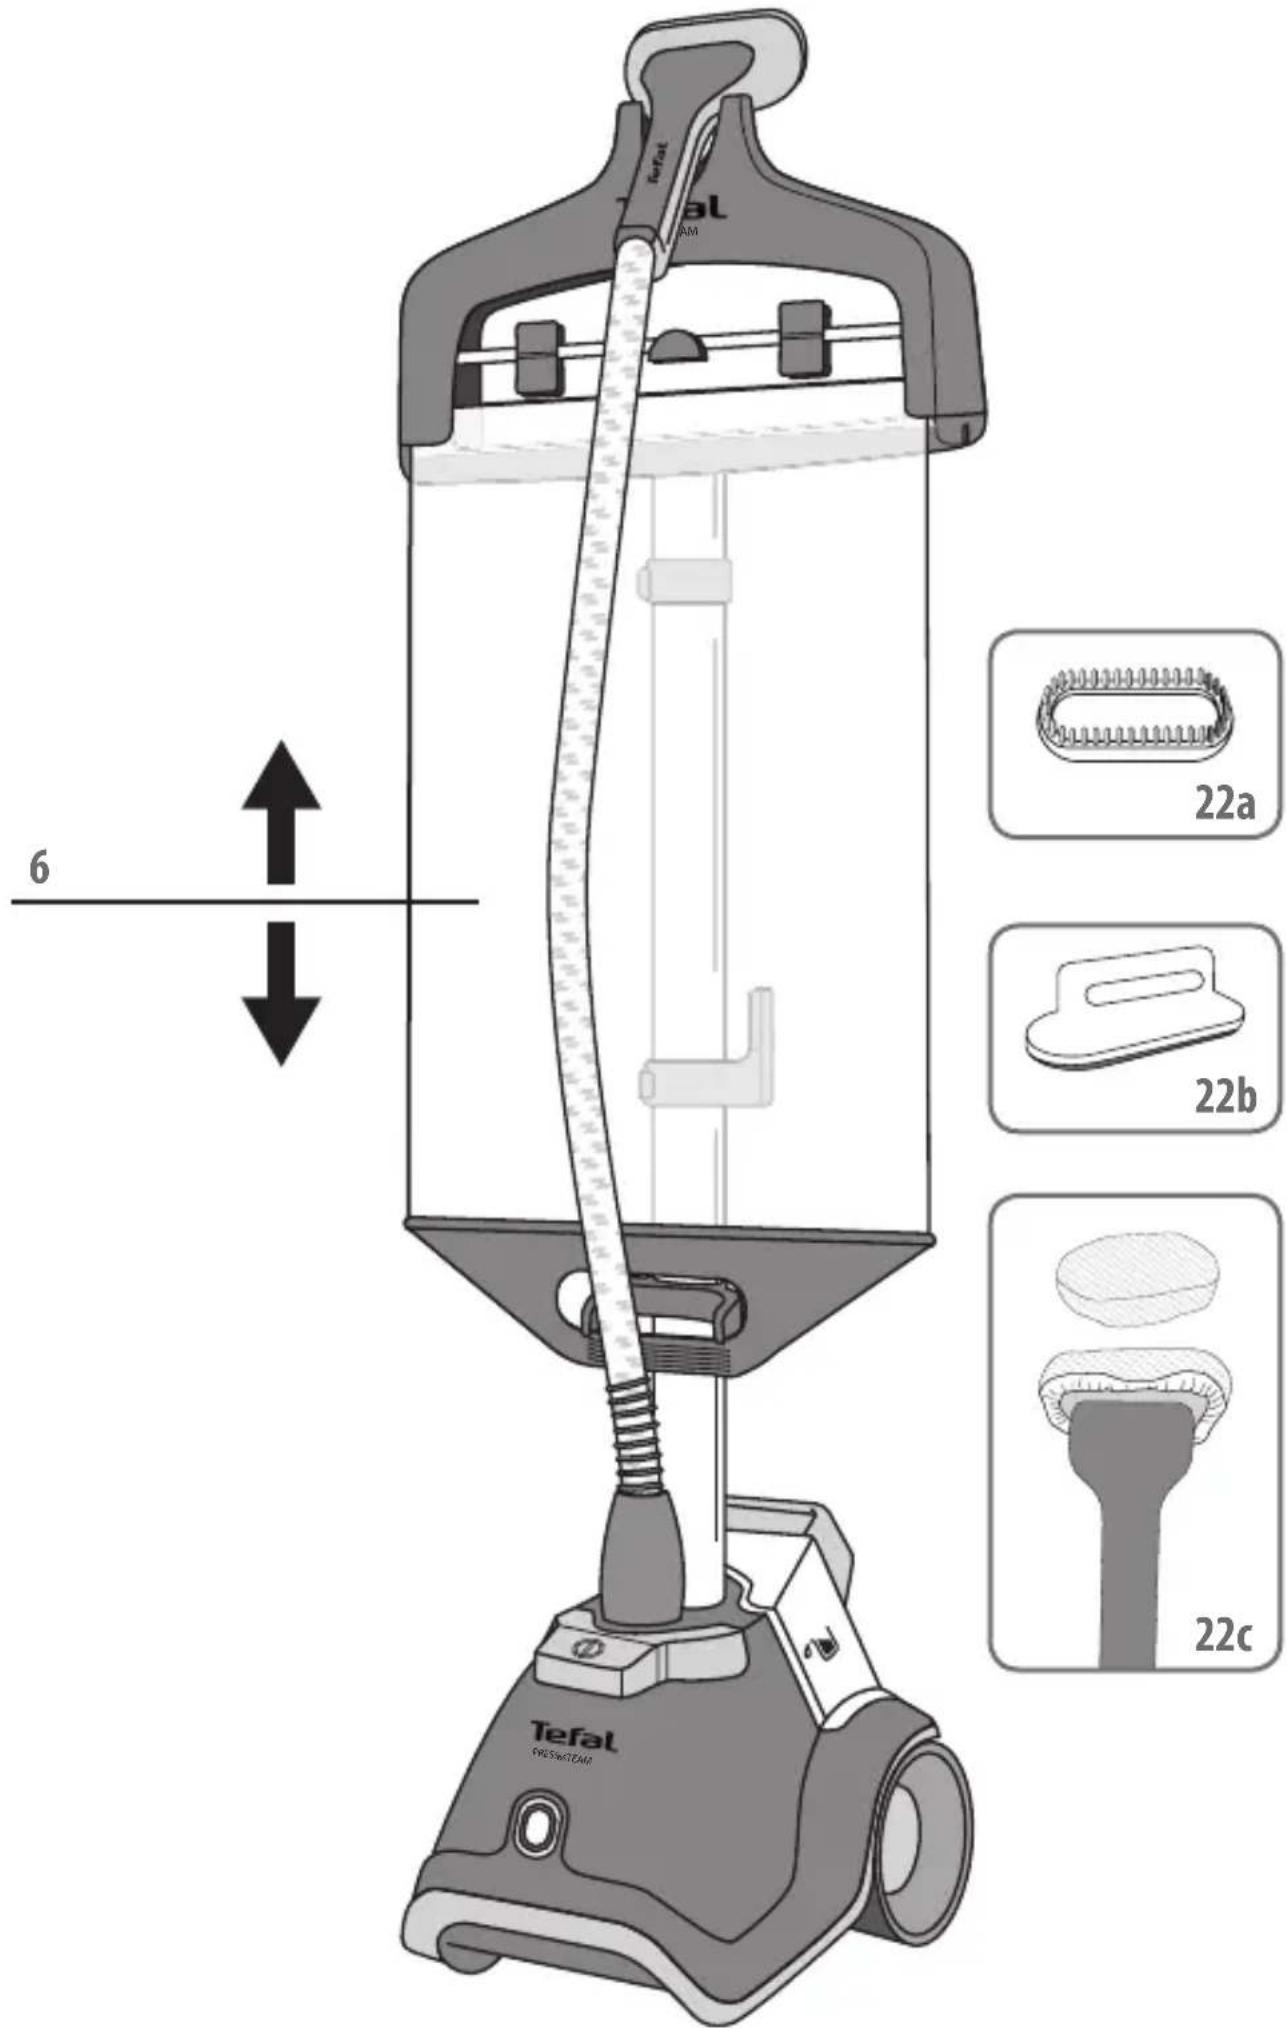
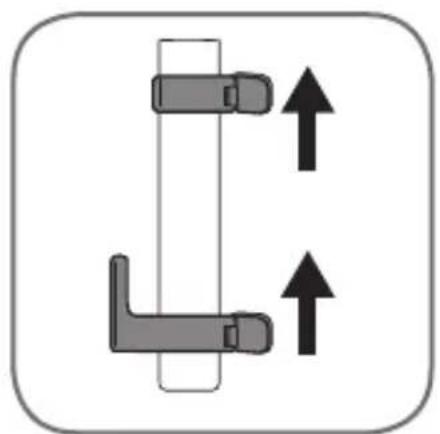
- Adjust the pole to its maximum height by sliding it upwards (fig. 5) then locking the 2 clips (fig. 6). Make sure the 3 segments of the pole are fully extended.
Hanger with Roll & Press system assembly
- Electric cord
- Velcro strip
- Pole fastening screw
- Steam hose connector
- Removable water tank
- ON/OFF pedal
- Transport wheels
- Textile steam hose
- On/off light
- Built in accessories
a. Fabric brush
b. Lint pad
c. Delicates steam cap
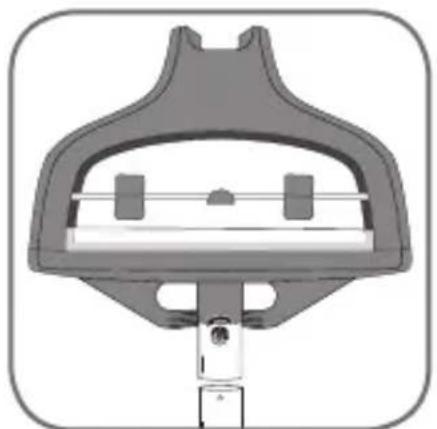
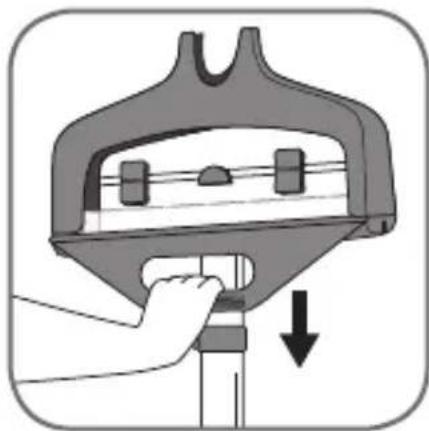
- Unscrew the hanger fastening screw at the bottom of the hanger (fig. 7).
- Hold the hanger such that the Roll & Press system handle is on the same side as the locking hook.
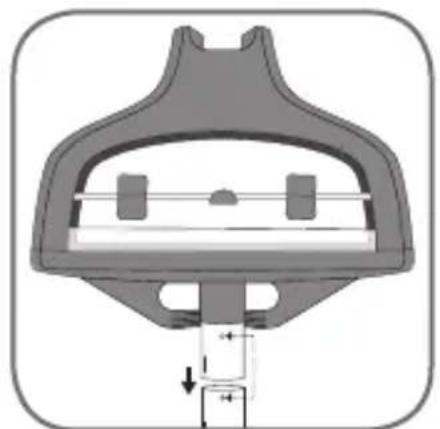
- Insert the hanger vertically on the top of the pole. The holes at the bottom of the hanger and in the pole should be at the same level (fig. 8).
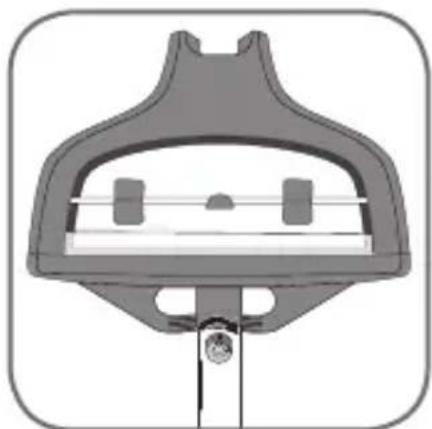
- Put the screw back and screw in as far as it will go so that the hanger is firmly fixed to the pole (fig. 9).
- Install the steam head between the hanger hooks.
2 • Filling the water tank
IMPORTANT: Your product is designed to operate using untreated tap water. If your water is very hard (check with your local water authority) it is possible to mix untreated tap water with store-bought distilled water in the following proportions 50% untreated tap water with 50% distilled water. Heat concentrates the elements contained in water during evaporation. The types of water listed below may contain organic waste, mineral or chemical elements that can cause spitting, brown staining or premature wear of the appliance: water from clothes dryers, scented or softened water, water from refrigerators, batteries, air conditioners, rain water, boiled, filtered or bottled water. These types of water should not be used. Only use store bought distilled water as advised above.
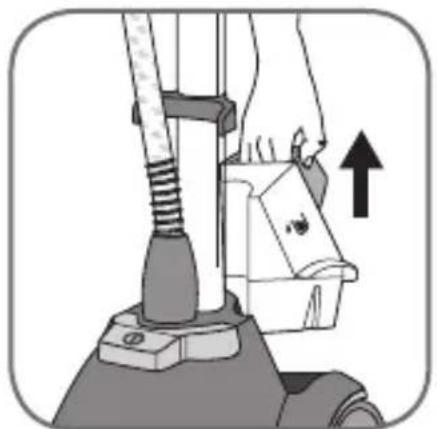
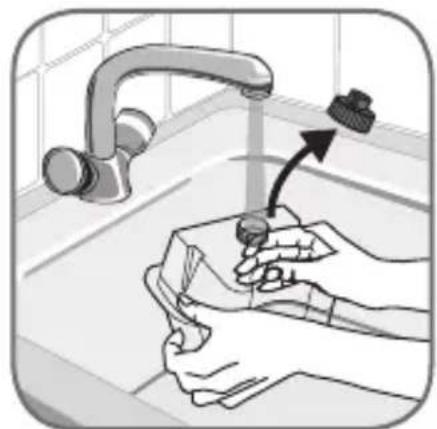
- Ensure that the steamer is unplugged. Remove the water tank from the base of the appliance by pulling the handle upwards (fig. 10). Unscrew the tank cap and fill the tank (fig. 11). Maximum capacity is indicated by the “max” mark.
- After closing the cap, turn the tank down and hold it by the handle. Check that no water is leaking through the cap.
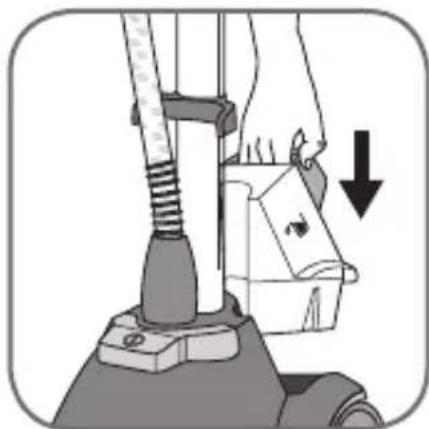
- Place the water tank on the base (fig. 12).
USE
WARNING: Never steam a garment while it is being worn. The flexible pipe and the end of the steam head can become extremely hot during use. This is perfectly normal. Be careful and avoid any prolonged contact.
1 • Setting up
- Only operate the steamer on the floor clear of any materials which may obstruct the base of the steamer, ensure the floor is dry, flat, stable and heat-resistant. Do not obstruct the openings on the lower part of the appliance. This device should not be used on very thick carpets or rugs.
- Undo the Velcro strip and completely unwind the electrical cord.
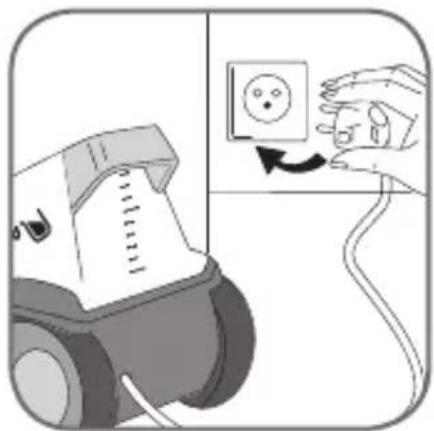
- Plug in to power socket (fig.13).
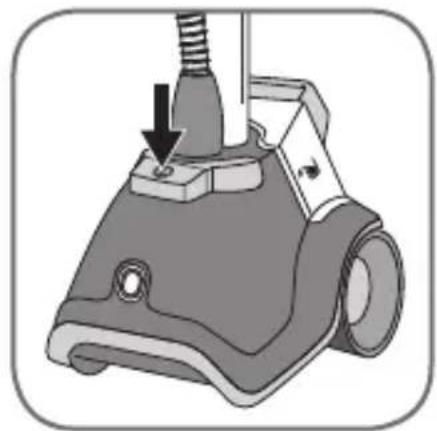
- Switch on by pressing the pedal located at the front of the device. The power indicator light will come on (fig.14).
- The device will begin producing steam after approximately 60 seconds.
2 • Using the Roll & Press system
To use the Roll & Press system:
- Hold the Roll & Press system handle and roll down the panel (fig. 15).
- Insert the handle into the locking hook on the pole and check that it is firmly locked (fig. 16)
- Hang the garments from the built-in hanger or from another hanger which may be suspended from the hook located on the hanger rod (fig. 18-19).
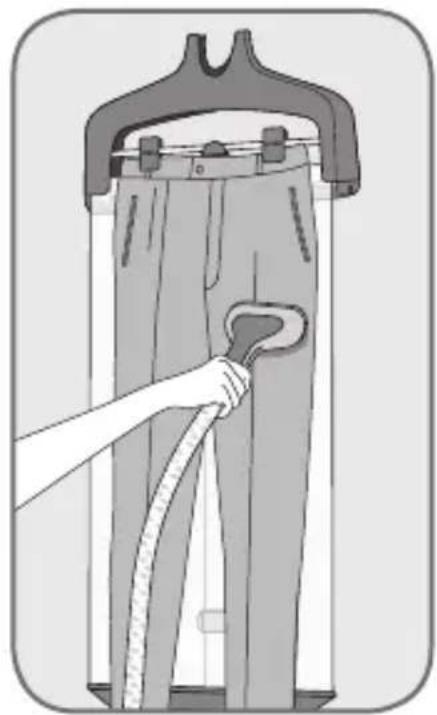
- To steam trousers, we recommend that you also use the support with clips as indicated in the illustration (fig. 20).
- Grasp the steam head with the steam vents pointing away from you.
- Start steaming by brushing material lightly with the grain of the fabric in an up/down vertical motion.
- The vertical support panel helps keep the garment in place while steaming.
- Start at the top the garment and gradually move downward. Always steam in a vertical position.
• Always be careful not to touch the hot steam.
- Always hang the steam head in an upright position on the hook when not in use.
- During use, the hose may make a gurgling noise. This is a normal occurrence due to condensation. If the appliance begins to gurgle, rest the steam head on its support for a few moments in order to direct any build-up of condensation into the appliance once again.
- During use, some water drips may appear on the telescopic pole. This is also a normal occurrence due to condensation. To limit condensation, do not press the steam head too heavily on the Roll and Press panel.
Tips for better results with your garment steamer and Roll & Press system
• We recommend checking the garment care label for manufacturer recommendations before steaming. We also recommend testing the garment and effect on the garment on an unobtrusive area such as an inner seam.
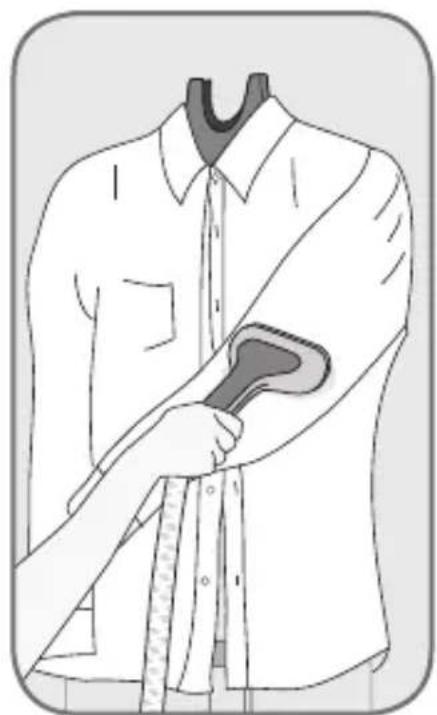
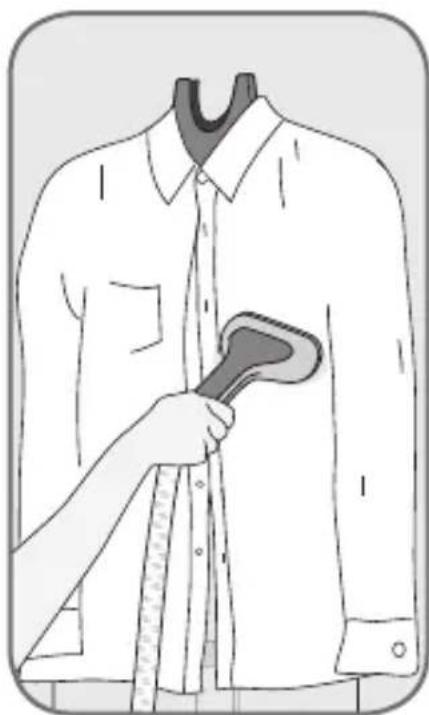
- Button up shirt collars to prevent them from slipping on the hanger during steaming (fig. 17).
- When steaming a shirt, begin with steaming the sleeves. Get hold of one sleeve and cross it over the garment using the Roll & Press for vertical support (fig. 17).
- To steam the back of the shirt, lift up the shirt by the shoulders and turn it around the hanger (fig. 19).
- To put crisp edges on trousers and shirts, press the steam head (without any accessory) against the fabric and the vertical support.
- Gently press the steamer brush into fabric while making slow passes.
- Avoid contact between the steam head and silk or velvet.
- Certain garments are smoothed more easily on the reverse side.
- Heavy fabrics may need to be steamed for longer.
- If you are using the steam head at a position close to the ground, raise the hose frequently in order to avoid the formation of condensation. A gurgling noise may be heard if the flexible pipe is pinched.
- If no steam is produced, if a gurgling sound is heard or if water is dripping through the holes of the steam head, raise the steam hose occasionally to remove condensation inside.
- Be careful at all times.
ACCESSORIES
Before using an accessory, check the manufacturer recommendations.
It is also recommend that you carry out a test on part of the fabric which cannot be seen.
1 • Fabric brush
The fabric brush opens the weave of the fabrics for better steam penetration.
Be sure unit is unplugged and completely cool before attaching accessories.
- Attach the fabric brush to the steam head by lining up the bottom of the brush with the bottom of the steam head. Gently push the top of the brush onto the steam head until it clicks into place.
- Gently brush the area to be steamed with the grain or nap of the fabric.
- Remove the fabric brush once unit is unplugged and completely cool. Remove it by pressing on the release tab on top of brush while pulling it forward.

natural_image
Illustration showing two steps of a hairdryer tool: one with a spiral brush and arrow, the other with a brush and arrow (no text or symbols)2 • Lint pad
The lint pad is a separate accessory and cannot be attached to the steam head. You can use the lint pad independently from the steamer.
The lint pad removes hair, lint and animal fur for a professional looking finish.
- To use the lint pad, slowly brush the clothing with the grain or nap of the fabric.
- The pad can be cleaned by brushing it in the opposite direction. We recommend cleaning the pad on an old cloth that can be discarded.
- We recommend to use the lint pad before steaming your clothes for perfect results.
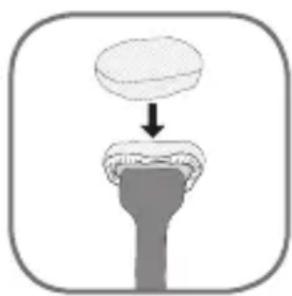
3 • Delicates steam cap
The steam cap cannot be used together with the fabric brush on the steam head. Be sure the unit is unplugged and completely cool before attaching accessories.
natural_image
Simple diagram showing a capsule being inserted into a base, with no text or symbols present.
natural_image
Illustration of a person applying a bandage to another shirt (no text or symbols)The steam cap provides even distribution of steam, filters impurities from the water and protects fabrics from water dripping.
- Attach the steam cap to the steam head.
The steam head should be totally covered. - Gently press the steam head with cap on the area to be steamed.
- Remove the steam cap once the appliance is unplugged and completely cool.
AFTER USE
• After using the garment steamer, switch off the appliance by pressing the pedal once again. The power indicator light will go off, and you can then unplug the appliance.
- Hang the steam head in an upright position on the hook when not in use.
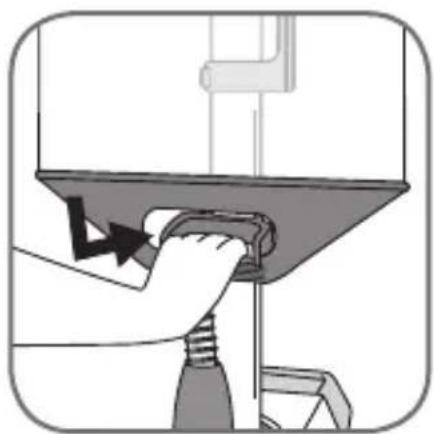
- Unlock the Roll & Press handle from its hook on the pole (fig. 21). Keep your hand on the
handle while the panel is rolling back to the top.
WARNING: never let go of the handle until the panel has totally rolled back.
Once the appliance is switched off, it is recommended to wait several minutes so that the Roll & Press panel has dried before rolling it back.
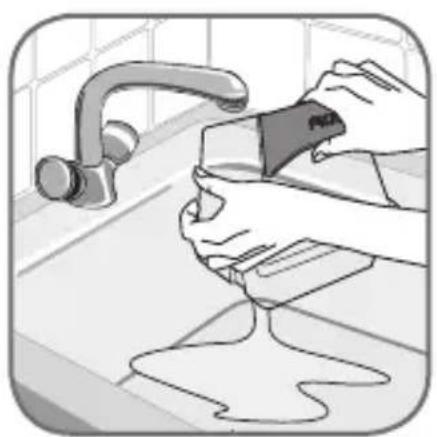
- Empty and rinse the water tank each time before storage in order to flush out any scale particles (fig. 22).
- Loosely wind up the electrical cord and close with the Velcro strip, then hang it from the clip on the pole (fig.23 - fig. 24).
- Do not carry the steamer by the water tank handle. This appliance includes luggage style wheels for added convenience when transporting.
WARNING: Never touch the head until it has cooled down completely.
1 • Transport
- Your appliance is fitted with two wheels for ease of transport. Tilt the appliance towards the rear holding the pole and then pull along to transport.
- You can also lift up the appliance in order to transport it, again holding the appliance by the pole.
Do not attempt to lift up or transport the appliance holding the Roll & Press panel, the pedal, the water tank handle or the built-in hanger. Always roll back the Roll & Press panel before transporting the appliance. Always make sure the pole is firmly attached to the base unit before lifting up the appliance (see assembly instructions).
2 • Cleaning
- Clean the main unit with a damp cloth.
- Clean the Roll & Press system panel with a damp cloth or non abrasive sponge. Do not use any cleaning products such as soap or detergents.
• Always handwash the delicates steam cap and wait until it is totally dry before using again. - To maintain maximum performance, your steamer must be descaled occasionally. The time between descaling operations depends on the quality of the water and the frequency with which you use the appliance. The appliance must be descaled at least once a year or after 50 hours of use.
- To carry out a descaling operation, follow the following steps:
- Ensure that the appliance has cooled down completely (2 hours minimum).
- Fill the water tank with fresh untreated tap water and place it on the main unit allowing water to fill the boiler.
- Remove the water tank from the base and empty out the water via the water tank filling hole by tipping the appliance over a sink. Limescale and other impurities can be rinsed away.
- Repeat step 2 and 3 several times until all the scale has been removed.
CAUTION: Don't fill the boiler by the steam head holes!
Never immerse the steam head in water!
TROUBLESHOOTING
| Problems Possible causes Solutions | ||
| There is no steam. The appliance | has not been turned on. | Check that the appliance has been plugged in correctly. Next press the On/Off pedal, the power indicator light located at the front of the appliance will come on. |
| The hose has been obstructed. | Check that the hose is not bent or twisted. The device will begin producing steam after approximately 60 seconds. | |
| There is no water left in the water tank. | Switch off the appliance and fill the water tank. | |
| The steam flow is low. Your steamer has a build-up of scale because it has not been rinsed out regularly. | See descaling process (Cleaning paragraph). | |
| The hose has been obstructed. | ||
| There is no water left in the water tank. | ||
| The steam is not ready yet. The appliance will produce steam about 60 seconds after it has been switched on. | ||
| Water runs through the holes of the steam head. | There is condensation in the hose. | Never use a steamer in the horizontal position. Hold the hose vertically outstretched and wait for the condensed water to return to the steamer. |
| The steamer takes a long time to heat and/or ejects white particles. | Your steamer has a build-up of scale because it has not been descaled regularly. | See descaling process (Cleaning paragraph). |
| The Roll & Press system panel is crooked. | The panel didn't roll back correctly. | Unroll the panel again and keep your hand on the handle while rolling back to the top. |
| The Roll & Press system panel rolled back up while in use. | The panel didn't roll back correctly. | Make sure the Roll & Press handle is firmly locked in the hook. It should not be moving horizontally or vertically. |
| The hose makes a gurgling noise. | You are using the steam head in a position close to the ground and some condensation occurs in the hose. | Raise the hose frequently during use and adjust the pole to its maximum height in order to avoid the formation of condensation. |
| Water is overflowing from water tank. | You are using the steam head in a position close to the ground and some condensation occurs in the hose. | Raise the hose frequently during use and adjust the pole to its maximum height in order to avoid the formation of condensation. |
If you have any further problems or queries please contact the Tefal Customer Relations Helpline - see details at the end of this leaflet.
PT
natural_image
Diagram showing a capsule being inserted into a bulbous structure (no text or symbols)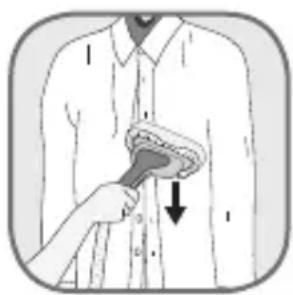
natural_image
Illustration of a person using a brush to clean or adjust a shirt (no text or symbols visible)ΜΕΤΑ ΑΠΟ ΚΑΘΕ ΧΡΗΣΗ
natural_image
Diagram of a mechanical joint with an arrow indicating force or movement (no text or symbols)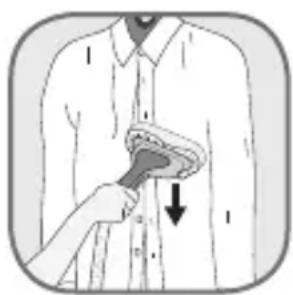
natural_image
Illustration of a person applying a bandage to another shirt (no text or symbols)natural_image
Diagram of a dental implant device with a magnified view showing internal structure (no text or symbols)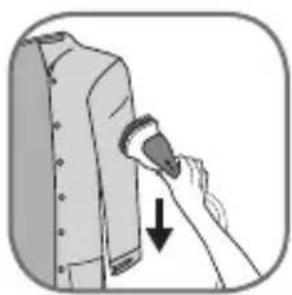
natural_image
Illustration of a hand inserting a plug into a jacket, with a downward arrow indicating force (no text or symbols)natural_image
Diagram showing a capsule being inserted into a bone, with an arrow indicating the process (no text or symbols present)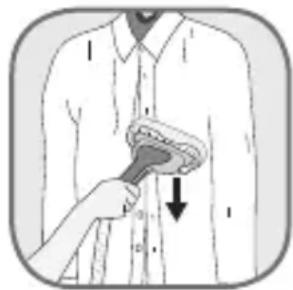
natural_image
Illustration of a person using a tool to press or adjust something down, with a downward arrow indicating pressure (no text or symbols present)يَس از استفاده
natural_image
Diagram of a device with a lid and base, showing internal components and an arrow indicating direction (no text or symbols)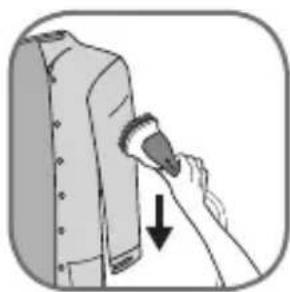
natural_image
Illustration of a hand inserting a plug into a jacket with a downward arrow indicating force (no text or symbols)natural_image
Illustration showing two steps of a hairpin usage: one with a bandage and arrow, the other with a brush touching the skin (no text or symbols)2 • แผ่นจับฝน
natural_image
Simple diagram showing a capsule being placed on a base with a downward arrow indicating motion (no text or symbols)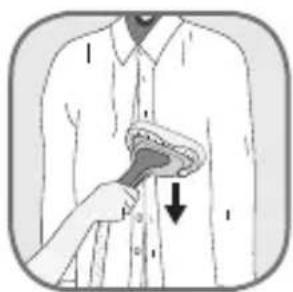
natural_image
Illustration of a person using a brush to apply a button on a shirt (no text or symbols present)natural_image
Illustration showing two steps of hair cleaning: one with a circular component being removed, the other with a brush touching it (no text or symbols present)2 · 绒垫
natural_image
Diagram showing a capsule being inserted into a bulb, with no text or symbols present.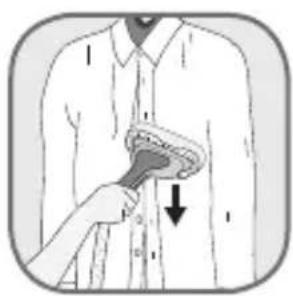
natural_image
Illustration of a person using a hairbrush to clean another shirt (no text or symbols)natural_image
Illustration showing two steps of a hairbrush tool: one with a circular brush and arrow, the other with a hand holding a brush (no text or symbols)2. Pad lin
natural_image
Diagram showing a capsule being placed above a bulb with a downward arrow, no text or symbols present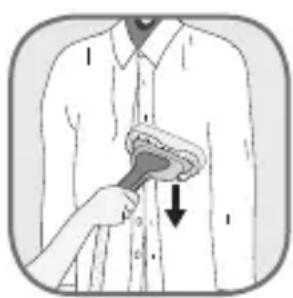
natural_image
Illustration of a person using a brush to apply a black ink on a shirt (no text or symbols present)- Penutup wap memberikan pengedaran wap yang sama rata, menapis kekotoran daripada air dan melindungi fabrik daripada titisan air.
- Pasangkan penutup wap kepada kepala wap. Kepala wap sepatutnya tertutup sepenuhnya.
- Tekan kepala wap bersama penutup dengan lembut ke kawasan yang akan diwapkan.
- Tanggalkan penutup wap sebaik sahaja palam peralatan dicabut dan ia benar-benar sejuk.
4. Sarung tangan
natural_image
Illustration showing two steps of a hairbrush tool: adding a circular component to a base and adjusting the handle (no text or symbols present)natural_image
Simple line drawing of a mechanical component with a cylindrical top and flange base, no text or symbols present.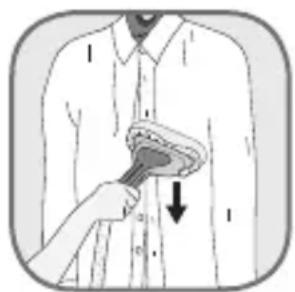
natural_image
Illustration of a person applying a medical or surgical tool to another person's chest (no text or symbols present)KULLANIM SONRASINDA


- FR
- Important safety instructions
- Before first use
- What water to use?
- SAVE THESE INSTRUCTIONS
- Environmental protection first!
- DESCRIPTION
- BEFORE USE
- • Garment steamer assembly
- Pole assembly
- Hanger with Roll & Press system assembly
- • Filling the water tank
- USE
- • Setting up
- • Using the Roll & Press system
- Tips for better results with your garment steamer and Roll & Press system
- ACCESSORIES
- • Fabric brush
- Be sure unit is unplugged and completely cool before attaching accessories.
- • Lint pad
- The lint pad is a separate accessory and cannot be attached to the steam head. You can use the lint pad independently from the steamer.
- • Delicates steam cap
- The steam cap cannot be used together with the fabric brush on the steam head. Be sure the unit is unplugged and completely cool before attaching accessories.
- AFTER USE
- • Transport
- • Cleaning
- PT
- ΜΕΤΑ ΑΠΟ ΚΑΘΕ ΧΡΗΣΗ
- • แผ่นจับฝน
- · 绒垫
- Pad lin
- Sarung tangan
- KULLANIM SONRASINDA
Brand : TEFAL
Model : Master Valet IS6300
Category : Steam cleaner