Instant Control IS8380 - Steam cleaner TEFAL - Free user manual and instructions
Find the device manual for free Instant Control IS8380 TEFAL in PDF.
User questions about Instant Control IS8380 TEFAL
0 question about this device. Answer the ones you know or ask your own.
Ask a new question about this device
Download the instructions for your Steam cleaner in PDF format for free! Find your manual Instant Control IS8380 - TEFAL and take your electronic device back in hand. On this page are published all the documents necessary for the use of your device. Instant Control IS8380 by TEFAL.
USER MANUAL Instant Control IS8380 TEFAL
natural_image
Illustration of a handheld cleaning or cleaning device with a curved tube and attached base (no text or symbols)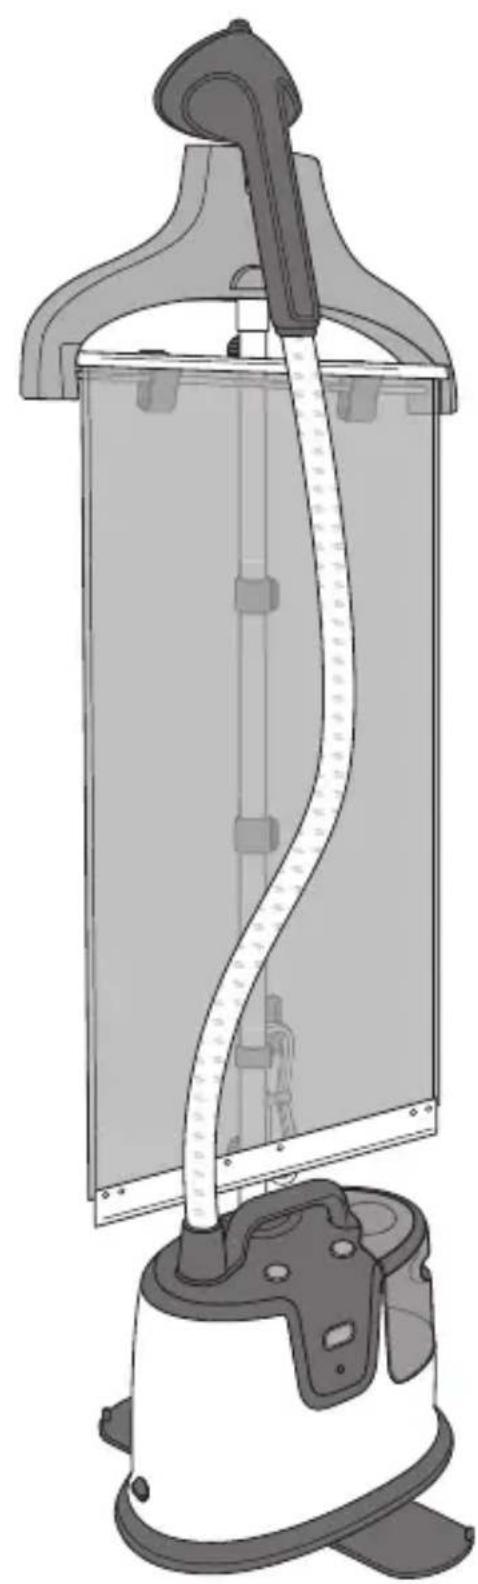
natural_image
Technical illustration of a portable device with attached cable and base mount (no text or symbols)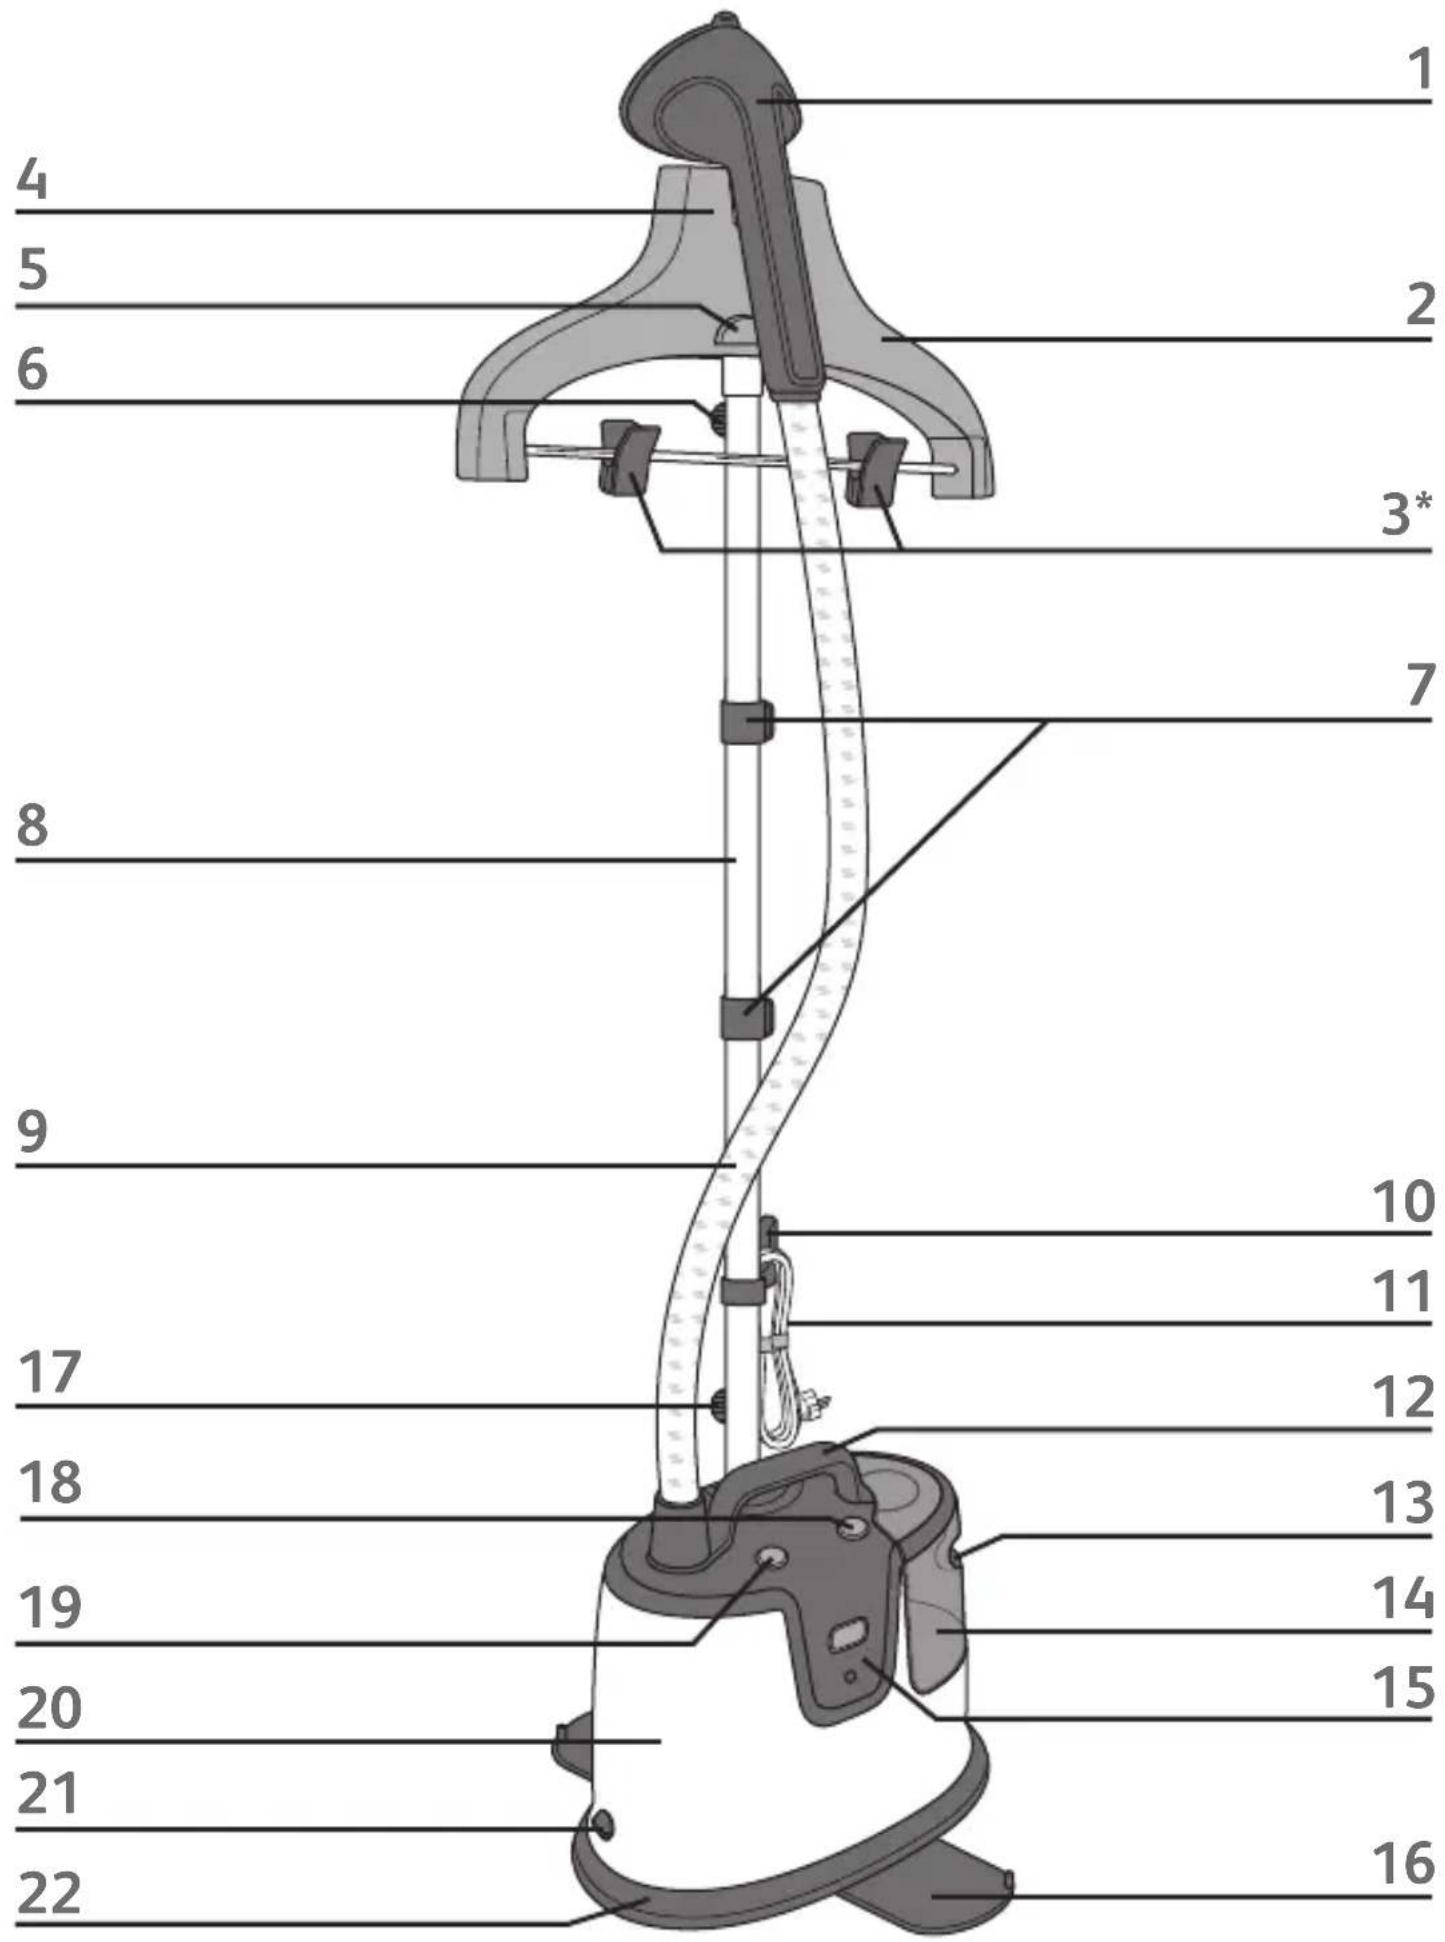
text_image
1 2 3* 4 5 6 7 8 9 10 11 12 13 14 15 16 17 18 19 20 21 22* EN Depending on model / FR Selon modèle / TH แตก당نگنباไنแตészرุ่n / MS Mengikut model / ZH 根據型號而定 / AR حسب الموديل / RU B зависимости от модели / UK Залежно від моделі / TR modele göre değişir
text_image
23* 24* 25* 26*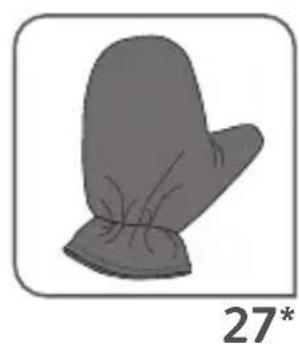
natural_image
Illustration of a mitten with visible skin texture and a number 27* below (no text or symbols on the mitten itself)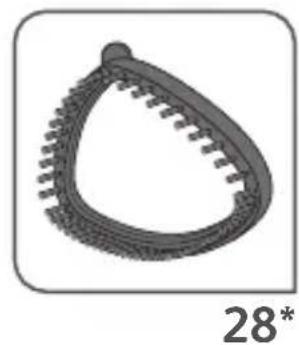
natural_image
3D rendered mechanical component with teeth and curved body, labeled 28* (no text or symbols on the object itself)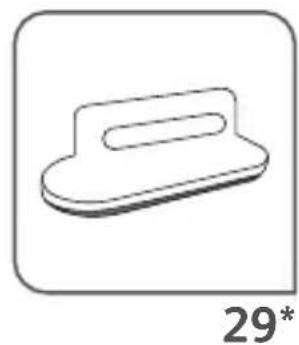
natural_image
Simple line drawing of a pushpin or clamp (no text or symbols)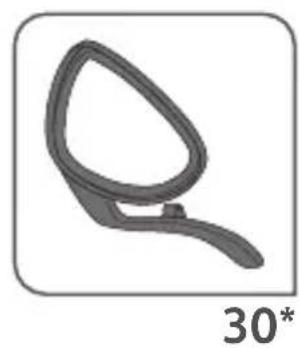
natural_image
Simple line drawing of a curved object resembling a stylized hand or tool, with no text or symbols present.natural_image
Diagram of a mechanical press or stamping device with rotating arrows indicating motion (no text or symbols)fig. 1 fig. 2

text_image
CLICK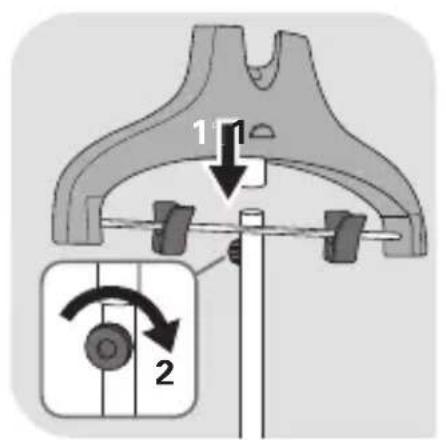
text_image
1 2fig. 5

natural_image
Diagram showing two gray rectangular objects aligned vertically with bidirectional arrows indicating rotation or movement (no text or symbols)fig. 3
text_image
Diagram illustrating a mechanical device with labeled parts and directional arrows indicating motion or assembly steps.fig. 4
text_image
1 2fig. 5
flowchart
graph TD
    A["Step 1"] --> B["Step 2"]
    B --> C["Step 3"]
    style A fill:#999,stroke:#333
    style B fill:#999,stroke:#333
    style C fill:#999,stroke:#333
fig. 6
natural_image
Medical illustration showing a hand holding a device with an upward arrow indicating motion or pressure (no text or symbols present)fig. 7
natural_image
Illustration of a hand holding a bottle with a tool, showing mechanical components and an arrow indicating motion (no text or symbols present)fig. 8 fig. 9
text_image
Medical diagram showing a device with two labeled steps (1 and 2) indicating mechanical or surgical positioning.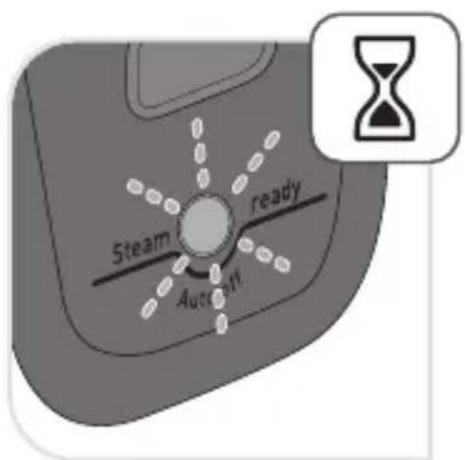
text_image
Steam ready Auto Off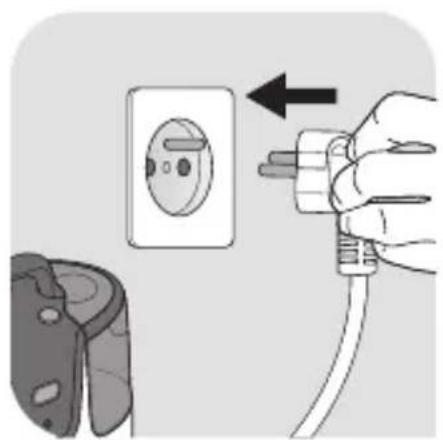
natural_image
Illustration of a hand inserting a plug into an electrical outlet, with a close-up of the socket (no text or symbols)fig. 10
text_image
ONfig. 11
fig. 12

text_image
Steam ready Auto port OKfig. 13

natural_image
Illustration of a hand holding a walking cane against a shirt collar (no text or symbols)fig. 14 fig. 15

natural_image
Illustration of a person using a walking cane to lift a button on a shirt (no text or symbols)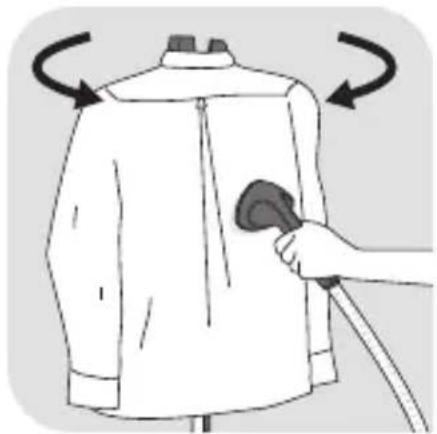
natural_image
Illustration of a hand holding a hairdryer over a jacket, with arrows indicating rotation (no text or symbols)fig. 16 fig. 17 fig. 18
natural_image
Illustration of a hand using a cane to clean or adjust clothing on a hanger (no text or symbols)
natural_image
Illustration of a hand holding a hairless dress on a hanger (no text or symbols)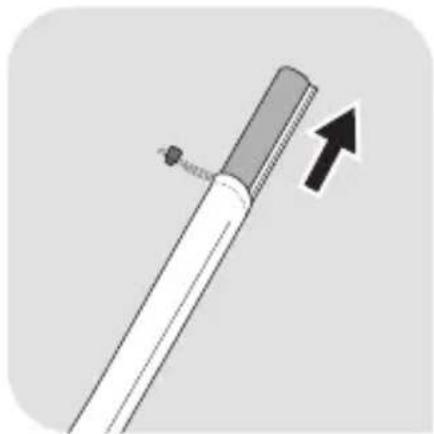
natural_image
Diagram of a pen-like tool with a handle and arrow indicating upward motion (no text or symbols)fig. 19
natural_image
Mechanical component diagram showing a clamp or bracket with directional arrows indicating motion (no text or symbols)fig. 20 fig. 21
text_image
KROS & STEAM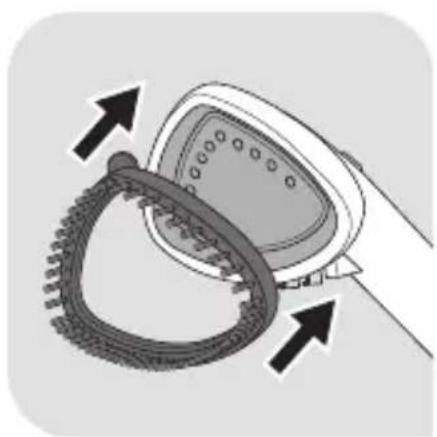
natural_image
Diagram of a mechanical component with gear and shaft, showing directional arrows (no text or symbols)fig. 22
natural_image
Illustration of a hand holding a walking cane over a suit jacket (no text or symbols)fig. 23 fig. 24
natural_image
Illustration of a person using a walking cane to clean a shirt (no text or symbols)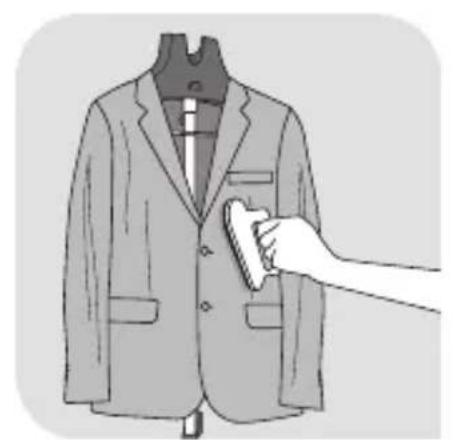
natural_image
Illustration of a hand brushing a suit with a sponge (no text or symbols)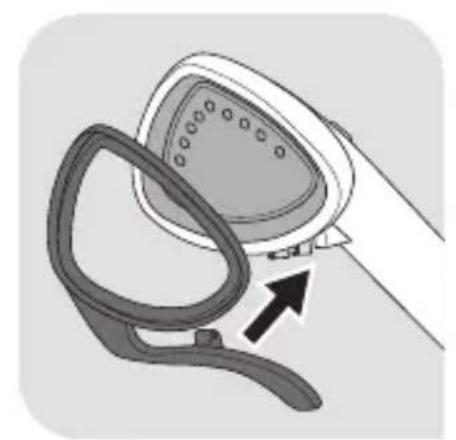
natural_image
Illustration of a hand holding a washing machine with a handle and arrow indicating motion (no text or symbols)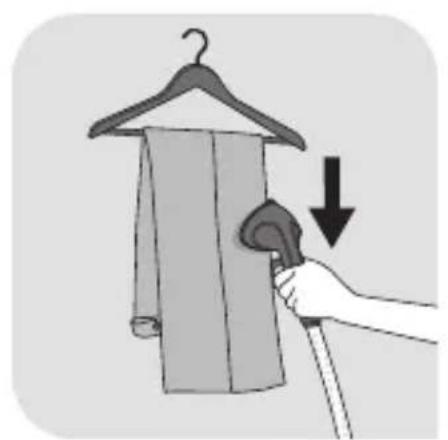
natural_image
Illustration of a hand holding a walking cane to lift a clothes rack (no text or symbols)fig. 25 fig. 26 fig. 27
text_image
OFFfig. 28
natural_image
Illustration of a hand inserting a plug into an electrical socket, with a close-up of the socket (no text or symbols)fig. 29
natural_image
Illustration of hands using a tool to lift a tooth, with a faucet and hand holding the tooth (no text or symbols)fig. 30
natural_image
Illustration of a hand pressing down on a mechanical component with rotational arrows indicating motion (no text or symbols)fig. 31
natural_image
Simple line drawing of a cable being attached to a vertical pole (no text or symbols)fig. 32
natural_image
Medical illustration showing a hand holding a tube with an upward arrow indicating pressure or movement (no text or symbols present)fig. 33
text_image
0.5 Lfig. 34
natural_image
Hand holding a small object with an arrow indicating rotation (no text or symbols)fig. 35
text_image
Medical illustration showing a hand using a surgical tool to lift a patient's mouth, with step 1 and step 2 instructions shown.fig. 36
SAFETY INSTRUCTIONS
Please read these instructions carefully before first use and keep them in a safe place.
- Never leave the appliance unattended whilst connected to the power supply, even if for a few moments, especially where children are present.
- Always unplug your appliance: before filling, or rinsing the water tank, before cleaning it, after each use.
- Care should be taken when using the appliance due to the emission of steam.
- This appliance is not intended to be used by persons (including children) with reduced or impaired physical, sensory or mental capacities or persons lacking appropriate knowledge or experience, unless a person responsible for their safety provides either supervision or appropriate instructions concerning use of the appliance prior to its use.
- This appliance can be used by children aged from 8 years and above and persons with reduced physical, sensory or mental capabilities or lack of experience and knowledge if they have been given supervision or instruction concerning use of the appliance in a safe way and understand the hazards involved.
- Children must be supervised to ensure that they do not play with the appliance.
- Cleaning and user maintenance shall not be made by children without supervision.
- The appliance must not be used if it has fallen to the floor, shows evident of damaged, leaks or fails to function correctly. Never dismantle your appliance. To avoid any danger, have it inspected in an approved service centre.
IMPORTANT RECOMMENDATIONS
- This product has been designed for domestic and indoor use only. Any commercial use, inappropriate use or failure to comply with the instructions, the manufacturer accepts no responsibility and the guarantee will not apply.
- This is a floor appliance, never carry it while in use.
- This appliance is designed to function on AC current only. Before using it for the first time, check that your mains supply voltage matches that indicated on the appliance data plate.
- Any connection error will invalidate your guarantee.
- Always plug the appliance into a socket outlet with an earth connection.
- Given the diverse standards in effect, if the appliance is used in a country other than that in which it is purchased, have it checked by an Approved Service Centre.
- Always keep the hose and nozzle elevated above the water tank.
- For your safety, this appliance conforms to the applicable standards and regulations (Low Voltage, Electromagnetic Compatibility, and Environmental Directives).
- The surfaces which are marked or close to with this sign are very hot during the use of the appliance. Do not touch these surfaces before the appliance has cooled down.
- To reduce the risk of contact with hot water or steam emitting from steam vents, check the appliance before each use by holding it away from your body and operating.
- Steam only in an up and down vertical motion. Never use the steam head in a horizontal position or tilt into a backward position, this may result in hot water discharge.
- To reduce the risk of electric shock, do not immerse the appliance or the steam head in water or any other liquids.
- The appliance should always be switched «OFF» before plugging or unplugging from socket outlet. Never pull the cord to disconnect it from the socket outlet, instead grasp the plug and pull to disconnect.
- Do not allow the cord to touch hot surfaces. After each use, unplug and let the appliance cool down completely before storing it away. Loop the cord loosely around the appliance when storing.
- Never place the appliance or its power cord near, or allow to come into contact with, sources of heat or sharp edges.
- Do not fasten the hose during operation. Scalding may occur if the hose adapter is removed while using the appliance.
- Do not attempt to hang up the unit using the hose.
- The use of accessory attachments other than those provided by Tefal is not recommended and may result in fire, electric shock or personal injury.
- Use caution when changing accessories or attachments, as they may contain hot water from condensation. Ensure the attachments are cooled off to avoid contact with hot water.
- Burns could occur from touching hot parts, hot water or steam. Use care when you empty a steam appliance. There may be hot water in the tank or from the inside the appliance.
- Do not direct steam at people, animals or steam clothes while they are being worn.
- Do not cut or attempt to extend the steam hose.
- If you are using a main extension lead, ensure that it is correctly rated to the required amperage with an earthed socket, and fully extended.
- Unwind the power cord fully before use and inspect the appliance and power cord for signs of wear or damage prior to connecting to the power supply.
- Any intervention other than normal cleaning and maintenance by the customer must be performed by an Approved Service Centre.
- Never drop or insert any object into any opening or hose.
- The glove should be only used with this garment steamer (*depending on model). The manufacturer accepts no responsibility for any inappropriate use.
- Remove all packaging materials, stickers and accessories from inside and outside of the appliance.
- Inspect the appliance and power cord for signs of wear or damage prior to connecting to the power supply.
- Do not use your appliance if it does not operate correctly, if it has been damaged or if the power cord or plug is damaged. To maintain safety, these parts must be replaced by an Approved Service Centre.
- Any intervention other than normal cleaning and maintenance by the customer must be performed by an Approved Service Centre.
- This unit is for indoor use only.
- Unwind the power cord fully before use and inspect the appliance and power cord for signs of wear or damage prior to connecting to the power supply.
ENVIRONMENT PROTECTION FIRST!

① Your appliance contains valuable materials which can be recovered or recycled.
Leave it at a local civic waste collection point.
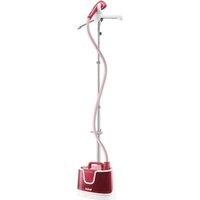
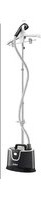
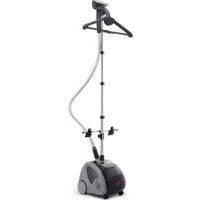
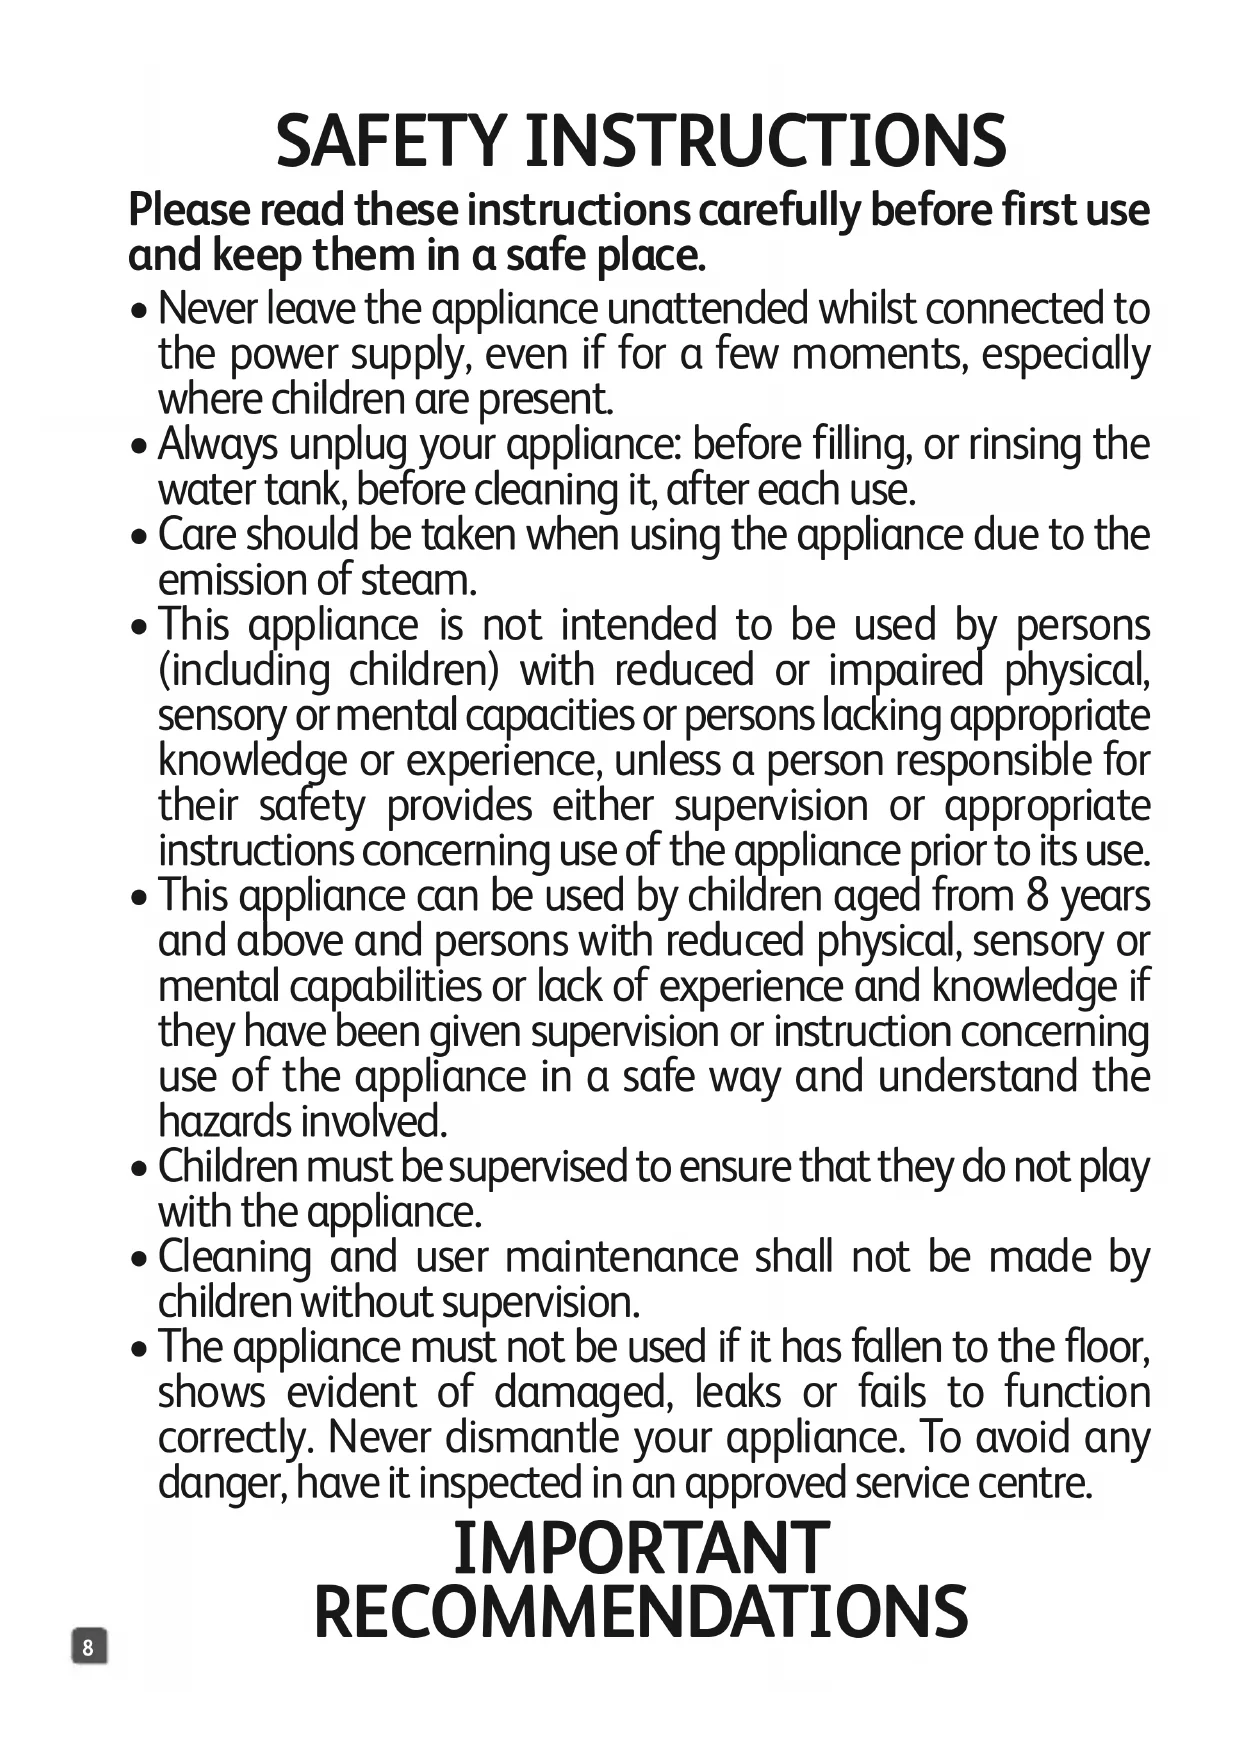
DESCRIPTION
- Steam head
- Integrated hanger
- Trouser clips*
- Steam head hook
- Hanger holder
- Hanger fastening screw
- Pole locking clips
- Telescopic pole
- Steam hose
- Electrical cord hook
- Electrical cord
- Transport handle
- Water tank handle
- Removable water tank
- Control panel
- Stability leg (x2)
- Pole fastening screw
-
Base unlocking button
-
ON/OFF switch
- Appliance
- "Anti calc" cap
- Base
- Press & Steam vertical support*
- Press & Steam pouch*
- Press & Steam locking handle*
- Press & Steam locking hook*
- Glove*
- Fabric brush*
- Lint pad*
- Crease attachment*
- Variable steam settings*
- "Anti calc" indicator*
- Empty tank indicator*
- Steam ready indicator / auto off indicator
- Variable steam setting button*
- Steam level indicator*
BEFORE USE
1 • Garment steamer assembly
Pole assembly
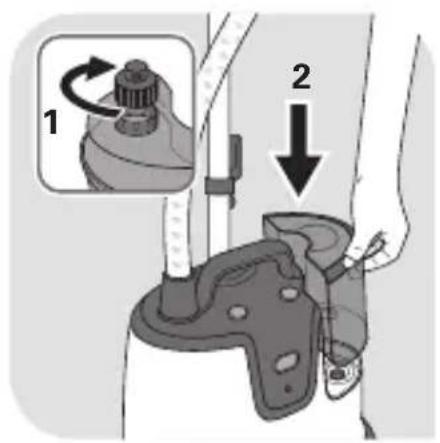
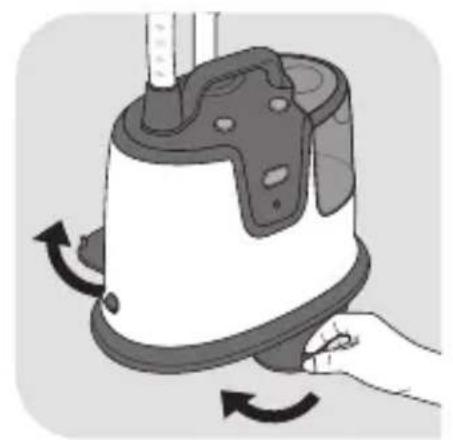
- Pull and rotate the 2 stability legs until you hear a "click" sound. (fig. 1)
- Unscrew the pole's fastening screw on the base of the pole.
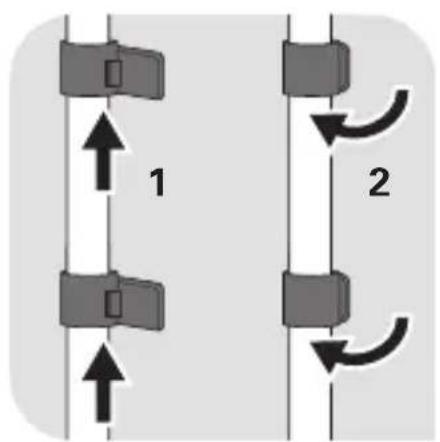
- Hold the pole such that the electrical cord hook is at the back. Check that the 2 pole clips are unlocked. (fig. 3)
- Insert the pole into the base by pressing downwards until the holes of the pole and base are at the same level, so that you can put the screw back. If the holes are not aligned, check that the clips of the pole are well and truly unlocked. (fig. 4)
- Screw the pole fastening screw back in as far as it will go so that the pole is firmly fixed to the base.
- Adjust the pole to its maximum height by sliding it upwards. Make sure the 3 segments of the pole are fully extended then lock the 2 clips. (fig 6)
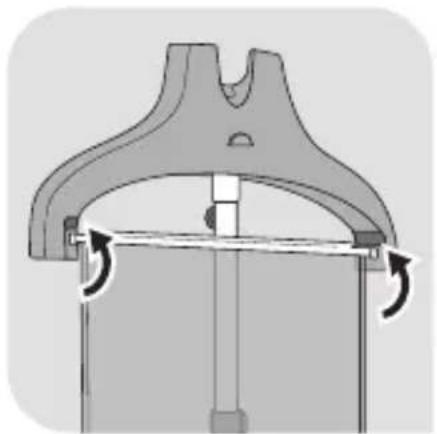
Integrated Hanger assembly
- Unscrew the hanger fastening screw at the bottom of the hanger.
- Hold the hanger such that the hanger holder is on the same side as the appliance control panel.
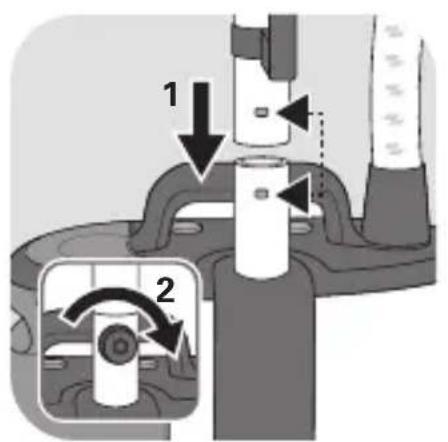
- Insert vertically the hanger on the top of the pole. The holes at the bottom of the hanger and in the pole should be at the same level. (fig. 5)
- Put the screw back and screw in as far as it will go so that the hanger is firmly fixed to the pole.
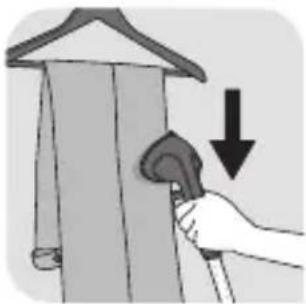
- Install the steam head on top of the integrated hanger.
2 • Filling the water tank
IMPORTANT: Your product is designed to operate using untreated tap water. If your water is very hard (check with your local water authority) it is possible to mix untreated tap water with store-bought distilled water in the following proportions 50% untreated tap water with 50% distilled water. Heat concentrates the elements contained in water during evaporation. The types of water listed below may contain organic waste, mineral or chemical elements that can cause spitting, brown staining or premature wear of the appliance: water from clothes dryers, scented or softened water, water from refrigerators, batteries, air conditioners, rain water, boiled, filtered or bottled water. These types of water should not be used. Only use store bought distilled water as advised above.
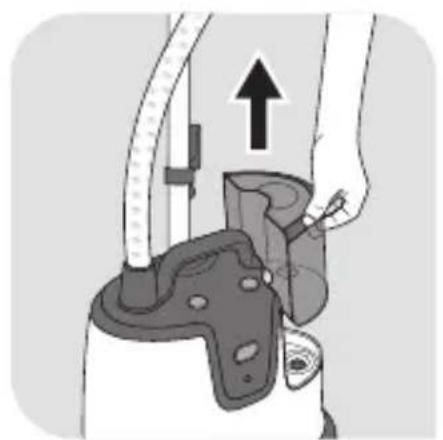
- Ensure that the steamer is unplugged. Remove the water tank from the base of the appliance by pulling the handle upwards (fig. 7). Unscrew the tank cap and fill the tank. (fig. 8)
- The steamer must be used with TAP WATER. If the water in your area is hard, we recommend that you mix half tap water and half distilled water, which reduces the hardness.
- After screwing back the water tank cap, turn the tank down and hold it by the handle. Check out that no water is leaking through the cap.
- Place vertically the water tank back on the appliance (fig. 9)
USE
Warning: Never steam a garment while it is being worn.
1 • Setting up
The flexible hose and the end of the steam head can become extremely hot during use. This is perfectly normal. Be careful and avoid any prolonged contact.
- Only operate the steamer on a floor clear of any materials which may obstruct the base of the steamer (flat and horizontal surface). Do not obstruct the openings on the lower part of the appliance. This device should not be used on very thick carpets or rugs.
- Undo the Velcro™ strip and completely unwind the electrical cord.
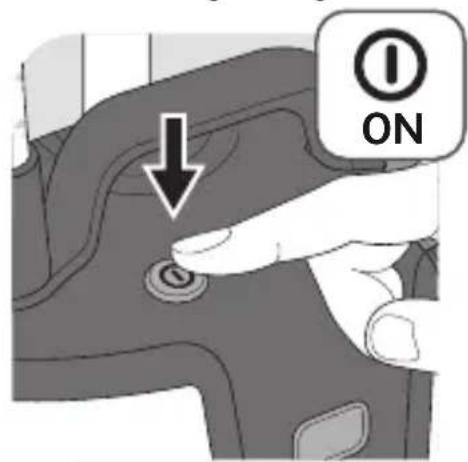
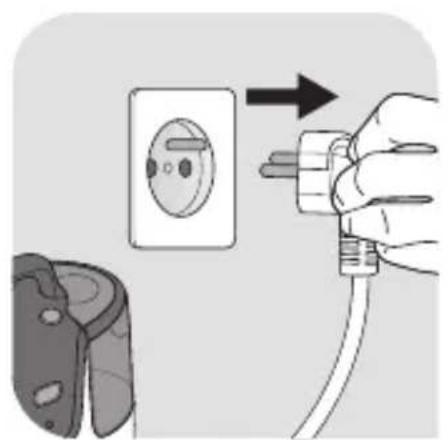
- Plug in to power socket. (fig.10)
- Switch on by pressing the ON/OFF button located on top of the appliance. (fig. 11) The steam ready indicator will flash approximately for 45 seconds then the light is fixed: your appliance is ready to use with maximum steam output. (fig. 12-13)
- The appliance device will begin producing steam after approximately 30 seconds.
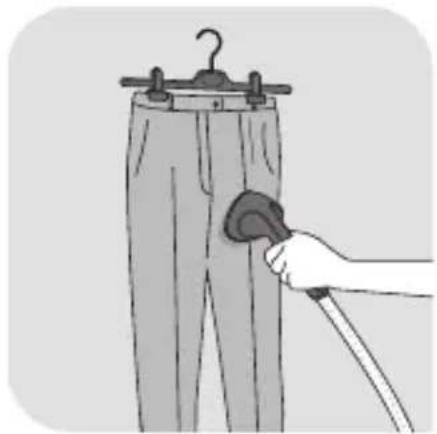
2 • Using the appliance
- Hang the garments on the integrated hanger or on separated hanger which may be suspended on the hanger holder.
- To steam trousers, we recommend that you also use the support with clips*.
- Grasp the steam head with the steam vents pointing away from you.
- Start steaming by brushing material lightly following the grain of the garment fabric.
- Start at the top of the garment and gradually move downward.
- Always use the steam head in a vertical position.
Always be careful not to touch the hot steam.
- Always hang the steam head in an upright position on the steam head hook when not in use. * depending on model
- During use, the hose may make a gurgling noise. This is a normal occurrence due to condensation. If the appliance begins to gurgle, rest the steam head on its support for a few moments in order to direct the condensation into the appliance once again.
- During use, some water drips may appear on the telescopic pole. This is also a normal occurrence due to condensation.
Tips for better results with your garment steamer
- We recommend checking the garment care label for manufacturer recommendations bet steaming. We also recommend testing the garment and effect on the garment on an unobtrusive area such as an inner seam.
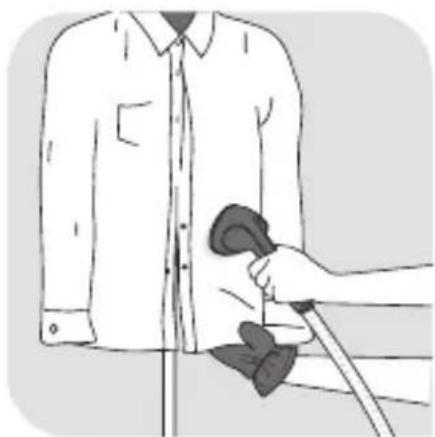
- Button up the shirt's collar to prevent them slipping on the hanger during steaming (fig.
- Gently press steamer brush into fabric while making slow passes.
- Avoid direct contact between the steam head and silk or velvet.
- Some garments are smoothed more easily on the reverse side.
• Heavy fabrics may need to be steamed for longer. - If you are using the steam head at a position close to the ground, raise the hose frequen order to avoid the formation of condensation. A gurgling noise may be heard if the flexib hose is pinched.
- If no steam is produced, if a gurgling sound is heard or if water is dripping through the h of the steam head, raise the steam hose occasionally to remove condensation inside the
Steam setting\*
Your appliance is fitted with 2 to 5 steam settings that you can set according to the fabric you are steaming, from delicate to thick ones.
- Models with 2 settings: set by successively pressing the steam setting button on the appliance's control panel.
| LIGHT COLOR STEAM OUTPUT | ||
 | Orange Mini | |
| Green Maxi | |
- Models with 3 settings: set by pressing on one of the buttons on the appliance's control panel.
- Models with 4 or 5 settings in the steam handle: set by successively pressing on the "SET" button located on the steam handle. The light indicators will show the steam level selected.
Empty tank detector\*
This appliance is equipped with an empty tank detector. When the water tank is empty, the light indicator on the appliance's control panel will blink to alert you to fill the water tank. Turn off the appliance and fill the water tank.
Electronic auto off\*
Your appliance is fitted with an “auto-off” system which places it on standby once the water tank has been empty for more than 10 minutes.
- The "Auto off" indicator on the control panel flashes slowly to indicate that the appliance is on standby.
• To reactivate the appliance: fill the water tank and select the desired steam level on
appliance's control panel or steam handle (depending on model).
ACCESSORIES
Be sure the unit is unplugged and completely cool before attaching accessories.
Before using an accessory, check the manufacturer recommendations. It is also recommended that you carry out a test on part of the fabric which cannot be seen.
1 • Press & Steam vertical support\*
The Press & Steam system set in the hanger provides a vertical support while steaming, to help remove "creases" more easily and efficiently.
Assembly:
- Remove the Press & Steam vertical support from its pouch. (fig. 19)
- Make sure the telescopic pole is fully extended.
- Hold the Press & Steam vertical support such as the handle is located downward and its "Press & Steam" logo is in front.
- Insert the upper part inside the integrated hanger, then pull down slightly until hooking the handle on the Press & Steam vertical support hook located on the pole. (fig. 20-21)
- The Press & Steam vertical support helps keep the garment in place while steaming.
- When steaming a shirt, begin with steaming the sleeves. Get hold of one sleeve and cross it over the garment using the Press & Steam for vertical support.
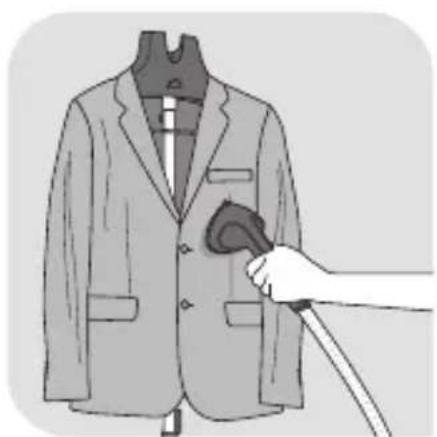
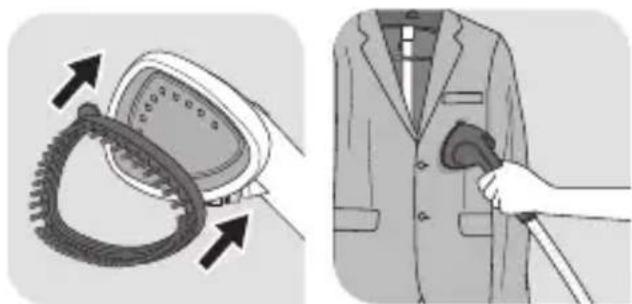
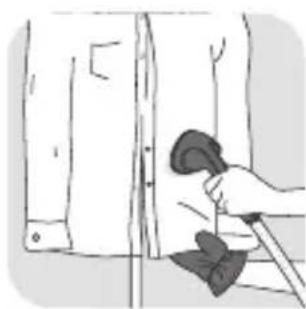
2 • Fabric brush\*
natural_image
Illustration showing a hand holding a walking stick next to a device with gear, and another person in a suit adjusting the device (no text or symbols present)The fabric brush opens the weave of the fabrics for better steam penetration.
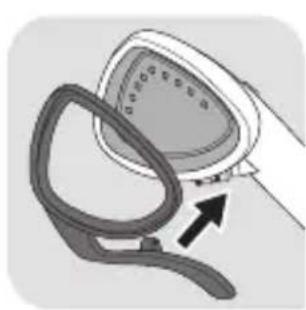
- Attach the fabric brush to the steam head by lining up the bottom of the brush with the bottom of the steam head. Gently push the top of the brush onto the steam head until it clicks into place. (fig. 22)
• Gently brush the area to be steamed following the grain or nap of the fabric. (fig. 23)
- Remove the fabric brush once unit is unplugged and completely cool. Remove it by pressing on the release tab on top of brush while pulling it forward.
3 • Lint pad\*

natural_image
Illustration of a mannequin with a hand holding a small object, no text or symbols presentThe lint pad is a separate accessory and cannot be attached to the steam head. You can use the lint pad independently from the steamer.
The lint pad removes hair, lint and animal fur for a professional finish.
* depending on model
• To use the lint pad, slowly brush the clothing with the grain or nap of the fabric. (fig. 25)
- The pad can be cleaned by brushing it in the opposite direction. We recommend cleaning the pad on an old cloth that can be discarded.
• We recommend to use the lint pad before steaming your clothes for perfect results.
4 • Crease attachment\*
EN
natural_image
Illustration of a medical device with a handle and arrow indicating direction (no text or symbols)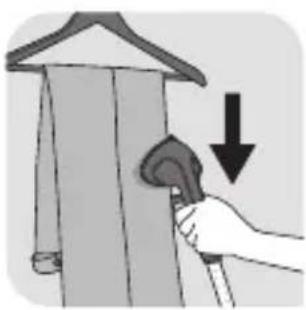
natural_image
Illustration of a hand using a tool to clean or adjust a wall panel, with a downward arrow indicating the process (no text or symbols present)- Remove the fabric brush. Completely slide the hook of the accessory into the slot located in the lower part of the steam head. (fig. 26)
- Push on the handle to open the crease attachment.
- Place the garment between the crease attachment and steam head.
- Release the handle.
- Starting at the top of the garment, move the crease attachment in a downwards motion. (fig. 27)
- Once the unit is unplugged and completely cooled down, remove the crease attachment by sliding it off of the steam head.
5 • Glove\*
natural_image
Illustration of a hand using a tool to clean or store floor tiles (no text or symbols visible)• The glove protects your free hand from the steam during use.
- To use the glove, put it on the hand you use to hold or pull the garment. (fig. 24)
The glove should be only used with this garment steamer and not for other purpose. Do not wash or iron the glove.
AFTER USE
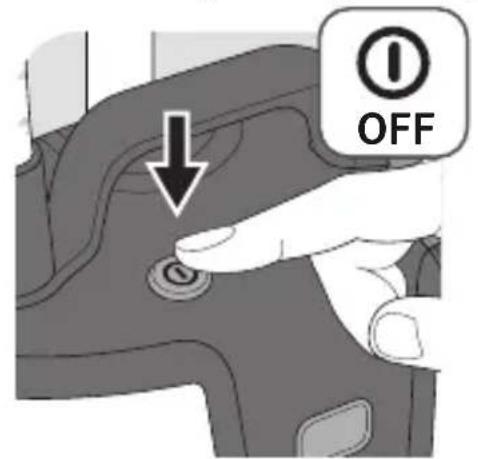
- Switch off the appliance by pressing the ON/OFF button. (fig. 28)
- The light indicators on the control panel will go off, and you can then unplug the appliance. (fig. 29)
- Hang the steam head in an upright position on the hook steam head.
Warning: never remove the Press & Steam accessory for storage before it has complet dried. Always roll the Press & Steam vertical support for storage. Do not crease it.
- Empty and rinse the water tank each time before storage in order to flush out any scale particles. (fig. 30)
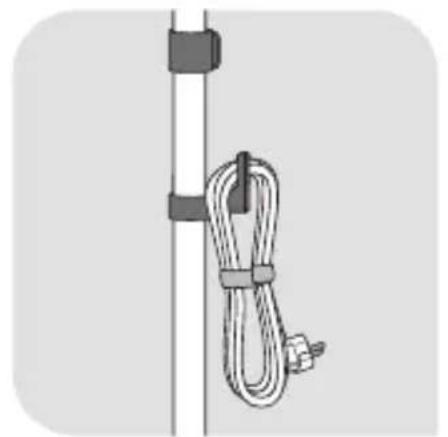
- Loosely wind up the electrical cord and close with the Velcro™ strip, then hang it on the cord hook on the pole. (fig. 32)
Warning: Never touch the steam head until it has cooled down completely.
1 • Transport
- Push back the 2 stability legs until locked in the appliance base. (fig. 31)
- You can transport your appliance by lifting it up by the telescopic pole or by the appliance's
* depending on model
handle.
Do not attempt to lift up or transport the appliance holding the integrated hanger. Always make sure the appliance and the pole are firmly fixed to the base before lifting up the appliance (see assembly instructions).
2 • Maintenance and cleaning
Do not use any descaling substances (vinegar, industrial descaling products, etc.) when rinsing the appliance: they could damage it.
Before emptying your appliance, it must always be left to cool for 2 hours to avoid any risks of scalding.
Cleaning
- Clean the main unit with a damp cloth.
- Clean the Press & Steam fabric with a damp cloth or non abrasive sponge. Do not use any cleaning products such as soap or detergents.
Easy descaling
Warning: Never try to separate the hose from the appliance. Make sure to avoid any shock on the steam head during descaling operation.
- To maintain maximum performance, your steamer must be descaled. The time between descaling operations depends on the appliance use. The appliance must be descaled at least once a year or after 30 hours of use.
- For models with "Anti calc" indicator*:
- To extend the life of your appliance and prevent the scaling, your appliance is fitted with an orange "Anti-calc" light that flashes on the control panel when you need to drain the appliance. - If the orange "Anti-calc" warning light flashes, you can continue steaming normally but remember to rinse the boiler before you use it again.
- To carry out a descaling operation, follow these steps:
- Ensure that the appliance has cooled down completely (2 hours minimum).
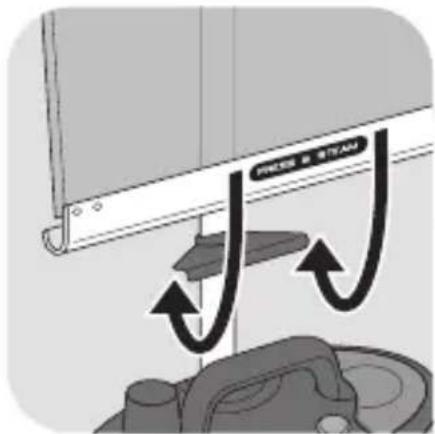
- Separate the appliance from the base, using the base unlocking button.
- Remove the steam head from the steam head hook. Remove also the electrical cord from the electrical cord hook.
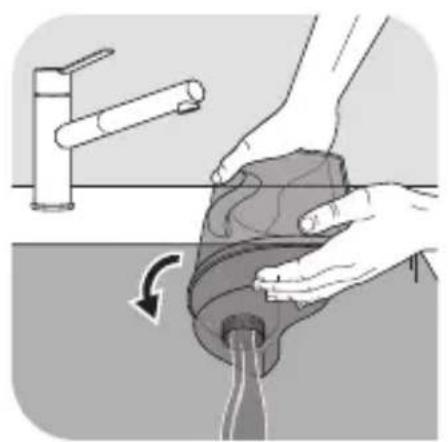
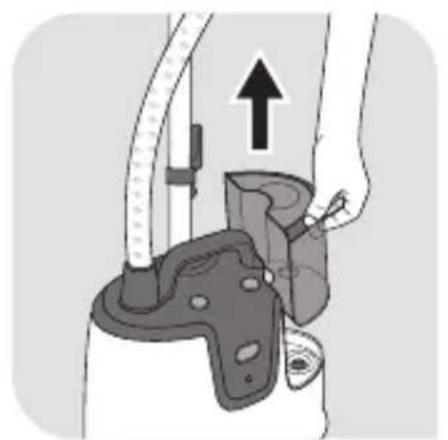
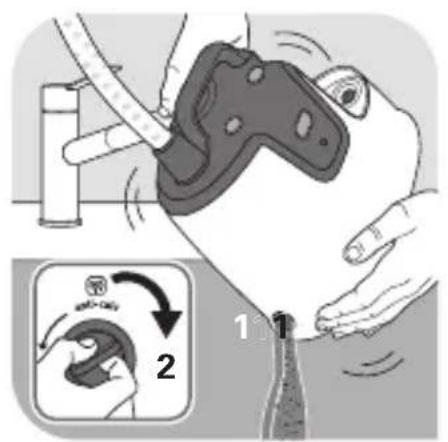
- Take out the water tank (fig. 33).
- Place the appliance flat on the edge of your sink.
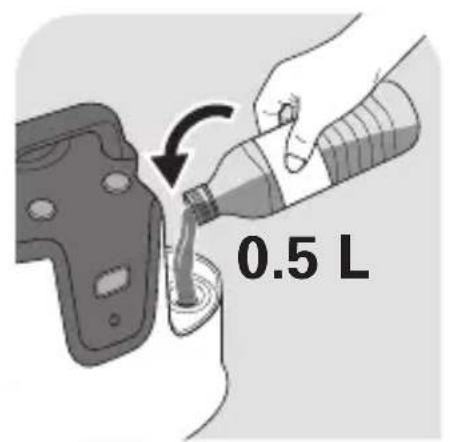
- Fill 12 litre of fresh water directly in the water inlet location located on the appliance, allowing water to fill the boiler (fig. 34). Pay attention not to overflow.
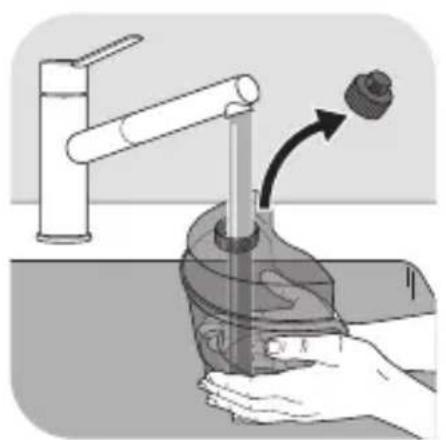
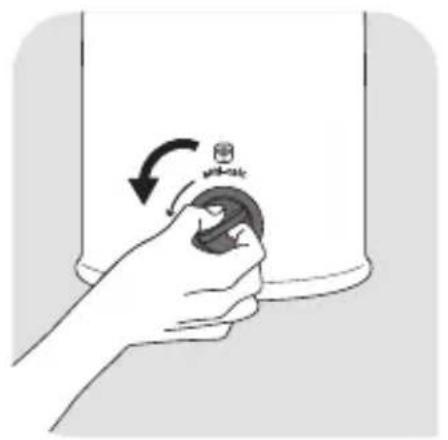
- Unscrew the "Anti calc" cap by turning it anti clockwise (fig. 35).
- Holding the appliance in a tilted position, help the scale particles to flow out with the water by soft movements (fig. 36).
- Insert the "Anti calc" cap and screw it back.
- Repeat above procedure as many times as needed to remove all the scale particles.
- For models with "Anti calc" indicator*: the next time you use your garment steamer, press the "Anti calc" button for 5 sec on the control panel to turn off the indicator.
CAUTION:
- Do not fill the boiler by the steam head holes or by the "Anti calc" draining outlet!
- Never immerse the steam head in water or any other liquid!
TROUBLESHOOTING
EN
| Problems Possible causes Solutions | ||
| There is no steam. The appliance has not been switched on. | Check that the appliance has been plugged in correctly. Press the On/Off button, the indicator light located at the front of the appliance will come on.The appliance will begin producing steam after approximately 30 seconds. | |
| The auto off system is activated. | To reactivate the appliance: fill the water tank and select the desired steam level. | |
| The steam flow is low. Your steamer has a build-up of scale because it has not been rinsed out regularly. | See descaling process. | |
| Water runs through the holes of the steam head. | There is condensation in the hose. | Never use the steamer in the horizontal position. Hold the hose vertically outstretched and wait for the condensed water to return to the steamer. |
| The steamer takes a long time to heat and/or ejects white particles. | Your steamer has a build-up of scale because it has not been descaled regularly. | See descaling process. |
| The Press & Steam accessory is crooked. | The Press & Steam accessory has not been installed properly. | Install again the Press & Steam accessory inside the integrated hanger.Make sure it is well hooked, following the instructions. |
| The Press & Steam accessory has not been rolled properly. | Make sure the Press & Steam accessory is always dry then rolled with care when stored.Do not crease it for storage. | |
| The Press & Steam accessory detaches while in use. | The Press & Steam accessory was not locked correctly in the hook. | Make sure the Press & Steam accessory handle is firmly locked in the hook. It should not be moving horizontally or vertically. Make sure the 3 segments of the pole are fully extended and that the 2 clips are firmly locked. |
| The hose makes a gurgling noise. | You are using the steam head in a position close to the ground and some condensation occurs in the hose. | Raise the hose frequently during use and adjust the pole to its maximum height in order to avoid the formation of condensation. |
| Water is overflowing from water tank. | You are using the steam head in a position close to the ground and some condensation occurs in the hose. | Raise the hose frequently during use and adjust the pole to its maximum height in order to avoid the formation of condensation. |
| The orange "Anti calc" light is flashing. | You did not press the "Anti calc" restart button after your descaling operation. | Press the "Anti calc" restart button located on the control panel. |
| Steam escapes from the "Anti calc" cap. | The "Anti calc" cap has not been tightened correctly. | Tighten the "Anti calc" cap after having let the appliance cool down for 2 hours. |
| The "Anti calc" cap is damaged. | Contact an Approved Service Centre (see contact information at the end of this page). | |
If you have any further problems or queries please contact the Customer Relations Helpline - see details at the end of this leaflet.
CONSIGNES DE SÉCURITÉ
RECOMMANDATIONS IMPORTANTES
1 • Support vertical Press & Steam\*
natural_image
Diagram of a mechanical component with arrows indicating motion or force direction (no text or symbols)
natural_image
Illustration of a hand holding a small object over a suit jacket (no text or symbols)natural_image
Illustration of a mannequin with a hand holding a small object, no text or symbols presentnatural_image
Illustration of a hand holding a device with a curved handle and an arrow pointing to it (no text or symbols present)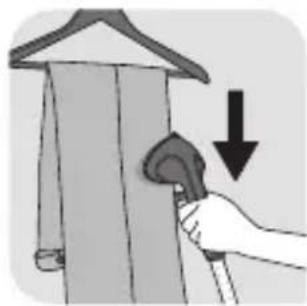
natural_image
Illustration of a hand using a tool to clean or adjust a wall-mounted object, with no visible text or symbols.natural_image
Illustration of a hand cleaning a door with a tool, no text or symbols presentnatural_image
Diagram of a mechanical component with gear and housing, showing directional arrows (no text or symbols)
natural_image
Illustration of a person in a suit holding a small object, with no visible text or symbolsnatural_image
Illustration of a mannequin with a hand holding a small object, no text or symbols presentnatural_image
Illustration of a hand holding a device with a magnified view showing internal components (no text or symbols)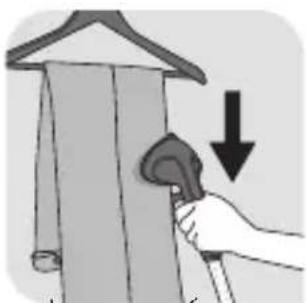
natural_image
Illustration of a hand using a tool to clean or adjust a garment (no text or symbols visible)natural_image
Illustration of a hand using a cane to clean or repair a wall, no text or symbols presentnatural_image
Diagram of a mechanical component with gear and chain, showing directional arrows (no text or symbols)
natural_image
Illustration of a hand holding a small object over a suit jacket (no text or symbols)natural_image
Illustration of a mannequin with a hand holding a small object, no text or symbols presentnatural_image
Illustration showing a hand holding a device with an arrow pointing to it, and another hand holding a cable or cable with arrows indicating force (no text or symbols present)natural_image
Illustration of a hand using a walking cane to clean or store floor near a door (no text or symbols visible)natural_image
Diagram of a mechanical device with gear and belt, showing directional arrows (no text or symbols)
natural_image
Illustration of a hand holding a walking cane over a suit jacket (no text or symbols)natural_image
Illustration of a suit jacket being held by a hand holding a small object (no text or symbols)natural_image
Illustration of a hand holding a device with a magnified view showing internal components (no text or symbols)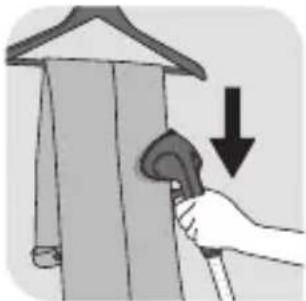
natural_image
Illustration of a hand holding a walking cane next to a wall-mounted object, with a downward arrow indicating motion (no text or symbols)natural_image
Illustration of a hand using a cane to clean or store floor near a door (no text or symbols visible)natural_image
Illustration of a hand holding a device with a curved handle and arrow indicating motion (no text or symbols)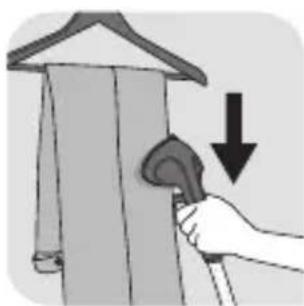
natural_image
Illustration of a hand holding a tool near a hanging garment with a downward arrow indicating motion (no text or symbols)natural_image
Illustration of a hand using a cane to clean or repair a wall, with no visible text or symbols(20-21) "Press & Steam"
natural_image
Diagram of a hand holding a device with a mesh gear and directional arrows indicating motion (no text or symbols)
natural_image
Illustration of a hand holding a small object over a suit jacket (no text or symbols)natural_image
Illustration of a hand holding a small object against a suit jacket (no text or symbols)natural_image
Diagram of a hand holding a device with gear and scroll, showing directional arrows (no text or symbols)
natural_image
Illustration of a hand holding a cane over a suit jacket (no text or symbols)natural_image
Illustration of a mannequin with a hand holding a small object, no text or symbols presentnatural_image
Illustration of a medical device with a hand holding a curved grip and an arrow pointing to it (no text or symbols present)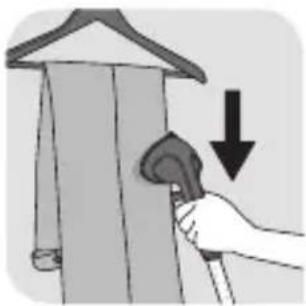
natural_image
Illustration of a hand using a tool to lift a wall-mounted device, with a downward arrow indicating compression (no text or symbols present)natural_image
Illustration of a hand using a tool to clean or store floor near a door (no text or symbols visible)natural_image
Close-up of a hand holding a circular device with a mesh ring, showing directional arrows (no text or symbols)
natural_image
Illustration of a hand holding a small object over a suit jacket (no text or symbols)natural_image
Illustration of a mannequin with a hand holding a small object, no text or symbols presentnatural_image
Illustration of a hand holding a medical device with a curved grip and arrow indicating motion (no text or symbols)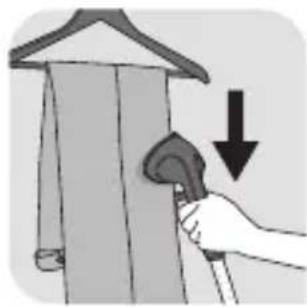
natural_image
Illustration of a hand using a tool to lift a garment, with a downward arrow indicating compression (no text or symbols)natural_image
Illustration of a person using a tool to clean or store floor near a door (no text or symbols visible)natural_image
Diagram of a mechanical component with directional arrows indicating motion or force (no text or symbols)
natural_image
Illustration of a hand holding a small object over a suit jacket (no text or symbols)natural_image
Illustration of a hand holding a small object against a suit jacket (no text or symbols)natural_image
Illustration of a hand holding a device with a curved handle and arrow indicating motion (no text or symbols)