
FH215051.1 - Heating Emerio - Free user manual and instructions
Find the device manual for free FH215051.1 Emerio in PDF.
| Product type | Fan heater |
| Brand | Emerio |
| Model | FH215051.1 |
| Operating voltage | 220-240 V ~ 50 Hz |
| Rated power | 2000 W (max), 1300 W (min) |
| Main functions | 2 heat levels, adjustable thermostat (10-49 °C), oscillation, timer (0-8 h), remote control |
| Display | Digital LED with room temperature and icons |
| Safety devices | Overheat protection, tip-over switch, do not cover |
| Assembly required | Yes, base to assemble with screws |
| Remote control | Yes, CR2025 battery included |
| Maintenance | Unplug and let cool before cleaning; soft cloth; no solvents |
| Warranty | 2 years |
| Recommended use | Indoor, well-insulated rooms, occasional use |
| Safety distance | Min. 1 m from flammable materials |
Frequently Asked Questions - FH215051.1 Emerio
User questions about FH215051.1 Emerio
0 question about this device. Answer the ones you know or ask your own.
Ask a new question about this device
Download the instructions for your Heating in PDF format for free! Find your manual FH215051.1 - Emerio and take your electronic device back in hand. On this page are published all the documents necessary for the use of your device. FH215051.1 by Emerio.
USER MANUAL FH215051.1 Emerio
natural_image
White cylindrical device with black top and white base, mounted on a circular base (no visible text or symbols)Fan heater (EN)
Heizlüfter (DE)
Instruction manual – English ...... - 2 -
Thank you very much for purchasing our products. In order to ensure correct operation, please read this manual and instruction carefully before use.
This product is only suitable for well insulated spaces or occasional use.
IMPORTANT INSTRUCTIONS
When using electrical appliances, basic precautions should always be followed to reduce the risk of fire, electric shock, burns and other injuries.
-
Read and save these instructions. Attention: pictures in the instructions are for reference only.
-
This appliance can be used by children aged from 8 years and above and persons with reduced physical, sensory or mental capabilities or lack of experience and knowledge if they have been given supervision or instruction concerning use of the appliance in a safe way and understand the hazards involved.
-
Children shall not play with the appliance.
-
Cleaning and user maintenance shall not be made by children without supervision.
-
Children of less than 3 years should be kept away unless continuously supervised.
-
Children aged from 3 years and less than 8 years shall only switch on/off the appliance provided that it has been placed or installed in its intended normal operating position and they have been given supervision or instruction concerning use of the appliance in a safe way and understand the hazards involved. Children aged from 3 years and less than 8 years shall not plug in, regulate and clean the appliance or perform user maintenance.
-
CAUTION — Some parts of this product can become very hot and cause burns. Particular attention has to be given where children and vulnerable people are present.
-
If the supply cord is damaged, it must be replaced by the manufacturer, its service agent or similarly qualified persons in order to avoid a hazard.
-
This appliance is intended to be used in household and similar applications.
-
Do not use this heater if it has been dropped.
-
Do not use if there are visible signs of damage to the heater.
-
Use this heater on a horizontal and stable surface.
-
WARNING: Do not use this heater in small rooms when they are occupied by persons not capable of leaving the room on their own, unless constant supervision is provided.
-
WARNING: To reduce the risk of fire, keep textiles, curtains, or any other flammable material a minimum distance of 1 m from the air outlet.
-
WARNING: In order to avoid overheating, do not cover the heater.
-
The heater must not be located immediately below a socket outlet.
-
Do not use this heater in the immediate surroundings of a bath, a shower or a swimming pool.
-
Make sure the appliance is in good condition after remove it from the package.
-
Check your mains voltage; it must match the specification of this heater.
-
Check the power cord and plug carefully before use to ensure that they are not damaged.
-
Be sure the power is turned off before unplugging the heater. Do not touch the plug with wet hands.
-
Don't cover the heater.
-
Don't allow moisture and dust to enter the appliance. Don't use this heater in bathrooms or laundries. Store it in dry areas.
-
Don't put the heater on soft surfaces such as beds or sofas.
-
Keep children away from the package. Polyethylene bags can be dangerous.
-
Avoid using extension cords, as they may cause a fire hazard due to overheating.
-
Indoor use only.
- Do not allow the power cord to hang (e.g over the edge of a table or counter) or place/run the power cord under rugs, carpeting, or in high-traffic areas where it may be tripped over or pulled.
- Do not plug or unplug the appliance from the electrical outlet with a wet hand.
- Do not put any stress on the power cord where it connects to the appliance, as the power cord could fray and break.
- Keep the power cord and product always away from heated surfaces.
- Do not insert any other objects into the heater, as it may cause an electric shock, fire or damage to this appliance.
- Do not use this appliance to dry or heat clothing, shoes, pipes or any other items.
- Use the appliance in a well-ventilated area, this heater is hot when in use, to avoid burns, do not let bare skin touch a hot surface, if provided, use handle when moving this heater.
- Use this heater only as described in the manual, any other use not recommended by the manufacturer may cause fire, electric shock or personal injury.
- The appliance should not be operated by means of an external timer-switch or by means of a separate system with remote control not originally belonging to this appliance.
- This heating device is not suitable for assembling in vehicles and machines.
- This appliance is not a toy.
- Do not immerse the unit in water.
- To avoid the risk of fire or electric shock do not remove the housing.
- Any servicing other than cleaning and user maintenance should be performed by an authorized service representative only.
42.
Means "DO NOT COVER".
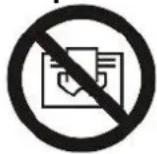
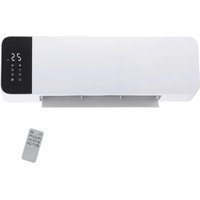
PARTS DESCRIPTION
- Control panel
- LED display
- Remote control
- Air outlet
- Base
- Air inlet
- Handle
- Power switch
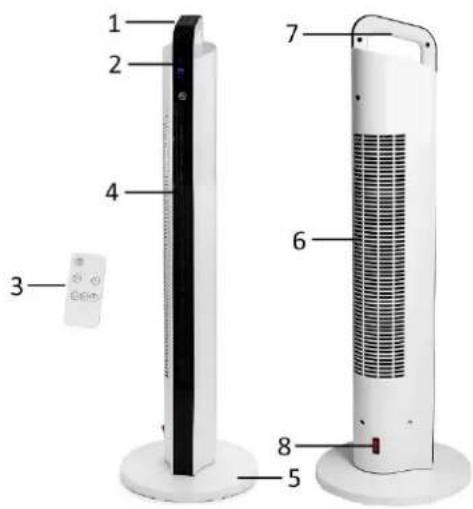
Control panel
- On/off button
- Power setting button
- Oscillation button
- Timer setting button
- Temperature adjustment button (for increase)
- Temperature adjustment button (for decrease)


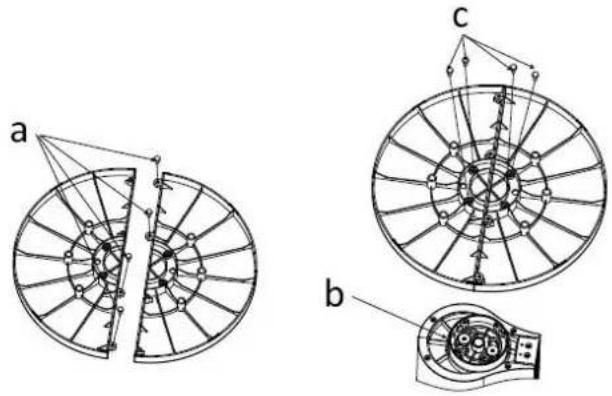
BASE ASSEMBLY
a. Combine the two halves of base together by aligning the bulge and groove. Fix it by firmly tightening the four provided screws.
b. Put the base onto the bottom of the main body by aligning the center four holes.
c. Tighten the other four provided screws to fix the assembly of the base.
OPERATION
Plug in the appliance into an appropriate electrical outlet. Turn on the appliance by pressing the power switch to the position "I". A beep sound will be heard. The appliance is standby with the current room temperature illuminating on the digital display. Press the on/off button on the control panel to start setting your heater.
1. On/off button
Press the button “💡” to run your heater. Press the button “💡” again, the appliance will enter into standby condition after a count-down of 30 seconds which is shown on the LED. The count-down is in order to cool off the inside of the appliance and protect its components.
2. Power setting button
Under working condition, you can press button “💡” to switch the power setting between low heating (1300W) and high heating (2000W).
- Low heating: one icon “☀️” will be shown on the digital display.
- High heating: two icons “☀️” “☀️” will be shown on the digital display.
3. Adjustment button
You can press the button “⊕” or “⊖” to adjust temperature setting in a range from 10^ C to 49^ C. The set temperature flashes for several seconds and then the display shows again the room temperature.
The heater will automatically stop heating when the set temperature is reached and resume heating when the room temperature is lower than the set temperature.
When the set temperature is 2^ higher than the room temperature, the appliance turns to low heating.
When the set temperature is 4^ C higher than the room temperature, the appliance turns to high heating.
4. Oscillation button
Under working condition, you can press button “💡” to activate or deactivate the swing function. The digital display will show icon “💡” lighted on when swing function is activated.
5. Timer button
Under working condition, you can press button "L" to set timer.
Press the button “ ” once, the appliance enters the timer setting mode. You can press “ ” to adjust the timer from 0 – 8H (each press changes the value of one hour and “OH” means no timer). The corresponding timer value will be shown on the digital display. The set timer will be activated in several seconds without any other operation and then the digital display will show back the room temperature. The icon “ ” on the display indicates the timer has been set. When the timer is counting down to 0 (not shown on the display), the appliance will stop working automatically (a beep sound will be sent out) and enter standby mode.
Note:
- If no operation for 10 minutes, the LED display will go out. Press once any one of the buttons can make the LED display come back.
• The heater will remain hot for some time after it is turned off; handle it with care.
After use, to turn off the power, press the power switch to the position "O".
REMOTE CONTROL
This unit has a remote control. One piece of CR2025 battery should be used for it. The functions of the remote control buttons are the same as of the buttons on the control panel. Follow the illustration on the back of the remote control to place or remove battery. Pay attention to the battery polarity when placing the battery. If it is not in use for a long time, please take the battery out of the remote control. Keep button cell batteries out of reach of small children.
SAFETY SYSTEM
- The appliance has a safety system which automatically switches off the unit when overheated.
- If overheating occurs, switch off the appliance, remove the plug from the socket, and let it cool down for at least 30 minutes. Put the plug in the socket and switch on the heater.
- This heater is equipped with a tilt protection safety device. For safety reasons, the unit will automatically switch off the power if it is put on unstable or uneven surfaces or if it is tilted accidentally.
CLEANING AND MAINTENANCE
• Before maintaining, please unplug the appliance and make sure the heater has cooled down completely.
- Please use soft cloth to wipe the dust on the appliance's surface.
- Do not use gasoline, thinner and any other abrasive cleaners to clean the appliance, as these can damage the surface of appliance.
• Make sure the appliance is cooled and dried before packaging. Store it in dry and ventilated places.
TECHNICAL DATA
Operation voltage: 220-240V \~ 50Hz
Power: 2000W
GUARANTEE AND CUSTOMER SERVICE
Before delivery our devices are subjected to rigorous quality control. If, despite all care, damage has occurred during production or transportation, please return the device to your dealer. In addition to statutory legal rights, the purchaser has an option to claim under the terms of the following guarantee:
For the purchased device we provide 2 years guarantee, commencing from the day of sale. If you have a defective product, you can directly go back to the point of purchase.
Defects which arise due to improper handling of the device and malfunctions due to interventions and repairs by third parties or the fitting of non-original parts are not covered by this guarantee. Always keep your receipt, without the receipt you can't claim any form of warranty. Damage caused by not following the instruction manual, will lead to a void of warranty, if this results in consequential damages then we will not be liable. Neither can we hold responsible for material damage or personal injury caused by improper use if the instruction manual is not properly executed. Damage to accessories does not mean free replacement of the whole appliance. In such case please contact our service department. Broken glass or breakage of plastic parts is always subject to a charge.
Defects to consumables or parts subjected to wearing, as well as cleaning, maintenance, replacement of said parts or shipping and transportation costs to and from any place of repair are not covered by the warranty and are to be paid.
ENVIRONMENT FRIENDLY DISPOSAL
Recycling – European Directive 2012/19/EU
This marking indicates that this product should not be disposed with other household wastes. To prevent possible harm to the environment or human health from uncontrolled waste disposal, recycle it responsibly to promote the sustainable reuse of material resources. To return your used device, please use the return and collection systems or contact the retailer where the product was
purchased. They can take this product for environmentally safe recycling.

BATTERY MUST BE RECYCLED OR DISPOSED OF PROPERLY. DO NOT OPEN. DO NOT DISPOSE
OR IN FIRE OR SHORT CIRCUIT.
Emerio Switzerland AG
Oberneuhofstrasse 1
6340 Baar
Switzerland
ERP information (EN)
Supplier: Emerio Switzerland AG
Oberneuhofstrasse 1
6340 Baar
Switzerland
Declare that the product detailed below:
Information requirements for electric local space heaters
| Model identifier(s): | |||||
| Item | Symbol | Value | Unit | Item | Unit |
| Heat output | Type of heat input, for electric storage local space heaters only (select one) | ||||
| Nominal heat output | P_nom | 2,0 | kW | manual heat charge control, with integrated thermostat | [no] |
| Minimum heat output (indicative) | P_min | 1,3 | kW | manual heat charge control with room and/or outdoor temperature feedback | [no] |
| Maximum continuous heat output | P_max,c | 2,0 | kW | electronic heat charge control with room and/or outdoor temperature feedback | [no] |
| Auxiliary electricity consumption | fan assisted heat output | [no] | |||
| At nominal heat output | el_max | 0,000 | kW | Type of heat output/room temperature control (select one) | |
| At minimum heat output | el_min | 0,000 | kW | single stage heat output and no room temperature control | [no] |
| In standby mode | el_SB | 0,000 | kW | Two or more manual stages, no room temperature control | [no] |
| with mechanic thermostat room temperature control | [no] | ||||
| with electronic room temperature control | [yes] | ||||
| electronic room temperature control plus day timer | [no] | ||||
| electronic room temperature control plus week timer | [no] | ||||
| Other control options (multiple selections possible) | |||||
| room temperature control, with presence detection | [no] | ||||
| room temperature control, with open window detection | [no] | ||||
| with distance control option | [no] | ||||
| with adaptive start control | [no] | ||||
| with working time limitation | [yes] | ||||
| with black bulb sensor | [no] | ||||
| Contact details | Emerio Switzerland AGOberneuhofstrasse 16340 BaarSwitzerland | ||||
Satisfies the requirement of the Council Directives:
COMMISSION REGULATION (EU) No 2015/1188 of 28 April 2015 and Amending COMMISSION REGULATION (EU) 2016/2282 implementing Directive 2009/125/EC of the European Parliament and of the Council with regard to ecodesign requirements for local space heaters
Regarding information for consumers on how to install, use and maintain the product, WEEE information, please check the instruction manual provided with packaging.
Emerio Switzerland AG
Oberneuhofstrasse 1
6340 Baar
Switzerland
Lieferant: Emerio Switzerland AG
Oberneuhofstrasse 1
6340 Baar
Switzerland
Emerio Switzerland AG
Oberneuhofstrasse 1
6340 Baar
Switzerland
Informations ERP (FR)
natural_image
Diagram of a circular mechanical or optical component with radial lines and concentric circles, no visible text or symbols.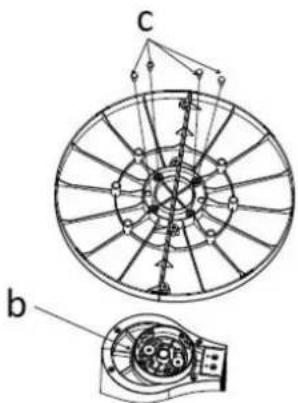
UTILIZZO
Emerio Switzerland AG
Oberneuhofstrasse 1
6340 Baar
Switzerland

- IMPORTANT INSTRUCTIONS
- PARTS DESCRIPTION
- Control panel
- BASE ASSEMBLY
- OPERATION
- On/off button
- Power setting button
- Adjustment button
- Oscillation button
- Timer button
- Note:
- REMOTE CONTROL
- SAFETY SYSTEM
- CLEANING AND MAINTENANCE
- TECHNICAL DATA
- GUARANTEE AND CUSTOMER SERVICE
- ENVIRONMENT FRIENDLY DISPOSAL
- ERP information (EN)
- Informations ERP (FR)
- UTILIZZO
Brand : Emerio
Model : FH215051.1
Category : Heating