
TFN214472.1 - Fan Emerio - Free user manual and instructions
Find the device manual for free TFN214472.1 Emerio in PDF.
| Product type | 3-in-1 fan with heating and cooling function |
| Brand | Emerio |
| Model | TFN214472.1 |
| Power supply | 220-240 V ~ 50-60 Hz |
| Heating power | 2000 W |
| Cooling power | 35 W |
| Maximum air flow | 19,5 m³/min |
| Maximum air speed | 3,2 m/s |
| Sound power level | 56,8 dB(A) |
| Standby power consumption | 0,45 W |
| Main functions | Cooling, heating, oscillation, timer (1-8 h), sleep mode, max mode, UV sterilization, remote control |
| Speed settings | 9 levels in cooling, 4 levels in heating |
| Adjustable temperature range (heating) | 1 to 30 °C |
| Filter | Replaceable purifying air filter (alarm after 720 h) |
| Display | Digital with temperature display |
| Remote control | Yes, with AAA 1.5 V battery (range 4 m) |
| Automatic shut-off | After 9 h in heating mode |
| Safety | Overheat and tip-over protection, do not cover |
| Maintenance | Clean with a soft, dry cloth; vacuum the air grilles |
| Warranty | 2 years (excluding wear parts and glass/plastic) |
| Customer service | Tel. +49 (0) 3222 1097 600, email info.de@emerio.eu |
Frequently Asked Questions - TFN214472.1 Emerio
User questions about TFN214472.1 Emerio
0 question about this device. Answer the ones you know or ask your own.
Ask a new question about this device
Download the instructions for your Fan in PDF format for free! Find your manual TFN214472.1 - Emerio and take your electronic device back in hand. On this page are published all the documents necessary for the use of your device. TFN214472.1 by Emerio.
USER MANUAL TFN214472.1 Emerio
natural_image
Black cylindrical object with a vertical rod and a small protrusion on top, isolated on white background (no text or symbols)3 in 1 Home Climate Controller (EN)
3 in 1 Home Climate Controller (DE)
3 in 1 Home Climate Controller (SE)
This product is only suitable for well insulated spaces or occasional use
SAFETY INSTRUCTIONS
Before use make sure to read all of the below instructions in order to avoid injury or damage, and to get the best results from the appliance. Make sure to keep this manual in a safe place. If you give or transfer this appliance to someone else make sure to also include this manual.
In case of damage caused by user failing to follow the instructions in this manual the warranty will be void. The manufacturer/importer accepts no liability for damages caused by failure to follow the manual, a negligent use or use not in accordance with the requirements of this manual.
- This appliance can be used by children aged from 8 years and above and persons with reduced physical, sensory or mental capabilities or lack of experience and knowledge if they have been given supervision or instruction concerning use of the appliance in a safe way and understand the hazards involved.
- Children shall not play with the appliance.
- Cleaning and user maintenance shall not be made by children without supervision.
- If the supply cord is damaged, it must be replaced by the manufacturer, its service agent or similarly qualified persons in order to avoid a hazard.
- Children of less than 3 years should be kept away unless continuously supervised.
- Children aged from 3 years and less than 8 years shall only switch on/off the appliance provided that it has been placed or installed in its intended normal operating position and they have been given supervision or instruction concerning use of the appliance in a safe way and understand the hazards involved. Children aged from 3
years and less than 8 years shall not plug in, regulate and clean the appliance or perform user maintenance.
-
CAUTION — Some parts of this product can become very hot and cause burns. Particular attention has to be given where children and vulnerable people are present.
-
WARNING: In order to avoid overheating, do not cover the appliance.
-
The appliance must not be located immediately below a socket outlet.
-
Do not use this appliance in the immediate surroundings of a bath, a shower or a swimming pool.
-
WARNING: This appliance is not equipped with a device to control the room temperature. Do not use this appliance in small rooms when they are occupied by persons not capable of leaving the room on their own, unless constant supervision is provided.
-
Prior to cleaning or other maintenance, the appliance must be disconnected from the supply mains.
-
Means "DO NOT COVER".
-
Do not use this appliance if it has been dropped.
-
Do not use if there are visible signs of damage to the appliance.
-
Use this appliance on a horizontal and stable surface.
-
Before inserting the plug into the mains socket, please check that the voltage and frequency comply with the specifications on the rating label.
-
Disconnect the mains plug from the socket when the appliance is not in use and before cleaning.
-
Ensure that the mains cable is not hung over sharp edges and keep it away from hot objects and open flames.
-
Do not immerse the appliance or the mains plug in water or other liquids. There is danger to life due to electric shock!
-
To remove the plug from the plug socket, pull the plug. Do not pull the power cord.
-
Do not plug or unplug the appliance from the electrical outlet with a wet hand.
- Never attempt to open the housing of the appliance, or to repair the appliance yourself. This could cause electric shock.
- Never leave the appliance unattended during use.
- This appliance is not designed for commercial use.
- Do not use the appliance for other than intended use.
- Do not wind the cord around the appliance and do not bend it.
- Do not place any objects on the air inlet or outlet. Make sure that the ventilation openings are free of dust, lint, hair and other obstacles that could impair the air flow.
- Keep the appliance at least 1.5 meters away from the fire source or tinder, and avoid direct sunlight.
- It is forbidden to replace the power switch by the method of plugging (unplugging) the power cord plug.
- Do not use the appliance against the power outlet or under the power outlet. The power outlet should be placed behind the appliance when the heater function (warm mode) is in use.
- Do not share the socket with other high-power appliances.
- This product must be equipped with a CE-approved fixed socket that is consistent with the rated working current. Do not use a mobile multi-purpose socket.
PARTS DESCRIPTION
text_image
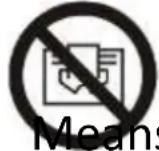
1 2 3 4 5 6 7 8 9 10- Cover
- Air outlet
- Air duct
- Control panel
- Air inlet
- Main body
- Air inlet
- Base
- Power switch
- Power cable
Control panel

text_image
8.8°C 3 2 1- On/off button (can also be used to control the air volume and swing function)
- Digital display
- Warm mode button
OPERATION
-
Insert the plug into a suitable power outlet. Press the power switch to position "I". The appliance is in standby mode.
-
To turn on and off:
Press the on/off button on the control panel the buzzer will beep once and the appliance will start running. Press and hold the on/off button for 2 seconds the buzzer will beep twice and the appliance will stop running after you release your hand.
- To switch to the warm mode:
The appliance starts working in cool mode by default; it sends out the cool air. Press the warm mode button on the control panel to enter the warm mode; the appliance starts sending out the warm air. The digital display shows the ambient temperature. Press the button again to exit the warm mode.
- To set the air volume:
When the appliance is in operation press the on/off button on the control panel to adjust the air volume from 1 to 9 under cool mode: adjust the air volume from 1 to 4 under warm mode.
- To set the oscillation function:
Press and hold the on/off buton on the control panel for 1 second the buzzer will beep once and the appliance will start oscillating. Press and hold the on/off button for 1 second again the buzzer will beep once and the appliance will stop oscillating.
To use the remote control:
This unit has a remote control. Please use 2x1.5V AAA batteries for this remote control. Please insert the batteries to the remote control tightly. If it is not in use for a long time, please take the batteries out of the remote control.
Note: Most functions of the appliance can only be controlled by remote control. If you have lost the remote control or if it is damaged, please contact our customer service.
The remote control should be pointed at the signal receiver on the digital display to maximize the remote control signal. Effective distance: 4M
text_image
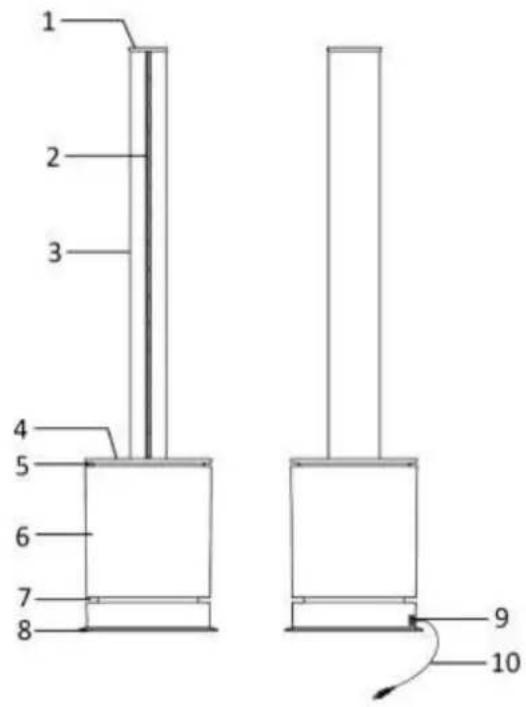
6 8 3 4 10 2 7 + + 9 5 7 - - 9- On/off button
Press the on/off button to turn on the appliance. Press the button again to turn off the appliance.
- Sleep mode button
Press the sleep mode button the digital display will show "LL" and the wind speed will become minimum. Press the button again to exit the mode. (You can also exit the mode by pressing the air volume button "+" /" -".)
- Max mode button
Press the max mode button the digital display will show "HH" and the wind speed will become maximum. Press the button again to exit the mode. (You can also exit the mode by pressing the air volume button "+" /" -".)
- Oscillation button
Press the oscillation button to turn on the oscillation function. Press the button again to stop oscillating.
- UV sterilization button
Press the UV sterilization button to turn on the UV sterilization function. The digital display will show "U". The UV lamp inside the appliance will effectively kill bacteria/virus in the air. Press the button again to turn the function off. This function will automatically shut down after 1 hour.
- Cool mode button
Press the cool mode button to enter the cool mode. You can adjust the air volume under this mode. Note: cool mode is the default mode when the appliance is turned on.
- Air volume button
Press the button “+” on the left side of the remote control to increase the air volume. Press the button “-” on the left side of the remote control to decrease the air volume. There are 9 level settings for cool mode. There are 4 level settings for warm mode.
- Warm mode button
Press the warm mode button to enter the warm mode. The digital display will show the ambient temperature. You can adjust the air volume and the temperature under this mode.* Note: under warm mode, max mode and sleep mode are not available.
- Temperature button
Under warm mode, press the button “+”/“-” on the right side of the remote control to set the temperature between 1-30°C. Note: buttons do not work under cool mode.
- Timer button
Press the timer button to set the working time from 1 to 8 hours. A small “.” will flash on the lower right corner of the digital display to indicate the timer is under setting/operation.
* The set temperature should be higher than the ambient temperature so that the warm mode function will be turned on. When the ambient temperature reaches the set temperature the warm mode function will stop. The appliance will send out a cool breeze for approx. 40 seconds and then turn into standby mode. When the ambient temperature is lower than the set temperature the warm mode function will automatically activate.
Under warm mode, the default set temperature is 25^ C. When the ambient temperature is below 0^ C the digital display will only show “01” instead of negative temperature value. After running over 9 hours under the warm mode, the appliance will automatically stop running. Restart by pressing the on/off button on the control panel or by using the remote control.
Note: the temperature can only be set by the remote control. The control panel does not support this operation.
Possible phenomenon
- This appliance may respond to the remote control of other devices.
- If you use the remote control of this appliance, other devices may respond.
This is due to the overlapping frequencies of the remote control. There is no quality problem in the product itself. To avoid misuse, keep the remote control away from other electrical devices during operation.
Note:
- The digital display will extinguish in approx. 20 seconds with no operations. If you want to do further operations, firstly press any button (except for the on/off button) on the remote control or the buttons on the control panel to turn on the digital display and then press your desired buttons to choose your desired functions.
- The on/off button on the remote control will turn the appliance to standby mode, not complete shutdown. Please press the power switch on the main body to completely power off when this appliance is not in use. If this appliance is not in use for a long time, please unplug the power cord.
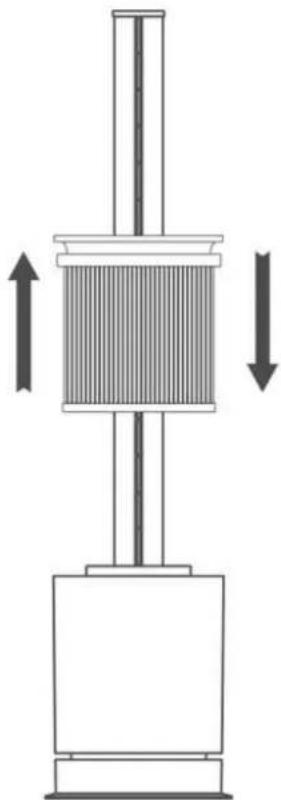
FILTER REPLACEMENT
This appliance is equipped with a purifying air filter which can purify the air.
Replacement method:
- Rotate the top cover anti-clockwise and pull out the filter after unlocking;
- Separate the assembled top cover from the filter;
- Assemble the new filter with the top cover;
- Put the assembled filter back into the appliance and rotate it clockwise to fix it.
natural_image
Diagram of a mechanical press or actuator with directional arrows indicating movement (no text or symbols present)To take out the filter To install the filter down

text_image
Top cover FilterTo separate or assemble

text_image
d=0 EAnti-clockwise rotation Unlock to pull up

text_image
d-δ aIXClockwise rotation Lock up
Replacing the filter alarm clock
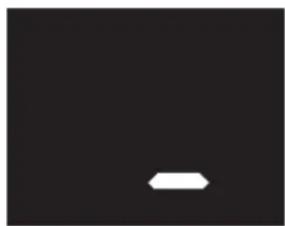
natural_image
Simple white diamond shape on black background (no text or symbols)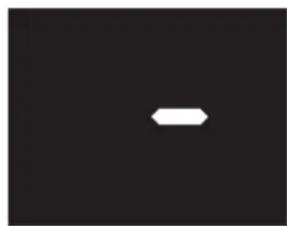
natural_image
Simple white arrow pointing left on a black background (no text or symbols)
natural_image
Simple white arrow pointing downward on a black background (no text or symbols)The appliance has a memory function. After a total of 720 hours of operation, the digital display (as shown in the figure) will light up for about 5 seconds with the indicator light cycling when the appliance is turned on.
After replacing the filter, press and hold the on/off button on the remote control for 5 seconds to clear the alarm and the operating time of the filter reclocks again.
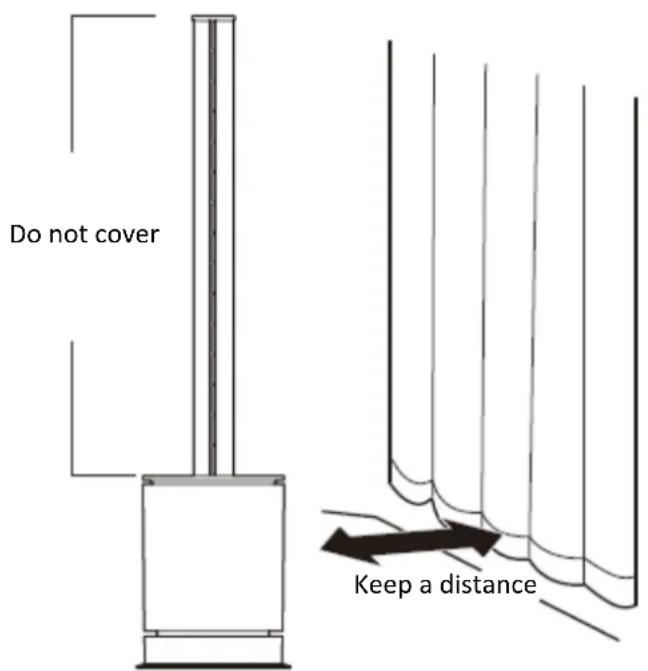
LOCATION
Please place the appliance in a horizontal position. Please do not use the appliance in high temperature and humidity (bathroom, kitchen).
text_image
Do not cover Keep a distanceDo not place anything within 1 meter.
SAFETY SYSTEM
This appliance is equipped with an overheat protection sensor and an automatic fail-safe that cuts power to the unit if it is accidentally tipped over or overheat. If this sensor is triggered, unplug the machine and allow it to cool. Check and remove any obstructions before restarting the appliance and be sure to place it on a hard and level surface.
CLEANING AND MAINTENANCE
• Unplug the appliance before cleaning and maintenance.
- Please do not put the appliance on the water or splash it, which may cause damage to the machine.
- Do not use banana oil, benzine, alcohol, bleach or metal objects to wipe the surface of the appliance, which may cause discoloration of the surface.
- Wipe the surface with a soft, dry cloth. If especially dirty, dilute with a mild detergent and wipe with a soft cloth. Then wipe with a dry cloth.
- Use a soft brush or a vacuum cleaner to clean the dust at the air inlet and outlet. Please clean it when there is less dust. Too much dust will reduce the efficiency.
TECHNICAL DATA
Operating voltage: 220-240V \~ 50-60Hz
Power consumption: 2000W
Cool mode power: 35W
GUARANTEE AND CUSTOMER SERVICE
Before delivery our devices are subjected to rigorous quality control. If, despite all care, damage has occurred during production or transportation, please return the device to your dealer. In addition to statutory legal rights, the purchaser has an option to claim under the terms of the following guarantee:
For the purchased device we provide 2 years guarantee, commencing from the day of sale. If you have a defective product, you can directly go back to the point of purchase.
Defects which arise due to improper handling of the device and malfunctions due to interventions and repairs by third parties or the fitting of non-original parts are not covered by this guarantee. Always keep your receipt, without the receipt you can't claim any form of warranty. Damage caused by not following the instruction manual, will lead to a void of warranty, if this results in consequential damages then we will not be liable. Neither can we hold responsible for material damage or personal injury caused by improper use if the instruction manual is not properly executed. Damage to accessories does not mean free replacement of the whole appliance. In such case please contact our service department. Broken glass or breakage of plastic parts is always subject to a charge. Defects to consumables or parts subjected to wearing, as well as cleaning, maintenance or the replacement of said parts are not covered by the warranty and are to be paid.
ENVIRONMENT FRIENDLY DISPOSAL

Recycling – European Directive 2012/19/EU
This marking indicates that this product should not be disposed with other household wastes. To prevent possible harm to the environment or human health from uncontrolled waste disposal, recycle it responsibly to promote the sustainable reuse of material resources. To return your used device,
please use the return and collection systems or contact the retailer where the product was purchased. They can take this product for environmental safe recycling.


BATTERY MUST BE RECYCLED OR DISPOSED OF PROPERLY. DO NOT OPEN. DO NOT DISPOSE
OR IN FIRE OR SHORT CIRCUIT.
Emerio Deutschland GmbH (no service address)
Lerchenweg 3
40789 Monheim am Rhein
Deutschland
Customer service:
T: +49 (0) 3222 1097 600
E: info.de@emerio.eu
For spare parts please visit: www.buyspareparts.eu
ERP information (EN)
Declare that the product detailed below:
Information requirements
| Model identifier(s): | |||||
| Item | Symbol | Value | Unit | Item | Unit |
| Heat output | Type of heat input, for electric storage local space heaters only (select one) | ||||
| Nominal heat output | P_nom | 2.0 | kW | manual heat charge control, with integrated thermostat | No |
| Minimum heat output (indicative) | P_min | 1.7 | kW | manual heat charge control with room and/or outdoor temperature feedback | No |
| Maximum continuous heat output | P_max,c | 2.0 | kW | electronic heat charge control with room and/or outdoor temperature feedback | No |
| Auxiliary electricity consumption | fan assisted heat output | No | |||
| At nominal heat output | el_max | N/A | kW | Type of heat output/room temperature control (select one) | |
| At minimum heat output | el_min | N/A | kW | single stage heat output and no room temperature control | No |
| In standby mode | el_SB | 0.00052 | kW | Two or more manual stages, no room temperature control | No |
| with mechanic thermostat room temperature control | No | ||||
| with electronic room temperature control | Yes | ||||
| electronic room temperature control plus day timer | No | ||||
| electronic room temperature control plus week timer | No | ||||
| Other control options (multiple selections possible) | |||||
| room temperature control, with presence detection | No | ||||
| room temperature control, with open window detection | No | ||||
| with distance control option | No | ||||
| with adaptive start control | No | ||||
| with working time limitation | Yes | ||||
| with black bulb sensor | No | ||||
Satisfies the requirement of the Council Directives:
COMMISSION REGULATION (EU) No 2015/1188 of 28 April 2015 and Amending COMMISSION REGULATION (EU) 2016/2282 implementing Directive 2009/125/EC of the European Parliament and of the Council with regard to ecodesign requirements for local space heaters
Regarding information for consumers on how to install, use and maintain the product, WEEE information, please check the instruction manual provided with packaging.
| Information to identify the TFN-214472.1 to which the information relates to [3 in 1 Home Climate Controller] | |||
| Description | Symbol | Value | Unit |
| Maximum fan flow rate | F | 19,5 | m^3/min |
| Fan power input | P | 26,6 | W |
| Service value | SV | 0,73 | (m^3/min)/W |
| Standby power consumption | P_SB | 0,45 | W |
| Fan sound power level | L_WA | 56,8 | dB(A) |
| Maximum air velocity | c | 3,2 | meters/sec |
| Measurement standard for service value | IEC 60879:2019 – Comfort fans and regulators for household and similar purposes – Methods for measuring performance | ||
| Contact details for obtaining more information | Emerio Deutschland GmbHLerchenweg 340789 Monheim am RheinDeutschland | ||
Satisfies the requirement of the Council Directives:
COMMISSION REGULATION (EU) No 206/2012 of 6 March 2012 and Amending COMMISSION REGULATION (EU) 2016/2282 implementing Directive 2009/125/EC of the European Parliament and of the Council with regard to ecodesign requirements for air conditioners and comfort fans
Regarding information for consumers on how to install, use and maintain the product, WEEE information, please check the instruction manual provided with packaging.
text_image
8.8°C 3 2 1natural_image
Diagram of a mechanical press or actuator with directional arrows indicating movement (no text or symbols present)text_image
8.8°C 3 2 1natural_image
Diagram of a mechanical press or actuator with directional arrows indicating movement (no text or symbols present)natural_image
Simple white arrow pointing downward on a black background (no text or symbols)text_image
8.8°C 3 2 1natural_image
Diagram of a mechanical press or actuator with directional arrows indicating movement (no text or symbols present)text_image
8.8°C 3 2 1natural_image
Diagram of a mechanical device with a central shaft and two opposing arrows indicating motion or force (no text or symbols present)text_image
8.8°C 3 2 1natural_image
Diagram of a mechanical press or actuator with directional arrows indicating movement (no text or symbols present)natural_image
Simple white arrow pointing downward on a solid black background (no text or symbols)
natural_image
Simple white arrow pointing left on a dark background (no text or symbols)
natural_image
Simple white arrow pointing downward on a dark background (no text or symbols)text_image
8.8°C 3 2 1natural_image
Solid black square with a small white rounded rectangle in the bottom right corner (no text or symbols)
natural_image
Simple white arrow pointing left on a black background (no text or symbols)