
SS4420 - Receiver Sogo - Free user manual and instructions
Find the device manual for free SS4420 Sogo in PDF.
| Product type | DVB-T/T2 Receiver |
| Brand | Sogo |
| Model | SS4420 |
| DVB Standard | DVB-T and DVB-T2 |
| Maximum video resolution | 1080p |
| Supported video formats | MPEG-4, H.264, AVCHD (3gp, mp4, avi) |
| Supported audio formats | MP3, WMA, AAC, AC3, PCM |
| Supported image formats | JPEG, BMP |
| Video outputs | HDMI, CVBS (composite) |
| Audio outputs | HDMI, RCA (left/right), optical digital audio output |
| USB port | Yes, USB 2.0 for PVR recording and multimedia playback |
| PVR function | Direct recording and time shift |
| Electronic Program Guide (EPG) | Yes, 7 days |
| Teletext | Yes |
| Parental control | Yes, with password |
| Software update | Via OTA (antenna) or USB |
| Power supply | DC adapter (not specified, typical 5V/1A) |
| Dimensions (approx.) | 150 x 100 x 30 mm |
| Weight (approx.) | 0.3 kg |
| Operating temperature | 5°C to 30°C |
| Maintenance and cleaning | Unplug before cleaning; use a soft dry cloth; avoid solvents |
| Safety | Do not open the case; avoid humidity and heat; easily accessible plug |
| Spare parts and repairability | Parts not provided by the manufacturer; contact customer service for repair |
| General information | Compliant with European directives (Low Voltage, EMC, WEEE) |
Frequently Asked Questions - SS4420 Sogo
User questions about SS4420 Sogo
0 question about this device. Answer the ones you know or ask your own.
Ask a new question about this device
Download the instructions for your Receiver in PDF format for free! Find your manual SS4420 - Sogo and take your electronic device back in hand. On this page are published all the documents necessary for the use of your device. SS4420 by Sogo.
USER MANUAL SS4420 Sogo
High Definition DVB-T2 Receiver
Caution: please read and preserve these important instructions
Nota
Despeje el polvo. El polvo o las partículas metálicas bajo el centro del ConjuntoSEOSEOSEOSEOSEOSEOSEOSEOSEOSEOSEOSEOSEOSEOSEOSEOSEOSEOSEOSEOSEOSEOSEOSEOSEOSEOSEOSEOSEOSEOSEOSEOSEOSEOSEOSEOSEOSEOSEOSEOSEOSEOSEOSEOSEOSEOSEOSEOSEOSEOSEOSEOSEOSEOSEOSEOSEOSEOSEOSEOSEOSEOSEOSEOSEOSEOSEOSEOSEOSEOSEOSEOSEOSEOSEOSEOSEOSEOSEOSEOSEOSEOSEOSEOSEOSEOSEOSEOSEOSEOSEOSEOSEOSEOSEOSEOSEOSEOSEOSEO SEOEYOEOY

Read this manual carefully and make sure you understand the provided instructions for your safety.
Warnings, Cautions and Notes
Throughout the whole manual pay special attention to the following marks that indicates hazardous situations.

Caution
Indicates a situation which, if not avoided, could damage the equipment or apparatus.

Warnings
Indicates a hazardous situation which, if not avoided, could result in serious injury.

Note
Indicates additional information to the user to make the user aware of possible
Problems and information of any importance to help the user to understand,
to use and to maintain the installation.
SAFETY INFORMATION
This digital terrestrial receiver has been manufactured to comply with international safety standards. Please read the following safety precautions carefully.
Safety Instructions and Precautions
The socket-outlet shall be installed near the equipment and shall be easily accessible.

Avoid placing heavy things and blocking ventilation passage. (Passage blocking can cause fire)
Avoid Scrubbing the surface with Benzene or Volatile gasoline, Colour can be damaged.

Leave the power and the antenna off for the ling absence or during thunder storm.
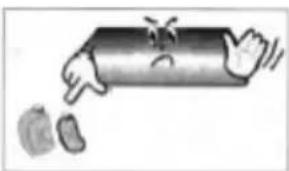
Avoid dropping and damaging Remote Control Unit.

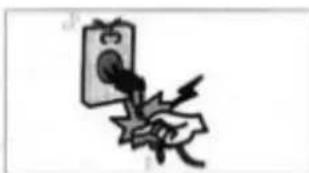
If there is smoke or burning smell, turn off & un-plug the set immediately. Contact your local repair centre for advice.
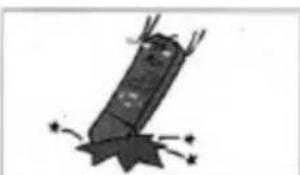
Avoid place the set on slippery and slant surface.
Keep away from the water.

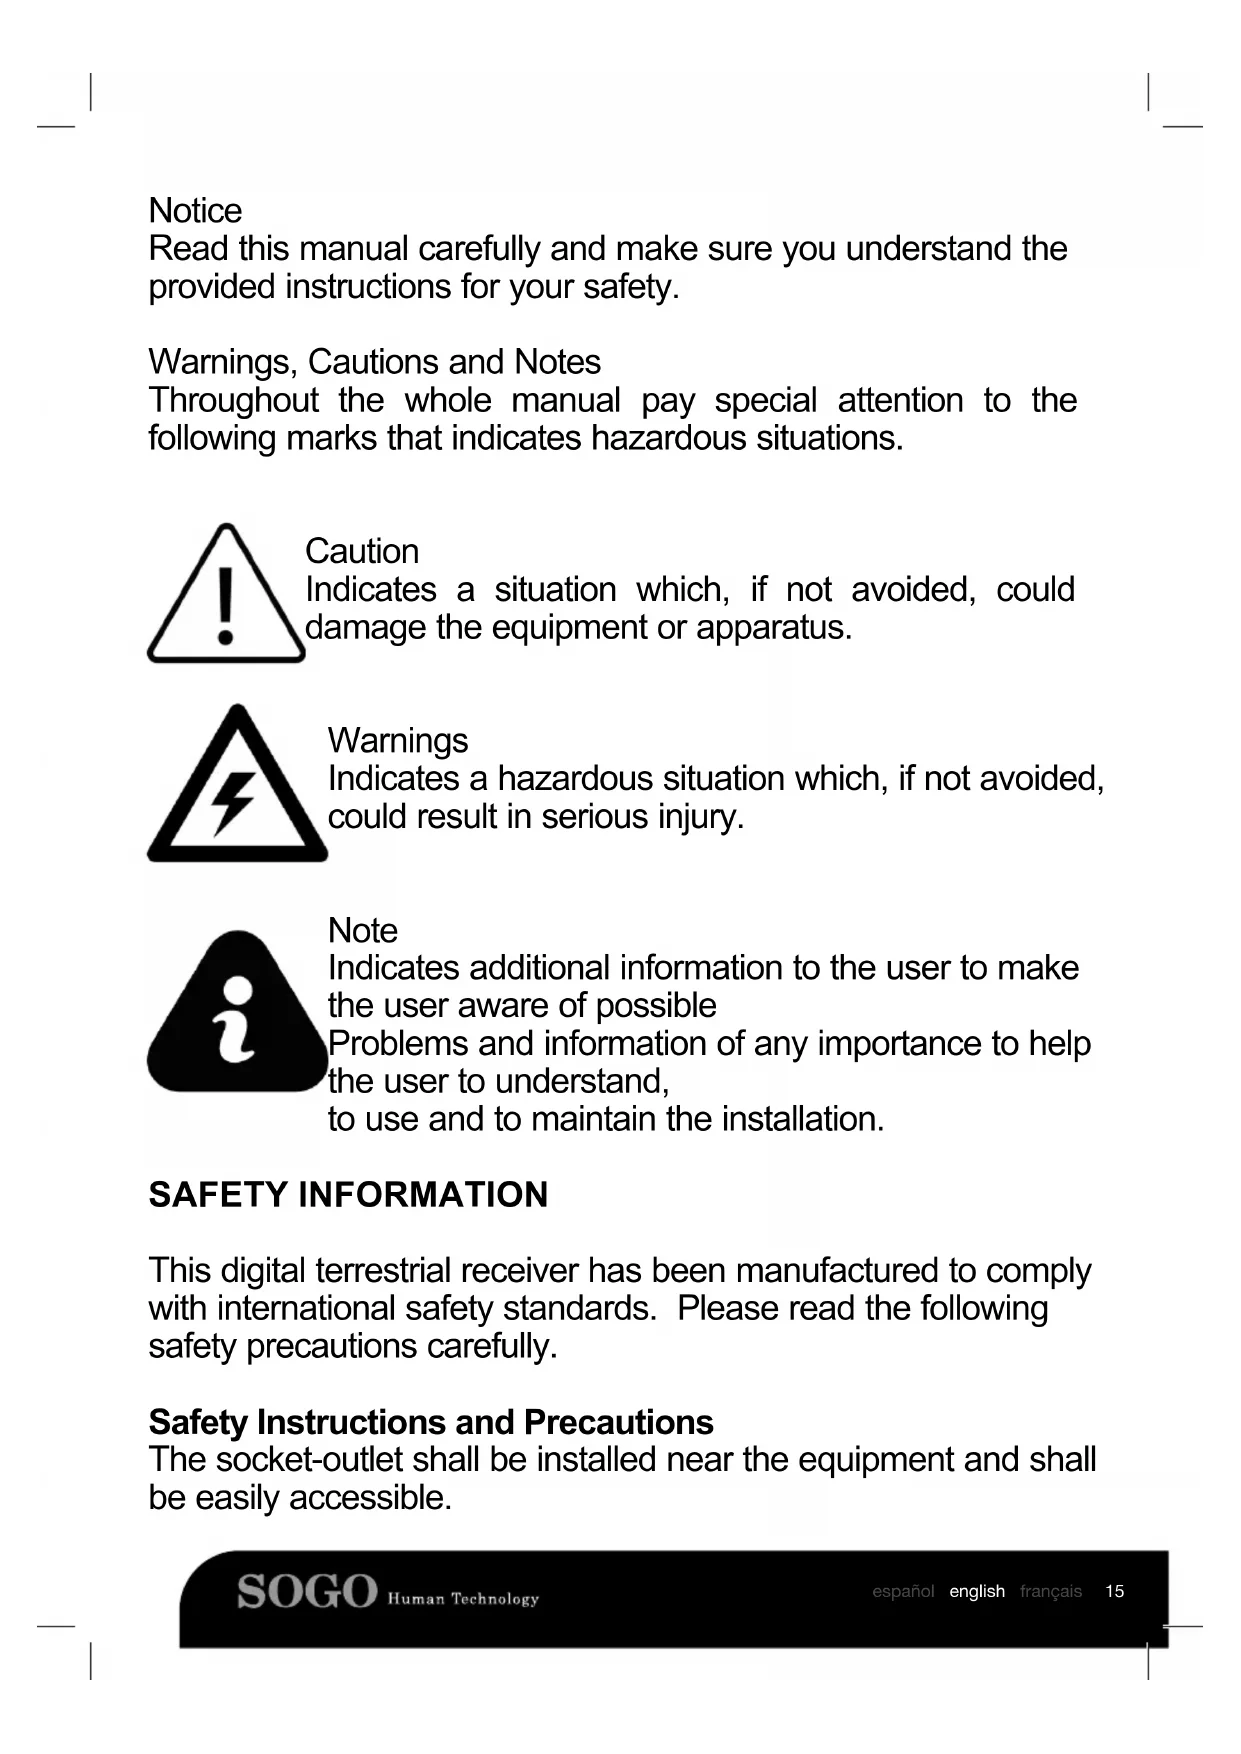
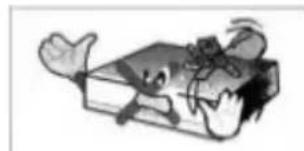
Clear off the dust. Dust or Metallic particles inside the set can cause fire and electric shock.

Avoid dissembling and assembling. Do not open the set.
Do not snatch the cable to plug out.
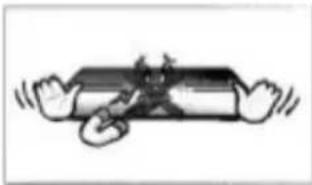
Do not move the set while power cord is plugged in.
Keep the distance from Magnetic items and Audio Speaker.
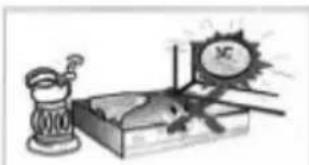
Place the set with the good ventilation and away from the direct
sunlight and humidity.
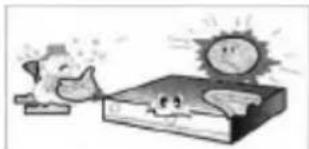
Avoid the temperature of over 30 C and below 5 C .
1. Before You Begin
1.1 Features
DVB-T/T2 H.264 HD Receivers, fully comply with DVB-T/T2 Standard
USB2.0 PVR and time shift-ready via USB port 576i/720p/1080i/1080p HD output
Support MPEG-4, H.264, AAC, AC3 and PCM formats
JPEG and BMP media playback
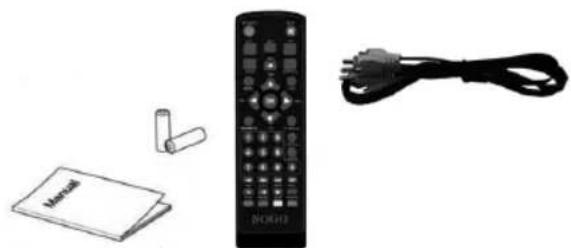
1.2 Accessories
User Manual
Remote Control
AV Cable
DC Adapter
Battery
2. Controls and Functions
2.1 Front Panel
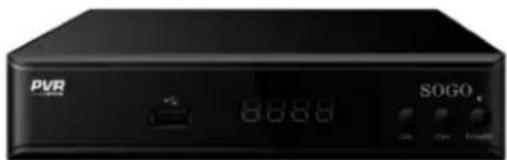
- LED DISPLAY WINDOW: Display channel number.
2.2 Rear Panel
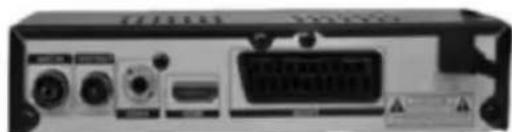
- RF IN: Connect the antenna.
- RF OUT: Loop Out is an output port of the DISH IN signal.
- HD OUT: Connect the TV HD OUT in.
- CVBS,R,L: This sockets connect to your TV.
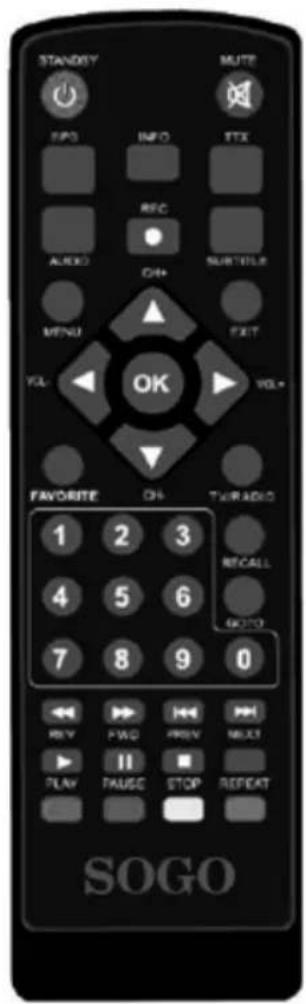
2.3 Remote Control Unit
All receiver features can be controlled with the remote controller.
1. STANDBY: switch the product to on or POWER.
2. MUTE: Mute or Restore Audio Output.
3. EPG:(Electronic Program Guide) Call up the EPF.
4. INFO: Show information of the current program.
5. TTX: Display Teletext contents.
6. AUDIO: Select an Audio Language or Audio Mode.
7. PVR: Record and replay television programme and film ect.
8. SUB-T: Select Subtitles Language.
9. MENU: Press this button to run menu on screen and call command box.
10. CH+/-: Navigate through the Menu. Select the next or previous Channel.
11. EXIT: Press to return to the previous menu.
12. VOL-/+: Volume increase and Decrease.
13. OK: Select the highlighted item.
14. FAV: Display or edit the favourite program list.
15. TV/RADIO: Switch between TV and Radio mode.
16. 0-9(Numeric Buttons): Selected menu.
17. RECALL: Return to the last selected menu.
18. GOTO: Set the play time of media.
19. REV: Search forward during media play.
20. FWD: Search backward during media play.
21. PREV: Return to the previous track during playing.
22. NEXT: Skip to the next track during playing.
23. PLAY: Press to resume playback.
24. PAUSE: Press to pause the running program.
25. STOP: Press this button to stop the running program.
26. REPEAT: Press this button to repeat program
4.Installation Guide and Operation
After all connections have been made properly, switch on TV and make sure the unit is connected to the Main Power. Press Power button to switch the unit on. If you are using the unit for the first time or have restored the unit to Factory default, the Installation Guide Menu will appear on your TV screen.
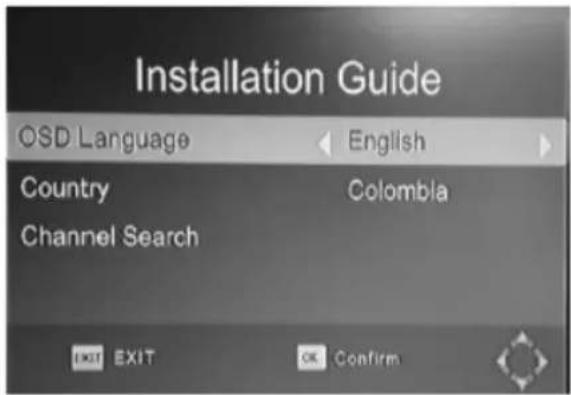
- Tum on your TV and receiver.
- Used the / button you can move upwards and downwards in the menu.
- When you have reached the required subject menu, Press the OK button to confirm your selection.
- Press the EXIT button to exit.
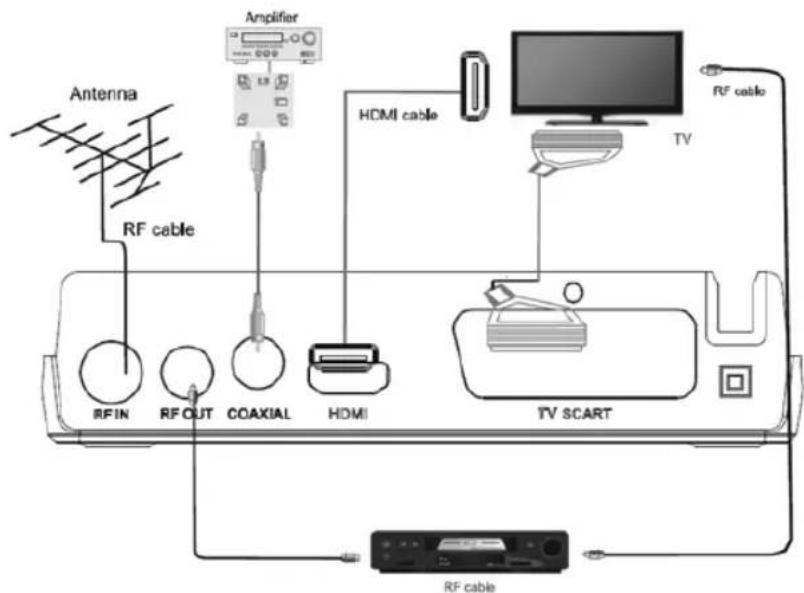
3 Connections
Install the receiver in a horizontal position.
Do not place any heavy object such a TV set-on the receiver. Do not install the receiver in following environments: vibration, direct sunrays, excessive humidity, extreme high or low temperatures, no ventilation, etc
3.1 Connecting to TV
4.1 OSD Language
- You can press the / button to select different
language. Such as English Czech Danish French German Italian Portuguese Spanish and Swedish.
4.2 Country
- You can press the / button to set the country which you belong to.
4.3 Auto Search
- If you select channel search and press the OK button. Then start to auto search the channel.
- Once channel tuning is complete, you can start watching TV program.
5. Main Menu
- Press the [MENU] key, enter the main menu.5.1 Program
To access the Menu, press the MENU button and select [Program]. Using the RIGHT/LEFT keys to navigate through the menu. The Menu provides options to adjust the Program Manage Settings. Select an option and press OK or RIGHT to adjust that setting. Press the EXIT button to exit the Menu.
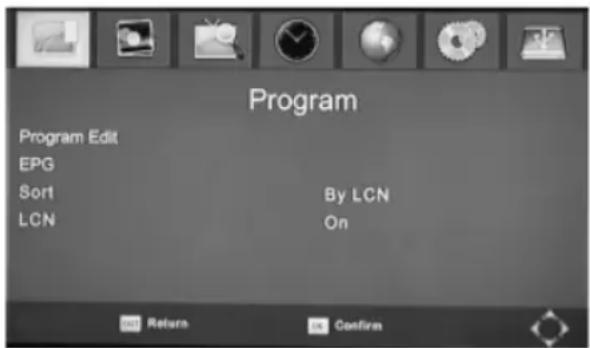
5.1 .1 Program Edit
To edit your program preferences (lock, skip, favourite, move or delete) you will need to enter the Program Edit Menu. This Menu requires a password to access. Enter the default password"000000". The master unlock password is "000000"
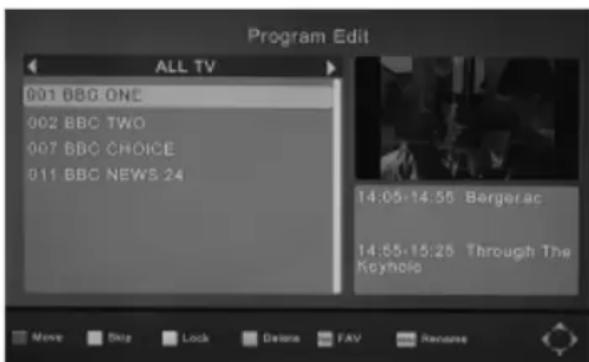
Set Favourite Channels
You can create a shortlist of favourite programs that you can easily access.
Set Favourite TV or Radio program:
- Select your desired channel then press the FAV button.
A heart-shaped symbol will appear and the channel is marked as a Favourite. - Repeat the previous step to select more Favourite channels
- To confirm and exit the Menu, press the EXIT key.
Disable Favourite TV or Radio Channel:
Select the Favourite channel and press Favourite button on the remote control to cancel View Favourite Channel
- While in normal viewing mode, press Favourite button and the Favourite Menu will appear.
- Press UP/DOEN to browse through your Favourite Channels
- Press OK to select your favourite channel.
Delete a TV or Radio Program
- Select the Program and then press the BLUE button.
A warning message will appear. Press OK to delete the channel,
- Repeat the previous step to select more channels to delete.
Skip TV or Radio Channel
- Select the channel you would like to skip and press the GREEN button.
A skip symbol is displayed. The channel is marked as a skip.
- Repeat the previous step to skip more channels
- To save your setting and exit it the menu, press EXIT key.
Disable the Skip Channel function:
Select the skip channel and press the GREEN button on the remote control to cancel
Move a TV or Radio Program
- Select the preferred channel then press the RED button. A move symbol will appear.
- Press UP/DOWN to move the channel.
- Press OK to confirm
- Repeat the above steps to move more channels.
Lock Program
You can lock selected programs for restricted viewing.
Lock a TV or Radio channel:
- Select the preferred channel then press the YELLOW button. A lock-shaped symbol is displayed. The channel is now marked as locked
- Repeat the previous step to select more channels.
- To confirm your setting and exit the menu, press the EXIT button.
- Press the YELLOW button to disable the lock
channels function
- To view the locked channels, you will be required to enter either the default password '000000' or your last set password. The master unlock password is '000000'.
- Press the TTX button, you can rename the program by soft keyboard.
5.1.2 EPG
The EPG is an on-screen TV guide that shows scheduled programs seven days in advance for every tuned channel. Press the EPG button on the Remote Control to access the guide.
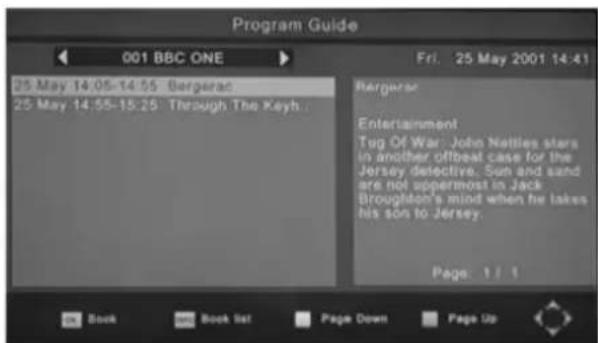
You can use the UP/DOWN key to select the preferred program. If there is more than one page of information, use the BLUE button for page up and the YELLOW button for page down.
5.1.3 Sort
- [By LCN]: Sort of programs under the LCN.
- [By Service Name]: According to the beginning letter of the program name to sort.
- [By Service ID]: According to service ID to sort.
- [By ONID]: Sort of programs according to ONID.
5.1.4 LCN
- [Off]: Disable to sort the programs by LCN.
- [On]: Enable to sort the programs by LCN.
5.2 Picture Setting
To access the Menu, press MENU the select[Picture] using the RIGHT/LEFT key. The Menu provides options to adjust the video settings. Press UP/DOWN to select an option and press RIGHT/LEFT to adjust that setting. Press EXIT to exit the menu.
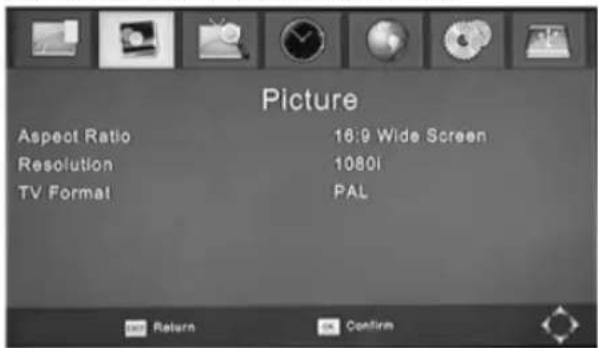
You can change this setting if the picture resolution does not appear to be correct. This setting is to match the most common setting for HDMI.
[480P]: for NTSC TV system
[576P]: for PAL TV system
[720P]: for NTSC or PAL TV system
[1080I]: for NTSC or PAL TV system
[1080P]: for NTSC or PAL TV system
(b)TV Format
If the picture does not appear to be correct you can change this setting. This should match the most common setting for TVs in your country.
[NTSC]: for NTSC system TV
[PAL]: for PAL system TV
5.3 Channel Search
To access the menu, press MENU and select [Search Channel] using the / keys.
This Menu provides options to adjust the Search Channel settings.
Press / to select an option and press / to adjust the settings.
Press EXIT to exit the Menu

(a)Auto Search
This option will automatically search for channels and save them. All previously saved channels and setting will be deleted.
- Select [Auto Search] and press OK or RIGHT to start channel search.
- To cancel channel search, press EXIT. Any channels that have been found will be saved.
5.3.1 Auto Search
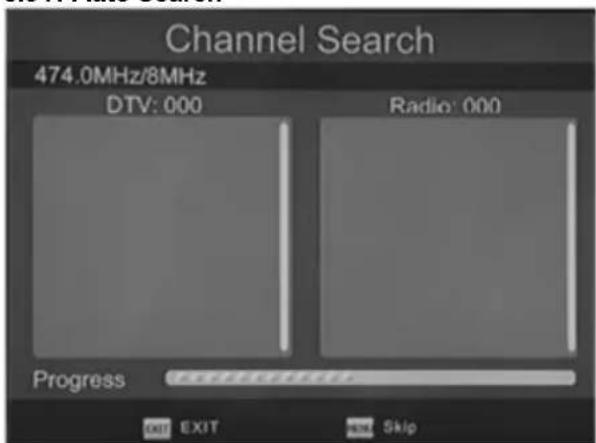
- If you don't know the frequency. Automatic search can search program from the prepared frequency.
- It will automatic to save program when the search is completed.
5.3.2 Manual Search
(b)Manual Search
This option allows you to scan for new channels without deleting previously saved channels and settings.
- Select [Manual Search] then press OK or RIGHT. The channel search screen will appear.
- Press the / key to select the channel frequency
- Press OK to start searching channels If a channel is found, it is saved.

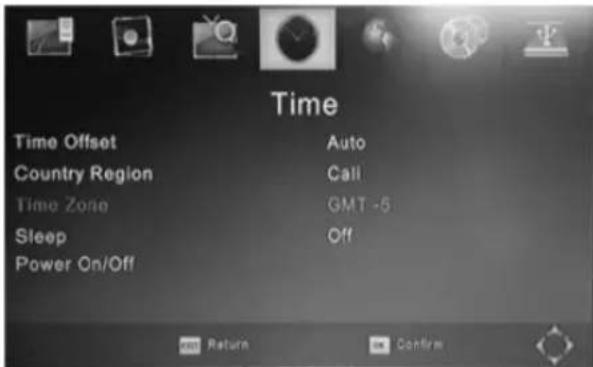
5.4 Time
- Press the / button to select an item.
- [Time Offset]: Press the / button to select auto or manual.
: Time Zone will be set automatically by country region.
: Time Zone will be set by manual. - [Sleep]: Press the / button to select the sleep time.
- [Power On/Off]: Press the OK button into setting window.
5.4 .1 Power On/Off
- [Power On]: Press the / button to select Disable or Enable.
: You could not set the power on time. : You could set the power on time. - [Power On Time]: Press number key to input time.
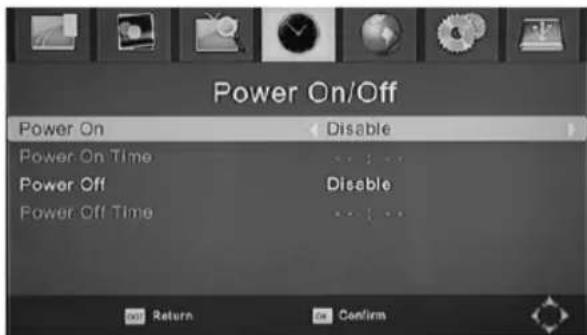
- [Power On]: Press the / button to select Disable or Enable.
: You could not set the power off time. - [Power Off Time]: Press number key to input time.
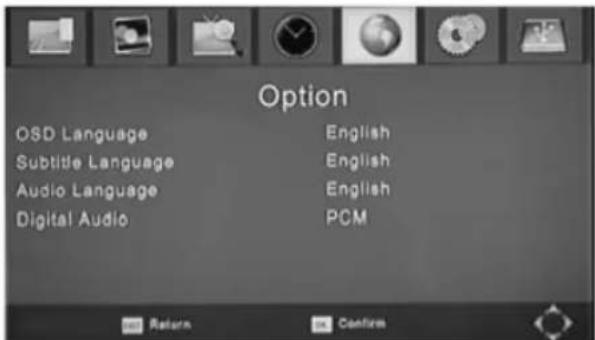
5.5 Option
- Press the / button to select an item.
- [OSD Language]: Press the button to select language that display on the menu.
- [Subtitle Language]: Press the / button to select the subtitle language.
- [Audio Language]: Press the button to select the audio language.
- [Digital Audio]: Press the / button to set the output form of digital audio.
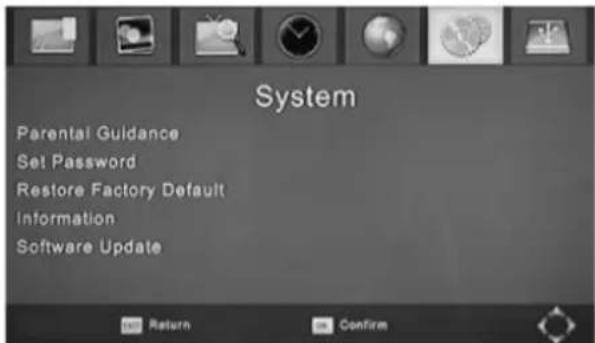
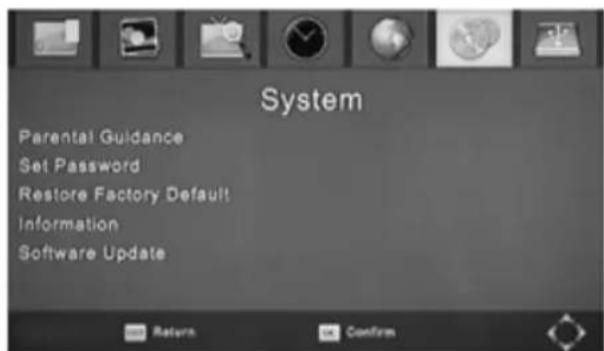
5.6 System
- Press the / button to select an item.
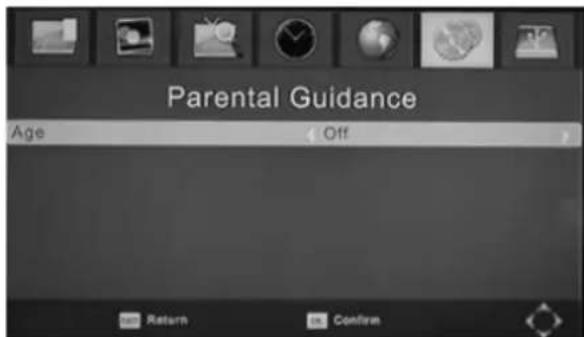
- [Parental Guidance]: Press the OK button to select the age level. : Default 000000
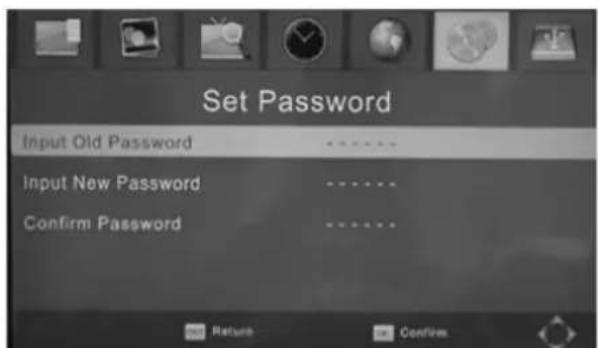
- [Set Password]: Press the OK button to input new password.
- [Restore Factory Default]: Press the OK button to restore factory default.
: Default 000000
- [Information]: Press the OK button to see the information about the model, SW version and HW version.
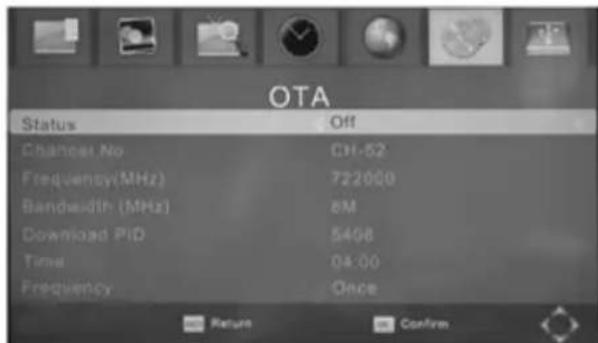
- [Software Update]: You can select OTA or USB to update.
5.6 .1 Parental Guidance
- Press the / button to select the age level.
- Press the OK button to confirm.
5.6 .2 Set Password
- [Input Old Password]: Press the number key to input old password.
- [Input New Password]: Press the number key to input new password.
- [Confirm Password]: Press the number key to input new password again.
- Press the OK button to confirm.
5.6.3 Information
- Press the EXIT button to exit.
5.6 .4 Software Update
- [OTA]: Press the OK button to set on air upgrade time and status.
- [USB Upgrade]: Press the OK button to select the file of usb upgrade all flash.bin..
- Press the EXIT button to exit.

- [Status]: Press the / button to select Off or On.
- [Start Time]: Press the / button to select Time.
- Press the OK button to confirm.
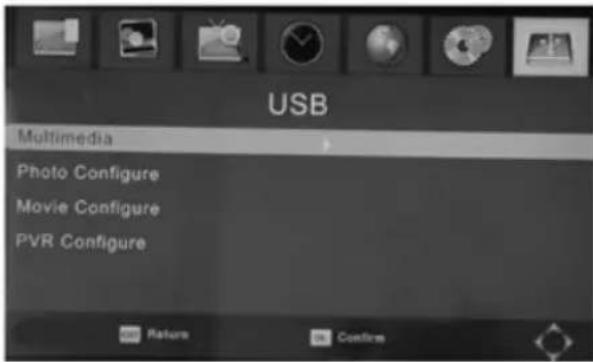
5.7 USB
- Press the / button to select an item.
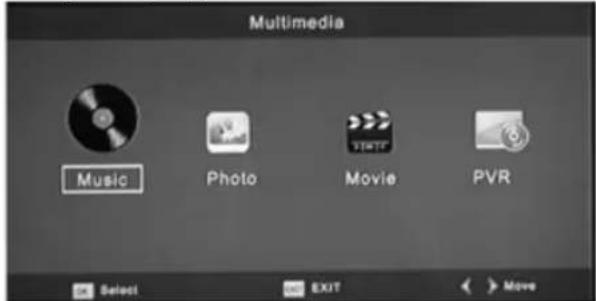
- [Multimedia]: Press the OK button to select a subject such as music photo movie or PVR.
- [Photo Configure]: Press the OK button to set parameters about photo configure.
- [Movie Configure]: Press the OK button to set
parameters about movie configure.
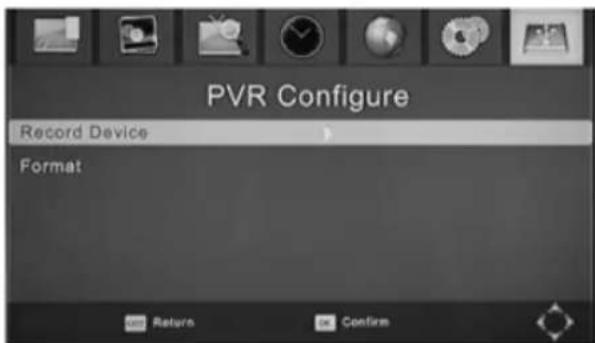
- [PVR Configure]: Press the OK button to set parameters about PVR configure.
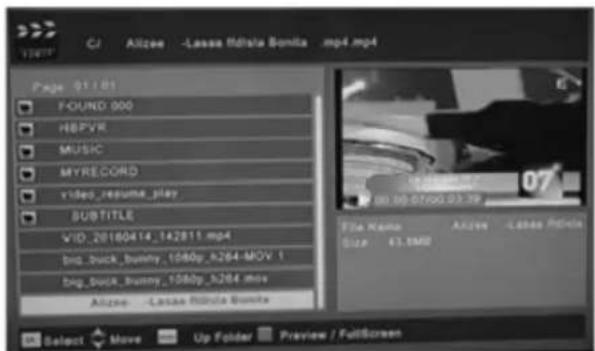
5.7.1 Multimedia
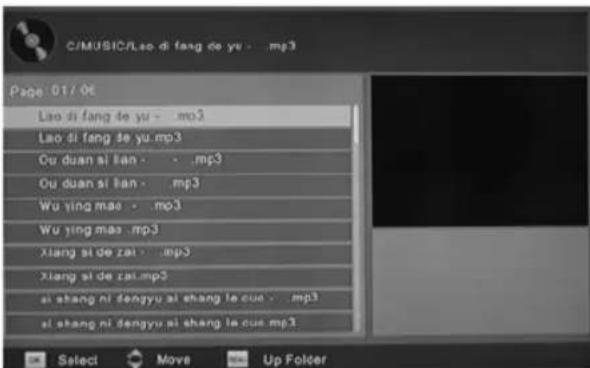
- [Music]: Press the OK button to select a music file. Player support format such as mp3, wma and so on.
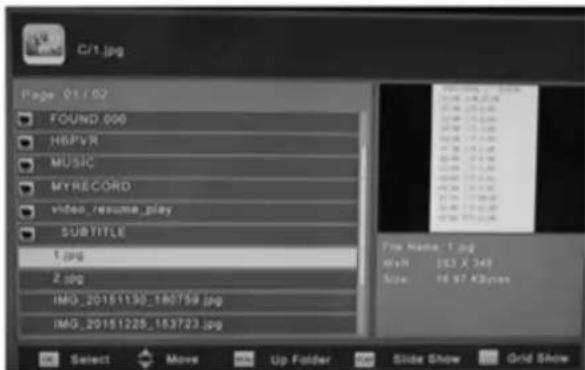
- [Photo]: Press the OK button to select a photo. Viewer support format such as jpg, bmp and so on.
- [Movie]: Press the OK button to select a movie file. Player support format such as mp4 3gp avi and so on.
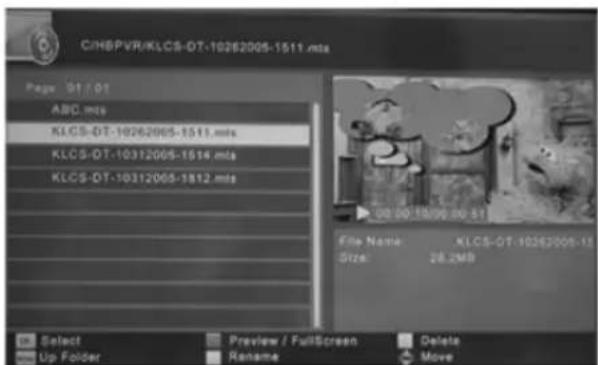
- [PVR]: Press the OK button to select a PVR file. Player only support format mts.
- [Ok] / [▶]: Press the OK/PLAY button to play music file.
- [<<] : Press the << button to play previous music file.
- [>>|] : Press the >> button to play next music file.
- [<<]: Press the F.RWD button to play backward. Its speed can be increased up to -2X, -4X, -8X, -16X, -32X.
- [>>] : Press the F.FWD button to play forward. Its speed can be increased up to 2X, 4X, 8X, 16X, 32X.
- [■]: Press the STOP button to stop playing music.
- [I]: Press the PAUSE button to pause music.
- [Ok]: Press the OK button to view a photo.
- [Slide Show]: Press the RED button to slide show photo.
- [Grid Show]: Press the BLUE button to grid show photo.
- [EXIT]: Press the EXIT button to exit.
- [Ok]/[▶]: Press the OK/PLAY button to play movie.
- [ |<<]: Press the |< button to play previous movie file.
- [>>]! : Press the >> button to play next movie file.
- [<<] : Press the F.RWD button to play backward. Its speed can be increased up to -2X, -4X, -8X, -16X, -32X.
- [>>] : Press the F.FWD button to play forward. Its speed can be increased up to 2X, 4X, 8X, 16X, 32X.
- [■]: Press the STOP button to stop playing movie.
- [ ]] : Press the PAUSE button to pause movie.
- [Preview/Full Screen]: Press the RED button to view the movie in preview or full screen mode.
- [Ok]/[▶]: Press the OK/PLAY button to play movie.
- [|<<]: Press the | button to play previous movie file.
- [ >>|]: Press the >> button to play next movie file.
- [<]: Press the F.RWD button to play backward. Its speed can be increased up to -2X, -4X, -8X, -16X, -32X.
-
[>>] : Press the F.FWD button to play forward. Its speed can be increased up to 2X, 4X, 8X, 16X, 32X.
-
[■]: Press the STOP button to stop playing movie.
- [ ]] : Press the PAUSE button to pause movie.
- [Preview/Full Screen]: Press the RED button to view the movie in preview or full screen mode.
- [Delete]: Press the YELLOW button to delete record file.
- [Rename]: Press the GREEN button to rename record file.
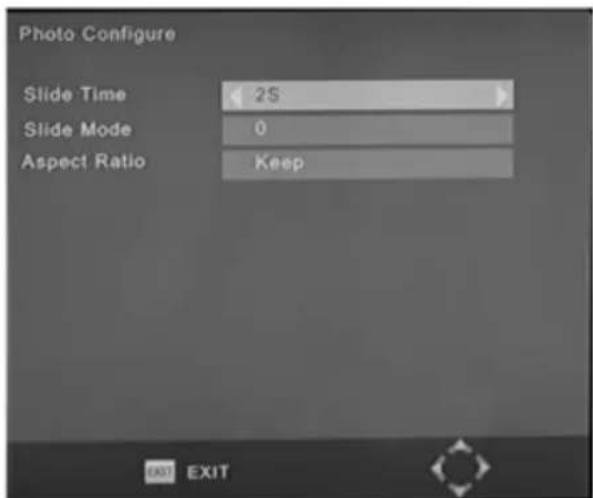
5.7.2 Photo Configure
- [Slide Time]: Press the / button to change the slide time.
- [Slide Mode]: Press the / button to change the slide mode.
- [Aspect Ratio]: Press the button to change aspect ratio in keep or discard.
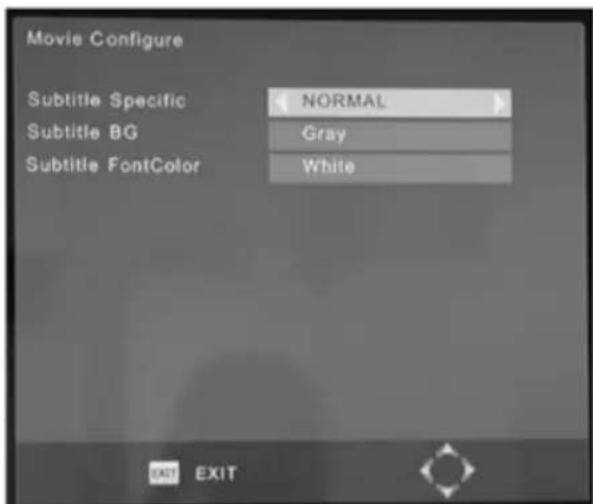
5.7 .3 Movie Configure
- [Subtitle Specific]: Press the / button to change subtitle size.
- [Subtitle BG]: Press the / button to change subtitle background.
- [Subtitle FontColor]: Press the / button to change subtitle font colour.
5.7 .3 PVR Configure
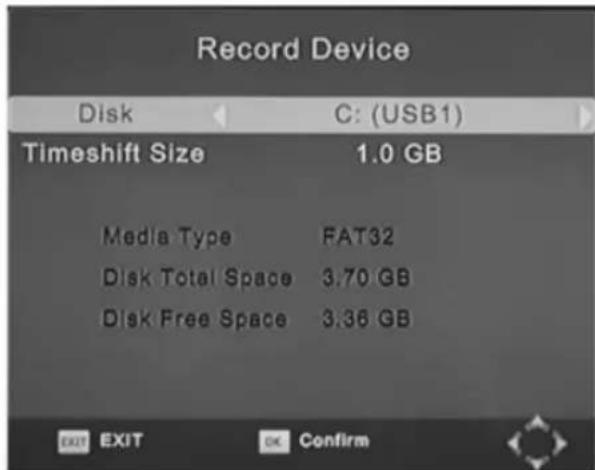
- [Record Device]: Press the OK button into record device window.
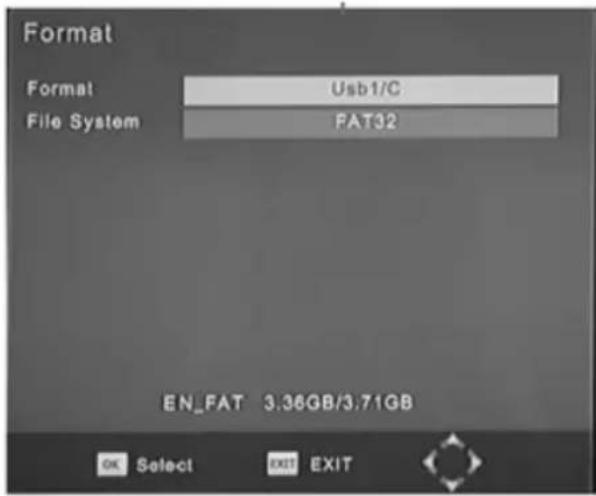
- [Format]: Press the OK button into format window.
- [Disk]: Press the button to select record device.
- [Timeshift Size]: Press the / button to change timeshift size.
- [Format]: Press the button to select format device.
- [File System]: Only support of file system FAT32.
- [OK]: Press the OK button to start format.
6. TV Viewing and Operation
In the TV viewing mode, you can do the following:
- [CH▲/CH▼]: Change the current TV programs.
- [VOL▲/VOL▶]: Adjust the TV volume.
- [0~9]: Press the number keys, enter the number of television programs to select the desired TV program.
- [REC]: Record the current program when you have inserted the USB storage device.
- [SUB-T]: Select TV subtitles.
- [AUDIO]: Select the TV program language.
- [OK]: Display a list of television programs.
- [FAV]: Enter the favourite program menu, select the favourite program which you want to watch.
- [INFO]: Press the button first to display the current TV program banner. If you press the button second before the banner disappear, it will to display the program information window.
7. Trouble shooting
There may be various reasons behind receiver problems. Check the receiver according to the procedures described below. If you can't solve your problem even after following the troubleshooting procedures, please contact the dealer. Do not open the receiver cover. It may cause a dangerous situation.
| The front panel doesn't display any message. | The power cord is not plugged in. Check that the power cable is plugged in to the wall outlet. | |
| No picture or sound. | Wrong connection of the Audio/Video output of the receiver to TV. | Connect the Audio/Video output of the receiver to TV correctly. |
| Wrong connection of the antenna. | Connect the antennal cable correctly. | |
| No or Bad signal message appears. | Check another device connected between Antenna and the receiver, or adjust the antenna position. | |
| Audio muting | Press the MUTE button | |
| TV Power | Turn TV on. | |
| No picture. | The receiver can't receive the signal. | Check the antenna cable, replace the cable, or connect the cable to the receiver tightly. |
| Incorrect values of some tuner parameters. | Set the values of tuner parameters correctly. Refer to the Installation menu. | |
| No or bad signal. | The UHF Antenna is not Pointing. Adjust the antenna. | |
| Signal too strong. | Connect the signal attenuator to the signal input. | |
| Antenna is too small. | Change to a larger antenna. | |
| The remote controller does not operate. | The batteries of the remote controller is not inserted or exhausted. | Check whether the batteries are inserted correctly in your remote controller. Check and replace the batteries of the remote controller. |
| Poor picture quality. Less channels in scanning. | Signal loss cable. Change the antenna | na power in Antenna menu. |
Avis
- RF: Branchez I' antennae.

5.7 .3 PVR Configurer
DECLARATION OF CONFORMITY
This device complies with Low Voltage Directive 2014/35/EC, Electromagnetic Compatibility Directive 2014/30/EU, Directive 2011/65/EU on the restriction of the use of certain hazardous substances in electrical and electronic equipment and Directive 2009/125/EC on the eco-design requirements applicable to energy-related products.

DECLARATION DE CONFORMITE
This symbol means that in case you wish to dispose of the product once its working life has ended, take it to an authorised waste agent for the selective collection of waste electrical and electronic equipment (WEEE)

Imported by:
Sanysan Appliances S.L, NIF: B98753056
C/ Barcas 2, 2
46002 Valencia, Spain
Product made in P.R.C. - Designed by
SOGO based on the European Quality
Standards
Customer Service: www.sogosat.com /
sogosat@sogosat.com/0034902222161