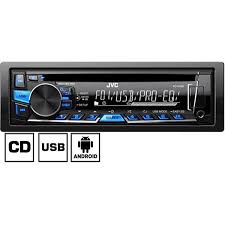
USER MANUAL KD-R462 JVC
INSTRUCTION MANUAL
JVCKENWOOD Corporation
Please read all instructions carefully before operation to obtain the best possible performance from the unit.
Information on Disposal of Old Electrical and Electronic Equipment and Batteries (applicable for countries that have adopted separate waste collection systems)
Products and batteries with the symbol (crossed-out wheeled bin) cannot be disposed as household waste.
Old electrical and electronic equipment and batteries should be recycled at a facility capable of handling these items and their waste byproducts.
Contact your local authority for details in locating a recycle facility nearest to you. Proper recycling and waste disposal will help conserve resources whilst preventing detrimental effects on our health and the environment.
Notice: The sign "Pb" below the symbol for batteries indicates that this battery contains lead.
Declaration of Conformity with regard to the EMC Directive 2004/108/EC
Declaration of Conformity with regard to the RoHS Directive 2011/65/EU
Manufacturer:
JVC KENWOOD Corporation
3-12, Moriya-cho, Kanagawa-ku, Yokohama-shi, Kanagawa, 221-0022, Japan
EU Representative's:
JVC Technical Services Europe GmbH
Konrad-Adenauer-Allee 1-11, D-61118 Bad Vilbel, Germany
CLASS 1 LASER PRODUCT
The marking of products using lasers
The label is attached to the chassis/case and says that the component uses laser beams that have been classified as Class 1. It means that the unit is utilizing laser beams that are of a weaker class. There is no danger of hazardous radiation outside the unit.
Do not operate any function that takes your attention away from safe driving.
Caution
Volume setting:
- Adjust the volume so that you can hear sounds outside the car to prevent accidents.
- Lower the volume before playing digital sources to avoid damaging the speakers by the sudden increase of the output level.
General:
- Avoid using the external device if it might hinder safe driving.
- Make sure all important data has been backed up. We shall bear no responsibility for any loss of recorded data.
- Never put or leave any metallic objects (such as coins or metal tools) inside the unit, to prevent a short circuit.
- If a disc error occurs due to condensation on the laser lens, eject the disc and wait for the moisture to evaporate.
Remote control (RM-RK52):
- Do not leave the remote control in hot places such as on the dashboard.
- The Lithium battery is in danger of explosion if replaced incorrectly. Replace it only with the same or equivalent type.
- The battery pack or batteries shall not be exposed to excessive heat such as sunshine, fire or the like.
- Keep the battery out of reach of children and in its original packaging when not in use. Dispose of used batteries promptly. If swallowed, contact a physician immediately.
How to read this manual
- Operations are explained mainly using buttons on the faceplate of KD-R461.
- English language is used for the display explanation in this manual.
- [XX] indicates the selected items.
- (⇔ XX) indicates references are available on the stated page.
Maintenance
Cleaning the unit: Wipe off dirt on the faceplate with a dry silicone or soft cloth.
Cleaning the connector: Detach the faceplate and clean the connector gently with a cotton swab, being careful not to damage the connector.
Handling discs:
- Do not touch the recording surface of the disc.
- Do not stick tape etc. on the disc, or use a disc with tape stuck on it.
- Do not use any accessories for the disc.
- Clean from the center of the disc and move outward.
- Clean the disc with a dry silicone or soft cloth. Do not use any solvents.
- When removing discs from this unit, pull them out horizontally.
- Remove burrs from the center hole and disc edge before inserting a disc.
Connector (on the reverse side of the faceplate)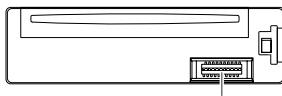
Faceplate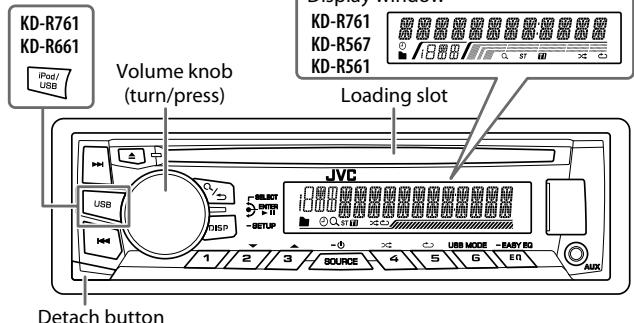
Attach
Detach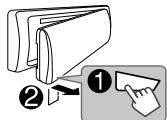
How to reset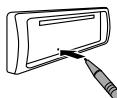
Your preset adjustments will also be erased.
Remote control (RM-RK52)
KD-R567 / KD-R467 can be remotely controlled with an optionally purchased remote control.
Remote sensor (Do not expose to bright sunlight.)
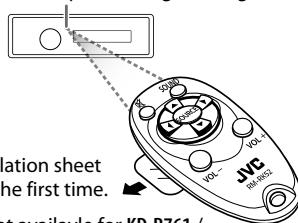
Pull out the insulation sheet when using for the first time.
Remote control functions are not available for KD-R761 / KD-R661 / KD-R561 / KD-R469 / KD-R464 / KD-R462 / KD-R461.
How to replace the battery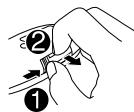
To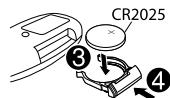
Turn on the power
Adjust the volume
Select a source
Change the display information
On the faceplate
Press SOURCE-
- Press and hold to turn off the power.
Turn the volume knob.
Press the volume knob to mute the sound or pause playback.
- Press again to cancel.
- Press SOURCE- repeatedly.
- Press SOURCE- ⊙, then turn the volume knob within 2 seconds.
- Press iPod / USB or USB to select iPod or USB source directly.
Press DISP-SETUP repeatedly. (⇔ 13)
On the remote control
Press VOL + or VOL -

to mute the sound or pause playback.
Press SOURCE repeatedly.
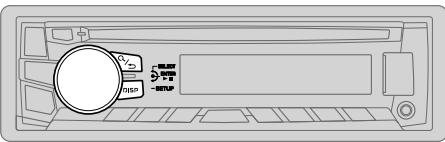

Cancel the demonstration
1 Press and hold DISP-SETUP. 2 Turn the volume knob to select [DEMO], then press the knob. 3 Turn the volume knob to select [DEMO OFF], then press the knob. 4 Press DISP-SETUP to exit.

Set the clock
1 Press and hold DISP-SETUP. 2 Turn the volume knob to select [CLOCK], then press the knob. 3 Turn the volume knob to select [CLOCK SET], then press the knob. 4 Turn the volume knob to make the settings, then press the knob. Day → Hour → Minute 5 Turn the volume knob to select [24H/ 12H], then press the knob. 6 Turn the volume knob to select [12 HOUR] or [24 HOUR], then press the knob. 7 Press DISP-SETUP to exit.
To return to the previous setting item, press Q → □.

Set the basic settings
1 Press and hold DISP-SETUP. 2 Turn the volume knob to make a selection (see the following table), then press the knob. 3 Repeat step 2 until the desired item is selected or activated. 4 Press DISP-SETUP to exit.
To return to the previous setting item, press Q/→.
Default: XX
| SETTINGS |
| BEEP | ON: Activates the keypress tone. ; OFF: Deactivates. |
| SRC SELECT |
| AM* | ON: Enables AM in source selection. ; OFF: Disables. |
| AUX* | BT ADAPTER: Selects when the KS-BTA100 Bluetooth adapter is connected to the AUX jack. (→9) ; ON: Enables AUX in source selection. ; OFF: Disables. |
| F/W UPDATE |
| SYSTEM |
| F/W xxxx | YES: Starts upgrading the firmware. ; NO: Cancels (upgrading is not activated). For details on how to update the firmware, see: <http://www.jvc.net/cs/car/>. |
| CLOCK |
| CLOCK SYNC | AUTO: The clock time is automatically set using the Clock Time (CT) data in FM Radio Data System signal. ; OFF: Cancels. |
| CLOCK DISP | ON: The clock time is shown on the display even when the unit is turned off. ; OFF: Cancels. |
| ENGLISH | Selected language is use as the display language for menu and Tag information (folder name, file name, song title, artist name, album name) if applicable. By default, the menu language is: KD-R761 / KD-R661 / KD-R561 / KD-R469 / KD-R464 / KD-R462 / KD-R461: ENGLISH KD-R567 / KD-R467: PUSCKK |
- Not displayed when the corresponding source is selected.
Start playback
The source changes automatically and playback starts.
CD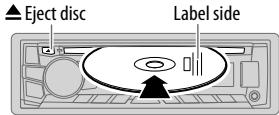
USB input terminal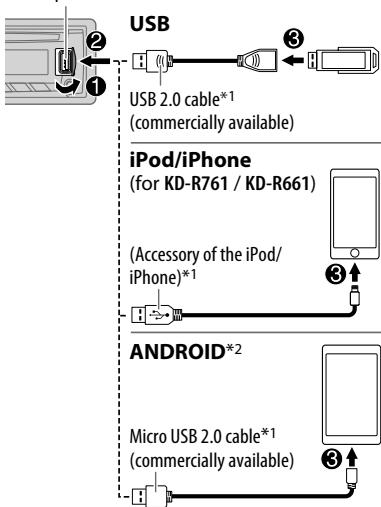
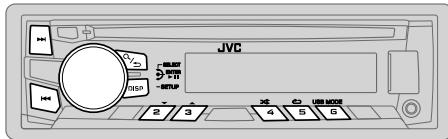
| To | On the faceplate | On the remote control |
| Reverse / Fast-forward*3 | Press and hold ↓/▶. | Press and hold ↓/▶. |
| Select a track/file | Press ↓/▶. | Press ↓/▶. |
| Select a folder*4 | Press 3 ▲/2 ▼. | Press ▲/▼. |
| Repeat play*5 | Press 5 ▷ repeatedly. |
| TRACK RPT/ RPT OFF | : Audio CD or JVC Playlist Creator (JPC) / JVC Music Control (JMC) file (→13) |
| TRACK RPT/ FOLDER RPT/ RPT OFF | : MP3/WMA/WAV file |
| ONE RPT/ ALL RPT/ RPT OFF | : iPod or ANDROID |
| Random play*5 | Press 4 ▶ repeatedly. |
| ALL RND/ RND OFF | : Audio CD |
| FOLDER RND/ ALL RND/ RND OFF | : MP3/WMA/WAV file or JPC / JMC file |
| SONG RND/ ALL RND/ RND OFF | : iPod or ANDROID |
1 Do not leave the cable inside the car when not using. 2 When connecting an Android device, "Press [VIEW] to install JVC MUSIC PLAY APP" is shown. Follow the instructions to install the application. You can also install the latest version of JVC MUSIC PLAY application on your Android device before connecting. (→ 13) 3 For ANDROID: Applicable only when [AUTO MODE] is selected. (→ 6) 4 For CD: Only for MP3/WMA files. This does not work for iPod/Android. *5 For iPod/ ANDROID: Applicable only when [HEAD MODE]/[AUTO MODE] is selected. (→ 6)
| To | On the faceplate |
| Select control mode | While in iPod source, press 6 USB MODE repeatedly.
HEAD MODE: Control from the unit.
IPHONE MODE: Control from the iPod/iPhone. However, you can still play/pause or file skip from the unit.
While inAndroid source, press 6 USB MODE repeatedly.
AUTO MODE: Control from the unit (using JVC MUSIC PLAY application).
AUDIO MODE: Control other media player applications from the Android device (without using JVC MUSIC PLAY application). However, you can still play/pause or file skip from the unit. |
| Select music drive | Press 6 USB MODE repeatedly.
The stored songs in the following start playback.
• Selected internal or external memory of a smartphone (Mass Storage Class).
• Selected drive of a multiple drives device. |
Change the playback speed of the Audiobook
(For KD-R761 / KD-R661)
While listening to the iPod and [HEAD MODE] is selected (⇒ Select control mode)...
1 Press and hold DISP-SETUP. 2 Turn the volume knob to select [IPOD], then press the knob. 3 Press the volume knob to select [AUDIOBOOKS]. 4 Turn the volume knob to make a selection, then press the knob. 0.5 × SPEED / 1 × SPEED / 2 × SPEED: Select the desired playback speed of the Audiobooks sound file in your iPod/iPhone. (Default: Depends on your iPod/iPhone setting.) 5 Press DISP-SETUP to exit.
To return to the previous setting item, press Q →.
Select a file from a folder/list
1 Press ⏏/⊃. 2 Turn the volume knob to select a folder/list, then press the knob. 3 Turn the volume knob to select a file, then press the knob.
Quick Search
If you have many files, you can search through them quickly. For MP3/WMA/WAV or JPC/JMC files: Turn the volume knob quickly.
For iPod:
You can search for a file according to the first character. Press 3 ▲/2▼ or turn the volume knob quickly to select the desired character (A to Z/0 to 9/Others).
- Select "OTHERS" if the first character is other than A to Z, 0 to 9.
To return to the previous setting item, press ⏏/⊃. To cancel, press and hold Q/. - For iPod, applicable only when [HEAD MODE] is selected. (→ Select control mode) - For ANDROID, applicable only when [AUTO MODE] is selected. (→ Select control mode)
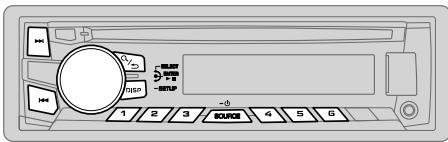
Supported band:
For KD-R761 / KD-R661 / KD-R561 / KD-R469 / KD-R464 / KD-R462 / KD-R461:
FM / AM
For KD-R567 / KD-R467:
FM/FM-LO/AM
"ST" lights up when receiving an FM stereo broadcast with sufficient signal strength.
Search for a station
1 Press SOURCE- repeatedly to select band. 2 Press ⎯⎯ (or press on RM-RK52) to search for a station automatically. (or)
Press and hold ⏎ / ▶ (or press and hold ◀ / ▶ on RM-RK52) until "M" flashes, then press repeatedly to search for a station manually.
Settings in memory
You can store up to 12 stations for FM, 6 stations for FM-LO and 6 stations for AM.
Store a station
While listening to a station...
Press and hold one of the number buttons (1 to 6). (or)
1 Press and hold the volume knob until "PRESET MODE" flashes. 2 Turn the volume knob to select a preset number, then press the knob.
The preset number flashes and "MEMORY" appears.
Select a stored station
Press one of the number buttons (1 to 6). (or)
1 Press Q/ 2 Turn the volume knob to select a preset number, then press the knob to confirm.
Other settings
1 Press and hold DISP-SETUP. 2 Turn the volume knob to select [TUNER], then press the knob. 3 Turn the volume knob to make a selection (⇄ 8), then press the knob. 4 Repeat step 3 until the desired item is selected/activated or follow the instructions stated on the selected item. 5 Press DISP-SETUP to exit.
To return to the previous setting item, press ℙ / →.
Default: XX
| RADIO TIMER | Turns on the radio at a specific time regardless of the current source.
1 ONCE/DAILY/ WEEKLY/OFF: Select how often the timer will be turned on.
2 Select the band. (→7)
3 Select the preset station.
For KD-R761 / KD-R661 / KD-R561 / KD-R469 / KD-R464 / KD-R462 / KD-R461:
01 to 18 (for FM)/ 01 to 06 (for AM)
For KD-R567 / KD-R467:
01 to 12 (for FM)/ 01 to 06 (for FM-LO/AM)
4 Set the activation day*1 and time.
“◇” lights up when complete.
Radio Timer will not activate for the following cases.
• The unit is turned off.
• [OFF] is selected for [AM] in [SRC SELECT] after Radio Timer for AM is selected. (→4) |
| SSM | (For KD-R761 / KD-R661 / KD-R561 / KD-R469 / KD-R464 / KD-R462 / KD-R461)
SSM 01 - 06 / SSM 07 - 12 / SSM 13 - 18:
Automatically resets up to 18 stations for FM.
“SSM” stops flashing when the first 6 stations are stored.
Select SSM 07 - 12 / SSM 13 - 18 to store the following 12 stations.
(For KD-R567 / KD-R467)
FM: SSM 01 - 06 / SSM 07 - 12; FM-LO: SSM 01 - 06:
Automatically preset up to 12 stations for FM and 6 stations for FM-LO.
“SSM” stops flashing when first 6 stations are stored.
Select SSM 07 - 12 to store the following 6 stations for FM. |
| LOCAL SEEK*2 | ON: Searches only stations with good reception. ; OFF: Cancels.
• Settings made are applicable only to the selected source/station. Once you change the source/station, you need to make the settings again. |
| IF BAND*2 | AUTO: Increases the tuner selectivity to reduce interference noises from adjacent FM/FM-LO stations. (Stereo effect may be lost.) ; WIDE: Subjects to interference noises from adjacent FM/FM-LO stations, but sound quality will not be degraded and the stereo effect will remain. |
| MONO*3 | ON: Improves the FM reception, but the stereo effect will be lost. ; OFF: Cancels. |
| NEWS-STBY*3 | ON: The unit will temporarily switch to News Programme if available. ; OFF: Cancels. |
| REGIONAL*3 | ON: Switches to another station only in the specific region using the “AF” control. ; OFF: Cancels. |
| AF SET*3 | ON: Automatically searches for another station broadcasting the same program in the same Radio Data System network with better reception when the current reception is poor. ; OFF: Cancels. |
| TI SET*3 | ON: Allows the unit to temporarily switch to Traffic Information if available (“TI” lights up). ; OFF: Cancels. |
| PTY SEARCH | Select a PTY code (see below). If there is a station broadcasting a program of the same PTY code as you have selected, that station is tuned in. |
PTY code: NEWS, AFFAIRS, INFO, SPORT, EDUCATE, DRAMA, CULTURE, SCIENCE, VARIED, POP M (music), ROCK M (music), EASY M (music), LIGHT M (music), CLASSICS, OTHER M (music), WEATHER, FINANCE, CHILDREN, SOCIAL, RELIGION, PHONE IN, TRAVEL, LEISURE, JAZZ, COUNTRY, NATION M (music), OLDIES, FOLK M (music), DOCUMENT
1 Selectable only when [ONCE] or [WEEKLY] is selected in step 1. 2 Only for FM/FM-LO source. *3 Only for FM source.
Use a portable audio player
1 Connect a portable audio player (commercially available).
3.5 mm stereo mini plug with "L" shaped connector
(commercially available)
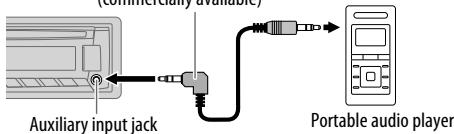
2 Select [ON] for [AUX] in [SRC SELECT]. (⇔ 4) 3 Press SOURCE- repeatedly to select AUX. 4 Turn on the portable audio player and start playback.

Use a 3-core plug head stereo mini plug for optimum audio output.
Use a Bluetooth® device
1 Connect the Bluetooth adapter, KS-BTA100 (separately purchased).
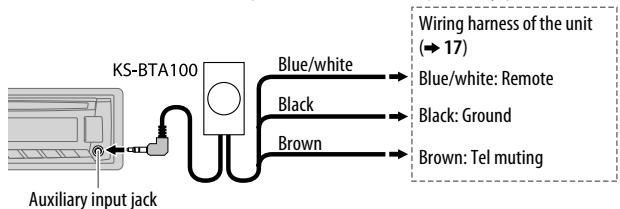
2 Register (pair) the Bluetooth device with KS-BTA100. 3 Select [BT ADAPTER] for [AUX] in [SRC SELECT]. (⇒ 4) 4 Press SOURCE- repeatedly to select BT AUDIO. 5 Start using the Bluetooth device.
For details, refer to the instruction manual of KS-BTA100.
AUDIO SETTINGS
| To | On the faceplate |
| Select a preset equalizer | Press EQ-EASY EQ repeatedly. |
| Press EQ-EASY EQ, then turn the volume knob within 2 seconds. Preset equalizer: FLAT (default), HARD ROCK, JAZZ, POP, R&B, TALK, USER1, USER2, VOCAL BOOST, BASS BOOST, CLASSICAL, DANCE |
| Store your own sound settings | 1 Press and hold EQ-EASY EQ.
2 Turn the volume knob to select [EASY EQ], then press the knob.
3 Turn the volume knob to select [USER1] or [USER2], then press the knob.
4 Turn the volume knob to make a selection, then press the knob. |
| SUB.W SP*1*2: 00 to +06 (Default: 03) |
| SUB.W*1*3: -08 to +08 00 |
| BASS LVL: -06 to +06 00 |
| MID LVL: -06 to +06 00 |
| TRE LVL: -06 to +06 00) |
| • To return to the previous setting item, press Q/¬D.
• To exit, press EQ-EASY EQ. |
1 Displayed only when [SUB.W] is set to [ON]. (→ 10) 2 Displayed only when [SPK/PRE OUT] is set to [SUB.W/SUB.W]. (→11) *3 Displayed only when [SPK/PRE OUT] is set to [REAR/SUB.W] or [SUB.W/SUB.W]. (→ 11)
Other settings
1 Press and hold DISP-SETUP. 2 Turn the volume knob to make a selection (⇔ 10), then press the knob. 3 Repeat step 2 until the desired item is selected/activated or follow the instructions stated on the selected item. 4 Press DISP-SETUP to exit.
To return to the previous setting item, press Q/→.
Default: XX
| EQ SETTING |
| EQ PRESET | FLAT / HARD ROCK / JAZZ / POP / R&B / TALK / USER1 / USER2 / VOCAL BOOST / BASS BOOST / CLASSICAL / DANCE: Selects a preset equalizer. |
| EASY EQ | 1 USER1/ USER2: Select a preset name. |
| 2 Adjust your own sound settings. |
| SUB.W SP*1*2: 00 to +06 (Default: 03) |
| SUB.W*1*3: -08 to +08 00 |
| BASS LVL: -06 to +06 00 |
| MID LVL: -06 to +06 00 |
| TRE LVL: -06 to +06 00) |
| PRO EQ | 1 USER1/ USER2: Select a preset name. |
| 2 BASS / MIDDLE / TREBLE: Select a sound tone. |
| 3 Adjust the sound elements of the selected sound tone. |
| BASS Frequency: 60/80/100/200 HZ (Default: 80 Hz) |
| Level: -06 to +06 00 |
| Q: Q1.0/Q1.25/Q1.5/Q2.0 01.0) |
| MIDDLE Frequency: 0.5/1.0/1.5/2.5 KHZ (Default: 1.0 KHZ) |
| Level: -06 to +06 00 |
| Q: Q0.75/Q1.0/Q1.25 01.25) |
| TREBLE Frequency: 10.0/12.5/15.0/17.5 KHZ (Default: 10.0 KHZ) |
| Level: -06 to +06 00 |
| Q: Q FIX 0 FIX) |
| AUDIO |
| BASS BOOST | +01/+02: Selects your preferred bass boost level.; OFF: Cancels. |
| LOUD | 01/02: Boosts low or high frequencies to produce a well-balanced sound at low volume.; OFF: Cancels. |
| SUB.W LEVEL*1 | SPK-OUT*2 | 00 to +06 (±03): Adjusts the output level of the subwoofer connected via speaker lead. (→ 17) |
| PRE-OUT*3 | -08 to +08 (00): Adjusts the output level of the subwoofer connected to the lineout terminals (REAR/ SW) through an external amplifier. (→ 17) |
| SUB.W*3 | ON / OFF: Turns on or off the subwoofer output. |
| SUB.W LPF*1 | THROUGH: All signals are sent to the subwoofer. ; LOW 55HZ / MID 85HZ / HIGH 120HZ: Audio signals with frequencies lower than 55 Hz/ 85 Hz/ 120 Hz are sent to the subwoofer. |
| SUB.W PHASE*1 | REVERSE (180°)/ NORMAL (0°): Selects the phase of the subwoofer output to be in line with the speaker output for optimum performance. (Selectable only if a setting other than [THROUGH] is selected for [SUB.W LPF].) |
| FADER | R06 — F06 (00): Adjusts the front and rear speaker output balance. |
| BALANCE*4 | L06 — R06 (00): Adjusts the left and right speaker output balance. |
| VOL ADJUST | -05 — +05 (00): Presets the volume adjustment level of each source (compared to the FM volume level). Before adjustment, select the source you want to adjust. ("VOL ADJ FIX" appears if FM is selected.) |
| AMP GAIN | LOW POWER: Limits the maximum volume level to 30. (Select if the maximum power of each speaker is less than 50 W to prevent damaging the speakers.) ; HIGH POWER: The maximum volume level is 50. |
1 Displayed only when [SUB.W] is set to [ON]. 2 Displayed only when [SPK/PRE OUT] is set to [SUB.W/SUB.W]. (→ 11) 3 Displayed only when [SPK/PRE OUT] is set to [REAR/SUB.W] or [SUB.W/SUB.W]. (→ 11) 4 This adjustment will not affect the subwoofer output.
AUDIO SETTINGS
| D.T.exp
(Digital Track Expander) | ON: Creates realistic sound by compensating the high-frequency components and restoring the rise-time of the waveform that are lost in audio data compression. ; OFF: Cancels. |
| TEL MUTING*5 | ON: Mutes the sounds while using the cellular phone (not connected through KS-BTA100). ; OFF: Cancels. |
| SPK/PRE OUT | Selects the appropriate setting to get the desired output. |
*5 Does not work if [BT ADAPTER] is selected for [AUX] in [SRC SELECT]. (→ 4)
SPK/PRE OUT
Connection via lineup terminals (→ 17)
| Setting | Lineout terminal |
| FRONT(for KD-R761 / KD-R661) | REAR/SW |
| REAR/REAR | Front speakers output | Rear speakers output |
| REAR/SUB.W | Front speakers output | Subwoofer output |
| SUB.W/SUB.W | Front speakers output | Subwoofer output |
Connection via speaker leads (⇔ 17)
| Setting | Rear speaker lead |
| L (left) | R (right) |
| REAR/REAR | Rear speakers output | Rear speakers output |
| REAR/SUB.W | Rear speakers output | Rear speakers output |
| SUB.W/SUB.W | Subwoofer output | (Mute) |
If [SUB.W/SUB.W] is selected: - [HIGH 120HZ] is selected in [SUB.W LPF] and [THROUGH] is not available. - [R01] is selected in [FADER] and selectable range is [R06] to [00]
DISPLAY SETTINGS
KD-R761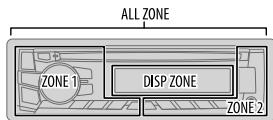
KD-R567 / KD-R561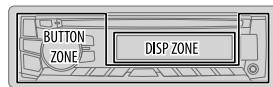
KD-R661/KD-R469/KD-R467/KD-R464/KD-R462/KD-R461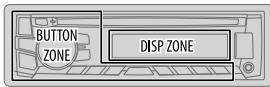
1 Press and hold DISP-SETUP. 2 Turn the volume knob to make a selection (see the following table), then press the knob. 3 Repeat step 2 until the desired item is selected/activated or follow the instructions stated on the selected item. 4 Press DISP-SETUP to exit.
To return to the previous setting item, press Q →.
Default: XX
| DISPLAY |
| DIMMER | Selects the display and button illumination adjusted in the [BRIGHTNESS] setting.
OFF: Selects the day adjustments. ; ON: Selects the night adjustments. ; DIMMER TIME: Adjusts the dimmer on and off time.
Turn the volume knob to adjust the [ON] time, then press the knob.
Turn the volume knob to adjust the [OFF] time, then press the knob.
(Default: [ON]: 18:00 or 6:00 PM
[OFF]: 6:00 or 6:00 AM)
AUTO: Changes between the day and night adjustments when you turn off or on the car headlights. *1
For KD-R761 / KD-R567 / KD-R561 / KD-R469, the display and button colors change according to the settings made on [COLOR]. |
*1 The illumination control wire connection is required. (→ 17)
DISPLAY SETTINGS
| BRIGHTNESS | Sets the button, display and USB input terminal brightness for day and night separately.
1 DAY/NIGHT: Select day or night.
2Select a zone for setting. (↔11)
3Set the brightness level (00 to 31).
(Default: KD-R761: DAY: 31; NIGHT: 11
Other models: BUTTON ZONE: DAY: 25; NIGHT: 09
DISP ZONE: DAY: 31; NIGHT: 12) |
| SCROLL*2 | ONCE: Scrolls the display information once.; AUTO: Repeats scrolling at 5-second intervals.; OFF: Cancels. |
| COLOR (for KD-R761) |
| PRESET | You can select a color for [ALL ZONE], [ZONE 1], [DISP ZONE], or [ZONE 2] separately. For [ALL ZONE], you can also select a color pattern.
Default color:
ALL ZONE: [COLOR 06], ZONE 1: [COLOR 06],
DISP ZONE: [COLOR 01], ZONE 2: [COLOR 27]
1 Select a zone for setting. (↔11)
2 Select a color for the selected zone.
• COLOR 01 to COLOR 29
• USER: The color you have created for [DAY COLOR] or [NIGHT COLOR] is shown.
• COLOR FLOW01 to COLOR FLOW03: Color changes at different speeds.
• GROOVE/ TECHNO/ EMOTION/ RELAX/ SPECTRUM/ SWEEP/POP: The selected color pattern is shown.*3 (Selectable only when [ALL ZONE] is selected in step 1.) |
| DAY COLOR | Store your own day and night colors for different zone.
1 Select a zone for setting. (↔11)
2 RED / GREEN / BLUE: Select a primary color.
3 00 to 31: Select the level. |
| NIGHT COLOR | Repeat steps 2 and 3 for all the primary colors.
• Your setting is stored to [USER] in [PRESET].
• If [00] is selected for all primary colors for [DISP ZONE], nothing appears on the display. |
| COLOR GUIDE | ON: Changes the button, display, USB input terminal and auxiliary input jack illumination when settings are performed on menu and list search. Display zone will automatically change depending on volume level. ; OFF: Cancels. |
| COLOR (for KD-R567 / KD-R561) |
| PRESET | Select a color for [BUTTON ZONE]. Default: [COLOR 06] · COLOR 01 to COLOR 29 · USER: The color you have created for [DAY COLOR] or [NIGHT COLOR] is shown. · COLOR FLOW01 to COLOR FLOW03: Color changes at different speeds. |
| DAY COLOR | Store your own day and night colors. 1 RED / GREEN / BLUE: Select a primary color. 2 00 to 31: Select the level. |
| NIGHT COLOR | Repeat steps 1 and 2 for all the primary colors. · Your setting is stored to [USER] in [COLOR]. |
| MENU COLOR | ON: Changes the button illumination to white color when settings are performed on menu and list search. ; OFF: Cancels. |
| COLOR (for KD-R469) |
| KEY ILLUMI | RED / GREEN: Selects the button illumination color. |
[NIGHT COLOR] or [DAY COLOR] is changed by turning on or off your car's headlight.
2 Some characters or symbols will not be shown correctly (or will be blanked). 3 If one of these color patterns is selected, the [ZONE 1], [DISP ZONE], [ZONE 2] illumination color will change to the default color.
About discs and audio files

- This unit can only play the following CDs:
- This unit can play back multi-session discs; however, unclosed sessions will be skipped during playback.
- Unplayable discs:
- Discs that are not round.
- Discs with coloring on the recording surface or discs that are dirty.
- Recordable/ReWritable discs that have not been finalized.
- 8 cm CD. Attempting to insert using an adapter may cause malfunction.
- DualDisc playback: The Non-DVD side of a "DualDisc" does not comply with the "Compact Disc Digital Audio" standard. Therefore, the use of Non-DVD side of a DualDisc on this product cannot be recommended.
- Playable files:
- File extensions: MP3 (.mp3), WMA (.wma)
- Bit rate: MP3: 8 kbps — 320 kbps WMA: 32 kbps — 192 kbps
- Sampling frequency: MP3: 48 kHz, 44.1 kHz, 32 kHz, 24 kHz, 22.05 kHz, 16 kHz, 12 kHz, 11.025 kHz, 8 kHz WMA: 8 kHz — 48 kHz
- Variable bit rate (VBR) files. Maximum number of characters for file/folder name: It depends on the disc format used (includes 4 extension characters - .mp3 or .wma)
- ISO 9660 Level 1 and 2: 32 characters
- Romeo: 32 characters
- Joliet: 32 characters
- Windows long file name: 32 characters
About USB devices
- This unit can play MP3/WMA/WAV files stored on a USB mass storage class device.
- You cannot connect a USB device via a USB hub.
- Connecting a cable whose total length is longer than 5 m may result in abnormal playback. The maximum number of characters for:
- Folder names: 64 characters
- File names: 64 characters
- MP3 Tag: 64 characters WMA Tag: 64 characters WAV Tag: 64 characters
- This unit can recognize a total of 20,480 files, 999 folders (999 files per folder including folders without unsupported files), and 8 hierarchies.
- This unit cannot recognize a USB device whose rating is other than 5V and exceeds 1A.
About iPod/iPhone
Made for
- iPod touch (2nd, 3rd, 4th, and 5th generation)
- iPod classic
- iPod nano (3rd, 4th, 5th, 6th, and 7th generation)
- iPhone 3G, 3GS, 4, 4S, 5, 5S, 5C
- It is not possible to browse video files on the "Videos" menu in [HEAD MODE].
- The song order displayed on the selection menu of this unit may differ from that of the iPod/iPhone.
- If some operations are not performed correctly or as intended, visit: http://www.jvc.net/cs/car/ .
About Android device
- This unit supports Android OS 4.1 and above.
- Some Android devices (with OS 4.1 and above) may not fully support Android Open Accessory (A0A) 2.0.
- If the Android device supports both mass storage class device and A0A 2.0, this unit always playback via A0A 2.0 as priority.
- For more information and the latest compatible list, see: http://www.jvc.net/cs/car/ .
About JVC Playlist Creator and JVC Music Control
- This unit supports the PC application JVC Playlist Creator and Android™ application JVC Music Control.
- When you play audio file with song data added using the JVC Playlist Creator or JVC Music Control, you can search for audio file by Genres, Artists, Albums, Playlists, and Songs.
- JVC Playlist Creator and JVC Music Control are available from the following web site: http://www.jvc.net/cs/car/ .
Press DISP-SETUP repeatedly.
| FM or AM | Station name (PS)*1 → Frequency → Program type (PTY)*1*2 → Title*1*2 → Day/Clock → (back to the beginning) *1 For FM Radio Data System stations only. *2 If unavailable, "NO PTY" / "NO TEXT" appears. |
| CD or USB | Playing time → Day/Clock → Disc name*3 → Album title/ Artist*4 → Track title*5 → Folder/file name*6 → (back to the beginning) *3 Only for CD-DA: If not recorded, "NO NAME" appears. *4 Only for MP3/WMA/WAV files: If not recorded, "NO NAME" appears. *5 If not recorded, "NO NAME" appears. *6 Only for MP3/WMA/WAV files. |
| USB-IPOD | Playing time → Day/Clock → Album title/Artist*7 → Track title*7 → (back to the beginning) *7 If not recorded, "NO NAME" appears. |
| USB- ANDROID | AUX ← Day/Clock |
| BT AUDIO | BT AUDIO ← Day/Clock |
TROUBLESHOOTING
| Symptom | Remedy |
| General | Sound cannot be heard. | ·Adjust the volume to the optimum level.
·Check the cords and connections. |
| "MISWIRING CHECK
WIRING THEN PWR ON" appears. | Turn the power off, then check to be sure the terminals of the speaker wires are insulated properly. Turn the power on again. |
| "PROTECTING SEND
SERVICE" appears. | Send the unit to the nearest service center. |
| Source cannot be selected. | Check the [SRC SELECT] setting. (→4) |
| Radio | ·Radio reception is poor.
·Static noise while listening to the radio. | ·Connect the antenna firmly.
·Pull the antenna out all the way. |
| CD/USB/iPod | Disc cannot be ejected. | Press and hold▲to forcibly eject the disc. Be careful not to drop the disc when it is ejected. |
| "IN DISC" appears. | Make sure nothing is blocking the loading slot when you eject the disc. |
| "PLEASE" and "EJECT" appear alternately. | Press▲, then insert the disc correctly. |
| Playback order is not as intended. | The playback order is determined by the file name (USB) or the order in which files were recorded (disc). |
| Elapsed playing time is not correct. | This depends on the recording process earlier. |
| "Not SUPPORT" appears and track skips. | Check whether the track is a playable format. (→13) |
| "READING" keeps flashing. | ·Do not use too many hierarchical levels and folders.
·Reload the disc or reattach the USB device. |
| "CANNOT PLAY" flashes and/or connected device cannot be detected. | ·Check whether the connected device is compatible with this unit and ensure the files are in supported formats. (→13)
·Reattach the device. |
| The iPod/iPhone does not turn on or does not work. | ·Check the connection between this unit and iPod/iPhone.
·Detach and reset the iPod/iPhone using hard reset. |
| Correct characters are not displayed. | This unit can only display uppercase letters, numbers, and a limited number of symbols. Uppercase Cyrillic letters can also be displayed if [РУСКИ] is selected. (→4) |
| Symptom | Remedy |
| ANDROID | ·Sound cannot be heard during playback.
·Sound output only from the Android device. | ·Reconnect the Android device.
·If in [AUDIO MODE], launch any media player application on the Android device and start playback.
·If in [AUDIO MODE], relaunch the current media player application or use another media player application.
·Restart the Android device.
·If this does not solve the problem, the connected Android device is unable to route the audio signal to unit. (⇒ 13) |
| Cannot playback at [AUTO MODE]. | ·Make sure JVC MUSIC PLAY APP is installed on the Android device. (⇒ 5)
·Reconnect the Android device and select the appropriate control mode. (⇒ 6)
·If this does not solve the problem, the connected Android device does not support [AUTO MODE]. (⇒ 13) |
| “NO DEVICE” or “READING” keeps flashing. | ·Switch off the developer options on the Android device.
·Reconnect the Android device.
·If this does not solve the problem, the connected Android device does not support [AUTO MODE]. (⇒ 13) |
| Playback is intermittent or sound skips. | Turn off the power saving mode on the Android device. |
| “CANNOT PLAY” | ·Make sure Android device contains playable audio files.
·Reconnect the Android device.
·Restart the Android device. |
| If you still have troubles, reset the unit. (→3) |
| Available Cyrillic letters
Available characters
Display indications
A B B Γ έ έ έ έ έ έ έ έ έ έ έ έ έ έ έ έ έ έ έ έ έ έ έ έ έ έ έ έ έ έ έ έ έ έ έ έ έ έ έ έ έ έ έ έ έ έ έ έ έ έ ο έ έ έ έ έ έ έ έ έ έ έ έ έ έ έ έ έ έ έ έ έ έ έ έ έ έ έ έ έ έ έ έ έ έ έ έ έ έ έ έ έ έ έ έ έ έ έ έ έ Ε | |
| C T U Φ X U Y U L U U U U U U U U U U U U U U U U U U U U U U U U U U U U U U U U U U U U U U U U U U U U U U U U U U U U U U U U U U U U U U U U U U U U U U U U U U U U U U U U U U U U U U U U U U U U U U U U U U U UU U U U U U U U U U U U U U U U U U U U U U U U U U U U U U U U U U U U U U U U U U U U U U U U U U U U U U U U U U U U U U U U U U U U U U U U U U U U U U U U U U U U U U U U U U U U U U U U U U U U/U U U U U U U U U U U U U U U U U U U U U U U U U U U U U U U U U U U U U U U U U U U U U U U U U U U U U U U U U U U U U U U U U U U U U U U U U U U U U U U U U U U U U U U U U U U U U U U U U U U UUUUUUUUUUUUUUUUUUUUUUUUUUUUUUUUUUUUUUUUUUUUUUUUUUUUUUUUUUUUUUUUUUUUUUUUUUUUUUUUUUUUUUUUUUUUUUUUUUUUUUUUUUUUUUUUUUUUUUUUUUUUUUUUUUUUUUUUUUUUUUUUUUUUUUUUUUUUUUUUUUUUUUUUUUUUUUUUUUUUUUUUUUUUUUUUUUUUUUUUUuuUUUUUUUUUUUUUUUUUUUUUUUUUUUUUUUUUUUUUUUUUUUUUUUUUUUUUUUUUUUUUUUUUUUUUUUUUUUUUUUUUUUUUUUUUUUUUUUUUUUUUUUUUUUUUUUUUUUUUUUUUUUUUUUUUUUUUUUUUUUUUUUUUUUUUUUUUUUUUUUUUUUUUUUUUUUUUUUUUUUUUUUUUUUUUUUUUUUUUU uuUUuuuuuuuuuuuuuuuuuuuuuuuuuuuuuuuuuuuuuuuuuuuuuuuuuuuuuuuuuuuuuuuuuuuuuuuuuuuuuuuuuuuuuuuuuuuuuuuuuuuuuuuuuuuuuuuuuuuuuuuuuuuuuuuuuuuuuuuuuuuuuuuuuuuuuuuuuuuuuuuuuuuuuuuuuuuuuuuuuuuuuuuuuuuuuuuuuuuuuuuuUUUUUUUUUUUUUUUUUUUUUUUUUUUUUUUUUUUUUUUUUUUUUUUUUUUUUUUUUUUUUUUUUUUUUUUUUUUUUUUUUUUUUUUUUUUUUUUUUUUUUUUUUUUUUUUUUUUUUUUUUUUUUUUUUUUUUUUUUUUUUUUUUUUUUUUUUUUUUUUUUUUUUUUUUUUUUUUUUUUUUUUUUUUUUUUUUUUUuuuuuuuuuuuuuuuuuuuuuuuuuuuuuuuuuuuuuuuuuuuuuuuuuuuuuuuuuuuuuuuuuuuuuuuuuuuuuuuuuuuuuuuuuuuuuuuuuuuuuuuuuuuuuuuuuuuuuuuuuuuuuuuuuuuuuuuuuuuuuuuuuuuuuuuuuuuuuuuuuuuuuuuuuuuuuuuuuuuuuuuuuuuuuuuuuuuuUUuuuuuuuuuuuuuuuuuuuuuuuuuuuuuuuuuuuuuuuuuuuuuuuuuuuuuuuuuuuuuuuuuuuuuuuuuuuuuuuuuuuuuuuuuuuuuuuuuuuuuuuuuuuuuuuuuuuuuuuuuuuuuuuuuuuuuuuuuuuuuuuuuuuuuuuuuuuuuuuuuuuuuuuuuuuuuuuuuuuuuuuuuuuuuuuuuuuu uuuuuuuuuuuuuuuuuuuuuuuuuuuuuuuuuuuuuuuuuuuuuuuuuuuuuuuuuuuuuuuuuuuuuuuuuuuuuuuuuuuuuuuuuuuuuuuuuuuuuuuuuuuuuuuuuuuuuuuuuuuuuuuuuuuuuuuuuuuuuuuuuuuuuuuuuuuuuuuuuuuuuuuuuuuuuuuuuuuuuuuuuuuuuuuuuuuuuuuu uu uu uu uu uu uu uu uu uu uu uu uu uu uu uu uu uu uu uu uu uu uu uu uu uu uu uu uu uu uu uu uu uu uu uu uu uu uu uu uu uu uu uu uu uu uu uu uu uu uu uu uu uu uu uu uu uu uu uu uu uu uu uu uu uu uu uu uu uu uu uu uu uu uu uu uu uu uu uu uu uu uu uu uu uu uu uu uu uu uu uu uu uu uu uu uu uu uu uu uu BB BB BB BB BB BB BB BB BB BB BB BB BB BB BB BB BB BB BB BB BB BB BB BB BB BB BB BB BB BB BB BB BB BB BB BB BB BB BB BB BB BB BB BB BB BB BB BB BB BB BB BB BB BB BB BB BB BB BB BB BB BB BB BB BB BB BB BB BB BB BB BB BB BB BB BB BB BB BB BB BB BB BB BB BB BB BB BB BB BB BB BB BB BB BB BB BB BB BB BBBB BB BB BB BB BB BB BB BB BB BB BB BB BB BB BB BB BB BB BB BB BB BB BB BB BB BB BB BB BB BB BB BB BB BB BB BB BB BB BB BB BB BB BB BB BB BB BB BB BB BB BB BB BB BB BB BB BB BB BB BB BB BB BB BB BB BB BB BB BB BB BB BB BB BB BB BB BB BB BB BB BB BB BB BB BB BB BB BB BB BB BB BB BB BB BB BB BB BB BB bb BB BB BB BB BB BB BB BB BB BB BB BB BB BB BB BB BB BB BB BB BB BB BB BB BB BB BB BB BB BB BB BB BB BB BB BB BB BB BB BB BB BB BB BB BB BB BB BB BB BB BB BB BB BB BB BB BB BB BB BB BB BB BB BB BB BB BB BB BB BB BB BB BB BB BB BB BB BB BB BB BB BB BB BB BB BB BB BB BB BB BB BB BB BB BB BB BB BB BBbb BB BB BB BB BB BB BB BB BB BB BB BB BB BB BB BB BB BB BB BB BB BB BB BB BB BB BB BB BB BB BB BB BB BB BB BB BB BB BB BB BB BB BB BB BB BB BB BB BB BB BB BB BB BB BB BB BB BB BB BB BB BB BB BB BB BB BB BB BB BB BB BB BB BB BB BB BB BB BB BB BB BB BB BB BB BB BB BB BB BB BB BB BB BB BB BB BB BB BB(bb) | |
SPECIFICATIONS
| Tuner | FM Frequency Range | KD-R761 / KD-R661 / KD-R561 / KD-R469 / KD-R464 / KD-R462 / KD-R461:
FM 87.5 MHz — 108.0 MHz (50 kHz step)
KD-R567 / KD-R467:
FM 87.5 MHz — 108.0 MHz (50 kHz step)
FM-LO 65.0 MHz — 74.0 MHz (30 kHz step) |
| Usable Sensitivity (S/N = 26 dB) | 0.71 μV/75 Ω |
| Quieting Sensitivity
(DIN S/N = 46 dB) | 2.0 μV/75 Ω |
| Frequency Response (±3 dB) | 30 Hz — 15 kHz |
| Signal-to-Noise Ratio (MONO) | 64 dB |
| Stereo Separation (1 kHz) | FM 40 dB |
| AM | Frequency Range | MW 531 kHz — 1611 kHz (9 kHz step)
LW 153 kHz — 279 kHz (9 kHz step) |
| Usable Sensitivity (S/N = 20 dB) | MW 28.2 μV
LW 50 μV |
| CD player | Laser Diode | GaAlAs |
| Digital Filter | 8 times over sampling |
| Spindle Speed | 500 rpm — 200 rpm (CLV) |
| Wow & Flutter | Below measurable limit |
| Frequency Response (±1 dB) | 20 Hz — 20 kHz |
| Total Harmonic Distortion (1 kHz) | 0.01 % |
| Signal-to-Noise Ratio (1 kHz) | 105 dB |
| Dynamic Range | 90 dB |
| Channel Separation | 85 dB |
| MP3 Decode | Compliant with MPEG-1/2 Audio Layer-3 |
| WMA Decode | Compliant with Windows Media Audio |
| USB | USB Standard | USB 1.1, USB 2.0 (Full speed) |
| Compatible Devices | Mass storage class |
| File System | FAT12/ 16/ 32 |
| Maximum Supply Current | DC 5 V --- 1 A |
| MP3 Decode | Compliant with MPEG-1/2 Audio Layer-3 |
| WMA Decode | Compliant with Windows Media Audio |
| WAV Decode | Linear-PCM |
| Auxiliary | Frequency Response (±3 dB) | 20 Hz — 20 kHz |
| Input Maximum Voltage | 1 000 mV |
| Input Impedance | 30 kΩ |
| Audio | Maximum Output Power | 50 W × 4 or
50 W × 2 + 50 W × 1 (Subwoofer = 4 Ω) |
| Full Bandwidth Power
(at less than 1 % THD) | 22 W × 4 |
| Speaker Impedance | 4 Ω — 8 Ω |
| Preout Level/Load (CD/USB) | 2 500 mV/10 kΩ |
| Preout Impedance | ≤ 600 Ω |
| General | Operating Voltage | 14.4 V (10.5 V — 16 V allowable) |
| Maximum Current Consumption | 10 A |
| Operating Temperature Range | 0°C to +40°C |
| Installation Size (W × H × D) | 182 mm × 53 mm × 158 mm |
| Weight | 1.2 kg |
Subject to change without notice.
Warning
- The unit can only be used with a 12 VDC power supply, negative ground.
- Disconnect the battery's negative terminal before wiring and mounting.
- Do not connect Battery wire (yellow) and Ignition wire (red) to the car chassis or Ground wire (black) to prevent a short circuit.
- Insulate unconnected wires with vinyl tape to prevent a short circuit.
- Be sure to ground this unit to the car's chassis again after installation.
Caution
- For safety's sake, leave wiring and mounting to professionals. Consult the car audio dealer.
- Install this unit in the console of your vehicle. Do not touch the metal parts of this unit during and shortly after use of the unit. Metal parts such as the heat sink and enclosure become hot.
- Do not connect the speaker wires to the car chassis or Ground wire (black), or connect them in parallel.
- Connect speakers with a maximum power of more than 50 W. If the maximum power of the speakers is lower than 50 W, change the [AMP GAIN] setting to avoid damaging the speakers. (=> 10)
- Mount the unit at an angle of less than 30 degrees.
- If your vehicle wiring harness does not have the ignition terminal, connect Ignition wire (red) to the terminal on the vehicle's fuse box which provides 12 V DC power supply and is turned on and off by the ignition key.
- Keep all cables away from heat dissipating metal parts.
- After the unit is installed, check whether the brake lamps, blinkers, wipers, etc. on the car are working properly.
- If the fuse blows, first make sure the wires are not touching the car's chassis, then replace the old fuse with one that has the same rating.
Basic procedure
1 Remove the key from the ignition switch, then disconnect the negative terminal of the car battery. 2 Connect the wires properly. See Wiring connection. (⇔ 17) 3 Install the unit to your car. See Installing the unit (in-dash mounting). 4 Connect the negative terminal of the car battery. 5 Reset the unit. (⇒ 3)
Installing the unit (in-dash mounting)

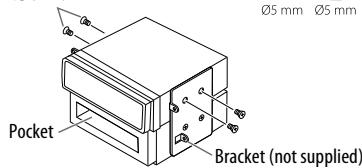
When installing without the mounting sleeve
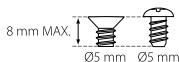
Use only the specified screws. Using wrong screws might damage the unit.
Flat or round head screws (not supplied)
Ø5 × 8 mm
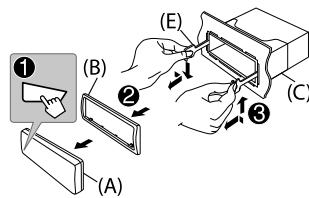
How to remove the unit
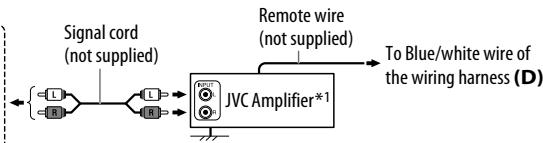
Wiring connection
KD-R761 / KD-R661


Rear/subwoofer output
Other models


Rear/subwoofer output
Fuse (10 A)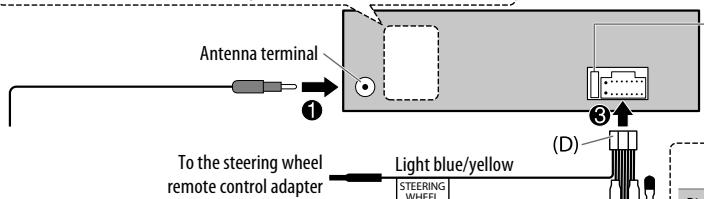
ISO connector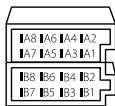
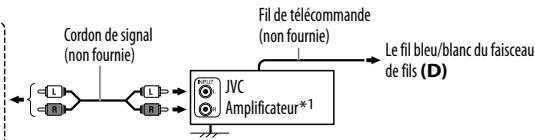
*1 Firmly connect the ground wire of the amplifier to the car's chassis to avoid damaging the unit.
Part list for installation
(A) Faceplate
(×1)
(B) Trim plate
(×1)
(C) Mounting sleeve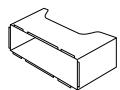
(×1)
(D) Wiring harness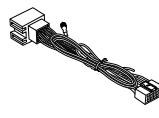
(×1)
(E) Extraction key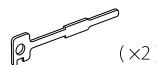
For some VW/Audi or Opel (Vauxhall) automobiles
You may need to modify the wiring of the supplied power cord (D) as illustrated. If the unit does not turn on with modified wiring 1, use modified wiring 2 instead.
Y:Yellow
R: Red
Original wiring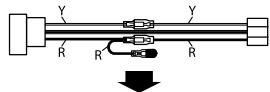
Modified wiring 1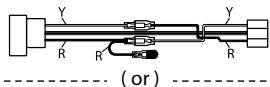
Modified wiring 2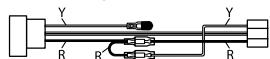
If your car does NOT have an ISO terminal *2 Custom wiring harness (separately purchased)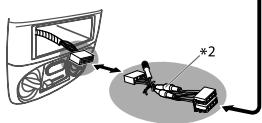
IMPORTANT: A custom wiring harness (separately purchased) which is suitable for your car is recommended for connection.
| Pin | Color and function |
| A2 | Brown | : Mobile phone system |
| A4 | Yellow | : Battery |
| A5 | Blue/White | : Power control |
| A6 | Orange/white | : Car light control switch |
| A7 | Red | : Ignition (ACC) |
| A8 | Black | : Earth (ground) connection |
| B1 | Purple ⊕ | |
| B2 | Purple/black ⊢ | : Rear speaker (right) |
| B3 | Gray ⊕ | |
| B4 | Gray/black ⊙ | : Front speaker (right) |
| B5 | White ⊕ | |
| B6 | White/black ⊙ | : Front speaker (left) |
| B7 | Green ⊕ | |
| B8 | Green/black ⊙ | : Rear speaker (left)*3 |
*3 You can also connect a subwoofer speaker directly without an external subwoofer amplifier. For setting, see 11.
TABLE OF CONTENTS
| AVANT L'UTILISATION | 2 |
| FONCTIONNEMENT DE BASE | 3 |
| PRISE EN MAIN | 4 |
| CD / USB / iPod / ANDROID | 5 |
| RADIO | 7 |
| AUX | 9 |
| RéGLAGES AUDIO | 9 |
| RéGLAGES D'AFFICHAGE | 11 |
| PLUS D'INFORMATIONS | 13 |
| GUIDE DE DÉPANNAGE | 14 |
| SPÉCIFICATIONS | 15 |
| INSTALLATION / RACCORDEMENT | 16 |
BEFORE USE
Warning
How to remove the unit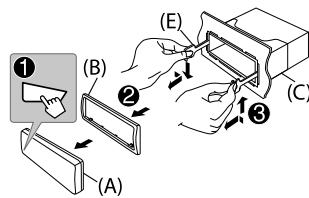
Connections
KD-R761 / KD-R661


Rear output/subwoofer output

Rear output/subwoofer output
Other models


Rear output/subwoofer
Fuse (10 A)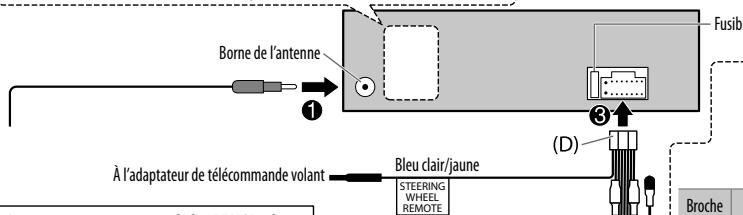
ISO connector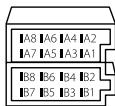
- Microsoft and Windows Media are either registered trademarks or trademarks of Microsoft Corporation in the United States and/or other countries.
- "Made for iPod," and "Made for iPhone" mean that an electronic accessory has been designed to connect specifically to iPod, or iPhone, respectively, and has been certified by the developer to meet Apple performance standards. Apple is not responsible for the operation of this device or its compliance with safety and regulatory standards. Please note that the use of this accessory with iPod or iPhone may affect wireless performance.
- iPhone, iPod, iPod classic, iPod nano, and iPod touch are trademarks of Apple Inc., registered in the U.S. and other countries. Lightning is a trademark of Apple Inc. Android is trademark of Google Inc.