
710110 - Plate warmer Emga - Free user manual and instructions
Find the device manual for free 710110 Emga in PDF.
| Brand | Emga |
| Model | 710110 |
| Product type | Professional plate warmer with infrared lamp |
| Power supply | 230 V ~ 50/60 Hz |
| Total power | 750 W (500 W heating plate + 250 W lamp) |
| Temperature range | 30 °C to 90 °C (adjustable by thermostat) |
| Net weight | 20 kg |
| Heating element type | Adhesive heating element at the bottom |
| Lamp type | Interchangeable infrared lamp |
| Material | Stainless steel (chrome-plated parts) |
| Installation | On rubber feet, requires grounded outlet |
| Protection | Overheat safety thermostat |
| Warranty | 24 months (excluding electrical parts and labor) |
| Maintenance | Clean with special stainless steel products or alcohol for chrome, no abrasive products |
| Spare parts available | Yes (heating element, lamp, thermostat, switch, etc.) |
| Standards | Compliant with CE directives, Schuko cable |
| Usage | Keeping food warm in a professional environment |
Frequently Asked Questions - 710110 Emga
User questions about 710110 Emga
0 question about this device. Answer the ones you know or ask your own.
Ask a new question about this device
Download the instructions for your Plate warmer in PDF format for free! Find your manual 710110 - Emga and take your electronic device back in hand. On this page are published all the documents necessary for the use of your device. 710110 by Emga.
USER MANUAL 710110 Emga
natural_image
Line drawing of a horizontal scale with a vertical support and attached sensor device (no text or symbols)Item:
*710.110 1/1 GN
Summary
- Instruction Warnings....2
- Safety and Right Use Warnings....2
- Warranty 2
- Installation....3
4.1 Technical Features....4
4.2 Assembly....4
4.3 Components....5 - Cleaning and Maintenance ....6
5.1 Breakdowns 6
5.2 Electrical scheme 7 - Disposal 8
1. Instruction Warnings
The final user has to hold the whole instructions. User must store up this document in case of use. Producer do not assume any responsibility for damages incurred due to the failure of improper use of this manual.
All measures in this manual are in mm.
2. Safety and Right Use Warnings
This product meets the latest technological evolutions and current safety guidelines.
The carving stations with infrared lamps, object of this booklet, is projected to be in compliance with directives and field laws, in order to guarantee a safe and reliable product.
Any other use will be considered inapposit to the original destination.
Producer do not assume any responsibility for damages caused by an improper use. Responsibility lies only on user.
A proper use also includes compliance with the instructions for use and installation and any additional documentation as well as the conditions of inspection and maintenance.
3. Warranty
This product is designed and produced for a professional environment. Due to commercial and construction requirements, the manufacturer reserves the right to make changes in order to enhance the quality and use of product. The producer, in compliance with European Community legislation, guarantees its products for 24 months. This guarantee does not include electrical parts, labor and all replacements related to an improper use of the good.
Any manipulation carried out automatically excludes the liability of the manufacturer. The products or parts to be replaced or repaired for unequivocal defects in workmanship and materials used must be in a “free port” at the offices of the producer, who after a careful inspection, will repair or replace them. The repairs are carried out exclusively at the headquarters of the manufacturer, and none cost incurred by the customer for repairs will be refunded by the manufacturer unless expressly agreed.
4. Installation
The manufacturer declines every responsibility of damage of someone or something caused by the failure to comply with the instructions of this manual.
After the unpacking of the item from its packing, proceed by removing the adhesive plastic tape before sarting up the product. Any residual glue has to be removed carefully (do not use abrasive cleaners).
The assembly for the end use concerns only to the infrared bulbs that have to be screwed-in inside the specific ceramic lampholder, and to the protection domes to be fixed with the provided screws following the scheme at page 4.
The device is designed to run on AC to the voltage specified on the technical data plate (located on the bottom of the unit).
The grounding line is marked by the colours yellow/green and must not be interrupted.
The device is provided with a cable in accordance with the CE regulations and with has CE and schuko plug (that can be replaced, when necessary, with a different plug, suitable for the specified wattage and in accordance to the current regulations and guidelines; when necessary, replace the provided cable with a new one with the same features).
Before switching the appliance:
- Check if the electrical system can withstand the appliance's load (WATT as indicated on the technical plate)
- Make sure that the electrical system is provided with ground connection according to the current norms and guidelines.
- Connect the device to the grounding network through a cable which has to be connected to the specified screw located on the external casing of the device itself. (Component n. 22, see exploded view page 5).
To switch on the device, turn the thermostat knob on the required temperature (max 90°) then the indicator light will turn on and when the right temperature is reached it will turn off; through the thermostat the selected temperature will be preserved.
Turn the knob to the position "0" (OFF) to switch off the device.
The infrared lamps have an independent system and are managed from the switch located on the top of the device.
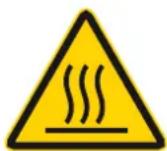
WARNING:
Once turned on, the appliance will reach the desired temperature very quickly. In order to avoid any inconvenience, turn the device on only shortly before starting the service and turn it off shortly after the end. Do not make any structural change to the appliance.
4.1 Technical Features
| Vulcano infra 1/1 | |
| Heating elem.warm plate | 500 |
| Infrared Lamps | 250W |
| Power supply | 230 V |
| Temperature range | 30°-90°C |
| Weight (Kg) | 25 |
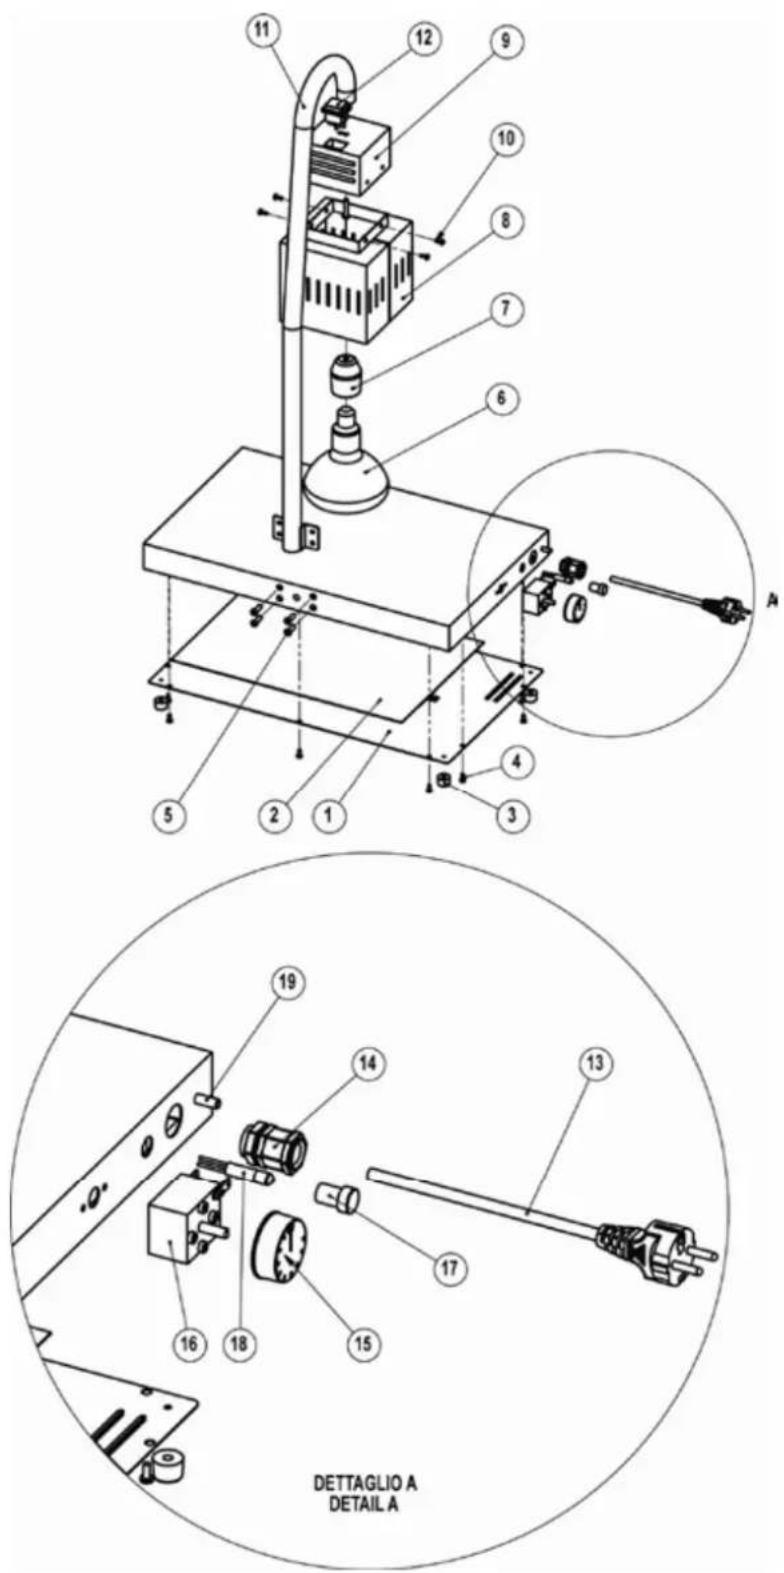
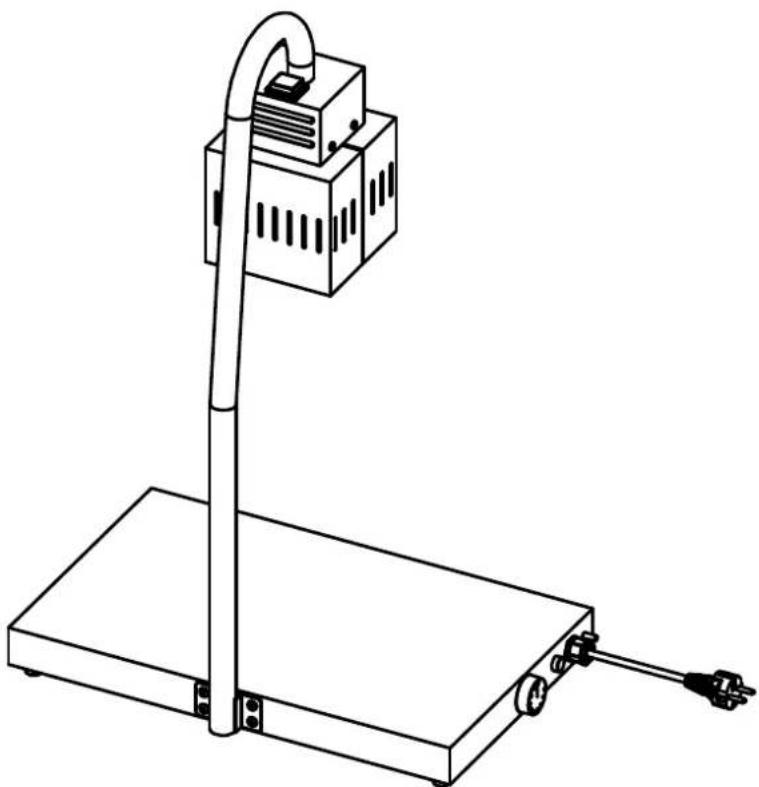
4.2 Assembly
The appliance is provided mounted. Before the first use it is necessary to mount the two plexiglass protection domes (1) with the provided screws (2) and to screw-in the infrared light bulbs (3) inside the specific ceramic lamp holders. Do not tight the bulbs too hard to avoid the breaking of the lamp holders.
text_image
11 12 9 10 8 7 6 5 4 3 2 1 A 19 14 13 17 16 18 15 DET TAGLIO A DETAIL A4.3 Components
| Ref. Code | Description | |
| 49992-21 | ||
| 1 1 Bottom | ||
| 2 1 Warm Plate | ||
| 3 2 Chromed hooks | ||
| 4 1 Outside parable | ||
| 5 1 Inside parable | ||
| 6 2 Plexiglass dome | ||
| 7 2 Ceramic lamp-holder | ||
| 8 2 Infrared lamps | ||
| 9 1 Adhesive heating elements | ||
| 10 1 Thermostat 30-90°C | ||
| 11 1 Thermostat knob | ||
| 12 1 Switch light | ||
| 13 1 Switch light cover | ||
| 14 1 Cable gland | ||
| 15 1 Schuko cable | ||
| 16 1 Switch | ||
| 17 B01INCE6X20 | 6 | Screws 6x20 st.steel CE |
| 18 B01ZITBL4X7 | 6 | Screws 4x16 zinc plated TBL |
| 19 B01INCE6X40 | 2 | Screws 6x40 st.steel CE |
| 20 B01INCE6X20 | 8 | Screws 6x20 st.steel CE |
| 21 B01ZITC4X10 | 12 | Screws 4x10 zinc plated TC |
| 22 1 Coupling grounding | ||
THE MANUFACTURER'S RESPONSABILITY AND THE PRODUCT'S WARRANTY WILL BE CONSIDER VOID AGAINST ANY MANIPULATION MADE BY THE USER.
5. Cleaning and Maintenance
WARNING:
Before any cleaning operation unplug the device from the electrical system. Never wash the appliance with water jets in order to prevent water seepage inside the electrical components.
Before any cleaning operation wait for the appliance to be cooled down (wait at least one hour from the end of the service).
The warm plate can be cleaned with st.steel specific cleansers, the two chromed hooks should be cleand with alcohol or specific cleansers for chromed surfaces, in any case do not use abrasives.
The appliance is provided with a safety thermostat with automatic reset which interrupts the power supply in case of overheating.
The appliance resumes its normal operation with the standard operating temperature.
5.1 Breakdowns
| Problem | Possible reason | Solution |
| The plate does not warm up | Power failure | Check the presence of power in the electric system |
| Heating element is burned | Contact the retailer | |
| Thermostat is broken | Contact the retailer | |
| The power cable is worn-out | Replace the cable with a suitable one | |
| The lamps do not light up | Lamps are burned | Replace the lamps with as many suitable ones |
| The switch doesn’t work | Contact the retailer | |
| The switch light does not light up | The warm plate has reached the temperature | - |
| The switch light is burned | Contact the retailer |
Whenever a replacement of the adhesive heating element is needed, clean up CAREFULLY the bottom from the old heating element glue residuals with a nistro solvent and place the new one only when the bottom is cleaned and dry.
5.2 Electrical scheme
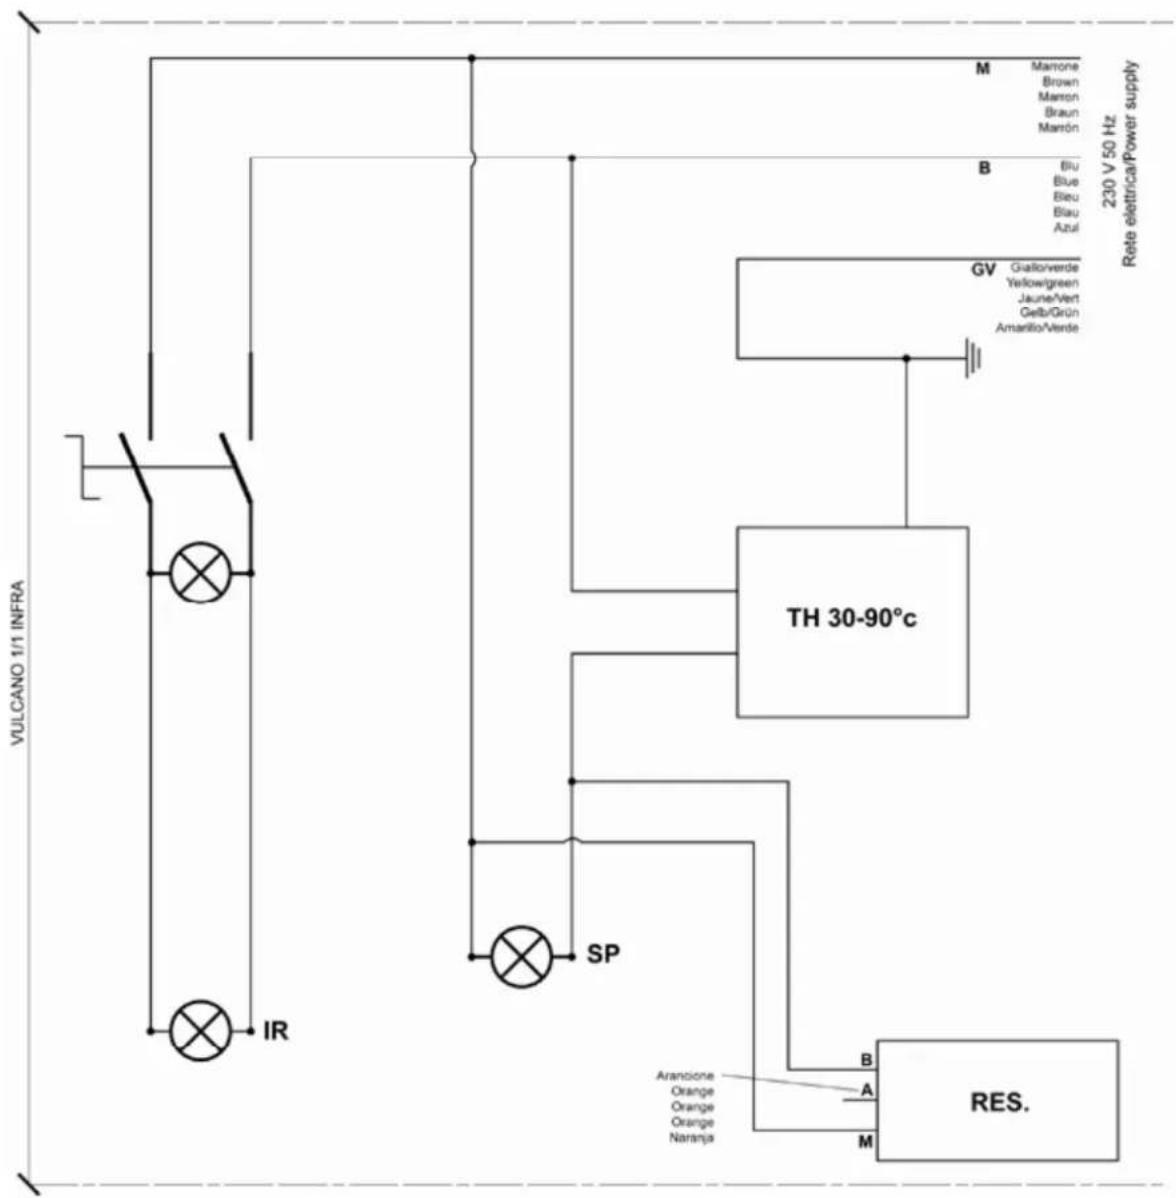
flowchart
graph TD
    A["VULCANO 1/1 INFRA"] --> B["IR"]
    A --> C["SP"]
    A --> D["TH 30-90°C"]
    D --> E["M: Marrone Brown Marron Braun Marrón"]
    D --> F["B: Blu Blue Bleu Blau Azul"]
    D --> G["GV: Gallorverde Yellowgreen Jaune/Vert Gelb/Grün Amarillo/Verde"]
    D --> H["RES."]
    I["Arancione Orange Orange Orange Naranja"] --> J["A"]
    K["M"] --> L["B"]
    M["230 V 50 Hz Rete elettrica/Power supply"] --> N["M"]
    O["RES."] --> P["A"]
    Q["IR"] --> R["SP"]
| Ref. Description | |
| TH Thermostat 30-90°C | |
| IR Infrared lamps | |
| SP Switch light | |
| RES Heating element |
6. Disposal
This marking shown on the product or its literature, indicates that it should not be disposed with other household wastes at the end of its working life.
To prevent possible harm to the environment or human health from uncontrolled waste disposal, please separate this from other types of wastes and recycl it responsibly to promote the sustainable reuse of material resources.
Household users should contact either the retailer where they purchased this product, or their local government office, for details of where and how they can take this item for environmentally safe recycling.
Business users should contact their supplier and check the terms and conditions of the purchase contract. This product should not be mixed with other commercial wastes for disposal.
natural_image
Line drawing of a simple electrical testing setup with a vertical pole and base, no text or symbols present.Article
*710.110 1/1 GN
Index
FR
text_image
Technical diagram of a laboratory apparatus with numbered components and an inset view labeled A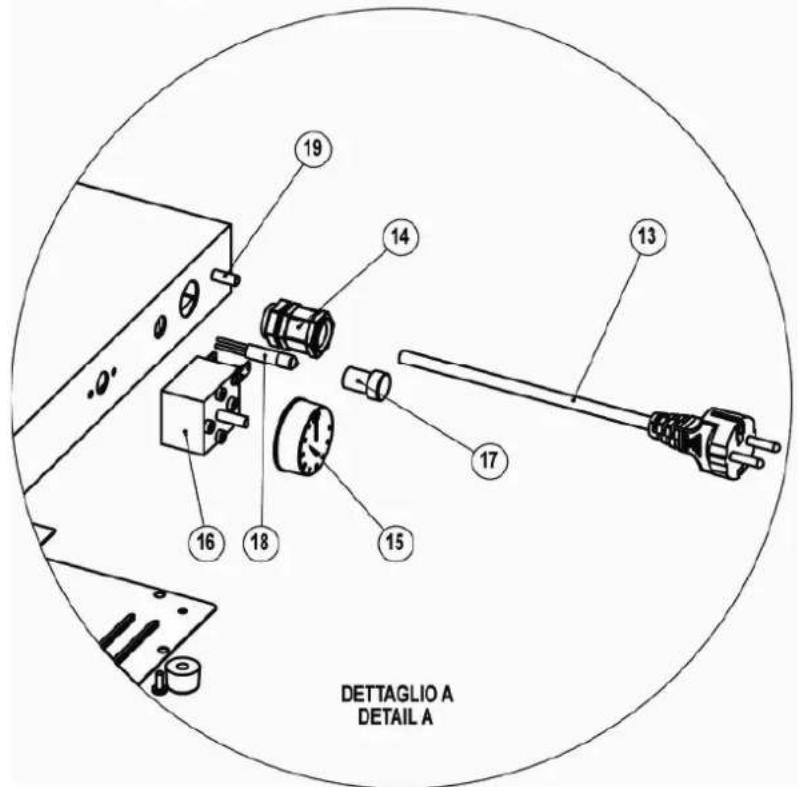
text_image
19 14 13 17 16 18 15 DET TAGLIO A DETAIL ARev. 03/2012