
REM5000R1001 - Controller HONEYWELL - Free user manual and instructions
Find the device manual for free REM5000R1001 HONEYWELL in PDF.

| Product Type | Controller (wireless thermostat remote) |
| Brand | Honeywell |
| Model | REM5000R1001 |
| Power Supply | 3 AA batteries (alkaline recommended) |
| Screen Type | Touchscreen |
| Main Functions | Temperature display and adjustment, system mode selection (Heat/Cool/Off/Auto Changeover), temporary or permanent hold, screen lock, outdoor temperature indication (with optional sensor), outdoor humidity display, multi-zone management (with multiple thermostats) |
| Communication | Wireless (radio frequency) with thermostat network |
| Approximate Range | 30 meters indoors (typical) |
| Operating Temperature | 0 °C to 40 °C (32 °F to 104 °F) |
| Low Battery Indicator | "REPLACE BATTERY" icon flashing about 2 months before depletion |
| Customization | Manual or automatic lock, key click sound, temperature offset (±3°) |
| Cleaning and Maintenance | Lock screen, then use a soft damp cloth (warm water or glass cleaner). Do not use abrasive products or sharp objects. |
| Security | Screen lock to prevent accidental changes; do not use sharp objects on touchscreen. |
| Warranty | 1 year against manufacturing defects (excluding batteries) |
| Customer Service | 1-800-468-1502 (US and Canada); website: yourhome.honeywell.com |
| Dimensions (approx.) | 10 cm x 6 cm x 2 cm (estimated from illustration) |
| Weight (with batteries) | Approximately 150 g |
| Country of Origin | Not specified in manual (probably China) |
| Spare Parts | Not available separately; contact support for replacement |
| Repairability | Not user-serviceable; contact Honeywell support |
Frequently Asked Questions - REM5000R1001 HONEYWELL
User questions about REM5000R1001 HONEYWELL
0 question about this device. Answer the ones you know or ask your own.
Ask a new question about this device
Download the instructions for your Controller in PDF format for free! Find your manual REM5000R1001 - HONEYWELL and take your electronic device back in hand. On this page are published all the documents necessary for the use of your device. REM5000R1001 by HONEYWELL.
USER MANUAL REM5000R1001 HONEYWELL
Wireless Remote Control
For use with RedLINK™ devices
69-2054EFS-03
natural_image
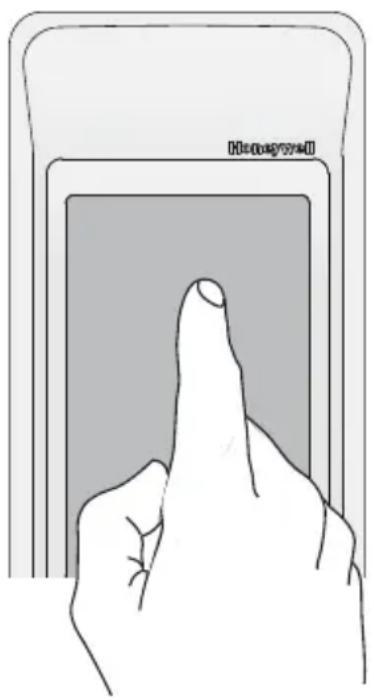
Illustration of a hand pressing a button on a device (no text or symbols visible)Always press touchscreen buttons with your fingertip. Never use sharp instruments, such as a pencil or pen.
To clean the screen, lock the display and use a damp cloth. Never use abrasive cleansers.
® U.S. Registered Trademark. Copyright © 2008 Honeywell International Inc. All rights reserved.
Contents
Quick reference ....4
System settings ....5
Temperature control options (one thermostat)......6
Temperature control options (multiple thermostats) ....7
Temperature "hold" 8
Screen lock/unlock 9
Customizing features (setup menu) ....10
Battery replacement ....12
In case of difficulty....13
Limited warranty ....14
Regulatory information ....43
Operating Manual
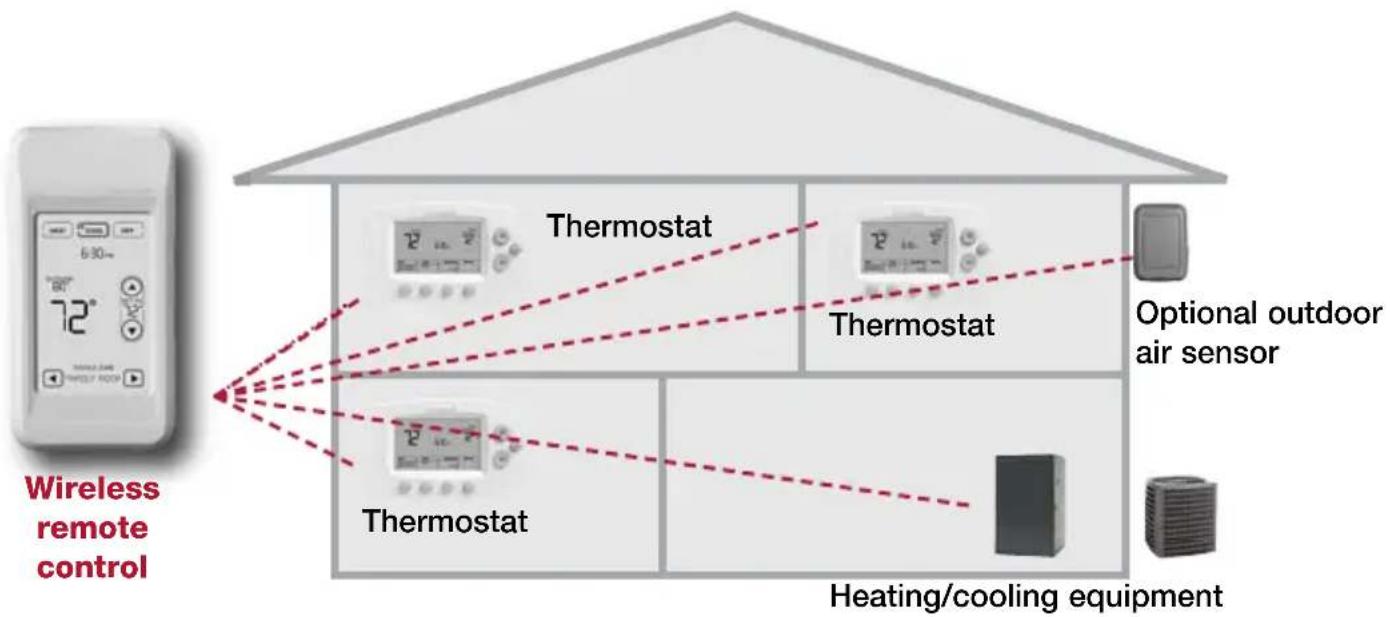
How it works
flowchart
graph TD
    A["Wireless remote control"] --> B["Thermostat"]
    A --> C["Thermostat"]
    A --> D["Thermostat"]
    B --> E["Optional outdoor air sensor"]
    C --> E
    D --> E
    F["Heating/cooling equipment"] --> E
If you have one thermostat, you can move the remote control around your home (like a mobile thermostat) to make sure the temperature is comfortable in the room you're using.
If you have multiple thermostats, you can use the remote control to display and adjust temperatures in each room independently. (See next page.)
How it works
If you have only one thermostat
Temperature is measured at thermostat or remote control, as you choose. You can move the remote control as needed, so the room you are using maintains a comfortable temperature (see page 6).
If you have multiple thermostats
Temperature is measured at each thermostat. Press TOGGLE ZONE buttons to choose which room to display and adjust (see page 7).
Quick reference to display screen
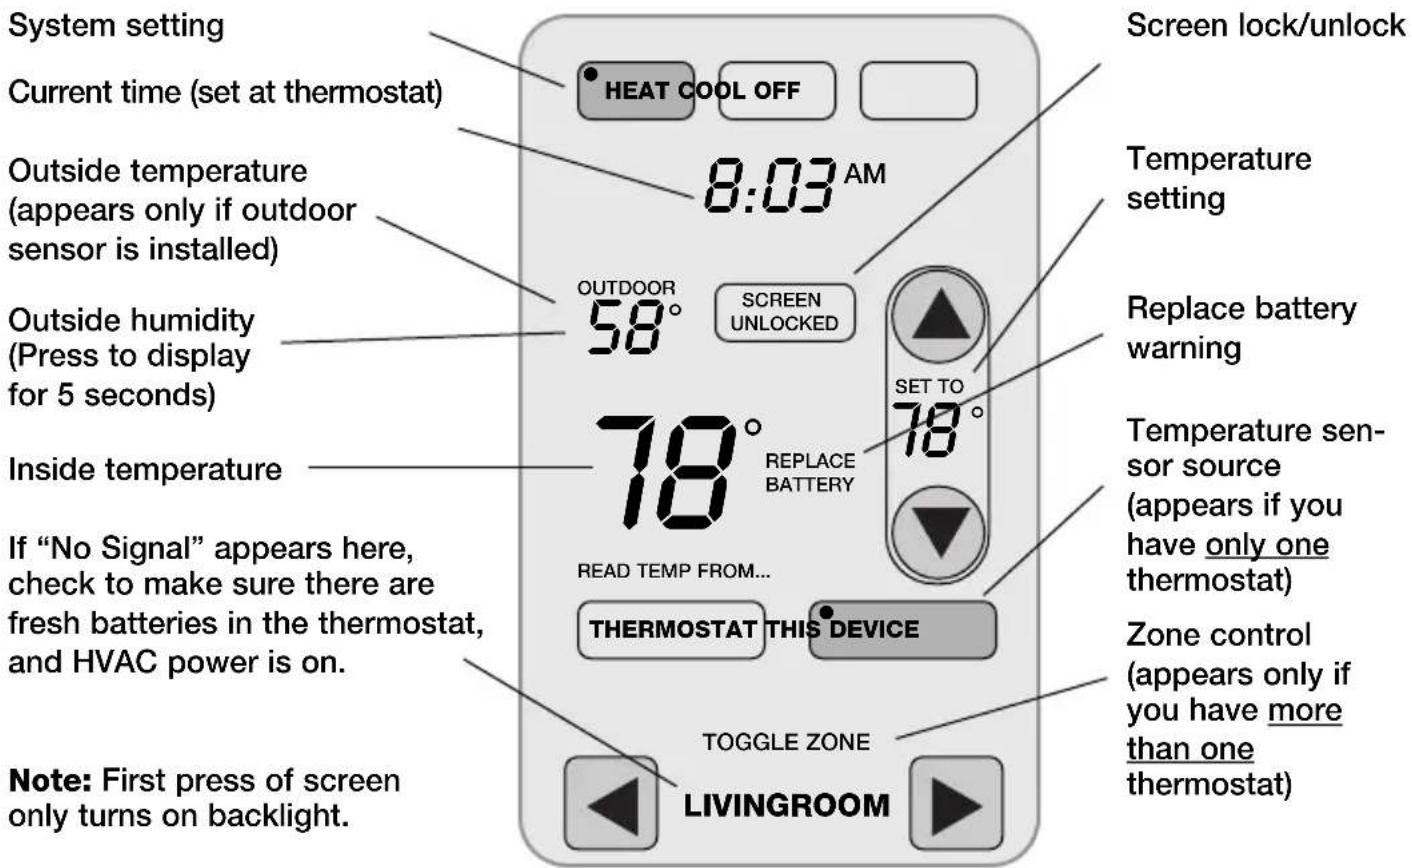
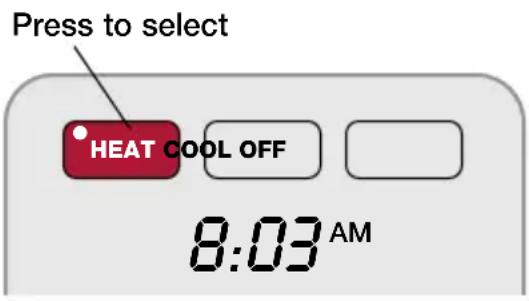
System settings
Press and hold either to select AUTO CHANGEOVER
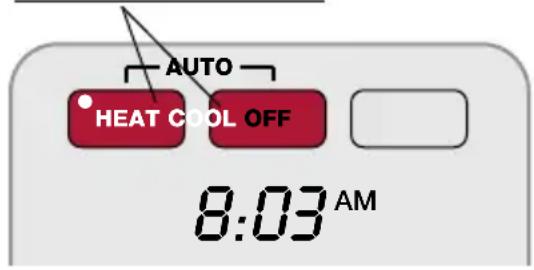
Note: The Auto Changeover option is available only if programmed by the system installer.
Note: Emergency Heat can only be set at the thermostat.
Press a SYSTEM button to select:
- Heat: Thermostat controls only the heating system.
- Cool: Thermostat controls only the cooling system.
- Off: Heating and cooling systems are off.
Press and hold HEAT or COOL for 3 seconds to select Auto Changeover (thermostat automatically selects heating or cooling depending on the indoor temperature).
In Auto Changeover mode, you can press HEAT or COOL to display or adjust the settings for each system.
To exit Auto Changeover mode, press and hold HEAT or COOL for 3 seconds.
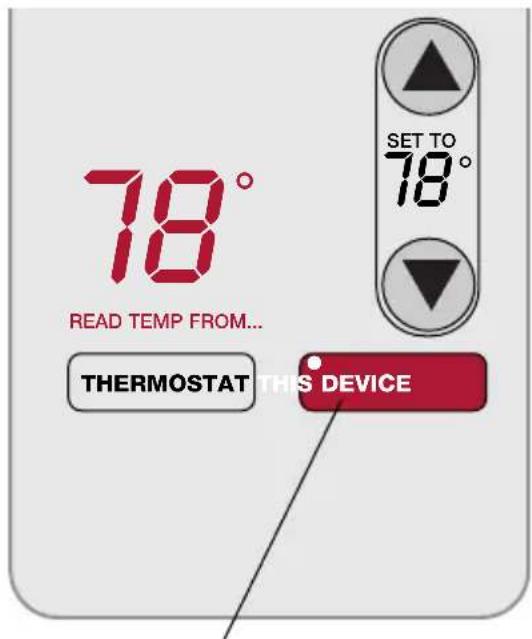
Temperature control options (one thermostat)
Display shows temperature at selected device /
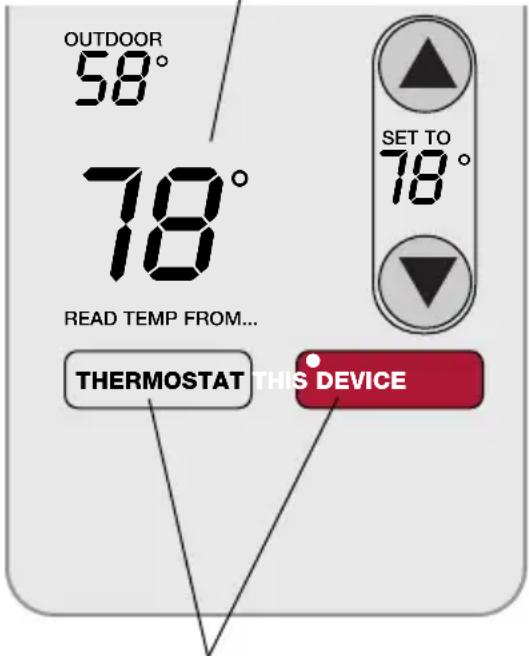
Press to choose temperature measurement device
Both the thermostat and the remote control have built-in temperature sensors. Press a button to choose whether the system responds to temperatures at the thermostat, or at the location of the remote control.
If you use the remote control to measure temperature, keep it in an upright position in an area with good air circulation. Do not place it near sources of heat or cold air. Keep away from air ducts, direct sunlight, appliances and electronic devices.
Note: This option will not appear if you have a zone system (more than one thermostat). In zone systems, temperature is always measured at the thermostats.
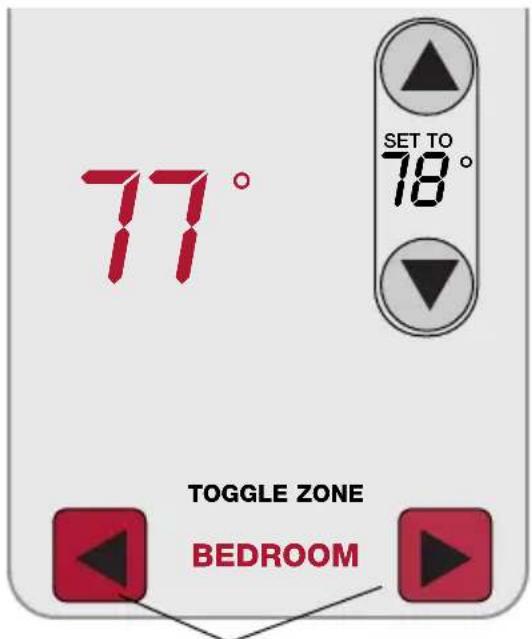
Temperature control options (multiple thermostats)
Display shows temperature in selected zone
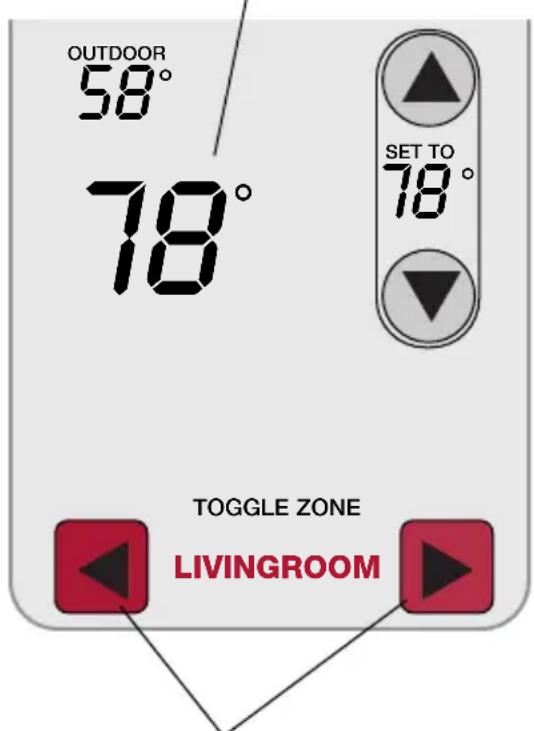
Press to select a thermostat zone
If you have a zone system (more than one thermostat), you can display and adjust the temperature in each zone from the remote control.
Press the arrow buttons until the thermostat zone you want is displayed. After a short delay, the remote will retrieve information, then display the current temperature in that zone.
At the remote control you can change the following settings for each zone independently:
- Temperature
- System setting (heat/cool)
- Temporary hold
- Permanent hold
(Fan operation and program schedules can be changed only at the thermostat.)
Temperature "hold" (programmable thermostats only)
1 Press to adjust temperature
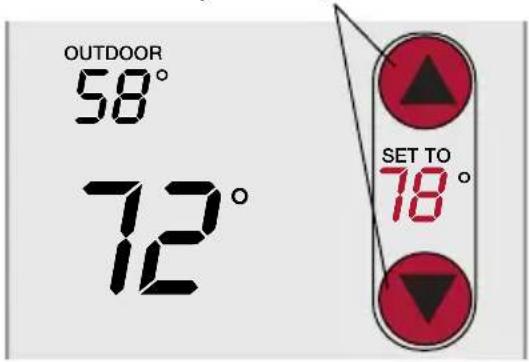
2 Set temporary hold time period
Press ▲ or ▼ to adjust the temperature.
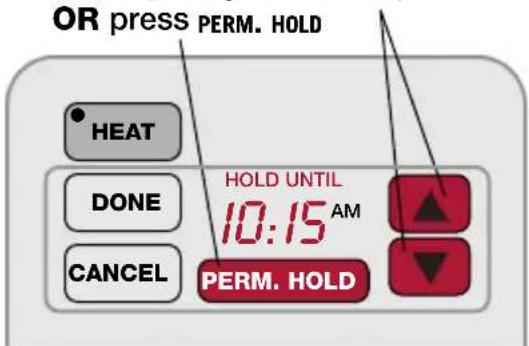
Temporary hold:
Press ▲ or ▼ to set the “Hold Until” time. When the timer expires (or when you press CANCEL), the temperature will revert to the setting you’ve programmed at the thermostat.
Permanent hold:
Press PERM. HOLD to maintain the new temperature permanently. The temperature will remain as you set it until you press CANCEL to revert to the setting you've programmed at the thermostat.
Note: If you have a zone system (more than one thermostat), Hold will only apply to the zone displayed at the bottom of the screen. Scroll to another zone to change the temperature in that zone (see page 7).
Screen lock/unlock
Press and hold until label appears
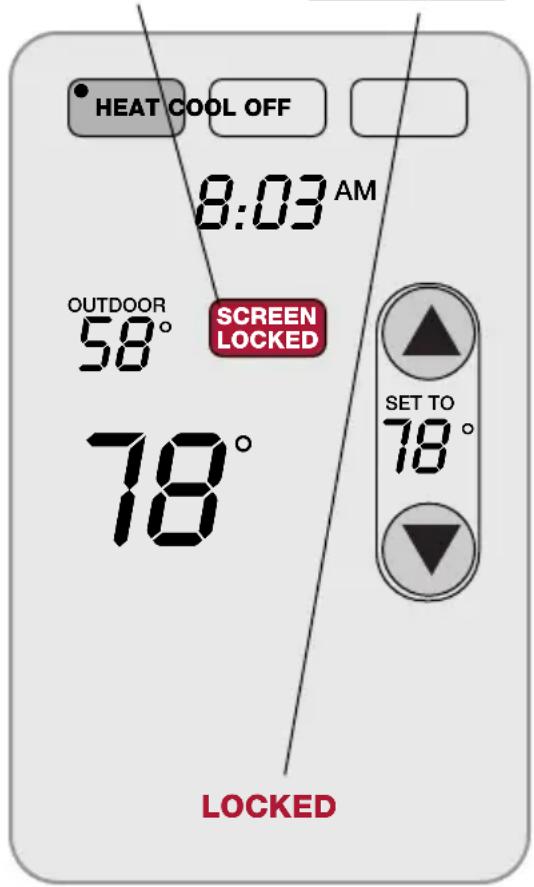
Press and hold the SCREEN LOCK button for 3 seconds to lock or unlock the screen.
If the remote control is set to use Auto Lock, the screen is re-locked 30 seconds after each use. If set to use Manual Lock, press and hold the SCREEN LOCK button to re-lock the screen after use.
You can lock the screen to prevent changes to settings while cleaning. Clean the screen with a soft cloth moistened with warm water or household window cleaner.
Note: The screen lock button will not appear if the remote control has not been set to use manual or auto lock options (see pages 10-11 to activate this feature).
Customizing features
Press and hold until screen changes
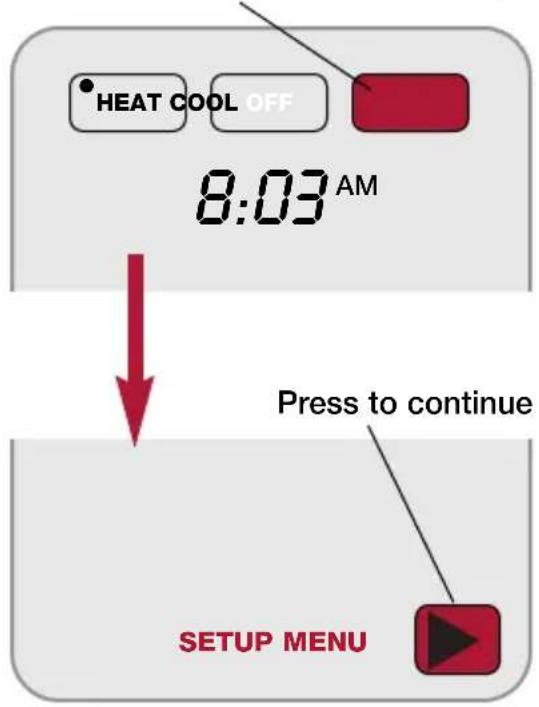
The remote control has four features that can be turned on or off as desired (see next page).
Press and hold the OFF button until the screen changes (about 3 seconds), then press the right arrow button to enter the setup menu.
Customizing features
Press arrow buttons to select feature, then YES or NO to enable or disable

flowchart
graph TD
    A["YES NO"] --> B["MENU MANUAL LOCK"]
    C["↓"] --> B
    B --> D["AUTOMATIC LOCK"]
    D --> E["BUTTON CLICK"]
    E --> F["TEMP OFFSET"]
Press arrow buttons to select a feature, then YES or NO to turn it on or off. When finished customizing features, pressDONE to exit the menu and restore the home screen.
- Manual Lock: Allows you to lock the screen by pressing and holding the LOCK button.
• Automatic Lock: Always locks the screen 30 seconds after each use. - Button Click: Audible tone sounds to confirm each keypress.
- Temp Offset: The remote control displays actual indoor temperature. If you prefer, you can offset the displayed temperature by up to ± 3 degrees (not displayed when used with more than one thermostat).
Battery replacement
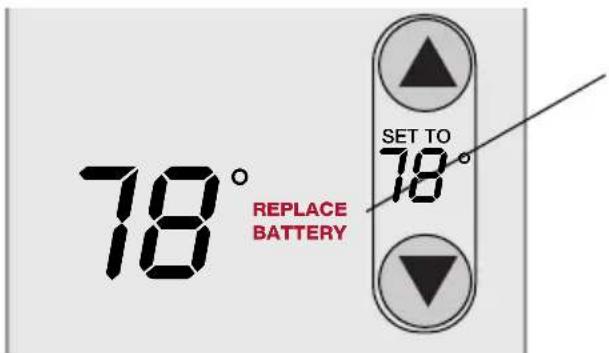
Install fresh batteries when the REPLACE BATTERY warning flashes on the screen. This warning will flash for approximately two months before the batteries fail.
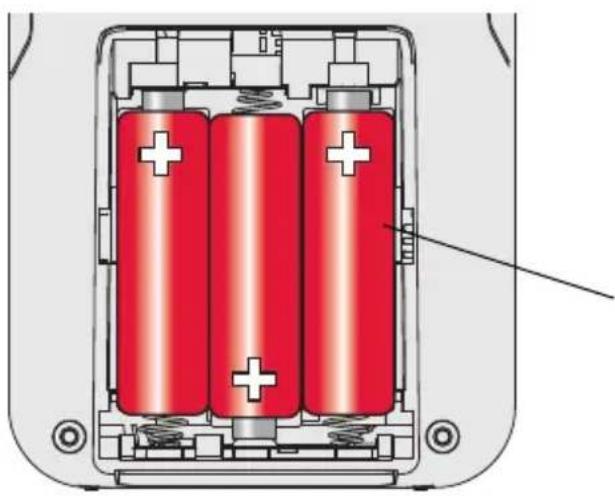
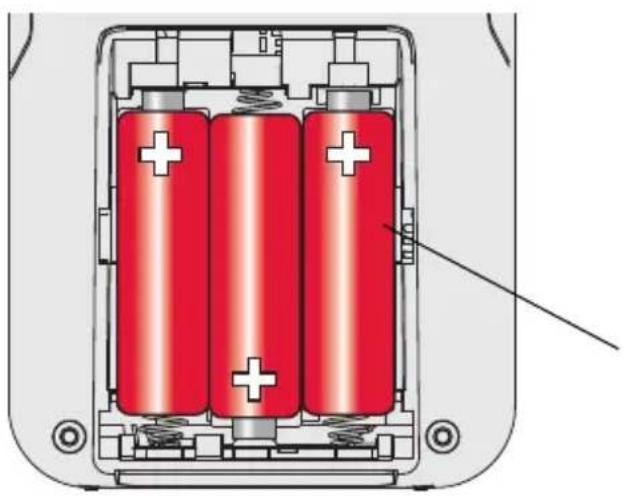
Remove the cover and install 3 fresh AA batteries. Make sure the batteries are inserted properly (see polarity marks on illustration at left).
natural_image
Diagram of a battery pack with three red cylinders and charging elements, showing internal structure without any text or symbols.After batteries are installed, the remote control will automatically restore communication with the wireless network within a few minutes.
Always use 3 fresh AA batteries
In case of difficulty
Slow response The thermostat may take up to 15 seconds to respond to commands entered at the remote control.
Heating or cooling system does not respond
- Check circuit breaker and reset if necessary.
- Make sure power switch at heating & cooling system is on.
- Make sure furnace door is closed securely.
- Wait 5 minutes for the system to respond.
Screen displays "No Signal"
Remote control has lost radio contact with the wireless network (usually because of a power outage). To restore power:
- Check circuit breaker and reset if necessary.
- Make sure power switch at heating & cooling system is on.
- Make sure furnace door is closed securely.
After power is restored, the remote control will automatically restore wireless communication within a few minutes.
1-year limited warranty
Honeywell warrants this product, excluding battery, to be free from defects in the workmanship or materials, under normal use and service, for a period of one (1) year from the date of purchase by the consumer. If at any time during the warranty period the product is determined to be defective or malfunctions, Honeywell shall repair or replace it (at Honeywell's option).
If the product is defective,
(i) return it, with a bill of sale or other dated proof of purchase, to the place from which you purchased it; or
(ii) call Honeywell Customer Care at 1-800-468-1502. Customer Care will make the determination whether the product should be returned to the following address: Honeywell Return Goods, Dock 4 MN10-3860, 1885 Douglas Dr. N., Golden Valley, MN 55422, or whether a replacement product can be sent to you.
This warranty does not cover removal or reinstallation costs. This warranty shall not apply if it is shown by Honeywell that the defect or malfunction was caused by damage which occurred while the product was in the possession of a consumer.
Honeywell's sole responsibility shall be to repair or replace the product within the terms stated above. HONEYWELL SHALL NOT BE LIABLE FOR ANY LOSS OR DAMAGE OF
ANY KIND, INCLUDING ANY INCIDENTAL OR CONSEQUENTIAL DAMAGES RESULTING, DIRECTLY OR INDIRECTLY, FROM ANY BREACH OF ANY WARRANTY, EXPRESS OR IMPLIED, OR ANY OTHER FAILURE OF THIS PRODUCT. Some states do not allow the exclusion or limitation of incidental or consequential damages, so this limitation may not apply to you.
THIS WARRANTY IS THE ONLY EXPRESS WARRANTY HONEYWELL MAKES ON THIS PRODUCT. THE DURATION OF ANY IMPLIED
WARRANTIES, INCLUDING THE WARRANTIES OF MERCHANTABILITY AND FITNESS FOR A PARTICULAR PURPOSE, IS HEREBY LIMITED TO THE ONE-YEAR DURATION OF THIS WARRANTY. Some states do not allow limitations on how long an implied warranty lasts, so the above limitation may not apply to you.
This warranty gives you specific legal rights, and you may have other rights which vary from state to state.
If you have any questions concerning this warranty, please write Honeywell Customer Relations, 1985 Douglas Dr, Golden Valley, MN 55422 or call 1-800-468-1502. In Canada, write Retail Products ON15-02H, Honeywell Limited/Honeywell Limitée, 35 Dynamic Drive, Scarborough, Ontario M1V4Z9.
Índice
- Temperature
- System setting (heat/cool)
- Temporary hold
- Permanent hold
Presione ▲ o ▼ para regular la temperatura.
natural_image
Diagram of a battery pack with three red cylinders and two white plus signs, showing internal structure without any text or symbols.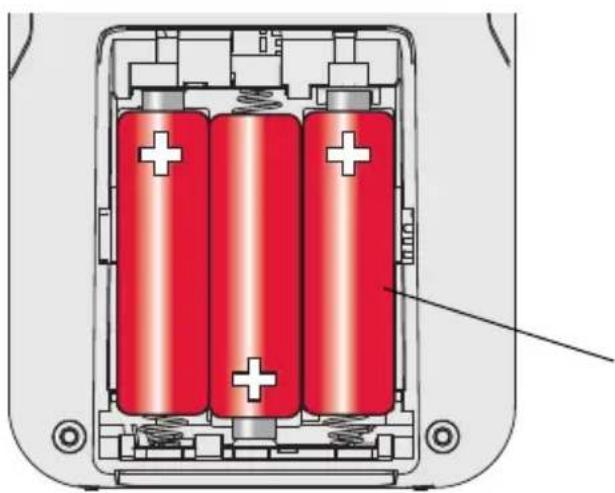
natural_image
Cross-sectional diagram of a battery pack with three red batteries and white plus signs, no text or symbols presentRegulatory information
FCC Compliance Statement (Part 15.19) (USA only)
This device complies with Part 15 of FCC Rules. Operation is subject to the following two conditions:
1 This device may not cause harmful interference, and
2 This device must accept any interference received, including interference that may cause undesired operation.
FCC Warning (Part 15.21) (USA only)
Changes or modifications not expressly approved by the party responsible for compliance could void the user's authority to operate the equipment.
FCC Interference Statement (Part 15.105 (b)) (USA only)
This equipment has been tested and found to comply with the limits for a Class B digital device, pursuant to Part 15 of the FCC Rules. These limits are designed to provide reasonable protection against harmful interference in a residential installation. This equipment generates uses and can radiate radio frequency energy and, if not installed and used in accordance with the instructions, may cause harmful interference to radio communications. However, there is no guarantee that interference will not occur in a particular installation. If this equipment does cause harmful interference to radio or television reception, which can be determined by turning the equipment off and on, the user is encouraged to try to correct the interference by one of the following measures:
- Reorient or relocate the receiving antenna.
- Increase the separation between the equipment and receiver.
- Connect the equipment into an outlet on a circuit different from that to which the receiver is connected.
- Consult the dealer or an experienced radio/TV technician for help.
Exposure Limits
This portable transmitter with its antenna complies with FCC and Industry Canada exposure limits for general population/uncontrolled exposure.
Industry Canada Section 7.1.5 of RSS-GEN
Operation is subject to the following two conditions:
1 this device may not cause interference, and
2 this device must accept any interference, including interference that may cause undesired operation of the device.
Wireless Remote Control
Need Help?
For assistance with this product please visit http://yourhome.honeywell.com or call Honeywell Customer Care toll-free at 1-800-468-1502
¿Necesita ayuda?
By using this Honeywell literature, you agree that Honeywell will have no liability for any damages arising out of your use or modification to, the literature. You will defend and indemnify Honeywell, its affiliates and subsidiaries, from and against any liability, cost, or damages, including attorneys' fees, arising out of, or resulting from, any modification to the literature by you.
Automation and Control Solutions
Honeywell International Inc.
1985 Douglas Drive North
Golden Valley, MN 55422
http://yourhome.honeywell.com
Scarborough, Ontario M1V 4Z9
69-2054EFS-03
07-2008
© 2008 Honeywell International Inc.
® U.S. Registered Trademark. All rights reserved. Printed in USA.
Honeywell

- Wireless Remote Control
- Contents
- How it works
- If you have only one thermostat
- If you have multiple thermostats
- Quick reference to display screen
- System settings
- Temperature control options (one thermostat)
- Temperature control options (multiple thermostats)
- Temperature "hold" (programmable thermostats only)
- Temporary hold:
- Permanent hold:
- Screen lock/unlock
- Customizing features
- Battery replacement
- In case of difficulty
- Heating or cooling system does not respond
- Screen displays "No Signal"
- 1-year limited warranty
- Índice
- Regulatory information
- FCC Compliance Statement (Part 15.19) (USA only)
- FCC Warning (Part 15.21) (USA only)
- FCC Interference Statement (Part 15.105 (b)) (USA only)
- Exposure Limits
- Industry Canada Section 7.1.5 of RSS-GEN
- Need Help?
- ¿Necesita ayuda?
- Automation and Control Solutions
Brand : HONEYWELL
Model : REM5000R1001
Category : Controller