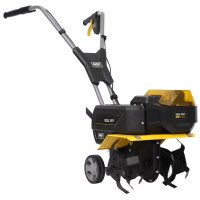
FRZ5800 - Electric tiller Texas - Free user manual and instructions
Find the device manual for free FRZ5800 Texas in PDF.
| Product type | Electric tiller |
| Brand | Texas |
| Model | FRZ5800 |
| Motor power | 800 W |
| Battery voltage | 58 V Li-ion |
| Recommended battery type | 2 x 4.0 Ah batteries (sold separately) |
| Weight | 27.5 kg |
| Working width | 28-40-60 cm (adjustable) |
| Working depth | 26 cm |
| Forward speeds | 2 (slow and fast) |
| Reverse speed | 1 |
| Blade rotation speed (forward) | 100/130 rpm |
| Blade rotation speed (reverse) | 45 rpm |
| Sound power level (L_WA) | 93 dB(A) |
| Sound pressure level (L_PA) | 88.2 dB(A) |
| Handle vibrations (left/right) | 8.1 / 7.4 m/s² |
| Gearbox grease | EP-1 (lubricated at factory) |
| Safety devices | Safety key, safety button, automatic stop after 5 minutes of inactivity |
| Depth adjustment | Adjustable depth shoe |
| Support wheels | Yes, for transport |
| Warranty (private use) | 2 years |
| Warranty (commercial use) | 1 year |
| Wear parts not covered | Blades, cables, belts, switches, batteries (if improperly maintained) |
| Recommended cleaning | Rinse with garden hose, avoid high-pressure cleaner |
| Winter storage | Battery charged to 100%, storage at 10-20°C, recharge every 3 months |
Frequently Asked Questions - FRZ5800 Texas
User questions about FRZ5800 Texas
0 question about this device. Answer the ones you know or ask your own.
Ask a new question about this device
Download the instructions for your Electric tiller in PDF format for free! Find your manual FRZ5800 - Texas and take your electronic device back in hand. On this page are published all the documents necessary for the use of your device. FRZ5800 by Texas.
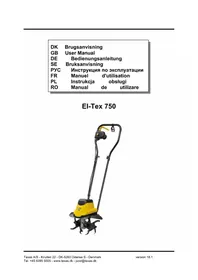
USER MANUAL FRZ5800 Texas
text_image
TEXAS EQUIPMENTFRZ 5800
text_image
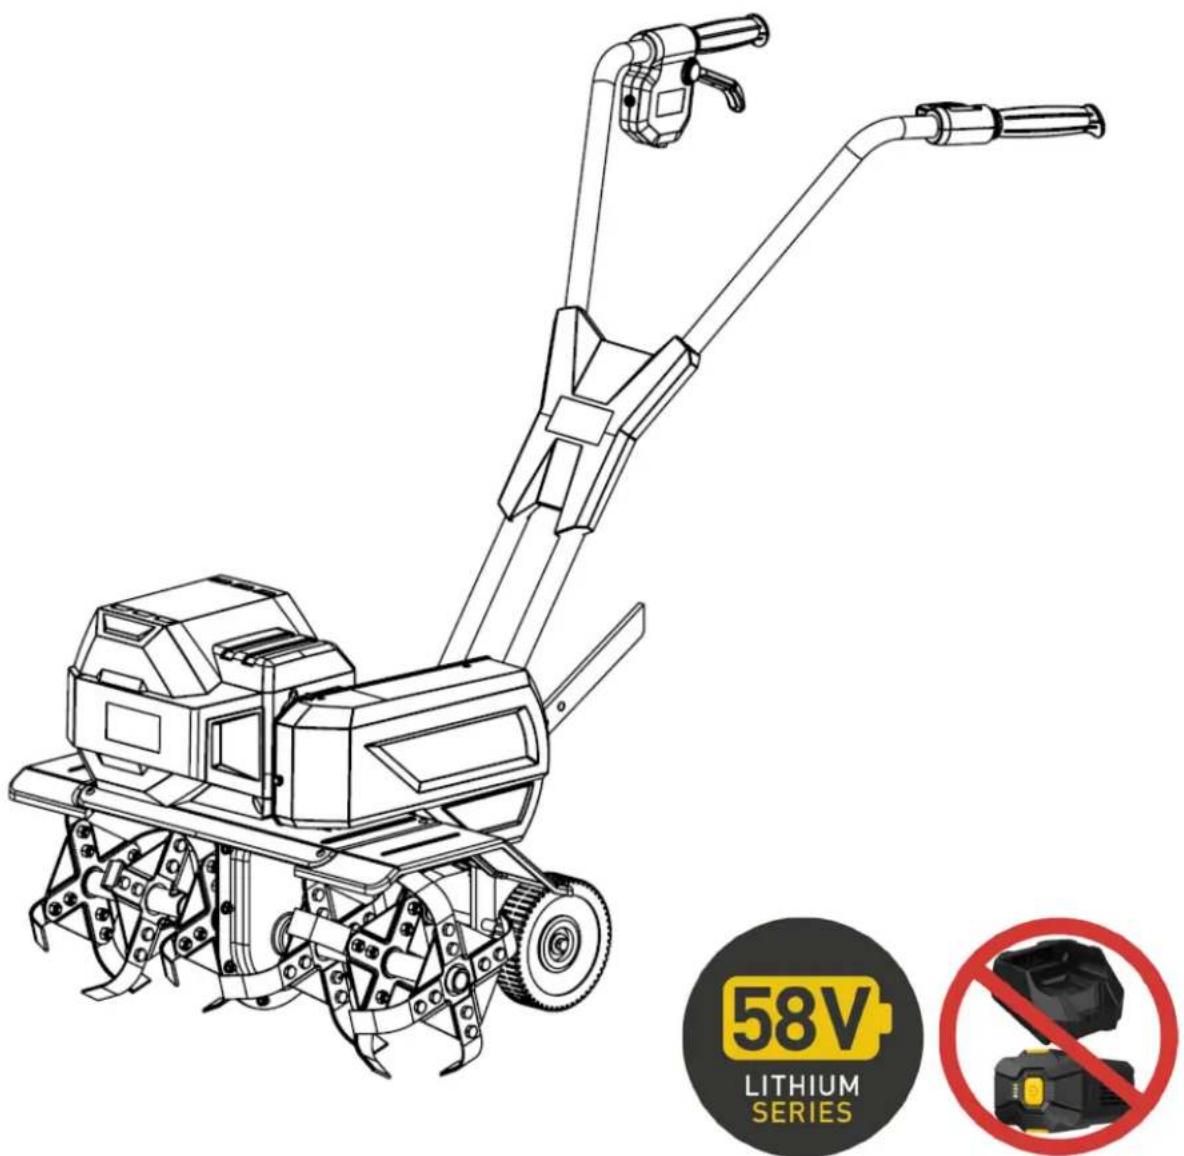
58V LITHIUM SERIES1

text_image
Technical diagram of a manual tool with labeled parts including a power tool, tool holder, and push cart.2
natural_image
Technical diagram showing mechanical assembly with green components and a separate assembled device (no text or labels)3
natural_image
Diagram of a green compass tool with adjustment knobs and a bracket, no text or symbols present| 4 |  | 5 |  |
| 6 | 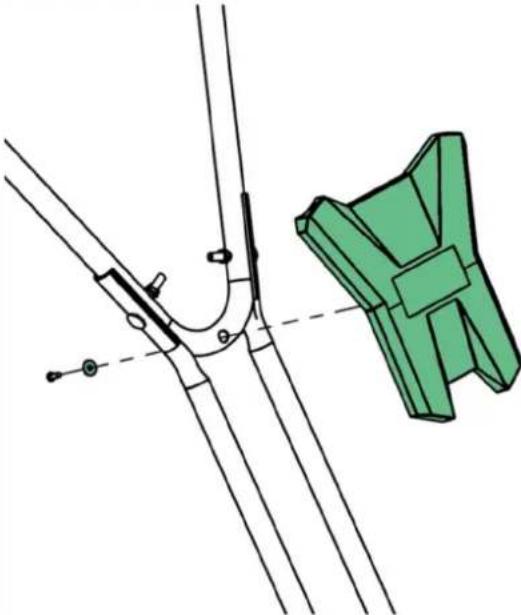 | 7 | 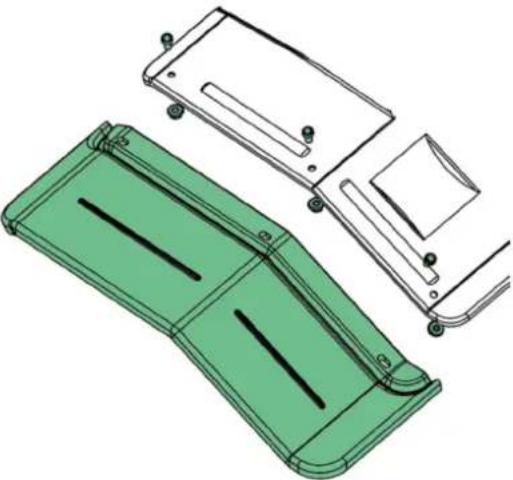 |
| 8 | 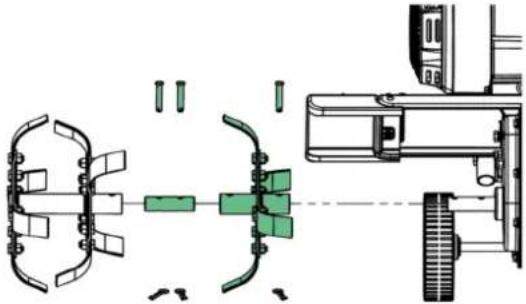 | 9 | 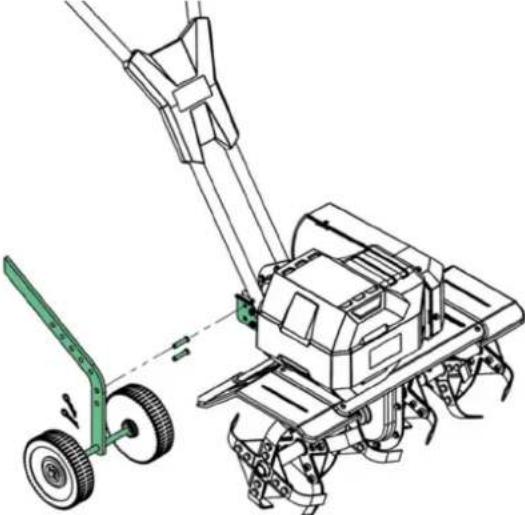 |
| 10 |  | 11 |  |
| 12 |  | 13 | 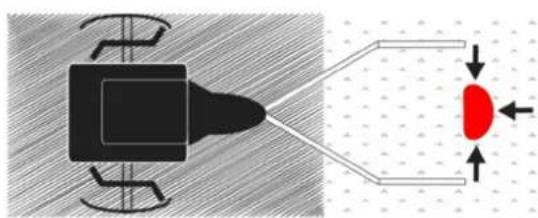 |
 | |||
| 14 | 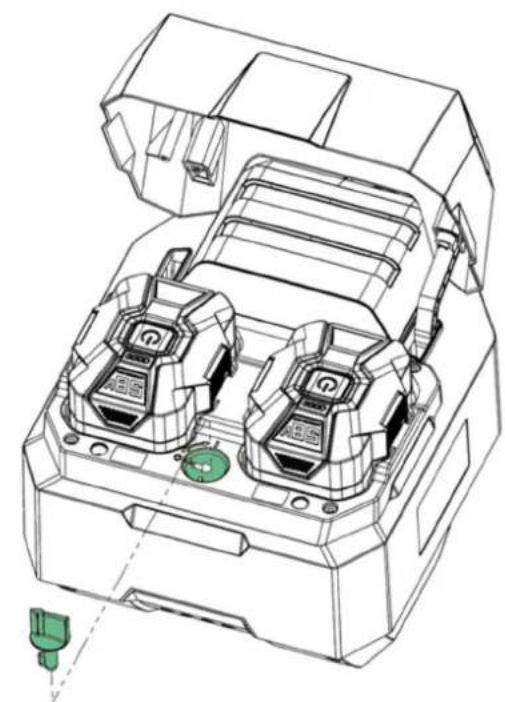 | 15 | 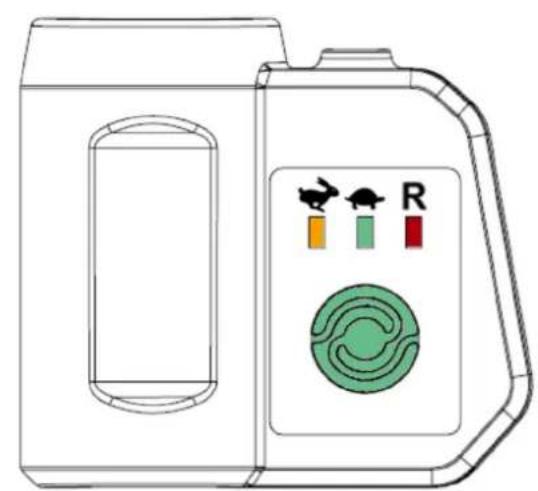 |
text_image
16 1 2 17 BATTERI OPBEVARING Battery storage only Akku aufbewahrung AKTIVT BATTERI Working battery Akkunutzung |  |  |  |  |
| DK | ||||
| Vær agtpågivende ved dette symbol. | Læs betjenings-vejledningen grundigt før maskinen benyttes. | Udsæt ikke maskinen for regn og fugtighed. | Fjern sikkerhedsnøgle før vedligeholdelse eller reparation | Fare for at skære sig på roterende klinger. |
| GB | ||||
| Pay attention to this symbol. | Please read the user manual carefully before operating the machine. | Do not expose the machine to rain or moisture. | Remove safety key before maintenance or repair. | Warning! Risk of getting cut on rotation blades. |
| D | ||||
| Seid vor diesem Symbol vorsichtig. | Bitte lesen Sie das Benutzerhandbuch aufmerksam durch, bevor Sie den Maschinen in Betrieb nehmen. | Das Werkzeug darf weder Regen noch anderen feuchten Bedingungen ausgesetzt werden. | Vor Wartung oder Reparatur: Schlüssel entfernen. | Gefahr, auf rotierende Klingen zu schneiden. |
| F | ||||
| Faites attention à ce symbole. | Lire les instructions d'utilisation avant d'utiliser la machine. | N'exposez pas la machine à la pluie ou à l'humidité. | Retirez la clé de sécurité avant l'entretien ou la réparation. | Avertissement! Risque de coupure sur les lames rotatives. |
 |  |  |  |  |
| DK | ||||
| Pas på hænderne!Lad dem ikke komme tæt på de roterende knive. | Pas på! Objekter kan forlade produktet med høj hastighed. | Hold tilskuere 5 m væk fra maskinen. | Advarsel:Pas på roterende knive! | Benyt skridsikkert sikkerhedsfodtøj. |
| GB | ||||
| Be careful about your hands. Do not let them come close to the rotating blades. | Be careful: Object can be thrown away with high speed. | Keep bystanders 5 m away from the machine. | Warning:Pay attention to rotating blades! | Wear nonskid safety footwear. |
| D | ||||
| Sei vorsichtig mit deinen Händen. Lassen Sie sie nicht in die Nähe die rotierenden Messer kommen. | Warnung: Gegenstände können herumgeschleudert werden. | Halten Sie Zuschauer 5 m entfernt von der Maschine. | Warnung:Achten Sie auf rotierende Messer! | Tragen Sie rutschfeste Sicherheitsschuhe. |
| F | ||||
| Faites attention à ce symbole. | Lire les instructions d'utilisation avant d'utiliser la machine. | Tenez les personnes à 5 m de la machine. | Avertissement:Faites attention à lames rotatives! | Porter des chaussures de sécurité antidérapantes. |
GB - Table of Contents - "Original instructions"
Illustrations 2
Warning symbols....6
Safety precautions.... 11
Assembly....12
Battery....12
Charging....12
Clothing 13
Operating the tiller 13
Operation zone.... 13
Adjusting the wheel/ depth skid 13
Lubrication of gearbox 13
Cleaning the tiller.... 14
Storage.... 14
Troubleshooting.... 14
Noise, vibration and precautionary measures 14
Warranty terms and conditions.... 14
Specifications 23
Accessories 24
EC Declaration of conformity.... 25
Congratulations on purchasing your new tiller. Please read this instruction manual carefully, especially the safety warnings marked with the symbol:

Spare parts
Spare part drawings for the specific product can be found on our website www.texas.dk If you find the part numbers yourself, this will facilitate more rapid service.
For purchase of spare parts, please contact your dealer. You will find a list of dealers on the Texas website.
Safety precautions
Setup
Do not put hands or feet near or under rotating parts.
Read this manual carefully. Make sure that you are familiar with the different controls, settings and handles of the equipment.
⚠ Know how to stop the unit and ensure that you are familiar with emergency stop.
Never allow children or people unfamiliar with these instructions to use the machine. Note, that local regulations can restrict the age of the operator.
If you feel unwell, tired or have consumed alcohol or drugs, do not operate the machine.
Always inspect the machine before usage Ensure that no parts are worn or damaged.
⚠️ Replace worn out or damaged elements and bolts in sets to preserve balance.
The operator of the machine is responsible for people's safety.
⚠️ Never use the machine near children or animals.
The operator of the machine is held liable for any accidents or hazards to other people and their property.
Thoroughly inspect the area, where the equipment is to be used, if necessary, remove any foreign objects.
Beware of hazards, while working on difficult soil hence; extremely stony or hard soil.
Boots with non-slip soles with steel jacket is required. Avoid loose-fitting clothes.
Operation
Always start the engine from safety zone.
Do not leave the safety zone while operating the machine, if it is necessary to leave the safety zone, turn off the engine before leaving the zone.
After striking a foreign object, stop the engine immediately and inspect the machine thoroughly for damage. Repair the damage before continuing
If the machine should start to vibrate abnormally, stop the engine and check immediately for the cause. Vibration is generally a warning of damage.
Always turn off the engine and ensure that all moving parts have come to a complete stop before making any repairs, adjustments, or inspections.
Exercise extreme caution when operating on slopes.
Never operate the machine at a fast pace.
Do not overload machine capacity by attempting to work at too fast a rate.
Do not carry passengers.
Pay attention, while the machine is in reverse.
Never allow any bystanders in front of unit.
Always disengage the blades, if not in use.
1 Only operate the machine at daylight or in fully illuminated areas
Ensure a stable foothold and always keep a firm hold on the handles. Always walk, never run.
Do not operate the equipment when barefoot or wearing sandals.
Exercise extreme caution when changing direction on slopes
By rear tillers, ensure that the blades are protected by safety shield, only the part of the blades that works into the soil must be free.
Never attempt to make any adjustments, while the engine is running.
Use extreme caution when reversing or pulling the machine backwards
Maintenance and storage
The engine shall be stopped when carrying out maintenance and cleaning operations, when changing tools and when being transported by means other than under its own power.
Check regularly that all bolts and nuts are tightened. Retighten if necessary.
The engine must be completely cooled before storing indoors or covered.
If the machine unused for a period of time, please refer to the instructions in this manual.
Maintain or replace safety and instruction labels, as necessary.
Only use original spare parts or accessories. If not original parts or accessories is used, the liability is no longer applied.
Miscellaneous
The gears are delivered pre-greased. However, always ensure they are well greased before each use.
! Factory-fitted control devices, such as the handle-mounted clutch cable, must not be removed or exposed.
1 Ensure that the machine is properly secured when transported on a flatbed etc.
Due to vibrations, it is recommended to take a break for every 30 minutes use to avoid fatigue in your arms.
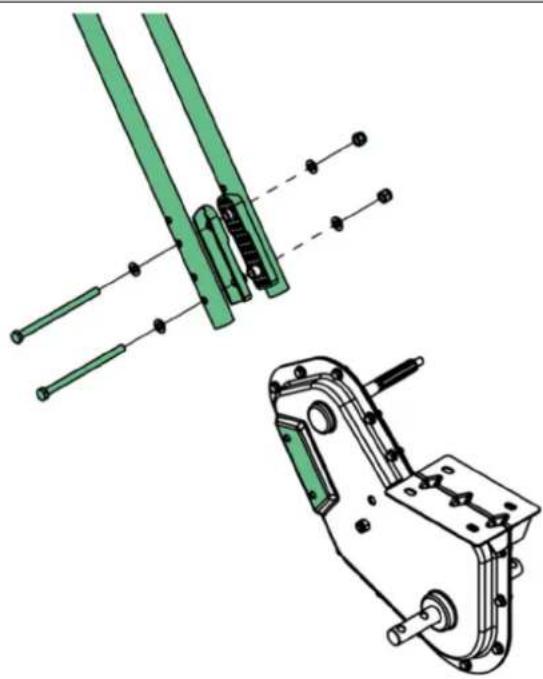
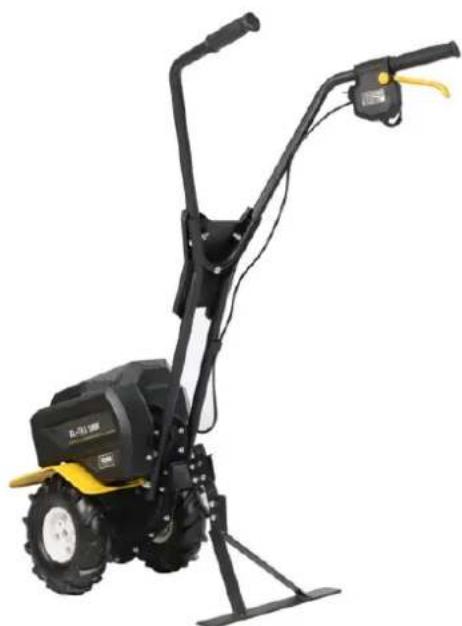
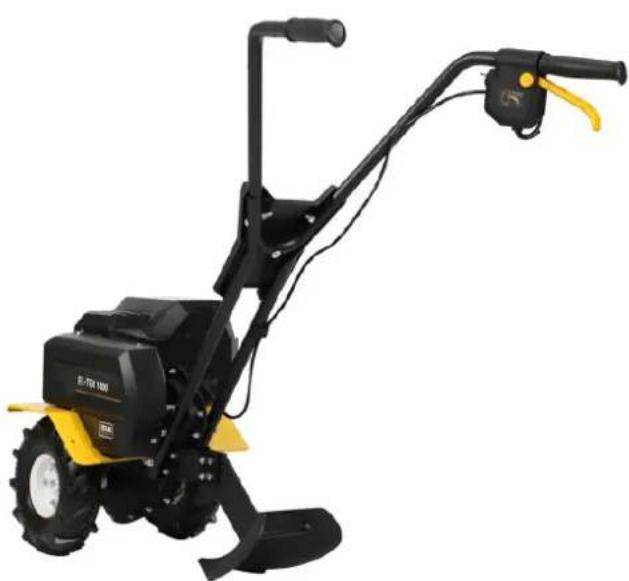
Assembly
Please follow the steps in figure:
(Actual model may vary from the illustration shown)
- Box content
A. Tiller with blades
B. Upper handlebar
C. Clutch handle with safety switch
D. Lower handlebars
E. Depth skid/support wheels
F. Extension blades
G. Panel
H. Side guards
I. Control panel
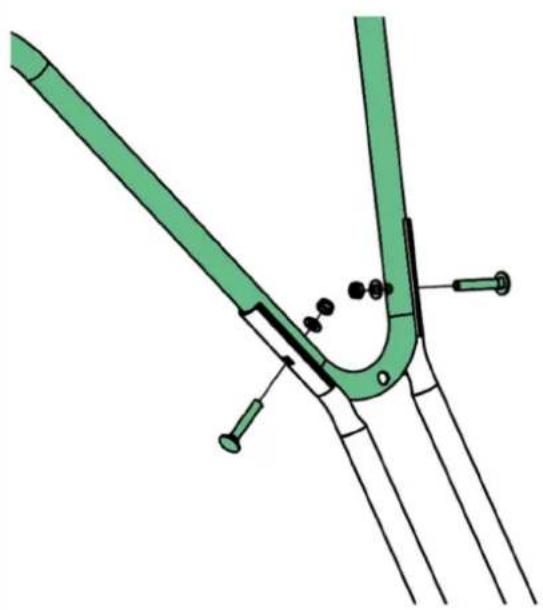
- Fit the lower handlebar section. Use the supplied mountings and bolts. You can choose between 2 different heights of handlebar.
- Fit the upper handle. Use the supplied assembly kit as shown.
- Mount the clutch handle as shown on the picture.
- Mount the control panel as shown on the picture.
- Mount the panel as shown on the picture.
- Mount the side guards using the bolts and nuts supplied. Note the side guard must go under the body frame.
- Mount the extension blades using the cotter bolts and pins.
- Mount the support wheels with the cotter bolt and pin.
- The support wheels can be turned, so it works as a depth skid. Depth can be adjusted.
Battery
This product is delivered without battery and charger. It is sold separately.
To get the best performance of this machine, it is recommended to use 2 x 4.0Ah battery.
Warning: Do not try to disassemble, short circuit or put it to extreme heat or fire, as it can cause serious inquiry and permanent damage to the battery!
The battery pack is only about 30% charged when delivered.
Charging
Only use the original charger with art. no. 90070054
Before the battery is being used the first time, it is recommended to fully charge it first.
The battery has an energy indicator. Press the button and a number of LED lights will flash (Illustration 11).
| LED lights | Battery Pack |
| All LEDs are lit Fully charged (75-100%). | |
| LED 1, LED 2, LED 3 are lit. | The battery pack is 50%-75% charged |
| LED 1, LED 2 are lit. | The battery pack is 25%-50% charged. |
| LED 1 are lit | The battery pack is 0%-25% charged |
| LED 1 flashes | The battery pack is empty. Charge the battery. |
Note: The indicator lights is only indicative indications, and is not accurate power indications.
Important: To protect the battery from total discharge, the machine will stop, when the battery is nearly empty.
The machine must not be started up again after automatic shutdown, as it can damage the battery. The battery must be recharges before the work can continue.
For further information, see the user manual which is included with the battery.

Waste lithium batteries and electric waste must not be disposed of with the household waste. Batteries and electric waste should be taken to your local recycling centre for safe treatment.
Charging
A full charge takes around 60 min for 2.0 Ah battery and 120 min for 4.0 Ah battery.
Only use the original charger, which is included with the product.
Do not try to charge other type of batteries in the charger, other than the original batteries with art. no. 90070051 (2.0 Ah) or 90070052 (4.0 Ah).
A Keep the charger in a dry and warm environment (10-25 degrees C) and only use it indoor. It should be connected to a normal 230V AC socket.
Before the battery is being used the first time, it is recommended to charge it fully.
The surface of the battery can become warm during charging. This is normal.
Do not cover battery or charger during charging. Allow free ventilation of air.
Insert the battery into the slots of the charger and slide it into place until it locks.
There are 4 lights on the charger indicating the status and state of charge of the battery (Illustration 12).
| Status | |
 | Charging |
| [YTOD] | Fully charged |
 | Evaluate |
 | Defective |
For further information, see the user manual which is included with the charger.
Important: The charger will stop, when the battery is full. However, it is not recommended to leave the battery in charger for more than 24 hours.
It is recommended to drain the battery completely and fully charge it whenever possible, as it can increase the health of the battery. But partial charge will not damage the battery.
To remove the battery from the charger, hold the button down and pull the battery out.
Before winter storage, the battery should be fully charged and kept warm at 10-20 degrees C. Charge it every 3 months. Make sure to keep ventilation holes clean and free from dirt.
Store the charger indoor between 5-25 degrees C.
The battery cells will go to sleep-mode if ont used for long time and must be activated again to reach full capacity. The battery will reach its full power after 5 full recharge cycles. Therefore, you might experience that for the first few times uses, the battery's operating time is a few minutes less than when it reaches its full power/capacity. This is also the case after long times winter storage.
Clothing
When using the machine, wear close-fitting work clothes, hard-wearing work gloves, ear defenders and non-slip boots with steel toecaps.
Operating the tiller
⚠ Ensure the machine is placed on a level surface with the support wheels lowered prior to start.
Remove all foreign objects from the work area before using the machine. Stones, glass, branches and similar items may damage the tiller. Also, check the bolts on the tiller are tightened.
Start the motor as per the instructions below. Stand clear of the machine's moving parts.
The tiller is designed for use in vegetable gardens and flowerbeds. Ensure that you are familiar with these instructions before operating the machine, in particular the start and stop procedures.
Warning: Stay out of dashed zone, while starting the engine! Always start the engine from dotted operation zone. See illustration 13.
Safety key. See illustration 14
The motor unit has a safety key, which is placed under the battery cover. If the safety key is removed, the power is disconnected, and it cannot start.
It is always recommended to remove the safety key:
- When the machine is left unattended (to prevent unintended start, e.g. by minors)
• Before clearing and maintenance
To remove the safety key, turn it to the free position "O" and pull it out. To insert the safety key, inset it and turn it to run position "I". Only then the motor can start.
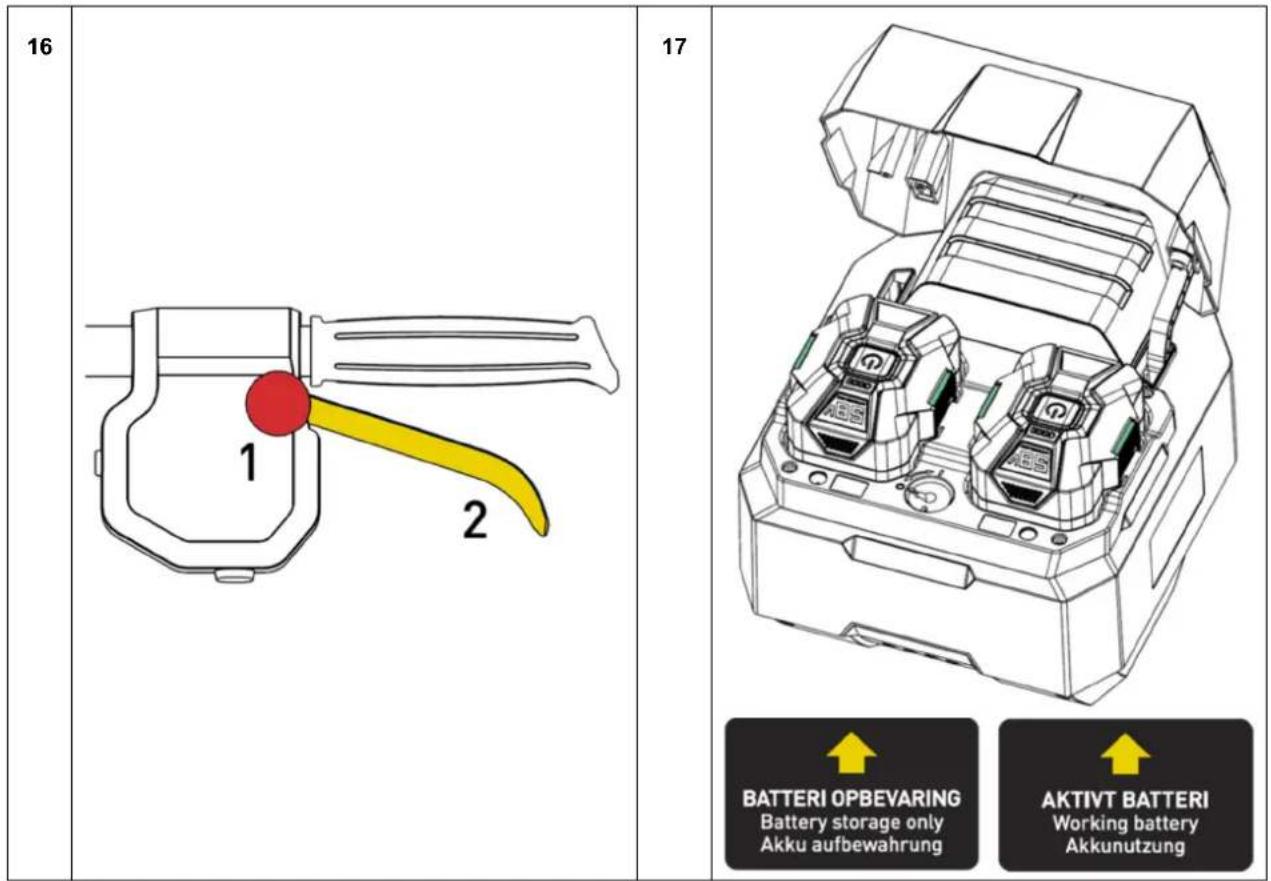
Start (Illustration 15 + 16)
- Turn the safety key to the run position "I"
- Press the button on the control panel once and it lights up green with "turtle" (slow speed).
- Press the button on the control panel once more and it lights up yellow at "rabbit" (fast speed). Subsequent fast presses toggle between slow and fast speed.
- Hold down the safety button (1) and activate the clutch lever (2).
Reverse speed
To use the reverse gear function, hold down the button so that it lights up red at "R". The button must be held down as long as go reverse. When the button is released, the function returns to slow forward speed (turtle) and blades stop turning.
Stop
Release the clutch lever. Turn the safety key to "O". After 5 minutes of inactivity the whole system will shut down automatically.
Remove the battery
To remove the battery, press and hold both latch buttons on the battery and pull it out (Illustration 17)
There is space for an additional battery in the motor unit. This can be purchased separately.
If 2 batteries are being used, the active battery must be placed in the right socket “(viewed from front)”. The battery socket in left side is only for storage.
Working time
The working time per full charge depends on several factors, like working speed (gear choice), soil hardness, temperature and if weed is growing in the soil.
Tips
Do not start motor before machine is at area to be worked. Always hold machine securely in both hands.
The blades will propel the machine forwards. Allow the blades to slowly sink into the soil.
Remember to adjust the depth skid before use.
When cutting deeply, the most effective method is to allow the blades to propel the machine forwards for an arm's length. Pull the machine back towards you. Allow it to run forwards again. Blades must always operate at maximum speed. Avoid overloading If the blades get buried, rock machine from side to side while holding it back, until it comes free

Vibrations may travel up into the handle during use. We therefore recommend taking a break every 30 minutes.
Operation zone
While the machine is being operated and the motor is running, do not leave the operation zone marked illustration 13. If it is necessary to leave the operation zone, for example to attach an accessory, first stop the engine.
It is normally necessary to drive the tiller over a section of earth 2-3 times from different directions. Do not till very wet soil, as clods of earth will form that are difficult to break up.
Adjusting the wheel/ depth skid
Fig. 9: Use the support wheels for transportation.
Fig. 10. The depth skid can be set in different depths. The deeper it extends into the soil, the deeper the tilling blades will work and the slower the machine will advance. Setting the correct tilling depth will significantly reduce the effort required. The depth skid should always be adjusted to suit the ground conditions. We recommend testing several depths to see which works best.
Lubrication of gearbox
The gearbox is permanently lubricated at the factory, never open the gearbox.
Cleaning the tiller
The tiller should be cleaned after use. Use a garden hose to wash off soil and dirt. Remove any grass, etc. from the rotor shaft. The chassis number should only be cleaned with a damp cloth to avoid unnecessary wear. Avoid using a high-pressure washer during cleaning.
Storage
- If the machine is likely to be stored unused for prolonged periods, follow the instructions below. This will ensure longer machine lifetime.
- Use a garden hose to wash off soil and dirt. Remove any grass, etc. from the rotor shaft. The chassis number should only be cleaned with a damp cloth to avoid unnecessary wear. Avoid using a high-pressure washer during cleaning.
- Wipe the tiller with a damp cloth so that all surfaces are clean. Wipe the surfaces down with an oily cloth to prevent rust.
• Always store the machine in a dry, clean location.
Troubleshooting
The motor will not start
- Check that the safety key is fitted correctly.
- Check that the battery is fully charged and mounted correctly in the right side of the battery compartment.
- Make sure to hold the safety switch down before activating the clutch handle.
The blades will not rotate
- Check for stones lodged between the blades.
- Release any stones by removing the blades.
- Check the cables are in good working order and fitted correctly.
- Check the belt is in good working order and fitted correctly.
- Ensure the belt tensioner is adjusted correctly.
Control panel flashes green (when hold clutch handle)
- The battery is discharged. Set it to charge
- The controller or battery is hot. Let it cool down.
- Connection failed. Reinstall battery and restart.
Control panel flashes orange (when hold clutch handle)
- The blades or gearbox may be blocked. Release any stones by removing the blades.
- Start failed. Switch off the machine and start again.
Noise, vibration and precautionary measures
- Long-term exposure to noise levels exceeding 85 dB (A) are damaging. Always use ear defenders when the machine is being used.
- To reduce noise levels further, only use the machine in an open environment.
- Vibrations can be reduced further by holding the handle firmly.
- To avoid disturbing others, the machine should only be used during the daytime.
- Always wear close-fitting work clothes, hard-wearing work gloves, ear defenders and non-slip boots with steel toecaps.
- Take 30-minute break every 2 working hours.
- A worn belt must be replaced/ serviced by an authorized dealer
Warranty terms and conditions
The warranty period is 2 years for private end users in EU countries.
Products sold for commercial use, only have a warranty period of 1 year.
The warranty covers material and/or fabrication faults.
Restrictions and requirements
Normal wear and replacement of wearing parts are NOT covered by the warranty.
Wearing parts, which are NOT covered for more than 12 months:
- Blades
- Cables
- Belts
- Switches
- Battery: If the battery is not stored correct (frost-free and recharged every 3 months), the durability is only guaranteed for 6 months
The warranty does NOT cover damages/faults caused by:
- Lack of service and maintenance
• Structural changes - Exposure to unusual external conditions
- Damages to the bodywork, deck, handles, panels etc.
- If the machine has been improperly used or overloaded
• Use of unoriginal spare parts. - Other conditions where Texas cannot be held responsible.
Whether a case is a warranty claim or not is determined in each case by an authorized service center.
Your receipt is your warranty note, why it should always be kept safe.
REMEMBER: The purchase of spare parts as well as any request for warranty repair, art. no. (e.g. 900XXXXX), year and serial number should always be informed. It can be found on the CE-label on the machine!
* We reserve the right to change the conditions and accept no liability for any misprints
natural_image
Exterior view of a black and yellow industrial tiller with two arms, no visible text or symbols on the device body.Art. no. 91033600100 Art. no. 91031
natural_image
Black and yellow manual tiller with a mounted tool, no visible text or symbols0100 + 451224
natural_image
Black and yellow manual tiller machine with black body and yellow handle, no visible text or symbolsArt. no. 91032500100 + 451224 Art. no. 9

natural_image
Black and yellow agricultural tiller machine with extended blade and base rack (no visible text or symbols)31100100
Fabrikant • Manufacturer • Hersteller • Fabricant • Producent •
Texas Andreas Petersen A/S
Erklærer herved at materiel • Hereby certifies that the following • Bescheinigt hiermit das die nachfolgenden • Certifie ici que • Niniejszym zaświadcza, że niżej wymieniona
Elektrisk havefræser • Electric cultivator • Electrisch Motorhacke • Électrique Motoculteur de jardin • Glebogryzarka elektryczny
FRZ 5800
Er fremstillet i overensstemmelse med fölgende direktiver • Is in compliance with the specifications of the machine directive and subsequent modifications • Steht im Einklang mit den folgenden Richtlinien • Est fabriqué en conformité avec les directives suivantes • Zgodność z wymaganiami dyrektywy maszynowej następujące
2006/42/EC - 2014/30/EU - 2000/14/EC amended by 2005/88/EC
Responsible for documentation
Johnny Lolk

text_image
Harry TahnJohnny Lolk
Managing Director