Perfect 16 - Air quality monitor IQAir - Free user manual and instructions
Find the device manual for free Perfect 16 IQAir in PDF.


User questions about Perfect 16 IQAir
0 question about this device. Answer the ones you know or ask your own.
Ask a new question about this device
Download the instructions for your Air quality monitor in PDF format for free! Find your manual Perfect 16 - IQAir and take your electronic device back in hand. On this page are published all the documents necessary for the use of your device. Perfect 16 by IQAir.
USER MANUAL Perfect 16 IQAir
Community Air Quality Monitor
Join the air quality community

geo
| Region | Value | |----------------|-------| | North America | High | | Europe | Medium| | Asia | High | | Africa | Medium| | South America | Low | | Australia | Low |EN Join the air quality community
IQAir reports data from thousands of ground level monitoring stations around the world. Yet, many places still lack local air quality information.
With the purchase of an AirVisual Outdoor monitor, you are only a few simple clicks away from becoming an official air quality monitoring station and contribute your data to global air pollution knowledge. Your station, after a short validation process, will become visible to the global air quality community on the IQAir AirVisual app and IQAir website. By making your AirVisual Outdoor public, you become part of a global community of air quality data contributors who help to increase knowledge about hyper-local air quality.
Together, we can raise air quality awareness and provide the global air quality data needed for people, businesses, NGOs, and governments to help improve air quality everywhere.
Visit us online for more information: iqair.com
text_image
QR code with a central logo featuring a stylized face and hair, likely for a social media or app linking.EN Scan this QR to get to the appropriate app store. Download the IQAir AirVisual app & create an account
Important safety instructions
Packaging contents
In the box you will find:
1x Air quality monitor with pre-installed sensor modules
1x Mounting plate
2x Screws & wall anchors
2x UV resistant cable ties
1x Allen key
1x Short power cable
1x Long power cable
1x Power adapter
1x User Manual
Safety information
Read this user manual before you use the device, and save it for future reference.
WARNINGS
- Use of equipment, components, and accessories other than those specified by IQAir may impair the safe operation of the equipment. The safe operation of the equipment as part of a larger system is the responsibility of the installer of the system.
- If the AirVisual Outdoor is out of reach, the power adapter should be positioned to allow it to be easily unplugged.
- When using in covered outdoor areas, the power adapter is to be installed in a weatherproof enclosure or indoors with the cable routed through a wall or window feed-through.
- If the AirVisual Outdoor is used in a manner not specified by the manufacturer, the protection provided by the equipment may be impaired.
CAUTION
• The AirVisual Outdoor enclosure is designed
to be water resistant to rain or spray. It is not designed to be waterproof when immersed. Setting it in a pool of water will result in flooding the inner compartment with water. This will severely damage your AirVisual Outdoor.
- DO NOT install the AirVisual Outdoor less than 1 meter (3 feet) from the ground to prevent splash back.
- DO NOT mount the AirVisual Outdoor upside down. To prevent the entry of insects and large particles, the PM sensor is covered by a porous screen that is not splash resistant. The AirVisual Outdoor is splash resistant from top, front, and back. Direct injection of water into the device is likely to damage it.
- The supplied power adapter is not intended for outdoor use.
- Before plugging the power adapter into a socket, check if power source, voltage and frequency corresponds to 100 to 240V and to 50 to 60Hz. Current rating of power adapter is 0.5A.
- Do not use the equipment at altitudes exceeding 2,000 meters (6,560 feet).
Important safety instructions
EN
- The maximum power consumption of the AirVisual Outdoor is 12W (48.0VDC and 0.25A from PoE). It is recommended to power the AirVisual Outdoor through the RJ45 Ethernet connector with the supplied power adapter and cables. There are no outputs available from the AirVisual Outdoor.
- The supplied power adapter is rated to operate between 0 °C and +40 °C (32 °F to 104 °F), with humidity ranging from 0% to 95% non-condensing. The AirVisual Outdoor is rated to operate between -20 °C to 50 °C (-4 °F to 122 °F), with humidity ranging from 0% to 100% non-condensing. IQAir recommends running the AirVisual Outdoor within these temperature limits.
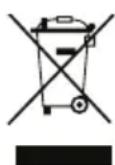
• WEEE directive requires that old or defective electrical and electronic products must be disposed of in an environmentally sound way. The symbol means that your product should be collected separately from household waste. Please contact a retailer or your community for the nearest collection center.
LASER SAFETY
• AirVisual Outdoor sensor modules are Class 1 laser-based instruments.
- During normal operation, you will not be exposed to laser radiation.
- DO NOT open the AirVisual Outdoor when it is powered ON.
- You will not be exposed to the laser radiation when the AirVisual Outdoor is disassembled.
- The PM sensor inside the PM sensor module contains a laser diode. DO NOT open the PM sensor module when it is powered ON.
Precautions
DO NOT remove any parts from the AirVisual Outdoor.
WARNING
The use of controls, adjustments, or procedures other than those specified in this manual may result in exposure to hazardous optical radiation.
When operated according to the manufacturer's instruction, this device is a Class 1 laser product as defined by U.S. Department of Health and Human Services standards under the Radiation
Control for Health and Safety Act of 1968.
This equipment is to be operated with provided accessories only. Equipment and accessories are to be supplied by IQAir or its agent only. This equipment is to be cleaned with a damp cleaning cloth with warm water containing some drops of dishwashing detergent. After cleaning, dry it with a cloth.
The power adapter is intended for use at supply voltages with fluctuations not exceeding +/-10% and classified as over-voltage category II. The IQAir AirVisual Outdoor is intended for use in environments classified as pollution degree 3, the power adapter is intended for use in environments classified as pollution degree 2.
FCC Statement
Any changes or modifications not expressly approved by the party responsible for compliance could void the user's authority to operate the equipment.
text_image
C2014 Product Name: C2014 Rating: 100% Product Quality: 95% Product Design: 95% Product Support: 95% Product Security: 95% Product Security Rating: 95% Product Security Protection: 95% Product Security Protection Support: 95% Product Security Protection Protection Support: 95% Product Security Protection Protection Support Support: 95% Product Security Protection Protection Support Support Support: 95% Product Security Protection Protection Support Support Support Support Support Support Support Support Support Support Support Support Support Support Support Support Support Support Support Support Support Support Support Support Support Support Support Support Support Support Support Support Support Support Support Support Support Support Support Support Support Support Support Support Support Support Support Support Support Support Support Support Support Support Support Support Support Support Support Support Support Support Support Support Support Support Support Support Support Support Support Support Support Support Support Support Support Support Support Support Support Support Support Support Support Support Support Support Support Support Support Support Support Support Support Support Support Support Support Support +6 Product Security Protection Rating: 95% Product Security Protection Rating: 95% Product Security Protection Rating: 95% Product Security Protection Rating: 95% Product Security Protection Rating: 95% Product Security Protection Rating: 95% Product Security Protection Rating: 95% Product Security Protection Rating: 95% Product Security Protection Rating: 95% Product Security Protection Rating: 95% Product Security Protection Rating: 95% Product Security Protection Rating: 95% 产品安全等级:C2014 产品安全等级:C2014 产品安全等级:C2014 产品安全等级:C2014 产品安全等级:C2014 产品安全等级:C2014 产品安全等级:C2014 产品安全等级:C2014 产品安全等级:C2014 产品安全等级:C2014 产品安全等级:C2014The compliance statements on the AirVisual Outdoor can be found under the mounting plate.
Note: This equipment has been tested and found to comply with the limits for a Class B digital device, pursuant to part 15 of the FCC Rules. These limits are designed to provide reasonable protection against harmful interference in a residential installation. This equipment generates, uses, and can radiate radio frequency energy and, if not installed and used in accordance with the instructions, may cause harmful interference to radio communications. However, there is no guarantee that interference will not occur in a particular installation. If this equipment does cause harmful interference to radio or television reception, which can be determined by turning the equipment off and on, the user is encouraged to try to correct the interference by one or more of the following measures:
- Reorient the receiving antenna by reorienting the equipment.
- Increase the separation between the equipment and receiver.
- Connect the equipment into an outlet on a circuit different from that to which the receiver is connected.
- Consult the seller or an experienced radio/TV technician for help.
ISEDC RSS Warning
This device complies with ISEDC license-exempt RSS standard(s). Operation is subject to the following two conditions: (1) this device may not cause interference, and (2) this device must accept any interference, including interference that may cause undesired operation of the device.
ISEDC Radiation Exposure Statement:
This equipment complies with ISEDC RF radiation exposure limits set forth for an uncontrolled environment. This transmitter must not be co-located or operated in conjunction with any other antenna or transmitter. This equipment should be installed and operated with minimum distance of 20 cm between the radiator and your body.
Any changes or modifications not expressly approved by the party responsible for compliance could void the user's authority to operate the equipment.
- Air inlet cover with insect mesh
- Sensor modules (up to 4)
- Control button
-
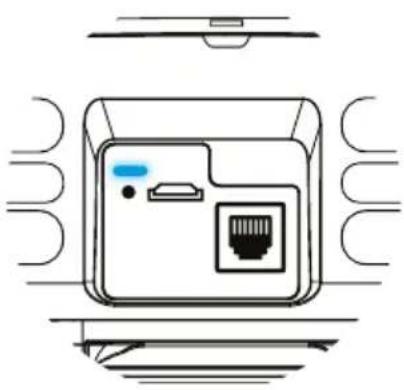
Status LED
-
Temperature & humidity sensor
- Slots for sensor modules
-
Micro-USB socket (not supported)
-
PoE Ethernet port (power and optional data)
- Optional 4G USB modem stick
- Mounting plate with mounting hook
AirVisual Outdoor LED indicator
natural_image
Diagram of a device with ports and ventilation slots, no text or symbols presentBlue = Connected to the IQAir cloud platform
Red = Not connected to cloud or network
Red, blinking = Resetting / updating / self-testing
Green = Wi-Fi setup, Wi-Fi hotspot paired
Green, blinking = Wi-Fi setup, Wi-Fi hotspot open
PoE power adapter LED indicator
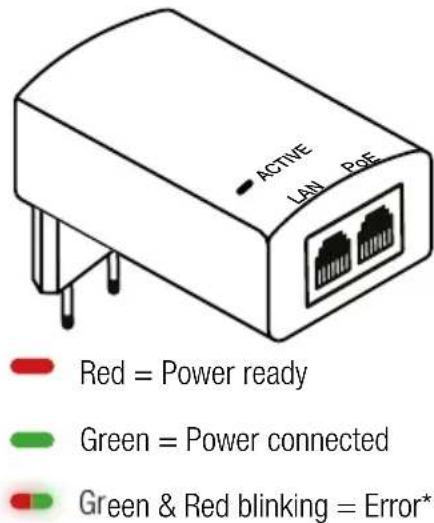
text_image
ACTIVE LAN RGE Red = Power ready Green = Power connected Green & Red blinking = Error*Setup and configuration
Power the device
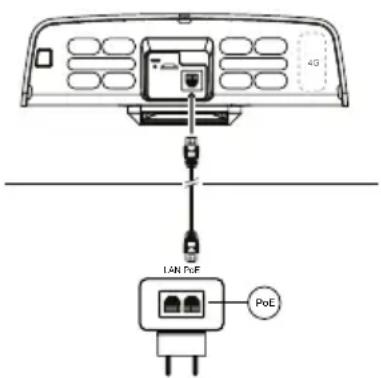
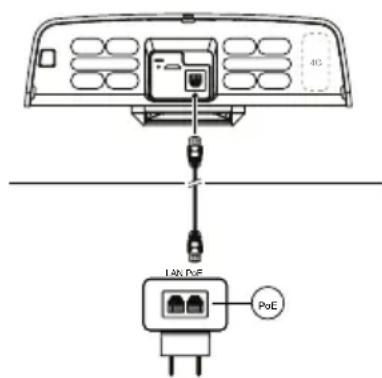
The AirVisual Outdoor uses Power over Ethernet (PoE) to power the monitor. Power is supplied with the provided 48V PoE power adapter and either of the two included Ethernet power cables.
When used in outdoor areas, the supplied PoE power adapter is to be installed in a dry spot where no water can reach the power adapter or use a power outlet with a weatherproof enclosure. When the PoE power adapter is connected indoors, the Ethernet cable should be routed through a wall or window feed-through.
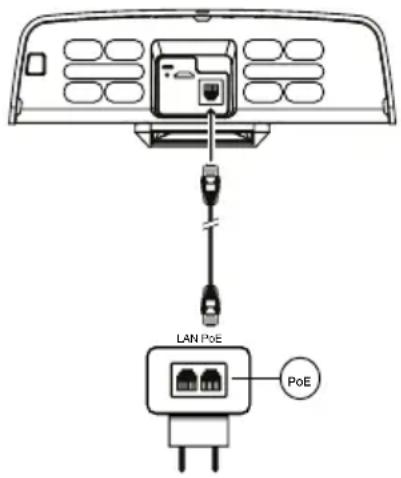
text_image
LAN PoE PoEPlug the power adapter into a power outlet and the status LED will turn red. Connect the Ethernet cable to the AirVisual Outdoor Ethernet port and to the PoE marked port of the power adapter. The status LED of the PoE power adapter will turn green.
The LAN marked port will not power the monitor. The LAN port on the power adapter can be used to connect the device to the Internet. Refer to "Connecting to the IQAir cloud platform."
Instead of the supplied PoE power adapter you can use a PoE Ethernet switch (IEEE-802.3af capable). If you need a longer cable, PoE can power the AirVisual Outdoor up to a distance up of 80m / 262ft. Use a shielded CAT7 UV resistant Ethernet cable.
When initially connected to power, the AirVisual Outdoor will turn on and display a red status LED — indicating the device is not connected to a network.
Data connectivity options
The AirVisual Outdoor can be networked to the IQAir data cloud where current and historic air quality data may be viewed on the IQAir AirVisual mobile app or on the IQAir web dashboard. Three network connectivity options are available. The device features Wi-Fi and Ethernet connectivity. A 4G cellular connection is possible with an optional 4G USB modem stick and SIM card with an active data plan.
The most suitable choice of cloud connection will depend on the following:
- Do you have a reliable Wi-Fi signal at the installation location? This would make a Wi-Fi connection suitable.
- Do you have access to an Ethernet outlet? This would make an Ethernet connection suitable.
- If neither Ethernet nor Wi-Fi connection is available, then a mobile 4G cellular network connection may be the best way to connect your AirVisual Outdoor to the IQAir cloud. Please note that the AirVisual Outdoor generates about 35 MB in monthly data.
Connection with Ethernet or cellular 4G USB modem establishes the connection automatically. Wi-Fi setup requires a few steps. Simply follow the instructions from the IQAir AirVisual app.
Setup and configuration
EN
Connect your AirVisual Outdoor to the app
Download the IQAir AirVisual app & create an account.
Add a device
In the app, select 'Scan QR Code' and scan the device QR code on the back side of the device or in the user manual.
Alternatively, in the app, select 'Add device' and follow the instructions to enter the serial number manually.
Follow the prompts for the network setup.
Connecting to the IQAir cloud platform
Ethernet connection
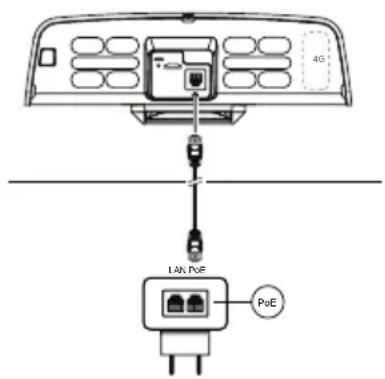
Connect the Ethernet cable from an Internet router to the port labeled LAN of the PoE power adapter. Connect the second Ethernet cable from the PoE labeled port of the PoE power adapter to the Ethernet port of the AirVisual Outdoor.
Wi-Fi connection
Use the AirVisual app to configure the AirVisual Outdoor to connect to your Wi-Fi network. Open the device settings and select Wi-Fi as connection type. To set the AirVisual Outdoor into pairing mode, press and hold the control button for 3 seconds. The status LED will start to blink green . Next, pair your phone with the device. The AirVisual app shows the Wi-Fi network of your device with the serial number for identification. After successful connection, the status LED will change to solid green . Select your local Wi-Fi network that you would like the AirVisual Outdoor to connect to. Enter the password if required or enter an SSID manually. The AirVisual app will ask you to verify the successful connection by observing the blue status LED .
4G cellular connection
Plug the 4G USB modem stick into the USB socket on the side of the AirVisual Outdoor. The "Component overview" on page 6 shows where the 4G USB modem stick must be inserted after removing the air inlet cover.
A successful connection to the IQAir cloud data platform is indicated by a status LED on the AirVisual Outdoor that turns blue ☐.
The device will now upload its data to the cloud and within a few minutes delay you can view your air quality data online from the AirVisual app or IQAir web dashboard (may require subscription).
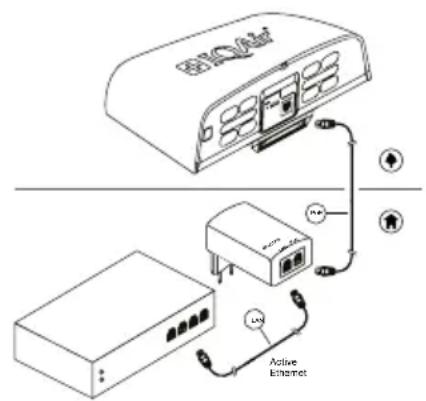
text_image
BIOVAT Active InternetEthernet connection
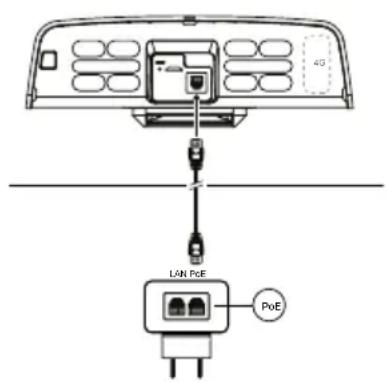
text_image
4G LAN PGE PoEWi-Fi & 4G connection
Installation
Select a suitable air quality monitoring location
After successful network configuration, the device is now ready to be mounted in a suitable location.

Configure your AirVisual Outdoor and confirm that it is connected to the Internet and IQAir cloud platform (blue LED) before starting the installation.
Always mount the AirVisual Outdoor in an outdoor location with good air circulation. Avoid locations near direct local pollution sources, such as vents, exhausts, open windows, smoking areas or any other combustion sources.
Installation orientation
Install the AirVisual Outdoor vertically, e.g. onto a wall or pole, with the air inlet openings facing downwards.
Do not mount the AirVisual Outdoor horizontally on a surface as this may reduce sensor lifetime and allow moisture to enter the device.
Installation height
Install the device with a minimum clearance of 1m / 3ft above any horizontal surface to avoid splash back.
Rain and snow
The AirVisual Outdoor power adapter must be placed so that
it will not get in contact with water or snow.
Always use a "drip loop" for the power cable to prevent

text_image
Drip Loopwater entering the device or the power adapter.
Prepare for installation
Remove the mounting plate and set aside. You do not need to fully remove the hex screw. Prepare the location and install the mounting plate.
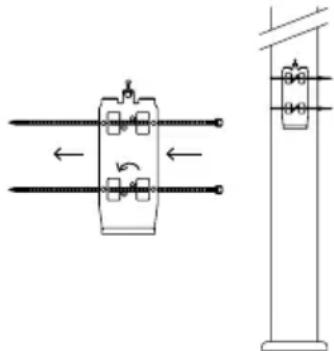
Pole mount
Install the mounting bracket with cable ties onto a pole or pillar. There are two UV resistant cable ties supplied. Insert the cable ties into the mounting plate. Install the mounting plate with zip-ties onto a pole or pillar.
Wall mount
To mount the device onto a wall, you may need a power tool to drill a hole for the wall plugs. Wall plugs and screws are supplied.
Attach the AirVisual Outdoor on the mounting plate
Once the mounting plate is installed, attach the AirVisual Outdoor by aligning the lower bracket on the mounting plate with the bottom slot on the back of the device. Tighten the hex screw.
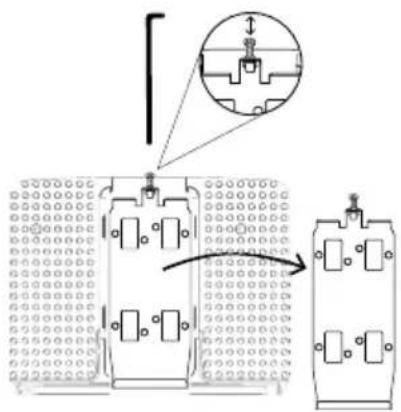
text_image
Technical diagram showing a mechanical assembly with labeled components and an inset magnified view of a component.Remove the mounting plate
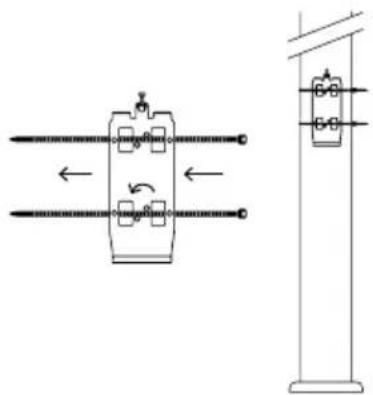
natural_image
Technical line drawing of a mechanical device with two shafts and a vertical support structure (no text or symbols)Pole mount with cable ties
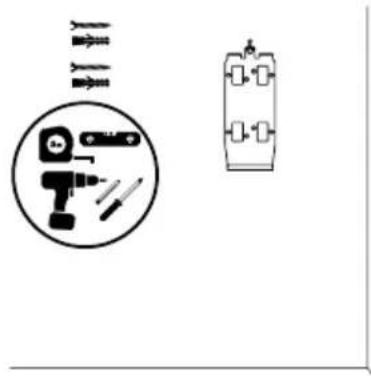
natural_image
Illustration of a tool kit with a circular component and a rectangular device (no text or symbols)Wall mount with hardware provided
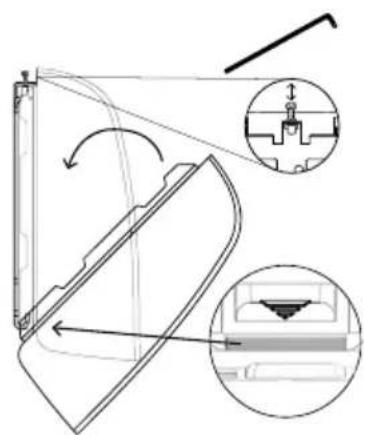
natural_image
Technical line drawing of a mechanical component with sectional views and directional arrows (no text or symbols)Attach the AirVisual Outdoor onto the mounting plate
Sensor modules and Technical information
EN
Sensor modules
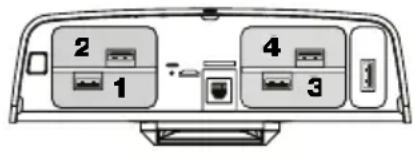
The AirVisual Outdoor has sensor slots (1-4) that allow for up to four removable sensor modules. The sensor slots can be filled with multiple identical or different sensor modules.
PM sensor module
The PM sensor module includes a laser-based nephelometer for simultaneous measurement of PM1, PM2.5 and PM10. The lifetime of the PM sensor is up to 5 years in average PM2.5 concentrations below 25 g/m^3 .
text_image
2 1 4 3Sensor slots
Calibration
The AirVisual Outdoor sensor modules are supplied pre-calibrated. Due to the sensitivity of the sensors, they will react to environmental changes. All sensors except the PM,
temperature, humidity, or pressure sensors may take up to 5 days to show correct values after the first start or when they are restarted after they have been switched off for more than a few days.
Replacing a sensor module
You will be notified by the AirVisual app or web dashboard if a sensor module requires replacement. To replace a defective sensor module, please follow the steps below:
- Unplug the power cable so the device is powered off.
natural_image
Technical diagram of a mechanical assembly with no visible text or symbolsRemove the air inlet cover
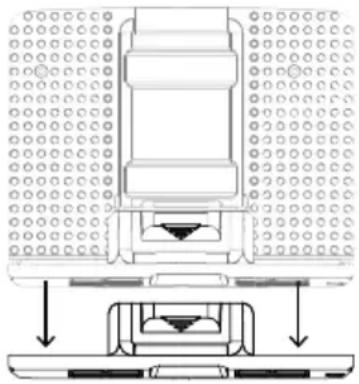
- Remove the AirVisual Outdoor from its mounting plate, by loosening the hex socket screw on top.
- Remove the air inlet cover by sliding down the cover at the back as shown.
- Pull out the defective sensor, which can be identified by the sensor module serial number and/or the sensor slot number shown in the replacement notification.
- Insert the new sensor module.
- Slide the air inlet cover back on.
- Plug back in the power cables.
- Place the monitor into its mounting plate and tighten the hex socket screw.
- Dispose of the old sensor according to your local disposal rules.
Technical specification
Model: AirVisual Outdoor
Type: 09
Power Input: PoE 48 VDC, 12W, 250 mA
PoE Standard: IEEE802.3af
USB 5.2VDC, 12W, 2.3 A
Operating temperature: -4 to 122 °F /-20 to 50 °C
Operating humidity: 0 - 100% RH, non-condensing
Warranty information
For warranty information, visit the support section on the IQAir website.
Support & FAQ's
For help with any questions and warranty information, visit the support section on the IQAir website at:
https://www.iqair.com/support
natural_image
Diagram of a device with ports and connectors, no text or symbols presenttext_image
POE ACTIVE LAN POERojo = Corriente lista
Verde = Corriente conectada
Verde y rojo,
parpadeando = Error*
text_image
EVIQ/AIR Active Ethernet Ethernet active.Conexión Ethernet
text_image
4G LAN PoE PoCConexión wifi y 4G
text_image
Technical diagram showing a mechanical assembly with labeled components and an inset magnified view of a component detail.natural_image
Technical line drawing of a mechanical assembly with two views (top and side), no text or symbols present.natural_image
Pure electrical circuit lines without any symbolsnatural_image
Technical line drawing of a mechanical component with sectional views and directional arrows (no text or symbols)natural_image
Diagram of a mechanical assembly with a component and base, showing internal components and directional arrows (no text or labels)USB 5.2VDC, 12W, 2.3 A
Temperatura de
funcionamiento: -4 to 122 °F /-20 to 50 °C
Humedad de
https://www.iqair.com/support
Health and Safety Act de 1968.
text_image
D104V Rear 2000-2005 Model No. 100 Description: D104V is the part of the device's internal structure, not directly used in this diagram. The device is designed to be a single or more complex device with no visible text or symbols. The label is "C" (circular) and is also marked with a small symbol.natural_image
Diagram of a device with a router and indicator lights, no text or symbols presenttext_image
BIOAM Active / Active ChannelConnexion Ethernet
text_image
4G LAN PoE PoEtext_image
Technical diagram showing a mechanical assembly with labeled components and an inset detail viewRetirez la plaque de montage
natural_image
Pure electrical circuit lines without any symbolsnatural_image
Pure electrical circuit lines without any symbolsnatural_image
Technical diagram of a mechanical assembly with cross-sectional views and component details (no text or symbols)natural_image
Technical diagram of a mechanical assembly with no visible text or symbolsUSB 5.2VDC, 12W, 2.3 A
Température de
https://www.iqair.com/support
text_image
DPOA R2 CEnatural_image
Diagram of a device with ports and wiring, no text or symbols presenttext_image
BID card Active / Altires EthernetEthernet-Verbindung
text_image
4G LAN/UE PoEtext_image
Technical diagram showing a mechanical assembly with labeled components and an inset magnified view of a component.natural_image
Technical diagram of a mechanical assembly with two vertical supports and directional arrows indicating motion (no text or labels)natural_image
Pure electrical circuit lines without any symbolsnatural_image
Technical line drawing of a mechanical component with sectional views and arrows indicating motion (no text or symbols)natural_image
Diagram of a mechanical assembly with a component and base, showing internal components and directional arrows (no text or labels)USB 5.2VDC, 12W, 2.3 A
Betriebstemperatur: -4 to 122 °F /-20 to 50 °C
https://www.iqair.com/support
Download the app and connect your AirVisual Outdoor by scanning the QR code:
If you have any questions, please contact us at: