
WX178L.3 - Drill WORX - Free user manual and instructions
Find the device manual for free WX178L.3 WORX in PDF.
| Product type | Cordless drill/driver |
| Brand | Worx |
| Model | WX178L.3 |
| Rated voltage | 20 V max (18 V nominal) |
| No-load speed | 0 - 800 rpm |
| Maximum torque | 180 in.lbs (~20.3 Nm) |
| Chuck capacity | 10 mm (3/8 in) |
| Max drilling diameter (steel) | 10 mm |
| Max drilling diameter (wood) | 25 mm |
| Weight | 1.3 kg |
| Battery type | Lithium-ion (Li-Ion) |
| Battery included | Yes (WA3520) |
| Charger included | Yes (WA3742, 100-240 V~50/60 Hz) |
| Operating modes | Drilling, screwdriving, impulse mode |
| Rotation direction | Forward/reverse reversible |
| Variable speed trigger | Progressive variable speed trigger |
| Bit Lock™ system | Automatic stop in screwdriving |
| Lighting | LED with battery indicator |
| Safety | Protection against overload, overheating and low voltage |
| Included accessories | Double bit PH2/SL5.5, charger, battery |
| Maintenance | Cleaning with a dry cloth, no lubrication required |
| Warranty | See terms on Worx website |
Frequently Asked Questions - WX178L.3 WORX
User questions about WX178L.3 WORX
0 question about this device. Answer the ones you know or ask your own.
Ask a new question about this device
Download the instructions for your Drill in PDF format for free! Find your manual WX178L.3 - WORX and take your electronic device back in hand. On this page are published all the documents necessary for the use of your device. WX178L.3 by WORX.
USER MANUAL WX178L.3 WORX
Advanced Intelligence Technology
20VMAX LITHIUM
| Drill/Driver | EN | P06 |
| Perceuse/tournevis | F | P14 |
| Taladro | ES | P23 |

natural_image
Completely black image with no visible content, text, or symbols.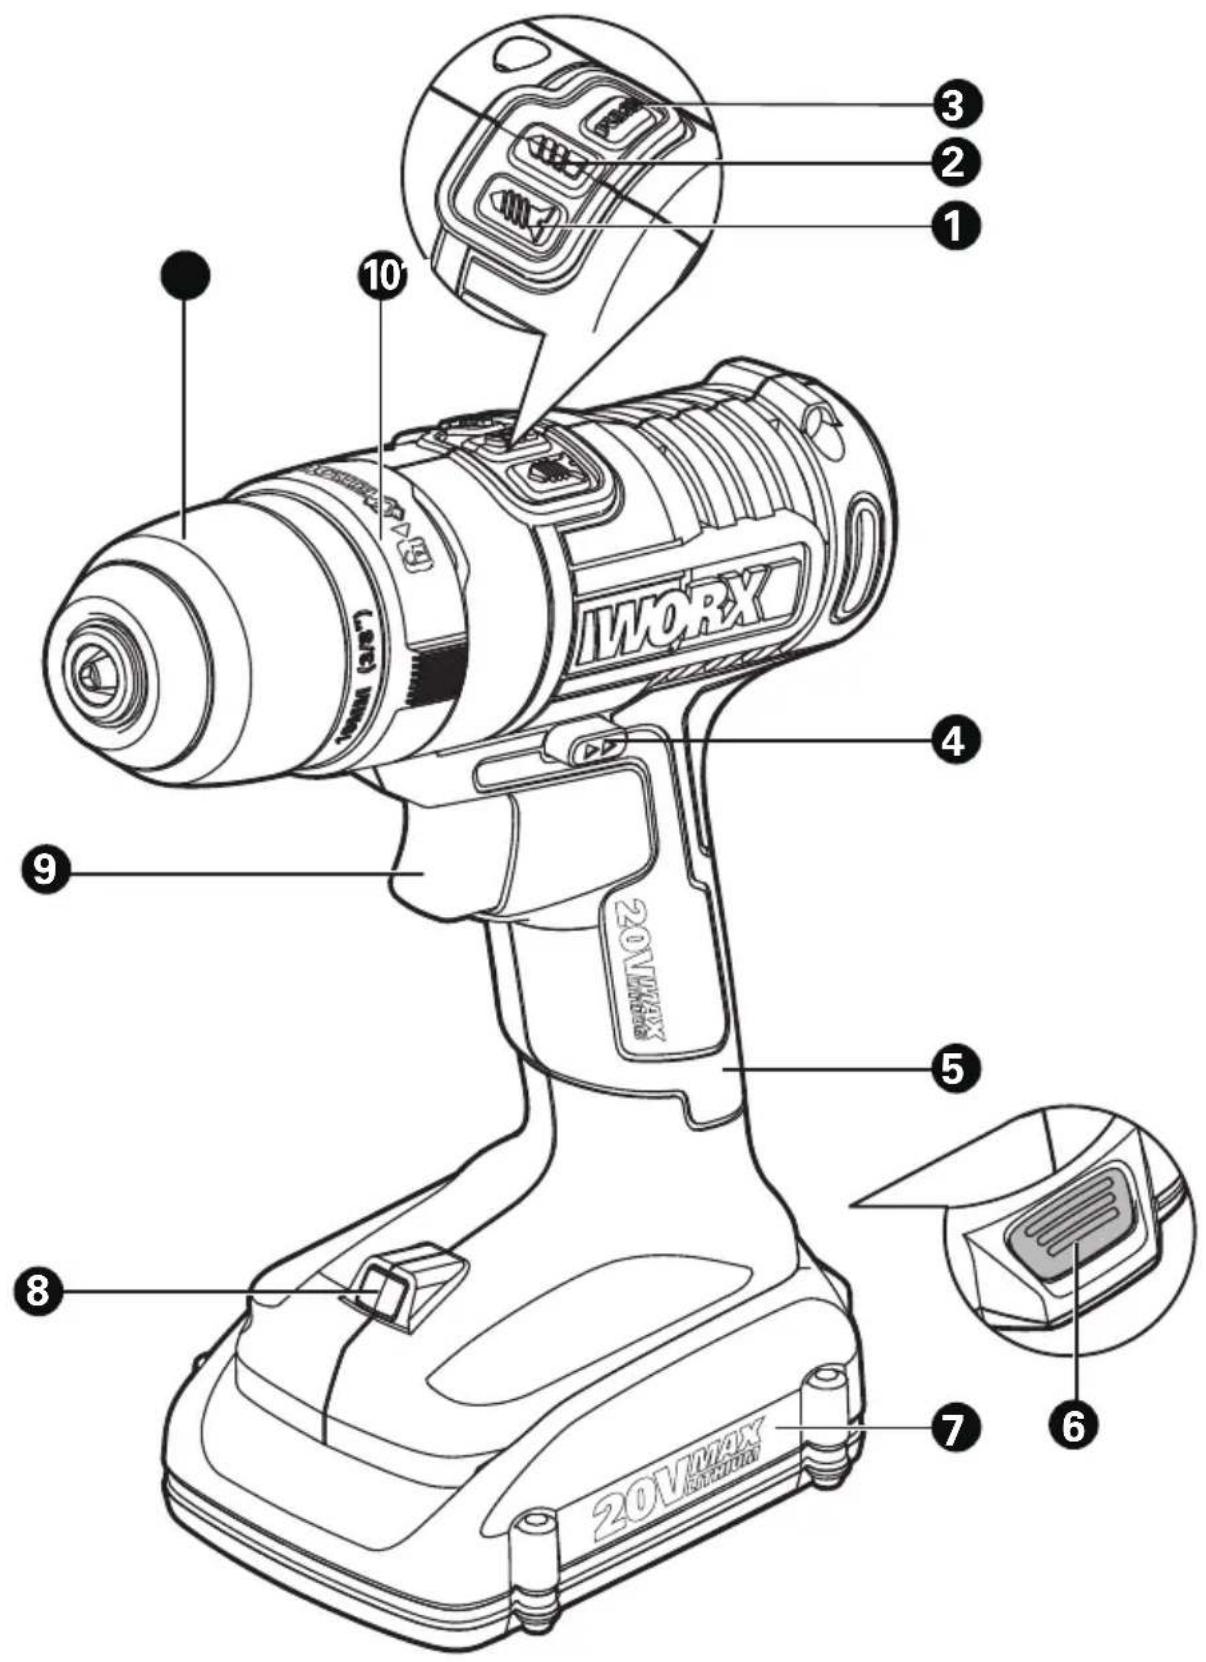
text_image
3 2 1 10 WORY 20V H-4X 20V H-4X 9 4 5 8 7 6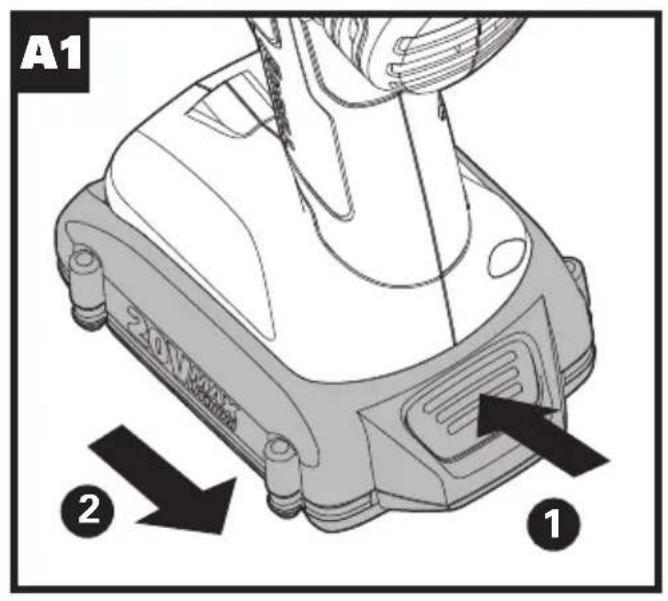
text_image
A1 2 1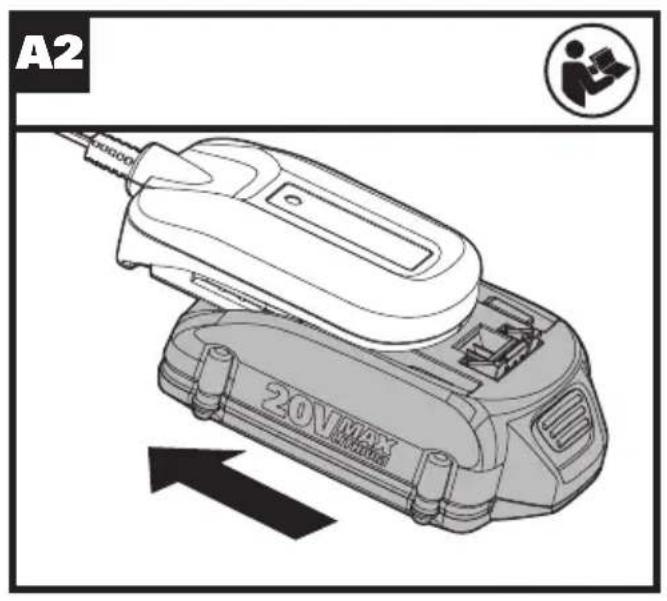
text_image
A2 20V MAX Power Supply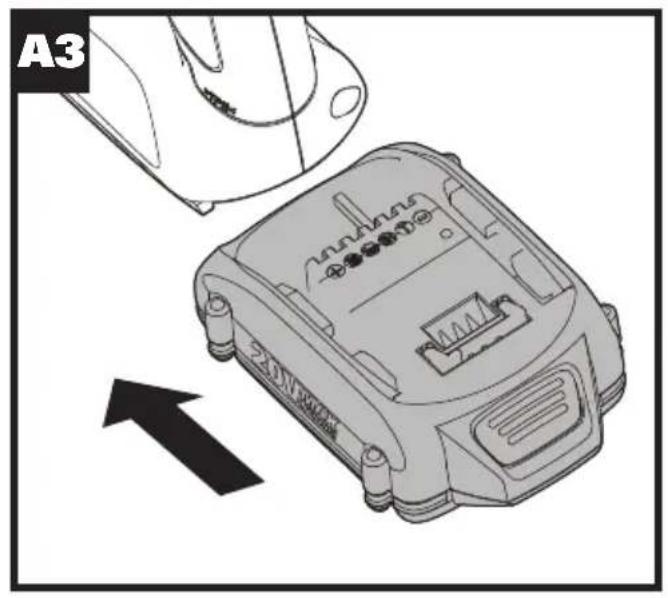
natural_image
Technical illustration of a mechanical device with a hand holding a tool, showing internal components and an arrow indicating direction (no text or symbols present)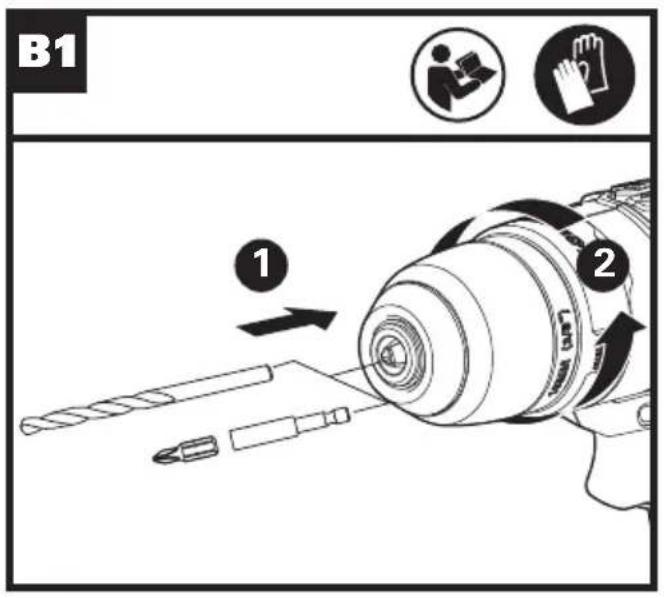
text_image
B1 ① ②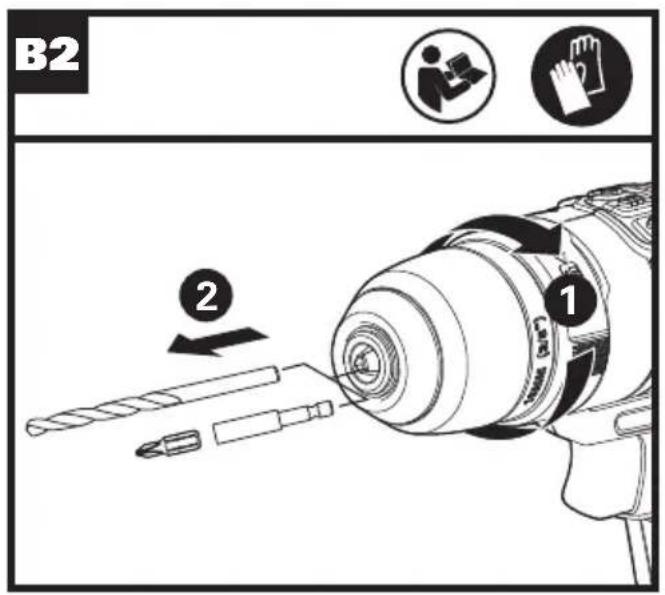
text_image
B2 ② ①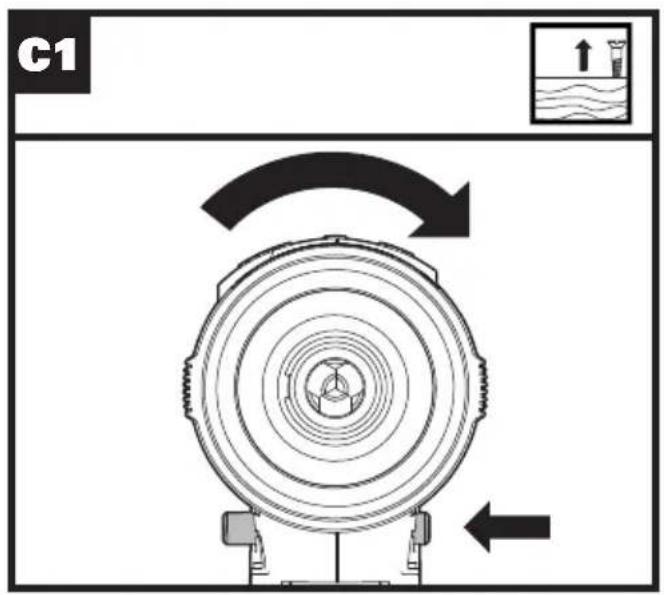
text_image
C1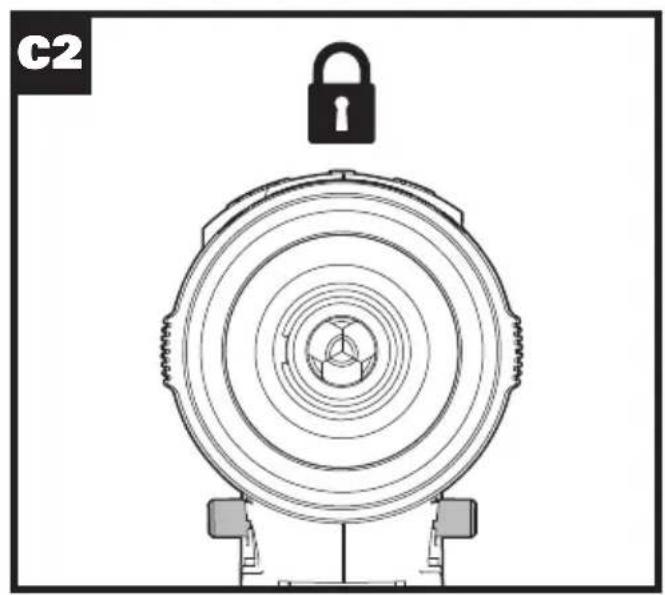
natural_image
Technical line drawing of a mechanical component with concentric circles and a lock above it (no text or symbols)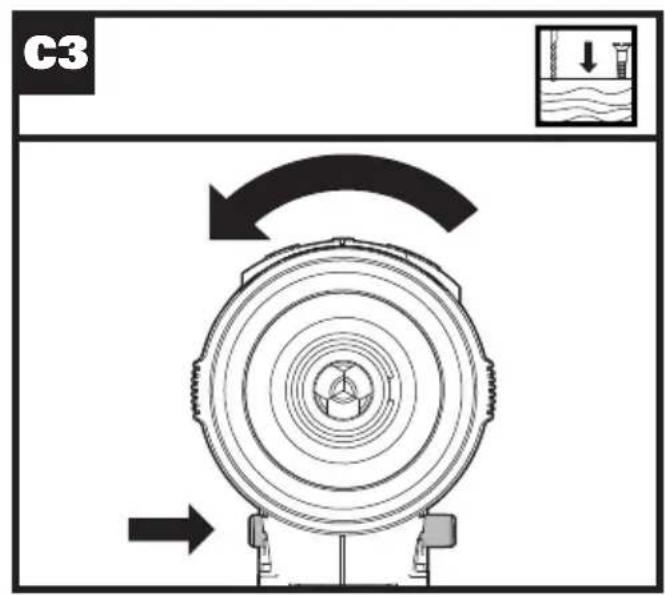
text_image
C3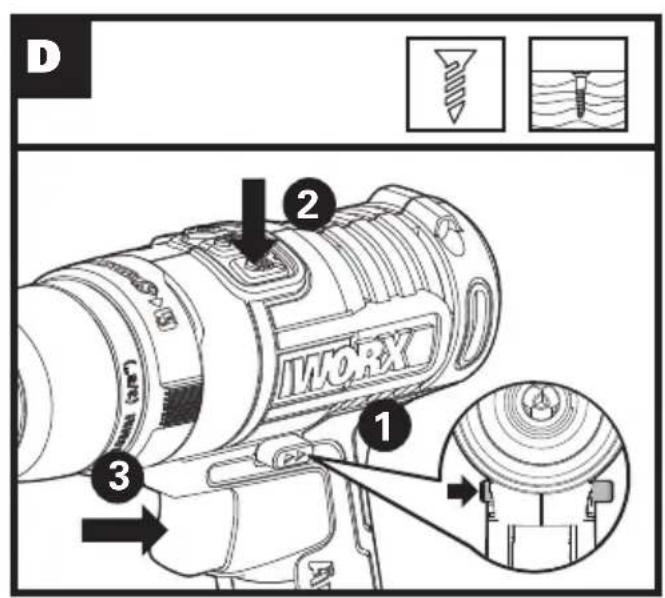
text_image
D 2 IWORK 1 3
text_image
WORX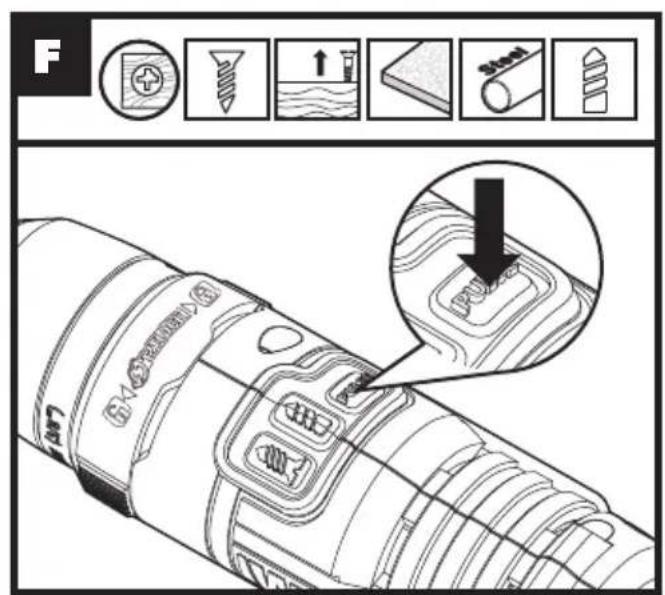
text_image
F 14.5mm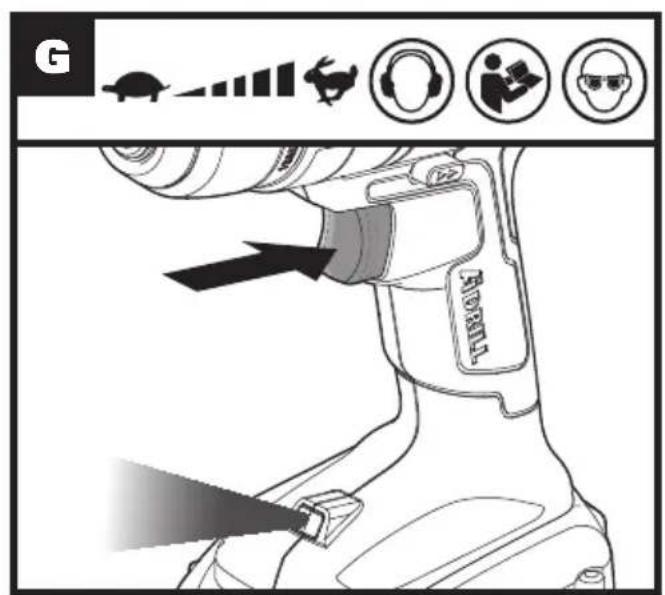
text_image
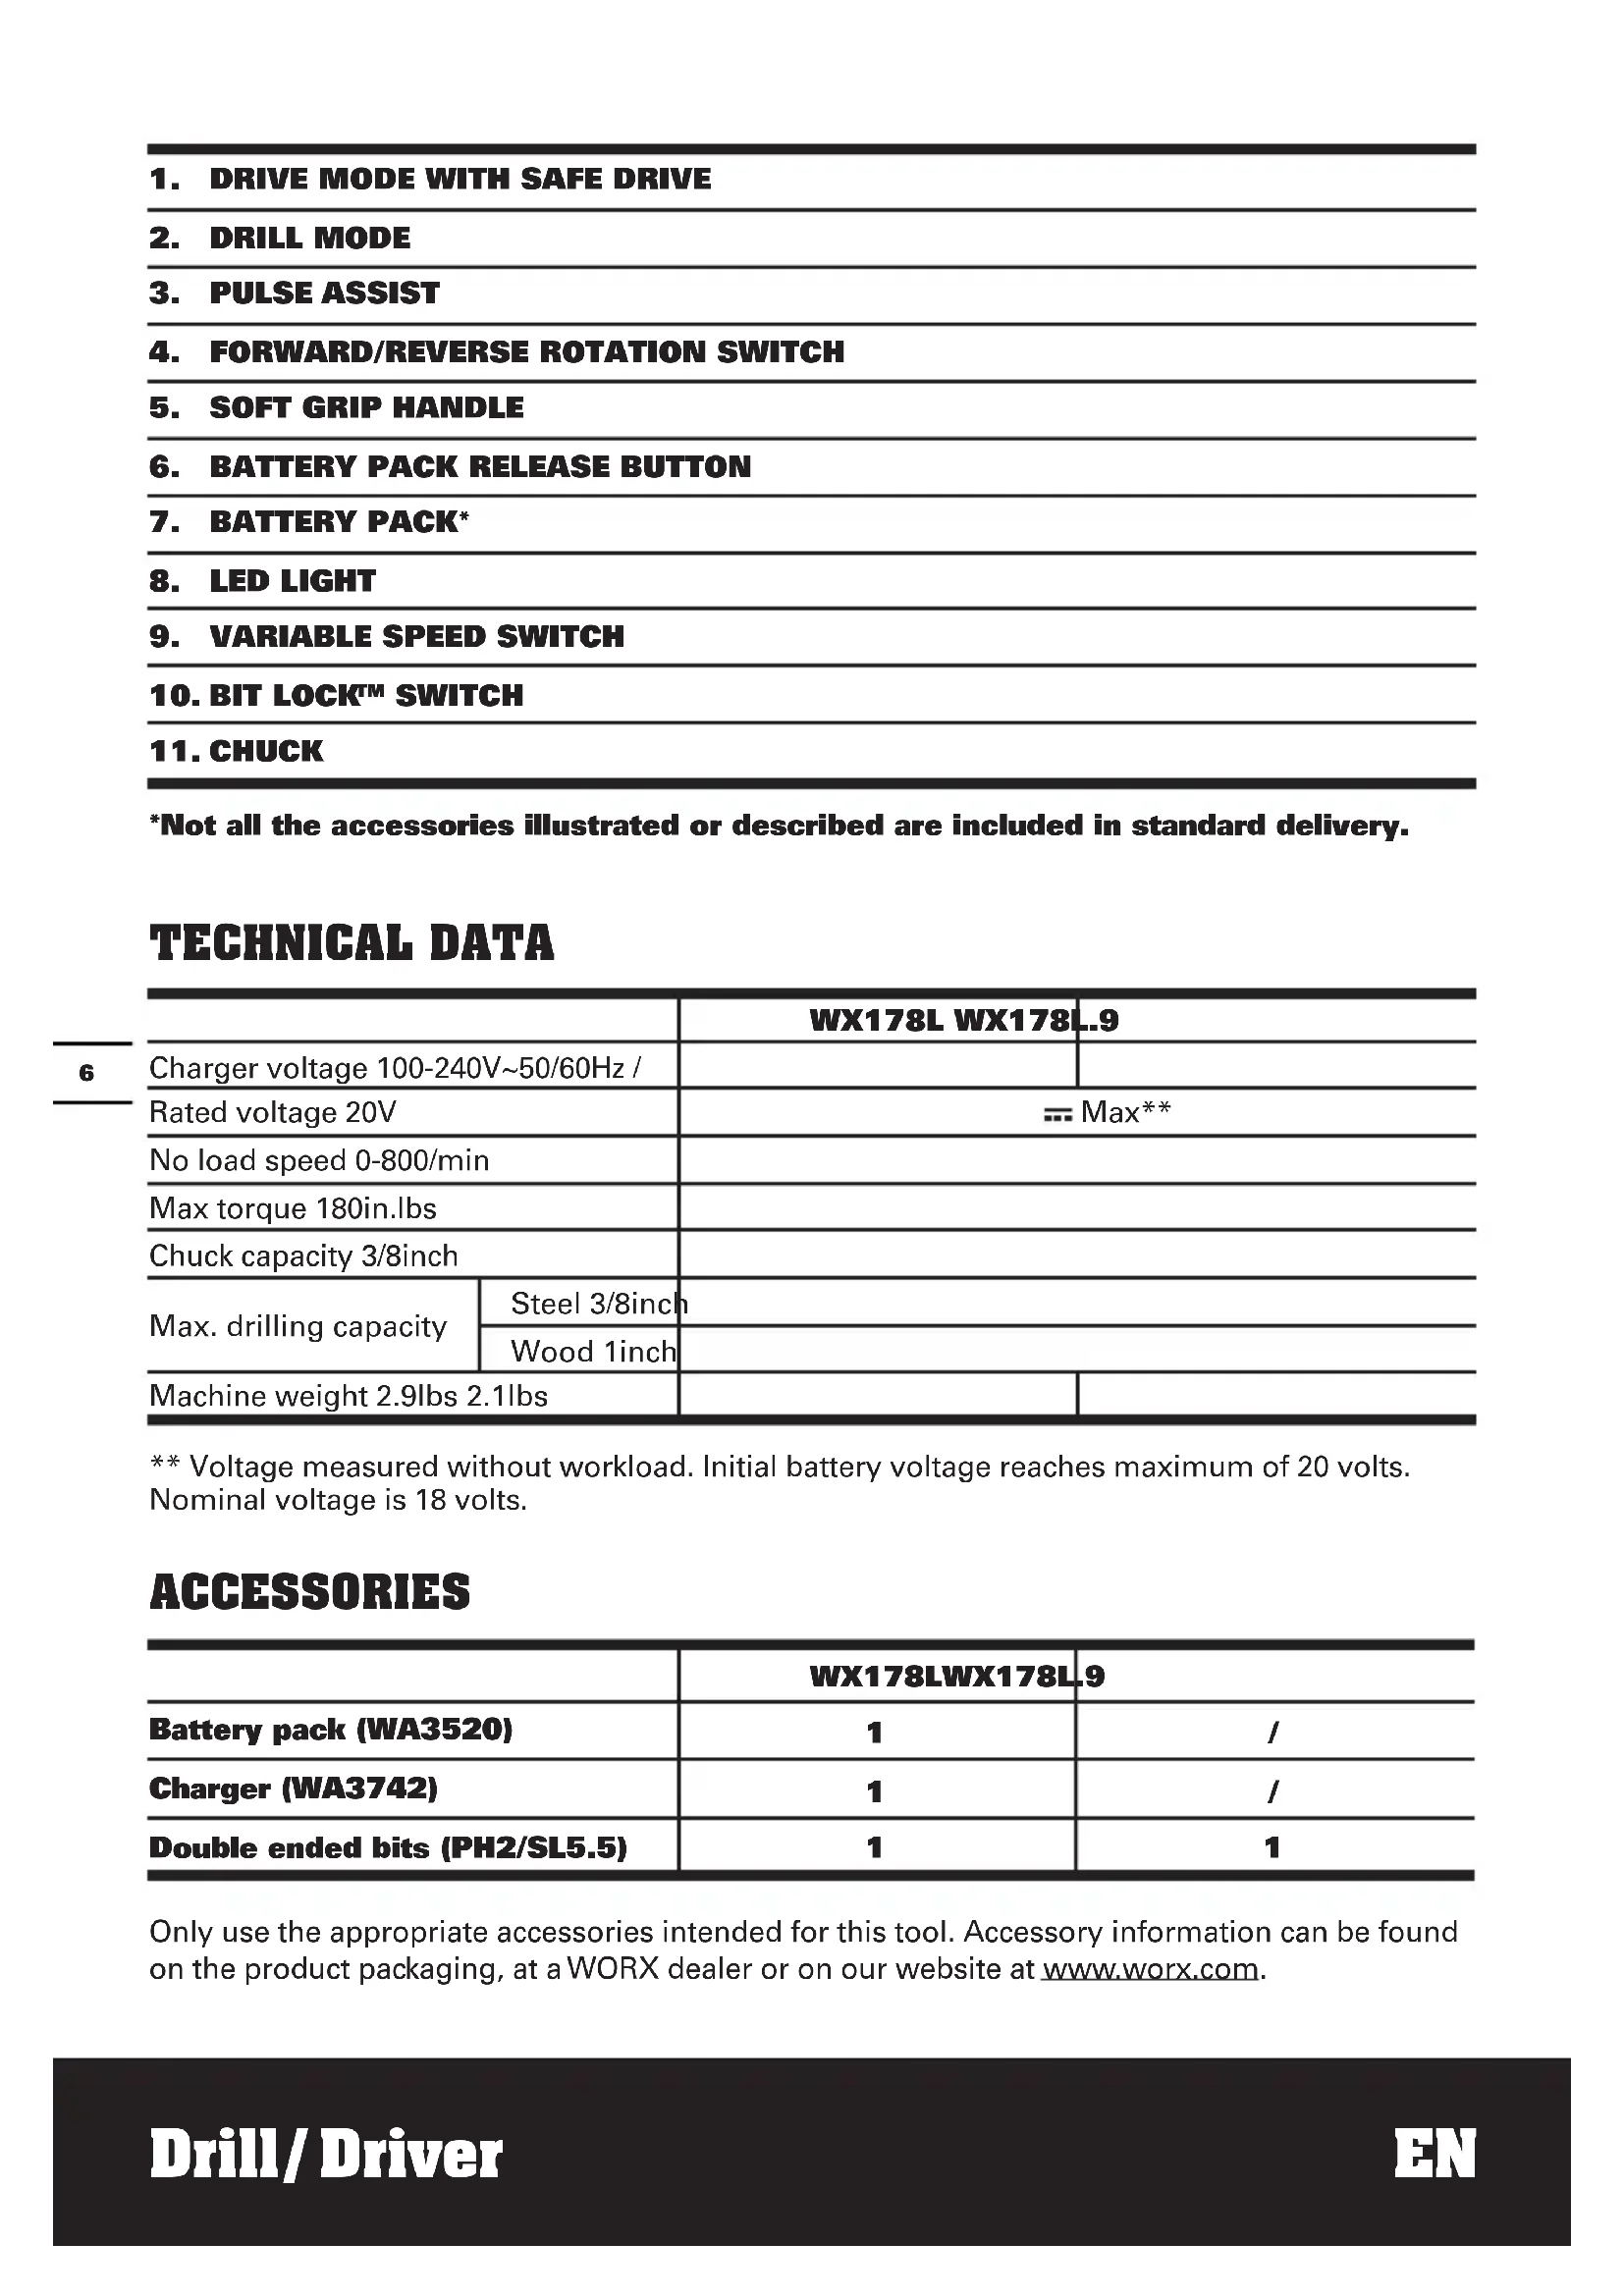
G SARROLL- DRIVE MODE WITH SAFE DRIVE
- DRILL MODE
- PULSE ASSIST
- FORWARD/REVERSE ROTATION SWITCH
- SOFT GRIP HANDLE
- BATTERY PACK RELEASE BUTTON
- BATTERY PACK*
- LED LIGHT
- VARIABLE SPEED SWITCH
- BIT LOCK™ SWITCH
- CHUCK
*Not all the accessories illustrated or described are included in standard delivery.
TECHNICAL DATA
| WX178L WX178L..9 | |||
| Charger voltage 100-240V~50/60Hz / | |||
| Rated voltage 20V | Max** | ||
| No load speed 0-800/min | |||
| Max torque 180in.lbs | |||
| Chuck capacity 3/8inch | |||
| Max. drilling capacity | Steel 3/8inch | ||
| Wood 1inch | |||
| Machine weight 2.9lbs 2.1lbs | |||
** Voltage measured without workload. Initial battery voltage reaches maximum of 20 volts. Nominal voltage is 18 volts.
ACCESSORIES
| WX178LWX178L.9 | ||
| Battery pack (WA3520) | 1 | / |
| Charger (WA3742) | 1 | / |
| Double ended bits (PH2/SL5.5) | 1 | 1 |
Only use the appropriate accessories intended for this tool. Accessory information can be found on the product packaging, at a WORX dealer or on our website at www.worx.com.
WARNING: Some dust created by power sanding, sawing, grinding, drilling and other construction activities contains chemicals known to the State of California to cause cancer, birth defects or other reproductive harm. Some examples of these chemicals are:
- Lead from lead-based paints;
- Crystalline silica from bricks and cement and other masonry products and
- Arsenic and chromium from chemically-treated lumber.
Your risk from these exposures varies, depending on how often you do this type of work. To reduce your exposure to these chemicals, work in a well ventilated area, and work with approved safety equipment, such as those dust masks that are specially designed to filter out microscopic particles.
WARNING: This product may contain lead, phthalate or other chemicals known to the State of California to cause cancer, birth defects and other reproductive harm. Wash your hands after use.
GENERAL POWER TOOL SAFETY WARNINGS
WARNING: Read all safety warnings and instructions. Failure to follow
the warnings and instructions may result in electric shock, fire and/or serious injury.
Save all warnings and instructions for future reference.
The term power tool in the warnings refers to your electric (corded) power tool or battery-operated (cordless) power tool.
1. WORK AREA SAFETY
a) Keep work area clean and well lit.
Cluttered or dark areas invite accidents.
b) Do not operate power tools in explosive atmospheres, such as in the presence of flammable liquids, gases or dust. Power tools create sparks which may ignite the dust or fumes.
c) Keep children and bystanders away while operating a power tool. Distractions can cause you to lose control.
2. ELECTRICAL SAFETY
a) Power tool plugs must match the outlet. Never modify the plug in any way. Do not use any adapter plugs with earthed (grounded) power tools. Unmodified plugs and matching outlets will reduce risk of electric shock.
b) Avoid body contact with earthed or grounded surfaces such as pipes, radiators, ranges and refrigerators. There is an increased risk of electric shock if your body is earthed or grounded.
c) Do not expose power tools to rain or wet conditions. Water entering a power tool will increase the risk of electric shock.
d) Do not abuse the cord. Never use the cord for carrying, pulling or unplugging the power tool. Keep cord away from heat, oil, sharp edges or moving parts.
Damaged or entangled cords increase the risk of electric shock.
e) When operating a power tool outdoors, use an extension cord suitable for outdoor use. Use of a cord suitable for outdoor use reduces the risk of electric shock.
f) If operating a power tool in a damp location is unavoidable, use a residual current device (RCD) protected supply. Use of an RCD reduces the risk of electric shock.
3. PERSONAL SAFETY
a) Stay alert, watch what you are doing and use common sense when operating a power tool. Do not use a power tool while you are tired or under the influence of drugs, alcohol or medication. A moment of inattention while operating power tools may result in serious personal injury.
b) Use personal protective equipment. Always wear eye protection.
Protective equipment such as dust mask, non-skid safety shoes, hard hat, or hearing protection used for appropriate conditions will reduce personal injuries.
c) Prevent unintentional starting. Ensure the switch is in the off-position before connecting to power source
and/or battery pack, picking up or carrying the tool. Carrying power tools with your finger on the switch or energizing power tools that have the switch on invites accidents.
d) Remove any adjusting key or wrench before turning the power tool on. A wrench or a key left attached to a rotating part of the power tool may result in personal injury.
e) Do not overreach. Keep proper footing and balance at all times. This enables better control of the power tool in unexpected situations.
f) Dress properly. Do not wear loose clothing or jewelry. Keep your hair, clothing and gloves away from moving parts. Loose clothes, jewelry or long hair can be caught in moving parts.
g) If devices are provided for the connection of dust extraction and collection facilities, ensure these are connected and properly used. Use of dust collection can reduce dust-related hazards.
- POWER TOOL USE AND CARE
a) Do not force the power tool. Use the correct power tool for your application. The correct power tool will do the job better and safer at the rate for which it was designed.
b) Do not use the power tool if the switch does not turn it on and off.
Any power tool that cannot be controlled with the switch is dangerous and must be repaired.
c) Disconnect the plug from the power source and/or the battery pack from the power tool before making any adjustments, changing accessories, or storing power tools. Such preventive safety measures reduce the risk of starting the power tool accidentally.
d) Store idle power tools out of the reach of children and do not allow persons unfamiliar with the power tool or these instructions to operate the power tool.
Power tools are dangerous in the hands of untrained users.
e) Maintain power tools. Check for
misalignment or binding of moving parts, breakage of parts and any other condition that may affect the power tool's operation. If damaged, have the power tool repaired before use. Many accidents are caused by poorly maintained power tools.
f) Keep cutting tools sharp and clean.
Properly maintained cutting tools with sharp cutting edges are less likely to bind and are easier to control.
g) Use the power tool, accessories and tool bits etc., in accordance with these instructions and in the manner intended for the particular type of power tool, taking into account the working conditions and the work to be performed. Use of the power tool for operations different from those intended could result in a hazardous situation.
- BATTERY TOOL USE AND CARE
a) Recharge only with the charger specified by the manufacturer. A charger that is suitable for one type of battery pack may create a risk of fire when used with another battery pack.
b) Use power tools only with specifically designated battery packs. Use of any other battery packs may create a risk of injury and fire.
c) When battery pack is not in use, keep it away from other metal objects, like paper clips, coins, keys, nails, screws or other small metal objects, that can make a connection from one terminal to another. Shorting the battery terminals together may cause burns or a fire.
d) Under abusive conditions, liquid may be ejected from the battery; avoid contact. If contact accidentally occurs, flush with water. If liquid contacts eyes, additionally seek medical help. Liquid ejected from the battery may cause irritation or burns.
- SERVICE
a) Have your power tool serviced by a qualified repair person using only identical replacement parts. This will ensure that the safety of the power tool is maintained.
DRILL SAFETY WARNINGS
- Hold power tool by insulated gripping surfaces, when performing an operation where the cutting accessory may contact hidden wiring.
Cutting accessory contacting a "live" wire may make exposed metal parts of the power tool "live" and could give the operator an electric shock.
SCREWDRIVER SAFETY WARNINGS
- Hold power tool by insulated gripping surfaces, when performing an operation where the fastener may contact hidden wiring. Fasteners contacting a "live" wire may make exposed metal parts of the power tool "live" and could give the operator an electric shock.
GENERAL SAFETY WARNINGS FOR BATTERY PACK
1) WARNING: Risk of fire and burns. Do not disassemble, heat above 100^ C ( 212^ F), or incinerate. Do not expose cells or batteries to heat or fire. Avoid storage in direct sunlight.
2) Dispose of used battery promptly. When disposing of secondary cells or batteries, keep cells or batteries of different electrochemical systems separate from each other.
3) Keep battery out of reach of children and in original package until ready to use.
4) Never put batteries in mouth. If swallowed, contact your physician or local poison control center.
5) CAUTION - The battery used in this device may present a risk of fire or chemical burn if mistreated. Replace battery with appropriate (WORX) battery only. Use of another battery may present a risk of fire or explosion.
6) WARNING: Do not use a visibly damaged battery pack or appliance as applicable.
7) WARNING: Do not modify or attempt to repair the appliance or the battery pack as applicable.
8) BATTERY MUST BE RECYCLED
9) Do not short-circuit a cell or battery. Do not store cells or batteries haphazardly in a box or drawer where they may short-circuit each other or be short-circuited by conductive materials.
10) Do not subject cells or batteries to mechanical shock.
11) Keep cells and batteries clean and dry. Wipe the cell or battery terminals with a clean dry cloth if they become dirty.
12) Do not maintain secondary cells and batteries on charge when not in use.
13) Retain the original cell and battery literature for future reference.
14) Do not use any charger other than that specifically provided for use with the equipment. Secondary cells and batteries need to be charged before use. Always use the correct charger and refer to the manufacturer's instructions or equipment manual for proper charging instructions.
15) When possible, remove the battery from the equipment when not in use.
16) Prevent unintentional starting. Ensure the switch is in the off-position before connecting to battery pack, picking up or carrying the appliance. Carrying the appliance with your finger on the switch or energizing appliances that have the switch on invites accidents..
17) Disconnect the battery pack from the appliance before making any adjustments, changing accessories, or storing appliance. Such preventive safety measures reduce the risk of starting the appliance accidentally.
SYMBOLS
| To reduce the risk of injury, user must read instruction manual | |
| Warning | |
| Wear ear protection | |
| Wear eye protection | |
| Wear dust mask | |
| Wear protective gloves | |
| Li-lon | Li-lon battery, battery must be recycled. |
| Drilling | |
| Screwdriving | |
| Stripped screw | |
| Wood |
| Metal | |
| Steel pipe | |
| Ceramic tile | |
| Lock | |
| High speed | |
| Low speed |

call②recycle®
POSITEC Inc. has established a partnership with the RBRC Corporation to recycle any Positec batteries with the RBRC-call2recycle seal. For environmental protection, please do not discard batteries in the trash. After the batteries' life cycle is ended, please call 1-800-822-8837 for a free service that will properly dispose of the battery.
OPERATING INSTRUCTIONS

NOTE: Before using the tool, read the instruction book carefully.
ASSEMBLY AND OPERATION
| ACTION FIGURE | |
| BEFORE OPERATION | |
| Removing the Battery Pack See Fig. A1 | |
| Charging the Battery Pack See Fig. A2 | |
| Installing the Battery Pack See Fig. A3 | |
| ASSEMBLY | |
| Bit LockTM AdjustmentWARNING: Always ensure the bit is secure before starting the tool.Damage to the Chuck or a loose bit may cause possible personal injury.NOTE: When the chuck jaws become fully opened or closed, the clutch will activate, making a clicking sound. This sound is normal.If the Bit LockTM Switch (10) does not operate, confirm the battery is charged and depress the trigger briefly.Keep drill tilted upward when adjusting the chuck to prevent bit from falling out. | |
| --Inserting the Bits See Fig. B1 | |
| --Removing the Bits See Fig. B2 | |
| OPERATION | |
| Forward/Reverse Rotation SwitchWARNING: Never change the direction of rotation when the Chuck is rotating. Wait until it has stopped! | See Fig. C1,C2, C3 |
| Function Mode SelectionPress the function button to select operation mode. The button will illuminate in blue for a few seconds. Depress the Variable Speed Switch (9) slightly to illuminate the function button again . | |
| Drive Mode with Safe DriveWhen driving a screw, the tool automatically stops as the screw head becomes flush with surface of workpiece. If a deeper screw is desired, continue to depress the Variable Speed Switch (9). The tool will make slow rotations to drive the screw deeper.Once the desired depth is reached, release the Variable Speed Switch (9).NOTE: If the tool stops sooner than desired, release the Variable Speed Switch (9) and press it again to reset the tool. | See Fig. D |
| Drill Mode See Fig. E | |
| Pulse Assist ModeWARNING: Do not work for long periods with the Pulse Assist Mode activated as the motor can be overheated.NOTE: Pulse Assist Mode is very effective to prevent stripping screws, removing stubborn screws and to prevent the bit tip from walking when drilling on smooth surfaces. When the Pulse Assist Mode is activated, it can be switched with the drill/drive mode.Make sure the Forward/Reverse Rotation Switch (4) is pushed to the left or right and the Pulse Assist Mode is selected.Press the Variable Speed Switch (9), the tool will begin to rotate at a controllable pace. | See Fig. F |
| Variable Speed SwitchWARNING: Do not operate for long periods at low speed because excess heat will be produced internally. | See Fig. G |
| Using the LED lightTo turn on the light, press the Variable Speed Switch (9) and make sure the Forward/Reverse Rotation Switch (4) is on right or left position. When you release the Variable Speed Switch (9), the light will go off after a moment.The LED Light is also a battery capacity indicator. It will flash when power gets low.The tool and battery pack are equipped with a protection system. When the LED Light is quickly flashing, the system will automatically cut power to the tool to extend battery life. The tool will automatically stop during operation if the tool and/or battery pack are placed under one of the following conditions:Overloaded: The tool is operated in a manner that causes it to draw an abnormally high current. In this situation, release the Variable Speed Switch on the tool and stop the application that caused the tool to become overloaded. Then pull the Variable Speed Switch again to restart.Overheated: Under the condition above, if the tool does not start, the tool and Battery Pack are overheated. Let the tool and Battery Pack cool before pulling the Variable Speed Switch again.Low battery voltage: The remaining Battery capacity is too low and the tool will not operate. Remove and recharge the Battery Pack. | See Fig. G |
TROUBLESHOOTING
1. WHY DOES THE DRILL NOT TURN ON WHEN YOU PRESS THE SWITCH?
The Forward/Reverse Rotation Switch, which is on top of the trigger, is positioned in the lock function. Unlock the Forward/Reverse Rotation Switch by putting it into the required rotation position. Push the trigger and the drill will start to rotate.
2. REASONS FOR DIFFERENT BATTERY PACK WORKING TIMES
Charging time problems, and having not used a Battery Pack (7) for a prolonged time will reduce the Battery Pack working time. This can be corrected after several charge and discharge operations by charging & working with your drill. Heavy working conditions such as large screws into hard wood will use up the Battery Pack energy faster than lighter working conditions. Do not re-charge your Battery Pack below 32°F (0°C) and above 113°F (45°C) as this will affect performance.
3. THE BIT LOCK™ SWITCH WILL NOT ROTATE.
Pull the trigger and have the drill rotate briefly. The Bit Lock ^TM Switch ring should release and operate as normal.
MAINTENANCE
Remove the battery pack from the tool before carrying out any adjustment, servicing or maintenance.
Your tool requires no additional lubrication or maintenance.
There are no user serviceable parts in your power tool. Never use water or chemical cleaners to clean your power tool. Wipe clean with a dry cloth. Always store your power tool in a dry place. Keep the motor ventilation slots clean. Keep all working controls free of dust. Occasionally you may see sparks through the ventilation slots. This is normal and will not damage your power tool.
- MODE VISSAGE AVEC MODE VISSAGE SÛR
- MODE PERCEUSE
- ASSISTANCE PAR IMPULSION
- COMMUTATEUR DE ROTATION AVANT/ARRIÈRE
- POIGNÉE SOUPLE
- MÉCANISME DE RETENUE DU BLOC-PILES
- BLOC-PILES*
- LUMIÈRE DE VISIBILITÉ
- DÉTENTE DE VITESSE VARIABLE
- BOUTON DE VERROUILLAGE BIT LOCK™
- MANDRIN
CONSIGNES DE SÉCURITÉ RELATIVES AU TOURNEVIS
you've got the power
www.worx.com
Copyright © 2016, Positec. All Rights Reserved.