
TFC7503B - Fan Tomado - Free user manual and instructions
Find the device manual for free TFC7503B Tomado in PDF.
| Product type | Tower fan |
| Model | TFC7503B |
| Brand | Tomado |
| Power supply | 220-240 V ~ 50 Hz |
| Power | 50 W |
| Number of speeds | 3 |
| Timer | Up to 120 minutes |
| Oscillation | Yes |
| Material | Plastic |
| Height | 80 cm |
| Base width | 30 cm |
| Base depth | 30 cm |
| Weight | 3.5 kg |
| Cable length | 1.5 m |
| Usage | Indoor |
| Assembly required | Yes |
| Cleaning | Slightly damp cloth |
| Safety | Do not immerse, keep out of reach of children under 8 years |
| Warranty | 24 months |
| Included accessories | Base (2 parts), plastic nut |
| Recycling | Compliant with WEEE (2012/19/EU) |
Frequently Asked Questions - TFC7503B Tomado
User questions about TFC7503B Tomado
0 question about this device. Answer the ones you know or ask your own.
Ask a new question about this device
Download the instructions for your Fan in PDF format for free! Find your manual TFC7503B - Tomado and take your electronic device back in hand. On this page are published all the documents necessary for the use of your device. TFC7503B by Tomado.
USER MANUAL TFC7503B Tomado
natural_image
Black vertical industrial fan tower with ventilation grilles and a base (no visible text or symbols)EN I nstruction manual
natural_image
Technical line drawing of a mechanical component with concentric grooves and mounting holes (no text or symbols)
natural_image
Circular mechanical component diagram with radial slots and central hub (no text or symbols)- First carefully read the instruction manual in full prior to using the appliance and store the manual in a safe place for future reference.
- Only use this appliance for the purposes described in the instruction manual.
- Caution: never insert objects into the ventilation grid when the appliance is switched on.
- Only connect the appliance to alternate current, with a mains voltage that corresponds with the information provided on the information plate of the appliance.
- Never bend the power cord sharply or allow it to run across hot parts.
- Fully unwind the cord to prevent it from overheating.
- Never place the appliance near appliances that give off heat, such as ovens, gas cookers, hotplates, etc. Keep the appliance away from walls or other objects that could catch flame, such as curtains, towels (cotton or paper, etc.).
• Always make sure the appliance is placed on an even, flat surface. - Only use the appliance indoors.
- Do not leave the appliance unsupervised if the appliance is operational.
- If you want to move the appliance, make sure the appliance is switched off.
- Do not use the appliance if the plug, cord or appliance are damaged, or if the appliance no longer functions properly or if it is damaged in any other way. If this is the case, consult the retailer or our maintenance service.
- If the cord of the appliance is damaged, it should be replaced by the manufacturer, his customer service or a similarly qualified person in order to prevent hazardous situations.
TOMADO®
- Never replace the plug or cord yourself. Repairs to electrical appliances should only be performed by skilled persons. Incorrect repairs may expose the user to serious hazards.
- Never use the appliance with parts that are not recommended or supplied by the manufacturer.
- Do not pull the cord and/or appliance to remove the plug from the wall socket. Never touch the appliance with wet or damp hands.
- Never connect the appliance to an external timer or a separate remote control system, in order to prevent hazardous situations.
- Keep the appliance out of reach of children. Children do not see the dangers associated with handling electrical appliances. Therefore, never allow children to operate electrical appliances without supervision. Keep the appliance and cord out of reach of children younger than 8 years of age.
- The appliance can be used by children of 8 years and older and persons with a limited physical, sensory or mental capacity or lack of experience or knowledge, provided they use the appliance under supervision or have been instructed about its safe use and understand the hazards involved.
- Children must not play with the appliance.
- The appliance may not be cleaned or maintained by children, unless this is done under supervision.
- If the appliance is not being used or is being cleaned, fully switch off the appliance by removing the plug from the socket.
- Extension cords may only be used if the mains voltage (see the information plate) and capacity are identical to or higher than that of the appliance. Always use an approved extension cord.
- Never submerge the appliance, cord or plug in water.
TOMADO®
- This appliance is intended for household and similar use, such as:
- in staff kitchens, shops, offices and other work environments;
- by guests of hotels, motels and other residential environments;
- in Bed&Breakfast type environments;
- farms.
- If the appliance is not used as intended, no compensation can be claimed in case of defects or accidents and the warranty will be invalidated.
- If you decide to stop using the appliance due to a defect, we recommend cutting the cord after removing the plug from the wall socket.
TOMADO®
ASSEMBLY
Before using the fan for the first time, please proceed as follows: carefully unpack the appliance and all components and remove all packaging material and any promotional stickers. Keep the packaging (plastic bags and cardboard) out of reach of children.
After unpacking the appliance, carefully check it for external damage that may have occurred during transport.
Assemble the fan in accordance with the instructions.
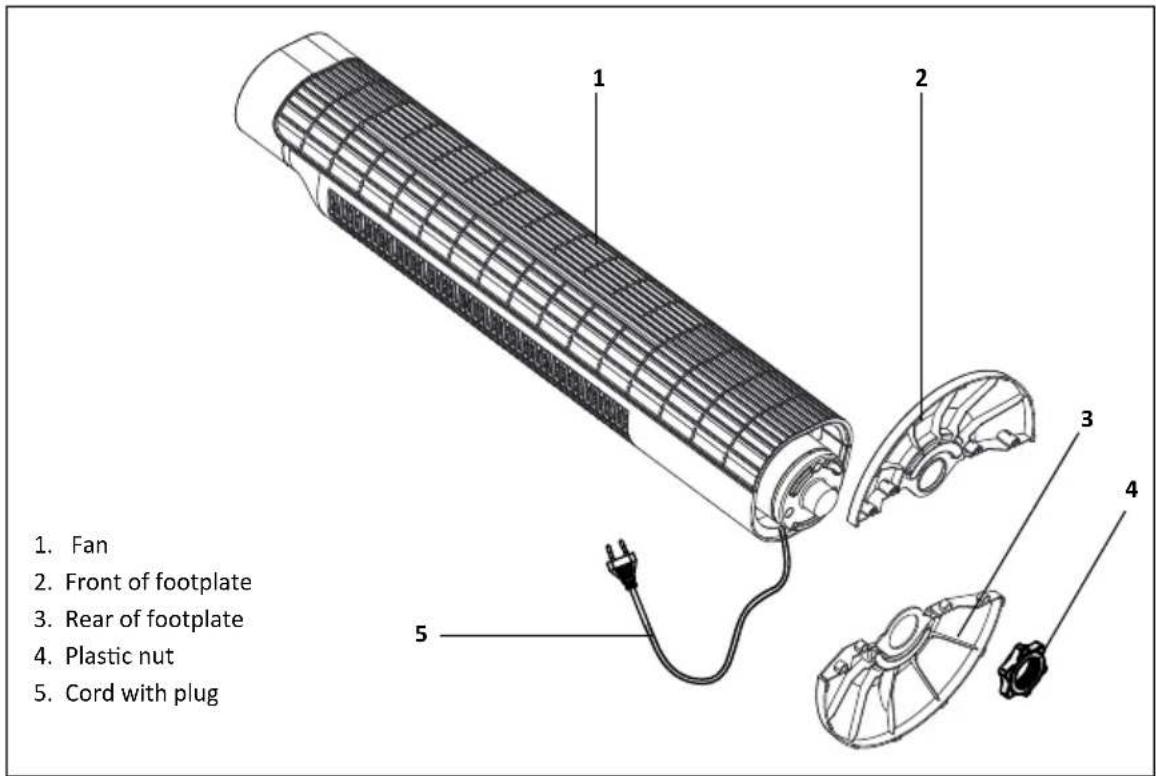
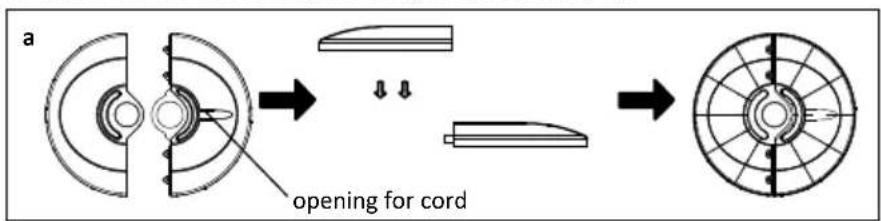
a. Make the footplate complete by combining the front [2] and rear [3].
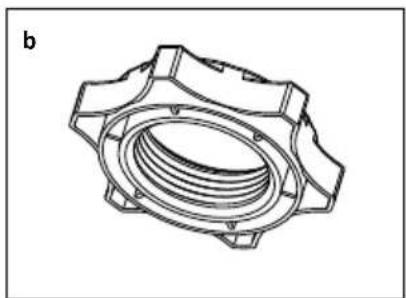
b. Unscrew the plastic nut [4] from the fan.
c. Lead the cord through the opening in the footplate and place the fan on the footplate.
d. Attach the fan to the footplate using the plastic nut [4].
natural_image
Technical line drawing of a mechanical component with concentric grooves and mounting holes (no text or symbols)
natural_image
Circular mechanical component diagram with radial slots and central hub (no text or symbols)Place the fan on a flat, stable surface. Clean the exterior of the fan using a slightly damp cloth and then wipe it with a dry cloth. The fan is ready for use.
Place the pedestal fan on a flat, stable surface. Insert the plug in a socket.
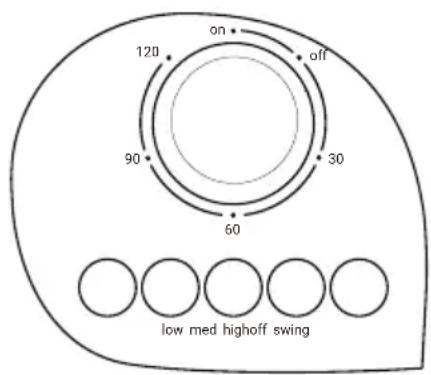
Switching on/off
Check that the timer button is on the ON position and press one of the position buttons 1 to 3 to switch on the fan.
Switch off the fan with the position button OFF, not with the timer button.
Position OFF = off
Position 1 = lowest position
Position 2 = middle position
Position 3 = highest position
Adjusting the timer
Turn the timer button to set the correct time period. The maximum is 120 minutes. Once the set time has passed, the fan stops. You can terminate the set time by turning the button back.
Oscillation
This fan is able to oscillate (swerve to the left and right) for a better air displacement. Press the oscillation button so that the fan starts to oscillate.
The entire fan will oscillate now, towards the left and towards the right.
CLEANING AND MAINTENANCE
Before cleaning the fan, you must switch it off by pressing position button OFF and remove the plug from the socket.
- Wipe the exterior of the appliance with a slightly damp cloth and dry properly.
- If necessary, you can clean the protective guard using a vacuum cleaner (nozzle).
- Do not use aggressive or abrasive cleaning agents for cleaning the appliance.
- Never submerge the fan in water or any other liquid.
RECYCLING
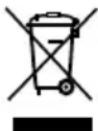
This symbol means that this product should not be disposed of with regular household waste (2012/19/EU). Observe the rules that apply in your country for the separated collection of electric and electronic products. Correct disposal of the product prevents negative consequences for the environment and for public health. The packaging material of this product can be recycled 100%, return packaging material separately.
TOMADO®
natural_image
Technical line drawing of a mechanical component with concentric grooves and mounting holes (no text or symbols)
natural_image
Circular mechanical component diagram with radial slots and central hub (no text or symbols)natural_image
Technical line drawing of a mechanical component with concentric grooves and mounting holes (no text or symbols)
natural_image
Circular mechanical component diagram with radial slots and central hub (no text or symbols)natural_image
Technical line drawing of a mechanical component with concentric grooves and mounting holes (no text or symbols)
natural_image
Circular mechanical component diagram with radial slots and central hub (no text or symbols)natural_image
Technical line drawing of a mechanical component with concentric grooves and mounting holes (no text or symbols)
natural_image
Circular mechanical component diagram with radial slots and central hub (no text or symbols)natural_image
Technical line drawing of a mechanical component with concentric grooves and mounting holes (no text or symbols)
natural_image
Circular mechanical component diagram with radial slots and central hub (no text or symbols)natural_image
Technical line drawing of a mechanical component with concentric grooves and mounting holes (no text or symbols)
natural_image
Circular mechanical component diagram with radial slots and central hub (no text or symbols)OBSŁUGA WENTYLATORA KOLUMNOWEGO
natural_image
Technical line drawing of a mechanical component with concentric grooves and mounting holes (no text or symbols)
natural_image
Circular mechanical component diagram with radial slots and central hub (no text or symbols)natural_image
Technical line drawing of a mechanical component with concentric grooves and mounting holes (no text or symbols)
natural_image
Circular mechanical component diagram with radial slots and central hub (no text or symbols)Go to www.tomado.com/support to purchase accessories or spare parts.
WARRANTY CONDITIONS
CONDITIONS DE LA GARANTIE


Brand : Tomado
Model : TFC7503B
Category : Fan