
Cube One - 3D Printer Renkforce - Free user manual and instructions
Find the device manual for free Cube One Renkforce in PDF.
User questions about Cube One Renkforce
0 question about this device. Answer the ones you know or ask your own.
Ask a new question about this device
Download the instructions for your 3D Printer in PDF format for free! Find your manual Cube One - Renkforce and take your electronic device back in hand. On this page are published all the documents necessary for the use of your device. Cube One by Renkforce.
USER MANUAL Cube One Renkforce
natural_image
Abstract geometric star-like pattern with five petal-like shapes and dot patterns (no text or symbols)renkforce
GB Operating Instructions
3D Drucker Cube One
Item No. 2583085 Page 20 - 37
F Mode d'emploi
3D Drucker Cube One
natural_image
Technical illustration of a mechanical device with a cylindrical component inserted into a base, showing a close-up view of the component (no text or symbols present)2

natural_image
Technical line drawing of a mechanical device with an inset showing a gear mechanism (no text or symbols)3

natural_image
Technical illustration of a mechanical device with a magnified inset showing a close-up of the component (no text or symbols present)4
text_image
Power USB ④ ③


natural_image
Technical line drawing of a mechanical device with attached cable and connector (no text or symbols)
natural_image
Technical line drawing of a mechanical device with a cylindrical component mounted on a base (no text or symbols)text_image
QR code image containing encoded data, no visible human-readable texttext_image
Diagram illustrating a 3D printer operation with labeled steps and components10 Drucken
natural_image
Hand operating a 3D printer with a yellow and cyan model, no visible text or symbols
natural_image
Hand holding a small 3D-printed model of a white and cyan mechanical device with a yellow rubber duck, against a plain white background (no text or symbols visible)F-4
11 Filamente
2 Introduction....22
3 Intended use....22
4 Delivery content....22
5 Up-to-date operating instructions....22
6 Description of symbols....23
7 Safety instructions 23
7.1 Read first! 23
7.2 General information 23
7.3 Handling....23
7.4 Unauthorized modifications 24
7.5 Operating environment 24
7.6 Power adapter 24
7.7 Operation 24
8 Operating elements 25
9 Getting started 26
9.1 Assembling printer 27
9.2 Connecting power....28
9.3 Switching on/off 28
9.4 Installing mobile app 28
9.5 Exploring the mobile app 29
9.6 Linking printer to mobile app and Wi-Fi 30
9.7 Calibrating print bed 31
9.8 Loading filament 32
10 Printing....33
10.1 Printing via mobile app 33
10.2 Printing via computer 33
10.3 Removing printed models....34
11 Filaments 34
11.1 Spare filaments....34
11.2 Switching filaments 34
12 Wi-Fi connections 35
12.1 Connecting to a different Wi-Fi network....35
12.2 Troubleshooting Wi-Fi connections....35
13 Cleaning and care....35
14 Disposal 36
15 Declaration of Conformity (DOC)....36
16 Technical data....37
16.1 Printer 37
16.2 Power adaptor 37
2 Introduction
Dear customer,
Thank you for purchasing this product.
If there are any technical questions, please contact: www.conrad.com/contact
3 Intended use
The product is an entry-level 3D printer. Use the product to print 3D models with the help of the accompanying mobile app or a connected computer. The product is intended for private use only.
The product is intended for indoor use only. Do not use it outdoors. Contact with moisture must be avoided under all circumstances.
If you use the product for purposes other than those described, the product may be damaged. Improper use can result in short circuits, fires, electric shocks or other hazards.
The product complies with the statutory national and European requirements. For safety and approval purposes, you must not rebuild and/or modify the product.
Read the operating instructions carefully and store them in a safe place. Make this product available to third parties only together with the operating instructions.
All company names and product names are trademarks of their respective owners. All rights reserved.
4 Delivery content
3D printer
Power adaptor
Spool holder
USB cable
PLA filament (5 m)
Levelling paper
Hex key 2 mm
Operating instructions
5 Up-to-date operating instructions
Download the latest operating instructions at www.conrad.com/downloads or scan the QR code shown. Follow the instructions on the website.

6 Description of symbols
The following symbols are on the product/appliance or are used in the text:

The symbol warns of hazards that can lead to personal injury.

The symbol warns of dangerous voltage that can lead to personal injury by electric shock.

The symbol warns of hot surfaces that can result in severe burns when touched. Read the information carefully.

Read the operating instructions carefully.

This product must only be used in dry, enclosed indoor areas. It must not become damp or wet.
7 Safety instructions

Read the operating instructions carefully and especially observe the safety information. If you do not follow the safety instructions and information on proper handling in this manual, we assume no liability for any resulting personal injury or damage to property. Such cases will invalidate the warranty/guarantee.
7.1 Read first!
This appliance can be used by children aged from 8 years if they have been given supervision or instruction concerning use of the appliance in a safe way and understand the hazards involved.
Cleaning and user maintenance shall not be made by children without supervision.
Children shall not play with the appliance.
7.2 General information
The device is not a toy. Keep it out of the reach of children and pets.
Do not leave packaging material lying around carelessly. This may become dangerous playing material for children.
If you have questions which remain unanswered by these operating instructions, contact our technical support service or other technical personnel.
Maintenance, modifications and repairs must only be completed by a technician or an authorised repair centre.
7.3 Handling
Please handle the product carefully. Jolts, impacts or a fall even from a low height can damage the product.
7.4 Unauthorized modifications
For safety reasons, unauthorised conversions and/or modifications to the product are not permitted (other than those indicated in these instructions), as this may damage the components and affect the functionality/safety of the device.
7.5 Operating environment
Always operate the printer in a well ventilated environment.
Do not place the product under any mechanical stress.
- Protect the appliance from extreme temperatures, strong jolts, flammable gases, steam and solvents.
■ Protect the product from high humidity and moisture.
■Protect the product from direct sunlight.
Do not switch the product on after it has been taken from a cold to a warm environment. The condensation that forms might destroy the product. Allow the product to reach room temperature before you use it.
7.6 Power adapter

Do not modify or repair mains supply components including mains plugs, mains cables, and power supplies. Do not use damaged components. Risk of death by electric shock!
■Connect the appliance to a wall socket that can be accessed easily.
As power supply, only use the supplied mains adaptor.
Only connect the power adaptor to a normal mains socket connected to the public supply. Before plugging in the power adaptor, check whether the voltage stated on the power adaptor complies with the voltage of your electricity supplier.
■ Never connect or disconnect power adaptors if your hands are wet.
Never unplug the power adaptor from the mains socket by pulling on the cable; always use the grips on the plug.
For safety reasons, disconnect the power adaptor from the mains socket during storms.
Do not touch the power adapter if there are any signs of damage, as this may cause a fatal electric shock! Take the following steps:
- Switch off the mains voltage to the socket containing the power adapter (switch off the corresponding circuit breaker or remove the safety fuse, and then switch off the corresponding RCD protective switch).
- Unplug the power adapter from the mains socket.
- Use a new power adapter of the same design. Do not use the damaged adapter again.
- Ensure that cables are not pinched, kinked or damaged by sharp edges.
Always lay cables so that nobody can trip over or become entangled in them. This poses a risk of injury.
7.7 Operation

The nozzle becomes very hot during use and can cause burns if touched. Never touch the nozzle during or shortly after use.
- Do not leave the product unattended during use.
Consult an expert when in doubt about the operation, safety or connection of the appliance.
If it is no longer possible to operate the product safely, take it out of operation and protect it from any accidental use. DO NOT attempt to repair the product yourself. Safe operation can no longer be guaranteed if the product:
– is visibly damaged,
– is no longer working properly,
– has been stored for extended periods in poor ambient conditions or
– has been subjected to any serious transport-related stresses.
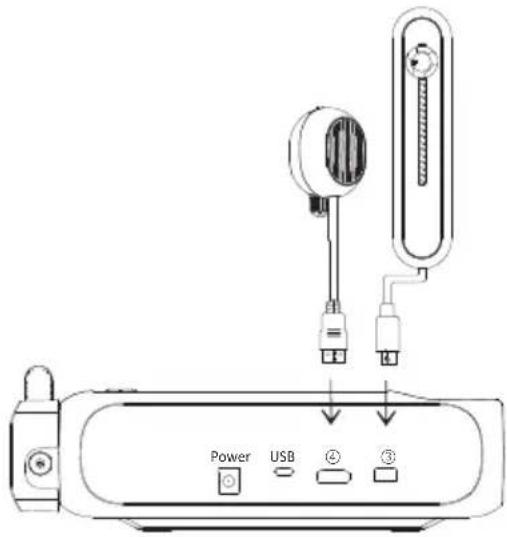
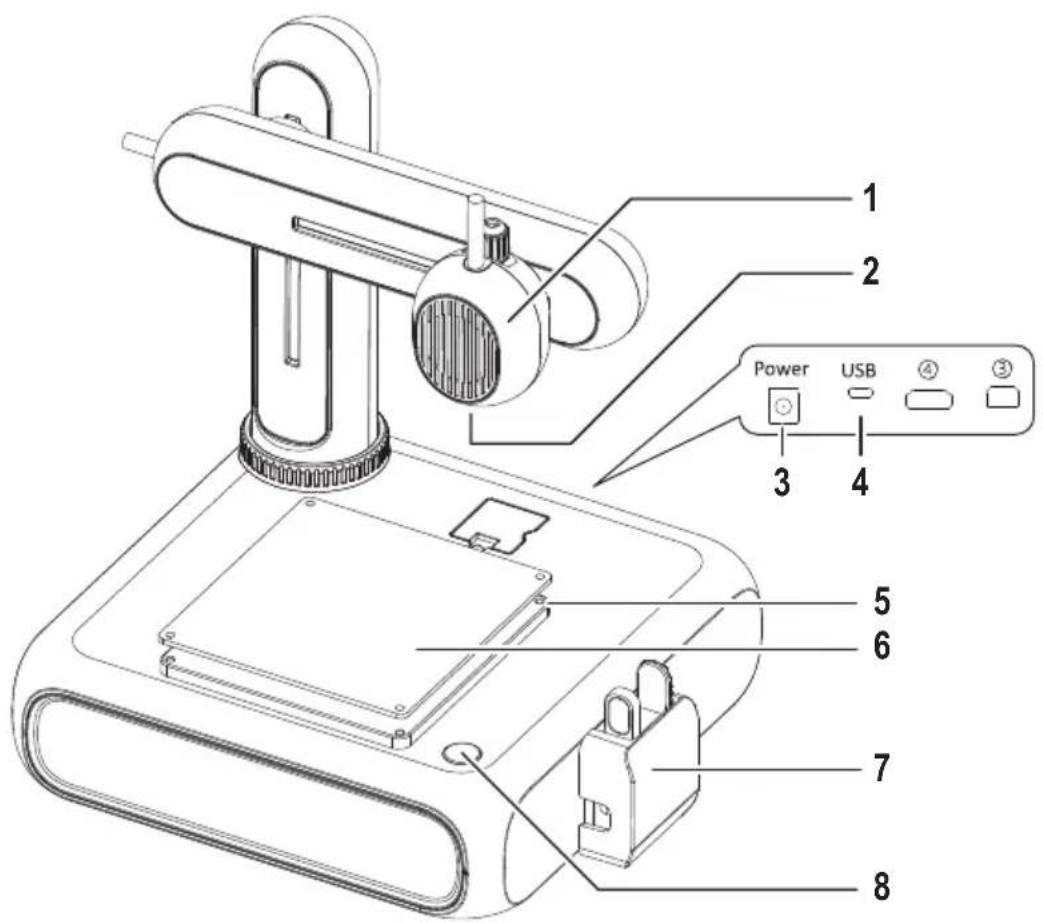
8 Operating elements
text_image
1 2 Power USB 4 3 3 4 5 6 7 81 Extruder
2 Nozzle
3 Power input socket
4 USB socket to connect to computer
5 Hex screw to adjust print bed
6 Print bed with removeable magnetic mat
7 Filament feeder with protective cap
8 Power button
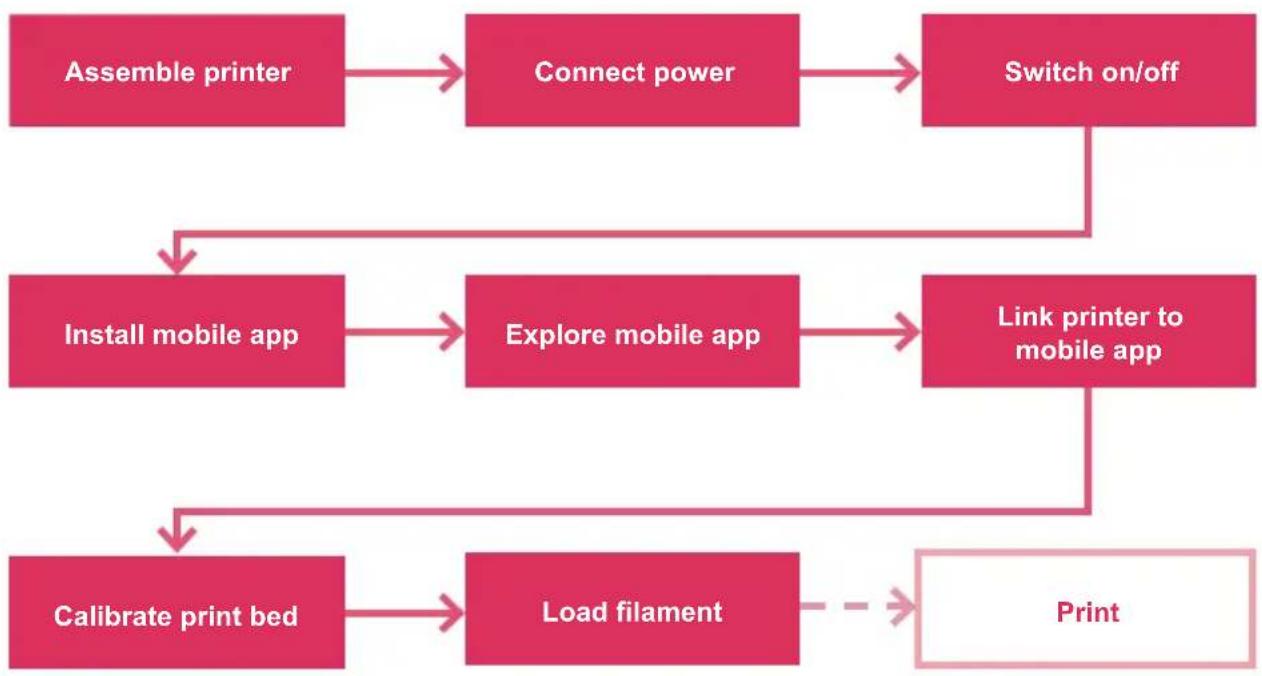
9 Getting started
The getting started section will guide you through all the necessary steps that you need to perform before you can start your first 3D print. The below diagram shows all the covered steps.
flowchart
graph TD
    A["Assemble printer"] --> B["Connect power"]
    B --> C["Switch on/off"]
    C --> D["Install mobile app"]
    D --> E["Explore mobile app"]
    E --> F["Link printer to mobile app"]
    F --> G["Calibrate print bed"]
    G --> H["Load filament"]
    H --> I["Print"]
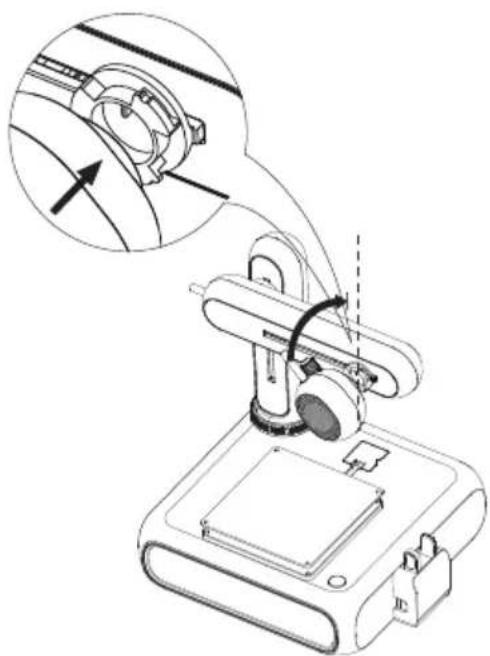
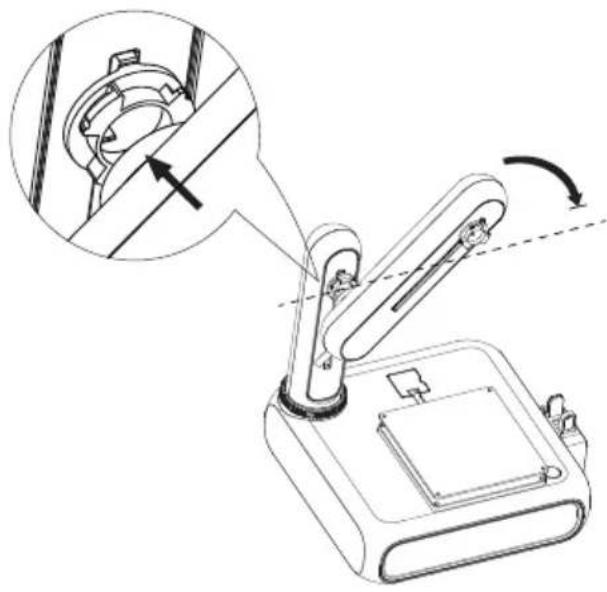
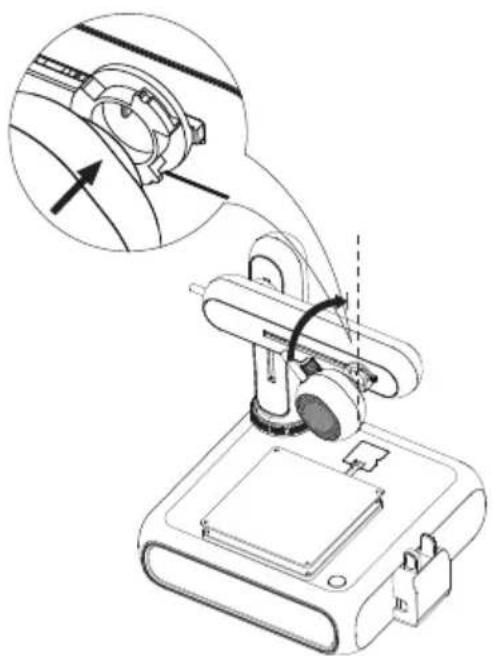
9.1 Assembling printer
1
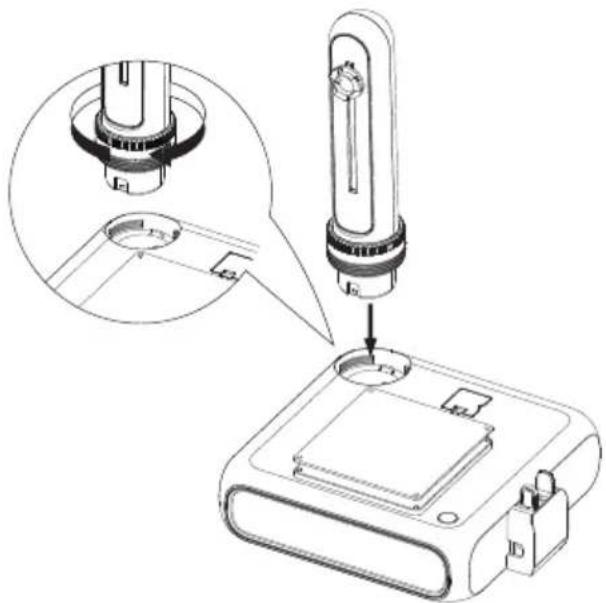
natural_image
Technical illustration of a mechanical device with a cylindrical component inserted into a base, showing a close-up view of the component (no text or symbols present)2

natural_image
Technical line drawing of a mechanical device with an inset showing a gear mechanism (no text or symbols)3
natural_image
Technical illustration of a mechanical device with a magnified inset showing a close-up of the component (no text or symbols present)4

text_image
Power USB ④ ③

natural_image
Technical line drawing of a mechanical device with attached cable and connector (no text or symbols)
natural_image
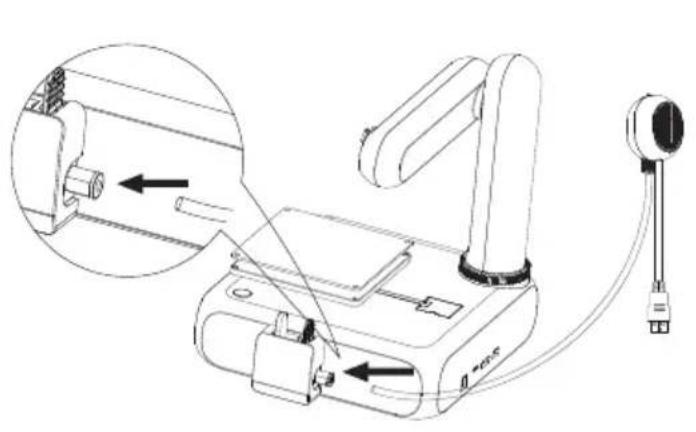
Technical line drawing of a mechanical device with a cylindrical component mounted on a base (no text or symbols)9.2 Connecting power
- Connect the cable of the power adaptor to the power input socket Power on the printer.
- Connect the power adaptor to a mains socket.
9.3 Switching on/off
- Press the power button to switch the printer on.
→ The indicator light in the power button lights up.
- Switch the printer off by holding down the power button for 3 seconds and then releasing it.
→ The indicator light in the power button goes off.
9.4 Installing mobile app
Install the mobile app on your mobile device to connect the printer to the Wi-Fi network, calibrate the printer, and control the printing process.
- Install the mobile app CUBE-3D via the displayed QR code. Alternatively, you can get the mobile app from the Google Play Store or the Apple App Store.
- Install the mobile app on your mobile device.

text_image
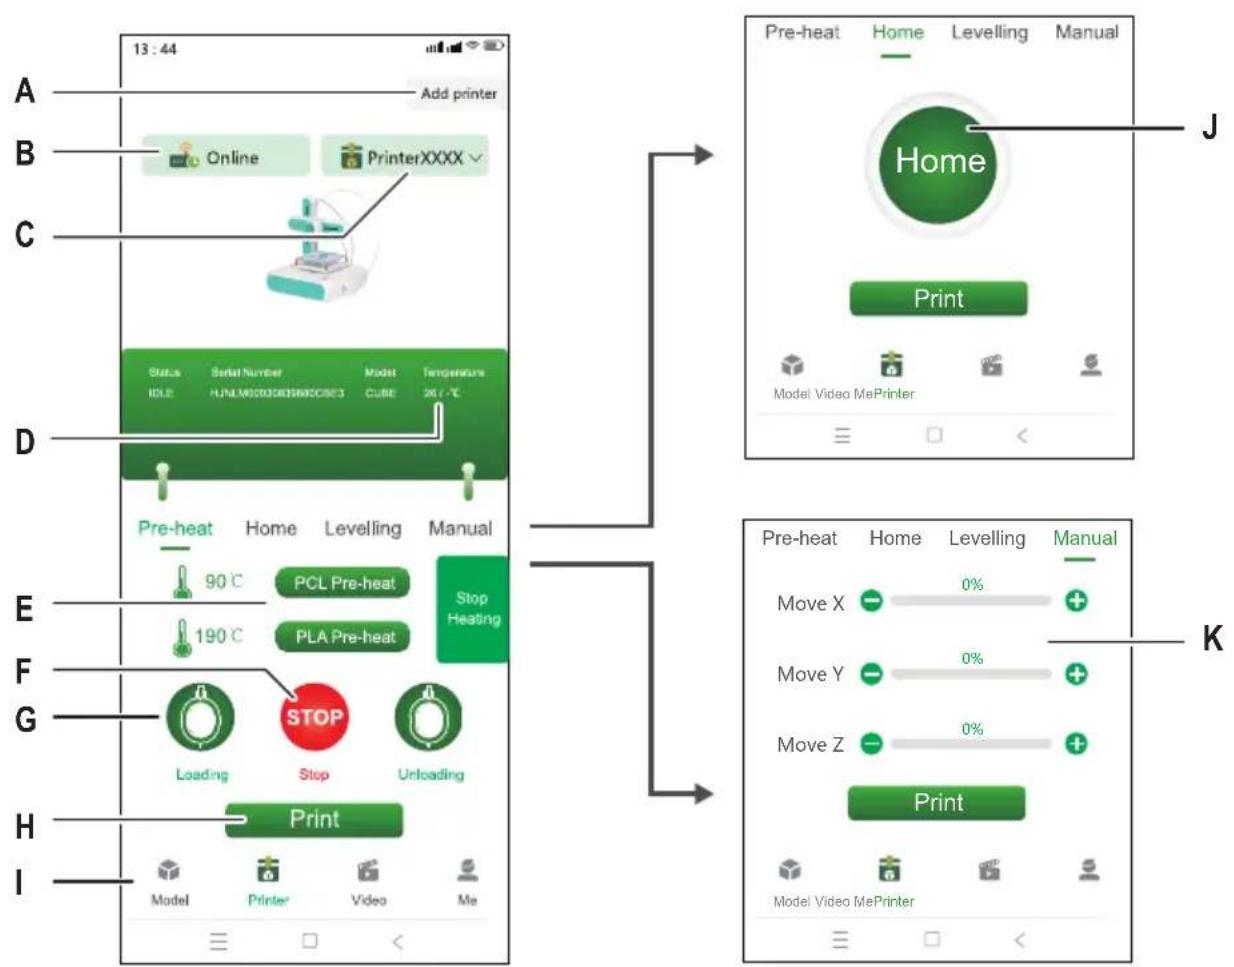
QR code image containing encoded data, no visible human-readable text9.5 Exploring the mobile app
Basic functions Advanced functions
flowchart
graph TD
    A["Add printer"] --> B["Online"]
    B --> C["PrinterXXXX"]
    C --> D["Status: Serial Number, Model Temperature, IDLE, FLN, M200, M200, M200, CUBE, 36.7°C"]
    D --> E["Pre-heat Home Levelling Manual"]
    E --> F["90°C PCL Pre-heat Stop Heating"]
    F --> G["190°C PLA Pre-heat"]
    G --> H["Loading STOP Unloading"]
    H --> I["Print"]
    I --> J["Model Printer Video MePrinter"]
A Link a new printer to the mobile app H Print 3D model selected from model library
B Shows if selected printer is online or offline | Access model library
C Currently selected printer J Move extruder to zero position
D Current nozzle temperature K Manually set extruder coordinates
E Start pre-heating extruder
F Stop pre-heating extruder
G Start feeder to load filament into printer
9.6 Linking printer to mobile app and Wi-Fi
To control the printer via the mobile app, you must link it to the app through a Wi-Fi network (2.4 GHz). You will use the mobile app to connect the printer to the Wi-Fi network.
You can link a printer to more than one mobile app but control the printer from only one mobile app at any given time.
You can also link multiple printers to the same mobile app.
Note:
The printer and the mobile device that runs the app must connect to the same Wi-Fi network. Network separations (example: subnet, VLAN) are not supported.
- Press the power button to switch the printer on.
- Open the mobile app.
- Open the window Printer.
- In the window Printer, touch Add Printer.
- Follow the instructions to connect the printer to the Wi-Fi network.
→ The printer is added to the window Printer (Fig. F-1).
→ The printer is linked to the mobile app.
→ The printer is connected to the Wi-Fi network. The printer will re-connect to the Wi-Fi network the next time it is switched on.
Note:
If the printer does show in the mobile app after switching on, follow the instructions in [▶ 12.2 Troubleshooting Wi-Fi connections].
text_image
13:44 Add printer Online PrinterXXX Status Save Number Model Temperature 0.5 RUN/MED/UNM/CO2 CUB 207.0°C Pre-heat Home Levelling Manual 90 °C PCL Pre-heat Stop 190 °C PLA Pre-heat Heating STOP Loading Stop Unloading Print Model Video MePrinterF-1
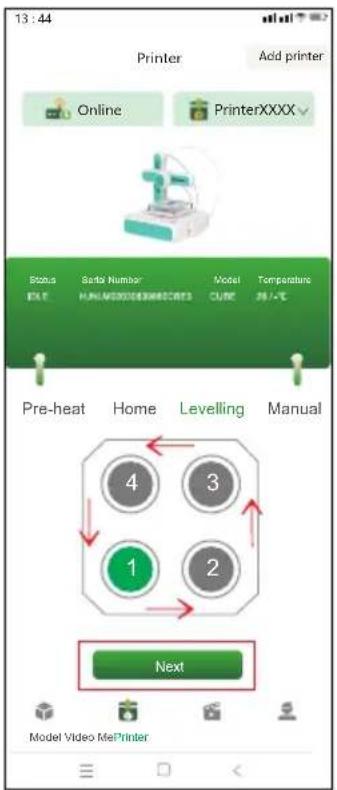
9.7 Calibrating print bed
By calibrating the print bed you make sure the print bed is level. The mobile app will guide you through four calibration points that you must check with the help of the supplied levelling paper. You might need to adjust the distance between print bed and extruder by turning the hex screws at the calibration points.
The print bed must be calibrated before using the printer for the first time. For consecutive prints, it is not necessary to calibrate the print bed before every print.
Notes:
While you adjust the hex screw at a given calibration point, it might be necessary to re-adjust some of the hex screws of other calibration points.
Preconditions:
Printer is switched on.
- Slide the levelling paper between the extruder and the print bed.
- In the mobile app go to Printer > Levelling.
- Touch Start levelling to start the print bed calibration process.
→ The extruder moves to the first calibration point. See Fig. F-2.
- Slide the levelling paper between the print bed and the extruder. If the paper can be moved rather easily between the nozzle and the extruder, turn the hex screw anticlockwise while moving the paper until you notice slight resistance. If the paper sits very tight, turn the screw clockwise instead.
→ You have calibrated the first calibration point.
- In the mobile app, touch Next to calibrate the second calibration point.
- Continue calibrating the remaining calibration points.
text_image
13:44 Printer Add printer Online PrinterXXXXV Status Sato Number Model Temperature EXIT HUMA0000000000000000000000000000000000000000000000000000000000000000000000000 Pre-heat Home Levelling Manual 4 3 1 2 Next Model Video MePrinterF-2
9.8 Loading filament
The filament provides the material needed to form 3D objects. Before you can print 3D objects, you must guide the rolled filament from the spool into the extruder.
Preconditions:
Printer is switched on.
- Put the filament spool on the spool holder. Adjust the width as needed. See fig. F-3 (1).
- Feed the filament into the feeder. See fig. F-3 (2).
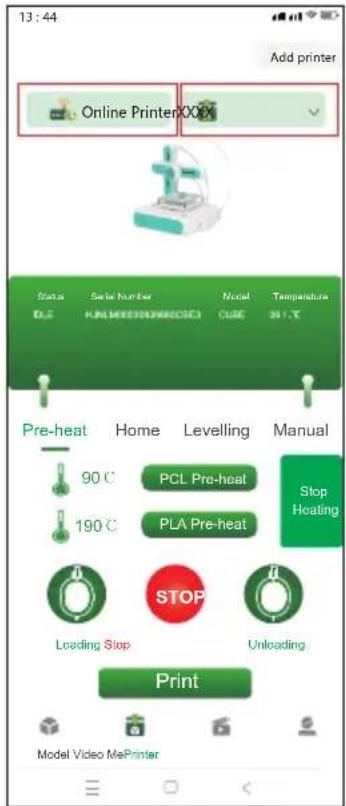
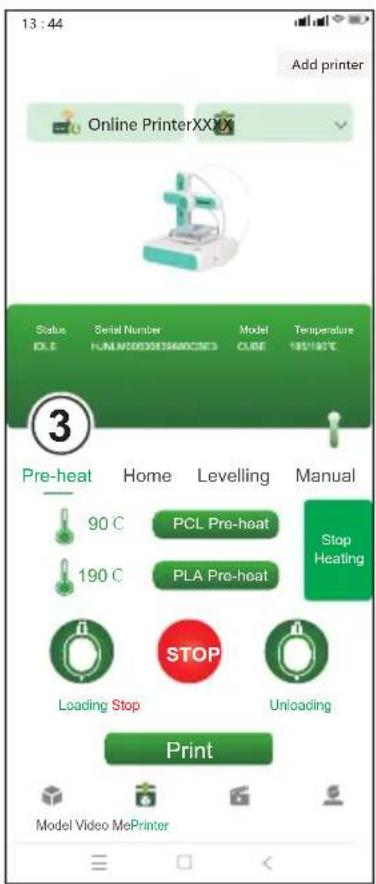
- In the mobile app, open Printer > Pre-heat. See fig. F-3 (3).
- Depending on your filament type (PCL/PLA), touch PCL Pre-heat or PLA Pre-heat in the mobile app to start pre-heating. The supplied filament is of type PLA.
→ The cooling fan runs.
→ The printer starts pre-heating. The current temperature shows in the mobile app.
- In the mobile app, wait until the temperature shows X/X°C (example: 90/90°C), then touch Loading to start loading the filament.
→ The feeder feeds filament into the extruder.
-
As soon as filament comes out of the extruder, touch STOP in the mobile app to stop loading.
-
Touch Heating Stop to stop pre-heating.
→ The cooling fan keeps running until the extruder is cool.
CAUTION! Extruder nozzle is hot. Risk of burns. Do not touch until cool.
- After the cooling fan has stopped (nozzle is cool), trim off any excess filament that came out of the extruder.
→ The filament has been loaded into the printer.
text_image
13:44 Add printer Online PrinterXXX Status Serial Number Model Temperature EXE FUNM00000SHWICED CUBE 195°18'0"E 3 Pre-heat Home Levelling Manual 90°C PCL Pre-heat Stop 190°C PLA Pre-heat Heating STOP Loading Stop Unloading Print Model Video MePrinter
text_image
Diagram illustrating a mechanical device with labeled parts and directional arrows indicating motion or operation.F-3
10 Printing
There are two ways you can print 3D models: (1) use the mobile app and select models from the model library, (2) connect the printer to a computer and use the open source software Ultimaker Cura. Printing via computer allows you to print your own 3D models.
10.1 Printing via mobile app
To print from the mobile app, you select 3D models from the model library included in the mobile app.
Preconditions:
√ Print bed is levelled.
Printer is linked to mobile app.
- In the mobile app, open the tab Model to access the model library.
- Tap on a model to view information about the model. You must look for a model that matches the filament type you are using with the printer. The supplied filament is of type PLA.
- Touch Select model to select the model for printing.
- Under the tab Printer, touch Print to start printing.
→ The model is sent to the printer.
→ The printer starts pre-heating.
→ The printer starts printing after pre-heating is completed.
- Wait for the printing to complete.
- (To pause printing) touch Pause to pause printing followed by Resume to resume printing.
- (To cancel printing) touch Stop to cancel printing.
10.2 Printing via computer
To print via a computer, you must use the software Ultimaker Cura. Printing via computer allows you to print your own 3D models.
Notes:
- Familiarize yourself with the software before printing. Look for online tutorials.
- It is assumed that you have your own model available in .stl format.
Preconditions:
√ Print bed is levelled.
- Download the Ultimaker Cura software (V5 or higher) from www.ultimaker.com/software/ultimaker-cura and install it on your computer.
- Connect a suitable USB data cable to the port USB on the printer and a USB port on the computer.
- Open the software.
- Select the printer interface goofoo CUBE.
- Load the 3D model .stl file into the software.
- Start the printing.
→ The printer starts pre-heating.
→ The printer starts printing after pre-heating is completed.
- Wait for the printing to complete.
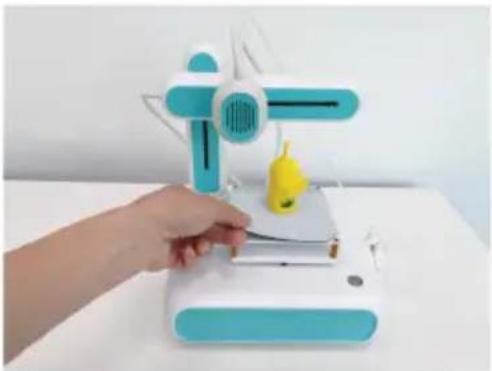
10.3 Removing printed models
- After printing is completed, remove the magnetic mat from the print bed. See fig. F-4.
- Carefully remove the 3D model from the magnetic mat.
- Put the magnetic mat back onto the print bed.
natural_image
Hand operating a 3D printer with a yellow and cyan model, no visible text or symbols
natural_image
Hand holding a small 3D-printed model of a white and cyan mechanical device with a yellow rubber duck, against a plain white background (no text or symbols visible)F-4
11 Filaments
11.1 Spare filaments
Purchase spare filaments that match the type (PCL or PLA) and are of the correct diameter. For details, see [▶ 16 Technical data ].
11.2 Switching filaments
To use a different filament you must first unload the filament that has already been fed through the extruder. You can then load the new filament.
- Before the feeder, clip the currently loaded filament with a side cutter.
- In the mobile app, open Printer > Pre-heat.
- Depending on your filament type (PCL/PLA), touch PCL Pre-heat or PLA Pre-heat in the mobile app to start pre-heating.
→ The cooling fan runs.
→ The printer starts pre-heating. The current temperature shows in the mobile app.
- In the mobile app, wait until the temperature shows X/X°C (example: 90/90°C), then touch Unloading to start unloading the filament.
→ The feeder retracts the filament from the extruder.
-
As soon as all of the filament has been retracted, touch STOP in the mobile app to stop unloading.
-
Touch Stop Heating to stop pre-heating.
→ The cooling fan keeps running until the extruder is cool.
- Load the new filament. Follow the instructions in [▶ 9.8 Loading filament].
12 Wi-Fi connections
12.1 Connecting to a different Wi-Fi network
Before you can connect to a different Wi-Fi network you must reset the current Wi-Fi configurations.
Preconditions:
√ The printer is switched on.
-
Press and hold the power button for 5 seconds to reset the Wi-Fi configurations.
-
Link the printer to the mobile app using the new Wi-Fi network. Follow the instructions in [▶ 9.6 Linking printer to mobile app and Wi-Fi].
12.2 Troubleshooting Wi-Fi connections
| Problem Solution | |
| Printer does not appear in mobile app.You have previously linked the printer to the mobile app but the printer now does not show in the mobile app after switching the printer off and on again. | Solution 1Let the mobile app find the printer on the network.√ The printer is switched on.√ The mobile app is connected to the Wi-Fi network.1. Close the mobile app.2. Open the mobile app.→ The mobile app will search for the printer.→ If the printer is not found, go to Solution 2.Solution 2Re-configure the Wi-Fi connection.√ The printer is switched on.1. Press and hold the power button for 5 seconds to reset the Wi-Fi configurations.2. Link the printer to the mobile app again. Follow the instructions in [▶ 9.6 Linking printer to mobile app and Wi-Fi ]. |
13 Cleaning and care
Important:
- Do not use aggressive cleaning agents, rubbing alcohol or other chemical solutions. They damage the housing and can cause the product to malfunction.
-
Do not immerse the product in water.
-
Disconnect the printer from the power supply.
- Let the printer cool down to room temperature.
CAUTION! Extruder nozzle is hot. Risk of burns. Do not touch until cool.
- Clean the product with a dry, fibre-free cloth.
14 Disposal
This symbol must appear on any electrical and electronic equipment placed on the EU market. This symbol indicates that this device should not be disposed of as unsorted municipal waste at the end of its service life.
Owners of WEEE (Waste from Electrical and Electronic Equipment) shall dispose of it separately from unsorted municipal waste. Spent batteries and accumulators, which are not enclosed by the WEEE, as well as lamps that can be removed from the WEEE in a non-destructive manner, must be removed by end users from the WEEE in a non-destructive manner before it is handed over to a collection point.
Distributors of electrical and electronic equipment are legally obliged to provide free take-back of waste. Conrad provides the following return options free of charge (more details on our website):
in our Conrad offices
at the Conrad collection points
at the collection points of public waste management authorities or the collection points set up by manufacturers or distributors within the meaning of the ElektroG
End users are responsible for deleting personal data from the WEEE to be disposed of.
It should be noted that different obligations about the return or recycling of WEEE may apply in countries outside of Germany.
15 Declaration of Conformity (DOC)
Conrad Electronic SE, Klaus-Conrad-Straße 1, D-92240 Hirschau hereby declares that this product conforms to the 2014/53/EU directive.
- Click on the following link to read the full text of the EU declaration of conformity: www.conrad.com/downloads
Enter the product item number in the search box. You can then download the EU declaration of conformity in the available languages.
16 Technical data
16.1 Printer
16.1.1 Power supply
Input voltage 24 V/DC
Input current 2 A
16.1.2 Printing
Type......FDM
Language...... GCODE
Build volume 80 x 80 x 80 mm
Supported filament types.....PLA, PCL
Filament diameter....1.75 mm
Layer thickness....min 0.1 mm / max. 0.4 mm
Nozzle diameter....0.7 mm
Extruder temperature....max. 190 °C
Print bed ...... Non-heated
16.1.3 Software support
Ultimaker Cura....min. V5.X.X
Mobile app......CUBE-3D (Android, iOS)
16.1.4 Wireless module
Wi-Fi standard 802.11b/g/n
Frequency....2.412 - 2.472 GHz
Transmission power.... 802.11b: 16.22 dBm
802.11g: 15.91 dBm
802.11n-HT20: 15.81 dBm
Transmission distance....max. 100 m
16.1.5 Others
Operating temperature ....+15 to +55 °C
Operating humidity .... 30 – 90 % relative humidity (non-condensing)
Storage temperature....+5 to +35 °C
Storage humidity....30 – 90 % relative humidity (non-condensing)
Dimensions (W x H x D) 208 x 254 x 206 mm
Weight 2.9 kg
16.2 Power adaptor
Input voltage....100 - 240 V/AC, 50/60 Hz
Output voltage 24 V/DC
Output current....2 A
France (email): technique@conrad-france.fr
Suisse: www.conrad.ch ____
natural_image
Technical line drawing of a mechanical device with attached cable and connector (no text or symbols)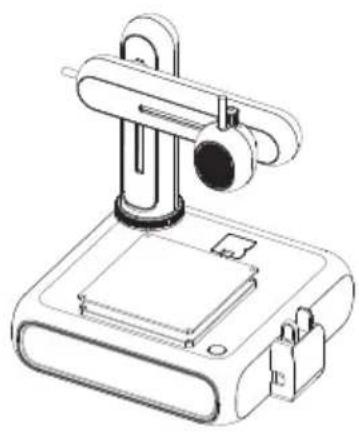
natural_image
Technical line drawing of a mechanical device with a cylindrical component mounted on a base (no text or symbols)9.2 Connecter l'alimentation
text_image
QR code image containing encoded data, no visible human-readable text9.5 Exploration de l'application mobile
flowchart
graph TD
    A["Add printer"] --> B["Online"]
    B --> C["PrinterXXXX"]
    C --> D["Status: Serial Number, Model Temperature, IDLE, FLN, M200, M200, M200, CUBE, 36.7°C"]
    D --> E["Pre-heat Home Levelling Manual"]
    E --> F["90°C PCL Pre-heat Stop Heating"]
    F --> G["190°C PLA Pre-heat"]
    G --> H["Loading STOP Unloading"]
    H --> I["Print"]
    I --> J["Model Printer Video MePrinter"]
text_image
Diagram illustrating a 3D printer operation with labeled steps and components10 Impression
natural_image
Hand operating a 3D printer with a yellow and cyan model, no visible text or symbols
natural_image
Hand holding a small 3D-printed model of a white and cyan mechanical device with a yellow rubber duck, against a plain white background (no text or symbols visible)F-4
11 Filaments
11.1 Filaments de rechange
Dimensions (L x H x P)....208 x 254 x 206 mm
Poids....2,9 kg
natural_image
Technical illustration of a mechanical device with a cylindrical component inserted into a base, showing a close-up view of the component (no text or symbols present)2
natural_image
Technical line drawing of a mechanical device with an inset showing a gear mechanism (no text or symbols)3
natural_image
Technical illustration of a mechanical device with a magnified inset showing a close-up view of the component (no text or symbols present)4

text_image
Power USB ④ ③5
6

text_image
Technical diagram of a robotic device with labeled components and directional arrows indicating assembly or connection.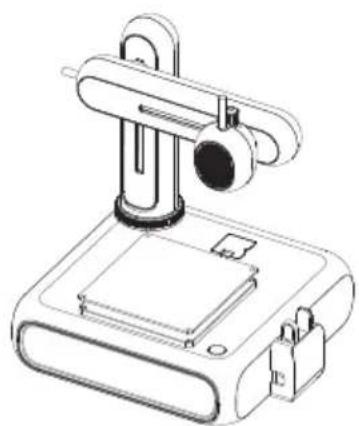
natural_image
Technical line drawing of a mechanical device with a cylindrical component mounted on a base (no text or symbols)text_image
QR code image containing encoded data, no visible human-readable text9.7 Printbed kalibreren (Calibrating print bed)
text_image
13:44 Add printer Online PrinterXXX Status Serial Number Model Temperature OLE UNLM500005000083 CUBE 185°190°C 3 Pre-heat Home Levelling Manual 90 °C PCL Pre-heat Stop 190 °C PLA Pre-heat Heating STOP Loading Stop Unloading Print Model Video MePrinter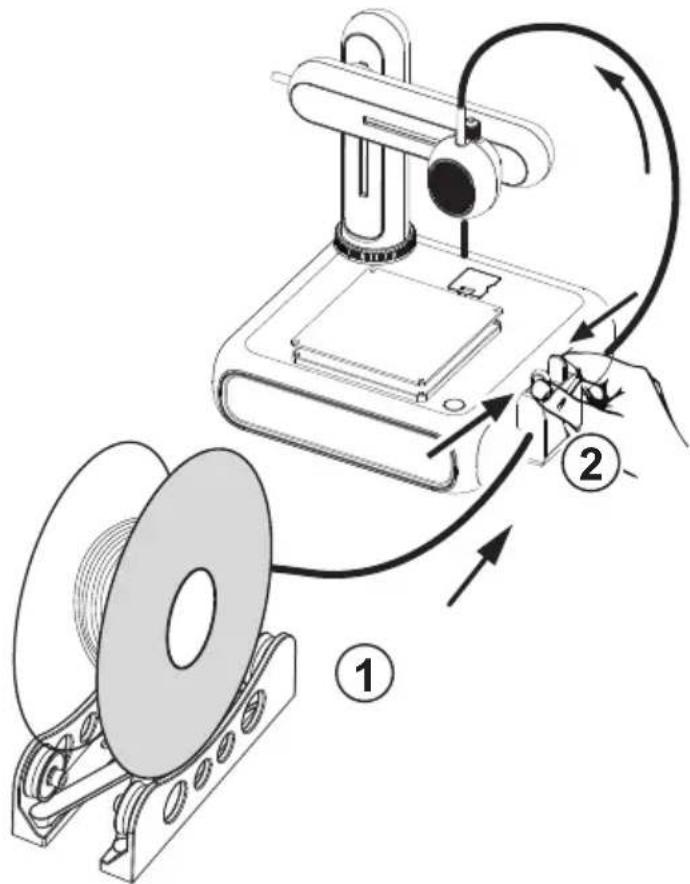
text_image
Diagram illustrating a 3D printer operation with labeled steps and componentsF-3
10 Printen
10.2 Printen via computer
natural_image
Hand operating a 3D printer with a yellow and cyan model, no visible text or symbols
natural_image
Hand holding a small 3D-printed model of a white and cyan mechanical device with a yellow rubber duck, against a plain white background (no text or symbols visible)F-4